Cisco Adaptive wIPS Deployment Guide
Available Languages
Table of Contents
Cisco Adaptive wIPS Management Deployment Guide, Release 8.0
Cisco Adaptive wIPS Introduction
Cisco Adaptive wIPS System Architecture
Component Functions in an Adaptive Wireless IPS Deployment
On-Channel vs. Off-Channel Scanning per wIPS Mode
wIPS Configuration and Profile Management
How Many wIPS Access Points do I need?
Location of wIPS Access Points
Access Point Density Recommendations
wIPS Integrated in a Cisco Unified Wireless Network
Mobility Services Engine Setup
Configuring Access Points to Local M ode with wIPS
Configuring Access Points to w IPS Monitor Mode
Configuring Access Points to A P3600 Local Mode and the WSM Module
Disabling Controller-Based IDS
Adaptive WIPS Management Best Practices
Understanding Adaptive wIPS Signatures
aWIPS Signature Compatibility Between CUWN Releases
Licensing and Ordering Information
WIPS monitoring on 2800, 3800 and 1560 AP
WIPS monitoring on 1800 AP Platform(1810, 1815, 1850, 1830)
ELM mode – Local AP mode with WIPS as Sub Mode
Cisco wIPS Solution Overview
Cisco wIPS solution offers flexible and scalable, 24x7x365-based full time wireless security solution to meet each customer’s needs. This document will cover the wIPS security solutions that are provided as part of Cisco Unified Wireless Solution. Depending on your deployment, there is a solution to meet your security needs, starting with the base Wireless LAN Controller (WLC), followed by the WLC and MSE, and finally the WLC, MSE, and CleanAir enabled access points. These three solutions are compared below.
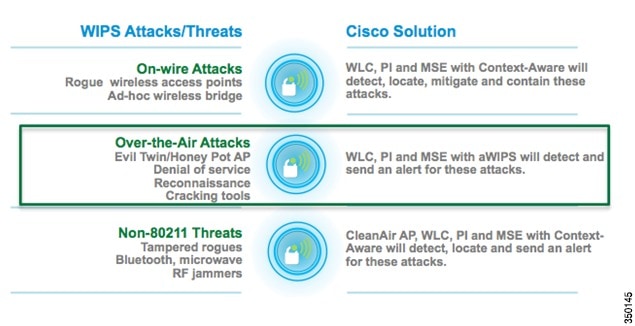
On-Wire Attacks
An Access Point in wIPS-optimized mode will perform rogue threat assessment and mitigation using the same logic as current Cisco Unified Wireless Network implementations. This allows a wIPS access point to scan, detect and contain rogue access points and ad-hoc networks. Once discovered, this information regarding rogue wireless devices is reported to PI where rogue alarm aggregation takes place. However, with this functionality comes the caveat that if a containment attack is launched using a wIPS mode access point, its ability to perform methodical attack-focused channel scanning is interrupted for the duration of the containment.
Over-the-Air Attacks
Cisco Adaptive Wireless IPS embeds complete wireless threat detection and mitigation into the wireless network infrastructure to deliver the industry’s most comprehensive, accurate and operationally cost-effective wireless security solution. Below are the Over-the-Air attacks that are detected by the Cisco Adaptive wIPS solution.
Cisco Adaptive wIPS Introduction
While the complete Cisco wIPS solution is included in the introduction, this document will focus on all aspects of the Over-the-Air wIPS detection. This document will go into detail on:
- Adaptive wIPS components / architecture
- The wIPS deployment modes
- Off-channel vs. On-channel wIPS scanning
- wIPS communication protocols
- wIPS Configuration and Profile Management
- wIPS Alarm Flow
- Deployment Considerations
- Forensics
- Licensing and Support
- A Step by Step Configuration Guide
Cisco Adaptive wIPS System Architecture
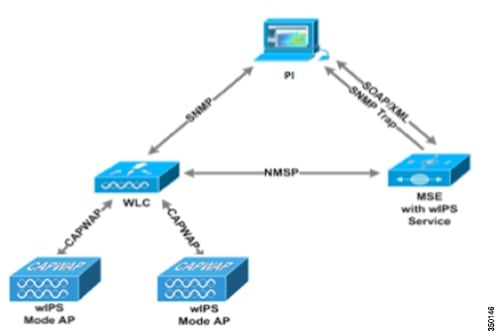
This document will address the wIPS solution for Over-the-Air Attacks. Cisco’s Adaptive Wireless Intrusion Prevention System (wIPS) is made up of a number of components that work together to provide a unified security monitoring solution. In addition to the WLAN Controllers, Access Points and Prime Infrastructure components that currently comprise Cisco’s Unified Wireless Networking solution; the wIPS portion introduces two additional components. These additional hardware components include Access Points in wIPS mode and the Mobility Services Engine running the wIPS service software.
Component Functions in an Adaptive Wireless IPS Deployment
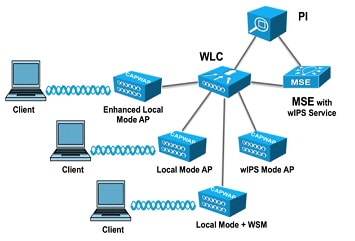
- wIPS Mode Access Point—A wIPS mode access point is any access point in Monitor Mode, Local Mode with wIPS, or with the WSM module. This term will be used to group access points capable of wIPS.
- wIPS Monitor Mode Access Point(s) – Provides constant channel scanning with attack detection and forensics (packet capture) capabilities.
- Local Mode Access Point(s)—Provides wireless service to clients in addition to limited time-sliced attacker scanning.
- Access Point(s) with Local Mode with wIPS—Like Local Mode, provides wireless service to client, but when scanning off-channel, the radio dwells on the channel for an extended period of time, allowing enhanced attack detection.
- Wireless Security (WSM) Module—This is an add-on module to the Cisco Aironet 3600/3700 Series Access Point, which offloads the constant channel scanning with attack detection and forensics capabilities to the module, freeing up the serving radios for clients.
- Mobility Services Engine (running wIPS Service)—The central point of alarm aggregation from all controllers and their respective wIPS Monitor Mode Access Points. Alarm information and forensic files are stored on the system for archival purposes.
- Wireless LAN Controller(s)—Forwards attack information from wIPS Monitor Mode Access Points to the MSE and distributes configuration parameters to APs.
- Prime Infrastructure—Provides the administrator the means to configure the wIPS Service on the MSE, push wIPS configurations to the controller and set Access Points into wIPS Monitor mode. It is also used for viewing wIPS alarms, forensics, reporting and accessing the attack encyclopedia.
wIPS Deployment Modes
Beginning with the 7.4 release, Cisco Adaptive Wireless IPS has three options for wIPS mode access points. To better understand the differences between the wIPS mode access points, lets discuss each mode.
Local Mode with wIPS
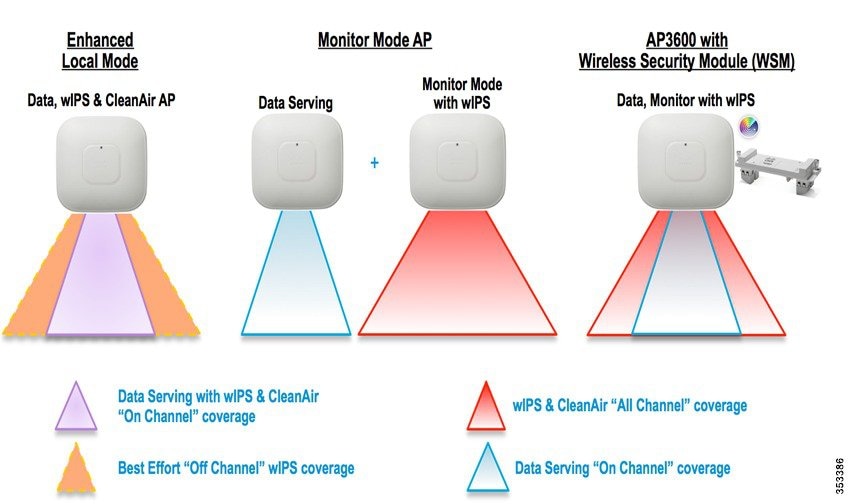
Local Mode with wIPS provides wIPS detection “on-channel”, which means attackers will be detected on the channel that is serving clients. For all other channels, ELM provides best effort wIPS detection. This means that every frame the radio would go “off-channel” for a short period of time. While “off-channel”, if an attack occurs while that channel is scanned, the attack will be detected.
An example of Local Mode with wIPS on an AP3600, the 2.4 GHz radio is operating on channel 6. The AP will constantly monitor channel 6, any attacks on channel 6 will be detected and reported. If an attacker attacks channel 11, while the AP is scanning channel 11 “off-channel”, the attack will be detected.
- Adds wIPS security scanning for 7x24 on channel scanning (2.4 GHz and 5 GHz), with best effort off channel support
- The access point is additionally serving clients and with the G2 Series of Access Points enables CleanAir spectrum analysis on channel (2.4 GHz and 5 GHz)
- Adaptive wIPS scanning in data serving local and FlexConnect APs
- Protection without requiring a separate overlay network
- Supports PCI compliance for the wireless LANs
- Full 802.11 and non-802.11 attack detection
- Adds forensics and reporting capabilities
- Flexibility to set integrated or dedicated MM APs
- Pre-processing at APs minimize data backhaul (that is, works over very low bandwidth links)
- Low impact on the serving data
Monitor Mode
Monitor Mode provides wIPS detection “off-channel”, which means the access point will dwell on each channel for an extend period of time, this allows the AP to detect attacks on all channels. The 2.4GHz radio will scan all 2.4GHz channels, while the 5GHz channel scans all 5GHz channels. An additional access point would need to be installed for client access.
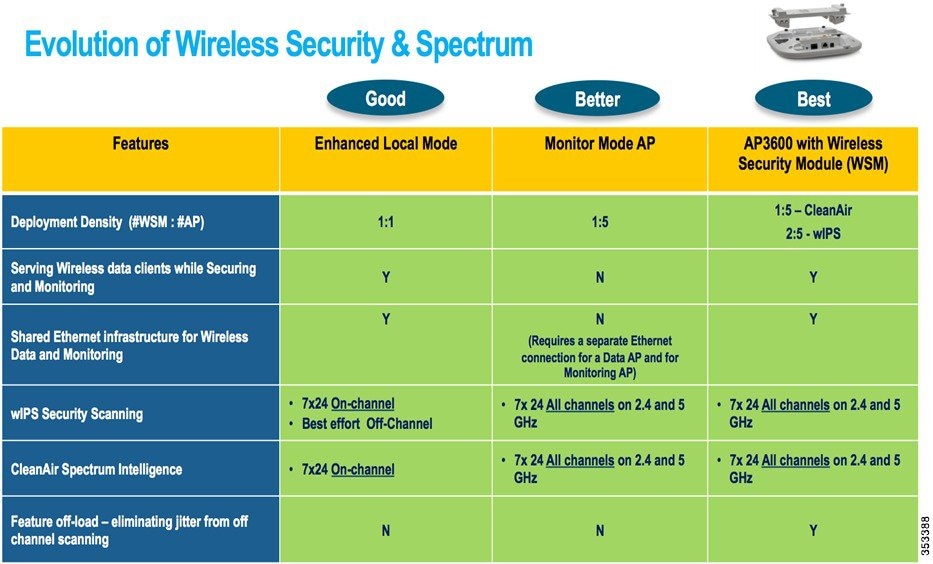
AP 3600/3700 with Wireless Security Module (WSM): The Evolution of Wireless Security and Spectrum
A Cisco 3600 series Access point with the WSM module uses a combination of “on-channel” and “off-channel”. This means that the AP3600 2.4 GHz and 5 GHz will scan the channel that they are serving clients and the WSM module would operate in monitor mode and scan all channels.
Some of the features of the WSM Module are:
- Industry’s first Access Point enabling the ability to simultaneously Serve clients, wIPS security scan, and analyze the spectrum using CleanAir Technology
- Dedicated 2.4 GHz and 5 GHz radio with its own antennas enabling 7x24 scanning of all wireless channels in the 2.4 GHz and 5 GHz bands
- A single Ethernet infrastructure provides simplified operation with fewer devices to manage and optimized return on investment of the AP3600 wireless infrastructure and the Ethernet wired infrastructure
On-Channel vs. Off-Channel Scanning per wIPS Mode
The figure below explains the radio’s behavior. When a radio is on its serving channel it is considered “on-channel”, when the radio is scanning other channels, it is considered “off-channel”.
An AP in local mode is mostly “on-channel”, making it difficult to detect attackers “off-channel”. A monitor mode AP is always “off-channel”, but cannot server clients, the WSM module provides a great combination of both.

wIPS Communication Protocols
To provide communication between each system component, a number of protocols are utilized:
- CAPWAP (Control and Provisioning of Wireless Access Points) – This protocol is utilized for communication between Access Points and controllers. It provides a bi-directional tunnel in which alarm information is shuttled to the controller and configuration information is pushed to the Access Point. CAPWAP control messages are DTLS encrypted and CAPWAP data has the option to be DTLS encrypted
- NMSP (Network Mobility Services Protocol) – The protocol used for communication between Wireless LAN Controllers and the Mobility Services Engine. In the case of a wIPS Deployment, this protocol provides a pathway for alarm information to be aggregated from controllers to the MSE and for wIPS configuration information to be pushed to the controller. This protocol is encrypted.
wIPS Configuration and Profile Management
Configuration of wIPS Profiles follows a chained hierarchy starting with PI, which is used for profile viewing and modification. The actual profiles are stored within the wIPS service running on the MSE. From the wIPS Service on the MSE, profiles are propagated to specific controllers, which in turn communicate this profile transparently to wIPS Mode Access Points associated to that perspective controller. When a configuration change to a wIPS profile is made at PI and applied to a set of Mobility Services Engine(s) and Controller(s), the following steps occur to put the change in place:

1. The configuration profile is modified on PI and versioning information is updated.
2. An XML-based profile is pushed to the wIPS Engine running on the MSE. This update occurs via the SOAP/XML protocol.
3. The wIPS Engine on the MSE will update each controller associated with that profile by pushing out the configuration profile via NMSP.

Note![]() A controller is associated to a single configuration profile, which will be utilized for all wIPS mode Access Points joined to that controller. As such, all wIPS Mode APs connected to a controller will share the same wIPS configuration.
A controller is associated to a single configuration profile, which will be utilized for all wIPS mode Access Points joined to that controller. As such, all wIPS Mode APs connected to a controller will share the same wIPS configuration.
4. The Wireless LAN Controller receives the updated wIPS profile, stores it into NVRAM (replacing any previous revision of the profile) and propagates the updated profile to its associated wIPS Access Points via CAPWAP control messages.
5. A wIPS Mode Access Point receives the updated profile from the controller and applies the modifications to its wIPS software engine.
It should be noted that a Mobility Services Engine can only be configured from one Prime Infrastructure. This is essentially a 1:1 relationship meaning that a Mobility Services Engine, once associated to a particular PI, cannot be added to another PI.
wIPS Alarm Flow
The Adaptive wIPS system follows a linear chain of communication to propagate attack information obtained from scanning the airwaves to the console of the Prime Infrastructure.
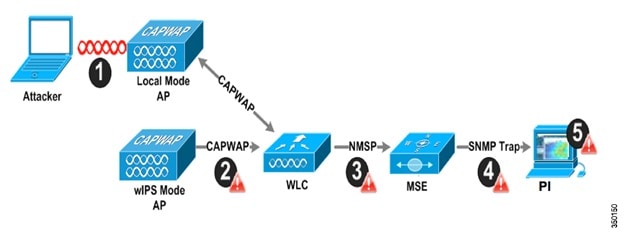
1. In order for an alarm to be triggered on the Cisco Adaptive wIPS system, an attack must be launched against a legitimate Access Point or Client. Legitimate Access Points and clients are discovered automatically in a Cisco Unified Wireless Network by ‘trusting’ devices broadcasting the same ‘RF-Group’ name. In this configuration, the system dynamically maintains a list of local-mode Access Points and their associated clients. The system can also be configured to ‘trust’ devices by SSID using the SSID Groups feature. Only attacks, which are considered harmful to the WLAN infrastructure, are propagated upwards to the rest of the system.
2. Once an attack has been identified by the wIPS Mode Access Point engine, an alarm update is sent to the Wireless LAN Controller and is encapsulated inside the CAPWAP control tunnel.
3. The Wireless LAN Controller will transparently forward the alarm update from the Access Point to the wIPS Service running on the Mobility Services Engine. The protocol used for this communication is NMSP.
4. Once received by the wIPS Service on the Mobility Services Engine, the alarm update will be added to the alarm database for archival and attack tracking. An SNMP trap is forwarded to the Prime Infrastructure containing the attack information. If multiple alarm updates are received referencing the same attack (for example, if multiple Access Points hear the same attack) only one SNMP trap will be sent to PI.
5. The SNMP trap containing the alarm information is received and displayed by PI.
Required Components
The basic system components for a Cisco Adaptive wIPS system include:
- Access Points in wIPS Monitor Mode, in Local Mode with wIPS, or with a wireless security module
- Wireless LAN Controller(s)
- A Mobility Services Engine running the wIPS Service
- A Prime Infrastructure
The minimum code versions required for an Adaptive wIPS system:
- Available with Cisco Mobility Services Engine Software Release 5.2.xxx or later
- Requires 5.2.xxx or later on Cisco Wireless Control System
- Requires 5.2.xxx or later on Cisco wireless LAN controllers
- Release 5.2 and later wireless IPS functionality requires Monitor Mode (that is, non-client-serving) access points
- Release 7.1.xxx and later wireless IPS functionality requires access points in local mode with wIPS (that is, client-serving)
The minimum code versions required for the Wireless Security Module (WSM):
System Scalability
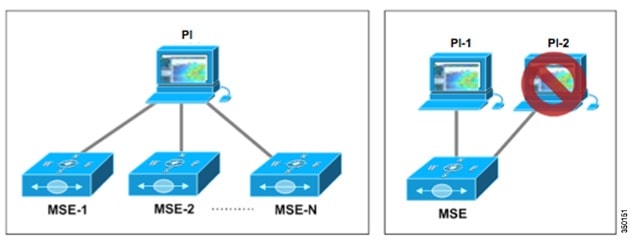
A Mobility Services Engine (MSE) can be managed only by one Prime Infrastructure, which has design implications when scaling the network. It is possible to have multiple Mobility Services Engines managed by a single Prime Infrastructure.
Use the following scalability facts when designing a system:
- PI can support a maximum of 15,000 Access Points on a high-end server. This limit of 15,000 includes both client-serving Access Points and Access Points in wIPS Monitor Mode. wIPS and Data APs can be intermixed at a variety of ratios to reach the upper limit of 15000 Access Points per PI. These ratios are dependent on environmental RF conditions, density of the existing WLAN installation and the required level of security monitoring.
- Each wIPS mode has a different recommended deployment density. For local mode with wIPS, we recommend a density of 1:1, meaning that every AP should be in Local Mode with wIPS. For Monitor Mode APs we recommend a density of 1:5 and for the AP3600 with the WSM module, we recommend 2:5. This is shown in the table below.

Note![]() Only Monitor Mode wIPS requires separate Access points for data.
Only Monitor Mode wIPS requires separate Access points for data.
How Many wIPS Access Points do I need?
Before deploying an Adaptive wIPS system, it is important to consider that the communications range of an access point’s cell is less than the actual range at which frames may be received and decoded. The reason for this discrepancy is that an Access Point’s communication range is limited by the weakest link – which in typical deployments is the WLAN client. Given that the output power of a WLAN client is intrinsically less than the Access Point’s maximum, the range of the cell is restricted to the client’s abilities. In addition, it is recommended practice to run Access Points at less than full power to build RF redundancy and load balancing into the wireless network. These aforementioned fact combined with the superior receive sensitivity of Cisco’s Access Points allows the Adaptive wIPS system to be deployed with less access point density than the client serving infrastructure while still providing pervasive monitoring.

As depicted in the above diagram, a wIPS deployment is based on hearing 802.11 management and control frames which are used by a majority of attacks to cause harm. This is in contrast to a data Access Points deployment that is surveyed to provide higher throughput data rates anywhere from 24Mbps to 54Mbps.
There are numerous factors that go into deciding exactly the number of wIPS Access Points that are required for a specific environment. Given that each prospective deployment’s security requirements and environmental conditions are different, there is no hard and fast rule that will address the needs of every deployment but a few generalized guidelines must be taken into account.
The main factors, which affect the number of wIPS Access Points required, are as follows.
Deployment Conditions
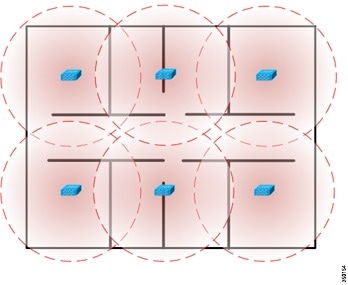
Deployment depends on specific environmental conditions such as floor layout and building materials. Given that wireless signal propagation is heavily dependent on the type of material the signal must pass through, an office environment with numerous walls will require more sensors than an empty warehouse. This factor is similar to pre-existing knowledge as to how data-serving Access Points are deployed. The more obstacles in the environment which cause RF signal attenuation, the denser the deployment of wIPS Access Points will need to be.
In the below diagram, an open indoor environment is depicted where wIPS Access Points are deployed with the ability to ‘listen’ for attacks for a long distance given that there are no walls to disrupt or weaken a wireless signal.

In sharp contrast, the diagram below depicts an indoor environment with numerous heavy walls, which cause signal attenuation. In this case, more wIPS Access Points will need to be deployed to ensure that attacks are picked up.
Frequency Band(s) Monitored
The radio frequency propagation characteristics of the 2.4GHz and 5GHz bands vary as a result of the wavelength differences between the two. Put simply, 2.4GHz wireless signals (802.11b/g/n) travel a further distance than 5GHz (802.11a/n). In order to accurately compute the number of wIPS access points needed for a prospective installation, one must consider what frequency bands must be monitored in the wIPS deployment.
The above charts outline the circular square footage than can be covered by a single wIPS mode Access Point in each frequency band and each type of environment. These metrics can provide a baseline as how many wIPS Access Points are needed to cover a specific floor area. These charts were created using MatLab simulation software assuming an attacking device outputting 15dBm of transmit power. The receive sensitivity used this calculation represents the lowest common denominator between Cisco’s line of Access Points that support wIPS.
Location of wIPS Access Points
The physical deployment of wIPS Mode Access Points is based on the end goal of providing pervasive monitoring across the entire WLAN infrastructure. To this end, wIPS mode APs are placed using two general guidelines. First, deploy wIPS access points around the periphery of your physical location to ensure adequate monitoring of attacks being launched from outside the building. This does not mean that wIPS mode Access Points should be deployed in the physical extremities of the building but instead they should be appropriately positioned to provide detection coverage to the extremities. Second, deploy wIPS access points throughout the center of the building to ensure complete detection of attacks launched from within the physical building.
The physical mounting location of a wIPS Access Point should be based on the same best practices used when mounting data serving Access Points. Following these conventions, it is important that wIPS Access Point antennas are not hidden behind heavy building materials or placed above drop ceilings. In the case that an Access Point is mounted above the ceiling, specific external antennas should be used to bring antenna leads into the same physical space that will be monitored.
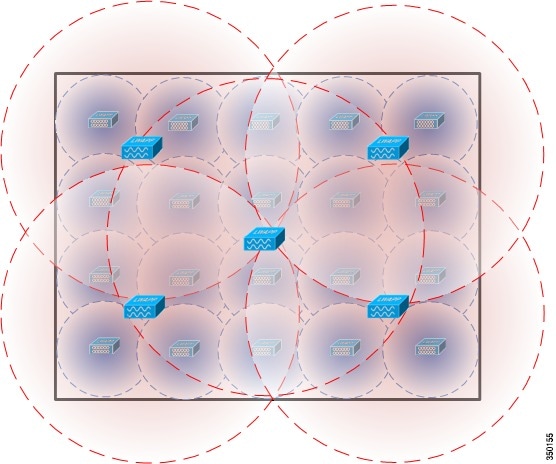
In the above deployment example, four wIPS Access Points are deployed around the edges of the building to provide security monitoring around the periphery of the physical building. In addition, a wIPS Access Point is deployed in the center of the building to provide security-monitoring coverage inside the building.
Access Point Density Recommendations
As stated above, the square footage of access point coverage can be measured based on frequency and environment, but with the newer wIPS modes, other factors also contribute to wIPS access point density recommendations. All access point modes can monitor the same distance, but due to the reasons below, it is recommended to deploy each mode with a different density.
Access Points in local mode with wIPS are geared towards serving clients. For local mode with wIPS deployments, it is recommended for every access point be put in local mode with wIPS.
For monitor mode access points, we recommend that a ratio of 1:5 local mode to monitor mode access points.
Finally for the WSM module, there is a single radio monitoring all channels on both the 2.4 GHz and 5 GHz band. Since radio has additional channels to scan, it is recommended that the WSM module be deployed with a 2:5 density to speed up detection time.
wIPS Integrated in a Cisco Unified Wireless Network
An integrated wIPS deployment is a system design in which non-wIPS Mode Access Points and wIPS Mode Access Points are intermixed on the same controller(s) and managed by the same Prime Infrastructure. This can be any combination of local mode, flex connect mode, local mode with wIPS, monitor mode, and 3600 series Access points with the WSM module. Overlaying wIPS protection and data shares many of the components including controllers and Prime Infrastructure thus reducing duplicate infrastructure costs.
Forensics
Cisco’s Adaptive wIPS system provides the ability to capture attack forensics for further investigation and troubleshooting purposes. At a base level, the forensics capability is a toggle-based packet capture facility, which provides the ability to log and retrieve a set of wireless frames. This feature is enabled on a per attack basis from within the wIPS profile configuration of PI.
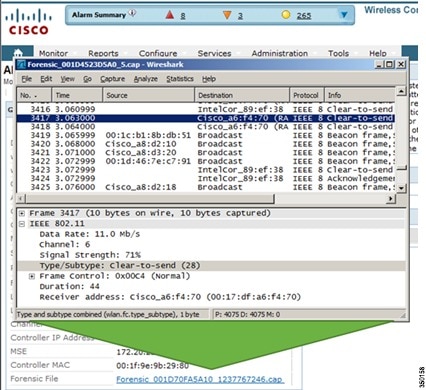
Once enabled, the forensics feature is triggered once a specific attack alarm is seen over the airwaves. The forensic file will be created based on the packets contained within the buffer of the wIPS Mode AP that triggered the original alarm. This file is transferred to the Wireless LAN Controller via CAPWAP, which then forwards the forensic file via NMSP to the wIPS Service running on the Mobility Services Engine. The file is stored within the forensic archive on the MSE until the user configured disk space limit for forensics is reached. By default this limit is 20Gigabytes, which when reached will cause the oldest forensic files to be removed. Access to the forensic file can be obtained by opening the alarm on the Prime Infrastructure, which contains a hyperlink to the forensic file. The files are stored as a ‘.CAP’ file format which can be opened by either WildPacket’s Omnipeek, AirMagnet Wi-Fi Analyzer, Wireshark or any other packet capture program which supports this format. Wireshark is available at http://www.wireshark.org.

Note![]() The forensics capability of the wIPS system should be used sparingly and then disabled after the desired information is captured. The reason for this recommendation is the intensive load it places on the Access Point as well as the interruption in scheduled channel scanning this capability requires. A wIPS Access Point cannot be simultaneously performing channel scanning at the same instance it is producing a forensic file. While the forensic file is being dumped, channel scanning will be delayed for a maximum of 5 seconds.
The forensics capability of the wIPS system should be used sparingly and then disabled after the desired information is captured. The reason for this recommendation is the intensive load it places on the Access Point as well as the interruption in scheduled channel scanning this capability requires. A wIPS Access Point cannot be simultaneously performing channel scanning at the same instance it is producing a forensic file. While the forensic file is being dumped, channel scanning will be delayed for a maximum of 5 seconds.
Mobility Services Engine Setup
To setup the mobility services engine:
Login with the following credentials: root/password
Step 2![]() Start the Setup Process:
Start the Setup Process:
Upon the initial boot up, the MSE will prompt the administrator to launch the setup script. Enter yes to this prompt.

Note![]() If the MSE does not prompt for setup, enter the following command: /opt/mse/setup/setup.sh
If the MSE does not prompt for setup, enter the following command: /opt/mse/setup/setup.sh
Step 3![]() Configure Hostname and DNS Domain Name:
Configure Hostname and DNS Domain Name:
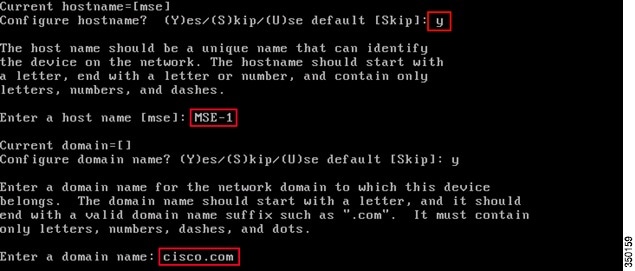
Step 4![]() Configure Ethernet Interface Parameters:
Configure Ethernet Interface Parameters:
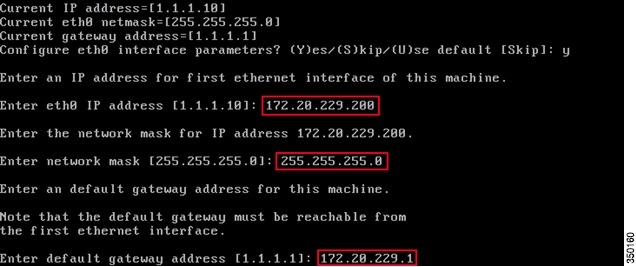
When prompted for eth1 interface parameters, enter Skip to proceed to the next step as a second NIC is not required for operation.

Note![]() The address configured must provide IP connectivity to the perspective Wireless LAN controller(s) and PI Management system used with this appliance.
The address configured must provide IP connectivity to the perspective Wireless LAN controller(s) and PI Management system used with this appliance.
Step 5![]() Configure High Availability (Optional):
Configure High Availability (Optional):
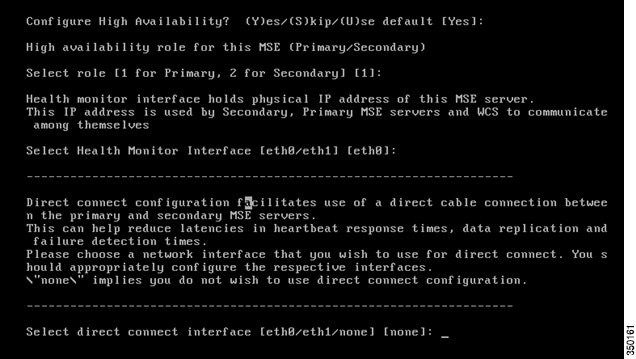
Enabled High Availability, then select the role of the MSE. Then select the Ethernet port that will be actively monitored by a secondary MSE server. If there is a direct connection, the Ethernet port must be given.

Now provide a Virtual IP address for this HA pair. Once a Virtual IP address is given, you can being the HA exchange by starting HA Recovery mode.
Step 6![]() Enter DNS Server(s) Information:
Enter DNS Server(s) Information:
Only one DNS server is required for successful domain resolution, enter backup servers for resiliency.

If the default time zone of New York is not applicable to your environment, browse through the location menus to set it correctly.

Step 8![]() Assign a time to restart the MSE (This step is optional):
Assign a time to restart the MSE (This step is optional):

Step 9![]() Configure a Remote Syslog Server:
Configure a Remote Syslog Server:

Configure the IP address of your remote Syslog Server.
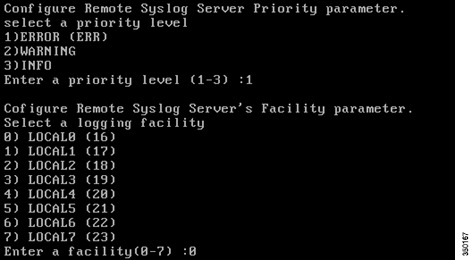
Then provide the log message priority level and facility.
Step 10![]() Configure NTP or System Time:
Configure NTP or System Time:
NTP is optional but ensures your system maintains an accurate system time. If you select No you will be prompted to set the current time for the system.
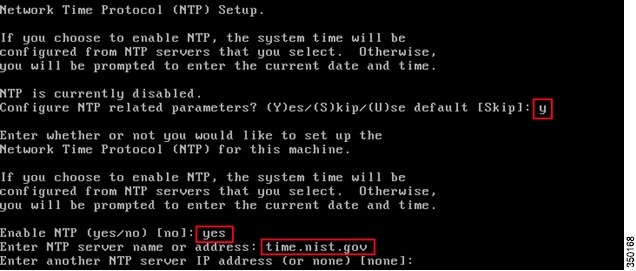

Note![]() It is imperative that the correct time be set on the Mobility Services Engine, Wireless LAN Controller and PI Management System. This can be achieved by pointing all three systems to the same NTP server and ensuring they have the correct time zones configured.
It is imperative that the correct time be set on the Mobility Services Engine, Wireless LAN Controller and PI Management System. This can be achieved by pointing all three systems to the same NTP server and ensuring they have the correct time zones configured.
Step 11![]() Configure Audit Rules (Optional):
Configure Audit Rules (Optional):

This allows the user to configure an audit daemon. This step can be skipped.
A login banner is used to inform users of the system’s use and present a warning to keep unauthorized users from accessing the system. Since the login banner may be a multi-line message, a single period (.) ends the message and proceeds to the next step.

Step 13![]() Enable local console root login:
Enable local console root login:
This parameter is used to enable/disable local console access to the system. This should be enabled so local troubleshooting can occur.

Step 14![]() Enable SSH (Secure Shell) root login (Optional):
Enable SSH (Secure Shell) root login (Optional):
This parameter is used to enable/disable remote console access to the system. This should be enabled so remote troubleshooting can occur however corporate security policies may mandate disabling this option.

Step 15![]() Change the root password:
Change the root password:
This step is critical in ensuring system security, be sure to pick a strong password consisting of letters and numbers with no dictionary words. The minimum password length is 8 characters.

Step 16![]() Configure single user mode and password strength:
Configure single user mode and password strength:
These configuration parameters are not required and the default setting is to skip them by entering ‘s’.

Step 17![]() Configure a GRUB password:
Configure a GRUB password:
This configuration parameter is not required and the default setting is to skip it by entering ‘s’. (This step is optional).

Step 18![]() Configure a Prime Infrastructure communication password:
Configure a Prime Infrastructure communication password:
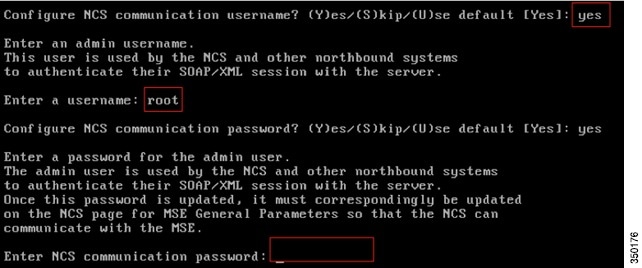
Step 19![]() Save Changes and Reboot:
Save Changes and Reboot:
Once the setup script has completed, save your changes when prompted. After saving, follow the prompts to reboot the MSE as well to ensure all settings are applied successfully.
Step 20![]() Start the MSE Service:
Start the MSE Service:
Login to the MSE using the username root and password previously configured in step 13. Execute the command service msed start to start the MSE service.

Step 21![]() Enable the MSE Service to Start at Boot up:
Enable the MSE Service to Start at Boot up:
Execute the command: chkconfig msed on

Adding the MSE to PI
Step 1![]() Navigate to the Mobility Services Configuration Page:
Navigate to the Mobility Services Configuration Page:
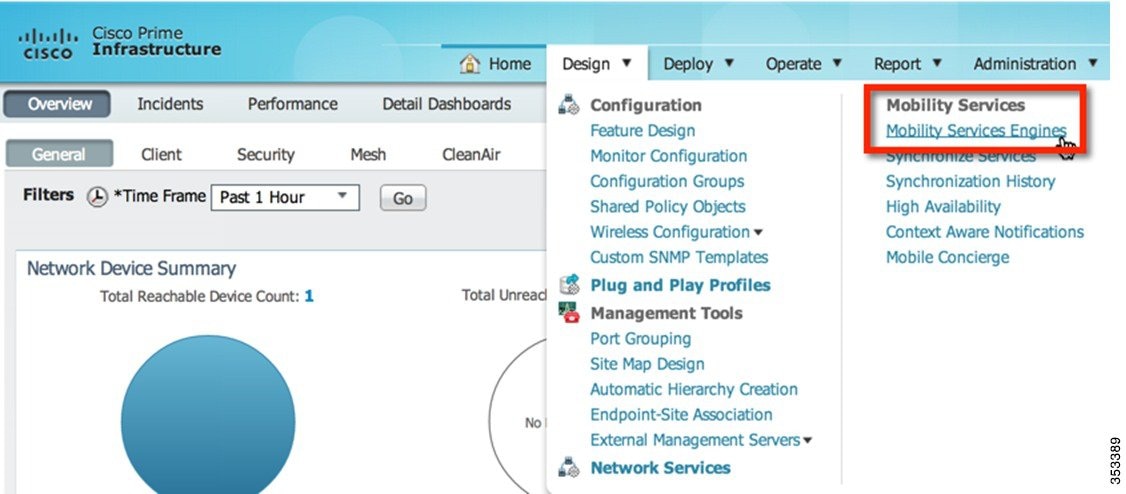
Login to PI and click Mobility Services Engine from the Design drop-down menu.
Step 2![]() Add the Mobility Services Engine to PI:
Add the Mobility Services Engine to PI:
From the drop down on the right hand side, select Add Mobility Services Engine and click Go
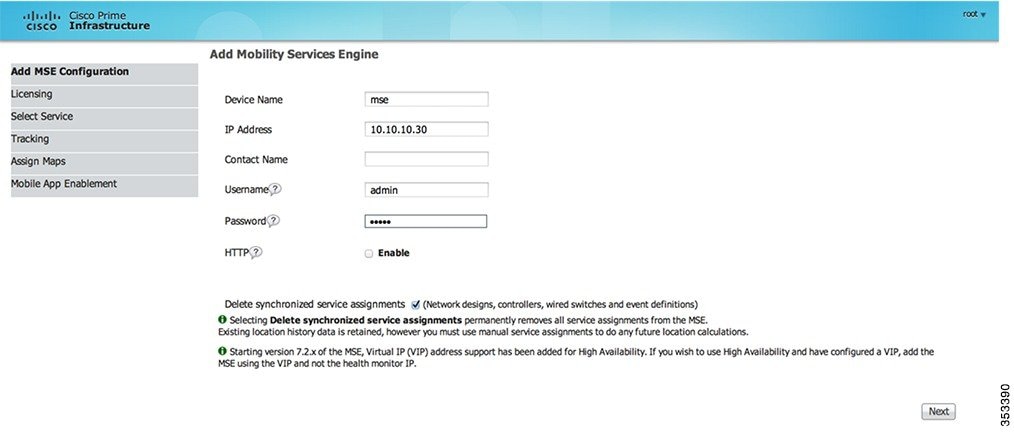
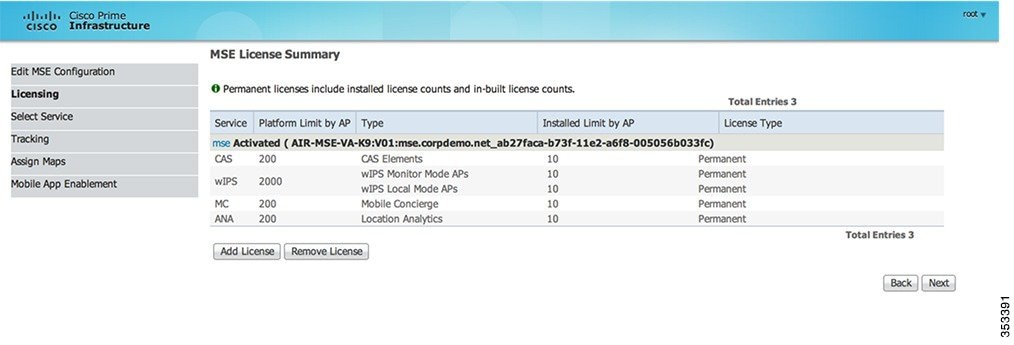
Enter a unique device name for the MSE, the IP address previously configured during the MSE setup, a contact name for support and the PI Communication Password configured during the MSE setup. Do not change the username from the default of admin.
Step 4![]() Select the WIPS Service to run on the MSE:
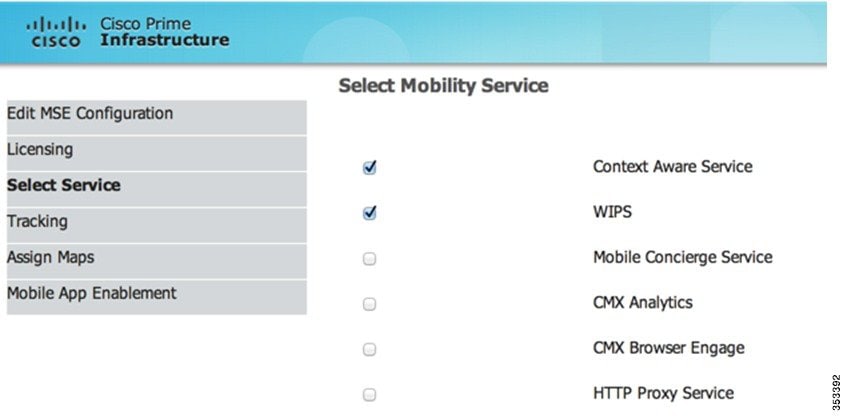
Select the WIPS Service to run on the MSE:
Step 5![]() Select tracking and history parameters:
Select tracking and history parameters:

Assign maps and synchronize network design. Once synced, the status is displayed as highlighted in the following figure.
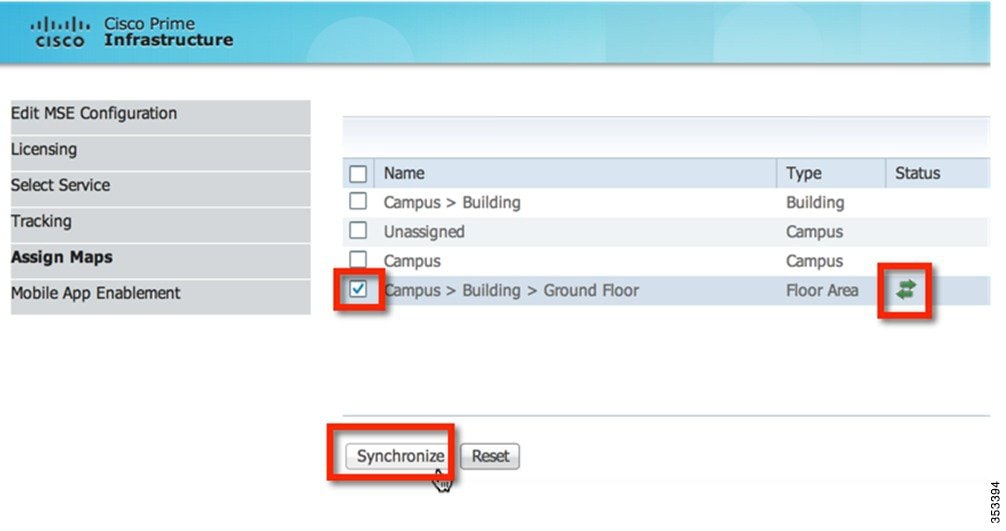
From the Design drop-down menu, select Synchronize Services

Step 7![]() Select Controllers to Synchronize:
Select Controllers to Synchronize:
Select the Controllers tab, to see a list of controllers. Once the desired controllers are selected, press the Change MSE Assignment button.

A popup will be displayed with a list of controllers to synchronize the MSE with. Select the desired features for synchronization and click.


Configuring Access Points to Local Mode with wIPS
Any local mode indoor access point (AP) can be configured to local mode with wIPS.
To configure APs to local mode with wIPS:
Step 1![]() Configure the AP to local mode with wIPS:
Configure the AP to local mode with wIPS:
a.![]() Enter the AP configuration menu in PI via Operate > Device Group > Device Type > Unified AP and click the AP’s name, then Configuration.
Enter the AP configuration menu in PI via Operate > Device Group > Device Type > Unified AP and click the AP’s name, then Configuration.

c.![]() Change AP Sub Mode to WIPS.
Change AP Sub Mode to WIPS.
d.![]() Click Save at the bottom of the page.
Click Save at the bottom of the page.
e.![]() Click OK when prompted to reboot the AP.
Click OK when prompted to reboot the AP.
Repeat this for each AP that is configured to local mode with wIPS.
Configuring Access Points to wIPS Monitor Mode
Any indoor access point (AP) can be configured to wIPS monitor mode.
To configure APs for wIPS monitor mode:
Step 1![]() Configure the Access Point to Monitor Mode:
Configure the Access Point to Monitor Mode:
a.![]() Enter the AP configuration menu in PI via Operate > Device Group> Device Type> Unified AP and click on the Access Point’s name, then Configuration
Enter the AP configuration menu in PI via Operate > Device Group> Device Type> Unified AP and click on the Access Point’s name, then Configuration
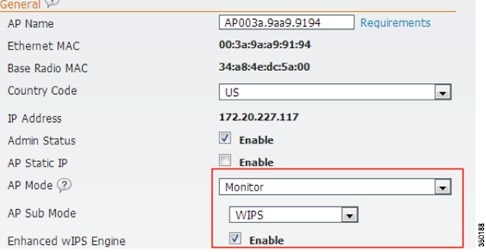
c.![]() Enable Enhanced WIPS Engine.
Enable Enhanced WIPS Engine.
d.![]() Change Monitor Mode Optimization to WIPS.
Change Monitor Mode Optimization to WIPS.
e.![]() Click Save at the bottom of the page.
Click Save at the bottom of the page.
f.![]() Click OK when prompted to reboot the AP.
Click OK when prompted to reboot the AP.
Repeat this for each AP that is configured to wIPS monitor mode.
Configuring Access Points to AP3600 Local Mode and the WSM Module
This mode is only available for a 3600 series Access Point (AP) with a WSM module installed.
To configure APs to AP3600 local mode plus the WSM module:
Step 1![]() Configure the AP to local mode:
Configure the AP to local mode:
Enter the AP configuration menu in PI via Operate > Device Group > Device Type > Unified AP and click on the Access Point’s name, then Configuration.

b.![]() Enable Enhanced WIPS Engine.
Enable Enhanced WIPS Engine.
c.![]() Change AP Sub Mode to WIPS.
Change AP Sub Mode to WIPS.
d.![]() Click Save at the bottom of the page.
Click Save at the bottom of the page.
e.![]() Click OK when prompted to reboot the AP.
Click OK when prompted to reboot the AP.
Repeat this for each AP that is configured to local mode.
Configuring wIPS Profiles
By default, the MSE and corresponding wIPS Access Points inherit the default wIPS profile from PI. This profile comes pre-tuned with a majority of attack alarms enabled by default and will monitor attacks against Access Points within the same RF-Group as the wIPS Access Points. In this manner, the system comes pre-setup to monitor attacks against a deployment model that utilizes an integrated solution in which both the WLAN infrastructure and wIPS Access Points are intermixed on the same controller.

Note![]() Some of the steps below are marked as Overlay-Only and are only to be undertaken when deploying the Adaptive wIPS solution to monitor an existing WLAN Infrastructure such as an autonomous or completely separate controller-based WLAN.
Some of the steps below are marked as Overlay-Only and are only to be undertaken when deploying the Adaptive wIPS solution to monitor an existing WLAN Infrastructure such as an autonomous or completely separate controller-based WLAN.
Step 1![]() Navigate to wIPS Profiles:
Navigate to wIPS Profiles:
From the top-level PI menu, click Design > Configuration > Wireless Configuration > wIPS Profiles.

Click Profile List on the left hand side.
Select Add Profile from the upper right-hand drop down menu.
Step 3![]() Select a profile template:
Select a profile template:
Cisco’s Adaptive wIPS system comes with a pre-defined set of profile templates of which customers can use as a starting place to create their own custom profiles. Each one is tailored to a specific vertical and varies in regards to which specific alarms are enabled.

After selecting a profile and providing a name, click Save and Edit.
Step 4![]() Configure the SSIDs to Monitor (Optional):
Configure the SSIDs to Monitor (Optional):
By default, the system monitors attacks launched against the local Wireless LAN Infrastructure (as defined by APs which have the same ‘RF Group’ name). If the system should also be required to monitor attacks against another network, such as when deployed in an overlay deployment model, the SSID groups feature must be utilized.
If this step is not required, simply click Next.

Check the box next to MyWLAN and select Edit Group from the drop down in the upper right hand corner then click Go.
Step 5![]() Enter SSIDs to Monitor (Optional):
Enter SSIDs to Monitor (Optional):
Once again, this step is only required if the system is to be utilized to monitor attacks against a different WLAN infrastructure which is typical of an overlay deployment model.
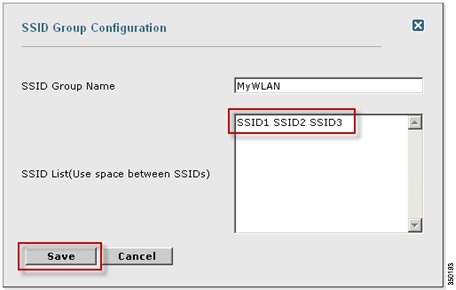
Enter the SSID(s) (separated by a single space if there are more than one) and click Save.
The SSID Groups page will now look like the following screen shot, confirming the SSID(s) were added successfully.
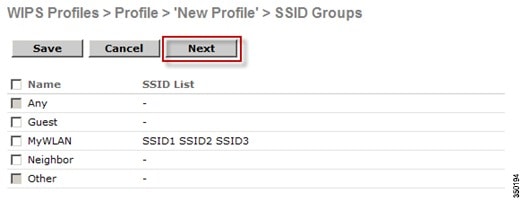
This configuration screen allows specific attacks to be enabled or disabled. It also permits the administrator to drill down to specific alarms and edit their specific thresholds or even turn on forensics.
To enable or disable alarms, simply click the box next to the specific alarm in question.
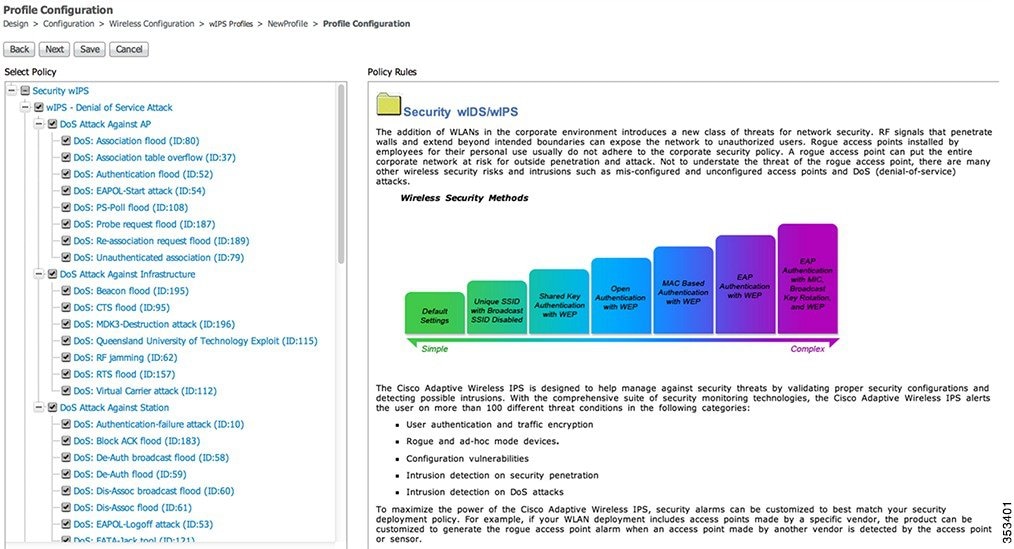
To edit the policy parameters, click on an alarm, which modifies the right hand frame to represent the point configuration of that attack.
Once a specific alarm is selected, the policy rules associated to that alarm can be modified.

To edit a policy rule, check the box next to the rule and click Edit.
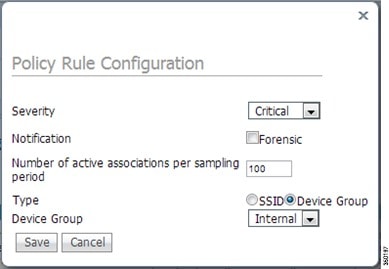
The policy rule window allows the severity of the alarm to be modified in addition to a number of other parameters. The notification item is a check box which defines whether forensic (packet captures) are taken for this particular alarm. There is also a specific threshold for this alarm, which in this case is defined as the number of active associations but this is different for every alarm. Next, the type parameter defines what WLAN infrastructure the system will monitor attacks against. By default this is configured to Device Group and Internal which specifies all APs in the same ‘RF Group’ name as the wIPS APs. Changing the type to SSID allows the system to monitor a separate network, which is typical of an overlay deployment and this configuration is discussed below.
Step 8![]() Add Policy Rules (Optional):
Add Policy Rules (Optional):
Editing a policy rule would typically only be needed in an overlay deployment where the system is to be configured to monitor another WLAN infrastructure by SSID.

To add a policy rule, click Add.
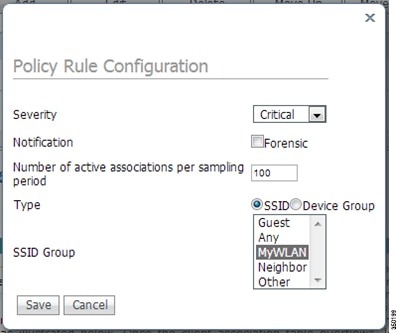
The policy rule window allows the severity of the alarm to be modified in addition to a number of other parameters. The notification item is a check box which defines whether forensic (packet captures) are taken for this particular alarm. There is also a specific threshold for this alarm, which in this case is defined as the number of active associations but this is different for every alarm. Next, the type parameter defines what SSIDs the system will monitor. If the type is changed to ‘Device Group’ then the system will monitor attacks only against APs in the same ‘RF Group’. In the case that ‘SSID’ is selected, then the system can be utilized to monitor attacks against a separate WLAN infrastructure as defined by the SSID Groups earlier in the setup.
After any changes have been made, click Save.
Step 9![]() Configuring Additional Policy Rules (Optional):
Configuring Additional Policy Rules (Optional):
If the system is to be configured to monitor another WLAN infrastructure by SSID, then changes will need to be made for each and every policy rule to monitor by SSID. A policy rule will need to created under each separate alarm which defines the system to monitor attacks against the SSID Group created earlier.
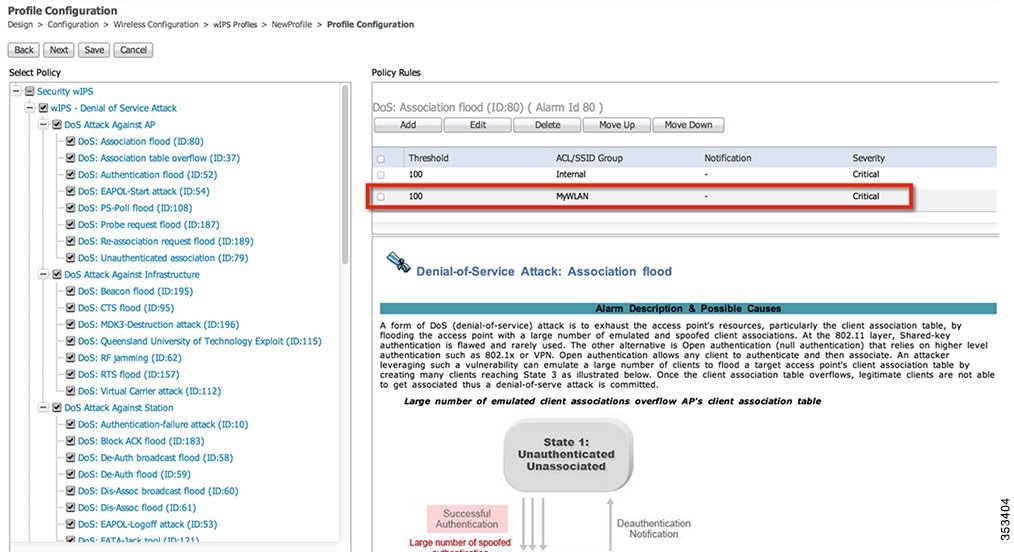
After any changes are made, click Save to save the profile on Prime Infrastructure and then click Next when done.

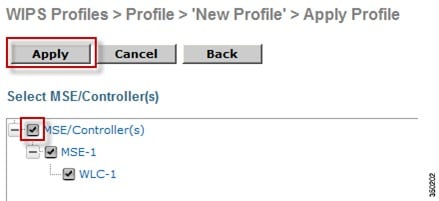
Select the MSE/Controller combinations to apply the profile to and then click Apply.
Disabling Controller-Based IDS
If Adaptive wIPS is enabled in the system, then IDS is disabled automatically. So, if the user needs to enable IDS, then the WIPS submode needs to be disabled.
To disable controller-based IDS:
Step 1![]() Login to the controller(s).
Login to the controller(s).
Step 2![]() Click on the Security tab from the top-level controller menu.
Click on the Security tab from the top-level controller menu.
Step 3![]() On the left hand-side, click Wireless Protection Policies > Standard Signatures.
On the left hand-side, click Wireless Protection Policies > Standard Signatures.
Step 4![]() Uncheck the standard signatures check box as shown in the below screenshot.
Uncheck the standard signatures check box as shown in the below screenshot.

Adaptive WIPS Management Best Practices
aWIPS Signature Compatibility Between CUWN Releases
Starting from WLC and MSE releases 7.5 through 8.0, there are new aWIPS signatures added along with some enhanced aWIPS features, such as new mitigation actions.
Refer to the table below for compatible release combinations between MSE, PI, and WLC first, with regard to aWIPS signature support.
To fine tune aWIPS signatures, we need to first understand configuration options available and their recommended settings.
Severity
The severity of aWIPS alarms is set based on its security threat level and operation impact on a wireless production network. For example, for most DoS attacks, they may have an operational impact on the wireless infrastructure. Thus, their severities are set to Critical by default. It is not necessary to change the default severity level, but it can be changed on case-by-case basis as long as thorough investigation and review have been done with InfoSec and Security Monitoring teams internally for customers.
Monitoring Objects
There are two types of monitoring objects, SSID Group and Device Group. Depending on signatures, it can be none, either one or both available to be configured.
For the Device Group, it is a list of device MAC addresses that administrators want to monitor for aWIPS attacks. The most effective monitoring for attacks specific to infrastructure devices, such as APs and associated clients, is to select the Internal option as the Device Group to be monitored.
If specific SSID Groups are configured, it means a list of SSIDs will be monitored for SSID specific attacks. To monitor these alarms correctly, it is critical to ensure that this list of SSIDs are configured inside specific SSID groups, so that they can be referred later in signature configuration.
To configure the Honeypot AP detected signature so that it monitors the following SSIDS, Cisco, cisco, and cIsco, follow this two-step process:
Step 1![]() Ensure that the specified SSIDS, Cisco, cisco, and cIsco, are configured in an SSID Group, such as MyWLAN, which should be available in SSID Group List of wIPS profile.
Ensure that the specified SSIDS, Cisco, cisco, and cIsco, are configured in an SSID Group, such as MyWLAN, which should be available in SSID Group List of wIPS profile.


Note![]() There is no regular expression support yet for SSID name configuration.
There is no regular expression support yet for SSID name configuration.
Step 2![]() In the Profile Configuration page of wIPS profile, highlight Honeypot AP detected signature and edit it to ensure that the MyWLAN SSID group is included as shown in the following screenshot:
In the Profile Configuration page of wIPS profile, highlight Honeypot AP detected signature and edit it to ensure that the MyWLAN SSID group is included as shown in the following screenshot:
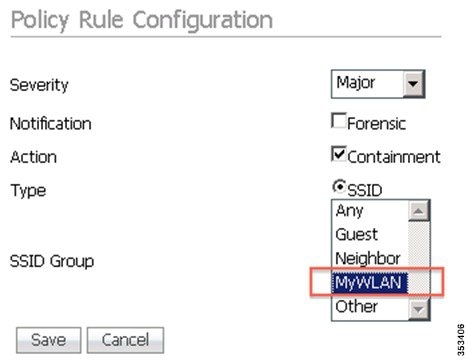

Note![]() The Honeypot AP detected signature attack can only detect specified SSIDs with open authentication. If Any is chosen for SSID Group, it means that the alarm will be triggered by any SSID, and not those specific to configured SSIDs or SSID groups. Thus, administrators must be cautious on SSID group changes because they affect the scope of monitoring SSIDs.
The Honeypot AP detected signature attack can only detect specified SSIDs with open authentication. If Any is chosen for SSID Group, it means that the alarm will be triggered by any SSID, and not those specific to configured SSIDs or SSID groups. Thus, administrators must be cautious on SSID group changes because they affect the scope of monitoring SSIDs.
Notification
Forensic is the only option for Notification in alarm configuration. It means capturing over-the-air packets that trigger an aWIPS alarm for troubleshooting and analysis purposes.
It is not recommended to enable Forensic for all alarms, because it will potentially increase the aWIPS alarm-related traffic throughput dramatically, especially in case WLC and MSE are separated in different locations and communicate over a WAN link. However, the Forensic option can be enabled on specific alarms, in case of troubleshooting and validating fidelity of alarms.
When the captured forensic file is not sufficient for troubleshooting, administrators can use third-party sniffing tools (such as AirMagnet Wi-Fi Analyzer or Wireshark AirPcap) to capture for a longer duration.
If you do not have sniffing tools, Cisco TAC offers OmniPeek Remote Assistant (ORA) for capturing.
To capture traffic through sniffing tools, administrators can follow the steps given below:
1.![]() From the triggered alarm, find the alarm MAC, reporting AP, last reporting time, and alarm channel if applicable.
From the triggered alarm, find the alarm MAC, reporting AP, last reporting time, and alarm channel if applicable.
2.![]() Schedule a site visit time close to the last reporting time, especially when it is a recurring alarm.
Schedule a site visit time close to the last reporting time, especially when it is a recurring alarm.
3.![]() Start the capture at or close to the reporting AP’s area.
Start the capture at or close to the reporting AP’s area.
a.![]() Enable all channels in 2.4 GHz and 5 GHz; scan for at least 30 minutes and save the capture. Note that not all sniffing tools can do this capture.
Enable all channels in 2.4 GHz and 5 GHz; scan for at least 30 minutes and save the capture. Note that not all sniffing tools can do this capture.
b.![]() Focus on the alarm channel; scan for at least 30 minutes and save the capture.
Focus on the alarm channel; scan for at least 30 minutes and save the capture.
After collecting enough traces, submit the file to Cisco TAC for further analysis.
Action
Action refers to the mitigation action that can be taken by aWIPS when an attack is detected. Up-to-date, there are four mitigation actions in Cisco aWIPS such as location, auto-immune, blocked list, and containment. The last three actions are only available in WLC and MSE releases 7.5 or 7.6 and PI releases 1.4 or 1.4.1.
Location
For most aWIPS alarms, location is still the only mitigation scheme available unless the other schemes are specified. This mitigation option is not configurable explicitly. It takes advantage of another service hosted by MSE, context aware, to help locate attackers or alarm sources, so that they can be physically removed later.
Auto-Immune
For some DoS attacks, a potential attacker can use specially crafted packets to mislead WIPS to treat a legitimate client as an attacker. It causes the controller to disconnect the legitimate client. The auto-immune feature is designed to ignore the crafted packets from an attacker and protect the legitimate client from loss of connectivity. Currently, there is only one attack that supports auto-immune action:

Note![]() It is not recommended to enable auto-immune, especially in Cisco 792x phone deployment because it may cause communication disruption during roaming.
It is not recommended to enable auto-immune, especially in Cisco 792x phone deployment because it may cause communication disruption during roaming.
Blocked List
Different from the auto-immune, blocked list is a more aggressive mitigation action to deauthenticate the identified attacking device if it is connected first; ignore all traffic from it afterwards as long as it is on the blocked list. Currently, the following attacks support blocked-list action:
Containment
Containment action in WIPS attacks is similar to rogue AP containment. It is designed to initiate containment on SSID-related attacks to prevent legitimate clients connecting to those SSIDs set up by attackers. Currently, the following attacks support for containment action:
Threshold
Some of the aWIPS alarms are threshold-based, that is, once the frames/packets match over the threshold in a sampling period, the alarms are triggered. A sampling period in Cisco WIPS is one minute, which is accumulated dwell time on a channel for WIPS APs.
An AP in local mode with wIPS spends only 50 ms for off-channel scanning; it will take a long time if the attacks are off-channel. This is why ELM only provides the best effort with regard to off-channels attacks. It is recommended to use monitoring mode (MM) AP to detect off-channel attacks. On the other hand, because ELM is on operating channel most of time, it detects on-channel attacks much faster than MM AP.
To get the best output, ELM AP with WSM module is the recommended solution for WIPS deployment. Threshold-based alarms tend to cause more false positives compared to non threshold-based ones. But for some of them, the accuracy of alarms can be increased when out of sequence (OOS) logic is also taken into consideration. Therefore, these alarms are subjects for administrators to monitor, review, and fine-tune.
Fidelity
Fidelity is one key attribute missing in previous Cisco aWIPS documentations or aWIPS user interfaces. It represents a measure of confidence level in signature accuracy. The fidelity level of WIPS alarms can be categorized into the five categories with regard to accuracy percentage as follows:
The higher the fidelity metric value, the more accurate the signature alarm is reported. Signatures with high fidelity have uniqueness in detection logic pattern, while ones with low fidelity can be triggered by various false positive conditions. Thus, this is an important metric to guide administrators when prioritizing WIPS attacks in monitoring, as well as mitigation.
aWIPS Monitoring and Tuning
The following are few misconceptions regarding WIPS profile:
1.![]() There is no one-fits-all WIPS profile for all organizations because each organization's wireless environment is different. Even within the same organization, wireless environment can change over the time. The WIPS profile must be customized for your environment with WIPS alarms. Cisco attempts to provide WIPS templates based on different verticals, such as Finance, Retail, Enterprise, and so on. However, they only represent a baseline for administrators to start with.
There is no one-fits-all WIPS profile for all organizations because each organization's wireless environment is different. Even within the same organization, wireless environment can change over the time. The WIPS profile must be customized for your environment with WIPS alarms. Cisco attempts to provide WIPS templates based on different verticals, such as Finance, Retail, Enterprise, and so on. However, they only represent a baseline for administrators to start with.
2.![]() There are no differences between various vertical WIPS templates, other than the signatures that are enabled by default for each one. For threshold-based alarms in each vertical WIPS template, there are no differences in the threshold settings among them.
There are no differences between various vertical WIPS templates, other than the signatures that are enabled by default for each one. For threshold-based alarms in each vertical WIPS template, there are no differences in the threshold settings among them.
Recommended Guidelines
The following table lists the recommended aWIPS signatures to be enabled along with fidelity and default severity setting (based on software release 8.0).
Administrators can refer to the above table for general guidance on monitoring and tuning as follows:
1.![]() Identify a subgroup of critical alarms for your organization to monitor after the internal review with the InfoSec and security incident monitoring teams and align the corresponding mitigation plans.
Identify a subgroup of critical alarms for your organization to monitor after the internal review with the InfoSec and security incident monitoring teams and align the corresponding mitigation plans.
2.![]() Focus on alarms with the combination of high severity (above Major) and high fidelity (above High), such as Honeypot AP detected signature. Administrators must collect packet traces for further validation if necessary and prepare to initiate mitigation effort on these alarms.
Focus on alarms with the combination of high severity (above Major) and high fidelity (above High), such as Honeypot AP detected signature. Administrators must collect packet traces for further validation if necessary and prepare to initiate mitigation effort on these alarms.
3.![]() Focus selective effort on alarms with lower severity (Minor and below) or lower fidelity (Medium and below). Administrators must first understand the security and operation impact of these alarms in order to outline the priority list. With this list, administrators can prioritize on validating and mitigation effort if needed. For example, the DoS: De-Auth flood alarm is one such alarm. Its fidelity level is Medium because it is threshold-based. But its severity is Critical because this attack will cause the legitimate client lose connectivity. In case of such alarms, administrators must validate whether it is false positive through troubleshooting. Then proceed with mitigation if needed.
Focus selective effort on alarms with lower severity (Minor and below) or lower fidelity (Medium and below). Administrators must first understand the security and operation impact of these alarms in order to outline the priority list. With this list, administrators can prioritize on validating and mitigation effort if needed. For example, the DoS: De-Auth flood alarm is one such alarm. Its fidelity level is Medium because it is threshold-based. But its severity is Critical because this attack will cause the legitimate client lose connectivity. In case of such alarms, administrators must validate whether it is false positive through troubleshooting. Then proceed with mitigation if needed.
4.![]() Ignore or turn off alarms with the combination of low severity (Minor and below) and low fidelity (Medium and below). For example, the NetStumbler detected alarm is one such alarm. From the field experience, it can be easily triggered by some chatty clients that send a large number of probe requests. It is a threshold-based alarm. Even if it is triggered, it does not mean that devices using the Netstumbler tool are detected. For administrators, it is fairly safe to ignore or even turn off this alarm.
Ignore or turn off alarms with the combination of low severity (Minor and below) and low fidelity (Medium and below). For example, the NetStumbler detected alarm is one such alarm. From the field experience, it can be easily triggered by some chatty clients that send a large number of probe requests. It is a threshold-based alarm. Even if it is triggered, it does not mean that devices using the Netstumbler tool are detected. For administrators, it is fairly safe to ignore or even turn off this alarm.
5.![]() Tune on threshold-based alarms if necessary. As discussed earlier, threshold-based alarms tend to trigger false positives. It requires administrators to adjust the threshold for some false positive scenarios. For example, the DoS: CTS flood alarm is one such alarm. In a mixed deployment of 802.11n and non-802.11n devices, CTS-to-Self frames of protection scheme for non-802.11n devices tend to trigger false positives for this alarm. In such cases, administrators should increase the threshold value to avoid this alarm being triggered in the future.
Tune on threshold-based alarms if necessary. As discussed earlier, threshold-based alarms tend to trigger false positives. It requires administrators to adjust the threshold for some false positive scenarios. For example, the DoS: CTS flood alarm is one such alarm. In a mixed deployment of 802.11n and non-802.11n devices, CTS-to-Self frames of protection scheme for non-802.11n devices tend to trigger false positives for this alarm. In such cases, administrators should increase the threshold value to avoid this alarm being triggered in the future.
6.![]() Auto mitigation action should be implemented only for alarms with the combination of high severity (above Major) and high fidelity (above High). For example, for any devices using your corporate SSIDS that trigger Honeypot AP detected alarms, administrators can implement containment as action to automate the mitigation effort. On the other hand, for alarms such as Hotspotter tool detected with Minor severity, it is not necessary to implement the containment action.
Auto mitigation action should be implemented only for alarms with the combination of high severity (above Major) and high fidelity (above High). For example, for any devices using your corporate SSIDS that trigger Honeypot AP detected alarms, administrators can implement containment as action to automate the mitigation effort. On the other hand, for alarms such as Hotspotter tool detected with Minor severity, it is not necessary to implement the containment action.
7.![]() Study WIPS alarm trending and history to identify the “usual suspects” as baseline. Then proceed with troubleshooting, tuning, and mitigation if needed.
Study WIPS alarm trending and history to identify the “usual suspects” as baseline. Then proceed with troubleshooting, tuning, and mitigation if needed.
Given the dynamic nature of a wireless environment, WIPS monitoring and tuning is an on-going process. To study WIPS alarms trending and history, you can use the following two methods:
- Leverage PI native report templates for WIPS alarms.
- Use third-party Security Information and Event Management (SIEM) as a northbound notification receiver of PI.
In this document, we illustrate the use of PI native report templates to study WIPS alarm trending and history.
In PI, you can generate the aWIPS alarm summary over a period of time through Report > Report Launch Pad > Security > Adaptive wIPS Alarm Summary as below:
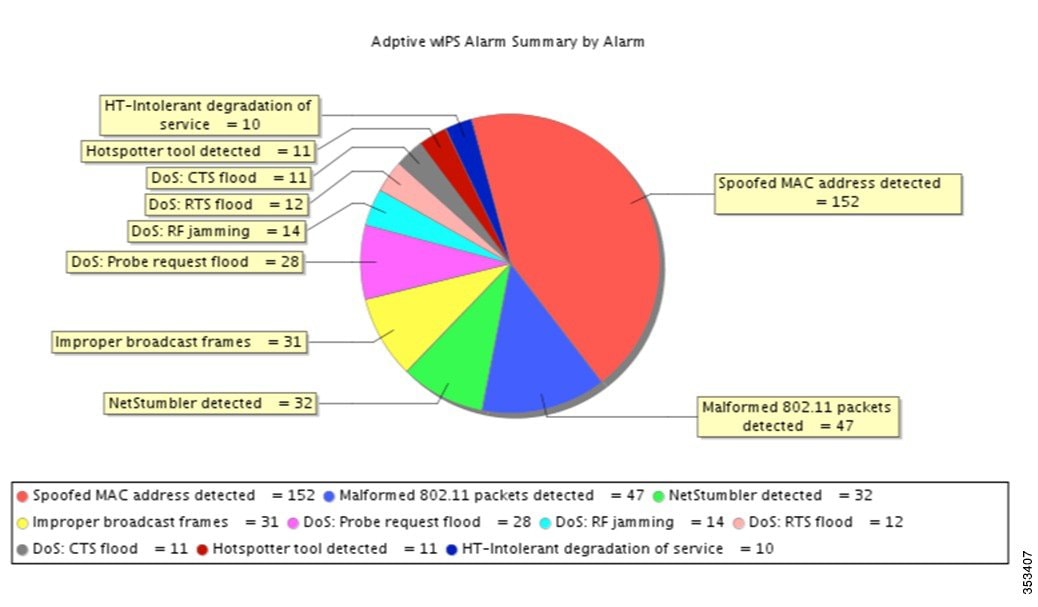
The figure above is a snapshot of the aWIPS alarms summary for Cisco lab environment over the last four weeks. The Spoofed MAC address detected count is almost 50% of the total alarms in this environment. First, this is an alarm with High fidelity and Major severity. As per the general guideline, No. 2 above, administrators should proceed to troubleshoot and find out why it was triggered so often in the last four weeks. To collect traces for analysis, administrators can try to enable Forensic for this alarm first. If it is not sufficient, you must locate detecting APs and reporting area, and start global forensic captures on those APs to collect more traces. Also engage Cisco TAC to analyze the traces and to troubleshoot.
Quick Tips
Based on field experience and feedback, the administrators can use the following quick tips to tune some WIPS alarms in this section. Note that these recommendations are applied for all conditions, unless they are specified otherwise.
Mobile devices are very chatty in regard to probe requests and they often trigger this type of alarms. These alarms do not really cause any operation impact:
If WEP encryption is not implemented in your wireless production network:
–![]() Client with encryption disabled
Client with encryption disabled
–![]() Device Using open authentication
Device Using open authentication
–![]() Device using shared key authentication
Device using shared key authentication
–![]() Fast WEP crack tool detected
Fast WEP crack tool detected
If LEAP authentication is not implemented in your wireless production network:
If there are Cisco CleanAir-capable APs in your wireless production network, CleanAir solution will provide a granular and accurate spectrum report and analysis and is the recommended solution for those purposes.
–![]() DoS: Queensland University of Technology Exploit
DoS: Queensland University of Technology Exploit
–![]() Suspicious after-hours traffic detected.
Suspicious after-hours traffic detected.
If you have 24-hour operating venue, there is no need to have this alarm enabled.
If P2P blocking is not required for your wireless production network, there is no need to enable this signature to detect peer-to-peer communication.
The following alarms may be outdated because they are used to detect attacks that may cause wireless devices to crash. These types of attacks are only effective on wireless clients with very old drivers, which are very rarely seen in today’s enterprise wireless network. They also have no impact on Cisco wireless devices based on our deployment experience. Thus, it is recommended to disable them.
–![]() Malformed 802.11 packets detected
Malformed 802.11 packets detected
–![]() Beacon Fuzzed Frame Detected
Beacon Fuzzed Frame Detected
–![]() Probe Request Fuzzed Frame Detected
Probe Request Fuzzed Frame Detected
–![]() Probe Response Fuzzed Frame Detected
Probe Response Fuzzed Frame Detected
–![]() Unauthorized Association Detected
Unauthorized Association Detected
In general, if you allow associated wireless clients to connect to SSIDs other than your managed ones, this alarm can be disabled. Especially for retail and public Wi-Fi deployment, if you provide Wi-Fi guest services for users, this alarm will be triggered a lot when it is enabled because users can connect to your neighboring Wi-Fi network.
This alarm will be triggered whenever a known hotspot (such as attwifi) is detected. It could be a real hotspot from carriers or retail store, but it could also be a fake hotspot that hackers set up to allure wireless clients. If there are real hotspots near your venue, especially for retail and public WiFi deployment, this alarm may be disabled to ignore unnecessary false positives generated.
Alarms to be Tuned
In mixed deployment of 802.11n and non-802.11n devices, this alarm can be triggered a lot. It does not mean real DoS attack happen. Administrators need to increase the threshold value based on your environment.
Similar to CTS flood, there may be a lot of false positives for this alarm. The threshold needs to be increased.
If administrators only care about any devices using your own SSIDs, you need to configure SSIDs in the SSID group you want to monitor such as the example given in the earlier section.
This is the default alarm to monitor any SSIDs. It can be triggered when a client associates with your wireless infrastructure first, and then switches to AP mode later. If administrators only care about monitoring your own SSIDs, you should make the change to a specific SSID group with your own SSIDs in it.
Licensing and Ordering Information
Cisco Adaptive wIPS is a licensed software feature set on the Cisco Mobility Services Engine. The table below shows the license levels available for Adaptive wIPS.

Note![]() The WSM module will use an L-WIPS-MM license. In addition, if the location of the WIPS attack or the location of rogue access points or clients are required, the customer must purchase a separate MSE server to calculate these locations and separate location licenses for these APs.
The WSM module will use an L-WIPS-MM license. In addition, if the location of the WIPS attack or the location of rogue access points or clients are required, the customer must purchase a separate MSE server to calculate these locations and separate location licenses for these APs.
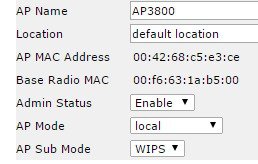
WIPS monitoring on 2800, 3800 and 1560 AP
Flexible Radio Assignment, allows for either manual configuration or for the APs to intelligently determine the operating role of the integrated radios based on the available RF environment. The AP can operate in Wireless Security Monitoring and 5 GHz role, where one radio serves 5 GHz clients, while the other radio scans both 2.4 GHz and 5 GHz for wIPS attackers, CleanAir interferers, and rogue devices.
When a radio is on its serving channel it is considered “on-channel”, when the radio is scanning other channels, it is considered “off-channel”. There are three deployment scenarios in which an AP can be configured for WIPS scanning.
Local Mode with wIPS provides wIPS detection “on-channel”, which means attackers will be detected on the channel that is serving clients. For all other channels, ELM provides best effort wIPS detection. This means that every frame the radio would go “off-channel” for a short period of time. While “off-channel”, if an attack occurs while that channel is scanned, the attack will be detected. FRA radio in ELM client serving mode is still capable of serving clients.
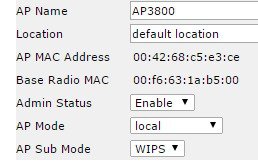

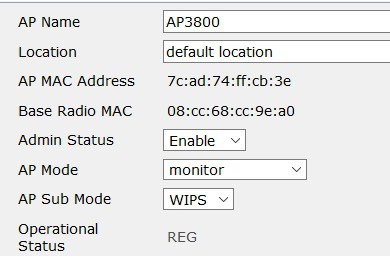
While ELM mode offers best effort scanning on radio slot 1 (5GHz), monitor mode on FRA radio provides dedicated wIPS detection “off-channel”, which means the access point will dwell on each channel for an extend period of time, this allows the AP to detect attacks on all channels. FRA radio in monitor mode is incapable of serving clients.

- AP in Monitor mode provides dedicated wIPS security scanning of all channels (2.4GHz and 5GHz) for over the air attacks.
A Summary - Comparison of WIPS threat detection in different deployment modes:
WIPS monitoring on 1800 AP Platform(1810, 1815, 1850, 1830)
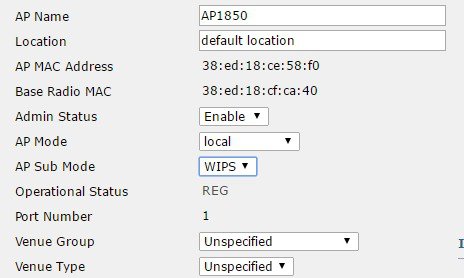
Similarly, 1800 Wave 2 Access Points including 1810, 1815, 1850 and 1830 can be deployed in a network for over the air scanning for wIPS attackers, CleanAir interferers, and rogue devices. The AP18xx series platform supports wips scanning in Local mode and Monitor Mode. Monitor mode support on the AP18xx series has been added in AireOS release 8.5.
ELM mode – Local AP mode with WIPS as Sub Mode
Local Mode with wIPS provides wIPS detection “on-channel”, which means attackers will be detected on the channel that is serving clients. For all other channels, ELM provides best effort wIPS detection. This means that every frame the radio would go “off-channel” for a short period of time. While “off-channel”, if an attack occurs while that channel is scanned, the attack will be detected. FRA radio in ELM client serving mode is still capable of serving clients.
Contact Cisco
- Open a Support Case

- (Requires a Cisco Service Contract)
 Feedback