Étapes de la réinstallation du contrôleur APIC via le serveur HTTP
Options de téléchargement
-
ePub (369.7 KB)
Consulter à l’aide de différentes applications sur iPhone, iPad, Android ou Windows Phone -
Mobi (Kindle) (267.6 KB)
Consulter sur un appareil Kindle ou à l’aide d’une application Kindle sur plusieurs appareils
Langage exempt de préjugés
Dans le cadre de la documentation associée à ce produit, nous nous efforçons d’utiliser un langage exempt de préjugés. Dans cet ensemble de documents, le langage exempt de discrimination renvoie à une langue qui exclut la discrimination en fonction de l’âge, des handicaps, du genre, de l’appartenance raciale de l’identité ethnique, de l’orientation sexuelle, de la situation socio-économique et de l’intersectionnalité. Des exceptions peuvent s’appliquer dans les documents si le langage est codé en dur dans les interfaces utilisateurs du produit logiciel, si le langage utilisé est basé sur la documentation RFP ou si le langage utilisé provient d’un produit tiers référencé. Découvrez comment Cisco utilise le langage inclusif.
À propos de cette traduction
Cisco a traduit ce document en traduction automatisée vérifiée par une personne dans le cadre d’un service mondial permettant à nos utilisateurs d’obtenir le contenu d’assistance dans leur propre langue. Il convient cependant de noter que même la meilleure traduction automatisée ne sera pas aussi précise que celle fournie par un traducteur professionnel.
Table des matières
Introduction
Ce document décrit comment réinstaller l'APIC avec l'aide du serveur HTTP.
Problème
En cas de panne d'un cluster APIC ou de migration matérielle de L2/M2 vers L4/M4, les périphériques APIC individuels peuvent nécessiter une nouvelle imagerie pour restaurer la fonctionnalité. Cette procédure décrit une approche rationalisée de la réinstallation des cartes APIC une par une à l'aide d'un serveur HTTP, ce qui permet une restauration plus rapide des clusters avec un minimum d'interruptions.
Répétez le processus séquentiellement pour chaque périphérique APIC nécessitant une nouvelle imagerie. Une fois que toutes les cartes APIC ont été recréées, restaurez la configuration du cluster si nécessaire et effectuez des tests approfondis pour valider leur fonctionnalité.
Cette procédure concise permet une récupération APIC efficace, permettant aux administrateurs de traiter rapidement les pannes de cluster et de restaurer efficacement les opérations réseau.
Conditions préalables
- CIMC doit être configuré avec une adresse IP OOB.
- Consultez les notes de version du contrôleur APIC et confirmez l'image du logiciel APIC que vous devez réinstaller.
- Obtenir une image logicielle à partir de software.cisco.com
- Vérifiez que la somme de contrôle MD5 de l'image correspond à celle publiée sur Cisco.com
- Téléchargez l'image APIC sur le serveur HTTP.
Solution
Pour recréer l'image du contrôleur APIC à l'aide d'un serveur HTTP, procédez comme suit.
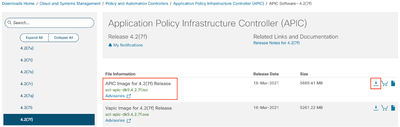
Étape 1.Vous devez d’abord télécharger le micrologiciel à partir du site Web de Cisco.
Ouvrez software.cisco.com/download.
Étape 2.Entrez APIC et sélectionnez la version appropriée pour ACI ici, Dans cette 4.2(7f) est sélectionné.
Exemple :
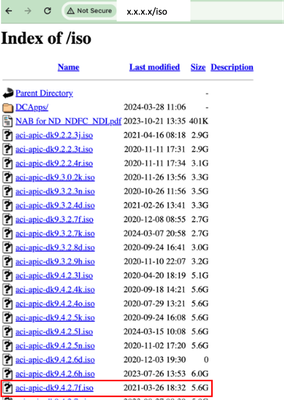
Étape 3. Copiez l'image .iso du logiciel APIC sur le serveur HTTP
Exemple : - http://x.x.x.x/iso/
Étape 4. SSH/console vers contrôleur de gestion intégré Cisco
-
À partir d’une fenêtre de terminal, connectez-vous à la console CIMC
# ssh admin@cimc_ip
Où cimc_ip est l'adresse IP CIMC. Exemple :
# ssh admin@x.x.x.x
admin@x.x.x.x's password:
system#
-
Modifiez l'étendue en Virtual Media :
system# scope vmedia
system /vmedia #
-
Mappez l'image .iso au serveur HTTP
system /vmedia # map-www volume_name http://http_server_ip_and_path iso_file_name
Where:
- nom_volume est le nom du volume.
- http_server_ip_and_path est l'adresse IP du serveur HTTP et le chemin vers l'emplacement du fichier .iso.
- iso_filename est le nom du fichier .iso.
Remarque : il y a un espace entre http_server_ip_and_path et iso_filename
Exemple :
system /vmedia # map-www apic http://x.x.x.x/iso/ aci-apic-dk9.4.2.7f.iso
Server username: admin
Server password:
Confirm password:
Remarque : /* Si aucune authentification n'est requise ici, appuyez simplement sur Entrée
-
Vérifiez l'état du mappage :
system /vmedia # show mappings detail
L'état de la carte doit être affiché comme OK.
Exemple :
system /vmedia # show mappings detail
Volume apic:
    Map-Status: OK
    Drive-Type: CD
    Remote-Share: http://x.x.x.x/iso/

    Remote-File: aci-apic-dk9.4.2.7f.iso
    Mount-Type: www
    Mount-Options: noauto,username=admin,password=********3
    system /vmedia #
-
Connectez-vous à SOL pour surveiller le processus d'installation :
system /vmedia # connect host
CISCO Serial Over LAN:
Press Ctrl+x to Exit the session
Étape 5. Mise hors tension puis sous tension à partir de la console KVM de l'interface graphique CIMC
Choisissez Power > Power Cycle System (démarrage à froid) pour mettre le contrôleur hors tension puis sous tension

Depuis la console SOL : regardez l'écran pendant le processus de démarrage et préparez-vous à appuyer sur F6 au moment approprié pour entrer dans le menu de sélection de démarrage.
Exemple :
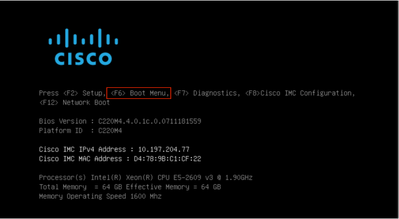
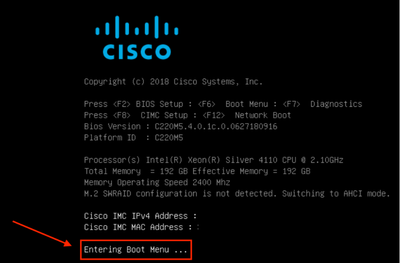
Après avoir appuyé sur F6
Remarque : si vous manquez l'occasion et que vous n'avez pas pu appuyer sur F6 au moment approprié, revenez à l'étape 5 pour mettre le contrôleur hors tension puis sous tension, puis répétez le processus jusqu'à ce que vous puissiez appuyer sur F6 pour accéder au menu de sélection du démarrage.
Vous pouvez également entrer le mot de passe du BIOS. Le mot de passe par défaut est password
Dans le menu de sélection du démarrage, sélectionnez l'option Cisco CIMC-Mapped vDVD1.22 comme périphérique de démarrage unique.

Étape 6. Revenez à l'interface de ligne de commande CIMC et surveillez le résultat de la commande « Connect Host ».
Surveillez l'interface de ligne de commande CIMC , lorsque vous recevez le message « To speed up the install, enter iso url in next ten minutes » puis entrez l'URL du serveur http avec l'image APIC.
++ grep /run/install/repo
++ cut -f 1 -d ' '
++ tr -d '[:digit:]'
+ usbdevice=/dev/sr
+ mkdir /mnt/usbdata
+ mount /dev/sr2 /mnt/usbdata
mount: special device /dev/sr2 does not exist
+ true
+ '[' -f /mnt/usbdata/ifabric.iso ']'
+ mountpoint -q /mnt/usbdata
+ true
+ echo 'INFO: found second partition on install media but did not find ifabric.iso. '
INFO: found second partition on install media but did not find ifabric.iso.
+ echo 'Continuing on to ISO URL prompt.'
Continuing on to ISO URL prompt.
+ '[' 0 -eq 0 ']'
+ read_iso_url
+ true,,
+ echo 'To speed up the install, enter iso url in next ten minutes: '      << Enter the http server URL with apic image  >>
To speed up the install, enter iso url in next ten minutes:
+ read -t 600 -p '? ' url
?
http://x.x.x.x/iso/aci-apic-dk9.4.2.7f.iso 5:program-log      << Enter the http server details  >>
[anaconda] 1:main* 2:shell  3:log  4:storage-lo> Switch tab: Alt+Tab | Help: F1
Remarque : il n'y a pas d'espace entre http_server_ip_and_path et iso_filename.
Étape 7 : Après avoir saisi l'URL HTTP , le processus de démarrage se poursuit.
Remarque : si vous choisissez l'option static, vous serez invité à saisir le nom de l'interface, l'adresse IP de gestion et la passerelle.
+ '[' 0 -eq 0 ']'
+ read_iso_url
+ true
+ echo 'To speed up the install, enter iso url in next ten minutes: '
To speed up the install, enter iso url in next ten minutes:
+ read -t 600 -p '? ' url
?
[ahttp://x.x.x.x/iso/aci-apic-dk9.4.2.7f.iso 5:program-log
++ awk -F '/|:' '{print $4}'
+ urlip=x.x.x.x
+ '[' -z http://x.x.x.x/iso/aci-apic-dk9.4.2.7f.iso ']'
+ '[' -z x.x.x.x ']'
+ break
+ '[' -n http://x.x.x.x/iso/aci-apic-dk9.4.2.7f.iso ']'
+ set +e
+ configured=0
+ '[' 0 -eq 0 ']'
+ echo 'Configuring network interface'
Configuring network interface
+ echo 'type static, dhcp, bash for a shell to configure networking, or url to re-enter the url: '
>>
<< Type static and configure the APIC OOB IP address with it’s gateway>>
type static, dhcp, bash for a shell to configure networking, or url to re-enter the url:
+ read -p '? ' ntype
? static.   << Enter the static  to configure the networking >>
[anaconda] 1:main* 2:shell  3:log  4:storage-lo> Switch tab: Alt+Tab | Help: F1
Remarque : après avoir tapé la commande static, elle répertorie l'interface CIMC, sélectionnez la bonne interface. Si vous avez sélectionné la mauvaise interface, la perte de paquets sera de 100 %, puis après trois tentatives infructueuses de ping , elle demandera à nouveau de sélectionner la bonne interface jusqu'à ce que la perte de paquets soit de 0 si vous ne connaissez pas l'interface, sélectionnez l'interface all un par un.
Exemple :
+ case $ntype in
+ configure_static
+ echo 'Available interfaces'
Available interfaces
+ ls -l /sys/class/net
total 0
lrwxrwxrwx. 1 root root 0 May  3 07:08 enp11s0 -> ../../devices/pci0000:00/0000:00:03.0/0000:06:00.0/0000:07:01.0/0000:09:00.0/0000:0a:00.0/0000:0b:00.0/net/enp11s0
lrwxrwxrwx. 1 root root 0 May  3 07:08 enp12s0 -> ../../devices/pci0000:00/0000:00:03.0/0000:06:00.0/0000:07:01.0/0000:09:00.0/0000:0a:01.0/0000:0c:00.0/net/enp12s0
lrwxrwxrwx. 1 root root 0 May  3 07:08 enp1s0f0 -> ../../devices/pci0000:00/0000:00:01.0/0000:01:00.0/net/enp1s0f0
lrwxrwxrwx. 1 root root 0 May  3 07:08 enp1s0f1 -> ../../devices/pci0000:00/0000:00:01.0/0000:01:00.1/net/enp1s0f1
lrwxrwxrwx. 1 root root 0 May  3 07:08 lo -> ../../devices/virtual/net/lo
+ read -p 'Interface to configure: ' interface
Interface to configure: enp1s0f0     <<  select the correct interface   >>
[anaconda] 1:main* 2:shell  3:log  4:storage-lo>
Étape 8 : vérification correcte de l'interface
Après avoir entré l'interface, il essaiera d'envoyer une requête ping au serveur http et si l'interface sélectionnée est correcte, alors la perte de paquets doit être de 0% et commencer à récupérer l'image à partir du serveur http.
Par exemple : Après avoir entré l'interface correcte avec une perte de paquets de 0 %.
+ read -p 'Interface to configure: ' interface
Interface to configure:  enp1s0f0
+ read -p 'address: ' addr
address: x.x.x.x/24
+ read -p 'gateway: ' gw
gateway: x.x.x.x
+ ip addr add x.x.x.x/24 dev enp1s0f0
+ ip link set enp1s0f0 up
+ ip route add default via x.x.x.x
++ seq 1 2
+ for count in '$(seq 1 2)'
+ ping -c 1 x.x.x.x
PING x.x.x.x (x.x.x.x) 56(84) bytes of data.
64 bytes from x.x.x.x: icmp_seq=1 ttl=64 time=55.0 ms
--- x.x.x.x ping statistics ---
1 packets transmitted, 1 received, 0% packet loss, time 0ms
rtt min/avg/max/mdev = 55.056/55.056/55.056/0.000 ms
+ configured=1
+ break
+ '[' 1 -eq 0 ']'
+ echo 'Fetching http://x.x.x.x/iso/aci-apic-dk9.4.2.7f.iso'

Fetching http://x.x.x.x/iso/aci-apic-dk9.4.2.7f.iso >> started fetching the apic image from HTTP server
+ wget -o /dev/null -O /tmp/cdrom.iso http://x.x.x.x/iso/aci-apic-dk9.4.2.7f.iso
Si vous avez sélectionné la mauvaise interface, la perte de paquets sera de 100 %, puis après trois tentatives infructueuses de ping, il demandera à nouveau de sélectionner la bonne interface.
Par exemple : Après avoir entré la mauvaise interface avec 100% de perte de paquets
+ read -p 'Interface to configure: ' interface
Interface to configure: enp11s0
+ read -p 'address: ' addr
address: x.x.x.x/24
+ read -p 'gateway: ' gw
gateway: x.x.x.x
+ ip addr add x.x.x.x/24 dev enp11s0
+ ip link set enp11s0 up
+ ip route add default via x.x.x.x
++ seq 1 2
+ for count in '$(seq 1 2)'
+ ping -c 1 x.x.x.x
PING x.x.x.x (x.x.x.x) 56(84) bytes of data.
From x.x.x.x icmp_seq=1 Destination Host Unreachable

--- x.x.x.x ping statistics ---
1 packets transmitted, 0 received, +1 errors, 100% packet loss, time 0ms

+ sleep 20
+ for count in '$(seq 1 2)'
+ ping -c 1 x.x.x.x
PING x.x.x.x (x.x.x.x) 56(84) bytes of data.
From x.x.x.x icmp_seq=1 Destination Host Unreachable

--- x.x.x.x ping statistics ---
1 packets transmitted, 0 received, +1 errors, 100% packet loss, time 0ms

+ sleep 20
+ '[' 0 -eq 0 ']'
+ echo 'Configuring network interface'
Configuring network interface
+ echo 'type static, dhcp, bash for a shell to configure networking, or url to re-enter the url: ' <<Asking again to select the interface after selecting the type i,e static >>
type static, dhcp, bash for a shell to configure networking, or url to re-enter the url:
+ read -p '? ' ntype
?
Continuez à surveiller l’interface de ligne de commande CIMC et attendez environ 40 à 50 min pour obtenir les informations suivantes sur l’interface de ligne de commande.
[anaconda] 1:main* 2:shell  3:log  4:storage-lo> Switch tab: Alt+Tab | Help: F1
[  OK  ] Started Show Plymouth Power Off Screen.
[  OK  ] Stopped Availability of block devices.
         Stopping Logout off all iSCSI sessions on shutdown...
         Stopping LVM2 metadata daemon...
[  OK  ] Stopped LVM2 metadata daemon.
[  OK  ] Stopped Logout off all iSCSI sessions on shutdown.
[  OK  ] Stopped target Network.
[  OK  ] Stopped Remount Root and Kernel File Systems.
         Stopping Remount Root and Kernel File Systems...
[  OK  ] Started Restore /run/initramfs.
[  OK  ] Reached target Shutdown.
dracut Warning: Killing all remaining processes
Powering off.
reboot: Power down
Étape 9 : Quittez SOL après la mise hors tension
Attendez que le message « poweroff » s’affiche dans la console SOL, puis quittez SOL en appuyant sur Ctrl et x (Ctrl+x) et reconnectez-vous à CIMC et modifiez à nouveau l’étendue.
(i) Change the scope to virtual media again:
system# scope vmedia
system /vmedia #
 (ii) Unmap the .iso image that you mapped in 2.c:
 system /vmedia # unmap volume_name
 At the Save mapping prompt, enter yes if you want to save the mapping or no if you do not want to save the mapping. For example:
 system /vmedia # unmap apic
 Save mapping? Enther 'yes' or 'no' to confirm (CTRL-C to cancel) → yes
 system /vmedia #
 (iii) Connect back to SOL again:
       system /vmedia #  connect host
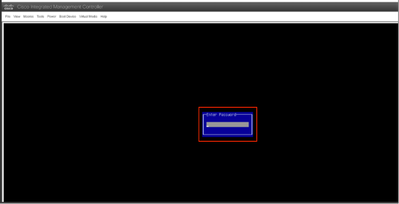
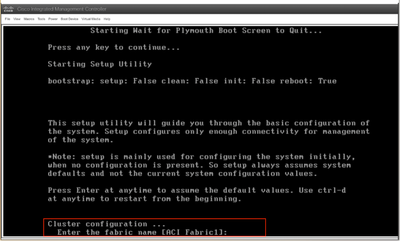
Étape 10 : Configuration initiale
À partir de la console KVM : sélectionnez Power > Power on System pour mettre le contrôleur sous tension et Lunch KVM , il vous demandera la configuration initiale du contrôleur APIC
Historique de révision
| Révision | Date de publication | Commentaires |
|---|---|---|
1.0 |
03-Jun-2024 |
Première publication |
Contribution d’experts de Cisco
- Shivam TripathiTAC
 Commentaires
Contacter Cisco
- Ouvrir un dossier d’assistance

- (Un contrat de service de Cisco est requis)