Configuration d'un VAP sur les WAP351, WAP131 et WAP371
Objectif
Les points d'accès virtuels (VAP) segmentent le réseau local sans fil en plusieurs domaines de diffusion qui sont l'équivalent sans fil des réseaux locaux virtuels Ethernet. Les VAP simulent plusieurs points d'accès dans un périphérique WAP physique. Jusqu'à quatre VAP sont pris en charge sur le Cisco WAP131 et jusqu'à huit VAP sont pris en charge sur les Cisco WAP351 et WAP371.
L'objectif de ce document est de vous montrer comment configurer un VAP sur les points d'accès WAP351, WAP131 et WAP371.
Périphériques pertinents
•WAP351
•WAP131
•WAP371
Version du logiciel
· V1.0.0.39 (WAP351)
· V1.0.0.39 (WAP131)
· V1.2.0.2 (WAP371)
Ajouter et configurer un VAP
Remarque : chaque VAP est identifié par un SSID (Service Set Identifier) configuré par l'utilisateur. Plusieurs VAP ne peuvent pas avoir le même nom SSID.
Remarque : pour que votre réseau sans fil fonctionne, la radio à laquelle votre VAP configuré est associé doit être activée et correctement configurée. Pour plus d'informations, consultez Configuration des paramètres radio de base sur le WAP131 et le WAP351 ou Configuration des paramètres radio de base sur le WAP371
Étape 1. Connectez-vous à l'utilitaire de configuration Web et accédez à Wireless > Networks. La page Réseaux s'affiche :

Étape 2. Dans le champ Radio, sélectionnez la case d'option pour la radio sans fil sur laquelle vous souhaitez configurer les VAP.

Étape 3. Pour ajouter un nouveau VAP, cliquez sur Add. Un nouveau VAP apparaît dans le tableau.

Remarque : le WAP131 prend en charge jusqu'à 4 VAP, tandis que le WAP371 et le WAP351 prennent en charge jusqu'à 8 VAP.
Étape 4. Pour commencer à modifier un VAP, cochez la case située à l'extrême gauche de l'entrée du tableau, puis cliquez sur Modifier. Cela vous permettra de modifier les champs grisés du VAP que vous avez sélectionné.

Étape 5. Pour activer l'utilisation du VAP, assurez-vous que la case Enable est cochée.
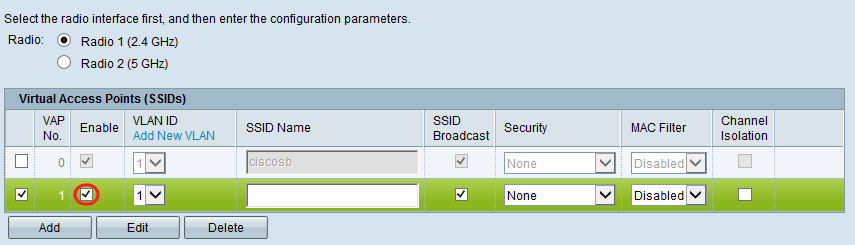
Étape 6. Dans le champ VLAN ID, spécifiez l'ID de VLAN que vous souhaitez associer au VAP. Si vous utilisez le WAP131 ou le WAP371, entrez l'ID de VLAN. La valeur maximale que vous pouvez entrer est 4094.

Remarque : l'ID de VLAN saisi doit exister sur votre réseau et être correctement configuré. Pour plus d'informations, consultez Configuration VLAN sur le point d'accès WAP351, Gestion des ID de VLAN balisés et non balisés sur WAP131, ou Gestion des ID de VLAN balisés et non balisés sur WAP371.
Étape 7. Saisissez le nom du réseau sans fil dans le champ SSID Name (Nom SSID). Chaque VAP doit avoir un nom SSID unique.

Étape 8. Si vous souhaitez que le nom SSID soit diffusé aux clients, cochez la case SSID Broadcast. Le nom SSID s’affiche alors pour les clients figurant sur leur liste de réseaux disponibles.

Configuration des paramètres de sécurité
Étape 1. Sélectionnez la méthode d'authentification requise pour la connexion au VAP dans la liste déroulante Security. Si une option autre que None est sélectionnée, des champs supplémentaires s'affichent.

Les options disponibles sont les suivantes :
•Aucune
•WEP statique
· WEP dynamique
· WPA personnel
· WPA Entreprise
Remarque : WPA Personal (WPA personnel) et WPA Enterprise (WPA entreprise) sont les types d'authentification privilégiés pour une sécurité maximale. Les protocoles WEP statique et WEP dynamique ne doivent être utilisés qu'avec des équipements hérités et nécessitent que la radio soit définie sur le mode 802.11a ou 802.11b/g pour être utilisée. Consultez Configuration des paramètres radio de base sur le WAP131 et le WAP351 ou Configuration des paramètres radio de base sur le WAP371 pour plus d'informations.
WEP statique
Le protocole WEP statique est la méthode d'authentification la moins sécurisée. Il chiffre les données du réseau sans fil en fonction d'une clé statique. Il est devenu facile d'obtenir cette clé statique de manière illégitime, de sorte que l'authentification WEP ne doit être utilisée que lorsque cela est nécessaire avec des périphériques hérités.
Remarque : lorsque vous sélectionnez Static WEP comme méthode de sécurité, une invite s'affiche et vous indique que votre choix de méthode de sécurité n'est pas sécurisé.
Étape 1. Dans la liste déroulante Transfer Key Index, sélectionnez l'index de la clé WEP dans la liste des clés ci-dessous que le périphérique utilisera pour chiffrer les données.

Étape 2. Sélectionnez une case d'option dans le champ Key Length pour spécifier si la clé a une longueur de 64 bits ou de 128 bits.

Étape 3. Dans le champ Type de clé, indiquez si vous souhaitez saisir les clés au format ASCII ou hexadécimal. Le format ASCII inclut toutes les lettres, tous les chiffres et tous les symboles présents sur le clavier, tandis que le format hexadécimal ne doit utiliser que des chiffres ou des lettres de A à F.

Étape 4. Dans le champ WEP Keys, saisissez jusqu'à 4 clés WEP différentes pour votre périphérique. Chaque client qui doit se connecter à ce réseau doit avoir une des mêmes clés WEP dans le même logement spécifié par le périphérique.

Étape 5. (Facultatif) Cliquez sur la case à cocher dans le champ Afficher la clé en tant que texte clair, si vous révélez les chaînes de caractères des clés.

Remarque : si vous utilisez un microprogramme différent sur le WAP351, le WAP131 ou le WAP371, le champ Show Key as Clear Text (Afficher la clé en texte clair) peut être manquant.
Étape 6. Dans le champ 802.1X Authentication, spécifiez l'algorithme d'authentification que vous souhaitez utiliser en choisissant les options Open System et/ou Shared Key. L’algorithme d’authentification définit la méthode utilisée pour déterminer si une station client est autorisée à s’associer au périphérique WAP lorsque le mode de sécurité est le mode WEP statique.

Les options disponibles sont définies comme suit :
· Système ouvert : l'authentification permet à toute station client de s'associer au périphérique WAP, que cette station client dispose ou non de la clé WEP correcte. Cet algorithme est utilisé en mode texte brut, IEEE 802.1X et WPA. Lorsque l'algorithme d'authentification est défini sur Open System, n'importe quel client peut s'associer au périphérique WAP.
· Shared Key : l'authentification nécessite que la station client dispose de la clé WEP correcte pour pouvoir s'associer au périphérique WAP. Lorsque l'algorithme d'authentification est défini sur Shared Key, une station avec une clé WEP incorrecte ne peut pas s'associer au périphérique WAP.
· Open System and Shared Key (Système ouvert et clé partagée) : lorsque vous avez sélectionné ces deux algorithmes d'authentification, les stations clientes configurées pour utiliser WEP en mode clé partagée doivent disposer d'une clé WEP valide pour pouvoir s'associer au périphérique WAP. En outre, les stations clientes configurées pour utiliser WEP en tant que système ouvert (mode de clé partagée non activé) peuvent s'associer au périphérique WAP même si elles ne disposent pas de la clé WEP correcte.
Étape 7. Cliquez sur Save.
WEP dynamique
Le protocole WEP dynamique fait référence à la combinaison de la technologie 802.1x et du protocole EAP (Extensible Authentication Protocol). Ce mode nécessite l'utilisation d'un serveur RADIUS externe pour authentifier les utilisateurs. Le périphérique WAP nécessite un serveur RADIUS qui prend en charge EAP, tel que Microsoft Internet Authentication Server. Pour fonctionner avec les clients Microsoft Windows, le serveur d'authentification doit prendre en charge les protocoles PEAP (Protected EAP) et MSCHAP v2. Vous pouvez utiliser l'une des nombreuses méthodes d'authentification prises en charge par le mode IEEE 802.1X, y compris les certificats, Kerberos et l'authentification par clé publique, mais vous devez configurer les stations clientes pour qu'elles utilisent la même méthode d'authentification que celle utilisée par le périphérique WAP.
Étape 1. Par défaut, l'option Use global RADIUS server settings est cochée. Désactivez cette case à cocher si vous souhaitez configurer le VAP pour qu'il utilise un ensemble différent de serveurs RADIUS. Sinon, passez à l'étape 8.

Étape 2. Dans le champ Server IP Address Type, sélectionnez le type d'adresse IP de serveur que votre périphérique WAP utilise. Les options sont IPv4 ou IPv6. IPv4 utilise des nombres binaires de 32 bits représentés en notation décimale à point. IPv6 utilise des nombres hexadécimaux et des deux-points pour représenter un nombre binaire de 128 bits. Le périphérique WAP contacte uniquement le ou les serveurs RADIUS pour le type d'adresse que vous avez sélectionné dans ce champ. Si vous choisissez IPv6, passez à l'étape 4.

Étape 3. Si vous avez sélectionné IPv4 à l'étape 2, entrez l'adresse IP du serveur RADIUS que tous les VAP utilisent par défaut. Passez ensuite à l'étape 5.
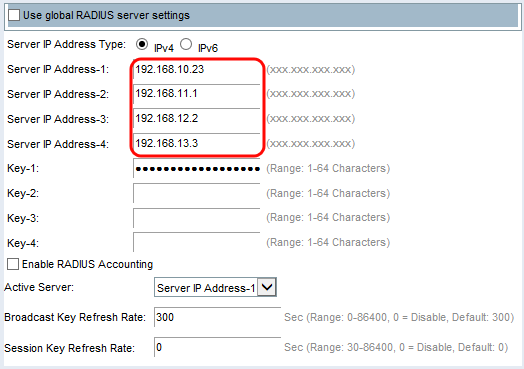
Remarque : vous pouvez avoir jusqu'à trois adresses de serveur RADIUS de sauvegarde IPv4. Si l'authentification échoue avec le serveur principal, chaque serveur de sauvegarde configuré est essayé dans l'ordre.
Étape 4. Si vous avez sélectionné IPv6 à l'étape 2, entrez l'adresse IPv6 du serveur RADIUS global principal.

Remarque : vous pouvez avoir jusqu'à trois adresses de serveur RADIUS de sauvegarde IPv6. Si l'authentification échoue avec le serveur principal, chaque serveur de sauvegarde configuré est essayé dans l'ordre.
Étape 5. Dans le champ Key-1, entrez la clé secrète partagée que le périphérique WAP utilise pour s'authentifier auprès du serveur RADIUS principal.

Étape 6. Dans les champs Key-2 to Key-4, entrez la clé RADIUS associée aux serveurs RADIUS de sauvegarde configurés. L'adresse IP du serveur 2 utilise Key-2, l'adresse IP du serveur 3 utilise Key-3 et l'adresse IP du serveur 4 utilise Key-4.

Étape 7. (Facultatif) Dans le champ Enable RADIUS Accounting, cochez la case si vous souhaitez activer le suivi et la mesure des ressources qu'un utilisateur particulier a consommées. L'activation de la gestion des comptes RADIUS permet de suivre l'heure système et la quantité de données transmises et reçues. Les informations seront stockées sur le serveur Radius. Cette option sera activée pour le serveur RADIUS principal et tous les serveurs de sauvegarde.

Remarque : si vous avez activé la comptabilité RADIUS, elle est activée pour le serveur RADIUS principal et tous les serveurs de sauvegarde
Étape 8. Sélectionnez le premier serveur actif dans le champ Serveur actif. Cela permet de sélectionner manuellement le serveur RADIUS actif, plutôt que de demander au périphérique WAP de tenter de contacter chaque serveur configuré dans l'ordre et de choisir le premier serveur actif.

Étape 9. Dans le champ Broadcast Key Refresh Rate, saisissez l'intervalle auquel la clé de diffusion (groupe) est actualisée pour les clients associés à ce VAP. 300 secondes sont établies par défaut.

Étape 10. Dans le champ Session Key Refresh Rate, saisissez l'intervalle auquel le périphérique WAP actualise la clé de session (monodiffusion) pour chaque client associé au VAP. 0 est établi par défaut.

WPA personnel
WPA Personal (WPA personnel) est une norme Wi-Fi Alliance IEEE 802.11i, qui inclut le cryptage AES-CCMP et TKIP. WPA utilise une clé prépartagée (PSK) au lieu d'utiliser IEEE 802.1X et EAP, comme c'est le cas en mode de sécurité WPA d'entreprise. La clé PSK est utilisée pour une vérification initiale des informations d'identification uniquement. WPA est également appelé WPA-PSK. Ce mode de sécurité est rétrocompatible pour les clients sans fil qui prennent en charge le WPA d'origine.
Étape 1. Dans le champ WPA Versions, cochez la case WPA-TKIP si vous voulez activer WPA-TKIP. Les protocoles WPA-TKIP et WPA2-AES peuvent être activés simultanément. Le WAP prend toujours en charge WPA2-AES, vous ne pourrez donc pas le configurer.

Les options disponibles sont définies comme suit :
· WPA-TKIP - Le réseau comporte des stations clientes qui prennent uniquement en charge le protocole de sécurité WPA et TKIP d'origine. Selon les dernières exigences de WiFi Alliance, il n'est pas recommandé de choisir uniquement WPA-TKIP.
· WPA2-AES : toutes les stations client du réseau prennent en charge les protocoles de chiffrement/sécurité WPA2 et AES-CCMP. Cette version WPA offre la meilleure sécurité selon la norme IEEE 802.11i. Selon les dernières exigences de la WiFi Alliance, le point d'accès doit prendre en charge ce mode tout le temps.
· WPA-TKIP et WPA2-AES - Si le réseau comporte plusieurs clients, dont certains prennent en charge WPA2 et d'autres uniquement le WPA d'origine, cochez les deux cases. Ce paramètre permet aux stations clientes WPA et WPA2 de s'associer et de s'authentifier, mais utilise le WPA2 plus robuste pour les clients qui le prennent en charge. Cette configuration WPA permet davantage d'interopérabilité au lieu d'une certaine sécurité.
Remarque : les clients WPA doivent disposer de l'une de ces clés (clé TKIP ou clé AES-CCMP valides) pour pouvoir s'associer au périphérique WAP.
Étape 2. Dans le champ Key, saisissez la clé secrète partagée pour la sécurité WPA Personal. Saisissez au moins 8 caractères et un maximum de 63 caractères.

Remarque : les caractères autorisés sont les lettres majuscules et minuscules, les chiffres et les symboles spéciaux (?!/\@#$%^&*).
Étape 3. (Facultatif) Cochez la case Show Key as Clear Text si vous souhaitez que le texte que vous tapez soit visible. Par défaut, cette case est décochée.

Remarque : si vous utilisez un microprogramme différent sur le WAP351, le WAP131 ou le WAP371, le champ Show Key as Clear Text (Afficher la clé en texte clair) peut être manquant.
Remarque : le champ Key Strength Meter (Indicateur de puissance de clé) permet au périphérique WAP de vérifier la clé par rapport à des critères de complexité tels que le nombre de types de caractères différents utilisés et la durée de la clé. Si la fonction de vérification de la complexité WPA-PSK est activée, la clé n'est pas acceptée sauf si elle répond aux critères minimaux. Pour plus d'informations sur la complexité WPA-PSK, référez-vous à Configuration de la complexité des mots de passe pour les WAP131, WAP351 et WAP371.

Étape 4. Dans le champ Broadcast Key Refresh Rate, saisissez l'intervalle auquel la clé de diffusion (groupe) est actualisée pour les clients associés à ce VAP. 300 secondes sont établies par défaut.

WPA entreprise
WPA Enterprise avec RADIUS est une mise en oeuvre de la norme Wi-Fi Alliance IEEE 802.11i, qui inclut le cryptage CCMP (AES) et TKIP. Le mode Entreprise nécessite l'utilisation d'un serveur RADIUS pour authentifier les utilisateurs. Le mode de sécurité est rétrocompatible avec les clients sans fil qui prennent en charge le WPA d'origine.
Remarque : le mode VLAN dynamique est activé par défaut, ce qui permet au serveur d'authentification RADIUS de décider quel VLAN est utilisé pour les stations.
Étape 1. Dans le champ WPA Versions, cochez la case pour les types de stations client à prendre en charge. Ils sont tous activés par défaut. Le point d'accès doit prendre en charge WPA2-AES en permanence afin que vous ne puissiez pas le configurer.

Les options disponibles sont définies comme suit :
· WPA-TKIP - Le réseau comporte des stations client qui prennent uniquement en charge le protocole de sécurité WPA et TKIP d'origine. Notez que la sélection de WPA-TKIP uniquement pour le point d'accès n'est pas autorisée conformément à la dernière exigence de WiFi Alliance.
· WPA2-AES : toutes les stations client du réseau prennent en charge la version WPA2 et le protocole de chiffrement/sécurité AES-CCMP. Cette version WPA offre la meilleure sécurité selon la norme IEEE 802.11i. Conformément à la dernière exigence de la Wi-Fi Alliance, le WAP doit prendre en charge ce mode tout le temps.
· Enable pre-authentication : si vous choisissez uniquement WPA2 ou WPA et WPA2 comme version WPA, vous pouvez activer la pré-authentification pour les clients WPA2. Cochez cette option si vous souhaitez que les clients sans fil WPA2 envoient les paquets de pré-authentification. Les informations de pré-authentification sont relayées depuis le périphérique WAP que le client utilise actuellement vers le périphérique WAP cible. L'activation de cette fonctionnalité peut aider à accélérer l'authentification des clients itinérants qui se connectent à plusieurs WAP. Cette option ne s'applique pas si vous avez sélectionné WPA pour les versions WPA car le WPA d'origine ne prend pas en charge cette fonctionnalité.
Remarque : les stations clientes configurées pour utiliser WPA avec RADIUS doivent avoir l'une des adresses et clés suivantes : une adresse IP TKIP RADIUS ou CCMP (AES) valide et une clé RADIUS.
Étape 2. Par défaut, l'option Use global RADIUS server settings est cochée. Désactivez cette case à cocher si vous souhaitez configurer le VAP pour qu'il utilise un ensemble différent de serveurs RADIUS. Sinon, passez à l'étape 9.

Étape 3. Dans le champ Server IP Address Type, sélectionnez le type d'adresse IP de serveur que votre périphérique WAP utilise. Les options sont IPv4 ou IPv6. IPv4 utilise des nombres binaires de 32 bits représentés en notation décimale à point. IPv6 utilise des nombres hexadécimaux et des deux-points pour représenter un nombre binaire de 128 bits. Le périphérique WAP contacte uniquement le ou les serveurs RADIUS pour le type d'adresse que vous avez sélectionné dans ce champ.

Étape 4. Si vous avez sélectionné IPv4 à l'étape 2, entrez l'adresse IP du serveur RADIUS que tous les VAP utilisent par défaut. Passez ensuite à l'étape 6.

Remarque : vous pouvez avoir jusqu'à trois adresses de serveur RADIUS de sauvegarde IPv4. Si l'authentification échoue avec le serveur principal, chaque serveur de sauvegarde configuré est essayé dans l'ordre.
Étape 5. Si vous avez sélectionné IPv6 à l'étape 2, entrez l'adresse IPv6 du serveur RADIUS global principal.

Remarque : vous pouvez avoir jusqu'à trois adresses de serveur RADIUS de sauvegarde IPv6. Si l'authentification échoue avec le serveur principal, chaque serveur de sauvegarde configuré est essayé dans l'ordre.
Étape 6. Dans le champ Key-1, saisissez la clé secrète partagée que le périphérique WAP utilise pour s'authentifier auprès du serveur RADIUS principal.

Étape 7. Dans les champs Key-2 to Key-4, entrez la clé RADIUS associée aux serveurs RADIUS de sauvegarde configurés. L'adresse IP du serveur 2 utilise Key-2, l'adresse IP du serveur 3 utilise Key-3 et l'adresse IP du serveur 4 utilise Key-4.

Étape 8. (Facultatif) Dans le champ Enable RADIUS Accounting, cochez la case si vous souhaitez activer le suivi et la mesure des ressources qu’un utilisateur particulier a consommées. L'activation de la comptabilité RADIUS vous permet de suivre l'heure système d'un utilisateur particulier et la quantité de données transmises et reçues.

Remarque : si vous avez activé la comptabilité RADIUS, elle est activée pour le serveur RADIUS principal et tous les serveurs de sauvegarde.
Étape 9. Sélectionnez le premier serveur actif dans le champ Serveur actif. Cela permet de sélectionner manuellement le serveur RADIUS actif, plutôt que de demander au périphérique WAP de tenter de contacter chaque serveur configuré dans l'ordre.

Étape 10. Dans le champ Broadcast Key Refresh Rate, saisissez l'intervalle auquel la clé de diffusion (groupe) est actualisée pour les clients associés à ce VAP. 300 secondes sont établies par défaut.

Étape 11. Dans le champ Session Key Refresh Rate, saisissez l'intervalle auquel le périphérique WAP actualise les clés de session (monodiffusion) pour chaque client associé au VAP. 0 est établi par défaut.

Filtre MAC
Le filtre MAC indique si les stations qui peuvent accéder à ce VAP sont limitées à une liste globale configurée d'adresses MAC.
Étape 1. Dans la liste déroulante MAC Filter, sélectionnez le type de filtrage MAC souhaité.

Les options disponibles sont définies comme suit :
· Disabled : n'utilise pas le filtrage MAC.
· Local : utilise la liste d'authentification MAC que vous configurez dans la section MAC Filtering. Pour en savoir plus sur le filtrage MAC, reportez-vous à la section How to configure MAC Filtering on the WAP351 and WAP131.
· RADIUS : utilise la liste d'authentification MAC sur un serveur RADIUS externe.
Isolement des canaux
Lorsque l'isolation de canal est désactivée, les clients sans fil peuvent normalement communiquer entre eux en envoyant du trafic via le périphérique WAP. Lorsqu'il est activé, le périphérique WAP bloque la communication entre les clients sans fil sur le même VAP. Le périphérique WAP autorise toujours le trafic de données entre ses clients sans fil et les périphériques câblés sur le réseau, via une liaison WDS, et avec d'autres clients sans fil associés à un autre VAP, mais pas entre les clients sans fil.
Étape 1. Dans le champ Channel Isolation, cochez la case si vous voulez activer Channel Isolation.

Étape 2. Cliquez sur Save.
Remarque : une fois les nouveaux paramètres enregistrés, les processus correspondants peuvent être arrêtés et redémarrés. Lorsque cette situation se produit, le périphérique WAP peut perdre la connectivité. Nous vous recommandons de modifier les paramètres du périphérique WAP lorsqu'une perte de connectivité affectera le moins vos clients sans fil.
Dirigeant De Bande
Band Steer est uniquement disponible sur le WAP371. Band Steer utilise efficacement la bande 5 GHz en orientant les clients supportés bibande de la bande 2,4 GHz vers la bande 5 GHz. Cela libère la bande 2,4 GHz pour une utilisation par les périphériques hérités qui n'ont pas la double prise en charge radio.
Remarque : les radios 5 GHz et 2,4 GHz doivent être activées pour utiliser le mode d'orientation de bande. Pour plus d'informations sur l'activation des radios, consultez Comment configurer les paramètres radio de base sur le WAP371.
Étape 1. Le sélecteur de bande est configuré par VAP et doit être activé sur les deux radios. Si vous souhaitez activer le sélecteur de bande, cochez la case correspondante dans le champ Sélecteur de bande.

Remarque : le mode de gestion de bande n'est pas recommandé sur les VAP dont le trafic voix ou vidéo est sensible au temps. Même si la radio 5 GHz utilise moins de bande passante, elle tente d'orienter les clients vers cette radio.
Étape 2. Cliquez sur Save.
Suppression d’un VAP
Étape 1. Cochez la case du VAP que vous souhaitez supprimer.

Étape 2. Cliquez sur Delete pour supprimer le VAP.

Étape 3. Cliquez sur Enregistrer pour enregistrer définitivement votre suppression.

Historique de révision
| Révision | Date de publication | Commentaires |
|---|---|---|
1.0 |
11-Dec-2018 |
Première publication |
 Commentaires