Introduzione
In questo documento viene descritta la guida all'installazione di Cisco ISR-WAAS su Cisco Integrated Services Router (ISR). Si tratta dell'implementazione di virtual Wide Area Application Services (vWAAS) su un Cisco ISR.
ISR-WAAS è implementato all'interno di un contenitore IOS-XE. In questo contesto, per contenitore si intende l'hypervisor che esegue applicazioni virtualizzate su un router Cisco ISR serie 4000.
Prerequisiti per l'installazione di ISR-WAAS
Ogni versione del software WAAS può avere requisiti di risorse diversi (memoria, CPU e unità a stato solido (SSD) ). Se non si soddisfano tali requisiti, possono verificarsi problemi di prestazioni o addirittura errori durante l'installazione.
Consultare la guida alla configurazione al seguente collegamento:
https://www.cisco.com/c/en/us/support/routers/virtual-wide-area-application-services-vwaas/products-installation-and-configuration-guides-list.html
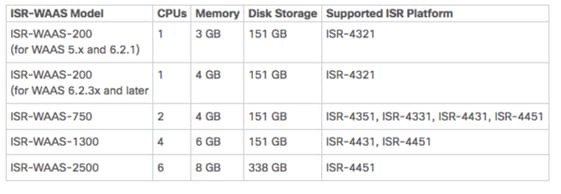
In questa tabella vengono riepilogati i requisiti delle risorse e le piattaforme ISR supportate per ogni modello ISR.

Differenza tra NIM-SSD e ISR-SSD
NIM-SSD
NIM-SSD è l'unità esterna all'RCI e sostituibile a caldo.

Questo è un modulo che viene installato in uno dei moduli NIM (Network Interface Module) disponibili dei router ISR.
Questi sono identificatori di prodotto (PID) per NIM-SSD e SSD che possono essere utilizzati per aumentare la RMA:
NIM-SSD(=)NIM Carrier Card for SSD drives
SSD-SATA-200G(=)200 GB, SATA Solid State Disk for NIM-SSD
Per rimuovere NIM-SSD o NIM-HDD dal router, attenersi alla seguente procedura:
Passaggio 1. Utilizzare un cacciavite Phillips per allentare le viti di fissaggio su entrambi i lati, come mostrato nella seguente immagine:

Passaggio 2. Rimuovere NIM-SSD o NIM-HDD dal router, come mostrato nell'immagine:

ISR-SSD
ISR-SSD invece è installato all'interno dello chassis del router, è necessario spegnere il router, aprire il coperchio per individuare l'ISR-SSD.
ISR-SSD non è sostituibile a caldo.
Questo è il PID per ISR-SSD sulla serie ISR 4300 che può essere utilizzato per aumentare la RMA:
SSD-MSATA-200G(=)200 GB, mSATA Solid State Disk
Nell'immagine sono illustrate le posizioni della scheda di memoria flash e dei dispositivi di storage SSD mSATA:

Installazione ISR-WAAS
Una volta soddisfatti tutti i requisiti per l'installazione di ISR-WAAS, il passaggio successivo consiste nel scaricare un file OAV (Open Virtualization Appliance) della versione ISR-WAAS che si intende installare. È possibile scaricare il software da questo link:
https://software.cisco.com/download/home/280484571/type/280836712
Una volta scaricato il software, è necessario trasferire il file nella memoria bootflash del router:

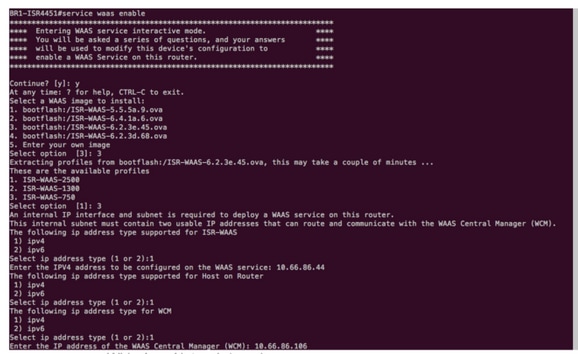
Dalla CLI del router, attenersi alla seguente procedura per distribuire ISR-WAAS e utilizzare il programma EZConfig:
- Eseguire il comando Service WAAS enable.
- Selezionare l'immagine .ova trasferita in precedenza per la versione WAAS da distribuire.
- Selezionare il profilo WAAS da distribuire.
- Configurare l'indirizzo IP ISR-WAAS.
- Configurare l'indirizzo IP di WAAS Central Manager.

- Selezionare l'interfaccia WAN (Wide Area Network) sul router in cui si desidera abilitare l'intercettazione WAAS.
- Al termine, salvare la configurazione. L'immagine mostra l'installazione completata.

Risoluzione dei problemi di ISR-WAAS
Scenario di errore di installazione WAAS
L'installazione di ISR-WAAS non riesce se non è presente un'unità SSD. Verificare innanzitutto se l'unità SSD è presente.

Scenario di errore dell'attivazione ISR-WAAS
In alcuni scenari, l'attivazione di ISR-WAAS non riuscirà dopo la sostituzione del router e l'installazione dell'SSD nel nuovo chassis.
Questi errori possono essere rilevati sul router ISR:
09/16 11:44:08.946 [vman]: [31298]: (note): VM (AUTOWAAS) State Transition: next_state: LIFECYCLE_DEACTIVATE

09/16 11:44:17.613 [vman]: [31298]: (ERR): Loading of machine definition (/vol/harddisk/virtual-instance/AUTOWAAS/ISR4331X.xml) failed

09/16 11:44:17.613 [vman]: [31298]: (ERR): Failed to load machine definition

09/16 11:44:17.613 [vman]: [31298]: (note): Setting failure response (1)

09/16 11:44:17.613 [vman]: [31298]: (ERR): Virtual Service failure log[AUTOWAAS]::Validation::Package validation::Failed to process package-def file::File '/vol/harddisk/virtual-instance/AUTOWAAS/ISR4331X.xml'

09/16 11:44:17.613 [errmsg]: [31298]: (ERR): %VMAN-3-PROCESS_PKG_DEF: Virtual Service[AUTOWAAS]::Validation::Package validation::Failed to process package-def file::File '/vol/harddisk/virtual-instance/AUTOWAAS/ISR4331X.xml'

09/16 11:44:17.613 [vman]: [31298]: (note): VM (AUTOWAAS) State Transition: next_state: LIFECYCLE_WAIT_ACTIVATE

09/16 11:44:17.613 [vman]: [31298]: (note): IF MTU message received:

09/16 11:44:17.613 [vman]: [31298]: (ERR): Invalid bridge ID or the bridge(31) has not been created yet

09/16 11:44:17.614 [vman]: [31298]: (ERR): Failed to set DP IF mtu for DP bridge 31

09/16 11:44:17.614 [vman]: [31298]: (note): vman IF MTU message processed

09/16 11:44:24.725 [vman]: [31298]: (note): Get local RP location rp/0/0

09/16 11:44:27.758 [vman]: [31298]: (note): Get local RP location rp/0/0

09/16 11:44:27.759 [vman]: [31298]: (note): Get local RP location rp/0/0

09/16 11:44:27.772 [vman]: [31298]: (note): Get local RP location rp/0/0

09/16 11:44:27.779 [vman]: [31298]: (note): Get local RP location rp/0/0

09/16 11:44:27.779 [vman]: [31298]: (note): Successfully removed VM init ctx for VM [AUTOWAAS]

09/16 11:44:27.780 [vman]: [31298]: (note): Per-VM message marshalled successfully into persistent DB

09/16 11:44:27.780 [vman]: [31298]: (note): Successfully reset per-VM mac address binding into TDL msg

09/16 11:44:28.063 [vman]: [31298]: (ERR): vman_libvirt_err: code=1

09/16 11:44:28.063 [vman]: [31298]: (ERR): internal error '/usr/sbin/lvremove -f /dev/lvm_raid/vdc.AUTOWAAS' exited with non-zero status 5 and signal 0:   /dev/harddisk1: read failed after 0 of 4096 at 21474770944: Input/output error

  /dev/harddisk1: read failed after 0 of 4096 at 21474828288: Input/output error

  /dev/harddisk1: read failed after 0 of 4096 at 0: Input/output error

  /dev/harddisk1: read failed after 0 of 4096 at 4096: Input/output error

  /dev/dm-1: read failed after 0 of 4096 at 4429119488: Input/output error

  /dev/dm-1: read failed after 0 of 4096 at 4429176832: Input/output error

  /dev/dm-1: read failed after 0 of 4096 at 0: Input/output error

  /dev/dm-1: read failed after 0 of 4096 at 4096: Input/output error

  /dev/dm-2: read failed after 0 of 4096 at 11072897024: Input/output error

  /dev/dm-2: read failed after 0 of 4096 at 11072954368: Input/output error

  /dev/dm-2: read failed after 0 of 4096 at 0: Input/output error

  /dev/dm-2: read failed after 0 of 4096 at 4096: Input/output error

  /dev/dm-3: read failed after 0 of 4096 at 1630

09/16 11:44:28.063 [vman]: [31298]: (ERR): Failed to delete volume vdc.AUTOWAAS in pool virt_strg_pool_vg

09/16 11:44:28.241 [vman]: [31298]: (ERR): vman_libvirt_err: code=1

09/16 11:44:28.241 [vman]: [31298]: (ERR): internal error '/usr/sbin/lvremove -f /dev/lvm_raid/vdb.AUTOWAAS' exited with non-zero status 5 and signal 0:   /dev/harddisk1: read failed after 0 of 4096 at 0: Input/output error

  /dev/dm-1: read failed after 0 of 4096 at 0: Input/output error

  /dev/dm-2: read failed after 0 of 4096 at 0: Input/output error

  /dev/dm-3: read failed after 0 of 4096 at 0: Input/output error

  /dev/harddisk1: read failed after 0 of 4096 at 21474770944: Input/output error

  /dev/harddisk1: read failed after 0 of 4096 at 21474828288: Input/output error

  /dev/harddisk1: read failed after 0 of 4096 at 4096: Input/output error

  /dev/dm-1: read failed after 0 of 4096 at 4429119488: Input/output error

  /dev/dm-1: read failed after 0 of 4096 at 4429176832: Input/output error

  /dev/dm-1: read failed after 0 of 4096 at 4096: Input/output error

  /dev/dm-2: read failed after 0 of 4096 at 11072897024: Input/output error

  /dev/dm-2: read failed after 0 of 4096 at 11072954368: Input/output error

  /dev/dm-2: read failed after 0 of 4096 at 4096: I

09/16 11:44:28.241 [vman]: [31298]: (ERR): Failed to delete volume vdb.AUTOWAAS in pool virt_strg_pool_vg

09/16 11:44:28.418 [vman]: [31298]: (ERR): vman_libvirt_err: code=1

09/16 11:44:28.418 [vman]: [31298]: (ERR): internal error '/usr/sbin/lvremove -f /dev/lvm_raid/vda.AUTOWAAS' exited with non-zero status 5 and signal 0:   /dev/harddisk1: read failed after 0 of 4096 at 0: Input/output error

  /dev/dm-1: read failed after 0 of 4096 at 0: Input/output error

  /dev/dm-2: read failed after 0 of 4096 at 0: Input/output error

  /dev/dm-3: read failed after 0 of 4096 at 0: Input/output error

  /dev/harddisk1: read failed after 0 of 4096 at 21474770944: Input/output error

  /dev/harddisk1: read failed after 0 of 4096 at 21474828288: Input/output error

  /dev/harddisk1: read failed after 0 of 4096 at 4096: Input/output error

  /dev/dm-1: read failed after 0 of 4096 at 4429119488: Input/output error

  /dev/dm-1: read failed after 0 of 4096 at 4429176832: Input/output error

  /dev/dm-1: read failed after 0 of 4096 at 4096: Input/output error

  /dev/dm-2: read failed after 0 of 4096 at 11072897024: Input/output error

  /dev/dm-2: read failed after 0 of 4096 at 11072954368: Input/output error

  /dev/dm-2: read failed after 0 of 4096 at 4096: I

09/16 11:44:28.418 [vman]: [31298]: (ERR): Failed to delete volume vda.AUTOWAAS in pool virt_strg_pool_vg

09/16 11:44:28.420 [vman]: [31298]: (note): Found orphaned volume(vda.AUTOWAAS) in pool(virt_strg_pool_vg). Deleting...
È possibile che l'hard disk sia danneggiato e che vengano intraprese le seguenti azioni:
# show platform hardware subslot <ssd subslot> module device filesystem

# request platform hardware filesystem harddisk: destroy

# hw-module subslot 0/5 reload
Scenario di errore SSD
In alcuni casi, se l'unità SSD è guasta mentre si eseguono comandi relativi al disco rigido e al file system, si verificano questi errori.
 “request platform hardware filesystem harddisk: destroy”
  %This operation can take some time, please be patient
   %Harddisk not present. Destroy filesystem aborted.
Per risolvere il problema, provare a eseguire la procedura seguente:
Passaggio 1. Provare a ricollocare l'SSD.
Passaggio 2. Riavviare il router.
Passaggio 3. Se questi passaggi non sono riusciti, è sufficiente eseguire l'autorizzazione al reso (RMA) per l'unità SSD.


 Feedback