Come cercare un OID specifico sulle piattaforme FXOS
Opzioni per il download
Linguaggio senza pregiudizi
La documentazione per questo prodotto è stata redatta cercando di utilizzare un linguaggio senza pregiudizi. Ai fini di questa documentazione, per linguaggio senza di pregiudizi si intende un linguaggio che non implica discriminazioni basate su età, disabilità, genere, identità razziale, identità etnica, orientamento sessuale, status socioeconomico e intersezionalità. Le eventuali eccezioni possono dipendere dal linguaggio codificato nelle interfacce utente del software del prodotto, dal linguaggio utilizzato nella documentazione RFP o dal linguaggio utilizzato in prodotti di terze parti a cui si fa riferimento. Scopri di più sul modo in cui Cisco utilizza il linguaggio inclusivo.
Informazioni su questa traduzione
Cisco ha tradotto questo documento utilizzando una combinazione di tecnologie automatiche e umane per offrire ai nostri utenti in tutto il mondo contenuti di supporto nella propria lingua. Si noti che anche la migliore traduzione automatica non sarà mai accurata come quella fornita da un traduttore professionista. Cisco Systems, Inc. non si assume alcuna responsabilità per l’accuratezza di queste traduzioni e consiglia di consultare sempre il documento originale in inglese (disponibile al link fornito).
Introduzione
Questo documento descrive i passaggi necessari per cercare gli OID (Simple Network Management Protocol) appropriati per una piattaforma Firepower eXtensible Operative System (FXOS), come i modelli 2100, 4100 e 9300.
Prerequisiti
Requisiti
Cisco raccomanda la conoscenza dei seguenti argomenti:
- Cisco Firepower FXOS
- protocollo SNMP
Componenti usati
Le informazioni di questo documento si basano sulle seguenti versioni hardware/software:
- Firepower 2100, 4100 e 9300
- FXOS versione 2.1, 2.2 e 2.3
Procedura
Passaggio 1. Passare al collegamento seguente per identificare il componente del dispositivo che si desidera monitorare.
Passaggio 2. Identificare il nome MIB (Management Information Base) dalla parte desiderata.

Passaggio 3. Scaricare il file MIB da software.cisco.com per la versione di FXOS installata.

Passaggio 4. Decomprimere il file zip MIB e aprire la cartella con il file MIB decompresso.
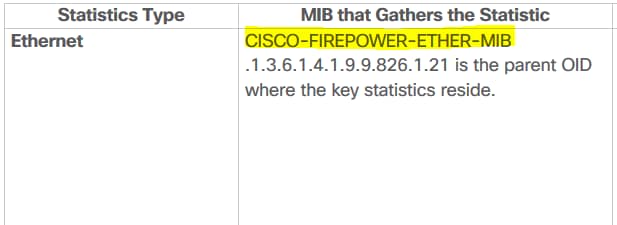
Passaggio 5. Cercare il file MIB. Nell'esempio, "CISCO-FIREPOWER-ETHER-MIB" è il MIB cercato.
Passaggio 6. Aprire il file con un editor di testo.
Una volta aperto il file, cercare la tabella specifica.

Passaggio 7. Cercare la tabella desiderata nel file MIB per ottenere l'OID finale.
Generazione dell'OID
Passaggio 1. Il numero MIB è l'identificatore padre del tipo di statistica da sottoporre a polling.

Passaggio 2. Sul file MIB aperto, cercare la stessa tabella nella procedura passo 6 sezione e annotare i primi 2 numeri:
cfprEtherPauseStatsTable OBJECT-TYPE <-------------------------------------------------------- Table we are looking
    SYNTAX           SEQUENCE OF CfprEtherPauseStatsEntry
    MAX-ACCESS       not-accessible
    STATUS           current
    DESCRIPTION
        "Cisco Firepower ether:PauseStats managed object table"
    ::= { cfprEtherObjects 14 } <------------------------------------------------------------- First number to be added

cfprEtherPauseStatsEntry OBJECT-TYPE
    SYNTAX           CfprEtherPauseStatsEntry
    MAX-ACCESS       not-accessible
    STATUS           current
    DESCRIPTION
        "Entry for the cfprEtherPauseStatsTable table."
    INDEX { cfprEtherPauseStatsInstanceId }
    ::= { cfprEtherPauseStatsTable 1 } <------------------------------------------------------ Second number to be added
Questi due numeri seguono l'OID padre estratto nel passaggio 1.
Passaggio 3. Nell'elenco seguente viene indicato l'ultimo numero per il completamento di OID.
CfprEtherPauseStatsEntry ::= SEQUENCE {
    cfprEtherPauseStatsInstanceId                                    CfprManagedObjectId,
    cfprEtherPauseStatsDn                                            CfprManagedObjectDn,
    cfprEtherPauseStatsRn                                            SnmpAdminString,
    cfprEtherPauseStatsIntervals                                     Gauge32,
    cfprEtherPauseStatsRecvPause                                     Unsigned64,
    cfprEtherPauseStatsRecvPauseDelta                                Counter64,
    cfprEtherPauseStatsRecvPauseDeltaAvg                             Unsigned64,
    cfprEtherPauseStatsRecvPauseDeltaMax                             Unsigned64,
    cfprEtherPauseStatsRecvPauseDeltaMin                             Unsigned64,
    cfprEtherPauseStatsResets                                        Unsigned64,
    cfprEtherPauseStatsResetsDelta                                   Counter64,
    cfprEtherPauseStatsResetsDeltaAvg                                Unsigned64,
    cfprEtherPauseStatsResetsDeltaMax                                Unsigned64,
    cfprEtherPauseStatsResetsDeltaMin                                Unsigned64,
    cfprEtherPauseStatsSuspect                                       TruthValue,
    cfprEtherPauseStatsThresholded                                   CfprEtherPauseStatsThresholded,
    cfprEtherPauseStatsTimeCollected                                 DateAndTime,
    cfprEtherPauseStatsUpdate                                        Gauge32,
    cfprEtherPauseStatsXmitPause                                     Unsigned64,
    cfprEtherPauseStatsXmitPauseDelta                                Counter64,
    cfprEtherPauseStatsXmitPauseDeltaAvg                             Unsigned64,
    cfprEtherPauseStatsXmitPauseDeltaMax                             Unsigned64,
    cfprEtherPauseStatsXmitPauseDeltaMin                             Unsigned64
}
Passaggio 4. Cercare il valore che si desidera monitorare. es. "cfprEtherPauseStatsResetsDeltaAvg"
cfprEtherPauseStatsResetsDeltaAvg OBJECT-TYPE
    SYNTAX       Unsigned64
    MAX-ACCESS   read-only
    STATUS       current
    DESCRIPTION
        "Cisco Firepower ether:PauseStats:resetsDeltaAvg
        managed object property"
    ::= { cfprEtherPauseStatsEntry 12 } <------------------------------------------------------ Last number to be added
Passaggio 5. Riunire tutti i numeri a partire dal MIB padre.
1.3.6.1.4.1.9.9.826.1.21.14.1.12
[6] Verificare con un percorso SNMP per raccogliere l'OID finale
root@NCRUZZAV-V18T1:~# snmpwalk -v 2c 10.88.243.250 -c cisco 1.3.6.1.4.1.9.9.826.1.21.14.1.12
iso.3.6.1.4.1.9.9.826.1.21.14.1.12.1091814 = Counter64: 0
iso.3.6.1.4.1.9.9.826.1.21.14.1.12.1091819 = Counter64: 0
iso.3.6.1.4.1.9.9.826.1.21.14.1.12.1091824 = Counter64: 0
iso.3.6.1.4.1.9.9.826.1.21.14.1.12.1091829 = Counter64: 0
iso.3.6.1.4.1.9.9.826.1.21.14.1.12.1091834 = Counter64: 0
iso.3.6.1.4.1.9.9.826.1.21.14.1.12.1091839 = Counter64: 0
iso.3.6.1.4.1.9.9.826.1.21.14.1.12.1091844 = Counter64: 0
iso.3.6.1.4.1.9.9.826.1.21.14.1.12.1091849 = Counter64: 0
iso.3.6.1.4.1.9.9.826.1.21.14.1.12.1091854 = Counter64: 0
iso.3.6.1.4.1.9.9.826.1.21.14.1.12.1091859 = Counter64: 0
iso.3.6.1.4.1.9.9.826.1.21.14.1.12.1091864 = Counter64: 0
iso.3.6.1.4.1.9.9.826.1.21.14.1.12.1091869 = Counter64: 0
iso.3.6.1.4.1.9.9.826.1.21.14.1.12.1091874 = Counter64: 0
iso.3.6.1.4.1.9.9.826.1.21.14.1.12.1091879 = Counter64: 0
iso.3.6.1.4.1.9.9.826.1.21.14.1.12.1091884 = Counter64: 0
iso.3.6.1.4.1.9.9.826.1.21.14.1.12.1091889 = Counter64: 0
iso.3.6.1.4.1.9.9.826.1.21.14.1.12.1091894 = Counter64: 0
root@NCRUZZAV-V18T1:~#
Nell'output viene visualizzato 1 OID per ogni parte selezionata nella tabella. Nell'esempio, la tabella selezionata contiene 1 OID per ciascuna interfaccia e visualizza le statistiche di tutte le interfacce dispositivo.
Contributo dei tecnici Cisco
- Created by Neri CruzTecnico di consulenza Cisco
- Edited by Cesar Lopez ZamarripaTecnico di consulenza Cisco
 Feedback