Converti in contenitore (modalità MI) in Firepower 4200 con FTD 7.6
Opzioni per il download
Linguaggio senza pregiudizi
La documentazione per questo prodotto è stata redatta cercando di utilizzare un linguaggio senza pregiudizi. Ai fini di questa documentazione, per linguaggio senza di pregiudizi si intende un linguaggio che non implica discriminazioni basate su età, disabilità, genere, identità razziale, identità etnica, orientamento sessuale, status socioeconomico e intersezionalità. Le eventuali eccezioni possono dipendere dal linguaggio codificato nelle interfacce utente del software del prodotto, dal linguaggio utilizzato nella documentazione RFP o dal linguaggio utilizzato in prodotti di terze parti a cui si fa riferimento. Scopri di più sul modo in cui Cisco utilizza il linguaggio inclusivo.
Informazioni su questa traduzione
Cisco ha tradotto questo documento utilizzando una combinazione di tecnologie automatiche e umane per offrire ai nostri utenti in tutto il mondo contenuti di supporto nella propria lingua. Si noti che anche la migliore traduzione automatica non sarà mai accurata come quella fornita da un traduttore professionista. Cisco Systems, Inc. non si assume alcuna responsabilità per l’accuratezza di queste traduzioni e consiglia di consultare sempre il documento originale in inglese (disponibile al link fornito).
Sommario
Introduzione
Questo documento descrive come configurare un contenitore (modalità a più istanze) nella serie Firepower 4200 Firewall con FTD 7.6 e i dettagli correlati.
Prerequisiti, Piattaforme supportate, Licenze
Piattaforme software e hardware minime


Nota: Multi-Instance non è supportato con FDM su nessuna piattaforma.
Licenze
- Le licenze per le funzionalità vengono assegnate manualmente a ciascuna istanza, ma si utilizza solo una licenza per ciascuna funzionalità per ciascun dispositivo serie 4200.
- Ad esempio, per una serie 4200 con 3 istanze FTD, è necessaria una sola licenza URL, indipendentemente dal numero di istanze in uso, a condizione che ci si trovi sullo stesso FMC.
- Tutte le licenze vengono utilizzate per ciascun dispositivo serie 4200 e non per singola istanza del contenitore, a condizione che si trovino sullo stesso FMC. Pertanto, per tutte le istanze su dispositivi serie 4200, si consiglia di utilizzare lo stesso FMC a causa dell'implementazione della licenza.
Componenti usati
Il documento può essere consultato per tutte le versioni software o hardware.
Le informazioni discusse in questo documento fanno riferimento a dispositivi usati in uno specifico ambiente di emulazione. Su tutti i dispositivi menzionati nel documento la configurazione è stata ripristinata ai valori predefiniti. Se la rete è operativa, valutare attentamente eventuali conseguenze derivanti dall'uso dei comandi.
Premesse
- FTD supporta già Multi-Instance (MI) sui modelli 3100 (nonché sulle serie 9300 e 4100), ma non è supportato per la serie 4200.
- I modelli 4200 sono supportati solo in modalità nativa in FMC.
- Non è possibile creare istanze multiple in 7.4.x in 4200.
- Multi-Instance (MI) su 3100 è supportata a partire dalla versione 7.4.1.
- Le istanze possono essere create e gestite utilizzando FMC (a differenza delle serie 9300 e 4100, in cui è necessario utilizzare FCM).
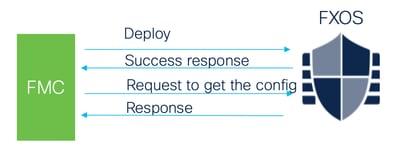
- FXOS può essere aggiornato, in modalità MI, tramite l'interfaccia utente dello chassis di aggiornamento di FMC.
- La conversione in modalità MI viene eseguita tramite una CLI.
Novità
- È possibile effettuare il provisioning e la gestione delle istanze MI sulla serie 4200.
- FMC - Soluzione di gestione singola per istanze della serie 4200 (modalità MI) e FTD
- Consentire la conversione di dispositivi nativi in modalità MI su FMC per i dispositivi serie 3100 e 4200.
- Mercato di destinazione: Aziende di grandi dimensioni - Internet Edge, centro dati
Piattaforme con supporto multi-istanza FTD

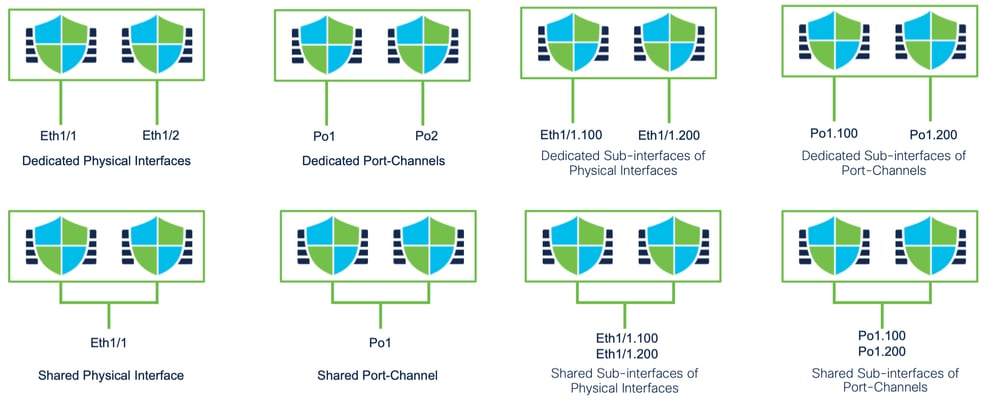
Differenze tra le serie 3100 e 4200
- 4200 dispone di due interfacce di gestione, che consentono di utilizzare una per la gestione e l'altra per gli eventi.
- Le interfacce Management1/1 e Management1/2 vengono entrambe avviate a tutte le istanze del contenitore FTD.
- In modalità MI è possibile utilizzare una o entrambe le interfacce di gestione.
- Management1/1 sia per Management che per Events, oppure
- Management1/1 può essere utilizzato per la gestione e Management1/2 per gli eventi, nel qual caso:
- È necessario definire route statiche per instradare il traffico utilizzando l'interfaccia di gestione 1/2.
- A causa delle dimensioni maggiori, è possibile creare un numero maggiore di istanze sullo switch 4200 rispetto allo switch 3100.
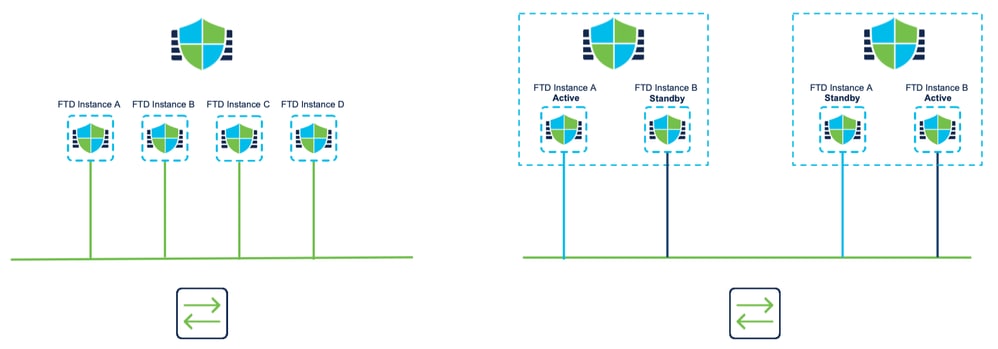
Distribuzioni supportate
- Gestione della serie 4200 (modalità MI) con istanze FTD autonome
- Gestione della serie 4200 (modalità MI) con istanze FTD HA*
Nota: Per la serie FPR4100, nel caso di FTD-HA, i nodi primario e secondario devono trovarsi su due dispositivi diversi della serie 4200 (modalità MI). Inoltre, il clustering MI non è supportato in questa release.
Descrizione delle funzionalità e procedura dettagliata
Modifiche alla configurazione a più istanze in 7.6.0:
- Supporto per la serie 4200 in modalità MI
- Modifiche apportate al CCP che riguardano anche la gestione della modalità MI della serie 3100:
- Conversione della periferica dalla modalità nativa alla modalità MI in FMC
- Controlli di fattibilità per verificare se il dispositivo può essere convertito in modalità MI
- Registra automaticamente istanza FTD in FMC dopo la conversione
Specifiche dell'istanza serie 4200
Numero massimo di istanze supportate
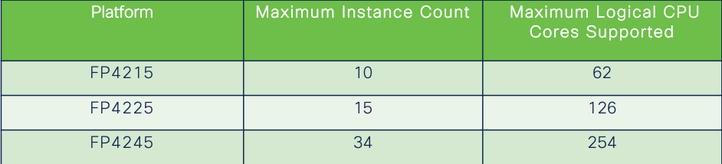
La densità delle varianti è determinata da due fattori principali:
1. La quantità di core CPU e la quantità di spazio su disco su una determinata piattaforma
2. Quante di queste risorse sono disponibili per il provisioning delle istanze. La dimensione minima dell'istanza richiede 3 core fisici CPU (6 logici) e 48 GB di spazio su disco.
Dimensioni istanza FTD

Allocazioni Snort Core Lina (Data Plane)
| 4215 |
4225 |
4245 |
||||
| Dimensione istanza |
Core del piano dati |
Core snort |
Core del piano dati |
Core snort |
Core del piano dati |
Core snort |
| 6 |
2 |
2 |
2 |
2 |
2 |
2 |
| 8 |
2 |
4 |
2 |
4 |
2 |
4 |
| 10 |
4 |
4 |
4 |
4 |
4 |
4 |
| 12 |
4 |
6 |
4 |
6 |
4 |
6 |
| 14 |
6 |
8 |
6 |
6 |
6 |
6 |
| 16 |
6 |
8 |
6 |
6 |
8 |
8 |
| 18 |
8 |
10 |
8 |
8 |
8 |
10 |
| 20 |
8 |
10 |
8 |
8 |
10 |
10 |
| 22 |
10 |
12 |
10 |
10 |
10 |
12 |
| 24 |
12 |
12 |
10 |
10 |
10 |
12 |
| 26 |
12 |
14 |
12 |
12 |
12 |
12 |
| 28 |
14 |
14 |
12 |
14 |
12 |
14 |
| 30 |
14 |
16 |
14 |
14 |
14 |
14 |
| 32 |
14 |
16 |
14 |
16 |
14 |
16 |
| 34 |
16 |
16 |
16 |
16 |
16 |
16 |
| 36 |
16 |
18 |
16 |
18 |
16 |
18 |
| 38 |
18 |
18 |
18 |
18 |
18 |
18 |
| 40 |
18 |
20 |
18 |
20 |
18 |
20 |
| 42 |
20 |
20 |
20 |
20 |
20 |
20 |
| 44 |
20 |
22 |
20 |
22 |
20 |
22 |
| 46 |
22 |
22 |
22 |
22 |
22 |
22 |
| 48 |
22 |
24 |
22 |
24 |
22 |
24 |
| 50 |
24 |
24 |
24 |
24 |
24 |
24 |
| 52 |
24 |
26 |
24 |
26 |
24 |
26 |
| 54 |
26 |
26 |
26 |
26 |
24 |
26 |
| 56 |
26 |
28 |
26 |
28 |
26 |
28 |
| 58 |
28 |
28 |
28 |
28 |
28 |
28 |
| 60 |
28 |
30 |
28 |
39 |
28 |
30 |
| 62 |
30 |
30 |
30 |
30 |
30 |
30 |
| 64 |
30 |
32 |
30 |
32 |
||
| 66 |
30 |
34 |
30 |
34 |
||
| 68 |
32 |
34 |
32 |
34 |
||
| 70 |
32 |
36 |
32 |
36 |
||
| 72 |
34 |
36 |
34 |
36 |
||
| 74 |
34 |
38 |
34 |
38 |
||
| 76 |
36 |
38 |
36 |
38 |
||
| 78 |
36 |
40 |
36 |
40 |
||
| 80 |
38 |
40 |
38 |
40 |
||
| 82 |
38 |
42 |
38 |
42 |
||
| 84 |
40 |
42 |
40 |
42 |
||
| 86 |
40 |
44 |
40 |
44 |
||
| 88 |
42 |
44 |
42 |
44 |
||
| 90 |
42 |
46 |
42 |
46 |
||
| 92 |
44 |
46 |
44 |
46 |
||
| 94 |
44 |
48 |
44 |
48 |
||
| 96 |
46 |
48 |
46 |
48 |
||
| 98 |
46 |
50 |
46 |
50 |
||
| 100 |
48 |
50 |
48 |
50 |
||
| 102 |
48 |
52 |
48 |
52 |
||
| 104 |
50 |
52 |
50 |
52 |
||
| 106 |
50 |
54 |
50 |
54 |
||
| 108 |
52 |
54 |
52 |
54 |
||
| 110 |
52 |
56 |
52 |
56 |
||
| 112 |
54 |
56 |
54 |
56 |
||
| 114 |
54 |
58 |
54 |
58 |
||
| 116 |
56 |
58 |
56 |
58 |
||
| 118 |
56 |
60 |
56 |
60 |
||
| 120 |
58 |
60 |
58 |
60 |
||
| 122 |
58 |
62 |
58 |
62 |
||
| 124 |
60 |
62 |
60 |
62 |
||
| 128 |
60 |
64 |
||||
| 130 |
60 |
66 |
||||
| 132 |
62 |
66 |
||||
| 134 |
62 |
68 |
||||
| 136 |
64 |
68 |
||||
| 138 |
64 |
70 |
||||
| 140 |
66 |
70 |
||||
| 142 |
66 |
72 |
||||
| 144 |
68 |
72 |
||||
| 146 |
68 |
74 |
||||
| 148 |
70 |
74 |
||||
| 150 |
70 |
76 |
||||
| 152 |
72 |
76 |
||||
| 154 |
72 |
78 |
||||
| 156 |
74 |
78 |
||||
| 158 |
74 |
80 |
||||
| 254 |
120 |
130 |
Configurazione
Panoramica della configurazione
- Registrare il dispositivo serie 4200 (modalità nativa) in FMC.
- Novità! Nel FMC, selezionare e convertire il dispositivo dalla modalità nativa alla modalità MI.
- Novità! Dopo la conversione, lo chassis MI si registra automaticamente nel FMC.
- Aggiorna interfacce fisiche.
- Creare istanze FTD e assegnare le interfacce.
- Creare/aggiornare/eliminare il canale della porta e le sottointerfacce da FMC.
- Configurare le impostazioni della piattaforma.
- Distribuire le modifiche alla configurazione nel dispositivo.
- Le istanze FTD vengono registrate automaticamente nel FMC.
Converti serie 4200 in modalità a più istanze in FMC
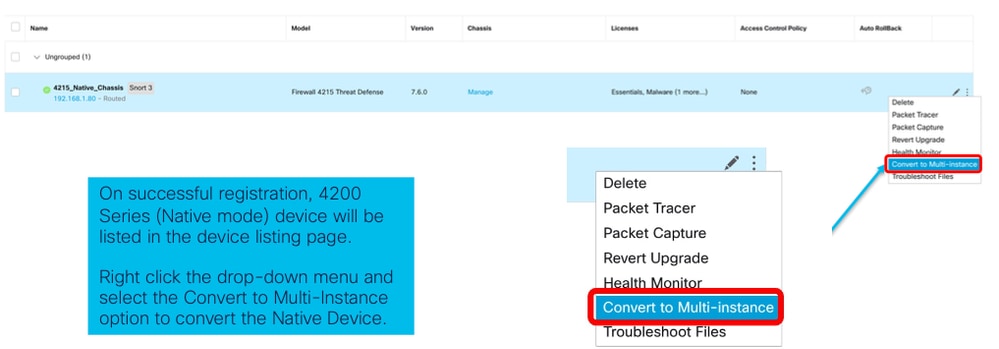
Per impostazione predefinita, gli access point serie 4200 sono in modalità nativa. Per convertire la serie 4200 in modalità a più istanze in FMC:
- Connettersi al dispositivo e creare un manager (già documentato).
- Registrare il dispositivo nativo nel CCP (già documentato).
- Convertire in istanze multiple utilizzando FMC.
- In FMC selezionare i dispositivi da convertire in istanze multiple e attivare la conversione. È possibile selezionare uno o più dispositivi.
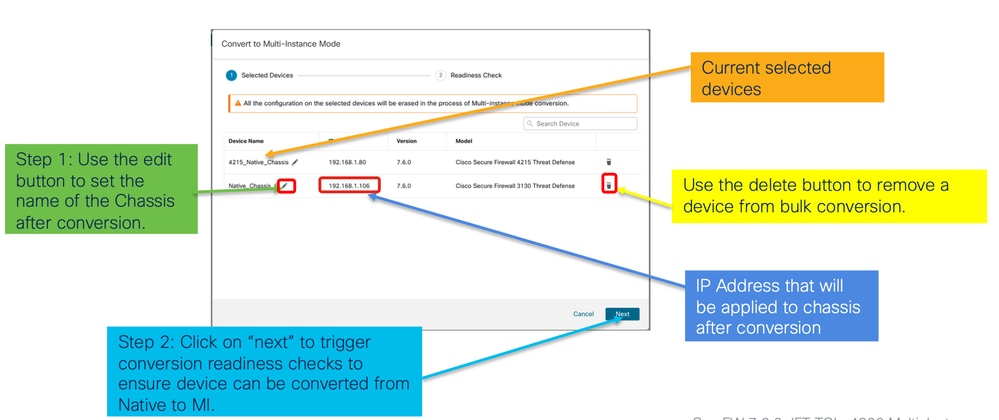
Nota: Se si passa dalla modalità nativa alla modalità MI, tutta la configurazione sullo chassis viene ripristinata. La conversione dalla modalità MI alla modalità nativa avviene ancora tramite CLI.
Conversione di un singolo dispositivo
1. Per avviare la conversione, passare a Dispositivi > Gestione dispositivi.
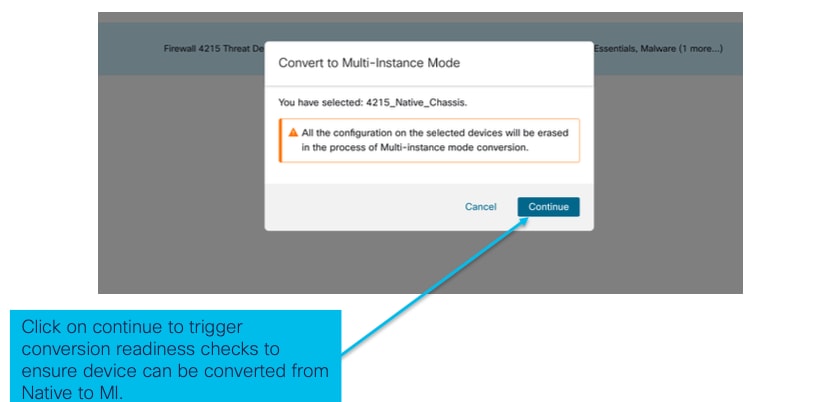
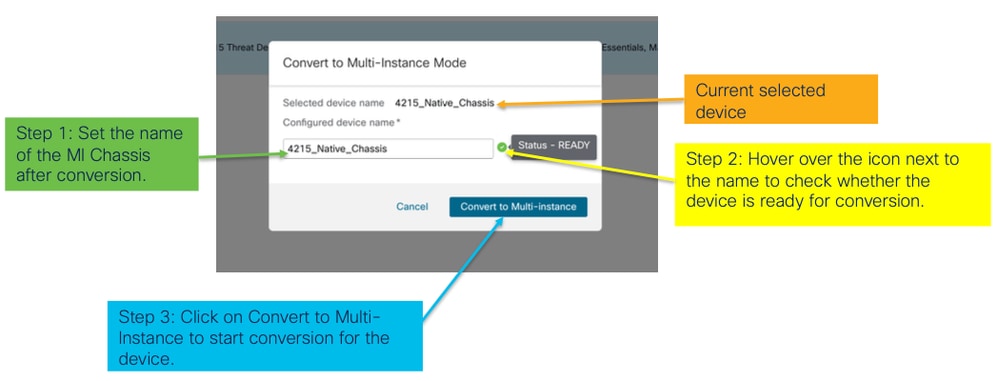
2. Convalidare il dispositivo selezionato e fare clic su Continue:
 convalida dispositivi selezionati
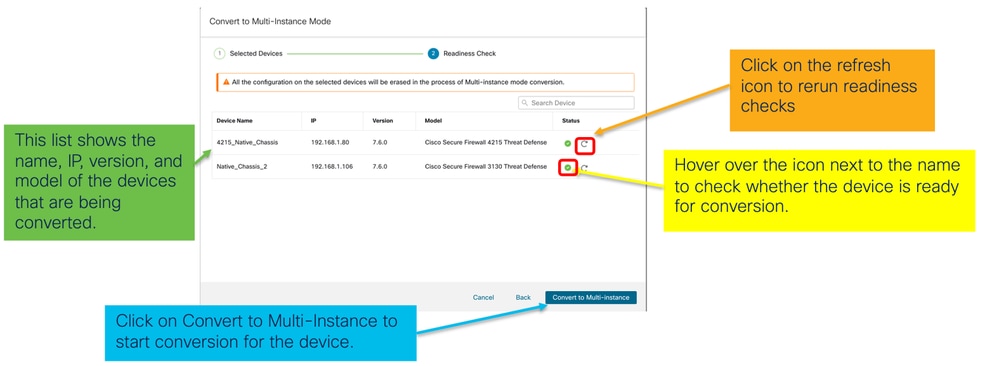
- Verifica della preparazione e conversione iniziale:
 verifica preparazione
Converti più di un dispositivo (Conversione in blocco)
- Seleziona dispositivi:
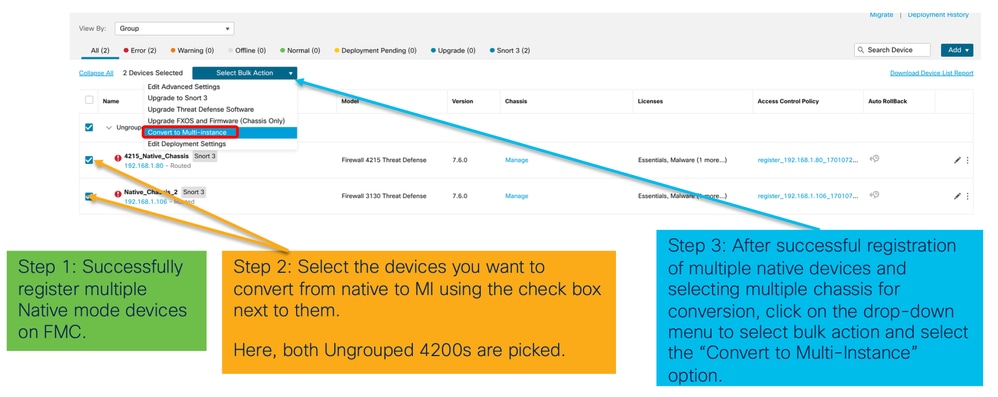
- Conferma selezione:
- Verifica preparazione e avvio conversione:
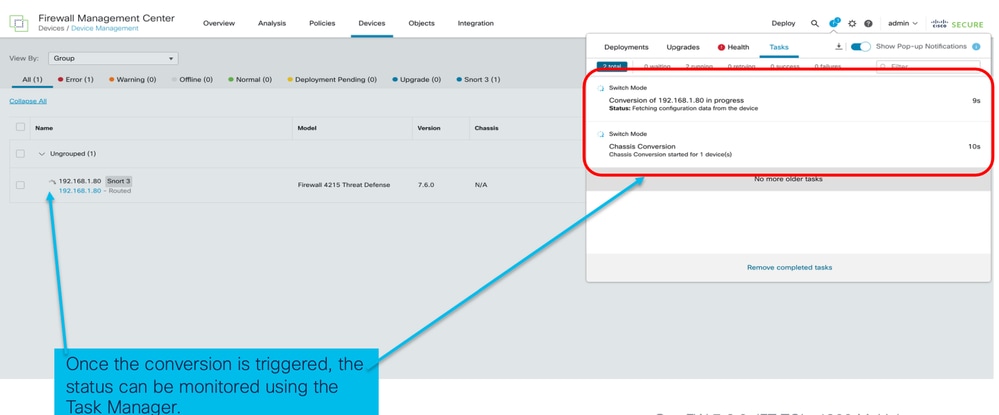
Monitoraggio dei progressi e completamento
- Notifica di avvio conversione:
- Registrazione automatica dello chassis:
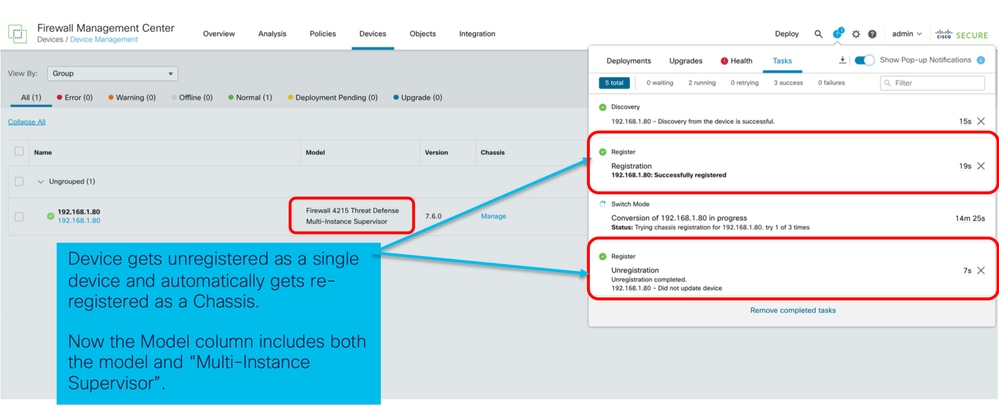
- Notifica post-conversione:
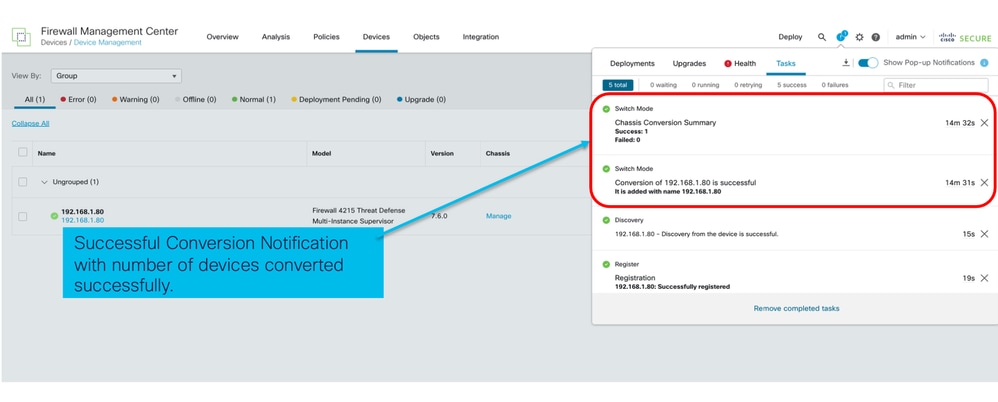
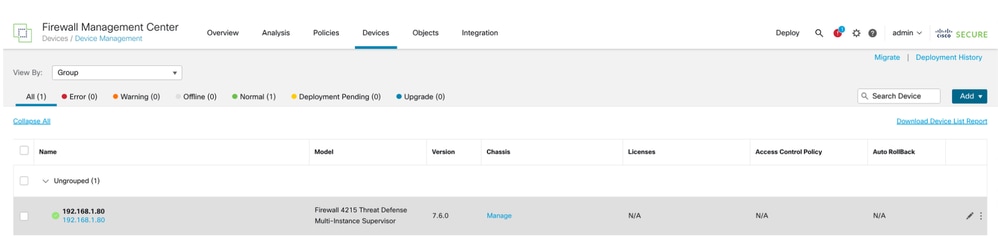
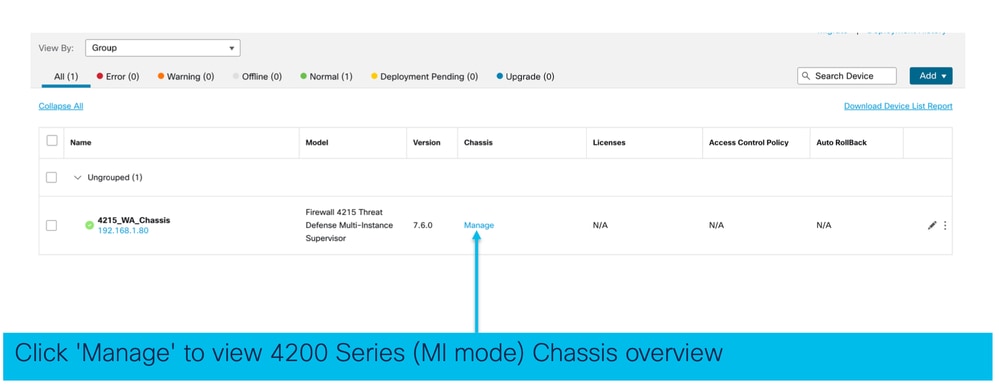
Pagina di gestione dei dispositivi risultante in cui sono elencati i dispositivi serie 4200 (modalità MI):
Pagina Panoramica dello chassis FMC
Panoramica della pagina Panoramica dello chassis FMC
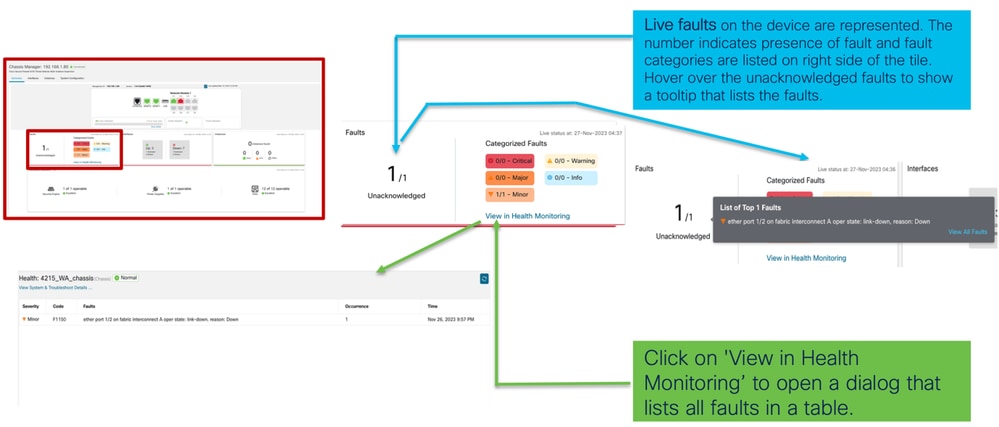
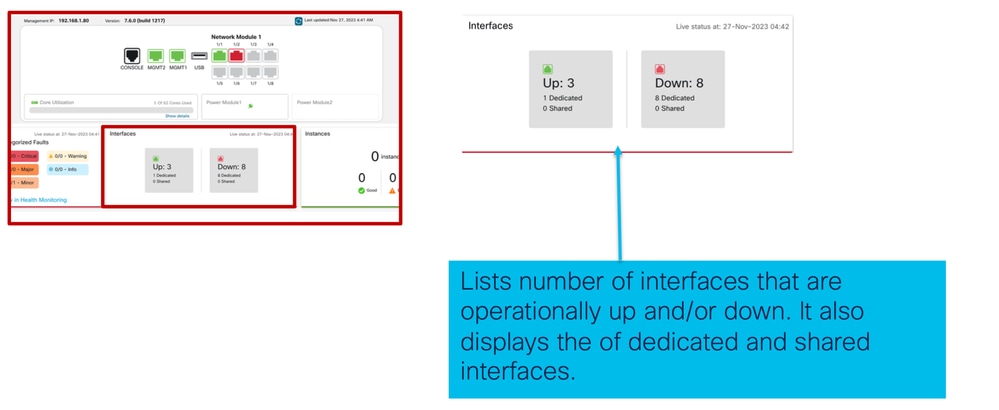
La pagina Panoramica dello chassis di FMC fornisce un riepilogo completo del dispositivo serie 4200 (modalità MI). Esso comprende:
- Vista del pannello posteriore illustrativa del dispositivo, inclusi i moduli di rete disponibili.
- Riepilogo degli errori, con la loro criticità.
- Riepilogo interfaccia, stato.
- Riepilogo istanza FTD, stato.
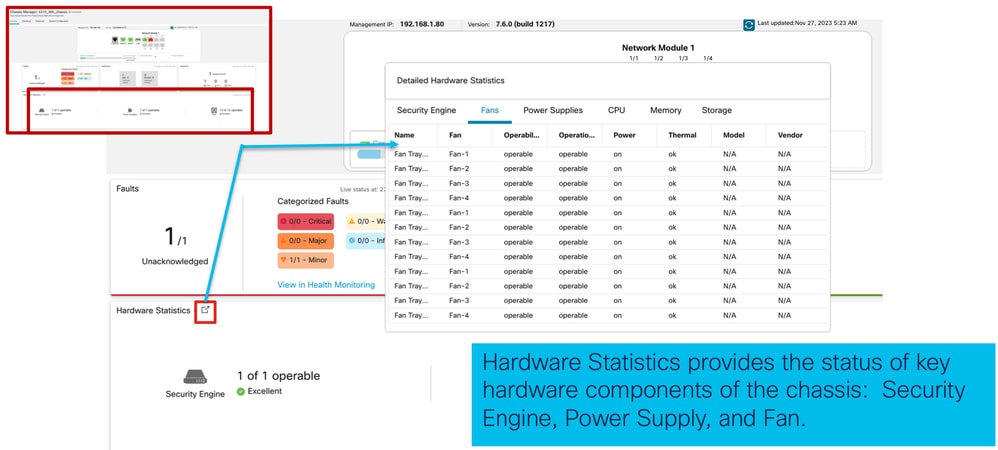
- Statistiche sull'hardware, tra cui ventola, alimentatore, memoria, utilizzo della CPU e storage.
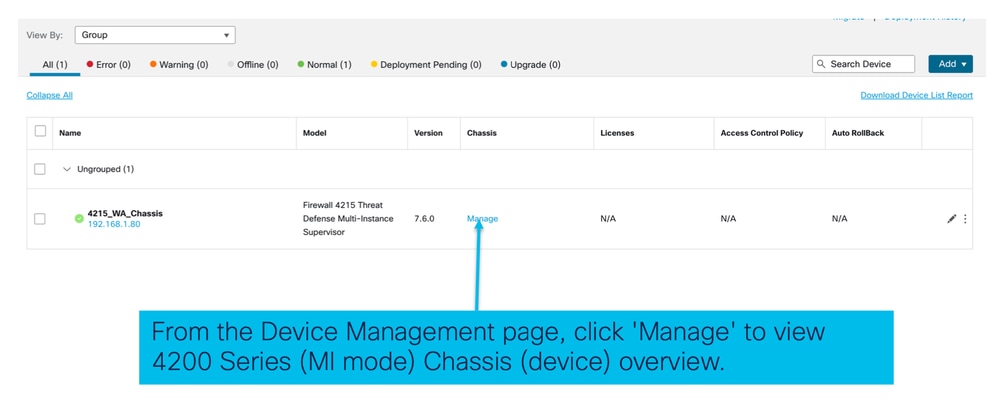
Fare clic su Gestisci per passare a Panoramica chassis:
Scheda Riepilogo pagina chassis:

Sezioni della scheda Riepilogo pagina chassis
La scheda Riepilogo contiene delle sezioni. Fare clic per ottenere ulteriori dettagli:
- Piano posteriore
- Errori
- Interfacce
- Istanze
- Statistiche hardware
Le sezioni sono mappate per numero come mostrato in questa immagine:
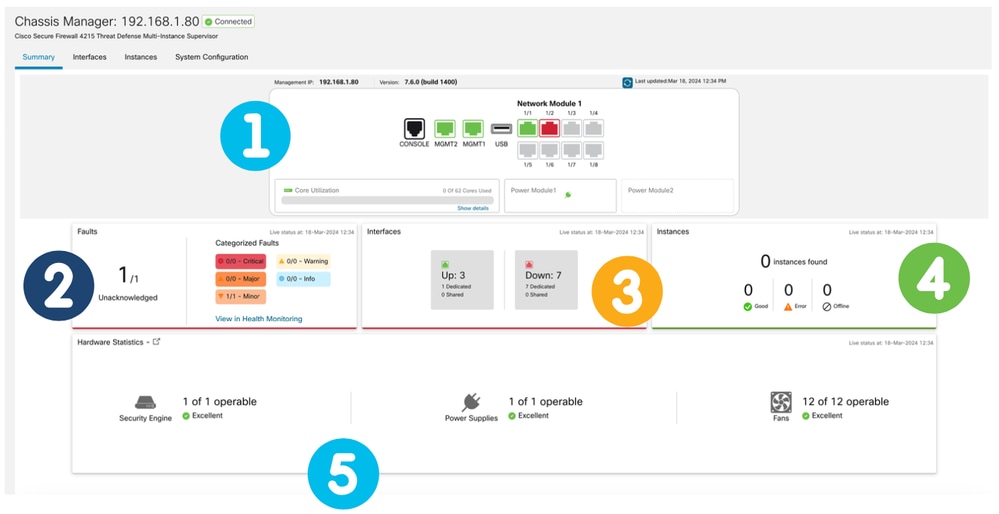
1. Vista posteriore:

2. Sezione Errori:
3. Sezione Interfacce:
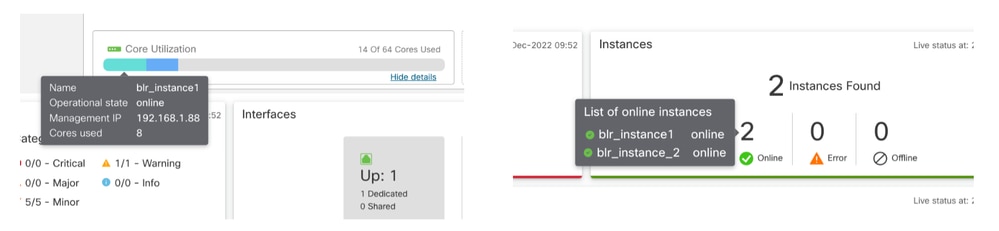
4. Sezione Instances:
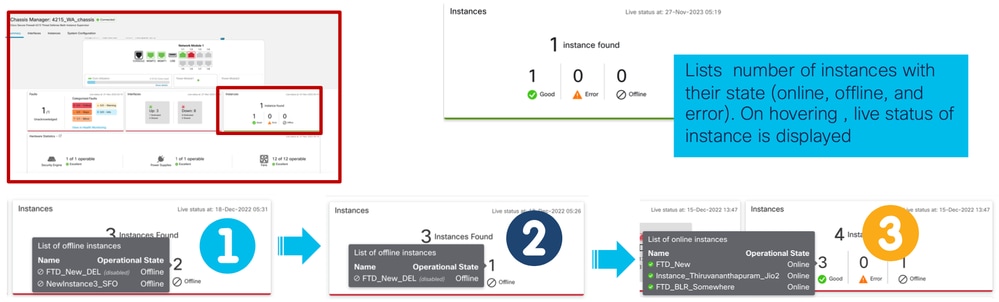
La transizione delle istanze da non in linea a in linea è illustrata nell'immagine precedente.
- Una volta eseguito il provisioning (1)
- L'istanza è offline fino a quando non viene connessa (2)
- Vengono riflessi anche gli stati intermedi (3)
5. Statistiche relative all'hardware:
Gestisci interfacce
Operazioni supportate dalla scheda Interfacce:
- Aggiornamento dell'interfaccia fisica
- Creazione/aggiornamento/eliminazione di sottointerfacce.
- Creazione/aggiornamento/eliminazione di interfacce EtherChannel.
- Configurazioni interfaccia di sincronizzazione.
- OIR del modulo Network.
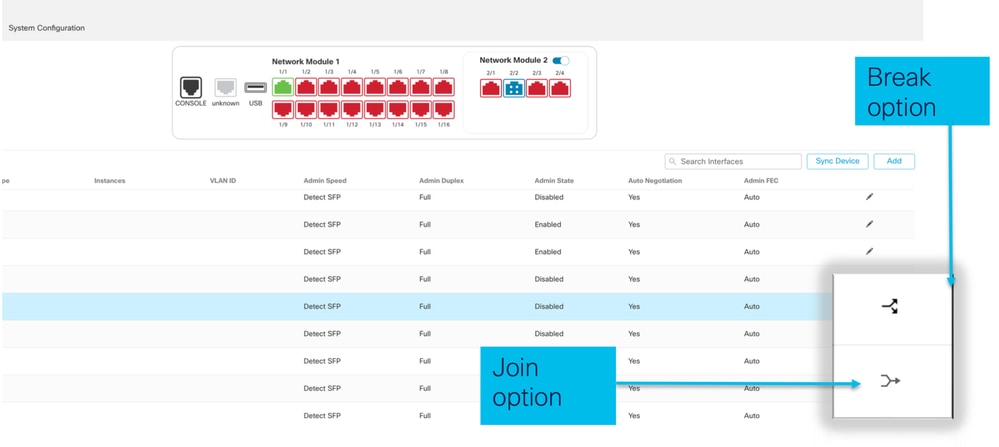
- Break/Join of Physical interface (Interruzione/unione dell'interfaccia fisica).
Riepilogo della scheda Interfacce

La pagina iniziale della scheda Interfacce mostra tutti i tipi di interfacce gestite per uno chassis, ad esempio le interfacce fisiche, le sottointerfacce e le sottointerfacce EtherChannel e EtherChannel.
Modifica delle configurazioni dell'interfaccia fisica
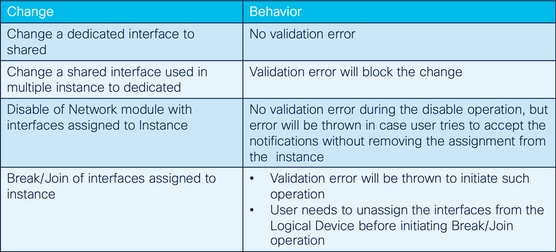
Questi attributi di un'interfaccia fisica possono essere aggiornati:
- Stato (Attivato/Disattivato)
- Tipo di porta (dati) | Condivisione dei dati)
- Admin Duplex
- Velocità amministratore
- Negoziazione automatica

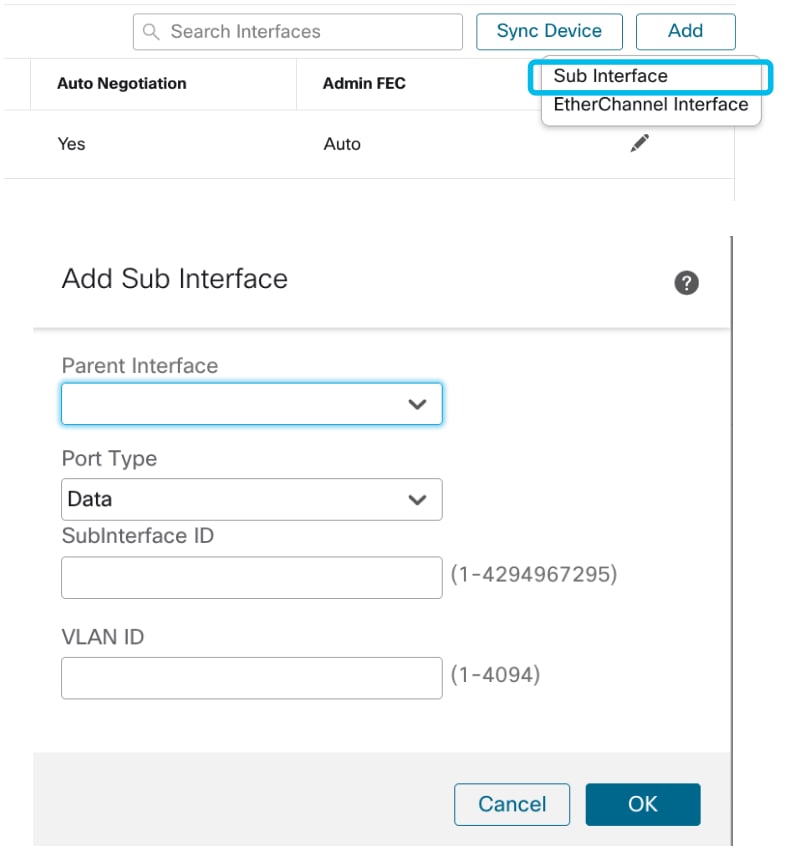
Gestisci interfaccia secondaria
Selezionare l'opzione relativa all'interfaccia secondaria dal pulsante Aggiungi per aggiungere una nuova interfaccia.
Gli attributi di una sottointerfaccia possono essere modificati:
- Interfaccia padre
- Tipo di porta (dati/condivisione dati)
- ID sottointerfaccia
- ID VLAN
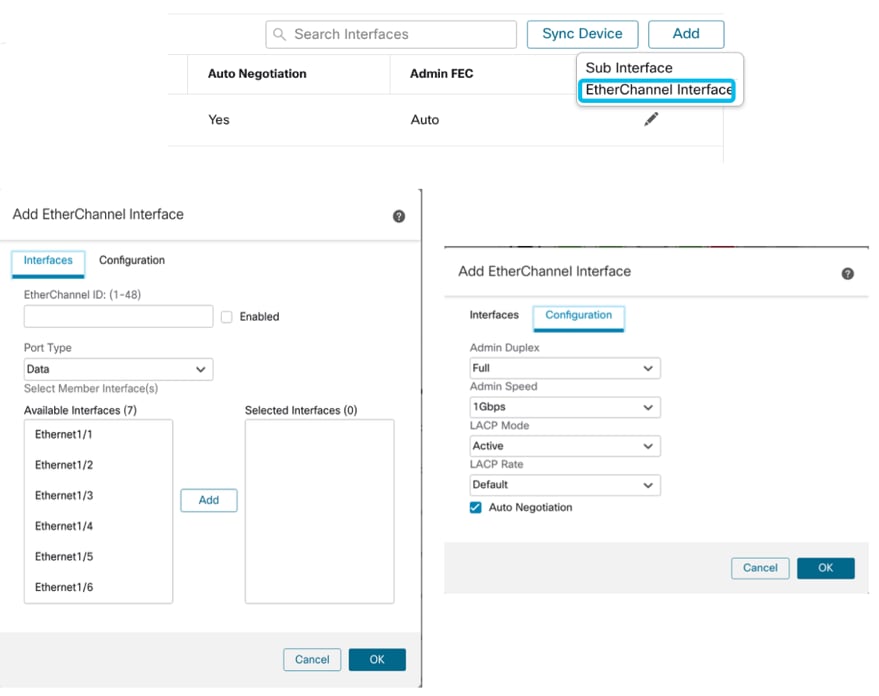
Gestisci EtherChannel
Per creare una nuova interfaccia EtherChannel, usare l'"interfaccia EtherChannel" sotto il pulsante Add.
Di seguito sono riportati gli attributi che è possibile configurare per EtherChannel:
- ID EtherChannel
- Tipo di porta (condivisione dati/dati)
- Interfacce membro
- Velocità amministratore
- Admin Duplex
- Modalità LACP
- Frequenza LACP
- Negoziazione automatica
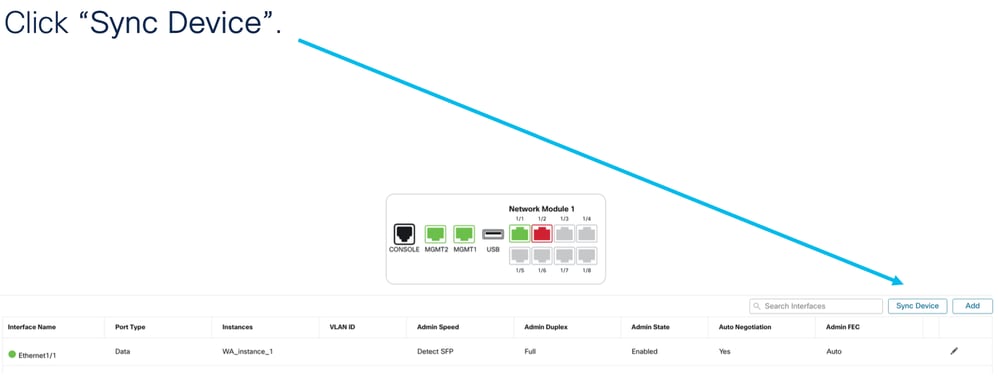
Configurazioni dispositivo di sincronizzazione
In alcuni casi la configurazione del FMC e quella del dispositivo potrebbero non essere più sincronizzate. Un caso è quello di un utente che rimuove o inserisce una netmod. In questi casi è possibile eseguire la sincronizzazione del dispositivo.
Supporto Netmod Hot Swap / Break-Out
La parola "sostituzione a caldo", utilizzata nei documenti, è indicata come inserimento e rimozione online o OIR in altra documentazione interna.
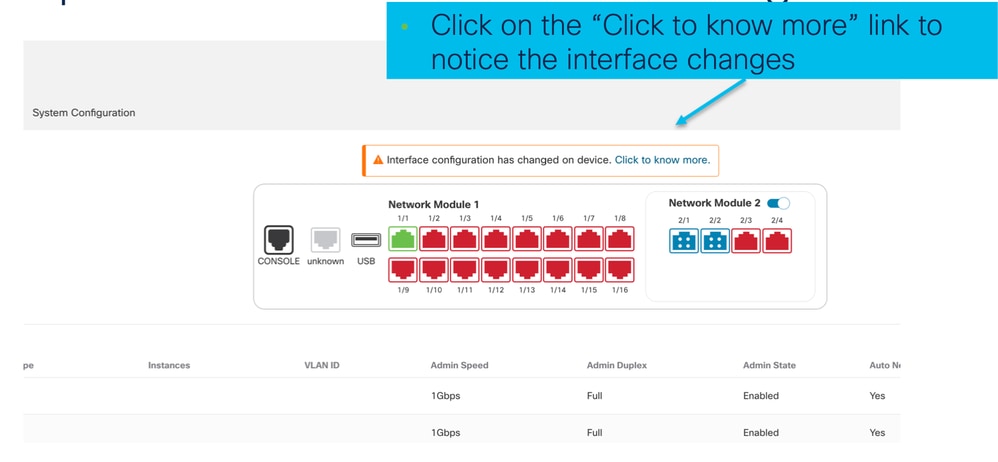
L'abilitazione/disabilitazione del modulo di rete, l'interruzione o l'unione di interfacce vengono implementate immediatamente. La modalità a più istanze è uguale alla serie 4200 in modalità nativa.
La risposta ricevuta viene confrontata con la configurazione corrente e quindi viene creata una notifica di modifica dell'interfaccia che l'utente deve confermare.
Supporto nativo di EPM Hot Swap e Breakout
EPM OIR e Breakout sono già supportati sul Secure Firewall serie 4200 standalone in modalità nativa.
Documentazione relativa a EPM OIR e Breakout FMC serie 4200:
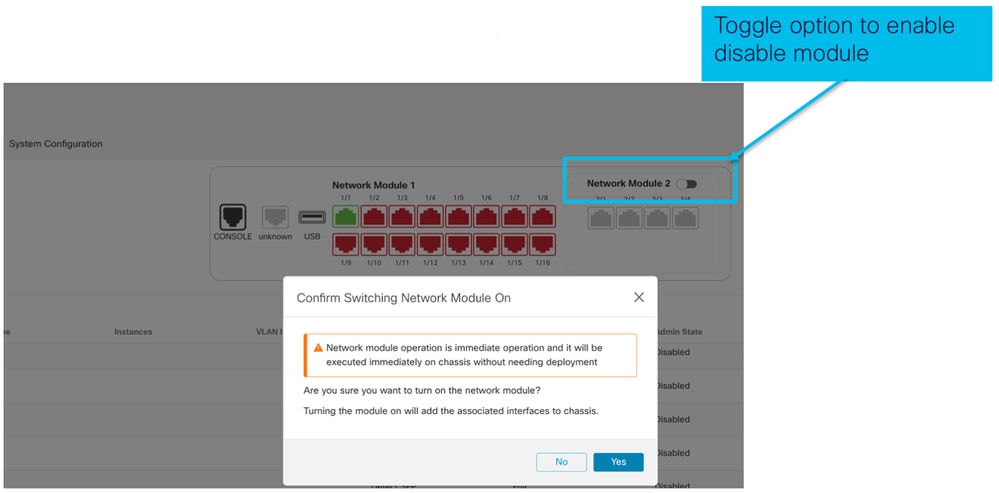
OIR: Abilita/Disabilita conferma EPM
Quando l'utente attiva o disattiva il modulo, viene visualizzato un avviso per assicurarsi che non si tratti di un clic accidentale.
Abilitazione EPM completata: Notifica interfaccia ricevuta
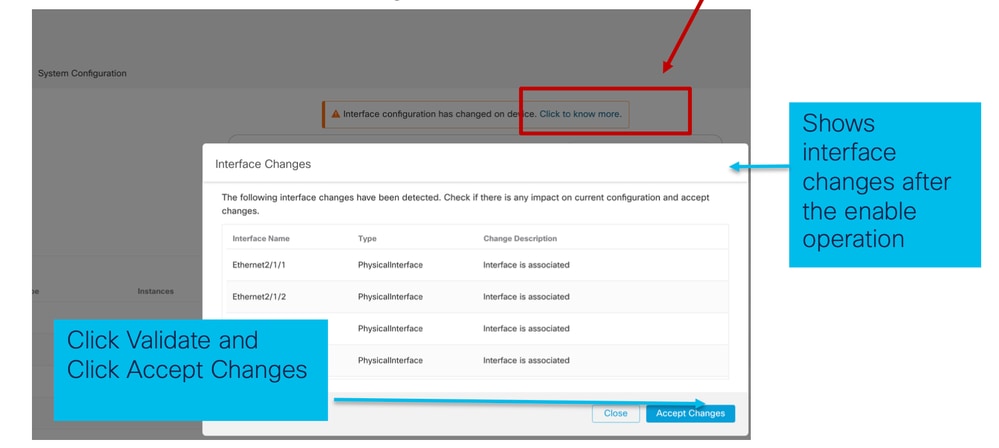
- Quando si abilita un EPM, sul dispositivo vengono associate nuove interfacce.
- FMC riceve la notifica relativa alle interfacce associate.
- In FMC, l'utente deve accettare le modifiche.
In questa schermata viene mostrata l'opzione per visualizzare le interfacce associate:

Notifica modifica interfaccia EPM
La pagina di elenco delle interfacce elenca le interfacce aggiunte quando EPM è abilitato. Fare clic per ulteriori informazioni per aprire la finestra di dialogo Modifiche interfaccia.
Fare clic per sapere se non è disponibile ulteriori informazioni dopo il salvataggio.
Pagina Opzioni di interruzione/unione nello chassis
Viene attivata l'opzione Interfaccia interruzione della procedura guidata per la conferma dell'interruzione.
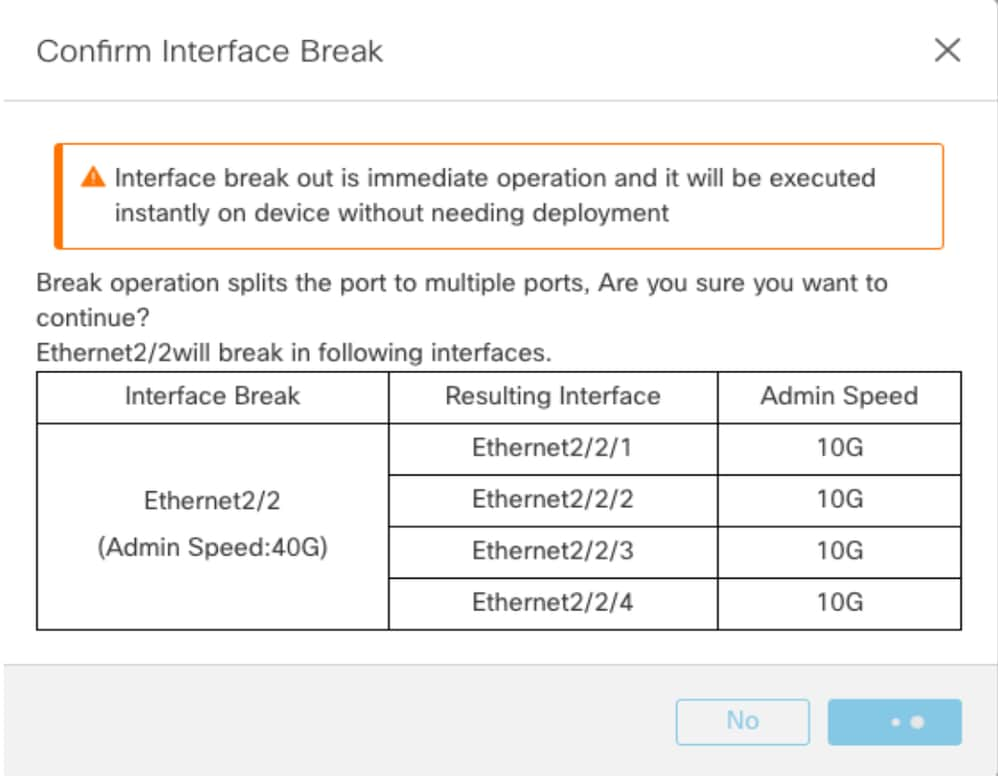
La notifica di aggiornamento dell'interfaccia è visibile sulla pagina dello chassis dopo la conferma dell'interruzione dell'interfaccia.
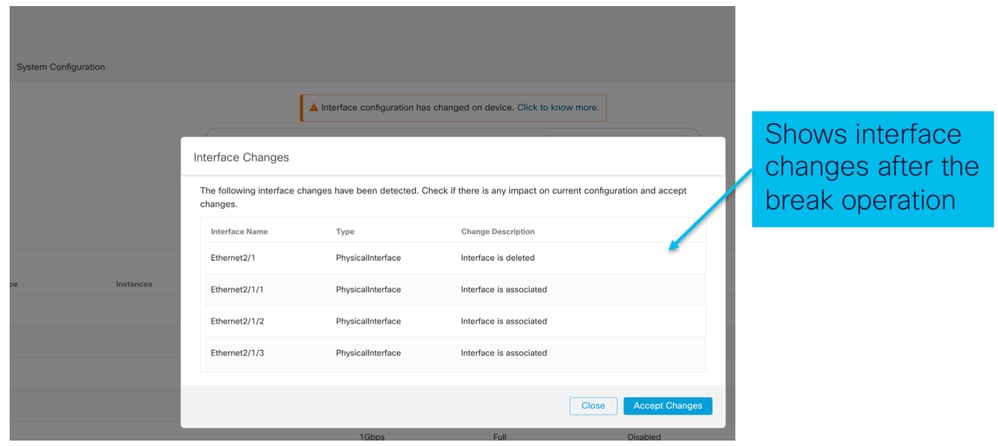
Modifiche all'interfaccia dopo un'interruzione o un'unione
Facendo clic su Accetta modifiche (Accept Changes), queste interfacce diventano disponibili nel CCP per essere utilizzate:
Impatto delle modifiche dell'interfaccia sull'istanza
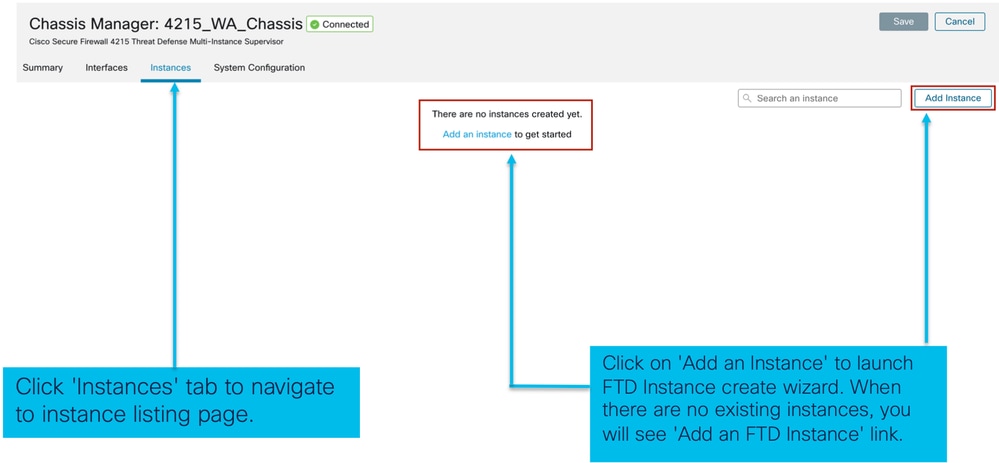
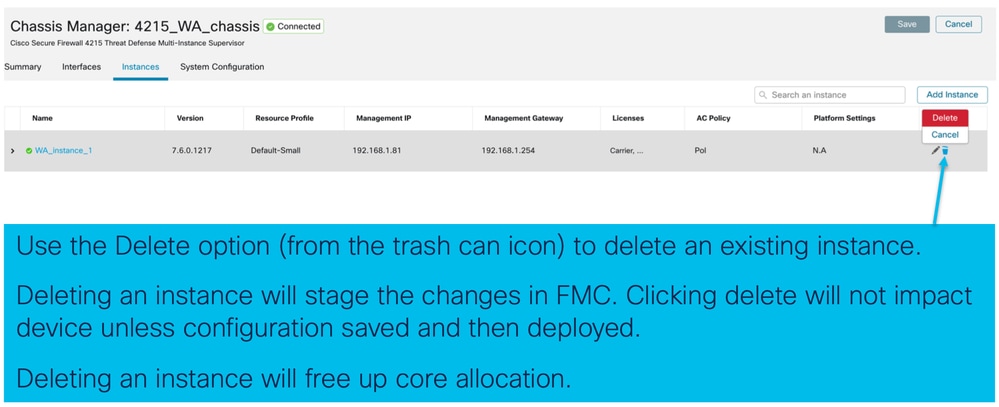
Gestione istanze
Instance Management consente di:
- Visualizzare tutte le istanze FTD esistenti e i relativi dettagli su un dispositivo serie 4200 (modalità MI).
- Crea/aggiorna istanze FTD con la versione del core CPU e del software desiderati.
- Eliminare un'istanza FTD esistente.
- Consente all'utente di scegliere i criteri FTD - Criteri di accesso e i criteri Impostazioni piattaforma per l'istanza FTD.
- Registra automaticamente l'istanza FTD in FMC quando è in linea.
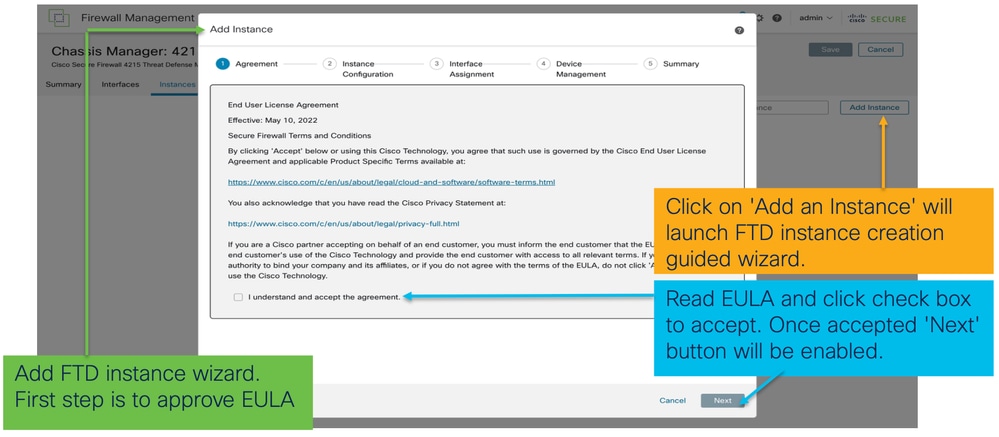
Crea istanza
Avviare la procedura guidata facendo clic su Aggiungi istanza.
Passaggio 1. Contratto:
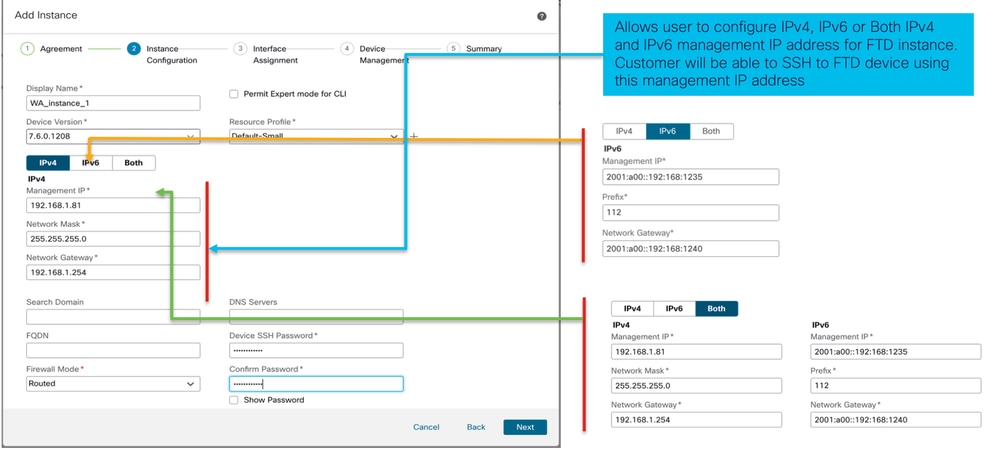
Passaggio 2.
- Nozioni di base sulla configurazione delle istanze:
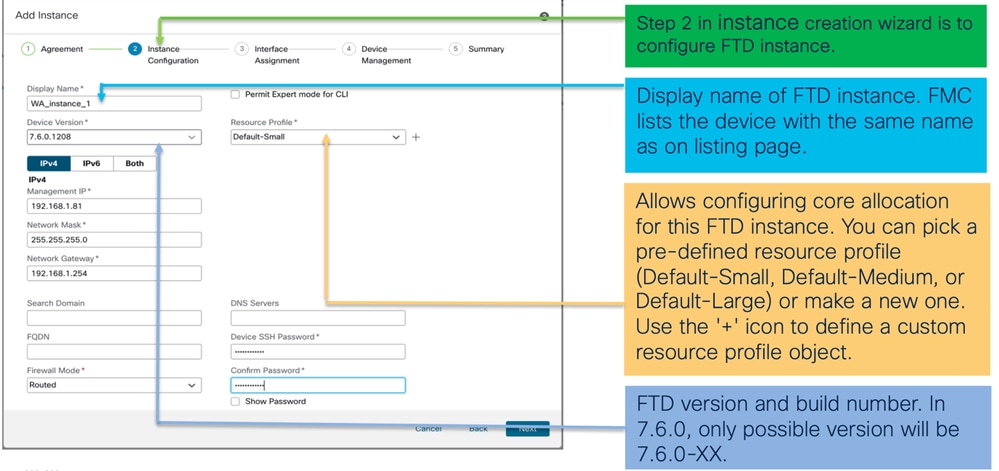
- IP configurazione istanza:
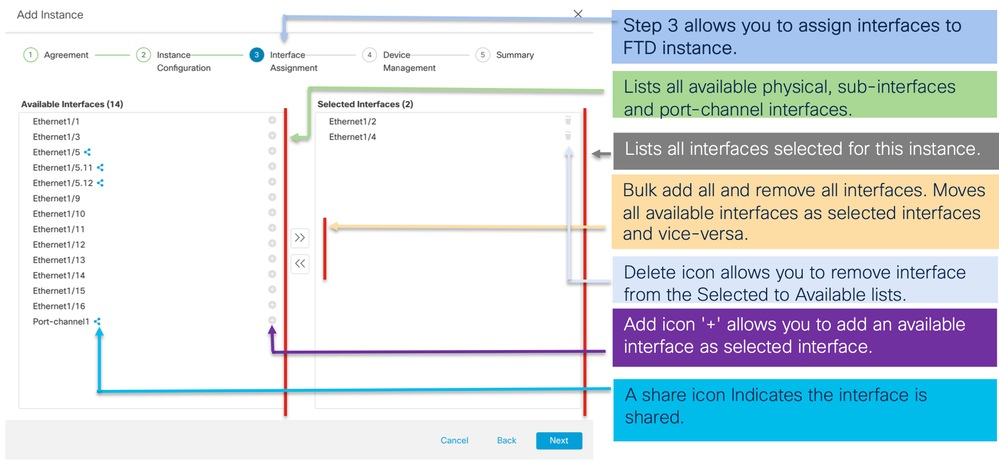
Passaggio 3. Assegnazioni interfaccia:
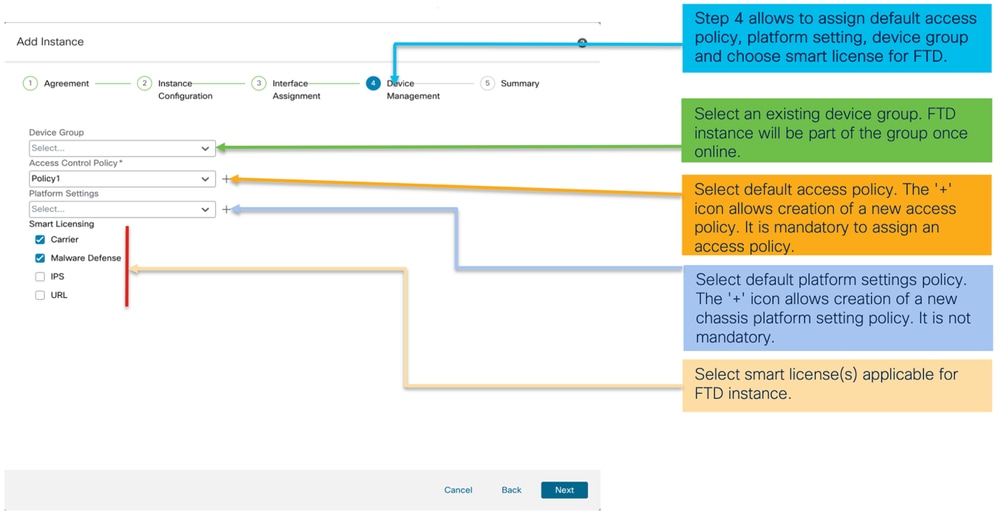
Passaggio 4. Gestione dei dispositivi:
Passaggio 5. Riepilogo:
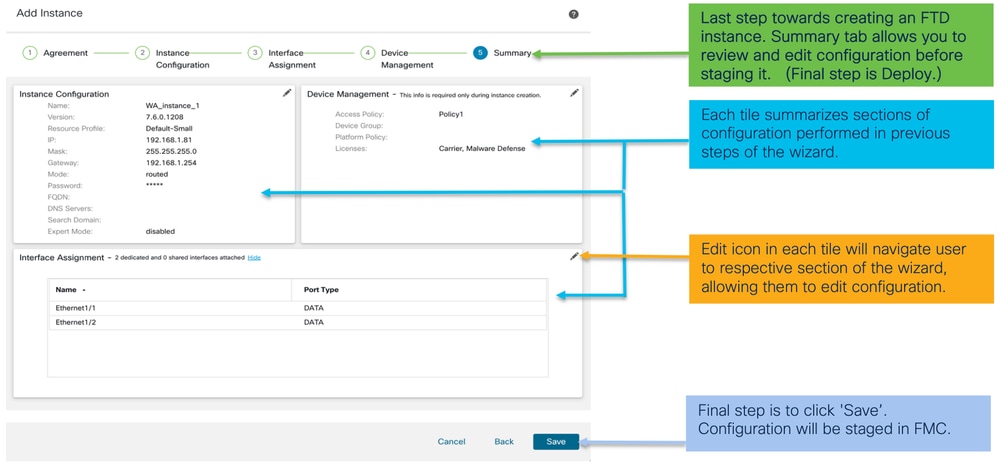
Per completare la configurazione, salvare e distribuire.
Registrazione automatica di un'istanza FTD dopo la corretta distribuzione:
Istanza registrata nel centro di gestione:
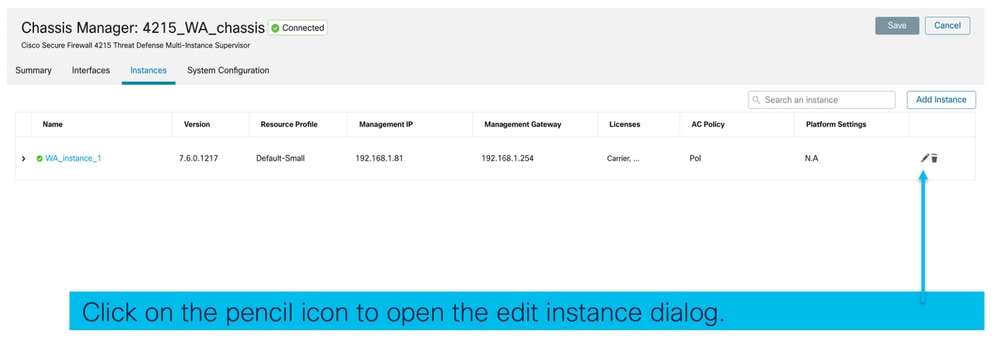
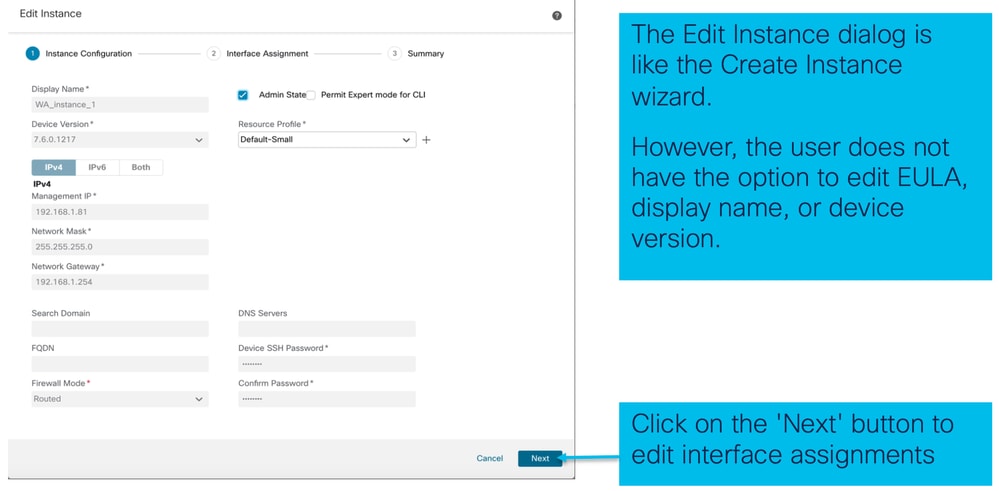
Modifica di un'istanza
Fare clic sull'icona a forma di matita per modificare un'istanza FTD:
Passaggio 1. Modifica istanza FTD:
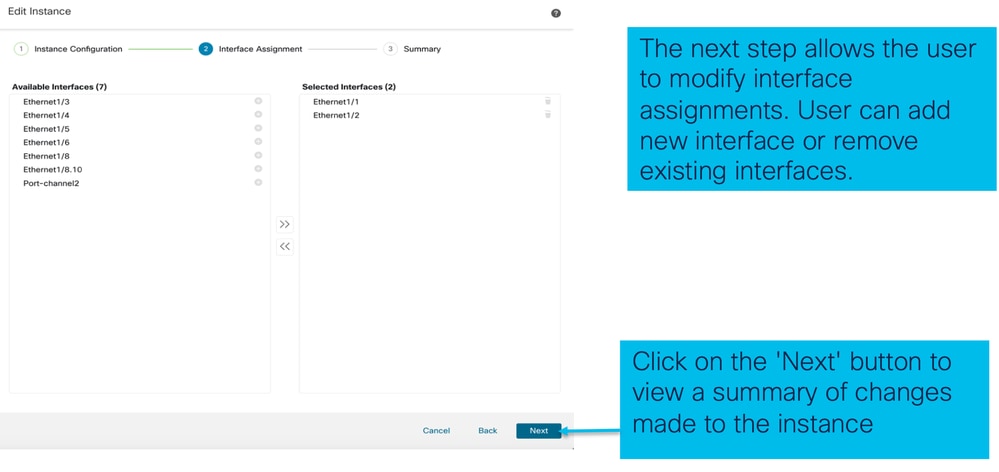
Passaggio 2. Modificare le assegnazioni di interfaccia per un'istanza:
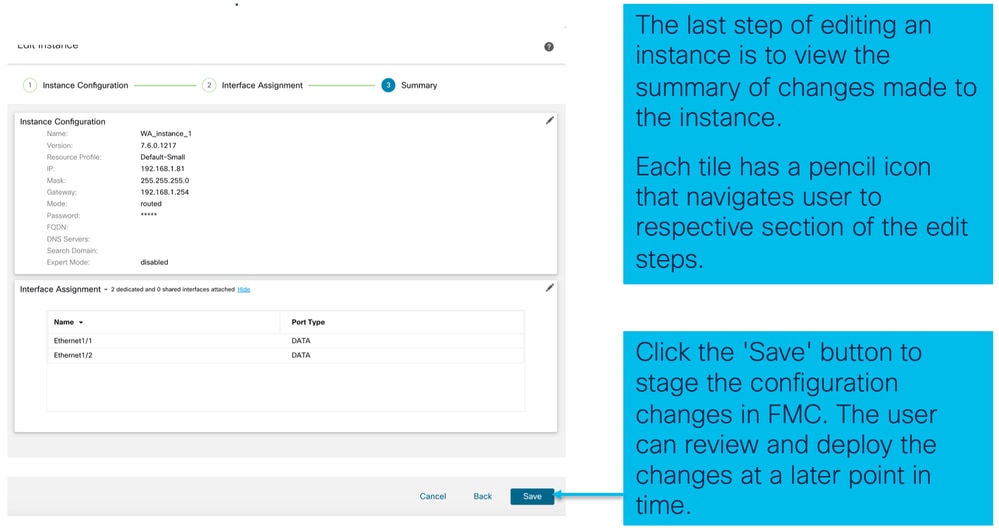
Passaggio 3. Riepilogo dell'istanza di modifica:
Elimina istanza
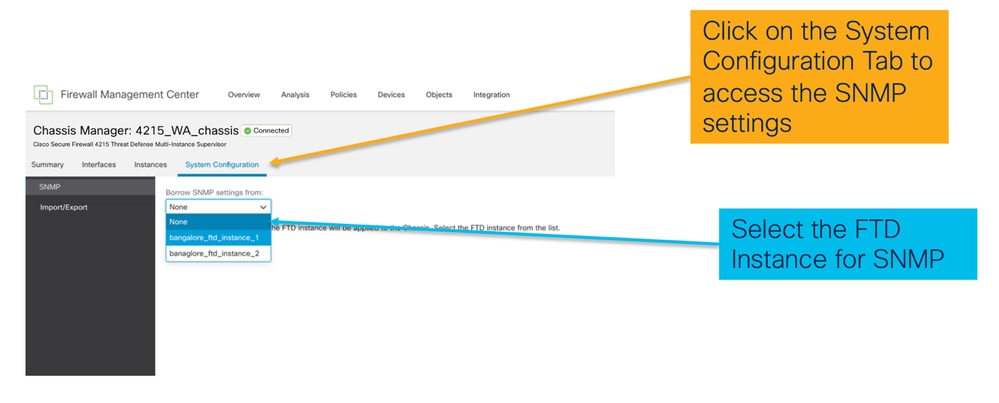
Configurazione SNMP
Passare alla scheda di configurazione del sistema per la configurazione di SNMP:
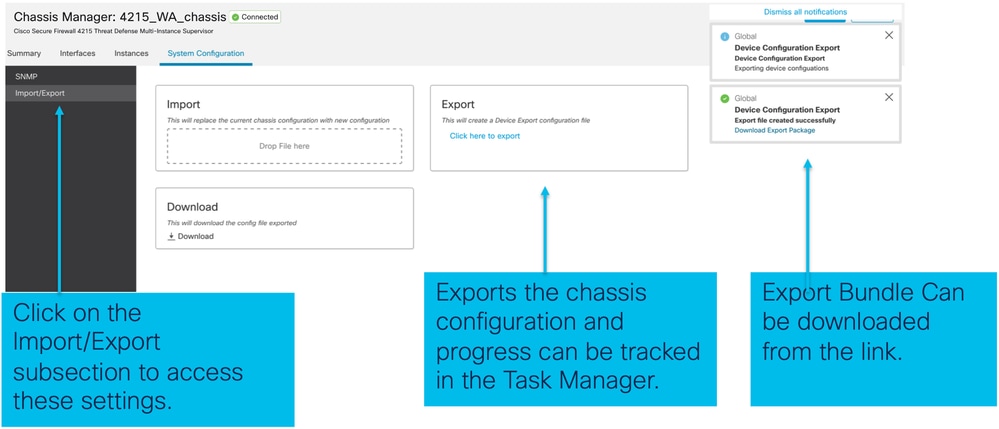
Importazione/esportazione chassis
Esporta configurazione
Selezionare Gestione chassis > Configurazione di sistema > Importazione/esportazione:
Importa configurazione
Selezionare Gestione chassis > Configurazione di sistema > Importazione/esportazione:
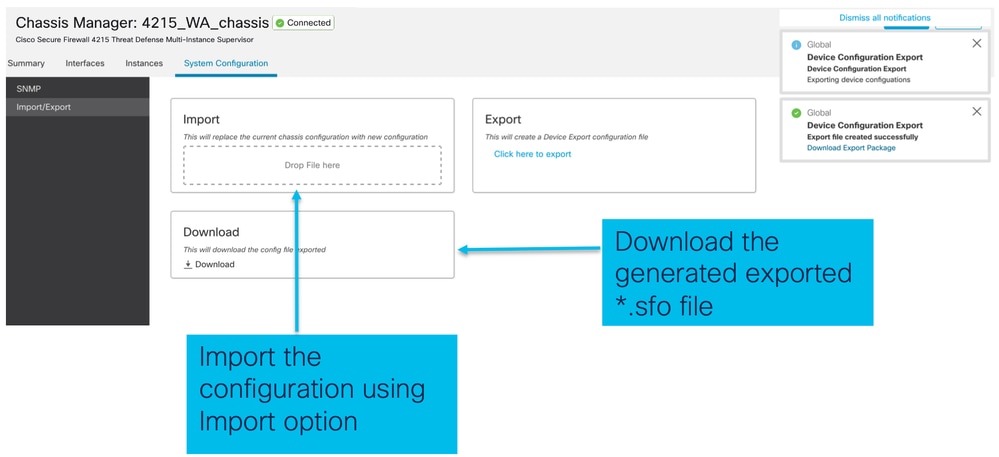
Informazioni sull'importazione/esportazione dello chassis
- Tutte le configurazioni esistenti sullo chassis vengono sostituite dalla configurazione nel file importato.
- La versione del software della piattaforma in cui viene importata la configurazione deve corrispondere alla versione esportata.
- Lo chassis in cui si sta importando la configurazione deve avere lo stesso numero di moduli di rete installati al momento dell'esportazione.
- Lo chassis in cui viene importata la configurazione deve avere la stessa immagine dell'applicazione installata per le periferiche logiche.
- Le impostazioni di configurazione specifiche dell'applicazione non vengono esportate. Vengono esportate solo le configurazioni dello chassis.
- Il backup delle istanze FTD deve essere eseguito separatamente.
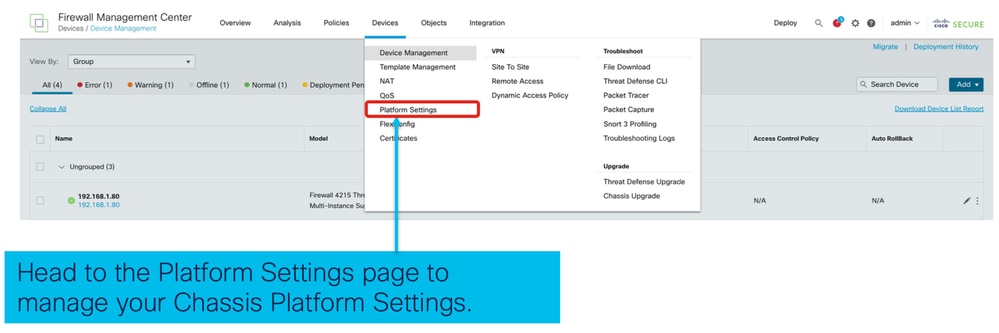
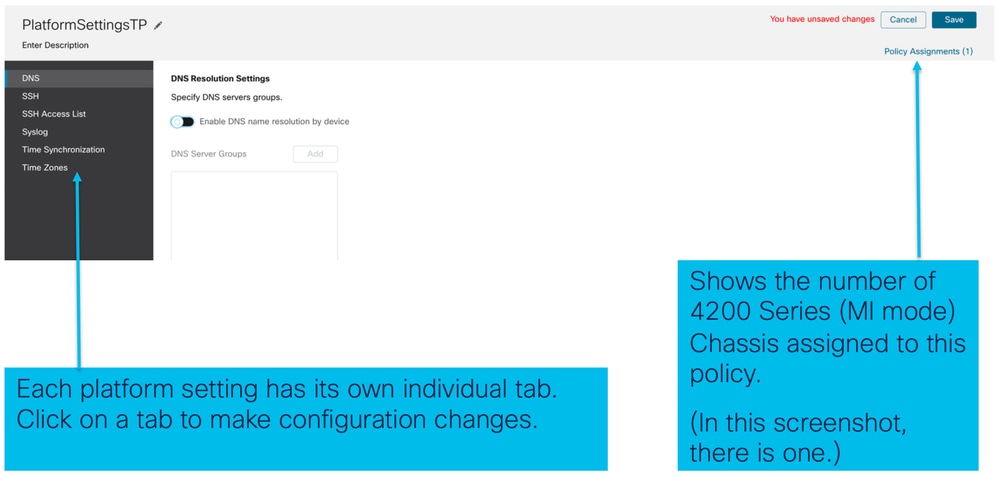
Criteri di impostazione della piattaforma chassis
Il criterio relativo alle impostazioni della piattaforma dello chassis consente agli utenti di configurare le seguenti configurazioni specifiche della piattaforma:
- Sincronizzazione ora (NTP)
- DNS
- Syslog
- Fuso orario
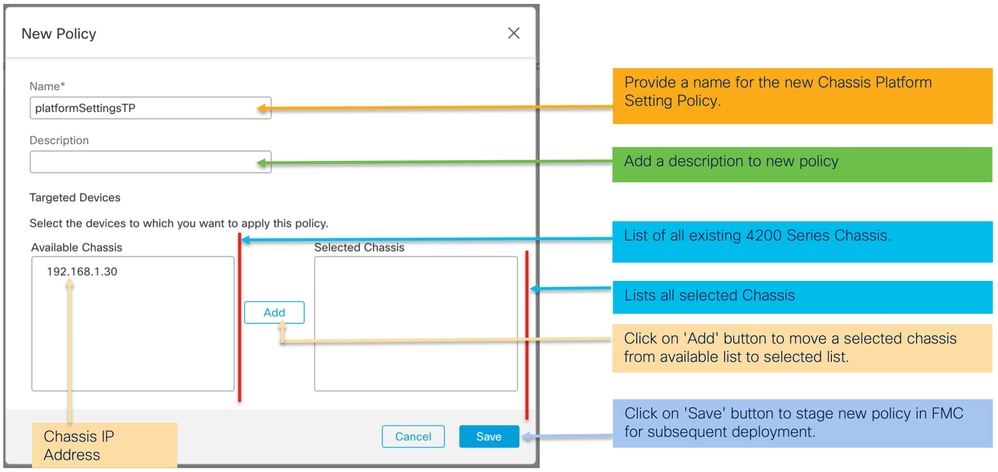
- L'utente può creare una nuova regola "Chassis Platform Setting" (Impostazione piattaforma chassis) e assegnarla a più chassis serie 4200 (modalità MI).

Suggerimento: Le impostazioni della piattaforma dello chassis si applicano solo allo chassis. Se l'utente desidera applicare le impostazioni della piattaforma alle proprie istanze, può utilizzare un criterio Impostazioni piattaforma di difesa dalle minacce.
1. Passare al criterio Impostazioni piattaforma dello chassis:
2. Creare le impostazioni della piattaforma dello chassis:
3. Pagina dei criteri di impostazione della piattaforma chassis:
Impostazioni piattaforma chassis: DNS
Abilitare e aggiungere gruppi di server DNS nella sezione DNS del criterio Impostazioni piattaforma chassis:

Impostazioni piattaforma chassis: SSH
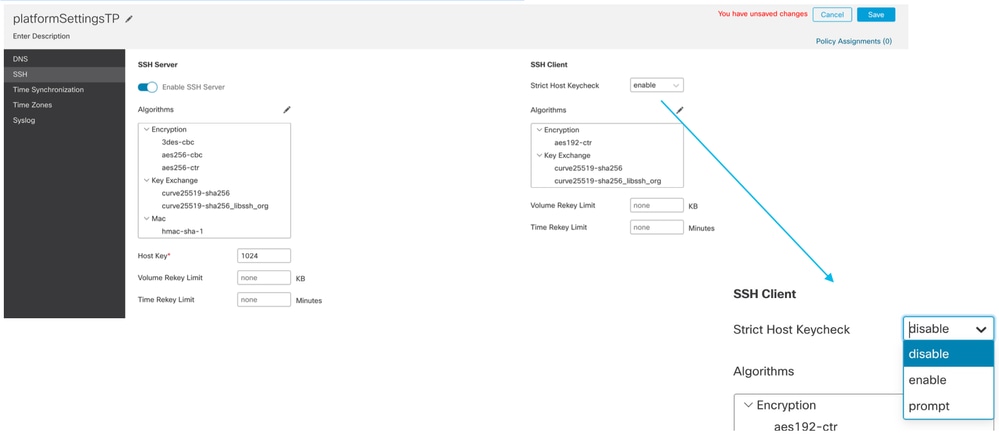
- Abilitare e aggiungere il server SSH nella sezione SSH del criterio Impostazioni piattaforma chassis:
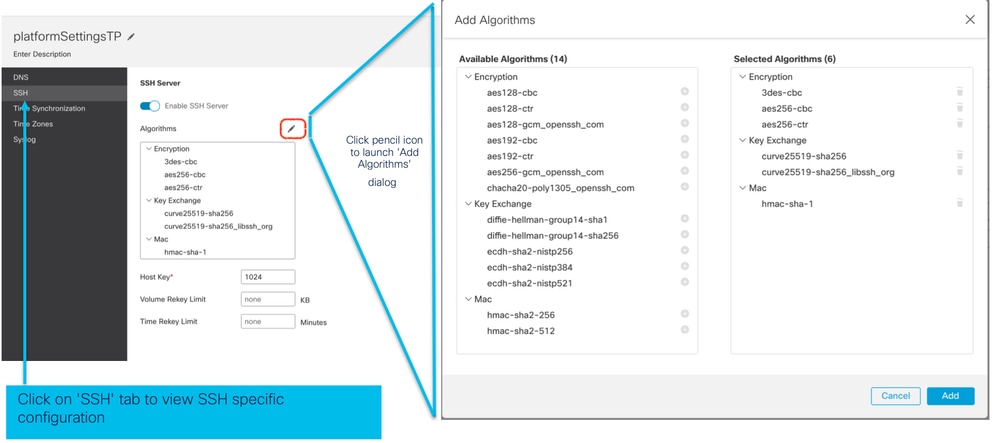
- Abilitare e aggiungere il client SSH:
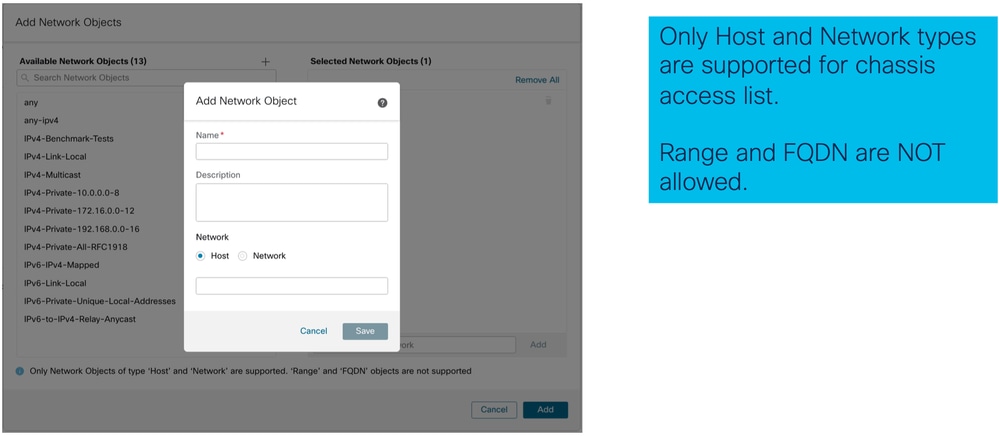
Impostazioni piattaforma chassis: Elenco accessi SSH
Questa scheda viene visualizzata solo dopo aver abilitato SSH nella sezione SSH delle impostazioni della piattaforma chassis.
- Creazione elenco accessi SSH:

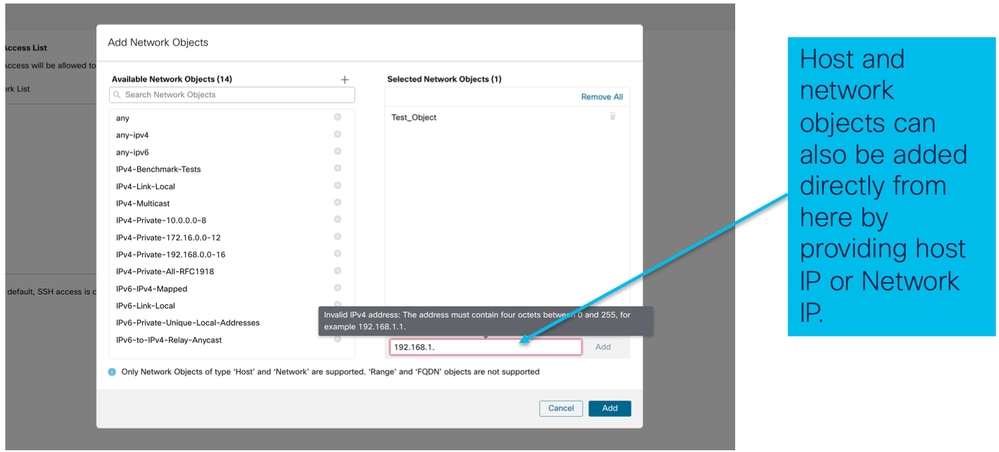
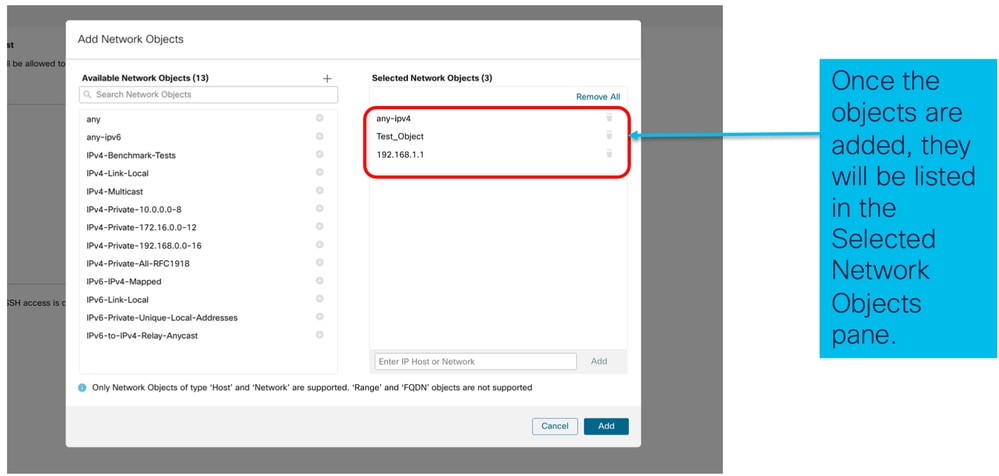
- Aggiungere l'elenco degli oggetti di rete per l'accesso SSH:
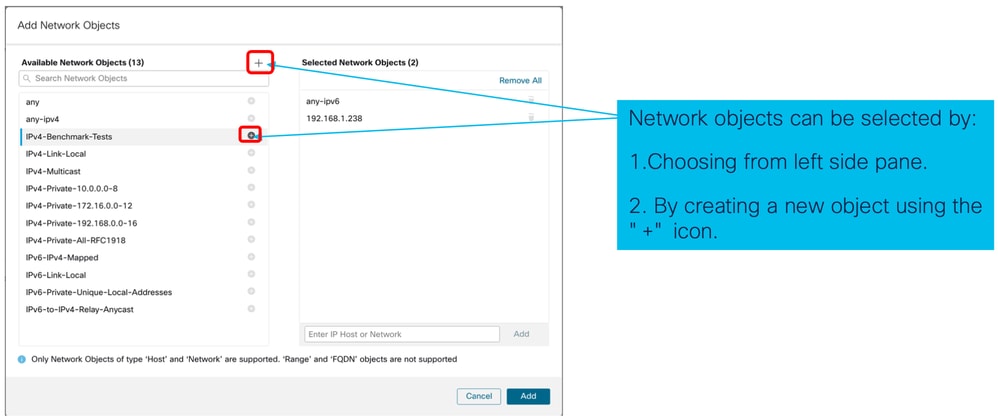
- Aggiungere un nuovo oggetto di rete:
- Visualizza oggetti di rete:
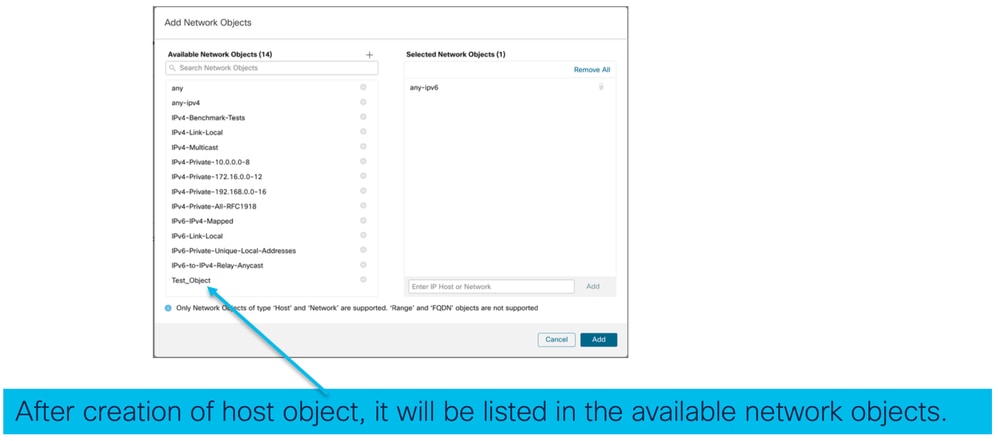
- Seleziona oggetti di rete:
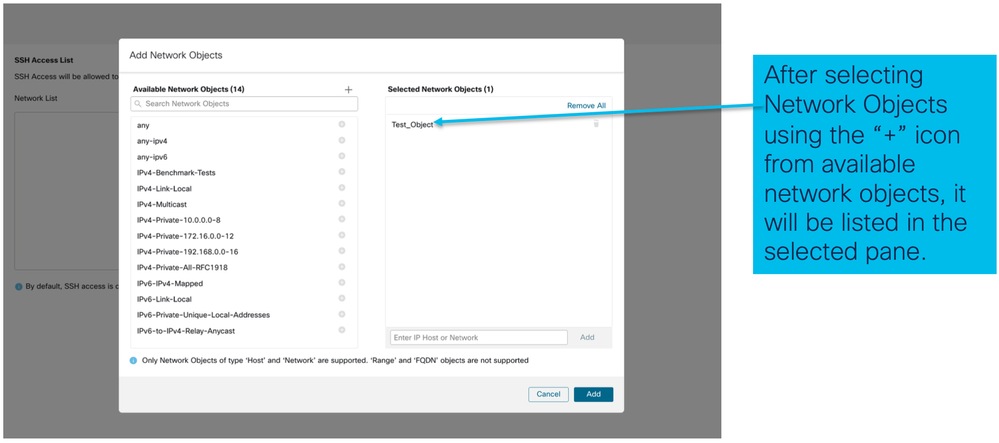
- Gli oggetti di rete possono essere creati come mostrato nella seguente immagine:
- Visualizza oggetti di rete aggiunti:
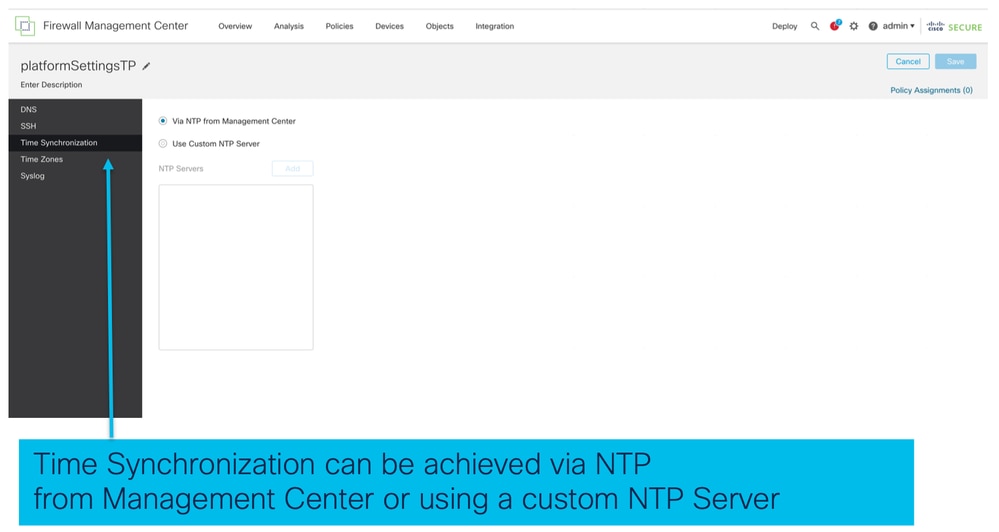
Impostazioni piattaforma chassis: Sincronizzazione ora
La sincronizzazione dell'ora può essere eseguita in due modi:
- Tramite NTP dal centro di gestione
- Sul server NTP personalizzato
Da NTP da Management Center
Sul server NTP personalizzato

Impostazioni piattaforma chassis: Fusi orari
Fusi orari:

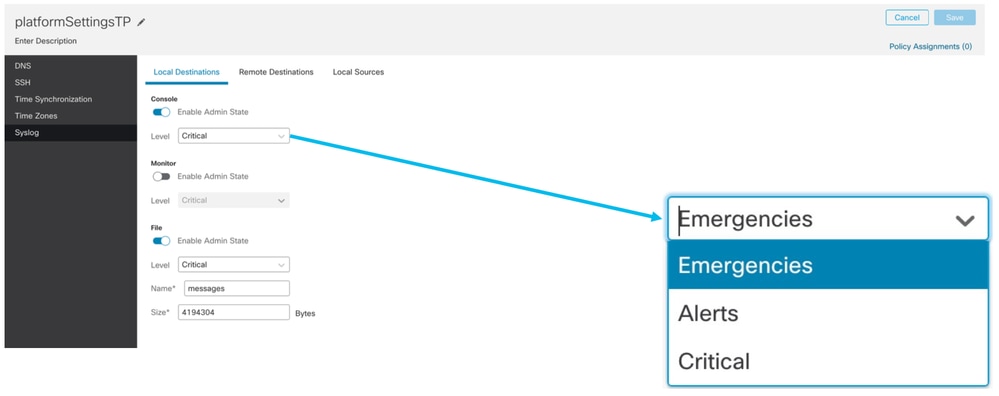
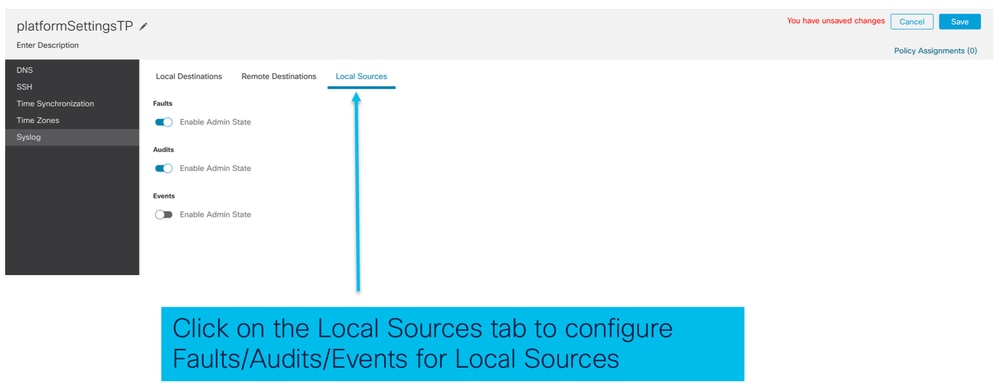
Impostazioni piattaforma chassis: Syslog
- Scheda Destinazioni locali Syslog:
- Scheda Destinazioni remote Syslog:

- Scheda Origini locali Syslog:
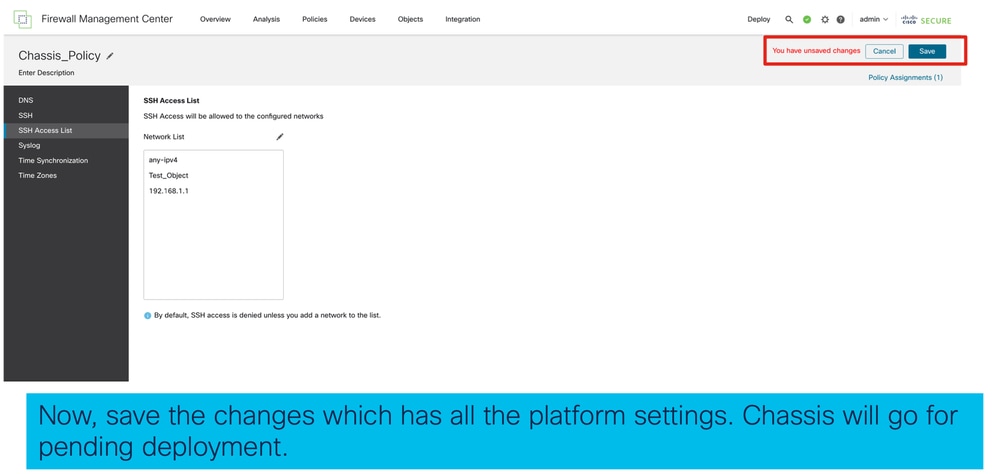
Impostazioni piattaforma chassis: Salva e distribuisci
Salvare le modifiche alle impostazioni della piattaforma chassis, quindi distribuire:

Annullamento della registrazione dello chassis
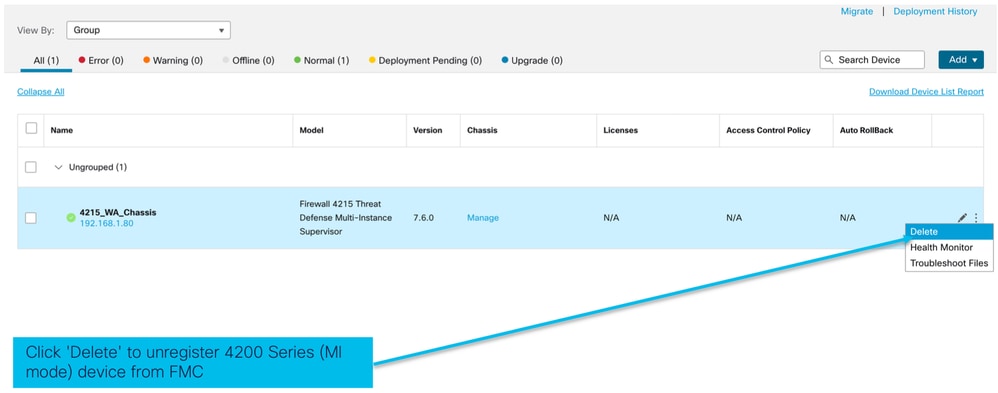
Per annullare la registrazione di uno chassis da FMC, selezionare Dispositivi > Gestione dispositivi > Elimina.
Converti da istanza multipla in modalità nativa
Attualmente, FMC supporta solo la conversione da Nativo a Multiistanza. Di conseguenza, per riconvertire un dispositivo alla modalità nativa, l'utente deve utilizzare la CLI.
Passaggio 1: Annullare la registrazione dello chassis dal FMC.
Passaggio 2: Utilizzare questo comando CLI per convertire la periferica serie 4200 in modalità nativa:
firepower-4215# scope system
firepower-4215 /system # set deploymode native
API FMC Rest
Le API REST pubbliche di FMC sono disponibili per tutte le operazioni supportate da FMC.
API REST per conversione da native a multi-istanza
API POST per verificare se il dispositivo nativo è pronto per la conversione a più istanze:
/api/fmc_config/v1/domain/{domainUUID}/chassis/fmcmanagedchassis/operating/switchmodereadinesscheck
JSON richiesta POST di esempio:
{
  "devices": [
    {
      "id": "DeviceUUID",
      "type": "Device"
    }
  ],
  "conversionType": "NATIVE_TO_MULTI_INSTANCE"
}
API POST per attivare la conversione da singola istanza a più istanze:
/api/fmc_config/v1/domain/{domainUUID}/chassis/fmcmanagedchassis/operating/switchmode
JSON richiesta POST di esempio:
{
  "items": [
    {
      "id": "


      ", "displayName": "Sample_Chassis_Name1" } ], "conversionType": "NATIVE_TO_MULTI_INSTANCE" }
API POST per attivare la conversione da nativa a più istanze in blocco:
/api/fmc_config/v1/domain/{domainUUID}/chassis/fmcmanagedchassis/operating/switchmode
JSON richiesta POST di esempio:
{
  "items": [
    {
      "id": "


      ", "displayName": "Sample_Chassis_Name1" }, { "id": "

       ", "displayName": "Sample_Chassis_Name2" } ], "conversionType": "NATIVE_TO_MULTI_INSTANCE" }
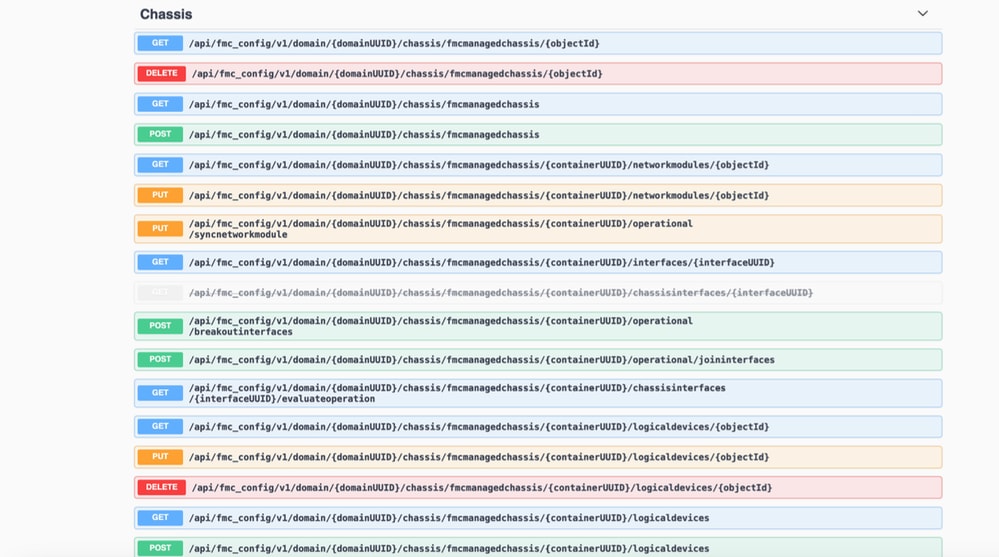
API REST per gestione chassis
POST Aggiunta di uno chassis al centro di gestione:
/api/fmc_config/v1/domain/{domainUUID}/chassis/fmcmanagedchassis
GET all Chassis (OTTIENI tutto lo chassis):
/api/fmc_config/v1/domain/{domainUUID}/chassis/fmcmanagedchassis/
GET a specific Chassis by uid (Ottieni uno chassis specifico da uuid):
/api/fmc_config/v1/domain/{domainUUID}/chassis/fmcmanagedchassis/{objectId}
Eliminare uno chassis tramite uuid:
/api/fmc_config/v1/domain/{domainUUID}/chassis/fmcmanagedchassis/{objectId}
JSON richiesta POST di esempio:
{
  "type": "FMCManagedChassis",
  "chassisName": "CHASSIS123",
  "chassisHostName": "192.168.xx.74",
  "regKey": "*****"
}
API REST per la gestione di Netmod (moduli di rete)
GET a Network Module by uid (OTTIENI modulo di rete da uuid):
/api/fmc_config/v1/domain/{domainUUID}/chassis/fmcmanagedchassis/{containerUUID}/networkmodules/{objectId}
GET ALL Network Module:
/api/fmc_config/v1/domain/{domainUUID}/chassis/fmcmanagedchassis/{containerUUID}/networkmodules/
PUT - Modifica un modulo di rete esistente tramite uuid:
/api/fmc_config/v1/domain/{domainUUID}/chassis/fmcmanagedchassis/{containerUUID}/networkmodules/{objectId}
PUT - Recupero dei dati del modulo di rete da FXOS e aggiornamento di Management Center:
/api/fmc_config/v1/domain/{domainUUID}/chassis/fmcmanagedchassis/{containerUUID}/operating/syncnetworkmodule
Risposta GET di esempio
{
  "metadata": {
    "timestamp": 1688670821060,
    "domain": {
      "name": "Global",
      "id": "e276abec-e0f2-11e3-8169-************",
      "type": "Domain"
    }
  },
  "links": {
    "self": "https://u32c01p10-vrouter.cisco.com:32300/api/fmc_config/v1/domain/e276abec-e0f2-11e3-8169-************/chassis/fmcmanagedchassis/f0f11b69-4229-4025-b0b9-************/networkmodules/0050568A-3F3F-0ed3-0000-0************"
  },
  "id": "0050568A-3F3F-0ed3-0000-************",
  "moduleState": "ENABLED",
  "type": "NetworkModule",
  "description": "Cisco FPR 8X1G 8X10G 1RU Module",
  "model": "FPR-3120",
  "operationState": "ok",
  "numOfPorts": 16,
  "slotId": "1",
  "vendor": "Cisco Systems, Inc.",
  "name": "Network Module 1"
}
API REST per gestione istanze
POST Aggiunta di uno chassis al centro di gestione:
/api/fmc_config/v1/domain/{domainUUID}/chassis/fmcmanagedchassis/{containerUUID}/logicaldevices
GET all Chassis (OTTIENI tutto lo chassis):
/api/fmc_config/v1/domain/{domainUUID}/chassis/fmcmanagedchassis/{containerUUID}/logicaldevices
GET a specific Instance by uuid (Ottieni un'istanza specifica per uuid):
/api/fmc_config/v1/domain/{domainUUID}/chassis/fmcmanagedchassis/{containerUUID}/logicaldevices/{objectId}
PUT - Modificare un'istanza in base a uuid:
/api/fmc_config/v1/domain/{domainUUID}/chassis/fmcmanagedchassis/{containerUUID}/logicaldevices/{objectId}
Eliminare uno chassis tramite uuid:
/api/fmc_config/v1/domain/{domainUUID}/chassis/fmcmanagedchassis/{containerUUID}/logicaldevices/{objectId}
Richiesta PUT di esempio:
{
  "name": "ftd1",
  "operationalState": "string",
  "deviceRegistration": {
    "licenseCaps": [
      "MALWARE",
      "URLFilter",
      "CARRIER",
      "PROTECT"
    ],
    "accessPolicy": {
      "name": "AC Policy name",
      "id": "


      ", "type": "AccessPolicy" }, "deviceGroup": { "name": "DeviceGroup name", "id": "
     ", "type": "DeviceGroup" } }, "managementBootstrap": { "ipv4": { "gateway": "192.168.xx.68", "ip": "192.168.xx.78", "mask": "255.255.255.0" }, "adminState": "enable", "firepowerManagerIP": "192.168.xx.32", "permitExpertMode": "yes", "searchDomain": "string", "firewallMode": "Routed", "dnsServers": "192.168.xx.123", "natId": "natId", "registrationKey": "regKey", "adminPassword": "adminPwd", "fqdn": "fqdn" }, "externalPortLink": [ { "name": "Ethernet1/1", "id": "

        ", "type": "ChassisInterface" }, { "name": "Ethernet2/2.1", "id": "

         ", "type": "ChassisInterface" } ], "type": "LogicalDevice" }
API REST per gestione SNMP
GET an SNMP Setting by uid (OTTIENI impostazione SNMP per uuid):
/api/fmc_config/v1/domain/{domainUUID}/chassis/fmcmanagedchassis/{containerUUID}/snmpsettings/{IDoggetto}
OTTIENI TUTTE LE impostazioni SNMP:
/api/fmc_config/v1/domain/{domainUUID}/chassis/fmcmanagedchassis/{containerUUID}/snmpsettings/
PUT - Modificare un modulo di rete esistente con uuid:
/api/fmc_config/v1/domain/{domainUUID}/chassis/fmcmanagedchassis/{containerUUID}/snmpsettings/{IDoggetto}
Risposta GET di esempio:
{
  "snmpAdminInstance": {
    "id": "logicalDeviceUuid",
    "type": "LogicalDevice",
    "name": "ftd3"
  },
  "id": "snmpsettingsUUID2",
  "type": "SnmpSetting"
}
API REST da recuperare riepilogo
Questo elenco contiene informazioni dettagliate sulle API REST per il recupero del riepilogo:
- Errori
- Istanze
- Inventario
- Interfacce
- Informazioni sull'app
Riepilogo degli errori GET per uno chassis:
/api/fmc_config/v1/domain/{domainUUID}/chassis/fmcmanagedchassis/{containerUUID}/faultsummary
Risposta di esempio:
{
  "links": {
    "self": "


      /api/fmc_config/v1/domain/domainUUID/chassis/fmcmanagedchassis/containerUUID/faultsummary?offset=0&limit=25&expanded=true" }, "items": [ { "faultList": [ { "id": 27429, "isAcknowledged": "no", "cause": "device-registration-pending", "gateway": "3::1", "ip": "3::2", "prefixLength": "33" } ], "managementPort": "Management1", "operationalState": "online", "adminState": "enabled", "deployType": "container" } ], "modifiedTime": "2022-07-05T06:39:25Z", "type": "InstanceSummary" ], "paging": { "offset": 0, "limit": 25, "count": 1, "pages": 1 } }
Riepilogo delle istanze GET per uno chassis:
/api/fmc_config/v1/domain/{domainUUID}/chassis/fmcmanagedchassis/{containerUUID}/instancesummary
Risposta di esempio:
{
  "links": {
    "self": "


      /api/fmc_config/v1/domain/domainUUID/chassis/fmcmanagedchassis/containerUUID/instancesummary?offset=0&limit=25&expanded=true" }, "items": [ { "instanceList": [ { "name": "ftdmi2", "startupVersion": "7.3.0.1402", "coresUsed": 6, "ipv4": { "gateway": "192.168.xx.68", "ip": "192.168.xx.78", "mask": "255.255.255.0" }, "ipv6": { "gateway": "3::1", "ip": "3::2", "prefixLength": "33" }, "managementPort": "Management1", "operationalState": "online", "adminState": "enabled", "deployType": "container" } ], "modifiedTime": "2022-07-05T06:39:25Z", "type": "InstanceSummary" } ], "paging": { "offset": 0, "limit": 25, "count": 1, "pages": 1 } }
GET Inventory Summary per uno chassis:
/api/fmc_config/v1/domain/{domainUUID}/chassis/fmcmanagedchassis/{containerUUID}/inventorysummary
Esempio di risposta:
{
  "links": {
    "self": "


      /api/fmc_config/v1/domain/domainUUID/chassis/fmcmanagedchassis/containerUUID/inventorysummary?offset=0&limit=25&expanded=true" }, "items": [ { "fanList": [ { "operationalState": "operable", "operability": "operable", "power": "on", "thermalStatus": "ok", "module": 1, "tray": 1, "id": 1, "model": "N/A", "vendor": "N/A" }, { "operationalState": "operable", "operability": "operable", "power": "on", "thermalStatus": "ok", "module": 1, "tray": 1, "id": 2, "model": "N/A", "vendor": "N/A" } ], "powerSupplyList": [ { "id": 2, "operationalState": "operable", "operability": "operable", "serialNumber": "***********", "thermalStatus": "ok", "model": "FPR2K-PWR-AC-400", "vendor": "Cisco Systems, Inc" } ], "processorList": [ { "id": 1, "operationalState": "operable", "operability": "operable", "vendor": "AuthenticAMD", "model": "49 AMD EPYC 7282 16-Core Processor", "type": "CPU", "thermalStatus": "ok" } ], "securityModuleList": [ { "id": 1, "operationalState": "ok", "operability": "operable", "serialNumber": "***********", "vendor": "Cisco Systems, Inc", "model": "FPR-3120", "availableCores": 24, "totalCores": 32 } ], "memoryList": [ { "capacity": 65536, "id": 1, "array": 1, "bank": 0, "model": "HMAA8GR7AJR4N-XN", "operationalState": "operable", "operability": "operable", "performance": "ok", "power": "not-supported", "serialNumber": "********", "thermalStatus": "ok", "vendor": "Hynix" } ], "model": "FPR-3120", "availableCores": 24, "totalCores": 32 } ], "paging": { "offset": 0, "limit": 25, "count": 1, "pages": 1 } }
GET Interface Summary per uno chassis:
/api/fmc_config/v1/domain/{domainUUID}/chassis/fmcmanagedchassis/{containerUUID}/interfacesummary
Risposta di esempio:
{
  "links": {
    "self": "


      /api/fmc_config/v1/domain/domainUUID/chassis/fmcmanagedchassis/containerUUID/interfacesummary?offset=0&limit=25" }, "items": [ { "interfaceList": [ { "name": "Ethernet1/8", "operationalState": "up", "adminState": "disabled", "portType": "data", "operationalSpeed": "10mbps", "adminSpeed": "1gbps", "adminDuplex": "fullDuplex", "autoNegotiation": "yes", "mediaType": "rj45", "type": "PhysicalInterface" }, { "name": "Ethernet1/7", "operationalState": "up", "adminState": "disabled", "portType": "data", "operationalSpeed": "1gbps", "adminSpeed": "1gbps", "adminDuplex": "fullDuplex", "autoNegotiation": "yes", "mediaType": "rj45", "type": "PhysicalInterface" }, { "name": "Ethernet1/6", "operationalState": "up", "adminState": "disabled", "portType": "data", "operationalSpeed": "1gbps", "adminSpeed": "1gbps", "adminDuplex": "fullDuplex", "autoNegotiation": "yes", "mediaType": "rj45", "type": "PhysicalInterface" }, { "name": "Ethernet1/3", "operationalState": "up", "adminState": "disabled", "portType": "data", "operationalSpeed": "1gbps", "adminSpeed": "1gbps", "adminDuplex": "fullDuplex", "autoNegotiation": "yes", "mediaType": "rj45", "type": "PhysicalInterface" }, { "name": "Ethernet1/2", "operationalState": "up", "adminState": "enabled", "portType": "data", "operationalSpeed": "1gbps", "adminSpeed": "1gbps", "adminDuplex": "fullDuplex", "autoNegotiation": "yes", "mediaType": "rj45", "type": "PhysicalInterface" }, { "name": "Ethernet1/1", "operationalState": "up", "adminState": "enabled", "portType": "data", "operationalSpeed": "1gbps", "adminSpeed": "1gbps", "adminDuplex": "fullDuplex", "autoNegotiation": "yes", "mediaType": "rj45", "type": "PhysicalInterface" }, { "name": "Port-channel48", "operationalState": "up", "adminState": "enabled", "portType": "data", "operationalSpeed": "1gbps", "adminSpeed": "1gbps", "adminDuplex": "fullDuplex", "autoNegotiation": "yes", "mediaType": "rj45", "type": "EtherChannelInterface" } ], "modifiedTime": "2022-07-05T06:39:25Z", "type": "InterfaceSummary" } ], "paging": { "offset": 0, "limit": 25, "count": 1, "pages": 1 } }
OTTENERE informazioni sull'app per uno chassis:
/api/fmc_config/v1/domain/{domainUUID}/chassis/fmcmanagedchassis/{containerUUID} /inventorysummary
Risposta di esempio:
{
  "links": {
    "self": "


      /api/fmc_config/v1/domain/domainUUID/chassis/fmcmanagedchassis/containerUUID/appinfo?offset=0&limit=25&expanded=true" }, "items": [ { "appVersion": "7.4.0.1024", "type": "AppInfo" }, { "appVersion": "7.4.0.1075", "type": "AppInfo" } ], "paging": { "offset": 0, "limit": 25, "count": 1, "pages": 1 } }
API REST per la gestione dell'interfaccia
In questa sezione vengono fornite informazioni dettagliate sulle API REST per la gestione della configurazione dell'interfaccia:
- URL da utilizzare per le modifiche alla configurazione dell'interfaccia
- URL da utilizzare per l'interruzione o il join delle interfacce
- URL da utilizzare per le configurazioni dei dispositivi di sincronizzazione
Aggiorna interfaccia fisica
Per supportare l'aggiornamento delle interfacce fisiche, sono stati introdotti questi URL.
OTTIENI tutte le interfacce fisiche:
/api/fmc_config/v1/domain/{domainUUID}/chassis/fmcmanagedchassis/{containerUUID}/interfacce fisiche
GET a specific physical interface by interface uuid (OTTIENI un'interfaccia fisica specifica per uuid interfaccia):
/api/fmc_config/v1/domain/{domainUUID}/chassis/fmcmanagedchassis/{containerUUID}/physical interface s/{interfaceUUID}
Aggiorna interfaccia in base all'uuid interfaccia:
/api/fmc_config/v1/domain/{domainUUID}/chassis/fmcmanagedchassis/{containerUUID}/physical interface s/{interfaceUUID}
Il modello di interfaccia fisica è simile al seguente:
{
  "metadata": {
    "supportedSpeed": "TEN_GBPS,ONE_GBPS,TWENTY_FIVE_GBPS,DETECT_SFP",
    "mediaType": "sfp",
    "sfpType": "none",
    "isBreakoutCapable": false,
    "isSplitInterface": false,
    "timestamp": 1692344434067,
    "domain": {
      "name": "Global",
      "id": "e276abec-e0f2-11e3-8169-**********",
      "type": "Domain"
    }
  },
  "type": "PhysicalInterface",
  "name": "Ethernet2/2",
  "portType": "DATA",
  "adminState": "DISABLED",
  "hardware": {
    "flowControlSend": "OFF",
    "fecMode": "AUTO",
    "autoNegState": true,
    "speed": "DETECT_SFP",
    "duplex": "FULL"
  },
  "LLDP": {
    "transmit": false,
    "receive": false
  },
  "id": "*************************************"
}
Configura sottointerfacce
Per supportare la gestione delle sottointerfacce, sono stati introdotti questi URL.
GET a sub interfaces:
/api/fmc_config/v1/domain/{domainUUID}/chassis/fmcmanagedchassis/{containerUUID}/sottointerfacce
GET a specific sub interface by interface uid (Ottieni una sottointerfaccia specifica per uuid interfaccia):
/api/fmc_config/v1/domain/{domainUUID}/chassis/fmcmanagedchassis/{containerUUID}/subinterfaces/{interfaceUUID}
POST una nuova sottointerfaccia:
/api/fmc_config/v1/domain/{domainUUID}/chassis/fmcmanagedchassis/{containerUUID}/sottointerfacce
AGGIORNA interfaccia per uuid interfaccia:
/api/fmc_config/v1/domain/{domainUUID}/chassis/fmcmanagedchassis/{containerUUID}/subinterfaces/{interfaceUUID}
DELETE a sub interface by interface uid (ELIMINA un'interfaccia secondaria tramite l'uuid interfaccia):
/api/fmc_config/v1/domain/{domainUUID}/chassis/fmcmanagedchassis/{containerUUID}/subinterfaces/{interfaceUUID}
Il modello di sottointerfaccia è simile al seguente:
{
  "metadata": {
    "isBreakoutCapable": false,
    "isSplitInterface": false,
    "timestamp": 1692536476265,
    "domain": {
      "name": "Global",
      "id": "e276abec-e0f2-11e3-8169-**********",
      "type": "Domain"
    }
  },
  "type": "SubInterface",
  "name": "Ethernet1/3.3",
  "portType": "DATA",
  "subIntfId": 3,
  "parentInterface": {
    "type": "PhysicalInterface",
    "id": "00505686-9A51-0ed3-0000-**********",
    "name": "Ethernet1/3"
  },
  "vlanId": 3,
  "id": "*************************************"
}
Configurazione delle interfacce EtherChannel
Per supportare la gestione delle interfacce EtherChannel, questi URL sono stati introdotti.
GET a etherchannel interfaces:
/api/fmc_config/v1/domain/{domainUUID}/chassis/fmcmanagedchassis/{containerUUID}/etherchannelinterfaces/{interfaceUUID}
GET a specific etherchannel interface by interface uid (Ottieni un'interfaccia etherchannel specifica per uuid interfaccia):
/api/fmc_config/v1/domain/{domainUUID}/chassis/fmcmanagedchassis/{containerUUID}/etherchannelinterfaces/{interfaceUUID}
Pubblicare una nuova interfaccia etherchannel:
/api/fmc_config/v1/domain/{domainUUID}/chassis/fmcmanagedchassis/{containerUUID}/etherchannelinterfaces
AGGIORNA interfaccia per uuid interfaccia:
/api/fmc_config/v1/domain/{domainUUID}/chassis/fmcmanagedchassis/{containerUUID}/etherchannelinterfaces/{interfaceUUID}
DELETE a etherchannel interface by interface uid:
/api/fmc_config/v1/domain/{domainUUID}/chassis/fmcmanagedchassis/{containerUUID}/etherchannelinterfaces/{interfaceUUID}
Il modello di interfaccia EtherChannel è simile al seguente:
{
  "metadata": {
    "supportedSpeed": "HUNDRED_MBPS,TEN_MBPS,ONE_GBPS",
    "timestamp": 1692536640172,
    "domain": {
      "name": "Global",
      "id": "e276abec-e0f2-11e3-8169-**********",
      "type": "Domain"
    }
  },
  "type": "EtherChannelInterface",
  "name": "Port-channel45",
  "portType": "DATA",
  "etherChannelId": 45,
  "selectedInterfaces": [
    {
      "type": "PhysicalInterface",
      "id": "00505686-9A51-0ed3-0000-**********",
      "name": "Ethernet1/4"
    },
    {
      "type": "PhysicalInterface",
      "id": "00505686-9A51-0ed3-0000-**********",
      "name": "Ethernet1/5"
    }
  ],
  "lacpMode": "ON",
  "lacpRate": "FAST",
  "adminState": "DISABLED",
  "hardware": {
    "flowControlSend": "OFF",
    "autoNegState": true,
    "speed": "ONE_GBPS",
    "duplex": "FULL"
  },
  "LLDP": {
    "transmit": true,
    "receive": true
  },
  "id": "00505686-9A51-0ed3-0000-**********"
}
Interfacce REST API Break/Join
Per supportare la separazione/join delle interfacce nella serie 4200, è possibile utilizzare i seguenti URL:
SCARICA:
/api/fmc_config/v1/domain/{domainUUID}/chassis/fmcmanagedchassis/{containerUUID}/chassisinterfaces/{interfaceUUID}/valuateoperation
Valuta la fattibilità di break/join per un'interfaccia
POST:
/api/fmc_config/v1/domain/{domainUUID}/chassis/fmcmanagedchassis/{containerUUID}/operating/breakoutinterfaces
Interrompe un'interfaccia
POST:
/api/fmc_config/v1/domain/{domainUUID}/chassis/fmcmanagedchassis/{containerUUID}/operating/joininterfaces
Unisce un insieme di interfacce interrotte
Flusso REST per interruzione interfaccia
1. Individuare il dispositivo chassis gestito FMC (4200) utilizzando l'endpoint chassis fmcmanaged.
GET /api/fmc_config/v1/domain/{domainUUID}/chassis/fmcmanagedchassis
Restituisce l'elenco dei dispositivi chassis gestiti da FMC insieme ai dispositivi a più istanze con i dettagli quali ID, nome e modello di ciascun dispositivo. Scegliere i dispositivi "MULTIINSTANCE".
Risposta di esempio:
{
  "id": "fcaa9ca4-85e5-4bb0-b049-**********",
  "type": "FMCManagedChassis",
  "chassisName": "192.168.0.75",
  "chassisMode": "MULTIINSTANCE",
  "links": {
    "self": "https://u32c01p06-vrouter.cisco.com:22512/api/fmc_config/v1/domain/e276abec-e0f2-11e3-8169-**********/chassis/fmcmanagedchassis/fcaa9ca4-85e5-4bb0-b049-**********"
  }
}
2. Verificare se l'interfaccia è breakout in grado di utilizzare l'endpoint interfacce/interfacce fisiche.
Breakout è possibile solo se "isBreakoutCapable" è true e mediaType è QSFP.
GET /api/fmc_config/v1/domain/{domainUUID}/chassis/fmcmanagedchassis/{containerUUID}/interfacce
Risposta di esempio:
{
  "metadata": {
    "supportedSpeed": "FORTY_GBPS,DETECT_SFP",  >>>>>>>>>
    "mediaType": "qsfp",                        >>>>>>>>>
    "sfpType": "none",
    "isBreakoutCapable": true,                  >>>>>>>>>
    "breakoutFactor": "4",                      >>>>>>>>>
    "isSplitInterface": false,
    "timestamp": 1692344434067,
    "domain": {
      "name": "Global",
      "id": "e276abec-e0f2-11e3-8169-**********",
      "type": "Domain"
    }
  },
  "type": "PhysicalInterface",
  "name": "Ethernet2/4",
  "portType": "DATA",
  "adminState": "DISABLED",
  "hardware": {
    "flowControlSend": "OFF",
    "fecMode": "AUTO",
    "autoNegState": true,
    "speed": "DETECT_SFP",
    "duplex": "FULL"
  },
  "LLDP": {
    "transmit": false,
    "receive": false
  },
  "id": "00505686-9A51-0ed3-0000-**********"
}
3. Nell'interfaccia, valutare la fattibilità dell'operazione break utilizzando l'endpoint valuateoperation.
GET /api/fmc_config/v1/domain/{domainUUID}/chassis/fmcmanagedchassis/{containerUUID}/chassisinterfaces/{interfaceUUID}/valuateoperation
Se nella risposta non sono presenti avvisi/errori, l'utente può eseguire un'operazione di interruzione.
Risposta di esempio:
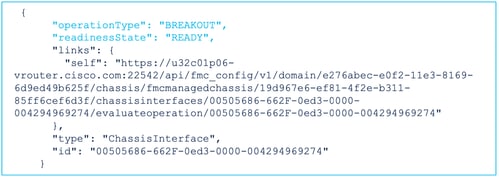
Se nella risposta sono presenti errori, l'utente non è autorizzato a eseguire l'operazione di interruzione:
{
  "operationType": "BREAKOUT",
  "interfaceUsages": [
    {
      "conflictType": "Interface usage on instance(s)",
      "severity": "ERROR",              >>>>>>>>>
      "description": "Interface Ethernet2/4 can not be split. Remove it from instances [FTD1] and try again.\n"
    }
  ],
  "readinessState": "NOT_READY",        >>>>>>>>>
  "links": {
    "self": "https://u32c01p06-vrouter.cisco.com:22542/api/fmc_config/v1/domain/e276abec-e0f2-11e3-8169-**********/chassis/fmcmanagedchassis/19d967e6-ef81-4f2e-b311-**********/chassisinterfaces/00505686-662F-0ed3-0000-004294969274/evaluateoperation/00505686-662F-0ed3-0000-**********"
  },
  "type": "ChassisInterface",
  "id": "00505686-662F-0ed3-0000-**********"
}
4. Se l'interfaccia è breakout e lo stato di preparazione è "READY", interrompere l'interfaccia utilizzando l'endpoint breakoutinterfaces.
POST /api/fmc_config/v1/domain/{domainUUID}/chassis/fmcmanagedchassis/{containerUUID}/operating/breakoutinterfaces
Richiesta:
{
  "targetInterfaces": [
    {
      "id": "***************ed3-0000-004294969276",
      "metadata": {
        "type": "PhysicalInterface"
      }
    }
  ],
  "type": "BreakoutInterface"
}
Risposta:
{
  "id": "4294969716",
  "type": "TaskStatus",
  "links": {
    "self": "https://u32c01p06-vrouter.cisco.com:22542/api/fmc_config/v1/domain/e276abec-e0f2-11e3-8169-**********/job/taskstatuses/4294969716"
  },
  "taskType": "DEVICE_DEPLOYMENT",
  "message": "Deployment status for ************************************: SUCCEEDED",
  "status": "Interface notification received"
}
5. Registrare il completamento del task utilizzando l'ID task nella risposta di interruzione. Impostare lo stato del task su "Notifica interfaccia ricevuta".
GET /api/fmc_config/v1/domain/{domainUUID}/job/taskstatuses/{objectId}
{
  "metadata": {
    "task": {
      "id": "4294969699",
      "links": {
        "self": "https://u32c01p06-vrouter.cisco.com:22542/api/fmc_config/v1/domain/e276abec-e0f2-11e3-8169-**********/job/taskstatuses/4294969699"
      }
    }
  },
  "targetInterfaces": [
    {
      "id": "00505686-662F-0ed3-0000-**********",
      "type": "PhysicalInterface"
    }
  ],
  "type": "BreakoutInterface"
}

{
  "id": "4294969716",
  "type": "TaskStatus",
  "links": {
    "self": "https://u32c01p06-vrouter.cisco.com:22542/api/fmc_config/v1/domain/e276abec-e0f2-11e3-8169-**********/job/taskstatuses/4294969716"
  },
  "taskType": "DEVICE_DEPLOYMENT",
  "message": "Deployment status for ************************************: SUCCEEDED",
  "status": "Interface notification received"
}
6. Ottenere le modifiche delle interfacce utilizzando l'endpoint chassisinterfaceevents.
GET /api/fmc_config/v1/domain/{domainUUID}/chassis/ fmcmanagedchassis/{containerUUID}/chassisinterfaceevents
Risposta di esempio:
[
  {
    "change": "Interface is deleted",
    "type": "PhysicalInterface",
    "state": "DISASSOCIATED",
    "name": "Ethernet2/3"
  },
  {
    "change": "Interface is associated",
    "type": "PhysicalInterface",
    "state": "ASSOCIATED",
    "name": "Ethernet2/3/2"
  },
  {
    "change": "Interface is associated",
    "type": "PhysicalInterface",
    "state": "ASSOCIATED",
    "name": "Ethernet2/3/3"
  },
  {
    "change": "Interface is associated",
    "type": "PhysicalInterface",
    "state": "ASSOCIATED",
    "name": "Ethernet2/3/4"
  }
]
7. Se la notifica dell'interfaccia non viene ricevuta, sincronizzare il dispositivo utilizzando l'endpoint chassisinterfaceevents e verificare che siano presenti modifiche in sospeso.
POST /api/fmc_config/v1/domain/{domainUUID}/devices/devicerecords/{containerUUID}/ chassisinterfaceevents
Richiesta:
{
  "action": "SYNC_WITH_DEVICE"
}
Risposta:
{
  "action": "SYNC_WITH_DEVICE",
  "hasPendingChanges": true
}
8. Una volta ricevuta la notifica, accettare le modifiche utilizzando l'endpoint chassisinterfaceevents.
POST /api/fmc_config/v1/domain/{domainUUID}/devices/devicerecords/{containerUUID}/ chassisinterfaceevents
Richiesta:
{
   "action":"ACCEPT_CHANGES"
}
9. Ottenere tutte le interfacce dello chassis e trovare le interfacce divise (interrotte) utilizzando l'endpoint delle interfacce.
GET /api/fmc_config/v1/domain/{domainUUID}/chassis/fmcmanagedchassis/{containerUUID}/interfacce
Un'interfaccia 40G, ad esempio eth2/2, è suddivisa in interfacce 4x10G - eth2/2/1, eth2/2/2, eth2/2/3 ed eth2/2/4
Flusso REST per join interfaccia
1. Verificare se l'interfaccia è interrotta utilizzando l'endpoint interfacce/interfacce fisiche.
L'operazione di join è possibile solo se "isSplitInterface" è true e mediaType è SFP
GET /api/fmc_config/v1/domain/{domainUUID}/chassis/fmcmanagedchassis/{containerUUID}/interfacce
{
  "metadata": {
    "supportedSpeed": "TEN_GBPS,DETECT_SFP",
    "mediaType": "sfp",
    "sfpType": "none",
    "isBreakoutCapable": false,
    "breakoutFactor": "4",
    "isSplitInterface": true,
    "timestamp": 1692541554935,
    "domain": {
      "name": "Global",
      "id": "e276abec-e0f2-11e3-8169-**********",
      "type": "Domain"
    }
  },
  "type": "PhysicalInterface",
  "name": "Ethernet2/3/4",
  "portType": "DATA",
  "adminState": "DISABLED",
  "LLDP": {
    "transmit": false,
    "receive": false
  },
  "hardware": {
    "flowControlSend": "OFF",
    "speed": "DETECT_SFP",
    "duplex": "FULL",
    "fecMode": "AUTO",
    "autoNegState": true
  },
  "id": "00505686-662F-0ed3-0001-**********"
}
2. Valutare la fattibilità dell'operazione Join utilizzando l'endpoint valuateoperation su una delle quattro interfacce divise.
GET /api/fmc_config/v1/domain/{domainUUID}/chassis/fmcmanagedchassis/{containerUUID}/ch assisinterfaces/{interfaceUUID}/valuateoperation
- Se nella risposta non sono presenti avvisi/errori, l'utente può eseguire l'operazione di join.
{
  "operationType": "JOIN",
  "readinessState": "READY",
  "links": {
    "self": "https://u32c01p06-vrouter.cisco.com:22542/api/fmc_config/v1/domain/e276abec-e0f2-11e3-8169-**********/chassis/fmcmanagedchassis/19d967e6-ef81-4f2e-b311-**********/chassisinterfaces/00505686-662F-0ed3-0001-**********/evaluateoperation/00505686-662F-0ed3-0001-**********"
  },
  "type": "ChassisInterface",
  "id": "00505686-662F-0ed*******************"
}- Se nella risposta sono presenti errori, l'utente non è autorizzato a eseguire l'operazione di join.
{
  "operationType": "JOIN",
  "interfaceUsages": [
    {
      "conflictType": "Interface used in EtherChannel Configuration",
      "severity": "ERROR",
      "description": "Interface (Ethernet2/3/4) referred to in Ether Channel Interface (Port-channel32) configurations will be impacted due to the JOIN operation."
    }
  ],
  "readinessState": "NOT_READY",
  "links": {
    "self": "https://u32c01p06-vrouter.cisco.com:22542/api/fmc_config/v1/domain/e276abec-e0f2-11e3-8169-*********/chassis/fmcmanagedchassis/19d967e6-ef81-4f2e-b311-********/chassisinterfaces/00505686-662F-0ed3-0001-692539698200/evaluateoperation/00505686-662F-0ed3-0001-***********"
  },
  "type": "ChassisInterface",
  "id": "00505686-662F-0ed*******************"
}
3. Se l'interfaccia è interrotta e lo stato di preparazione è "READY", unire l'interfaccia utilizzando l'endpoint delle interfacce join. Interface_uuid può essere identificata da una qualsiasi delle 4 interfacce interrotte.
POST/api/fmc_config/v1/domain/{domainUUID}/chassis/fmcmanagedchassis/{containerUUID}/operating/joininterfaces
Richiesta:
{
  "targetInterfaces": [
    {
      "id": "***************ed3-0001-692539698200",
      "type": "PhysicalInterface"
    }
  ],
  "type": "JoinInterface"
}
Risposta:
{
  "metadata": {
    "task": {
      "id": "4294970217",
      "links": {
        "self": "


      /api/fmc_config/v1/domain/e27"***************-8169-6d9ed49b625f/job/taskstatuses/4294970217" } } }, "targetInterfaces": [ { "id": "***************ed3-0001-692539698200", "type": "PhysicalInterface" }, { "id": "***************ed3-0001-692539698201", "type": "PhysicalInterface" }, { "id": "***************ed3-0001-692539698202", "type": "PhysicalInterface" }, { "id": "***************ed3-0001-692539698203", "type": "PhysicalInterface" } ], "type": "JoinInterface" }
4. Tenere traccia del completamento del task utilizzando l'ID task nella risposta join. Impostare lo stato del task su "Notifica interfaccia ricevuta".
GET /api/fmc_config/v1/domain/{domainUUID}/job/taskstatuses/{objectId}
Risposta:
{
  "id": "4294970237",
  "type": "TaskStatus",
  "links": {
    "self": "https://u32c01p06-vrouter.cisco.com:22542/api/fmc_config/v1/domain/e276abec-e0f2-11e3-8169-6d9ed49b625f/job/taskstatuses/4294970237"
  },
  "taskType": "SSP_EPM_OIR",
  "message": "Deployment status for 19d967e6-xxxx-xxxx-xxxx-85ff6cef6d3f: SUCCEEDED",
  "status": "Interface notification received"
}
5. Ottenere le modifiche delle interfacce utilizzando l'endpoint chassisinterfaceevents.
GET /api/fmc_config/v1/domain/{domainUUID}/devices/devicerecords/{containerUUID}/chassisinterfaceevents
Risposta:
[
  {
    "change": "Interface is associated",
    "type": "PhysicalInterface",
    "state": "ASSOCIATED",
    "name": "Ethernet2/3"
  },
  {
    "change": "Interface is deleted",
    "type": "PhysicalInterface",
    "state": "DISASSOCIATED",
    "name": "Ethernet2/3/1"
  },
  {
    "change": "Interface is deleted",
    "type": "PhysicalInterface",
    "state": "DISASSOCIATED",
    "name": "Ethernet2/3/2"
  },
  {
    "change": "Interface is deleted",
    "type": "PhysicalInterface",
    "state": "DISASSOCIATED",
    "name": "Ethernet2/3/3"
  },
  {
    "change": "Interface is deleted",
    "type": "PhysicalInterface",
    "state": "DISASSOCIATED",
    "name": "Ethernet2/3/4"
  }
]
6. Se la notifica dell'interfaccia non viene ricevuta, sincronizzare il dispositivo utilizzando l'endpoint chassisinterfaceevents e verificare che siano presenti modifiche in sospeso.
POST /api/fmc_config/v1/domain/{domainUUID}/devices/devicerecords/{containerUUID}/chassisinterfaceevents
Richiesta:
{
   "action":"SYNC_WITH_DEVICE"
}
Risposta:
{
   "action":"SYNC_WITH_DEVICE",
   "hasPendingChanges":true
}
7. Una volta ricevuta la notifica, accettare le modifiche utilizzando l'endpoint chassisinterfaceevents.
POST /api/fmc_config/v1/domain/{domainUUID}/devices/devicerecords/{containerUUID}/chassisinterface events
Richiesta:
{
   "action":"ACCEPT_CHANGES"
}
8. Ottenere tutte le interfacce dello chassis e trovare le interfacce unite e le altre interfacce che utilizzano l'endpoint delle interfacce.
GET /api/fmc_config/v1/domain/{domainUUID}/chassis/fmcmanagedchassis/{containerUUID}/interfacce
Si supponga che il join sia stato avviato su un'interfaccia 10G, ad esempio eth2/2/1, quindi che nella risposta sia disponibile un'interfaccia 40G eth2/2.
Sincronizza API REST dispositivo
Per supportare la sincronizzazione del modulo di rete e delle interfacce, sono stati introdotti questi URL.
POST:
/api/fmc_config/v1/domain/{domainUUID}/chassis/fmcmanagedchassis/{containerUUID}/eventi chassisinterface
Con payload
{"azione": "SYNC_WITH_DEVICE"} - > Attiva la sincronizzazione
{"azione": "ACCEPT_CHANGES"} - > Accetta le modifiche
SCARICA:
/api/fmc_config/v1/domain/{domainUUID}/chassis/fmcmanagedchassis/{containerUUID}/eventi chassisinterface
Elenca gli eventi modificati generati
Risoluzione dei problemi/Diagnostica
Registrazione FXOS
Se la registrazione non riesce, queste CLI di FXOS possono essere usate per controllare se sftunnel e i processi sfipproxy sono attivi.
firepower# connect local-mgmt
firepower-4215(local-mgmt)# show processes | include sftunnel grep: (standard input): binary file matches
3323 root 20 0 80328 2024 1544 S 0.0 0.0 0:11.53 /opt/cisco/sftunnel/sfipproxy -d –f /etc/sf/sfipproxy.conf
22066 root 20 0 376880 7140 5944 S 0.0 0.0 0:41.18 /opt/cisco/sftunnel/sftunnel -d -f /etc/sf/sftunnel.conf
Se si utilizza la console del terminale per la CLI, verificare che l'output del comando show processes non venga troncato impostando la larghezza del terminale su un valore appropriato usando questa CLI mostrata:
firepower-4215(local-mgmt)# terminal width 100 Se il processo SFTunnel è attivo e in esecuzione, ma la registrazione non riesce, questi comandi possono essere utilizzati per individuare qualsiasi possibile causa di errore.
Introdotta una nuova CLI in FXOS da connect local-mgmt per visualizzare i messaggi syslog in /opt/cisco/platform/logs/sfmessages
firepower# connect local-mgmt
firepower(local-mgmt)# tail-mgmt-log sfmessages


      Dec 9 18:31:17 firepower Ipc [30483]: add ep: 1,0x5613aa0e2fe8 total = 1 Dec 9 18:31:17 firepower Ipc [30483]: add ep: 1,0x5613aa0ec528 total = 2 Dec 9 18:31:17 firepower Ipc [30483]: add ep: 1,0x5613aa0f5ea8 total = 3 Dec 9 18:31:18 firepower SF-IMS[12621]: [12625] sftunneld:SYNC_PROC [INFO] Change in directory /var/sf/sync detected (0 vs 1670610348)
Registrazione FMC
- Se la registrazione del dispositivo non riesce, individuare usmsharedsvcs.log e vmssharedsvcs.log in questa posizione e cercare la stringa "CHASSIS DISCOVERY" o "NATIVE_TO_MULTI_INSTANCE" per individuare la potenziale causa dell'errore.
- Inoltre, cercare i problemi relativi al tunnel SFT in /var/log/action_queue.log e /var/sf/messages.
- /var/opt/CSCOpx/MDC/log/operation/usmsharedsvcs.log /var/opt/CSCOpx/MDC/log/operation/vmssharedsvcs.log
- Se la registrazione automatica dello chassis non riesce, individuare i file usmsharedsvcs.log e vmssharedsvcs.log e cercare le stringhe "CHASSIS DISCOVERY" e "NATIVE_TO_MULTI_INSTANCE" per individuare la potenziale causa del problema.
- Se la registrazione automatica dell'istanza non riesce, individuare usmsharedsvcs.log e vmssharedsvcs.log e cercare la stringa "MI_FTD_INSTANCE_AUTO_REGISTRATION" per individuare la potenziale causa dell'errore.
- In caso di errore di distribuzione nel dispositivo, passare a Distribuisci -> Cronologia distribuzione -> Fare clic sulla distribuzione non riuscita -> Apri trascrizione. Il file contiene il motivo dell'errore.
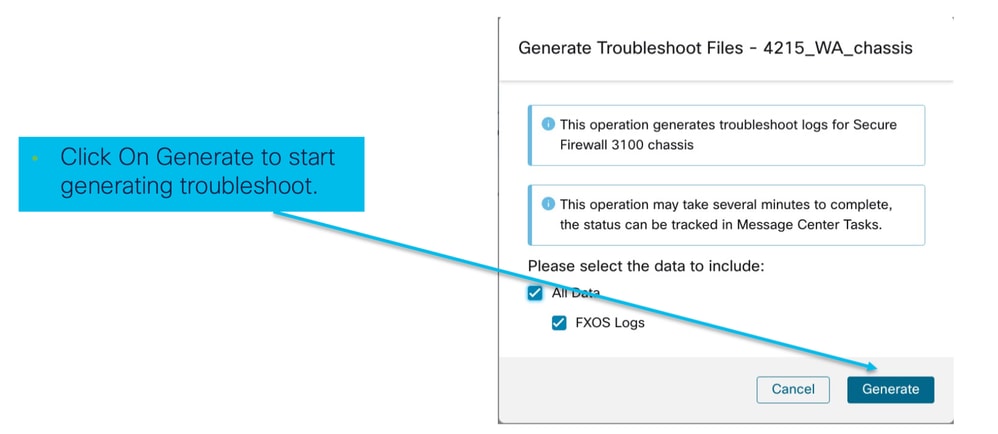
Risoluzione dei problemi dello chassis
FMC supporta la generazione di FPRM (Chassis Probleshoot) dalla pagina di gestione dei dispositivi.
- Come per il dispositivo FTD, è disponibile un'opzione di risoluzione dei problemi per il dispositivo chassis che genera la risoluzione dei problemi dello chassis e consente all'utente di scaricare il pacchetto di risoluzione dei problemi da FMC.
- Questo raccoglie il bundle "show tech-support form" dallo chassis:

Opzioni di risoluzione dei problemi dello chassis e generazione:
Stato risoluzione problemi chassis e download:

Procedure dettagliate per la risoluzione dei problemi di esempio
Registrazione automatica del guasto dello chassis in FMC
Problema: Errore durante la registrazione automatica dello chassis nel FMC.
Risultato previsto:
- Una volta avviata la conversione dal CCP, è prevista l'annullamento della registrazione e la registrazione automatica nel CCP.
Risultato effettivo:
- Registrazione automatica chassis non riuscita
Risoluzione del problema
1. Verificare la conversione:
- Verificare che la conversione sia stata attivata in FMC.
- Accedere al dispositivo e verificare se è stato convertito in modalità contenitore.
- Eseguire i comandi per verificare se la periferica è stata convertita:
firepower# scope sys
firepower /system # show
Systems:
Name Mode Deploy Mode System IP Address System IPv6 Address
---------- ----------- ----------- ----------------- -------------------
firepower Stand Alone Container 192.168.xx.xx ::
2. Controllare Gestione periferiche:
- Verificare che Gestione periferiche sia stato impostato correttamente:
firepower# show device-manager
    Device manager:
        Name: manager
        Hostname: 10.10.xx.xx
        NAT id: 3ab4bb1a-d723-11ee-a694-89055xxxxxxx
        Registration Status: Completed
        Error Msg:
- Registri da controllare:
3.1. Accedere a /var/opt/CSCOpx/MDC/log/operation/vmssharedsvcs.log e /var/opt/CSCOpx/MDC/log/operation/usmsharedsvcs.log
3.2. Cercare le parole chiave "NATIVE_TO_MI_CONVERSION" e "CHASSIS DISCOVERY" nei file per individuare la causa dell'errore.
Registrazione automatica dell'istanza in FMC
Problema: Errore durante la registrazione automatica dell'istanza in FMC.
Risultato previsto:
- Dopo il provisioning dell'istanza da FMC, è prevista la registrazione automatica in FMC
Risultato effettivo:
- Registrazione automatica istanza non riuscita
Risoluzione del problema
- Verificare che la distribuzione sia stata attivata dopo la creazione dell'istanza.
- Se la distribuzione non viene eseguita, assicurarsi di distribuire le modifiche nel dispositivo.
- In caso di errore nella distribuzione, passare a Cronologia distribuzione -> Fare clic su Trascrizione. Verificare la causa dell'errore, correggere e riprovare la distribuzione.
- Verificare che l'istanza sia installata e che il relativo stato operativo sia in linea. È possibile utilizzare la pagina di riepilogo dello chassis per controllare lo stato del provisioning dell'istanza.
- Verificare che SFTunnel sia attivo e in esecuzione sull'FTD dell'istanza utilizzando questo comando:
ps -ef | grep -i "sftunnel”- Se SFTunnel non è in esecuzione, provare a eseguire un comando di riavvio:
pmtool restartById sftunnel- Accedere a /var/opt/CSCOpx/MDC/log/operation/vmssharedsvcs.log e /var/opt/CSCOpx/MDC/log/operation/usmsharedsvcs.log
- Cercare la parola chiave "MI_FTD_INSTANCE_AUTO_REGISTRATION" nel file per individuare la causa dell'errore.
Registrazione del dispositivo nativo in FMC
Problema: Errore di Native Device Registration in FMC dopo la riconversione della periferica in modalità nativa
- Se l'utente riconverte lo chassis (modalità MI) in modalità nativa ma dimentica di eliminarlo dal FMC, il dispositivo non sarà in linea nel FMC.
- Se l'utente tenta di registrare nuovamente la periferica nativa nel FMC, la registrazione non riesce.
Risoluzione del problema
- Verificare che la voce relativa allo chassis sia stata eliminata dal FMC prima di riconvertire il dispositivo in modalità nativa.
- Una volta eliminata la voce, provare a registrare nuovamente la periferica nativa in FMC.
Riferimenti utili
- Informazioni sulle interfacce condivise:
- Pagina 3100 Multi-Instance sul sito del supporto Cisco:
Opzioni di interfaccia e alta disponibilità
Opzioni interfaccia
Standalone o Alta disponibilità
Utilizzo delle due interfacce di gestione
- Come il modello 4200 in modalità nativa, le due porte di gestione fisiche sono fornite per supportare la ridondanza dell'interfaccia per il traffico di gestione o per supportare interfacce separate per la gestione e gli eventi.
- I dispositivi 9300 e 4100, nonché la serie 4200, dispongono di due interfacce di gestione. La seconda interfaccia di gestione, Management 1/2, è destinata all'utilizzo per gli eventi.
- In modalità a più istanze (aka "contenitore"), è possibile configurare questa interfaccia dalla CLI di Threat Defense in ciascuna istanza. Assegnare un indirizzo IP nella stessa rete per ogni istanza.
- In modalità contenitore, a ogni istanza FTD vengono assegnate automaticamente entrambe le interfacce di gestione 1/1 e 1/2.
- La seconda interfaccia di gestione è disabilitata per impostazione predefinita.
- Non è possibile configurare Management1/2 utilizzando FMC; è necessario configurarlo tramite FTD CLISH (sui modelli 9300/4100, che. al contrario, viene eseguita nella CLI di FXOS). Utilizzare questo comando con il tipo di indirizzo IP, l'indirizzo, la subnet e la route statica desiderati:
configure network ipv4 manual 192.168.0.xx 255.255.255.0 192.168.0.1 management1 Cronologia delle revisioni
| Revisione | Data di pubblicazione | Commenti |
|---|---|---|
1.0 |
29-Oct-2024 |
Versione iniziale |
Contributo dei tecnici Cisco
- Sangeeth NamathTecnico di consulenza
 Feedback