Esempio di configurazione di router e client VPN per Internet pubblico su Memory Stick
Sommario
Introduzione
In questo documento viene descritto come configurare un router del sito centrale per eseguire il traffico IPsec su un dispositivo stick. Questa configurazione è valida in un caso specifico in cui il router, senza abilitare il tunneling suddiviso, e gli utenti mobili (Cisco VPN Client) possono accedere a Internet tramite il router del sito centrale. Per ottenere questo risultato, configurare la mappa dei criteri nel router in modo che tutto il traffico VPN (Cisco VPN Client) punti a un'interfaccia di loopback. In questo modo, il traffico Internet può essere convertito in PATed (Port Address Translation) verso l'esterno.
Per completare una configurazione simile su un sito centrale, fare riferimento agli esempi di configurazione di PIX/ASA 7.x e VPN Client for Public Internet VPN su Stick.
Nota: per evitare la sovrapposizione degli indirizzi IP nella rete, assegnare il pool di indirizzi IP completamente diversi al client VPN (ad esempio, 10.x.x.x , 172.16.x.x, 192.168.x.x). Questo schema di indirizzi IP consente di risolvere i problemi relativi alla rete.
Prerequisiti
Requisiti
Nessun requisito specifico previsto per questo documento.
Componenti usati
Le informazioni fornite in questo documento si basano sulle seguenti versioni software e hardware:
-
Cisco Router 3640 con software Cisco IOS® versione 12.4
-
Cisco VPN Client 4.8
Le informazioni discusse in questo documento fanno riferimento a dispositivi usati in uno specifico ambiente di emulazione. Su tutti i dispositivi menzionati nel documento la configurazione è stata ripristinata ai valori predefiniti. Se la rete è operativa, valutare attentamente eventuali conseguenze derivanti dall'uso dei comandi.
Convenzioni
Fare riferimento a Cisco Technical Tips Conventions per ulteriori informazioni sulle convenzioni dei documenti.
Configurazione
In questa sezione vengono presentate le informazioni necessarie per configurare le funzionalità descritte più avanti nel documento.
Nota: per ulteriori informazioni sui comandi menzionati in questa sezione, usare lo strumento di ricerca dei comandi (solo utenti registrati).
Esempio di rete
Il documento usa la seguente configurazione di rete:
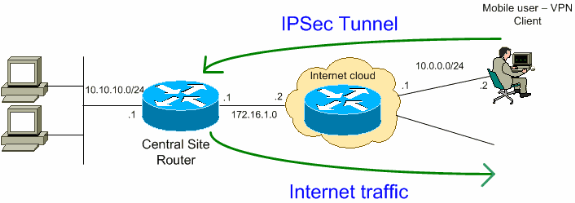
Nota: gli schemi di indirizzamento IP utilizzati in questa configurazione non sono legalmente instradabili su Internet. Sono indirizzi RFC 1918 utilizzati per le simulazioni di laboratorio.![]()
Configurazioni
In questo documento vengono usate le seguenti configurazioni:
| Router |
|---|
VPN#show run Building configuration... Current configuration : 2170 bytes ! version 12.4 service timestamps debug datetime msec service timestamps log datetime msec no service password-encryption ! hostname VPN ! boot-start-marker boot-end-marker ! ! !--- Enable authentication, authorization and accounting (AAA) !--- for user authentication and group authorization. aaa new-model ! !--- In order to enable Xauth for user authentication, !--- enable the aaa authentication commands. aaa authentication login userauthen local !--- In order to enable group authorization, enable !--- the aaa authorization commands. aaa authorization network groupauthor local ! aaa session-id common ! resource policy ! ! !--- For local authentication of the IPsec user, !--- create the user with a password. username user password 0 cisco ! ! ! !--- Create an Internet Security Association and !--- Key Management Protocol (ISAKMP) policy for Phase 1 negotiations. crypto isakmp policy 3 encr 3des authentication pre-share group 2 !--- Create a group that is used to specify the !--- WINS and DNS server addresses to the VPN Client, !--- along with the pre-shared key for authentication. crypto isakmp client configuration group vpnclient key cisco123 dns 10.10.10.10 wins 10.10.10.20 domain cisco.com pool ippool ! !--- Create the Phase 2 Policy for actual data encryption. crypto ipsec transform-set myset esp-3des esp-md5-hmac ! !--- Create a dynamic map and apply !--- the transform set that was created earlier. crypto dynamic-map dynmap 10 set transform-set myset reverse-route ! !--- Create the actual crypto map, !--- and apply the AAA lists that were created earlier. crypto map clientmap client authentication list userauthen crypto map clientmap isakmp authorization list groupauthor crypto map clientmap client configuration address respond crypto map clientmap 10 ipsec-isakmp dynamic dynmap ! ! ! ! !--- Create the loopback interface for the VPN user traffic . interface Loopback0 ip address 10.11.0.1 255.255.255.0 ip nat inside ip virtual-reassembly ! interface Ethernet0/0 ip address 10.10.10.1 255.255.255.0 half-duplex ip nat inside !--- Apply the crypto map on the interface. interface FastEthernet1/0 ip address 172.16.1.1 255.255.255.0 ip nat outside ip virtual-reassembly ip policy route-map VPN-Client duplex auto speed auto crypto map clientmap ! interface Serial2/0 no ip address ! interface Serial2/1 no ip address shutdown ! interface Serial2/2 no ip address shutdown ! interface Serial2/3 no ip address shutdown !--- Create a pool of addresses to be !--- assigned to the VPN Clients. ! ip local pool ippool 192.168.1.1 192.168.1.2 ip http server no ip http secure-server ! ip route 10.0.0.0 255.255.255.0 172.16.1.2 !--- Enables Network Address Translation (NAT) !--- of the inside source address that matches access list 101 !--- and gets PATed with the FastEthernet IP address. ip nat inside source list 101 interface FastEthernet1/0 overload ! !--- The access list is used to specify which traffic is to be translated for the !--- outside Internet. access-list 101 permit ip any any !--- Interesting traffic used for policy route. access-list 144 permit ip 192.168.1.0 0.0.0.255 any !--- Configures the route map to match the interesting traffic (access list 144) !--- and routes the traffic to next hop address 10.11.0.2. ! route-map VPN-Client permit 10 match ip address 144 set ip next-hop 10.11.0.2 ! ! control-plane ! line con 0 line aux 0 line vty 0 4 ! end |
Configurazione VPN Client 4.8
Completare questa procedura per configurare il client VPN 4.8.
-
Scegliere Start > Programmi > Cisco Systems VPN Client > VPN Client.
-
Fare clic su New (Nuovo) per avviare la finestra Create New VPN Connection Entry (Crea nuova voce di connessione VPN).
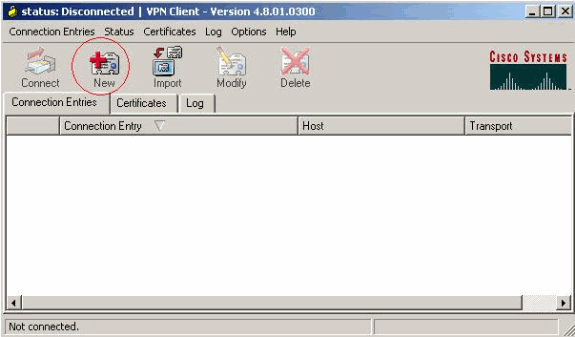
-
Immettere il nome della voce di connessione insieme a una descrizione, immettere l'indirizzo IP esterno del router nella casella Host e immettere il nome e la password del gruppo VPN. Fare clic su Save (Salva).
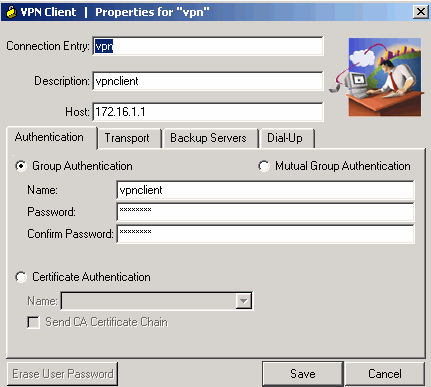
-
Fare clic sulla connessione che si desidera utilizzare e fare clic su Connetti dalla finestra principale di VPN Client.
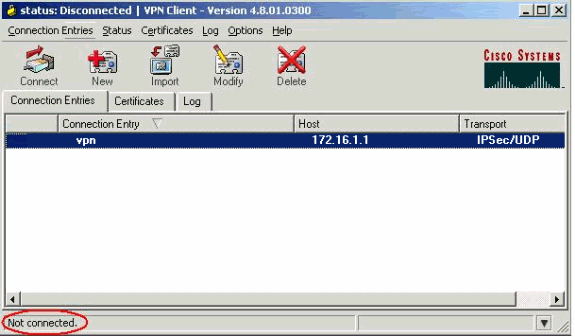
-
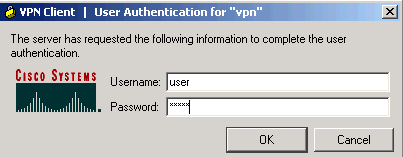
Quando richiesto, immettere il nome utente e la password per Xauth e fare clic su OK per connettersi alla rete remota.
-
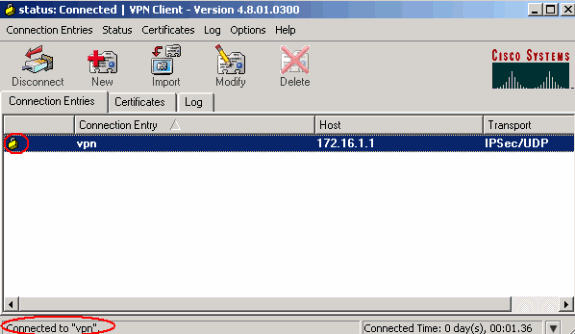
Il client VPN si connette al router sul sito centrale.
-
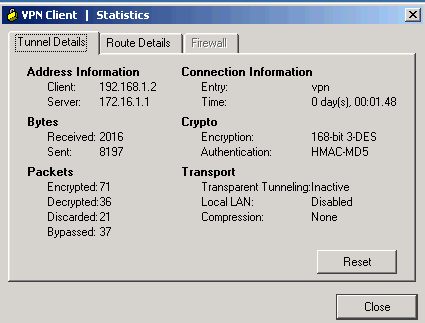
Scegliere Stato > Statistiche per controllare le statistiche del tunnel del client VPN.
Verifica
In questa sezione viene spiegato come verificare che la configurazione funzioni correttamente.
Lo strumento Output Interpreter (solo utenti registrati) (OIT) supporta alcuni comandi show. Usare OIT per visualizzare un'analisi dell'output del comando show.
-
show crypto isakmp sa: visualizza tutte le associazioni di sicurezza (SA) IKE correnti in un peer.
VPN#show crypto ipsec sa interface: FastEthernet1/0 Crypto map tag: clientmap, local addr 172.16.1.1 protected vrf: (none) local ident (addr/mask/prot/port): (0.0.0.0/0.0.0.0/0/0) remote ident (addr/mask/prot/port): (192.168.1.1/255.255.255.255/0/0) current_peer 10.0.0.2 port 500 PERMIT, flags={} #pkts encaps: 270, #pkts encrypt: 270, #pkts digest: 270 #pkts decaps: 270, #pkts decrypt: 270, #pkts verify: 270 #pkts compressed: 0, #pkts decompressed: 0 #pkts not compressed: 0, #pkts compr. failed: 0 #pkts not decompressed: 0, #pkts decompress failed: 0 #send errors 0, #recv errors 0 local crypto endpt.: 172.16.1.1, remote crypto endpt.: 10.0.0.2 path mtu 1500, ip mtu 1500, ip mtu idb FastEthernet1/0 current outbound spi: 0xEF7C20EA(4017889514) inbound esp sas: spi: 0x17E0CBEC(400608236) transform: esp-3des esp-md5-hmac , in use settings ={Tunnel, } conn id: 2001, flow_id: SW:1, crypto map: clientmap sa timing: remaining key lifetime (k/sec): (4530341/3288) IV size: 8 bytes replay detection support: Y Status: ACTIVE inbound ah sas: inbound pcp sas: outbound esp sas: spi: 0xEF7C20EA(4017889514) transform: esp-3des esp-md5-hmac , in use settings ={Tunnel, } conn id: 2002, flow_id: SW:2, crypto map: clientmap sa timing: remaining key lifetime (k/sec): (4530354/3287) IV size: 8 bytes replay detection support: Y Status: ACTIVE outbound ah sas: outbound pcp sas: -
show crypto ipsec sa: visualizza le impostazioni utilizzate dalle associazioni di protezione correnti.
VPN#show crypto isakmp sa
dst             src             state          conn-id slot status
172.16.1.1      10.0.0.2        QM_IDLE             15    0 ACTIVE
Risoluzione dei problemi
Comandi per la risoluzione dei problemi
Lo strumento Output Interpreter (solo utenti registrati) (OIT) supporta alcuni comandi show. Usare OIT per visualizzare un'analisi dell'output del comando show.
Nota: consultare le informazioni importanti sui comandi di debug prima di usare i comandi di debug.
-
debug crypto ipsec: visualizza le negoziazioni IPsec della fase 2.
-
debug crypto isakmp: visualizza le negoziazioni ISAKMP della fase 1.
Informazioni correlate
Cronologia delle revisioni
| Revisione | Data di pubblicazione | Commenti |
|---|---|---|
1.0 |
24-Jun-2008 |
Versione iniziale |


 Feedback