Configurazione di un VAP su WAP351, WAP131 e WAP371
Obiettivo
I punti di accesso virtuali (VAP) segmentano la LAN wireless in più domini di broadcast equivalenti wireless di VLAN Ethernet. I VAP simulano più punti di accesso in un unico dispositivo WAP fisico. Su Cisco WAP131 sono supportati fino a quattro VAP e su Cisco WAP351 e WAP371 ne sono supportati fino a otto.
Lo scopo di questo documento è mostrare come configurare un VAP sui punti di accesso WAP351, WAP131 e WAP371.
Dispositivi interessati
· WAP351
· WAP131
· WAP371
Versione del software
· V1.0.0.39 (WAP351)
· V1.0.0.39 (WAP131)
· V1.2.0.2 (WAP371)
Aggiunta e configurazione di un VAP
Nota: ogni VAP è identificato da un SSID (Service Set Identifier) configurato dall'utente. Più VAP non possono avere lo stesso nome SSID.
Nota: per il corretto funzionamento della rete wireless, è necessario che la radio a cui è associato il punto di accesso virtuale configurato sia abilitata e configurata correttamente. Per ulteriori informazioni, vedere Configurazione delle impostazioni radio di base su WAP131 e WAP351 o Configurazione delle impostazioni radio di base su WAP371
Passaggio 1. Accedere all'utility di configurazione Web e selezionare Wireless > Networks (Reti wireless). Viene visualizzata la pagina Reti:

Passaggio 2. Nel campo Radio, selezionare il pulsante di opzione per la radio wireless su cui si desidera configurare i VAP.

Passaggio 3. Per aggiungere un nuovo punto di accesso virtuale, fare clic su Aggiungi. Nella tabella verrà visualizzato un nuovo VAP.

Nota: WAP131 supporta fino a 4 VAP, mentre WAP371 e WAP351 supportano fino a 8 VAP.
Passaggio 4. Per iniziare a modificare un file VAP, fare clic sulla casella di controllo all'estrema sinistra della voce della tabella, quindi fare clic su Modifica. In questo modo sarà possibile modificare i campi disattivati del punto di accesso virtuale selezionato.

Passaggio 5. Per abilitare l'utilizzo del VAP, verificare che la casella di controllo Abilita sia selezionata.
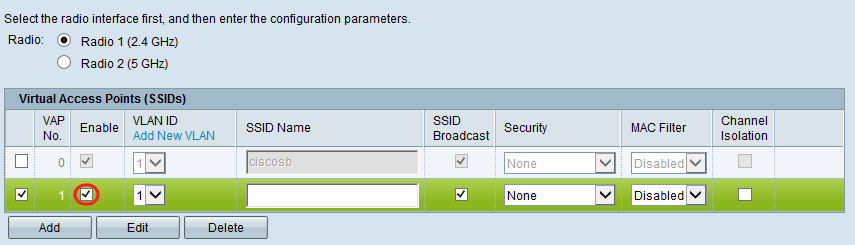
Passaggio 6. Nel campo VLAN ID (ID VLAN), specificare l'ID VLAN da associare al VAP. Se si utilizza il protocollo WAP131 o WAP371, immettere l'ID della VLAN. Il valore massimo che è possibile immettere è 4094.

Nota: l'ID VLAN immesso deve esistere sulla rete ed essere configurato correttamente. Per ulteriori informazioni, vedere Configurazione della VLAN sull'access point WAP351, Gestione di ID VLAN con e senza tag su WAP131 o Gestione di ID VLAN con e senza tag su WAP371.
Passaggio 7. Immettere il nome della rete wireless nel campo Nome SSID. Ogni VAP deve avere un nome SSID univoco.

Passaggio 8. Se si desidera che il nome SSID venga trasmesso ai client, selezionare la casella di controllo Trasmissione SSID. Il nome SSID verrà visualizzato ai client nell'elenco delle reti disponibili.

Configurazione delle impostazioni di protezione
Passaggio 1. Selezionare il metodo di autenticazione richiesto per la connessione al VAP dall'elenco a discesa Security. Se è selezionata un'opzione diversa da Nessuno, verranno visualizzati campi aggiuntivi.

Le opzioni disponibili sono le seguenti:
•Nessuna
· WEP statico
· WEP dinamico
· Personale WPA
· WPA Enterprise
Nota: WPA Personal e WPA Enterprise sono i tipi di autenticazione preferiti per la massima protezione. WEP statico e WEP dinamico devono essere utilizzati solo con apparecchiature legacy e richiedono l'impostazione della radio sulla modalità 802.11a o 802.11b/g. Per ulteriori informazioni, vedere Configurazione delle impostazioni radio di base su WAP131 e WAP351 o Configurazione delle impostazioni radio di base su WAP371.
WEP statico
Il metodo di autenticazione WEP statico è il meno sicuro. I dati della rete wireless vengono crittografati in base a una chiave statica. È diventato semplice ottenere questa chiave statica in modo illegale, quindi l'autenticazione WEP deve essere utilizzata solo quando necessario con i dispositivi legacy.
Nota: quando si seleziona Static WEP come metodo di protezione, viene visualizzato un messaggio che indica che il metodo di protezione scelto non è molto sicuro.
Passaggio 1. Nell'elenco a discesa Indice chiave di trasferimento, selezionare l'indice della chiave WEP dall'elenco di chiavi sottostante che il dispositivo utilizzerà per crittografare i dati.

Passaggio 2. Scegliere un pulsante di scelta nel campo Lunghezza chiave per specificare se la chiave è lunga 64 o 128 bit.

Passaggio 3. Nel campo Tipo di chiave, scegliere se si desidera immettere le chiavi in formato ASCII o esadecimale. Il codice ASCII include tutte le lettere, i numeri e i simboli presenti sulla tastiera, mentre il codice esadecimale deve utilizzare solo numeri o lettere da A a F.

Passaggio 4. Nel campo Chiavi WEP, immettere fino a 4 chiavi WEP diverse per il dispositivo. Ogni client da connettere a questa rete deve disporre di una delle stesse chiavi WEP nello stesso slot specificato dal dispositivo.

Passaggio 5. (Facoltativo) Fare clic sulla casella di controllo nel campo Mostra chiave come testo non crittografato se si visualizzano le stringhe di caratteri dei tasti.

Nota: quando si utilizza un firmware diverso su WAP351, WAP131 o WAP371, potrebbe mancare il campo Mostra chiave come testo non crittografato.
Passaggio 6. Nel campo Autenticazione 802.1X specificare l'algoritmo di autenticazione che si desidera utilizzare scegliendo le opzioni Apri sistema e/o Chiave condivisa. L'algoritmo di autenticazione definisce il metodo utilizzato per determinare se una stazione client può essere associata al dispositivo WAP quando la modalità di protezione è WEP statico.

Le opzioni disponibili sono definite come segue:
· Sistema aperto: l'autenticazione consente a qualsiasi stazione client di associarsi al dispositivo WAP indipendentemente dal fatto che la stazione client abbia o meno la chiave WEP corretta. Questo algoritmo viene utilizzato nelle modalità testo normale, IEEE 802.1X e WPA. Quando l'algoritmo di autenticazione è impostato su Open System, qualsiasi client può associarsi al dispositivo WAP.
· Chiave condivisa: per l'autenticazione è necessario che la stazione client disponga della chiave WEP corretta da associare al dispositivo WAP. Quando l'algoritmo di autenticazione è impostato su Chiave condivisa, una stazione con una chiave WEP non corretta non può essere associata al dispositivo WAP.
· Sistema aperto e chiave condivisa: se sono stati selezionati entrambi gli algoritmi di autenticazione, le stazioni client configurate per l'utilizzo di WEP in modalità chiave condivisa devono disporre di una chiave WEP valida da associare al dispositivo WAP. Inoltre, le stazioni client configurate per utilizzare WEP come sistema aperto (modalità chiave condivisa non abilitata) possono associarsi al dispositivo WAP anche se non dispongono della chiave WEP corretta.
Passaggio 7. Fare clic su Save (Salva).
WEP dinamico
Dynamic WEP fa riferimento alla combinazione della tecnologia 802.1x e del protocollo EAP (Extensible Authentication Protocol). Per autenticare gli utenti, questa modalità richiede l'utilizzo di un server RADIUS esterno. Il dispositivo WAP richiede un server RADIUS che supporti EAP, ad esempio Microsoft Internet Authentication Server. Per utilizzare i client Microsoft Windows, il server di autenticazione deve supportare PEAP (Protected EAP) e MSCHAP v2. È possibile utilizzare uno qualsiasi dei diversi metodi di autenticazione supportati dalla modalità IEEE 802.1X, inclusi i certificati, Kerberos e l'autenticazione a chiave pubblica, ma è necessario configurare le stazioni client in modo che utilizzino lo stesso metodo di autenticazione utilizzato dal dispositivo WAP.
Passaggio 1. Per impostazione predefinita è selezionata l'opzione Usa impostazioni globali server RADIUS. Deselezionare la casella di controllo se si desidera configurare il VAP per l'utilizzo di un set diverso di server RADIUS. In caso contrario, andare al passaggio 8.

Passaggio 2. Nel campo Server IP Address Type (Tipo di indirizzo IP server), selezionare il tipo di indirizzo IP del server utilizzato dal dispositivo WAP. Le opzioni sono IPv4 o IPv6. IPv4 utilizza numeri binari a 32 bit rappresentati sotto forma di numeri decimali separati da punti. IPv6 utilizza numeri esadecimali e due punti per rappresentare un numero binario a 128 bit. Il dispositivo WAP contatta solo il server o i server RADIUS per il tipo di indirizzo selezionato in questo campo. Se si sceglie IPv6, andare al passaggio 4.

Passaggio 3. Se è stato selezionato IPv4 nel passaggio 2, immettere l'indirizzo IP del server RADIUS utilizzato da tutti i VAP per impostazione predefinita. Quindi andare al Passaggio 5.
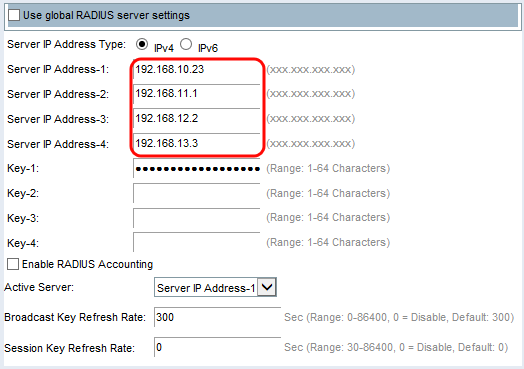
Nota: è possibile avere fino a tre indirizzi server RADIUS di backup IPv4. Se l'autenticazione non riesce con il server primario, ciascun server di backup configurato viene tentato in sequenza.
Passaggio 4. Se nel passaggio 2 è stato selezionato IPv6, immettere l'indirizzo IPv6 del server RADIUS globale primario.

Nota: è possibile avere fino a tre indirizzi server RADIUS di backup IPv6. Se l'autenticazione non riesce con il server primario, ciascun server di backup configurato viene tentato in sequenza.
Passaggio 5. Nel campo Key-1, immettere la chiave segreta condivisa utilizzata dal dispositivo WAP per l'autenticazione al server RADIUS primario.

Passaggio 6. Nei campi da Chiave-2 a Chiave-4, immettere la chiave RADIUS associata ai server RADIUS di backup configurati. L'indirizzo IP del server 2 utilizza Key-2, l'indirizzo IP del server 3 utilizza Key-3 e l'indirizzo IP del server 4 utilizza Key-4.

Passaggio 7. (Facoltativo) Nel campo Abilita accounting RADIUS selezionare la casella di controllo se si desidera abilitare la registrazione e la misurazione delle risorse consumate da un utente specifico. L'attivazione dell'accounting RADIUS consente di tenere traccia dell'ora del sistema e della quantità di dati trasmessi e ricevuti. Le informazioni verranno memorizzate nel server Radius. Verrà attivata per il server RADIUS primario e tutti i server di backup.

Nota: se l'accounting RADIUS è abilitato, è abilitato per il server RADIUS primario e per tutti i server di backup
Passaggio 8. Scegliere il primo server attivo nel campo Server attivo. In questo modo è possibile selezionare manualmente il server RADIUS attivo anziché fare in modo che il dispositivo WAP tenti di contattare in sequenza ogni server configurato e scelga il primo server attivo.

Passaggio 9. Nel campo Velocità di aggiornamento chiave trasmissione, immettere l'intervallo di aggiornamento della chiave di trasmissione (gruppo) per i client associati a questo VAP. L'impostazione predefinita è 300 secondi.

Passaggio 10. Nel campo Session Key Refresh Rate (Frequenza di aggiornamento chiavi sessione), immettere l'intervallo in base al quale il dispositivo WAP aggiorna la chiave di sessione (unicast) per ogni client associato al VAP. Il valore predefinito è 0.

Personale WPA
WPA Personal è uno standard Wi-Fi Alliance IEEE 802.11i, che include la crittografia AES-CCMP e TKIP. WPA utilizza una chiave precondivisa (PSK) anziché IEEE 802.1X e EAP come nella modalità di protezione WPA aziendale. La chiave PSK viene utilizzata solo per un controllo iniziale delle credenziali. WPA è anche noto come WPA-PSK. Questa modalità di protezione è compatibile con le versioni precedenti per i client wireless che supportano WPA originale.
Passaggio 1. Nel campo Versioni WPA, selezionare la casella di controllo WPA-TKIP se si desidera abilitare WPA-TKIP. È possibile abilitare contemporaneamente WPA-TKIP e WPA2-AES. WAP supporta sempre WPA2-AES, pertanto non sarà possibile configurarlo.

Le opzioni disponibili sono definite come segue:
· WPA-TKIP: la rete dispone di alcune stazioni client che supportano solo il protocollo di sicurezza WPA e TKIP originale. In base ai più recenti requisiti di WiFi Alliance, non è consigliabile scegliere solo WPA-TKIP.
· WPA2-AES: tutte le stazioni client della rete supportano il protocollo di crittografia/sicurezza WPA2 e AES-CCMP. Questa versione WPA offre la migliore protezione per lo standard IEEE 802.11i. In base all'ultimo requisito di WiFi Alliance, l'access point deve supportare questa modalità in ogni momento.
· WPA-TKIP e WPA2-AES: se la rete dispone di una combinazione di client, alcuni dei quali supportano WPA2 e altri che supportano solo WPA originale, selezionare entrambe le caselle di controllo. Questa impostazione consente l'associazione e l'autenticazione delle stazioni client WPA e WPA2, ma utilizza la più affidabile WPA2 per i client che la supportano. Questa configurazione WPA consente una maggiore interoperabilità al posto di un certo livello di sicurezza.
Nota: i client WPA devono disporre di una di queste chiavi (una chiave TKIP valida o una chiave AES-CCMP valida) per poter essere associati al dispositivo WAP.
Passaggio 2. Nel campo Chiave, immettere la chiave segreta condivisa per la protezione personale WPA. Immettere almeno 8 e un massimo di 63 caratteri.

Nota: i caratteri accettabili includono lettere maiuscole e minuscole, cifre numeriche e simboli speciali (?!/\@#$%^&*).
Passaggio 3. (Facoltativo) Selezionare la casella di controllo Mostra chiave come testo non crittografato se si desidera che il testo digitato sia visibile. Per impostazione predefinita, la casella di controllo è deselezionata.

Nota: quando si utilizza un firmware diverso su WAP351, WAP131 o WAP371, potrebbe mancare il campo Mostra chiave come testo non crittografato.
Nota: il campo Misuratore di forza chiave indica dove il dispositivo WAP controlla la chiave in base a criteri di complessità, quali il numero di tipi di caratteri diversi utilizzati e la lunghezza della chiave. Se la funzione di controllo della complessità WPA-PSK è attivata, la chiave viene accettata solo se soddisfa i criteri minimi. Per ulteriori informazioni sulla complessità di WPA-PSK, consultare il documento sulla configurazione della complessità della password per WAP131, WAP351 e WAP371.

Passaggio 4. Nel campo Velocità di aggiornamento chiave di trasmissione, immettere l'intervallo di aggiornamento della chiave di trasmissione (gruppo) per i client associati al VAP. L'impostazione predefinita è 300 secondi.

WPA - Enterprise
WPA Enterprise con RADIUS è un'implementazione dello standard Wi-Fi Alliance IEEE 802.11i, che include CCMP (AES) e crittografia TKIP. La modalità Enterprise richiede l'utilizzo di un server RADIUS per autenticare gli utenti. La modalità di protezione è compatibile con i client wireless che supportano WPA originale.
Nota: la modalità VLAN dinamica è abilitata per impostazione predefinita e consente al server di autenticazione RADIUS di decidere quale VLAN utilizzare per le stazioni.
Passaggio 1. Nel campo WPA Versions (Versioni WPA), selezionare la casella di controllo relativa ai tipi di stazioni client da supportare. Per impostazione predefinita, sono tutti abilitati. L'access point deve supportare sempre WPA2-AES, quindi non sarà possibile configurarlo.

Le opzioni disponibili sono definite come segue:
· WPA-TKIP: la rete dispone di alcune stazioni client che supportano solo il protocollo di sicurezza WPA e TKIP originale. Si noti che la selezione solo di WPA-TKIP per l'access point non è consentita in base al più recente requisito di WiFi Alliance.
· WPA2-AES: tutte le stazioni client della rete supportano la versione WPA2 e la cifratura/protocollo di sicurezza AES-CCMP. Questa versione WPA offre la migliore protezione dello standard IEEE 802.11i. In base all'ultimo requisito di Wi-Fi Alliance, il WAP deve supportare sempre questa modalità.
· Abilita preautenticazione: se si sceglie solo WPA2 o sia WPA che WPA2 come versione WPA, è possibile abilitare la preautenticazione per i client WPA2. Selezionare questa opzione se si desidera che i client wireless WPA2 inviino i pacchetti di preautenticazione. Le informazioni di preautenticazione vengono inoltrate dal dispositivo WAP attualmente utilizzato dal client al dispositivo WAP di destinazione. L'attivazione di questa funzionalità consente di velocizzare l'autenticazione per i client mobili che si connettono a più WAP. Questa opzione non è applicabile se è stata selezionata l'opzione WPA per le versioni WPA, in quanto la funzionalità WPA originale non è supportata.
Nota: le stazioni client configurate per l'utilizzo di WPA con RADIUS devono avere uno degli indirizzi e delle chiavi seguenti: un indirizzo RADIUS TKIP valido o un indirizzo IP AES (CCMP) valido e una chiave RADIUS.
Passaggio 2. Per impostazione predefinita è selezionata l'opzione Usa impostazioni globali server RADIUS. Deselezionare la casella di controllo se si desidera configurare il VAP per l'utilizzo di un set diverso di server RADIUS. In caso contrario, andare al passaggio 9.

Passaggio 3. Nel campo Server IP Address Type (Tipo di indirizzo IP server), selezionare il tipo di indirizzo IP del server utilizzato dal dispositivo WAP. Le opzioni sono IPv4 o IPv6. IPv4 utilizza numeri binari a 32 bit rappresentati sotto forma di numeri decimali separati da punti. IPv6 utilizza numeri esadecimali e due punti per rappresentare un numero binario a 128 bit. Il dispositivo WAP contatta solo il server o i server RADIUS per il tipo di indirizzo selezionato in questo campo.

Passaggio 4. Se si è selezionato IPv4 nel passaggio 2, immettere l'indirizzo IP del server RADIUS utilizzato da tutti i VAP per impostazione predefinita. Quindi andare al passo 6.

Nota: è possibile avere fino a tre indirizzi server RADIUS di backup IPv4. Se l'autenticazione non riesce con il server primario, ciascun server di backup configurato viene tentato in sequenza.
Passaggio 5. Se nel passaggio 2 è stato selezionato IPv6, immettere l'indirizzo IPv6 del server RADIUS globale primario.

Nota: è possibile avere fino a tre indirizzi server RADIUS di backup IPv6. Se l'autenticazione non riesce con il server primario, ciascun server di backup configurato viene tentato in sequenza.
Passaggio 6. Nel campo Chiave-1 immettere la chiave segreta condivisa utilizzata dal dispositivo WAP per l'autenticazione al server RADIUS primario.

Passaggio 7. Nei campi da Chiave-2a Chiave-4 immettere la chiave RADIUS associata ai server RADIUS di backup configurati. L'indirizzo IP del server 2 utilizza Key-2, l'indirizzo IP del server 3 utilizza Key-3 e l'indirizzo IP del server 4 utilizza Key-4.

Passaggio 8. (Facoltativo) Nel campo Abilita accounting RADIUS selezionare la casella di controllo se si desidera abilitare la registrazione e la misurazione delle risorse consumate da un utente specifico. L'attivazione dell'accounting RADIUS consente di tenere traccia dell'ora di sistema di un utente specifico e della quantità di dati trasmessi e ricevuti.

Nota: se è stato abilitato l'accounting RADIUS, è abilitato per il server RADIUS primario e per tutti i server di backup.
Passaggio 9. Scegliere il primo server attivo nel campo Server attivo. In questo modo è possibile selezionare manualmente il server RADIUS attivo anziché fare in modo che il dispositivo WAP tenti di contattare in sequenza ogni server configurato.

Passaggio 10. Nel campo Velocità di aggiornamento chiave trasmissione, immettere l'intervallo di aggiornamento della chiave di trasmissione (gruppo) per i client associati a questo VAP. L'impostazione predefinita è 300 secondi.

Passaggio 11. Nel campo Session Key Refresh Rate (Frequenza di aggiornamento chiavi sessione), immettere l'intervallo con cui il dispositivo WAP aggiorna le chiavi di sessione (unicast) per ogni client associato al VAP. Il valore predefinito è 0.

Filtro MAC
Filtro MAC specifica se le stazioni che possono accedere a questo VAP sono limitate a un elenco globale configurato di indirizzi MAC.
Passaggio 1. Nell'elenco a discesa MAC Filter (Filtro MAC), scegliere il tipo di filtro MAC desiderato.

Le opzioni disponibili sono definite come segue:
· Disabilitato — Non usa il filtro MAC.
· Locale: utilizza l'elenco di autenticazione MAC configurato nella sezione Filtro MAC. Per ulteriori informazioni sul filtro MAC, consultare il documento sulla configurazione del filtro MAC sui protocolli WAP351 e WAP131.
· RADIUS: utilizza l'elenco di autenticazione MAC su un server RADIUS esterno.
Isolamento canali
Quando Isolamento canale è disattivato, i client wireless possono comunicare tra loro normalmente inviando traffico attraverso il dispositivo WAP. Quando è abilitato, il dispositivo WAP blocca la comunicazione tra i client wireless sullo stesso VAP. Il dispositivo WAP consente ancora il traffico di dati tra i propri client wireless e i dispositivi cablati della rete, attraverso un collegamento WDS e con altri client wireless associati a un VAP diverso, ma non tra i client wireless.
Passaggio 1. Nel campo Isolamento canale, selezionare la casella di controllo se si desidera attivare l'isolamento del canale.

Passaggio 2. Fare clic su Save (Salva).
Nota: dopo il salvataggio delle nuove impostazioni, è possibile arrestare e riavviare i processi corrispondenti. Quando si verifica questa condizione, il dispositivo WAP potrebbe perdere la connettività. È consigliabile modificare le impostazioni del dispositivo WAP quando la perdita di connettività influisce meno sui client wireless.
Banda sterzo
Band Steer è disponibile solo su WAP371. Band Steer utilizza in modo efficace la banda a 5 GHz guidando i client supportati dalla banda a 2,4 GHz fino alla banda a 5 GHz. In questo modo la banda a 2,4 GHz viene liberata per l'utilizzo con dispositivi legacy che non dispongono di supporto per doppia radio.
Nota: per utilizzare la funzione Band Steer, è necessario abilitare sia la radio a 5 GHz che quella a 2,4 GHz. Per ulteriori informazioni sull'attivazione delle radio, consultare il documento sulla configurazione delle impostazioni radio di base su WAP371.
Passaggio 1. La funzione Band Steer è configurata per VAP e deve essere abilitata su entrambe le radio. Se si desidera attivare il mandrino della banda, selezionare la casella di controllo nel campo Mandrino della banda.

Nota: la funzione Band Steer non è consigliata sui VAP con traffico voce o video sensibile al tempo. Anche se la radio a 5 GHz utilizza meno larghezza di banda, cerca di indirizzare i client verso quella radio.
Passaggio 2. Fare clic su Save (Salva).
Eliminazione di un VAP
Passaggio 1. Selezionare la casella di controllo del VAP che si desidera eliminare.

Passaggio 2. Fare clic su Delete (Elimina) per eliminare il VAP.

Passaggio 3. Fare clic su Salva per salvare l'eliminazione in modo permanente.

Cronologia delle revisioni
| Revisione | Data di pubblicazione | Commenti |
|---|---|---|
1.0 |
11-Dec-2018 |
Versione iniziale |
 Feedback