Personalizzazione Web in Captive Portal su access point WAP321
Obiettivo
La funzione Captive Portal consente di bloccare l'accesso dei client wireless alla rete se non sono riusciti a superare la fase di verifica. Il Captive Portal consente ai client sulla rete WAP321 di visualizzare una pagina Web speciale a scopo di autenticazione prima dell'utilizzo normale di Internet. È possibile personalizzare questa pagina con immagini personalizzate (tre per ciascuna lingua) e altre immagini. Questi elementi grafici predefiniti possono essere sostituiti per consentire all'utente di personalizzare le immagini:
· Logo — visualizzato nella pagina in alto a sinistra per informazioni sul marchio. Deve essere conforme alle dimensioni 168 x 78 pixel (Larghezza x Altezza).
· Account: visualizzato sopra il campo di accesso. Deve essere conforme alle dimensioni 295 x 55 pixel (Larghezza x Altezza).
· Sfondo - visualizzato come sfondo della pagina. Deve essere conforme alle dimensioni 10 x 800 pixel (Larghezza x Altezza).
Questo articolo spiega come caricare ed eliminare file di immagini binarie per la personalizzazione Web nel punto di accesso WAP321 e personalizzare la pagina di autenticazione con elementi di testo e grafici.
La configurazione di Captive Portal è composta dai seguenti elementi:
· Configurazione globale di Captive Portal: il Captive Portal consente ai client sulla rete WAP di visualizzare una pagina Web speciale a scopo di autenticazione prima di poter utilizzare Internet normalmente. Il database degli utenti autenticati viene archiviato localmente nel dispositivo WAP o nel server RADIUS. La pagina di configurazione globale viene utilizzata per controllare lo stato amministrativo della funzionalità Portale vincolato e per configurare le impostazioni globali che avranno effetto su tutte le istanze di Portale vincolato configurate nel dispositivo WAP. Per ulteriori informazioni sulla configurazione globale su Captive Portal, fare riferimento all'articolo Captive Portal Global Configuration su WAP321 Access Point.
· Configurazione dell'istanza : le istanze di Captive Portal sono un set definito di configurazioni utilizzate per autenticare i client sulla rete WAP. È possibile configurare istanze diverse (massimo due) in modo che rispondano in modo diverso agli utenti che tentano di accedere al punto di accesso virtuale associato. Per ulteriori informazioni sulla configurazione delle istanze in Captive Portal, fare riferimento all'articolo Configurazione delle istanze di Captive Portal in WAP321 Access Point.
· Associazione di istanze: le istanze di Captive Portal sono un set definito di configurazioni utilizzate per autenticare i client sulla rete WAP. Le VAP sono LAN wireless segmentate in più domini di broadcast che sono equivalenti wireless di VLAN Ethernet. In questo modo è possibile simulare più punti di accesso in un unico dispositivo WAP fisico. Per ulteriori informazioni sull'associazione delle istanze in Captive Portal, consultare l'articolo Captive Portal Instance Association in WAP321 Access Point.
· Personalizzazione del portale Web: il Captive Portal consente ai client sulla rete WAP321 di visualizzare una pagina Web speciale a scopo di autenticazione prima dell'utilizzo normale di Internet. È possibile personalizzare questa pagina con immagini personalizzate (tre per ciascuna lingua) e altre immagini. Questo articolo spiega come caricare ed eliminare file di immagini binarie per la personalizzazione Web nel punto di accesso WAP321 e personalizzare la pagina di autenticazione con elementi di testo e grafici.
· Gruppi locali : in Captive Portal ogni utente locale è assegnato a un gruppo di utenti e ogni gruppo è assegnato a un'istanza di Captive Portal. Il gruppo consente di gestire l'assegnazione degli utenti all'istanza di Captive Portal. Impossibile eliminare il gruppo predefinito già presente. È possibile creare due gruppi di utenti aggiuntivi. Per ulteriori informazioni sulla configurazione dei gruppi locali in Captive Portal. fare riferimento all'articolo Local Groups in Captive Portal sui punti di accesso WAP321.
· Utenti locali : la pagina Utenti locali viene utilizzata per configurare gli utenti guest o gli utenti autorizzati. Oltre agli utenti guest, gli utenti autorizzati devono fornire un nome utente e una password validi per accedere alla rete WAP. Per ulteriori informazioni sulla configurazione degli utenti locali su Captive Portal, consultare l'articolo Configurazione degli utenti locali di Captive Portal sui punti di accesso WAP321.
Dispositivo applicabile
· WAP321
Versione del software
•1.0.3.4
Personalizzazione Web
Passaggio 1. Accedere all'utilità Configurazione punto di accesso e scegliere Captive Portal > Personalizzazione portale Web. Viene visualizzata la pagina Personalizzazione portale Web:
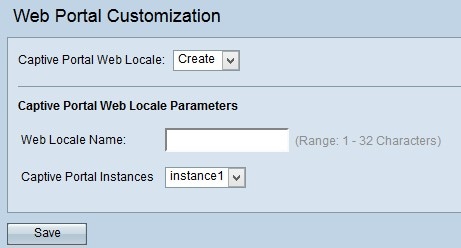
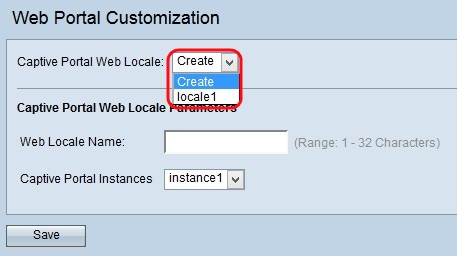
Passaggio 2. Scegliere Crea dall'elenco a discesa Locale Web portale vincolato per creare un utente per il Web portale vincolato. Se si desidera modificare una versione locale Web precedente, scegliere la versione locale Web creata dall'elenco a discesa Captive Portal Web Locale e andare al passo 6.
Passaggio 3. Immettere il nome delle impostazioni internazionali nel campo Nome impostazioni internazionali Web.

Passaggio 4. Scegliere l'istanza del portale vincolato dall'elenco a discesa Istanze del portale vincolate.
Passaggio 5. Fare clic su Salva per salvare le configurazioni create. Verrà quindi visualizzata l'area Parametri delle impostazioni internazionali Web del portale Captive con informazioni aggiuntive.
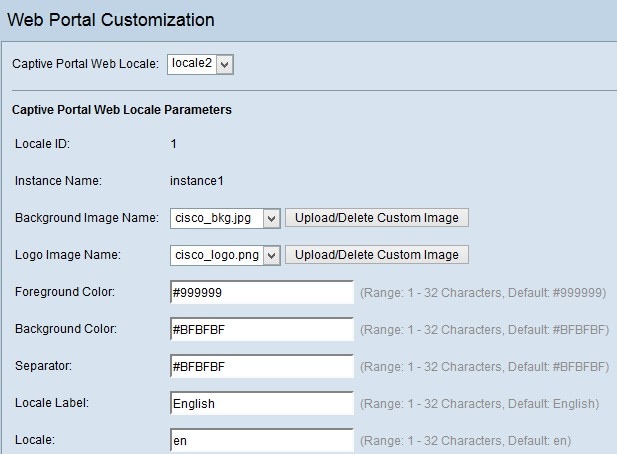
Nell'area Parametri delle impostazioni internazionali del Web del portale captive, il numero di sequenza delle impostazioni internazionali viene visualizzato nel campo ID impostazioni internazionali.
Il nome dell'istanza scelta viene visualizzato nel campo Nome istanza.
Nota: L'ID delle impostazioni internazionali e il nome dell'istanza non possono essere modificati in questa area e vengono generati automaticamente.

Passaggio 6. Scegliere l'immagine per lo sfondo dall'elenco a discesa Nome immagine di sfondo.

Nota: Se non è stata trovata l'immagine desiderata dall'elenco a discesa Nome immagine di sfondo o se si desidera ottenere una nuova immagine o eliminare l'immagine dall'elenco, fare clic sul pulsante Carica/Elimina immagine personalizzata. Per caricare ed eliminare un'immagine personalizzata, passare a Carica/Elimina immagine personalizzata.

Passaggio 7. Scegliere l'immagine del logo dall'elenco a discesa Nome immagine logo.

Nota: Se non è stata trovata l'immagine desiderata dall'elenco a discesa Nome immagine logo o se si desidera ottenere una nuova immagine o eliminare l'immagine dall'elenco, fare clic sul pulsante Carica/Elimina immagine personalizzata. Per caricare ed eliminare un'immagine personalizzata, passare a Carica/Elimina immagine personalizzata.

Passaggio 8. Inserire il numero di colore per il primo piano nel campo Colore primo piano.
Passaggio 9. Inserire il numero di colore per lo sfondo nel campo Colore sfondo.
Passaggio 10. Inserire il numero di colore per il separatore (linea che separa l'intestazione dalla pagina del corpo) nel campo Separatore.
Nota: I colori menzionati sono in formato esadecimale e in codice HTML.
Passaggio 11. Immettere l'etichetta per le impostazioni internazionali nel campo Etichetta impostazioni internazionali. Il valore predefinito è Inglese.
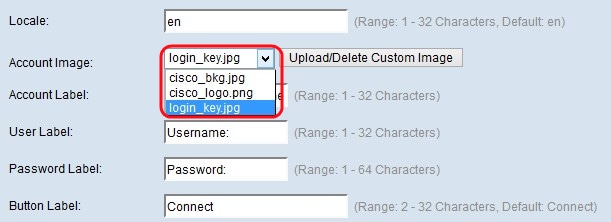
Passaggio 12. Dall'elenco a discesa Immagine account, scegliere l'immagine da visualizzare nell'accesso autenticato sopra il campo di accesso.

Nota: Se non è stata trovata l'immagine desiderata dall'elenco a discesa Immagine account o se si desidera ottenere una nuova immagine o eliminare l'immagine dall'elenco, fare clic sul pulsante Carica/elimina immagine personalizzata. Per caricare ed eliminare un'immagine personalizzata, passare a Carica/Elimina immagine personalizzata.

Passaggio 13. Inserire il testo che fornisce all'utente l'istruzione di immettere un nome utente per accedere nel campo Etichetta account.
Passaggio 14. Immettere il nome per la casella di testo del nome utente nel campo Etichetta utente.
Passaggio 15. Immettere il nome per la casella di testo password nel campo Etichetta password.
Passaggio 16. Immettere il nome del pulsante utilizzato per aggiornare le informazioni e autenticare l'utente nel campo Etichetta pulsante.
Passaggio 17. Immettere il nome del tipo di carattere che l'utente può utilizzare nella pagina Portale vincolato nel campo Tipi di carattere. È possibile immettere più opzioni separate da una virgola.
Passaggio 18. Inserire il nome da visualizzare nella barra del titolo della finestra nel campo Titolo browser.
Passaggio 19. Immettere il testo di benvenuto visualizzato a destra dell'immagine del logo nel campo Contenuto browser.

Passaggio 20. Immettere l'istruzione per l'utente visualizzata nella pagina del corpo del messaggio nel campo Contenuto.
Passaggio 21. Immettere le condizioni che l'utente deve accettare per accedere e utilizzare il portale vincolato nel campo Criterio d'uso accettazione.
Passaggio 22. Immettere il testo in modo che l'utente accetti il criterio di utilizzo e selezionare la casella di controllo nel campo Accetta etichetta.
Passaggio 23. Nel campo Testo non accettato, immettere il testo che viene visualizzato quando l'utente non accetta il criterio e desidera eseguire l'accesso. Il valore predefinito è un messaggio di errore visualizzato in una finestra popup.
Passaggio 24. Nel campo Testo in corso immettere il testo visualizzato mentre l'utente attende l'autenticazione.

Passaggio 25. Nel campo Testo rifiutato, immettere il testo visualizzato quando l'autenticazione dell'utente non riesce.
Passaggio 26. Nel campo Titolo benvenuto, immettere il testo che viene visualizzato quando l'utente è stato autenticato.
Passaggio 27. Nel campo Contenuto iniziale, immettere il testo che indica quando l'utente si connette alla rete Captive Portal.

Passaggio 28. (Facoltativo) Se si desidera eliminare la configurazione locale corrente, selezionare la casella di controllo Elimina impostazioni locali.
Passaggio 29. Fare clic su Save per salvare tutte le configurazioni create.

Passaggio 30. (Facoltativo) Se si desidera visualizzare in anteprima le configurazioni locali create, fare clic su Anteprima. Viene visualizzata la pagina Anteprima parametri delle impostazioni internazionali Web del portale Captive:
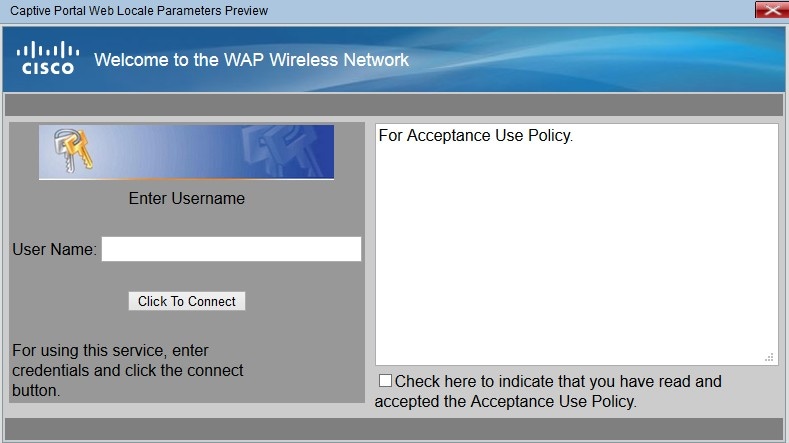
Nota: L'anteprima mostra il testo e le immagini già salvati nella configurazione di avvio. Se si apporta una modifica, fare clic su Salva prima di fare clic su Anteprima per visualizzare le modifiche.
Carica/Elimina immagine personalizzata
Passaggio 1. Fare clic sul pulsante Carica/Elimina immagine personalizzata nella pagina Parametri delle impostazioni internazionali del Web di Captive Portal se non è stata trovata l'immagine desiderata dall'elenco a discesa Immagine account o se si desidera ottenere una nuova immagine o eliminare l'immagine dall'elenco. Verrà aperta l'immagine personalizzata del portale Web:

· Upload Web Custom Image (Carica immagine personalizzata Web): per caricare una nuova immagine personalizzata, passare a Upload Web Custom Image (Carica immagine personalizzata Web).
· Elimina immagine personalizzata Web — se si desidera eliminare l'elenco dei moduli immagine personalizzati, passare a Elimina immagine personalizzata Web.
Carica immagine personalizzata Web

Passaggio 1. Nel campo Carica immagine personalizzata Web, fare clic su Sfoglia per selezionare un file dal computer. Viene visualizzata la pagina Scegli file da caricare.
Passaggio 2. Selezionare il file immagine dal computer locale e fare clic su Apri.
Nota: L'immagine deve essere di almeno 5 kilobyte e deve essere in formato GIF o JPEG.
Passaggio 3. Fare clic su Upload per caricare l'immagine nel dispositivo WAP.
Elimina immagine personalizzata Web
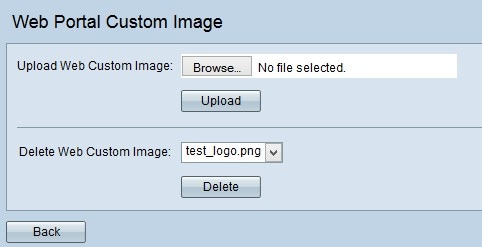
Passaggio 1. Scegliere il file che si desidera eliminare dall'elenco a discesa nel campo Elimina immagine personalizzata Web.
Passaggio 2. Fare clic su Elimina per eliminare il file selezionato dal dispositivo WAP.
Attenzione: L'eliminazione delle immagini attualmente utilizzate ripristinerà la sezione predefinita della pagina di personalizzazione Web.
 Feedback