Aggiornamento dei controller SD-WAN con l'utilizzo di vManage GUI o CLI
Linguaggio senza pregiudizi
La documentazione per questo prodotto è stata redatta cercando di utilizzare un linguaggio senza pregiudizi. Ai fini di questa documentazione, per linguaggio senza di pregiudizi si intende un linguaggio che non implica discriminazioni basate su età, disabilità, genere, identità razziale, identità etnica, orientamento sessuale, status socioeconomico e intersezionalità. Le eventuali eccezioni possono dipendere dal linguaggio codificato nelle interfacce utente del software del prodotto, dal linguaggio utilizzato nella documentazione RFP o dal linguaggio utilizzato in prodotti di terze parti a cui si fa riferimento. Scopri di più sul modo in cui Cisco utilizza il linguaggio inclusivo.
Informazioni su questa traduzione
Cisco ha tradotto questo documento utilizzando una combinazione di tecnologie automatiche e umane per offrire ai nostri utenti in tutto il mondo contenuti di supporto nella propria lingua. Si noti che anche la migliore traduzione automatica non sarà mai accurata come quella fornita da un traduttore professionista. Cisco Systems, Inc. non si assume alcuna responsabilità per l’accuratezza di queste traduzioni e consiglia di consultare sempre il documento originale in inglese (disponibile al link fornito).
Sommario
Introduzione
Questo documento descrive il processo di aggiornamento dei controller SD-WAN (Wide Area Network) definiti dal software.
Prerequisiti
Requisiti
Cisco raccomanda la conoscenza dei seguenti argomenti:
- SD-WAN (Wide Area Network) definito dal software Cisco
- Cisco Software Central
- Scaricare il software Controller da software.cisco.com
- Eseguire lo script AURA prima dell'aggiornamento CiscoDevNet/sure: esperienza di preparazione all'aggiornamento SD-WAN
È possibile pianificare l'aggiornamento dei controller per diversi motivi, ad esempio:
- Nuove release con nuove funzionalità.
- Correzione di avvertenze/bug noti
- Release differite.
Nota: se la release è stata posticipata, è buona norma aggiornare il più presto possibile la versione gold-star. Le versioni posticipate non sono consigliate sui controller di produzione a causa di difetti noti.
Quando è il momento di aggiornare i Controller, considera le seguenti informazioni utili:
- Verificare le note di rilascio dei controller SD-WAN.
- Verificare i percorsi di aggiornamento di Cisco vManage.
- Verificare che i controller Cisco SD-WAN soddisfino le risorse di elaborazione consigliate.
- Verificare gli avvisi di fine ciclo di vita e di fine vendita dei prodotti SD-WAN.
Nota: per aggiornare i controller SD-WAN, usare vManage > vBonds > vSmarts.
Componenti usati
Questo documento si basa sulle seguenti versioni software:
- Cisco vManage 20.3.5 e 20.6.3.1
- Cisco vBond e vSmart 20.3.5 e 20.6.3
Le informazioni discusse in questo documento fanno riferimento a dispositivi usati in uno specifico ambiente di emulazione. Su tutti i dispositivi menzionati nel documento la configurazione è stata ripristinata ai valori predefiniti. Se la rete è operativa, valutare attentamente eventuali conseguenze derivanti dall'uso dei comandi.
Controlli preliminari da eseguire prima dell'aggiornamento di un controller
Eseguire il backup del controller
- Se il sistema è ospitato nel cloud, verificare che sia stato eseguito il backup più recente o avviare un backup del database di configurazione come indicato nel passaggio successivo.
- È possibile visualizzare i backup correnti e attivare una copia istantanea su richiesta dal portale SSP. Ulteriori informazioni sono disponibili qui.
- Se in locale, eseguire un backup config-db e un'istantanea della VM dei controller.
vManage# request nms configuration-db backup path /home/admin/db_backup
successfully saved the database to /home/admin/db_backup.tar.gz
- Se in locale, raccogliere il file show running-config e salvarlo localmente.
- Se si è in sede, accertarsi di conoscere la password neo4j e di annotare la versione corrente esatta.
Eseguire un controllo AURA
- Scaricare e attenersi alla procedura per eseguire AURA da CiscoDevNet/sure: esperienza di preparazione all'aggiornamento di SD-WAN
- Aprire una richiesta TAC SR per risolvere eventuali problemi relativi ai controlli non riusciti riportati nel rapporto AURA.
Accertarsi che sia stata eseguita l'operazione Invia ai controller/Invia a vBond
Controlla intervallo raccolta statistiche vManage
Cisco consiglia di impostare l'intervallo di raccolta delle statistiche in Amministrazione > Impostazioni sul timer predefinito di 30 minuti.

Nota: Cisco consiglia di associare vSmarts e vBonds al modello vManage prima di un aggiornamento.
Verifica dello spazio su disco su vSmart e vBond
Utilizzare il comando df -kh | grep boot da vShell per determinare le dimensioni del disco.
controller:~$ df -kh | grep boot
/dev/sda1       2.5G  232M  2.3G  10% /boot
controller:~$
Se le dimensioni sono maggiori di 200 MB, procedere con l'aggiornamento dei controller.
Se le dimensioni sono inferiori a 200 MB, procedere come segue:
1. Verificare che la versione corrente sia l'unica elencata nel comando show software.
VERSION    ACTIVE   DEFAULT PREVIOUS  CONFIRMED TIMESTAMP
------------------------------------------------------------------------------
20.11.1     true    true    false    auto     2023-05-02T16:48:45-00:00
20.9.1      false   false   true     user     2023-05-02T19:16:09-00:00
20.8.1      false   false   false    user     2023-05-10T10:57:31-00:00
2. Verificare che la versione corrente sia impostata come predefinita nel comando show software version.
controller# request software set-default 20.11.1
status mkdefault 20.11.1: successful
controller#
3. Se sono elencate più versioni, rimuovere tutte le versioni non attive con il comando request software remove <version>. In questo modo si aumenta lo spazio disponibile per procedere con l'aggiornamento.
controller# request software remove 20.9.1
status remove 20.9.1: successful
vedge-1# show software
VERSION   ACTIVE DEFAULT PREVIOUS CONFIRMED TIMESTAMP
------------------------------------------------------------------------------
20.11.1   true   true    false    auto      2023-05-02T16:48:45-00:00
controller#
4. Controllare lo spazio su disco per verificare che sia superiore a 200 MB. In caso contrario, aprire TAC SR.
Flusso di lavoro di aggiornamento controller
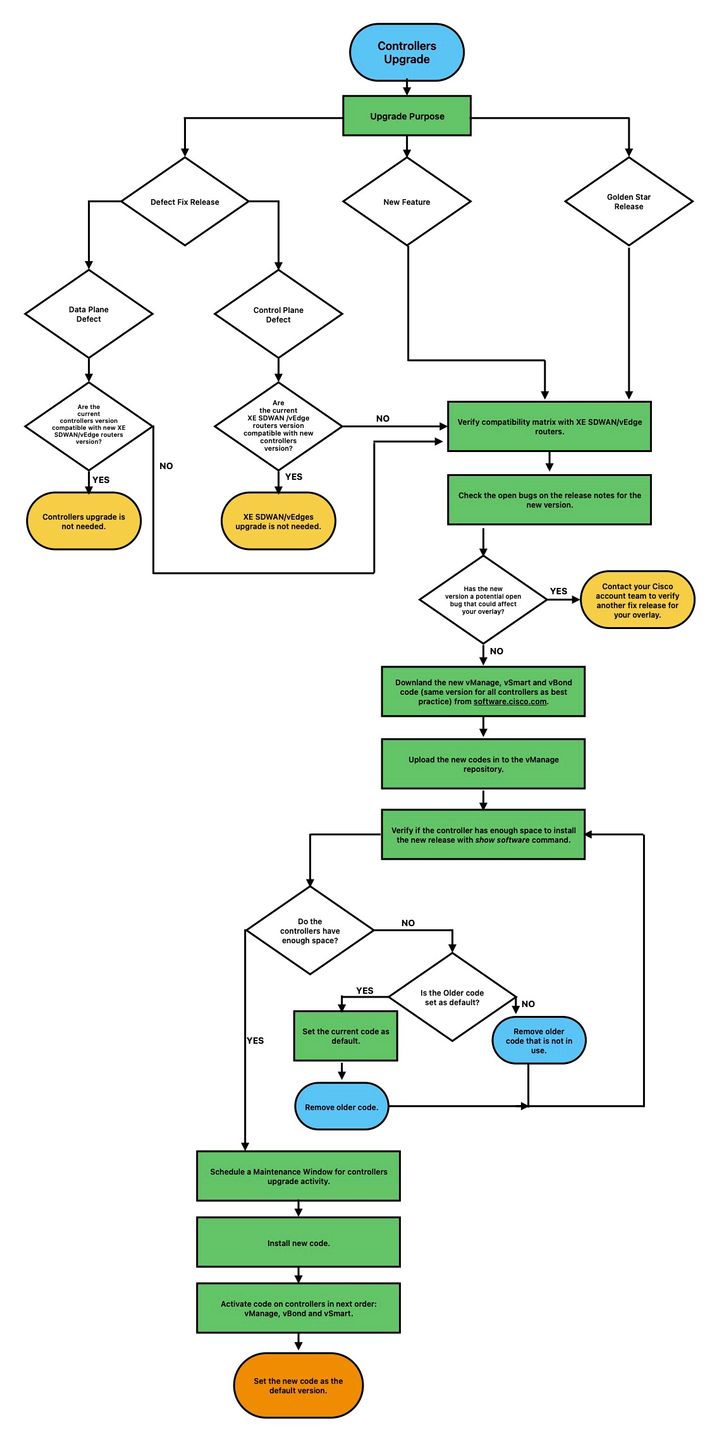
Aggiornamento cluster vManage
In caso di aggiornamento del cluster, è necessario eseguire i passaggi descritti nella Cisco SD-WAN Getting Started Guide - Cluster Management [Cisco SD-WAN] - Cisco Guide.
Nota: l'aggiornamento del cluster vManage non ha alcun impatto sulla rete di dati.
Attenzione: in caso di domande o problemi durante l'aggiornamento del cluster, contattare TAC prima di procedere.
Aggiornamento dei controller SD-WAN tramite interfaccia grafica utente (GUI) vManage
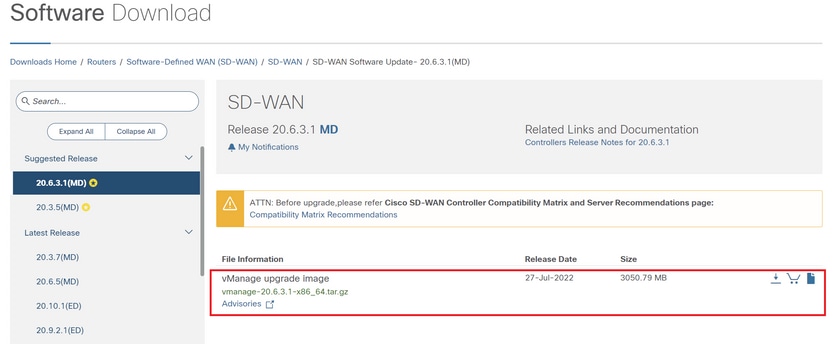
Passaggio 1. Caricare le immagini software nel repository vManage
Passare a Download software e scaricare l'immagine della versione del software necessaria per vManage.
Nota: sono disponibili due tipi di immagini per i controller: distribuzione e aggiornamento. Per l'ambito di questa guida, l'immagine da scaricare deve essere un'immagine di aggiornamento.
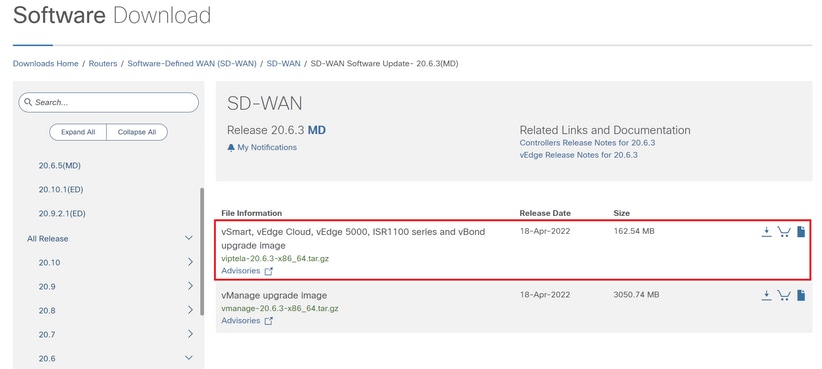
Passare a Software Download e scaricare l'immagine della versione del software per vBond e vSmart.
Nota: l'immagine per vBond e vSmart è la stessa.
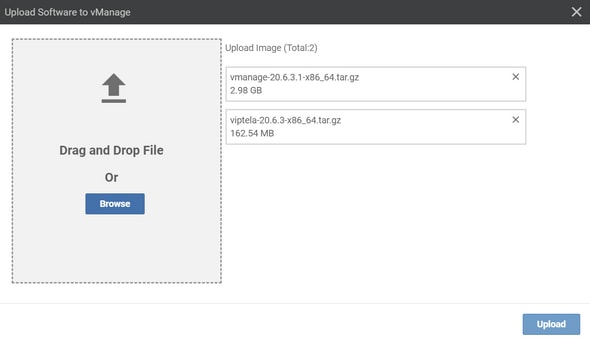
Per caricare le nuove immagini, selezionare Manutenzione > Repository software > Immagini software, fare clic su Aggiungi nuovo software e selezionare vManage nel menu a discesa.

Selezionare le immagini e fare clic su Upload.
Una volta caricate le immagini, verificare che siano elencate in Repository software > Immagini software.

Passaggio 2. Installazione, attivazione e impostazione della nuova versione come predefinita
Questo passaggio spiega come eseguire l'aggiornamento in tre passaggi: installazione, attivazione e impostazione della nuova versione come predefinita.
vManage
Fase A. Installazione
Nel menu principale, passare a Manutenzione > Aggiornamento software > vManage e fare clic su Aggiorna.

Nella finestra popup Aggiornamento software, procedere come segue:
- Scegliere la scheda vManage.
- Selezionare la versione dell'immagine da aggiornare dall'elenco a discesa Versione.
- Fare clic su Aggiorna.
Nota: questo processo non esegue il riavvio di vManage, ma solo il trasferimento, la decompressione e la creazione delle directory necessarie per l'aggiornamento.
Nota: si consiglia di eseguire il backup del volume di dati prima di procedere con l'aggiornamento di vManage.
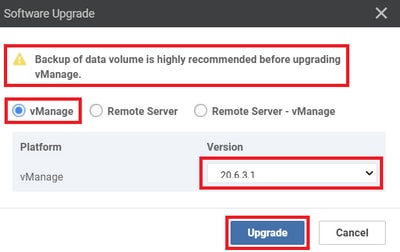
Verificare lo stato dell'attività fino a quando non viene visualizzata come Completata (Success).

Fase B. Attivazione
In questo passaggio, vManage attiva la nuova versione del software installato e si riavvia per avviarsi con il nuovo software.
Passare a Manutenzione > Aggiornamento software > vManage, quindi fare clic su Attiva.

Selezionare la nuova versione e fare clic su Attiva.
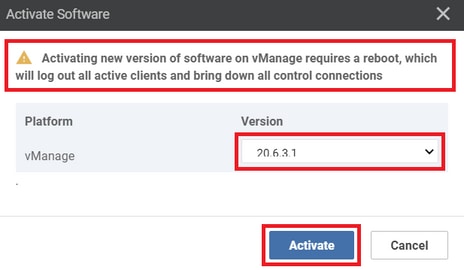
Nota: l'accesso alla GUI non è disponibile durante il riavvio di vManage. L'attivazione completa può richiedere fino a 60 minuti.
Al termine del processo, accedere e passare a Manutenzione > Aggiornamento software > vManage per verificare che la nuova versione sia attivata.

Fase C. Impostazione della versione software predefinita
È possibile impostare un'immagine software come immagine predefinita su un dispositivo Cisco SD-WAN. Si consiglia di impostare la nuova immagine come predefinita dopo aver verificato che il software funzioni come desiderato sul dispositivo e nella rete.
Se viene eseguito un reset di fabbrica sul dispositivo, il dispositivo si avvia con l'immagine impostata come predefinita.
Nota: si consiglia di impostare la nuova versione come predefinita perché se vManage viene riavviato, viene avviata la versione precedente. Ciò può causare il danneggiamento del database. Il downgrade da una versione principale a una precedente non è supportato in vManage.
Per impostare un'immagine software come immagine predefinita, procedere come segue:
- Passare a Manutenzione > Aggiornamento software > vManage.
- Fare clic su Imposta versione predefinita, selezionare la nuova versione dall'elenco a discesa e fare clic su Imposta versione predefinita.
Nota: questo processo non esegue il riavvio di vManage.

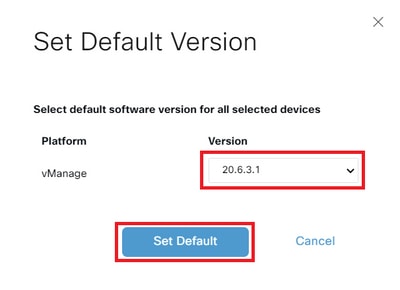
Verificare lo stato dell'attività fino a quando non viene visualizzata come Completata (Success).

Per verificare la versione predefinita, selezionare Manutenzione > Aggiornamento software > vManage.

vBond
Fase A. Installazione
In questa fase, vManage invia il nuovo software a vBond e installa la nuova immagine.
Passare a Manutenzione > Aggiornamento software > Controller e fare clic su Aggiorna.

Nella finestra popup Aggiornamento software, procedere come segue:
- Scegliere la scheda vManage.
- Selezionare la versione dell'immagine da aggiornare dall'elenco a discesa Versione.
- Fare clic su Aggiorna.
Nota: questo processo non esegue il riavvio di vBond, ma solo il trasferimento, la decompressione e la creazione delle directory necessarie per l'aggiornamento.
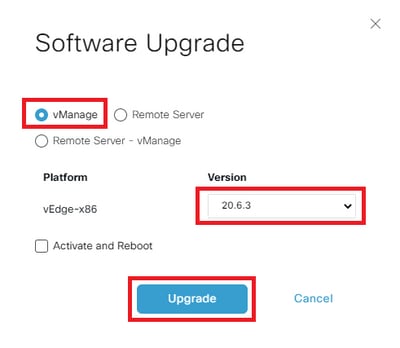
Verificare lo stato dell'attività fino a quando non viene visualizzato come Riuscito.

Fase B. Attivazione
In questo passaggio, vBond attiva la nuova versione del software installato e si riavvia per avviarsi con il nuovo software.
Selezionare Manutenzione>Aggiornamento software>Controller, quindi fare clic su Attiva.

Selezionare la nuova versione e fare clic su Attiva.
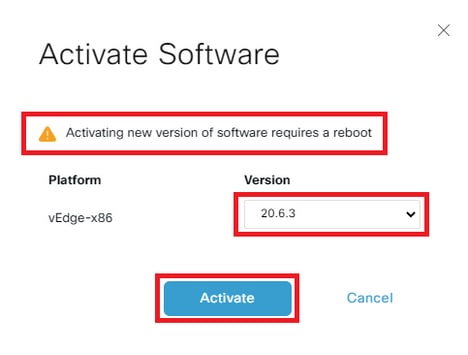
Nota: questo processo richiede il riavvio di vBond. L'attivazione completa può richiedere fino a 30 minuti.
Verificare lo stato dell'attività fino a quando non viene visualizzato come Riuscito.

Al termine del processo, passare a Manutenzione > Aggiornamento software > Controller per verificare che la nuova versione sia attivata.

Passaggio facoltativo. Attivare e riavviare la nuova immagine software
Nota: questo passo è facoltativo. È possibile selezionare la casella dell'opzione Activate and Reboot durante il processo di installazione. Utilizzare questa procedura per installare e attivare la nuova versione aggiornata del software.
Fase C. Impostazione della versione software predefinita
È possibile impostare un'immagine software come immagine predefinita su un dispositivo Cisco SD-WAN. Si consiglia di impostare la nuova immagine come predefinita dopo aver verificato che il software funzioni come desiderato sul dispositivo e nella rete.
Se viene eseguito un reset di fabbrica sul dispositivo, il dispositivo si avvia con l'immagine impostata come predefinita.
Per impostare un'immagine software come immagine predefinita, procedere come segue:
- Passare a Manutenzione>Aggiornamento software>Controller.
- Fare clic su Imposta versione predefinita, selezionare la nuova versione dall'elenco a discesa e fare clic su Imposta versione predefinita.
Nota: questo processo non esegue il riavvio di vBond.

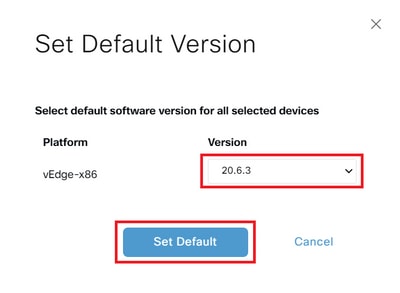
Verificare lo stato dell'attività fino a quando non viene visualizzato come Riuscito.

Per verificare la versione predefinita, selezionare Manutenzione > Aggiornamento software > Controller.

vSmart
Fase A. Installazione
In questo passaggio, vManagesinvia il nuovo software a vSmart e installa la nuova immagine.
Passare a Manutenzione>Aggiornamento software>Controller e fare clic su Aggiorna.

Nella finestra popup Aggiornamento software, procedere come segue:
- Scegliere la scheda vManage.
- Selezionare la versione dell'immagine da aggiornare dall'elenco a discesa Versione.
- Fare clic su Aggiorna.
Nota: questo processo non esegue il riavvio di vSmart, ma solo il trasferimento, la decompressione e la creazione delle directory necessarie per l'aggiornamento.
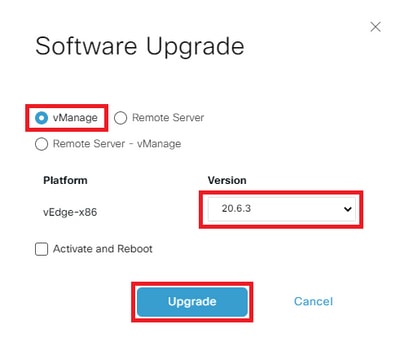
Verificare lo stato dell'attività fino a quando non viene visualizzato come Riuscito.

Fase B. Attivazione
In questo passaggio, vSmart attiva la nuova versione del software installato e si riavvia per avviarsi con il nuovo software.
Selezionare Manutenzione>Aggiornamento software>Controller, quindi fare clic su Attiva.

Selezionare la nuova versione e fare clic su Attiva.
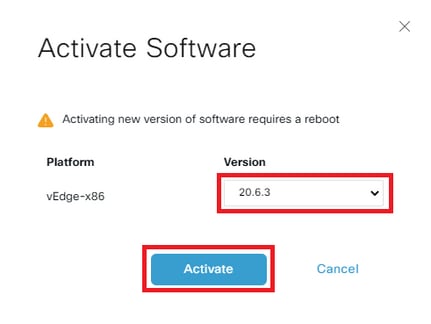
Nota: questo processo richiede il riavvio di vSmart. L'attivazione completa può richiedere fino a 30 minuti.
Verificare lo stato dell'attività fino a quando non viene visualizzato come Riuscito.

Al termine del processo, passare a Manutenzione > Aggiornamento software > Controller per verificare che la nuova versione sia attivata.

Passaggio facoltativo. Attivare e riavviare la nuova immagine software
Nota: questo passaggio è facoltativo. È possibile selezionare la casella Attiva e riavvia durante il processo di installazione. Utilizzare questa procedura per installare e attivare la nuova versione aggiornata del software.
Fase C. Impostazione della versione software predefinita
È possibile impostare un'immagine software come immagine predefinita su un dispositivo Cisco SD-WAN. Si consiglia di impostare la nuova immagine come predefinita dopo aver verificato che il software funzioni come desiderato sul dispositivo e nella rete.
Se viene eseguito un reset di fabbrica sul dispositivo, il dispositivo si avvia con l'immagine impostata come predefinita.
Per impostare un'immagine software come immagine predefinita, procedere come segue:
- Passare a Manutenzione>Aggiornamento software>Controller.
- Fare clic su Imposta versione predefinita, selezionare la nuova versione dall'elenco a discesa e fare clic su Imposta versione predefinita.
Nota: questo processo non consente di riavviare vSmart.

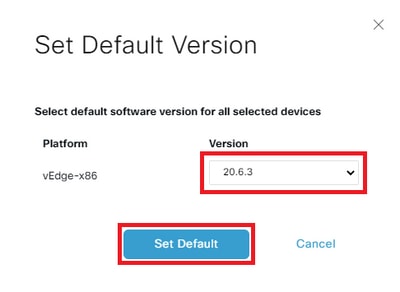
Verificare lo stato dell'attività fino a quando non viene visualizzato come Riuscito.

Per verificare la versione predefinita, selezionare Manutenzione > Aggiornamento software > Controller.

Aggiornamento dei controller SD-WAN tramite CLI
Passaggio 1. Installazione
Per installare l'immagine è possibile procedere in due modi:
Opzione 1: dalla CLI con l'uso di HTTP, FTP o TFTP.
Per installare l'immagine software dalla CLI:
-
Configurare il limite di tempo per la conferma della riuscita di un aggiornamento software. Il tempo può essere compreso tra 1 e 60 minuti.
Viptela# system upgrade-confirm minutes - Installare il software:
Viptela# request software install url/vmanage-20.6.3.1-x86_64.tar.gz [reboot]Specificare la posizione dell'immagine in uno dei modi seguenti:
- Il file immagine si trova sul server locale:
/directory-path/
È possibile utilizzare la funzione di completamento automatico in CLI per completare il percorso e il nome del file.
- Il file immagine si trova su un server FTP.
ftp://hostname/
- Il file immagine si trova su un server HTTP.
http://hostname/
- Il file immagine si trova su un server TFTP.
tftp://hostname/
È possibile specificare l'identificatore VPN in cui si trova il server.
L'opzione reboot attiva la nuova immagine software e riavvia il dispositivo al termine dell'installazione.
3. Se l'opzione di riavvio non è stata inclusa nel passaggio 2, attivare la nuova immagine del software ed esegue automaticamente il riavvio dell'istanza per avviare la nuova versione.
Viptela# request software activate4. Confermare, entro il limite di tempo configurato per la conferma dell'aggiornamento (12 minuti per impostazione predefinita), che l'installazione del software è stata completata:
Viptela# request software upgrade-confirmSe non si esegue questo comando entro questo limite di tempo, il dispositivo torna automaticamente all'immagine software precedente.
Opzione 2: da GUI vManage
Questo passaggio consente di caricare le immagini nel repository vManage.
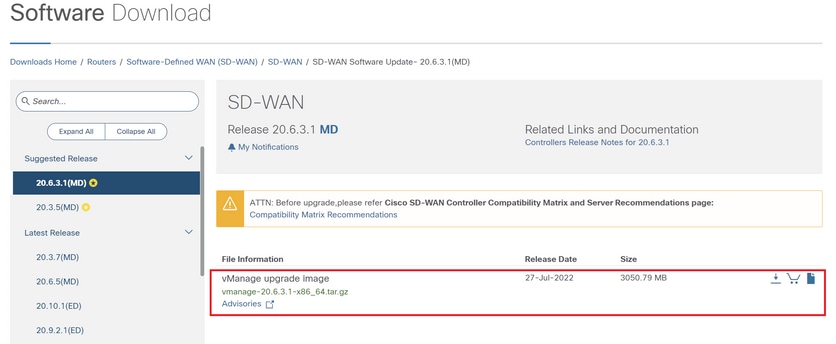
Passare a Download software e scaricare l'immagine della versione del software per vManage.
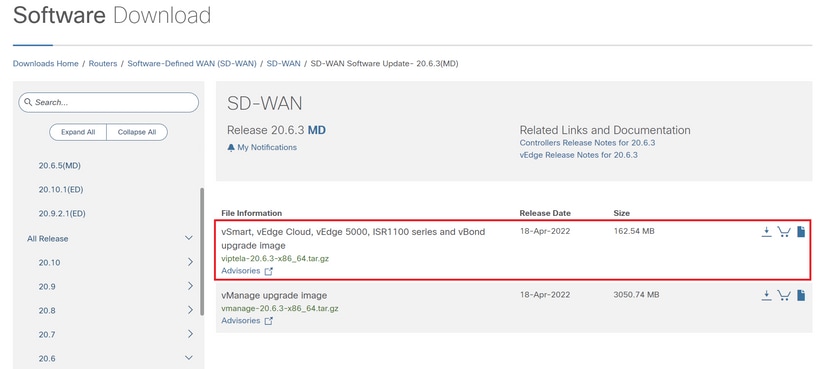
Passare a Software Download e scaricare l'immagine della versione del software per vBond e vSmart.
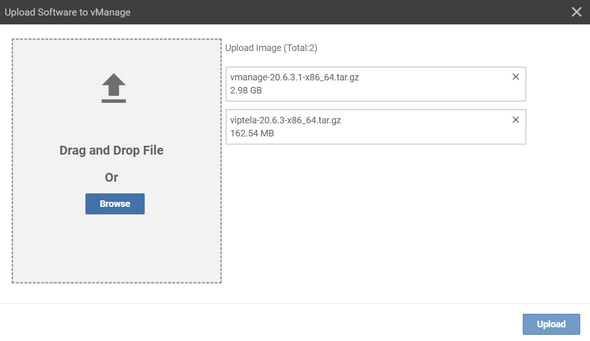
Per caricare le nuove immagini, nel menu principale, selezionare Manutenzione > Repository software > Immagini software, fare clic su Aggiungi nuovo software e sull'opzione di trascinamento selezionare vManage.

Selezionare le immagini e fare clic su Upload.
Per verificare se le immagini sono disponibili, selezionare Repository software > Immagini software.

Nota: questa procedura deve essere eseguita per tutti i controller.
vManage:
Fare clic su Aggiorna.

vBond:
Fare clic su Aggiorna.

vSmart
Fare clic su Aggiorna.

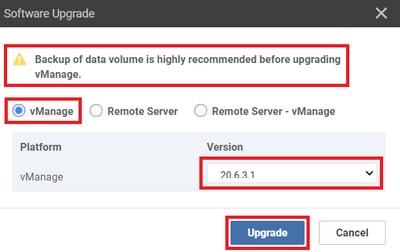
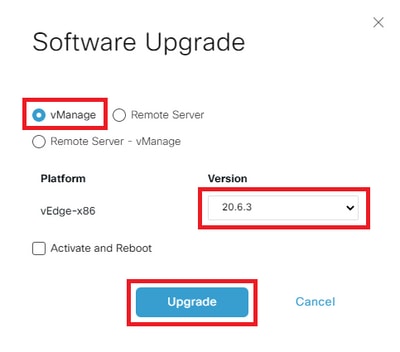
Nella finestra popup Aggiornamento software, procedere come segue:
- Scegliere la scheda vManage.
- Selezionare la versione dell'immagine da aggiornare dall'elenco a discesa Versione.
- Fare clic su Aggiorna.
Per vManage:
Per vBond e vSmart:
Passaggio 2. Attivazione
Al termine dell'installazione, verificare le immagini software installate nei controller.
vmanage# show software

VERSION ACTIVE DEFAULT PREVIOUS CONFIRMED TIMESTAMP
---------------------------------------------------------------------------
20.3.5 true true - - 2023-02-01T22:25:24-00:00
20.6.3.1 false false false - -
vbond# show software

VERSION ACTIVE DEFAULT PREVIOUS CONFIRMED TIMESTAMP
--------------------------------------------------------------------------
20.3.5 true true - - 2022-10-01T00:30:40-00:00
20.6.3 false false false - -
vsmart# show software

VERSION ACTIVE DEFAULT PREVIOUS CONFIRMED TIMESTAMP
--------------------------------------------------------------------------
20.3.5 true true - - 2022-10-01T00:31:34-00:00
20.6.3 false false false - -
Nota: per attivare l'immagine, usare il comando successivo nei controller (Controller by Controller, 1st vManage, 2nd vBond, 3rd vSmart).
vmanage# request software activate ?
Description: Display software versions
Possible completions:
20.3.5
20.6.3.1
clean Clean activation
now Activate software version
vmanage# request software activate 20.6.3.1
This will reboot the node with the activated version.
Are you sure you want to proceed? [yes,NO] yes

Broadcast message from root@vmanage (console) (Tue Feb 28 01:01:04 2023):

Tue Feb 28 01:01:04 UTC 2023: The system is going down for reboot NOW!
vbond# request software activate ?
Description: Display software versions
Possible completions:
20.3.5
20.6.3
clean Clean activation
now Activate software version
vbond# request software activate 20.6.3
This will reboot the node with the activated version.
Are you sure you want to proceed? [yes,NO] yes

Broadcast message from root@vbond (console) (Tue Feb 28 01:05:59 2023):

Tue Feb 28 01:05:59 UTC 2023: The system is going down for reboot NOW!
vsmart# request software activate ?
Description: Display software versions
Possible completions:
20.3.5
20.6.3
clean Clean activation
now Activate software version
vsmart# request software activate 20.6.3
This will reboot the node with the activated version.
Are you sure you want to proceed? [yes,NO] yes

Broadcast message from root@vsmart (console) (Tue Feb 28 01:13:44 2023):

Tue Feb 28 01:13:44 UTC 2023: The system is going down for reboot NOW!
Nota: i controller attivano la nuova immagine e si riavviano.
Per verificare che la nuova versione del software sia attivata, eseguire il comando seguente:
vmanage# show version
20.6.3.1
vmanage# show software

VERSION ACTIVE DEFAULT PREVIOUS CONFIRMED TIMESTAMP
---------------------------------------------------------------------------
20.3.5 false true true - 2023-02-01T22:25:24-00:00
20.6.3.1 true false false auto 2023-02-28T01:05:14-00:00
vbond# show version
20.6.3
vbond# show software

VERSION ACTIVE DEFAULT PREVIOUS CONFIRMED TIMESTAMP
--------------------------------------------------------------------------
20.3.5 false true true - 2022-10-01T00:30:40-00:00
20.6.3 true false false - 2023-02-28T01:09:05-00:00
vsmart# show version
20.6.3
vsmart# show software

VERSION ACTIVE DEFAULT PREVIOUS CONFIRMED TIMESTAMP
--------------------------------------------------------------------------
20.3.5 false true true - 2022-10-01T00:31:34-00:00
20.6.3 true false false - 2023-02-28T01:16:36-00:00
Passaggio 3. Imposta versione software predefinita
È possibile impostare un'immagine software come immagine predefinita su un dispositivo Cisco SD-WAN. Si consiglia di impostare la nuova immagine come predefinita dopo aver verificato che il software funzioni come desiderato sul dispositivo e nella rete.
Se viene eseguito un reset di fabbrica sul dispositivo, il dispositivo si avvia con l'immagine impostata come predefinita.
Nota: si consiglia di impostare la nuova versione come predefinita perché se vManage viene riavviato, viene avviata la versione precedente. Ciò può causare il danneggiamento del database. Il downgrade da una versione principale a una precedente non è supportato in vManage.
Nota: questo processo non esegue il riavvio dei controller.
Per impostare una versione del software come predefinita, usare il comando seguente nei controller:
vmanage# request software set-default ?
Possible completions:
20.3.5
20.6.3.1
cancel Cancel this operation
start-at Schedule start.
| Output modifiers
<cr>
vmanage# request software set-default 20.6.3.1
status mkdefault 20.6.3.1: successful
vbond# request software set-default ?
Possible completions:
20.3.5
20.6.3
cancel Cancel this operation
start-at Schedule start.
| Output modifiers
<cr>
vbond# request software set-default 20.6.3
status mkdefault 20.6.3: successful
vsmart# request software set-default ?
Possible completions:
20.3.5
20.6.3
cancel Cancel this operation
start-at Schedule start.
| Output modifiers
<cr>
vsmart# request software set-default 20.6.3
status mkdefault 20.6.3: successful
Per verificare che la nuova versione predefinita sia impostata sui controller, eseguire il comando seguente:
vmanage# show software

VERSION ACTIVE DEFAULT PREVIOUS CONFIRMED TIMESTAMP
---------------------------------------------------------------------------
20.3.5 false false true - 2023-02-01T22:25:24-00:00
20.6.3.1 true true false auto 2023-02-28T01:05:14-00:00
vbond# show software

VERSION ACTIVE DEFAULT PREVIOUS CONFIRMED TIMESTAMP
--------------------------------------------------------------------------
20.3.5 false false true - 2022-10-01T00:30:40-00:00
20.6.3 true true false - 2023-02-28T01:09:05-00:00
vsmart# show software

VERSION ACTIVE DEFAULT PREVIOUS CONFIRMED TIMESTAMP
--------------------------------------------------------------------------
20.3.5 false false true - 2022-10-01T00:31:34-00:00
20.6.3 true true false - 2023-02-28T01:16:36-00:00
Risoluzione dei problemi
1. Se dopo l'attivazione l'interfaccia utente rimane inattiva per un lungo periodo di tempo e non è più raggiungibile, questi output possono essere utili per individuare la causa principale:
vmanage# request nms application-server status
NMS application server
Enabled: true   <<<<<<<<<<<   "false"
Status: running PID:26470 for 22279s   <<<<<<<<<<  "not running"
Se lo stato dell'app-server indica Enabled come false e lo stato non è in esecuzione, è possibile usare il comando successivo per ripristinare l'interfaccia GUI:
vmanage# request nms application-server restart
2. Per verificare lo stato di tutti i servizi nms, è possibile eseguire il comando seguente:
vmanage# request nms all status
NMS service proxy
Enabled: true
Status: running PID:22194 for 22774s
NMS service proxy rate limit
Enabled: true
Status: running PID:24076 for 22795s
NMS application server
Enabled: true
Status: running PID:26470 for 22638s
NMS configuration database
Enabled: true
Status: running PID:25030 for 22697s
NMS coordination server
Enabled: true
Status: running PID:23918 for 22741s
NMS messaging server
Enabled: true
Status: running PID:23386 for 22795s
NMS statistics database
Enabled: true
Status: running PID:23284 for 22741s
NMS data collection agent
Enabled: true
Status: running PID:21708 for 22746s
NMS CloudAgent v2
Enabled: true
Status: running PID:25431 for 22704s
NMS cloud agent
Enabled: true
Status: running PID:21731 for 22747s
NMS SDAVC server
Enabled: false
Status: not running
NMS SDAVC proxy
Enabled: true
Status: running PID:21780 for 22747s
3. Per verificare che l'handshake TCP sia stato completato, usare il comando seguente:
vmanage# request nms all diagnostics
NMS service server
Checking cluster connectivity...
Pinging server on localhost:8443...
Starting Nping 0.7.80 ( https://nmap.org/nping ) at 2023-02-28 01:48 UTC
SENT (0.0023s) Starting TCP Handshake > localhost:8443 (127.0.0.1:8443)
RCVD (0.0023s) Handshake with localhost:8443 (127.0.0.1:8443) completed
SENT (1.0036s) Starting TCP Handshake > localhost:8443 (127.0.0.1:8443)
RCVD (1.0036s) Handshake with localhost:8443 (127.0.0.1:8443) completed
SENT (2.0051s) Starting TCP Handshake > localhost:8443 (127.0.0.1:8443)
RCVD (2.0051s) Handshake with localhost:8443 (127.0.0.1:8443) completed

Max rtt: 0.039ms | Min rtt: 0.029ms | Avg rtt: 0.035ms
TCP connection attempts: 3 | Successful connections: 3 | Failed: 0 (0.00%)
Nping done: 1 IP address pinged in 2.01 seconds
WARNING: Reverse DNS lookup on localhost timed out after 2 seconds

Checking server localhost...
Server network connections
--------------------------
tcp 0 0 127.0.0.1:37533 127.0.0.1:8443 TIME_WAIT -
tcp 0 0 127.0.0.1:40364 127.0.0.1:8443 ESTABLISHED 1614/python3
tcp 0 0 127.0.0.1:46626 127.0.0.1:8443 ESTABLISHED 1615/python3
tcp 0 0 127.0.0.1:46606 127.0.0.1:8443 ESTABLISHED 1617/python3
tcp 0 0 127.0.0.1:46654 127.0.0.1:8443 ESTABLISHED 21708/python3
tcp 0 0 127.0.0.1:36835 127.0.0.1:8443 TIME_WAIT -
tcp 0 0 127.0.0.1:46590 127.0.0.1:8443 ESTABLISHED 1616/python3
tcp 0 0 127.0.0.1:46255 127.0.0.1:8443 TIME_WAIT -
tcp6 0 0 :::8443 :::* LISTEN 23643/envoy
tcp6 0 0 127.0.0.1:8443 127.0.0.1:46606 ESTABLISHED 23643/envoy
tcp6 0 0 127.0.0.1:8443 127.0.0.1:46654 ESTABLISHED 23643/envoy
tcp6 0 0 127.0.0.1:8443 127.0.0.1:46626 ESTABLISHED 23643/envoy
tcp6 0 0 127.0.0.1:8443 127.0.0.1:40364 ESTABLISHED 23643/envoy
tcp6 0 0 127.0.0.1:8443 127.0.0.1:46590 ESTABLISHED 23643/envoy
NMS application server
Checking cluster connectivity...
Pinging server 0 on localhost:8443...
Starting Nping 0.7.80 ( https://nmap.org/nping ) at 2023-02-28 01:48 UTC
SENT (0.0023s) Starting TCP Handshake > localhost:8443 (127.0.0.1:8443)
RCVD (0.0023s) Handshake with localhost:8443 (127.0.0.1:8443) completed
SENT (1.0037s) Starting TCP Handshake > localhost:8443 (127.0.0.1:8443)
RCVD (1.0037s) Handshake with localhost:8443 (127.0.0.1:8443) completed
SENT (2.0050s) Starting TCP Handshake > localhost:8443 (127.0.0.1:8443)
RCVD (2.0050s) Handshake with localhost:8443 (127.0.0.1:8443) completed

Max rtt: 0.042ms | Min rtt: 0.031ms | Avg rtt: 0.035ms
TCP connection attempts: 3 | Successful connections: 3 | Failed: 0 (0.00%)
Nping done: 1 IP address pinged in 2.01 seconds

Disk I/O statistics for vManage storage
---------------------------------------
avg-cpu: %user %nice %system %iowait %steal %idle
1.59 0.05 0.63 0.11 0.00 97.62

Device tps kB_read/s kB_wrtn/s kB_dscd/s kB_read kB_wrtn kB_dscd


NMS configuration database
Checking cluster connectivity...
Pinging server 0 on localhost:7687,7474...
Starting Nping 0.7.80 ( https://nmap.org/nping ) at 2023-02-28 01:48 UTC
SENT (0.0023s) Starting TCP Handshake > localhost:7474 (127.0.0.1:7474)
RCVD (0.0023s) Handshake with localhost:7474 (127.0.0.1:7474) completed
SENT (1.0036s) Starting TCP Handshake > localhost:7687 (127.0.0.1:7687)
RCVD (1.0037s) Handshake with localhost:7687 (127.0.0.1:7687) completed
SENT (2.0050s) Starting TCP Handshake > localhost:7474 (127.0.0.1:7474)
RCVD (2.0050s) Handshake with localhost:7474 (127.0.0.1:7474) completed
SENT (3.0063s) Starting TCP Handshake > localhost:7687 (127.0.0.1:7687)
RCVD (3.0064s) Handshake with localhost:7687 (127.0.0.1:7687) completed
SENT (4.0077s) Starting TCP Handshake > localhost:7474 (127.0.0.1:7474)
RCVD (4.0078s) Handshake with localhost:7474 (127.0.0.1:7474) completed
SENT (5.0090s) Starting TCP Handshake > localhost:7687 (127.0.0.1:7687)
RCVD (5.0091s) Handshake with localhost:7687 (127.0.0.1:7687) completed

Max rtt: 0.061ms | Min rtt: 0.029ms | Avg rtt: 0.038ms
TCP connection attempts: 6 | Successful connections: 6 | Failed: 0 (0.00%)
Nping done: 1 IP address pinged in 5.01 seconds

Connecting to localhost...
+------------------------------------------------------------------------------------+
| type | row | attributes[row]["value"] |
+------------------------------------------------------------------------------------+
| "StoreSizes" | "TotalStoreSize" | 554253748 |
| "PageCache" | "Flush" | 19834 |
| "PageCache" | "EvictionExceptions" | 0 |
| "PageCache" | "UsageRatio" | 0.001564921426952844 |
| "PageCache" | "Eviction" | 0 |
| "PageCache" | "HitRatio" | 1.0 |
| "ID Allocations" | "NumberOfRelationshipIdsInUse" | 907 |
| "ID Allocations" | "NumberOfPropertyIdsInUse" | 15934 |
| "ID Allocations" | "NumberOfNodeIdsInUse" | 891 |
| "ID Allocations" | "NumberOfRelationshipTypeIdsInUse" | 27 |
| "Transactions" | "LastCommittedTxId" | 415490 |
| "Transactions" | "NumberOfOpenTransactions" | 1 |
| "Transactions" | "NumberOfOpenedTransactions" | 36268 |
| "Transactions" | "PeakNumberOfConcurrentTransactions" | 5 |
| "Transactions" | "NumberOfCommittedTransactions" | 31642 |
+------------------------------------------------------------------------------------+

15 rows available after 644 ms, consumed after another 20 ms
Completed
Disk space used by configuration-db
961M .
NMS statistics database
Checking cluster connectivity...
Pinging server 0 on localhost:9300,9200...
Starting Nping 0.7.80 ( https://nmap.org/nping ) at 2023-02-28 01:48 UTC
SENT (0.0022s) Starting TCP Handshake > localhost:9200 (127.0.0.1:9200)
RCVD (0.0023s) Handshake with localhost:9200 (127.0.0.1:9200) completed
SENT (1.0036s) Starting TCP Handshake > localhost:9300 (127.0.0.1:9300)
RCVD (1.0037s) Handshake with localhost:9300 (127.0.0.1:9300) completed
SENT (2.0050s) Starting TCP Handshake > localhost:9200 (127.0.0.1:9200)
RCVD (2.0050s) Handshake with localhost:9200 (127.0.0.1:9200) completed
SENT (3.0055s) Starting TCP Handshake > localhost:9300 (127.0.0.1:9300)
RCVD (3.0055s) Handshake with localhost:9300 (127.0.0.1:9300) completed
SENT (4.0068s) Starting TCP Handshake > localhost:9200 (127.0.0.1:9200)
RCVD (4.0068s) Handshake with localhost:9200 (127.0.0.1:9200) completed
SENT (5.0080s) Starting TCP Handshake > localhost:9300 (127.0.0.1:9300)
RCVD (5.0081s) Handshake with localhost:9300 (127.0.0.1:9300) completed

Max rtt: 0.043ms | Min rtt: 0.022ms | Avg rtt: 0.029ms
TCP connection attempts: 6 | Successful connections: 6 | Failed: 0 (0.00%)
Nping done: 1 IP address pinged in 5.01 seconds

Connecting to server localhost

Overall cluster health state
----------------------------
Total number of shards: 35
Total number of nodes: 1
Average shards per node: 35
Primary shard allocation of 35 is within 20% of expected average 35
Cluster status: healthy (green)

Cluster shard state
-------------------
There are no unassigned shards

Cluster index statistics
------------------------
health status index uuid pri rep docs.count docs.deleted store.size pri.store.size
green open trackerstatistics_2023_02_27t19_39_42 S-2Zq9MMRN-apsr562z-zw 1 0 0 0 261b 261b
green open sulstatistics_2023_01_11t21_21_16 BmnHn29dSFeGKjayJHz6aQ 1 0 0 0 261b 261b
green open deviceconfiguration_2023_01_11t21_21_24 0qF86WgoSTm3ysve6e_hnw 1 0 5 0 57.3kb 57.3kb
green open deviceevents_2023_01_11t21_21_23 1rOapbVwR_ipH1PvcWbhVg 1 0 406 0 153.4kb 153.4kb
green open alarm_2023_01_11t21_21_20 mY4hmLf8ScaL32cD_Jzlzw 1 0 73 3 203.2kb 203.2kb
green open umbrella_2023_01_11t21_21_21 0AEhzE0wTaiwbvgE2m9e_g 1 0 0 0 261b 261b
green open sleofflinereport_2023_01_11t21_21_19 j0ALD8s6SgW_ostXGkSKLA 1 0 0 0 261b 261b
green open deviceevents_2023_02_27t19_39_57 kKT6LOFRSaSQ45YIq_BW8Q 1 0 133 0 75.2kb 75.2kb
green open eioltestatistics_2023_02_27t19_39_50 mSI3dVEISeKa4HVaDAUcQA 1 0 0 0 261b 261b
green open utddaqioxstatistics_2023_01_11t21_21_21 Uw52JOTMRo2aw0W2ZfBF-w 1 0 0 0 261b 261b
green open fwall_2023_01_11t21_21_20 ImSKES5UQ_m50NA3xE916A 1 0 0 0 261b 261b
green open approutestatsstatistics_routing_summary_2023_02_28t00_54 8cTHcjROSMaf7gLaqpOztg 1 0 0 0 261b 261b
green open apphostingstatistics_2023_01_11t21_21_24 F0CnoCsBSIGLsFJD5oPB9g 1 0 0 0 261b 261b
green open urlf_2023_01_11t21_21_24 541JR9PjRJ2F5VCAnnu_qQ 1 0 0 0 261b 261b
green open bridgemacstatistics_2023_01_11t21_21_17 B_Za3olfTU-shOcmVpJ5AA 1 0 0 0 261b 261b
green open wlanclientinfostatistics_2023_01_11t21_21_19 QW3fxuqaScm5girepulUEA 1 0 0 0 261b 261b
green open devicesystemstatusstatistics_2023_01_11t21_21_23 0eyHAP6uTH2KukP-eTqZow 1 0 90067 0 36.8mb 36.8mb
green open nwpi_2023_01_11t21_21_22 p0ohA5eAS4-mUo2V5CUAew 1 0 0 0 261b 261b
green open vnfstatistics_2023_01_11t21_21_24 ZFoka_AORoen37PNrxVTGg 1 0 0 0 261b 261b
green open device-tag-v1 8L9UIFgGTkCkUct2KcDHyQ 1 0 6 0 3.4kb 3.4kb
green open artstatistics_2023_01_11t21_21_22 ziMT4UixSMCVl16W2PsoaQ 1 0 0 0 261b 261b
green open dpistatistics_application_summary_2023_02_28t00_54 OtYhwgXIRkepG1gVoWLiEQ 1 0 0 0 261b 261b
green open bridgeinterfacestatistics_2023_01_11t21_21_22 qk7AuPzUTqasOxM0G0DtSA 1 0 0 0 261b 261b
green open speedtest_2023_01_11t21_21_22 MdR4FUFlROKqBYXmhXDR-w 1 0 0 0 261b 261b
green open aggregatedappsdpistatistics_2023_01_11t21_21_24 g4y-eKklTL-PHwwRvKmiyQ 1 0 0 0 261b 261b
green open ipsalert_2023_01_11t21_21_21 l3L6NhB6Sha31mp0UZBgig 1 0 0 0 261b 261b
green open flowlogstatistics_2023_01_11t21_21_20 F9uuICzfS6Cq8GcGkU0wTA 1 0 0 0 261b 261b
green open nwpiflowraw_2023_01_11t21_21_22 FdIv-sjwQGiq0YPVh2-alw 1 0 0 0 261b 261b
green open auditlog_2023_01_11t21_21_21 LLsBmyAjRWiIJiDYkEBVqg 1 0 407 0 447.7kb 447.7kb
green open interfacestatistics_2023_01_11t21_21_23 u8LXrT8qTcmeeeIFSo3h0w 1 0 0 0 261b 261b
green open approutestatsstatistics_transport_summary_2023_02_28t00_54 g6V1J_ByS8-6PfH9_lRkmg 1 0 0 0 261b 261b
green open qosstatistics_2023_01_11t21_21_16 Yr6x2NsYTC2c9o8KUgb9ZA 1 0 0 0 261b 261b
green open approutestatsstatistics_2023_01_11t21_21_18 OIWGMGvoSSO-xZUd-ajI-g 1 0 0 0 261b 261b
green open cloudxstatistics_2023_02_27t19_40_01 tAx45uDeQ0Gz5XnAUafpyg 1 0 0 0 261b 261b
green open dpistatistics_2023_02_27t19_39_54 yTkRk7XRSA2tTeRmDM--Dg 1 0 0 0 261b 261b
NMS coordination server
Checking cluster connectivity...
Pinging server 0 on localhost:2181...
Starting Nping 0.7.80 ( https://nmap.org/nping ) at 2023-02-28 01:48 UTC
SENT (0.0021s) Starting TCP Handshake > localhost:2181 (127.0.0.1:2181)
RCVD (0.0021s) Handshake with localhost:2181 (127.0.0.1:2181) completed
SENT (1.0033s) Starting TCP Handshake > localhost:2181 (127.0.0.1:2181)
RCVD (1.0033s) Handshake with localhost:2181 (127.0.0.1:2181) completed
SENT (2.0047s) Starting TCP Handshake > localhost:2181 (127.0.0.1:2181)
RCVD (2.0047s) Handshake with localhost:2181 (127.0.0.1:2181) completed

Max rtt: 0.039ms | Min rtt: 0.032ms | Avg rtt: 0.035ms
TCP connection attempts: 3 | Successful connections: 3 | Failed: 0 (0.00%)
Nping done: 1 IP address pinged in 2.00 seconds
WARNING: Reverse DNS lookup on localhost timed out after 2 seconds

Checking server localhost...
Server network connections
--------------------------
tcp 0 0 127.0.0.1:2181 0.0.0.0:* LISTEN 23864/docker-proxy
tcp 0 0 127.0.0.1:34397 127.0.0.1:2181 TIME_WAIT -
tcp 0 0 127.0.0.1:2181 127.0.0.1:47388 ESTABLISHED 23864/docker-proxy
tcp 0 0 127.0.0.1:40733 127.0.0.1:2181 TIME_WAIT -
tcp 0 0 127.0.0.1:45953 127.0.0.1:2181 TIME_WAIT -
tcp6 0 0 127.0.0.1:47388 127.0.0.1:2181 ESTABLISHED 26470/java
NMS container manager is disabled
NMS SDAVC server is disabled
Informazioni correlate
Procedura di attivazione della rete overlay Cisco SD-WAN
Risoluzione dei problemi della soluzione Cisco SD-WAN
Cronologia delle revisioni
| Revisione | Data di pubblicazione | Commenti |
|---|---|---|
4.0 |
13-Oct-2023 |
Sezione vManage Cluster Upgrade |
3.0 |
11-Jul-2023 |
Controlli preliminari da eseguire prima dell'aggiornamento di un controller |
2.0 |
27-Apr-2023 |
Release iniziale |
1.0 |
26-Apr-2023 |
Versione iniziale |
Contributo dei tecnici Cisco
- Cesar Daniel AvilaTecnico di consulenza
- Ian EstradaTecnico di consulenza
 Feedback