概要
このドキュメントでは、Cisco Unified Computing System(UCS)Bシリーズを、Virtual Machine Manager(VMM)ドメイン統合を活用するアプリケーションセントリックインフラストラクチャ(ACI)ファブリックに統合するために必要な設定手順について説明します。
前提条件
要件
このドキュメントに特有の要件はありません。
使用するコンポーネント
このドキュメントの情報は、次のハードウェアとソフトウェアのバージョンに基づいています。
- 2 つのスパイン スイッチおよび 2 つのリーフ スイッチから構成される ACI ファブリック
- 2 つのファブリック インターコネクトを搭載した UCS B シリーズのシャーシ
- VMware ESXi を搭載した UCS B シリーズのブレード
- Application Policy Infrastructure Controller(APIC)
このドキュメントの情報は、特定のラボ環境にあるデバイスに基づいて作成されました。このドキュメントで使用するすべてのデバイスは、初期(デフォルト)設定の状態から起動しています。対象のネットワークが実稼働中である場合には、どのようなコマンドについても、その潜在的な影響について確実に理解しておく必要があります。
設定
VMM ドメインの作成
この設定のほとんどは、サーバ ハードウェアでの VMM ドメインの導入に似ています。特定の方法で APIC を設定するための次善策には、一定の制限があります。この手順では、これらの次善策の設定について具体的に示します。
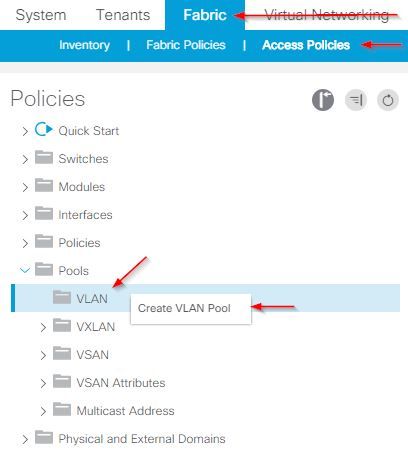
- ダイナミック VLAN プールを作成します。APIC ユーザ インターフェイスから、[Fabric] > [Access Policies] > [Pools] > [VLAN] > [Create VLAN Pool] を選択します。
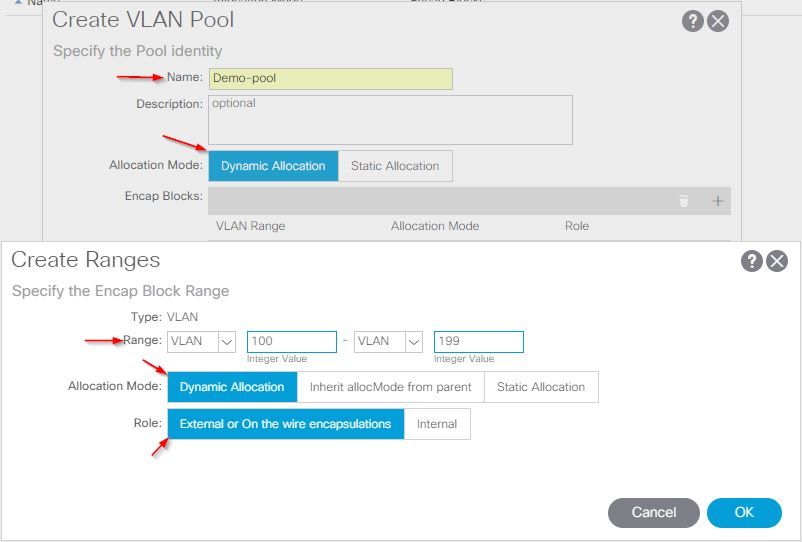
- [Create VLAN Pool] ウィンドウが開いたら、次の情報を入力します。
- [Name] フィールドにプールの名前を入力します。
- 「動的割り当て」をクリックします。
- [Encap Blocks (+)] プラス記号をクリックし、[Create Ranges] ダイアログボックスの [Range] フィールドに encap ブロック範囲を入力します。
- [割り当てモード]フィールドの[動的割り当て]をクリックします。
- ワイヤのカプセル化で[外部]または[オン]をクリックします。
- [OK] をクリックします。
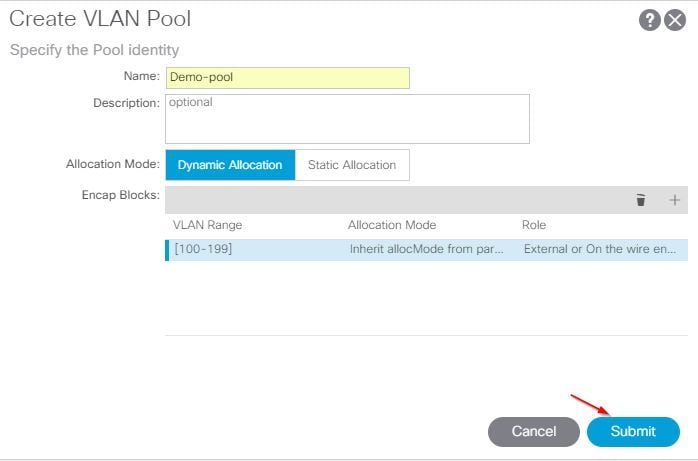
- [Submit] をクリックします。
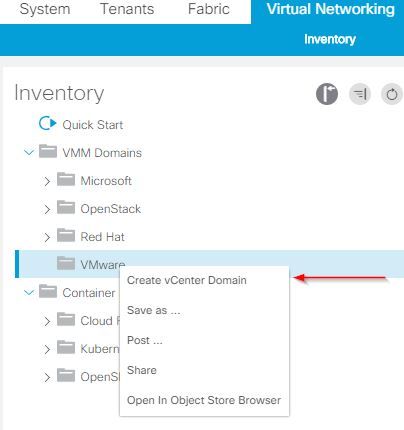
- APICユーザインターフェイスから、[Virtual Networking] > [VMM Domains] > [VMware] > [Create vCenter Domain]を選択します。
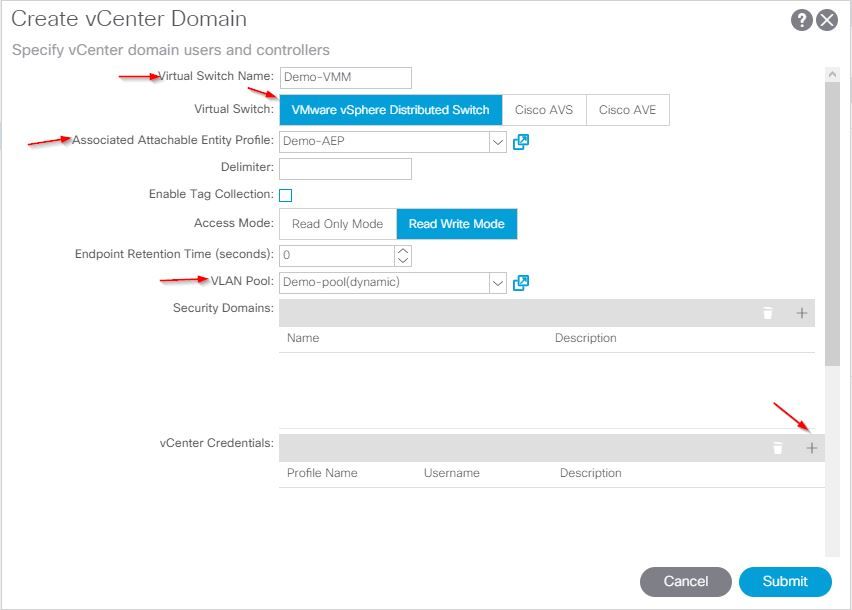
- [Create vCenter Domain] ウィンドウが表示されたら、次の情報を入力します。
- [Virtual Switch Name]フィールドにドメイン名を入力します。
- [VMWare vSphere Distributed Switch]をクリックします。
- 「関連付けられた取付可能なエンティティ・プロファイル」ドロップダウンリストから、(必要に応じて作成)「Demo-AEP」を選択します。
- [VLAN Pool] ドロップダウン リストから、[Demo-Pool (dynamic)] を選択します。
- [vCenter Credentials (+)] プラス記号をクリックし、[Create vCenter Credential] ダイアログボックスで vCenter クレデンシャル情報を入力します。
- [OK] をクリックします。
- [Submit] をクリックします。

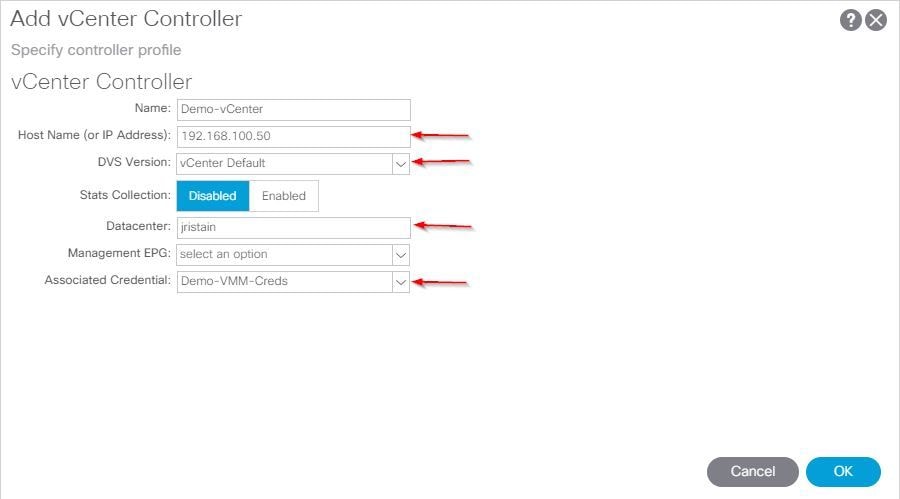
- [vCenterドメインの作成]ウィンドウから(+)プラス記号( by vCenter )をクリックします。表示するには、下にスクロールする必要があります。[Create vCenter Controller]ウィンドウが表示されたら、次の情報を入力します。

- [Hostname(または IP Address)] フィールドに、ホスト名または IP アドレスを入力します。
- [DVS Version] ドロップダウン リストから、[vCenter Default] を選択します。
- [Datacenter] フィールドにデータセンターの名前を入力します。
- [Associated Credential] ドロップダウン リストから、[Demo-VMM-Creds] を選択します。
- [OK] をクリックします。
- [Submit] をクリックします。
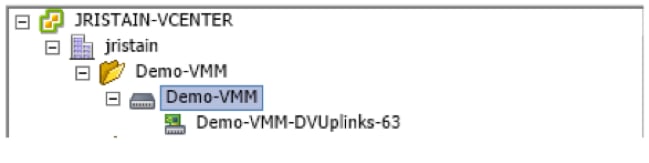
vCenter で DVS が作成されていることの確認
[Recent Tasks] ウィンドウに数個の新しいタスクが表示され、vCenter Server に分散仮想スイッチ(DVS)が追加されているはずです。

CDP または LLDP が UCS の vNIC で有効になっていることの作成/確認
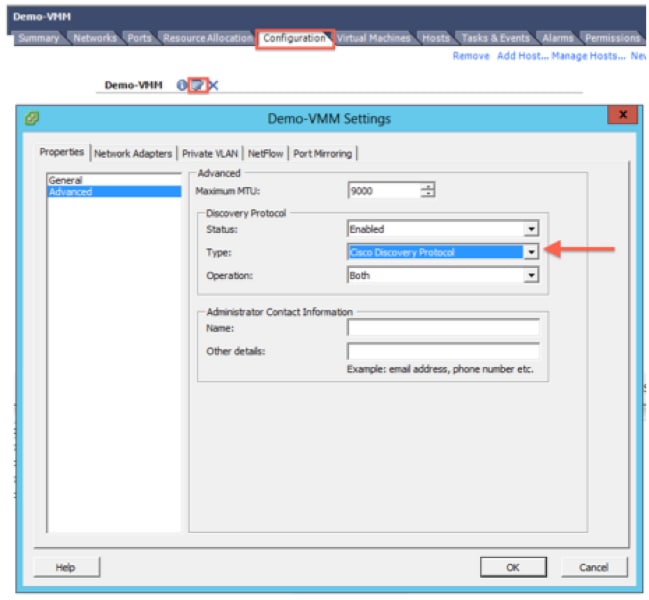
ACI に UCS B を導入すると、ホストの検出に使用する検出プロトコルを選択できます。このセクションでは、UCS Manager で各タイプを設定する方法について説明します。
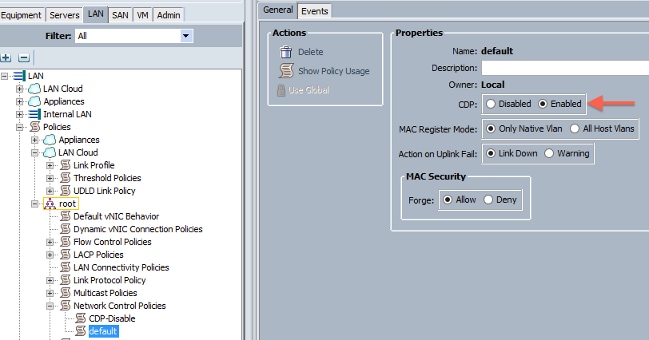
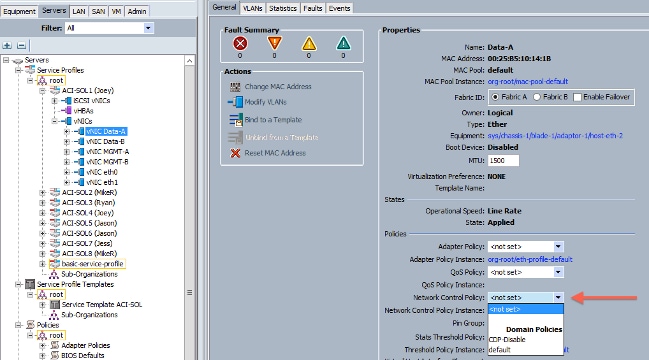
デフォルトのネットワーク コントロール ポリシーで Cisco Discovery Protocol(CDP)が無効になっているため、CDP はデフォルトでは UCS の仮想ネットワーク インターフェイス カード(vNIC)で無効になっています。CDP を有効にするには、デフォルトのネットワーク コントロール ポリシーを変更するか、または CDP が有効なポリシーを新規作成する方法があります。次に、そのポリシーを各サービス プロファイルの各 vNIC に適用します。この例では、すべてのサービス プロファイルがデフォルトで使用するため、デフォルトのネットワーク コントロール ポリシーを変更します。
別のポリシーを使用する場合は、そのポリシーを各サービス プロファイルの vNIC に追加してください。
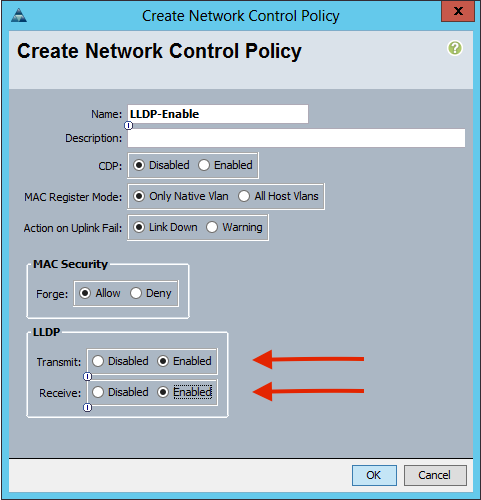
バージョン 2.2(4b) 以降では、UCS は、ファブリック インターコネクトからブレードまで、Link Layer Discovery Protocol(LLDP)をサポートします。つまり、このバージョン以降を実行している場合は、LLDPを使用してvCenterとファブリックのホストを検出することもできます。設定は上記とまったく同じですが、両方向で LLDP を有効にします。
UCS B に関する APIC での vSwitch ポリシーの設定
デフォルトでは、DVS で使用される検出プロトコルは LLDP です。これは LLDP をサポートするサーバでは問題ありませんが、UCS B シリーズのブレードは、UCSM バージョン 2.2(4b)でのみ LLDP をサポートします。このため、正しいコードでないと、ESXi は LLDP 情報を APIC に報告できません。
LLDP の代わりに、CDP を使用してホストを検出します。DVSでCDPを使用できるようにするには、CDPが有効でLLDPが無効になっているVMMドメインでvSwitchポリシーを設定します。
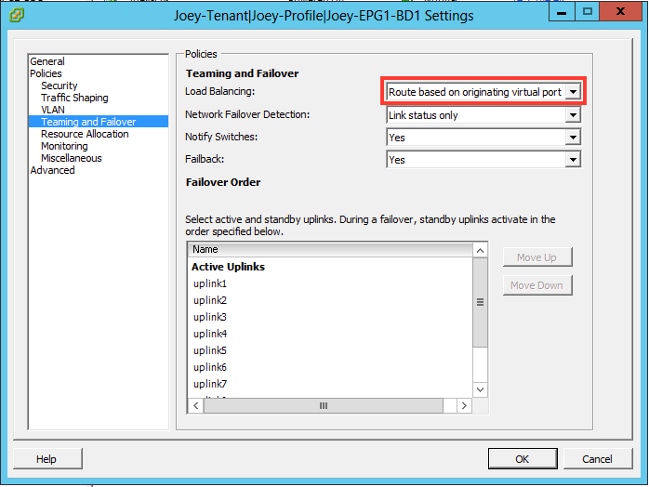
これと併せて、UCS B シリーズを使用する場合にサポートされている唯一のロード バランシング メカニズムは、発信仮想ポートに基づくルートです。mac-pinning ポリシーを設定する場合、このメカニズムを使用するポート グループがプログラムされます。これはパケット損失を防ぐために非常に重要です。
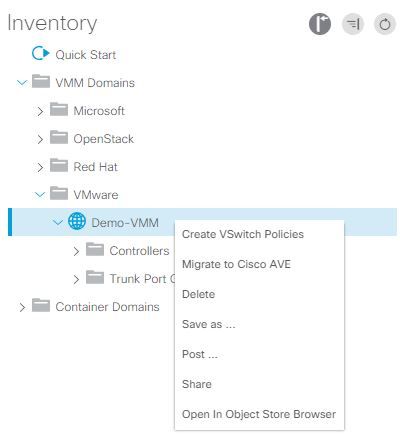
- APICユーザインターフェイスから、[Virtual Networking] > [VMM Domains] > [VMware] > [Configured Domain] > [Create VSwitch Policies]を選択します。
- この時点で、デフォルトのVSwitchポリシーが作成されたことを警告する警告が表示されます。
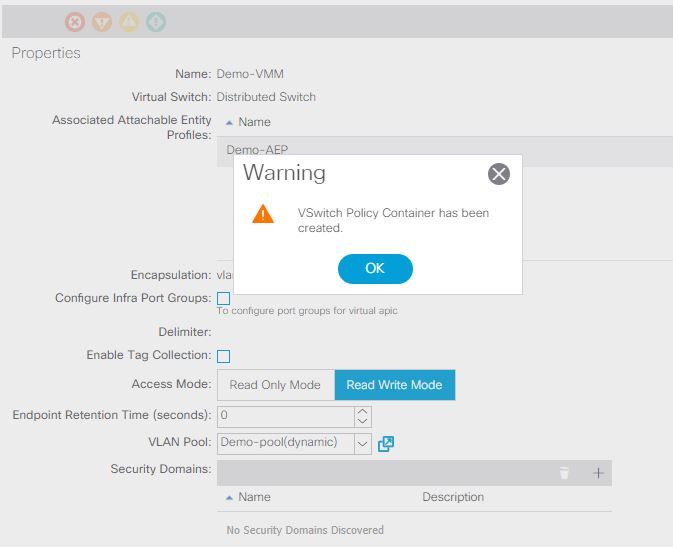
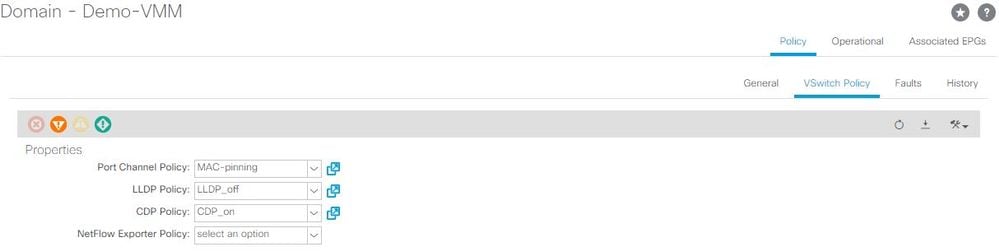
- 警告メッセージを受け入れ、VMMドメインの[Vswitch Policy]タブに移動します。
- CDPが有効になっているCDPポリシーを選択または作成します。
- MACピニングモードを選択して、ポートチャネルポリシーを選択または作成します。
- CDPが無効になっているLLDPポリシーを選択または作成します。
- [Submit] をクリックします。
注:UCSM 2.2(4b) 以降で LLDP を使用する場合は、UCS がサポートしているため、この vSwitch ポリシーで LLDP を有効にすることができます。この例の対象は、LLDP をサポートしない UCSM バージョン、または CDP が適切である場合のみです。 LLDPとCDPの両方が有効になっている場合、LLDPが優先されます。
[Submit] をクリックすると、DVS が vCenter で再設定されることが確認できます:
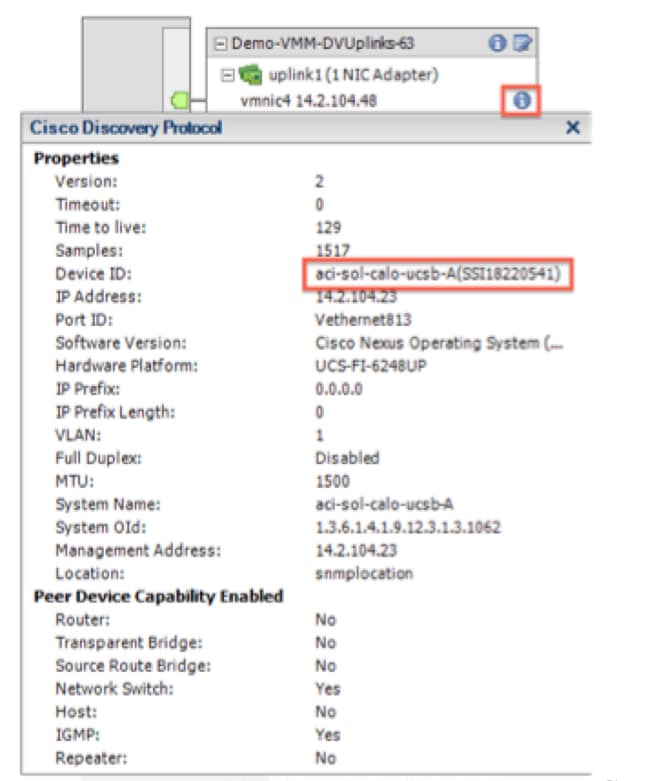
また、vmnicがFabric InterconnectからCDP情報を参照していることを確認することもできます。
- 「Route based on originating virtual port」がポートグループにプログラムされていることを確認します。[Networking] タブのポート グループを右クリックし、設定を編集して、次の情報を確認します。
確認
ここでは、設定が正常に機能しているかどうかを確認します。
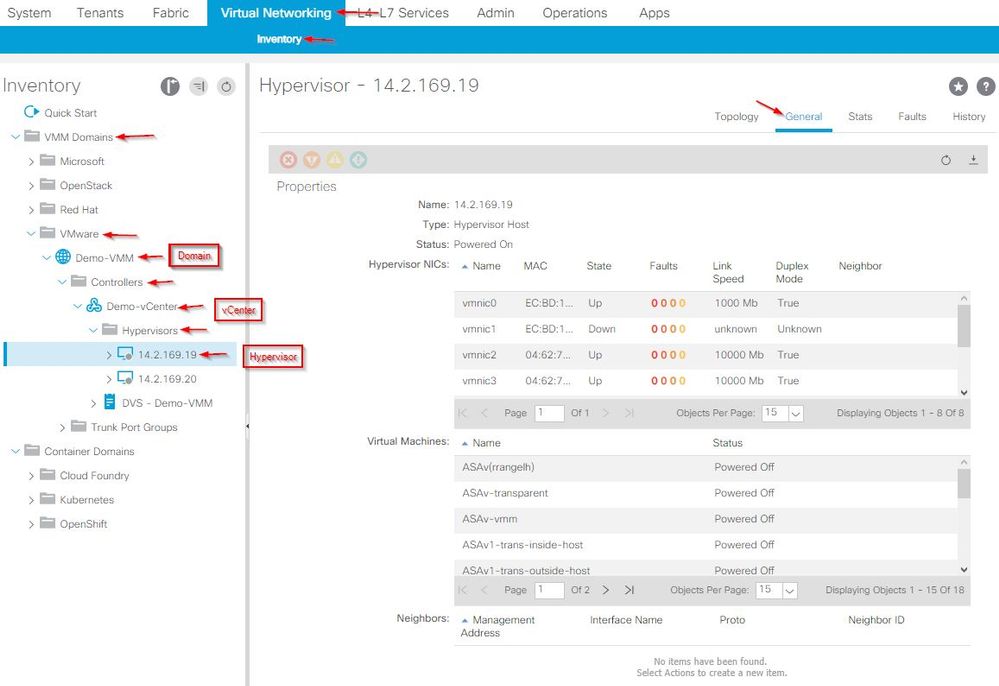
これらの変更を加えた後、APIC は CDP 情報について vCenter から通知される必要があります。これを確認するには、VMM ドメインのインベントリを確認します。
APICユーザインターフェイスから、[Virtual Networking] > [Inventory] > [VMM Domains] > [VMware] > [Domain] > [Controllers] > [vCenter] > [Hypervisors] > [Hypervisor] > [General] を選択し、[Properties]ウィンドウを表示します。
この時点で、VM ネットワーク設定を変更し、アダプタを適切なポート グループに追加して、接続をテストできます。ping が成功することを確認します。ping が成功しない場合、vCenter と APIC のすべての設定が CDP ネイバーの検出に関して正しいことを確認します。
トラブルシュート
現在、この設定に関する特定のトラブルシューティング情報はありません。
 フィードバック