はじめに
このドキュメントでは、HTTPサーバを使用してAPICを再イメージングする方法について説明します。
問題
APICクラスタの故障やL2/M2からL4/M4へのハードウェア移行が発生した場合、機能を復元するために個々のAPICデバイスの再イメージングが必要になる場合があります。この手順では、HTTPサーバを使用してAPICを1つずつ再イメージングする合理化されたアプローチを紹介します。これにより、中断を最小限に抑えてクラスタのリカバリを高速化できます。
再イメージングが必要なAPICデバイスごとに、このプロセスを順番に繰り返します。すべてのAPICのイメージが再作成されたら、必要に応じてクラスタ設定を復元し、機能を検証するための徹底的なテストを実施します。
この簡潔な手順によって効率的なAPICリカバリが可能になり、管理者はクラスタの障害に迅速に対応し、ネットワーク運用を効果的に復元できます。
前提条件
- CIMCにはOOB IPアドレスを設定する必要があります。
- APICリリースノートを確認し、どのAPICソフトウェアイメージに再イメージングする必要があるかを確認します。
- ソフトウェアイメージをsoftware.cisco.comから取得します。
- イメージのMD5チェックサムが、Cisco.comで公開されているものと一致することを確認します。
- APICイメージをHTTPサーバにアップロードします。
解決方法
HTTPサーバを使用してAPICを再イメージングするには、次の手順が必要です。
ステップ1:まず、シスコのWebサイトからファームウェアをダウンロードする必要があります。
software.cisco.com/download を開く.
ステップ2:APICを入力し、ACIの適切なバージョンを選択します。ここでは、4.2(7f)が選択されます。
例:
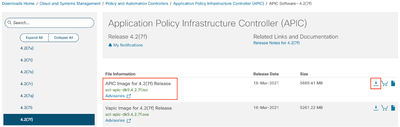
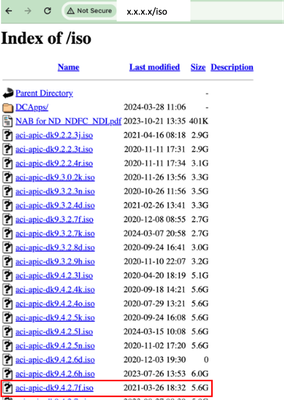
ステップ 3:APICソフトウェア.isoイメージをHTTPサーバにコピーします。
例:- http://x.x.x.x/iso/
ステップ 4:SSH/コンソールからCisco Integrated Management Controller
-
ターミナルウィンドウから、CIMCコンソールにログインします
# ssh admin@cimc_ip
ここで、cimc_ipはCIMC IPアドレスです。例:
# ssh admin@x.x.x.x
admin@x.x.x.x's password:
system#
system# scope vmedia
system /vmedia #
-
.isoイメージをHTTPサーバにマッピングします。
system /vmedia # map-www volume_name http://http_server_ip_and_path iso_file_name
場所:
- volume_nameは、ボリュームの名前です。
- http_server_ip_and_pathは、HTTPサーバのIPアドレスと.isoファイルの場所へのパスです。
- iso_filenameは、.isoファイルの名前です。
注:http_server_ip_and_pathとiso_filenameの間にはスペースがあります
例:
system /vmedia # map-www apic http://x.x.x.x/iso/ aci-apic-dk9.4.2.7f.iso
Server username: admin
Server password:
Confirm password:
注:/*ここで認証が必要ない場合は、Enterキーを押すだけです
system /vmedia # show mappings detail
Map-StatusがOKと表示されている必要があります。
例:
system /vmedia # show mappings detail
Volume apic:
    Map-Status: OK
    Drive-Type: CD
    Remote-Share: http://x.x.x.x/iso/

    Remote-File: aci-apic-dk9.4.2.7f.iso
    Mount-Type: www
    Mount-Options: noauto,username=admin,password=********3
    system /vmedia #
-
SOLに接続して、インストールプロセスを監視します。
system /vmedia # connect host
CISCO Serial Over LAN:
Press Ctrl+x to Exit the session
ステップ 5:CIMC GUIのKVMコンソールからの電源の再投入
Power > Power Cycle System (cold boot)の順に選択して、コントローラの電源を再投入します

SOLコンソールから:ブートプロセス中に画面を確認し、適切な時点でF6キーを押してブート選択メニューに入る準備をします。
例:
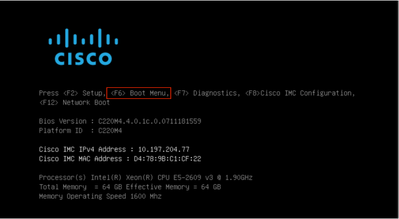
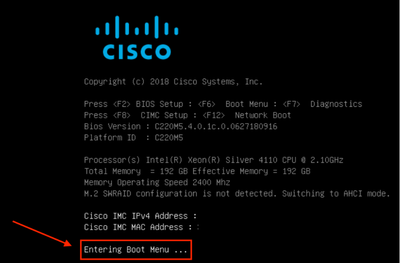
F6キーを押した後
注:機会を逃したために適切なタイミングでF6キーを押すことができなかった場合は、ステップ5に戻ってコントローラの電源を再投入し、F6キーを押してブート選択メニューに入ることができるようになるまで、このプロセスを繰り返します。
BIOSパスワードを入力する必要がある場合もあります。デフォルトパスワードはpasswordです
ブート選択メニューで、ワンタイムブートデバイスとしてCisco CIMC-Mapped vDVD1.22オプションを選択します。

手順 6:CIMC CLIに戻り、「Connect Host」の出力を監視します。
CIMC CLIをモニタし、「To speed up the install, enter iso url in next 10 minutes」というメッセージが表示されたら、APICイメージでhttp server URLと入力します。
++ grep /run/install/repo
++ cut -f 1 -d ' '
++ tr -d '[:digit:]'
+ usbdevice=/dev/sr
+ mkdir /mnt/usbdata
+ mount /dev/sr2 /mnt/usbdata
mount: special device /dev/sr2 does not exist
+ true
+ '[' -f /mnt/usbdata/ifabric.iso ']'
+ mountpoint -q /mnt/usbdata
+ true
+ echo 'INFO: found second partition on install media but did not find ifabric.iso. '
INFO: found second partition on install media but did not find ifabric.iso.
+ echo 'Continuing on to ISO URL prompt.'
Continuing on to ISO URL prompt.
+ '[' 0 -eq 0 ']'
+ read_iso_url
+ true,,
+ echo 'To speed up the install, enter iso url in next ten minutes: '      << Enter the http server URL with apic image  >>
To speed up the install, enter iso url in next ten minutes:
+ read -t 600 -p '? ' url
?
http://x.x.x.x/iso/aci-apic-dk9.4.2.7f.iso 5:program-log      << Enter the http server details  >>
[anaconda] 1:main* 2:shell  3:log  4:storage-lo> Switch tab: Alt+Tab | Help: F1
注: http_server_ip_and_pathとiso_filenameの間にはスペースがありません。
ステップ7:HTTP urlを入力した後、ブートプロセスが続行されます。
注:静的オプションを選択した場合は、インターフェイス名、管理IPアドレス、およびゲートウェイの入力を求められます。
+ '[' 0 -eq 0 ']'
+ read_iso_url
+ true
+ echo 'To speed up the install, enter iso url in next ten minutes: '
To speed up the install, enter iso url in next ten minutes:
+ read -t 600 -p '? ' url
?
[ahttp://x.x.x.x/iso/aci-apic-dk9.4.2.7f.iso 5:program-log
++ awk -F '/|:' '{print $4}'
+ urlip=x.x.x.x
+ '[' -z http://x.x.x.x/iso/aci-apic-dk9.4.2.7f.iso ']'
+ '[' -z x.x.x.x ']'
+ break
+ '[' -n http://x.x.x.x/iso/aci-apic-dk9.4.2.7f.iso ']'
+ set +e
+ configured=0
+ '[' 0 -eq 0 ']'
+ echo 'Configuring network interface'
Configuring network interface
+ echo 'type static, dhcp, bash for a shell to configure networking, or url to re-enter the url: '
>>
<< Type static and configure the APIC OOB IP address with it’s gateway>>
type static, dhcp, bash for a shell to configure networking, or url to re-enter the url:
+ read -p '? ' ntype
? static.   << Enter the static  to configure the networking >>
[anaconda] 1:main* 2:shell  3:log  4:storage-lo> Switch tab: Alt+Tab | Help: F1
注:スタティックを入力すると、CIMCインターフェイスがリストダウンされるので、正しいインターフェイスを選択してください。誤ったインターフェイスを選択した場合、パケット損失は100 %になり、pingの試行が3回失敗した後は、すべてのインターフェイスを1つずつ選択するインターフェイスに気づかない場合は、パケット損失が0になるまで正しいインターフェイスの選択を再度求められます。
例:
+ case $ntype in
+ configure_static
+ echo 'Available interfaces'
Available interfaces
+ ls -l /sys/class/net
total 0
lrwxrwxrwx. 1 root root 0 May  3 07:08 enp11s0 -> ../../devices/pci0000:00/0000:00:03.0/0000:06:00.0/0000:07:01.0/0000:09:00.0/0000:0a:00.0/0000:0b:00.0/net/enp11s0
lrwxrwxrwx. 1 root root 0 May  3 07:08 enp12s0 -> ../../devices/pci0000:00/0000:00:03.0/0000:06:00.0/0000:07:01.0/0000:09:00.0/0000:0a:01.0/0000:0c:00.0/net/enp12s0
lrwxrwxrwx. 1 root root 0 May  3 07:08 enp1s0f0 -> ../../devices/pci0000:00/0000:00:01.0/0000:01:00.0/net/enp1s0f0
lrwxrwxrwx. 1 root root 0 May  3 07:08 enp1s0f1 -> ../../devices/pci0000:00/0000:00:01.0/0000:01:00.1/net/enp1s0f1
lrwxrwxrwx. 1 root root 0 May  3 07:08 lo -> ../../devices/virtual/net/lo
+ read -p 'Interface to configure: ' interface
Interface to configure: enp1s0f0     <<  select the correct interface   >>
[anaconda] 1:main* 2:shell  3:log  4:storage-lo>
ステップ8:インターフェイスチェックを修正する
インターフェイスの入力後、httpサーバへのpingを試行し、選択したインターフェイスが正しければ、パケット損失は0 %である必要があり、httpサーバからのイメージの取得を開始します。
例:パケット損失が0 %の正しいインターフェイスを入力した後。
+ read -p 'Interface to configure: ' interface
Interface to configure:  enp1s0f0
+ read -p 'address: ' addr
address: x.x.x.x/24
+ read -p 'gateway: ' gw
gateway: x.x.x.x
+ ip addr add x.x.x.x/24 dev enp1s0f0
+ ip link set enp1s0f0 up
+ ip route add default via x.x.x.x
++ seq 1 2
+ for count in '$(seq 1 2)'
+ ping -c 1 x.x.x.x
PING x.x.x.x (x.x.x.x) 56(84) bytes of data.
64 bytes from x.x.x.x: icmp_seq=1 ttl=64 time=55.0 ms
--- x.x.x.x ping statistics ---
1 packets transmitted, 1 received, 0% packet loss, time 0ms
rtt min/avg/max/mdev = 55.056/55.056/55.056/0.000 ms
+ configured=1
+ break
+ '[' 1 -eq 0 ']'
+ echo 'Fetching http://x.x.x.x/iso/aci-apic-dk9.4.2.7f.iso'

Fetching http://x.x.x.x/iso/aci-apic-dk9.4.2.7f.iso >> started fetching the apic image from HTTP server
+ wget -o /dev/null -O /tmp/cdrom.iso http://x.x.x.x/iso/aci-apic-dk9.4.2.7f.iso
間違ったインターフェイスを選択した場合、パケット損失は100 %になり、pingの試行が3回失敗すると、正しいインターフェイスの選択を再度求められます。
例:誤ったインターフェイスを100 %パケット損失で入力した後
+ read -p 'Interface to configure: ' interface
Interface to configure: enp11s0
+ read -p 'address: ' addr
address: x.x.x.x/24
+ read -p 'gateway: ' gw
gateway: x.x.x.x
+ ip addr add x.x.x.x/24 dev enp11s0
+ ip link set enp11s0 up
+ ip route add default via x.x.x.x
++ seq 1 2
+ for count in '$(seq 1 2)'
+ ping -c 1 x.x.x.x
PING x.x.x.x (x.x.x.x) 56(84) bytes of data.
From x.x.x.x icmp_seq=1 Destination Host Unreachable

--- x.x.x.x ping statistics ---
1 packets transmitted, 0 received, +1 errors, 100% packet loss, time 0ms

+ sleep 20
+ for count in '$(seq 1 2)'
+ ping -c 1 x.x.x.x
PING x.x.x.x (x.x.x.x) 56(84) bytes of data.
From x.x.x.x icmp_seq=1 Destination Host Unreachable

--- x.x.x.x ping statistics ---
1 packets transmitted, 0 received, +1 errors, 100% packet loss, time 0ms

+ sleep 20
+ '[' 0 -eq 0 ']'
+ echo 'Configuring network interface'
Configuring network interface
+ echo 'type static, dhcp, bash for a shell to configure networking, or url to re-enter the url: ' <<Asking again to select the interface after selecting the type i,e static >>
type static, dhcp, bash for a shell to configure networking, or url to re-enter the url:
+ read -p '? ' ntype
?
CIMC CLIをモニタし、約40 ~ 50分待つと、CLIに次の出力が表示されます。
[anaconda] 1:main* 2:shell  3:log  4:storage-lo> Switch tab: Alt+Tab | Help: F1
[  OK  ] Started Show Plymouth Power Off Screen.
[  OK  ] Stopped Availability of block devices.
         Stopping Logout off all iSCSI sessions on shutdown...
         Stopping LVM2 metadata daemon...
[  OK  ] Stopped LVM2 metadata daemon.
[  OK  ] Stopped Logout off all iSCSI sessions on shutdown.
[  OK  ] Stopped target Network.
[  OK  ] Stopped Remount Root and Kernel File Systems.
         Stopping Remount Root and Kernel File Systems...
[  OK  ] Started Restore /run/initramfs.
[  OK  ] Reached target Shutdown.
dracut Warning: Killing all remaining processes
Powering off.
reboot: Power down
ステップ9:電源オフ後にSOLを終了する
SOLコンソールにメッセージpoweroffが表示されるまで待ってから、Ctrlキーとx(Ctrl+x)キーを押してSOLを終了し、再度CIMCにログインしてスコープを再度変更します。
(i) Change the scope to virtual media again:
system# scope vmedia
system /vmedia #
 (ii) Unmap the .iso image that you mapped in 2.c:
 system /vmedia # unmap volume_name
 At the Save mapping prompt, enter yes if you want to save the mapping or no if you do not want to save the mapping. For example:
 system /vmedia # unmap apic
 Save mapping? Enther 'yes' or 'no' to confirm (CTRL-C to cancel) → yes
 system /vmedia #
 (iii) Connect back to SOL again:
       system /vmedia #  connect host
ステップ10:初期設定
KVMコンソールから、Power > Power on Systemの順に選択してコントローラの電源をオンにし、KVMを起動します。APICの初期設定を求められます。
 フィードバック