概要
このドキュメントでは、Hyperflexクラスタの自己署名SSL証明書をサードパーティ証明書に置き換える方法について説明します。
前提条件
要件
次の項目に関する知識があることが推奨されます。
- SSL証明書の基本的な知識。
- Linuxコマンドラインの基本的な知識。
- Hyperflexクラスタの運用
使用するコンポーネント
このドキュメントの情報は、次のハードウェアに基づくものです。
Hyperflex Data Platform(HXDP) 5.0.(2a)以降
このドキュメントの情報は、特定のラボ環境にあるデバイスに基づいて作成されました。このドキュメントで使用するすべてのデバイスは、クリアな(デフォルト)設定で作業を開始しています。本稼働中のネットワークでは、各コマンドによって起こる可能性がある影響を十分確認してください。
背景説明
Cisco HyperFlexの導入では、信頼できる通信を可能にするために、コンポーネント間に一連のローカル証明書が生成されます。
組織にすでに認証局がある場合は、デフォルトのSSL証明書を独自の証明書で置き換えることをお勧めします。
Eこの設定を開始する前に、次の要件を満たしていることを確認してください :を入力します。
設定
ステップ 1:openssl.cnfのコピーを作成する
SSHを管理ユーザとして使用してHyperflex Cluster Management IP(CMIP)に接続し、diagユーザに切り替えます。
HyperFlex StorageController 5.0(2a)
admin @ X.X.X.X's password:
This is a Restricted shell.
Type '?' or 'help' to get the list of allowed commands.
hxshell:~$ su diag
Password:
 _____ _                     _____ _                              ___                       ____
|  ___(_)_   _____     _    |_   _| |__  _ __ ___  ___     _     / _ \ _ __   ___          / ___|  _____   _____ _ __
| |_  | \ \ / / _ \  _| |_    | | | '_ \| '__/ _ \/ _ \  _| |_  | | | | '_ \ / _ \  _____  \___ \ / _ \ \ / / _ \ '_ \
|  _| | |\ V /  __/ |_   _|   | | | | | | | |  __/  __/ |_   _| | |_| | | | |  __/ |_____|  ___) |  __/\ V /  __/ | | |
|_|   |_| \_/ \___|   |_|     |_| |_| |_|_|  \___|\___|   |_|    \___/|_| |_|\___|         |____/ \___| \_/ \___|_| |_|


Enter the output of above expression: 2
Valid captcha
diag#

注:5.0(2a)バージョンからは、より多くの権限をユーザに付与するためにdiagユーザを使用できます。クラスタが4.5にある場合は、Cisco TACに連絡して、この手順を完了してください。
/tmpフォルダにディレクトリを作成します。
この例では、名前はsslです。
diag# mkdir /tmp/ssl
ディレクトリのアクセス許可を変更します。
diag# chmod 777 /tmp/ssl
openssl.cnfのコピーを作成します
この例では、openssl.cnfのコピーの名前はopenssl-san.cnfです。
diag# cp /etc/ssl/openssl.cnf /tmp/ssl/openssl-san.cnf
diag# ls -l /tmp/ssl/
total 12
-rwxr-xr-x 1 diag diag 10835 Aug  3 21:39 openssl-san.cnf
ステップ 2:openssl-san.cnfファイルの編集
ローカルLinuxマシン上にディレクトリを作成し、CMIPからopenssl-san.cnfの内容をコピーします。
Linuxマシンでファイルの内容を編集します。

注:openssl-san.cnfは、viを使用してSCVMで編集できます。
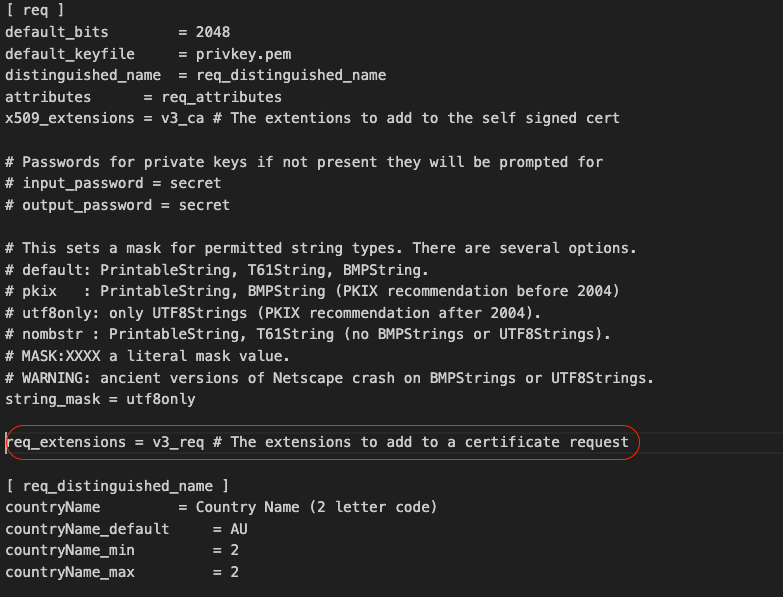
[ req ]セクションのreq-extensions行のコメントを解除します。
行から#記号を削除します。

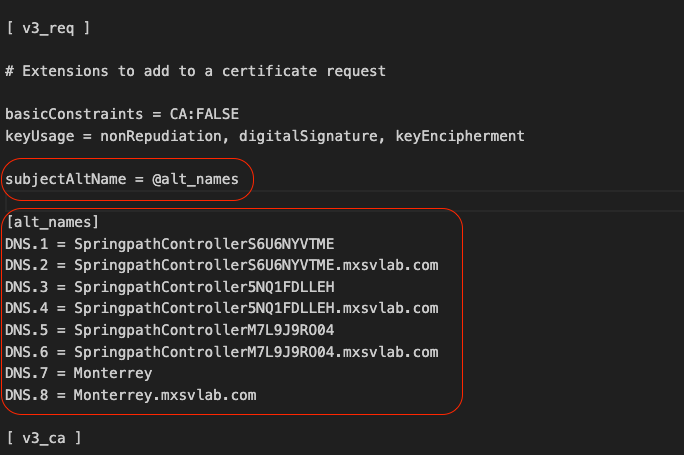
[ v3_req ]セクションにサブジェクト代替名(SAN)を追加します。
[ v3_req ]セクションでSAN回線を追加します。すべてのストレージコントローラ仮想マシン(SCVM)とHyperflexクラスタの完全修飾ドメイン名(FQDN)を追加します。

注:Chromeでは共通名(CN)の使用がサポートされなくなり、証明書にサブジェクト代替名(SAN)が存在する必要があります。


注:DNSサーバは、クラスタ内のすべてのSCVMを解決する必要があります。
ステップ 3:証明書の作成
ステップ 3a:CSRの作成
Linuxマシンから、次のコマンドを実行します。
openssl req -nodes -newkey rsa:2048 -keyout /


      /

       .key -out /

        /

         .csr -config /

          /openssl-san.cnf
user$ openssl req -nodes -newkey rsa:2048 -keyout /Users/user/Documents/SpringpathController5NQ1FDLLEH.key -out /Users/user/Documents/SpringpathController5NQ1FDLLEH.csr -config /Users/user/Documents/openssl-san.cnf
Generating a 2048 bit RSA private key
..........................+++++
.....................................................................................................+++++
writing new private key to '/tmp/ssl/SpringpathControllerM7L9J9RO04.key'
-----
You are about to be asked to enter information that will be incorporated
into your certificate request.
What you are about to enter is what is called a Distinguished Name or a DN.
There are quite a few fields but you can leave some blank
For some fields there will be a default value,
If you enter '.', the field will be left blank.
-----
Country Name (2 letter code) [AU]:MX
State or Province Name (full name) [Some-State]:CDMX
Locality Name (eg, city) []:Benito Juarez
Organization Name (eg, company) [Internet Widgits Pty Ltd]:Cisco Systems
Organizational Unit Name (eg, section) []:TAC
Common Name (e.g. server FQDN or YOUR name) []:Monterrey.mxsvlab.com
Email Address []:

Please enter the following 'extra' attributes
to be sent with your certificate request
A challenge password []:


      An optional company name []:Cisco Systems
このコマンドの実行後、.keyと.csrの2つのファイルが生成されます。
user$ ls -l
total 54
-rw-r--r--@ 1 user staff 1549 Aug 3 14:24 SpringpathControllerM7L9J9RO04.csr
-rw-r--r-- 1 user staff 1704 Aug 3 14:24 SpringpathControllerM7L9J9RO04.key
-rw-r--r-- 1 user staff 11193 Aug 3 14:19 openssl-san.cnf
ステップ 3b:認証局(CA)からの証明書の作成
http://<CA-IP>/certsrv/certrqxt.aspに移動します

<Host Name of the CVM>.csrファイルの内容をコピーして、認証局(CA)に貼り付けます。
Certificate templateの下にあるWeb Serverを選択します。
属性に次の形式でALT名を入力します。
san:dns=


      &dns=

       &dns=

        &dns=

「submit」をクリックして、証明書を.cerファイルとして生成します

注:証明書タイプがWebサーバであり、属性フィールドに代替名があることを確認してください。

注:X.509 CSRの内容はユーザが入力します。エントリの内容に対するバックエンドチェックはありません。ノードの[multiple]ホスト名またはIPをサブジェクト代替名として指定する場合、またはワイルドカード文字を使用して共通名のホスト名を指定する場合は、1つの証明書をすべてのノードに使用できます
ステップ 4:証明書を.cerから.crtに変換します。
ローカルLinuxマシンに。cer証明書をコピーします
ローカルのLinuxマシンで、次のコマンドを実行します。
openssl x509 -inform PEM -in certnew.cer -out certnew.crt
user$ openssl x509 -inform PEM -in certnew.cer -out certnew.crt
user$ ls -l
total 56
-rw-r--r--@ 1 user  staff   1549 Aug  3 14:24 SpringpathControllerM7L9J9RO04.csr
-rw-r--r--  1 user  staff   1704 Aug  3 14:24 SpringpathControllerM7L9J9RO04.key
-rw-r--r--@ 1 user staff   2380 Aug  3 15:03 certnew.cer
-rw-r--r--  1 user  staff   2342 Aug  3 15:04 certnew.crt
-rw-r--r--  1 user  staff  11193 Aug  3 14:19 openssl-san.cnf
ステップ 5:証明書をインポートします。
ローカルのLinux VMからCMIPの/tmp/sslに.keyおよび。crtファイルをアップロードします。

注:SCPを使用してファイルをSCVMにコピーできます
diag# ls -l
total 20
-rw-r--r-- 1 admin springpath  1704 Aug  3 22:46 SpringpathControllerM7L9J9RO04.key
-rw-r--r-- 1 admin springpath  2342 Aug  3 22:46 certnew.crt
-rwxr-xr-x 1 diag  diag       10835 Aug  3 21:39 openssl-san.cnf
次のコマンドを実行します
diag# /usr/share/springpath/storfs-misc/hx-scripts/certificate_import_input.sh
Enter the path for the key: /tmp/ssl/SpringpathControllerM7L9J9RO04.key
Enter the path for the certificate in crt format: /tmp/ssl/certnew.crt
Successfully installed certificate
The cluster needs to be re-registered with vCenter for the certificate import to be completed.
Do you want to continue with re-registration? (y/n): y
Enter vCenter username (user@domain): administrator @ vsphere.local
Enter vCenter Password:
Trying to retrieve vCenter information ....
Cluster re-registration in progress ....
Cluster re-registered successfully with vCenter !!

注:vCenterの再登録が必要です。管理者クレデンシャルを送信します。
確認
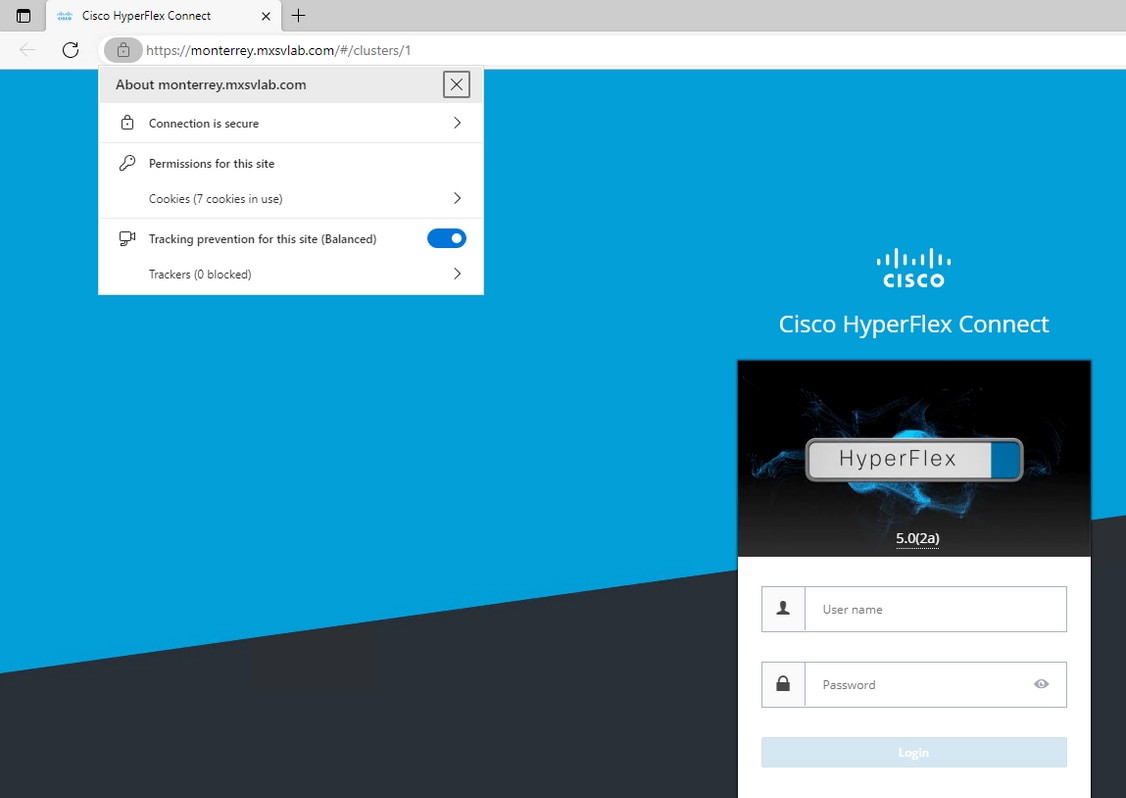
証明書をインポートした後、セキュアな接続が確立されていることを確認します。

トラブルシュート
IPを使用した証明書が無効です。
FQDNを使用して証明書が生成されるため、SCVM IPの使用にはセキュアな接続がありません。

FQDNを使用すると、セキュアな接続が可能になります。

関連情報