PIX/ASA:staticコマンドおよび2つのNATインターフェイスによるDNS Doctoringの設定例
内容
はじめに
このドキュメントでは、ASA 5500 シリーズ適応型セキュリティ アプライアンスまたは PIX 500 シリーズ セキュリティ アプライアンスで、スタティック ネットワーク アドレス変換(NAT)ステートメントを使用してドメイン ネーム システム(DNS)Doctoring を実行するための設定例について説明します。DNS Doctoring により、セキュリティ アプライアンスは DNS A レコードを書き換えられます。
DNS 書き換えでは、次の 2 つの機能が実行されます。
-
DNS クライアントがプライベート インターフェイス上に存在する場合、DNS 応答に含まれるパブリック アドレス(ルーティング可能なアドレスまたはマップ アドレス)をプライベート アドレス(リアル アドレス)に変換する。
-
DNS クライアントがパブリック インターフェイス上に存在する場合、プライベート アドレスをパブリック アドレスに変換する。
注:このドキュメントの設定には、InsideとOutsideの2つのNATインターフェイスが含まれています。static コマンドと 3 つの NAT インターフェイス(inside、outside、および dmz)を使用した DNS Doctoring の例については、『PIX/ASA:static コマンドおよび 3 つの NAT インターフェイスによる DNS Doctoring の設定例』を参照してください。
セキュリティ アプライアンスで NAT を使用する方法についての詳細は、『PIX/ASA 7.x の NAT と PAT の設定例』および『PIX での nat、global、static、conduit、および access-list の各コマンドとポート リダイレクション(フォワーディング)の使用方法』を参照してください。
前提条件
要件
セキュリティ アプライアンスで DNS Doctoring を実行するには、DNS インスペクションをイネーブルにする必要があります。デフォルトでは、DNS インスペクションはオンになっています。DNS インスペクションがオフになっている場合は、このドキュメントの「DNS インスペクションの設定」セクションを参照してください。DNS インスペクションがイネーブルになっている場合、セキュリティ アプライアンスでは次のタスクが実行されます。
-
static および nat コマンドを使用して作成された設定に基づいて DNS レコードを変換します(DNS 書き換え)。 変換は DNS 応答の A レコードだけに適用されます。そのため、PTR レコードを要求する逆参照は DNS 書き換えの影響を受けません。
注:各Aレコードには複数のPATルールが適用可能であり、使用するPATルールがあいまいになるため、DNS書き換えはスタティックPort Address Translation(PAT;ポートアドレス変換)と互換性がありません。
-
DNS メッセージの最大長を適用します(デフォルトは 512 バイト、最大長は 65535 バイトです)。 設定された最大長よりもパケットの長さが短いことを確認するために、必要に応じて再構成が実行されます。最大長を超えるパケットは廃棄されます。
注:最大長オプションを指定せずにinspect dnsコマンドを発行した場合、DNSパケットサイズはチェックされません。
-
ドメイン名の長さを 255 バイトに、ラベルの長さを 63 バイトに制限します。
-
DNS メッセージで圧縮ポインタが見つかった場合、ポインタによって参照されているドメイン名の整合性を確認します。
-
圧縮ポインタのループが存在するかどうかを確認します。
使用するコンポーネント
このドキュメントの情報は ASA 5500 シリーズ セキュリティ アプライアンス バージョン 7.2(1) に基づくものです。
このドキュメントの情報は、特定のラボ環境にあるデバイスに基づいて作成されました。このドキュメントで使用するすべてのデバイスは、クリアな(デフォルト)設定で作業を開始しています。対象のネットワークが実稼働中である場合には、どのようなコマンドについても、その潜在的な影響について確実に理解しておく必要があります。
関連製品
この設定は、Cisco PIX 500 シリーズ セキュリティ アプライアンス バージョン 6.2 以降にも適用できます。
注:Cisco Adaptive Security Device Manager(ASDM)の設定は、バージョン7.xにのみ適用できます。
表記法
表記法の詳細については、『シスコ テクニカル ティップスの表記法』を参照してください。
背景説明
一般的な DNS 交換においては、クライアントが DNS サーバーに URL またはホスト名を送信し、そのホストの IP アドレスを調べます。DNS サーバは要求を受信し、そのホストの名前と IP アドレスのマッピングを参照して、IP アドレスを含む A レコードをクライアントに提供します。この手順はほとんどの状況において問題なく実行されますが、場合によっては問題が発生することもあります。クライアントと、そのクライアントがアクセスしようとしているホストの両方が NAT の背後にある同一のプライベート ネットワーク上に存在し、クライアントによって使用される DNS サーバが他のパブリック ネットワーク上に存在する場合は、そのような問題が発生します。
シナリオ:2つのNATインターフェイス(inside、outside)
トポロジ
このシナリオでは、クライアントと、クライアントがアクセスしようとしている WWW サーバは、どちらも ASA の inside インターフェイス上に存在しています。クライアントがインターネットにアクセスできるようにダイナミック PAT が設定されています。サーバがインターネットにアクセスできるように(さらに、インターネット ホストが WWW サーバにアクセスできるように)、アクセスリストを含むスタティック NAT が設定されています。
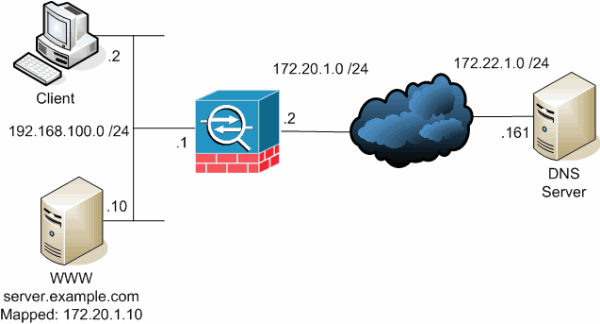
この図は、この状況の例です。この場合、192.168.100.2 のクライアントが server.example.com という URL を使用して 192.168.100.10 の WWW サーバにアクセスしようとしています。クライアントの DNS サービスは、172.22.1.161 の外部 DNS サーバによって提供されます。この DNS サーバは他のパブリック ネットワーク上に存在するため、WWW サーバのプライベート IP アドレスを認識していません。ただし、WWW サーバのマップ アドレス(172.20.1.10)は認識しています。そのため、この DNS サーバには server.example.com を 172.20.1.10 に変換する IP アドレスと名前のマッピングが含まれています。
問題:クライアントがWWWサーバにアクセスできない
この状況で DNS Doctoring やその他のソリューションが無効になっていない場合、クライアントから server.example.com の IP アドレスに関する DNS 要求が送信されても、クライアントは WWW サーバにアクセスできません。これは、WWW サーバのパブリック アドレス(172.20.1.10)を含む A レコードをクライアントが受信するためです。クライアントがこの IP アドレスにアクセスしようとすると、同じインターフェイスでのパケット リダイレクションが許可されないため、セキュリティ アプライアンスによってパケットが廃棄されます。DNS Doctoring がイネーブルになっていない場合、設定の NAT 部分は次のようになります。
ciscoasa(config)#show running-config
: Saved
:
ASA Version 7.2(1)
!
hostname ciscoasa


!--- Output suppressed.

access-list OUTSIDE extended permit tcp any host 172.20.1.10 eq www


!--- Output suppressed.

global (outside) 1 interface
nat (inside) 1 192.168.100.0 255.255.255.0
static (inside,outside) 172.20.1.10 192.168.100.10 netmask 255.255.255.255
access-group OUTSIDE in interface outside


!--- Output suppressed.
DNS Doctoring がイネーブルになっていない場合、ASDM の設定は次のようになります。
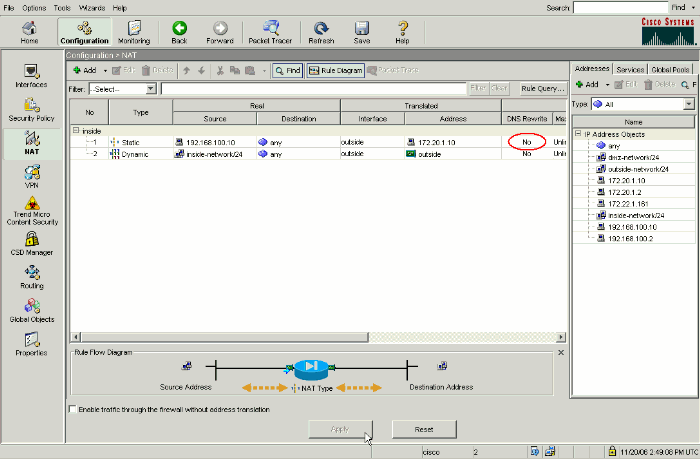
DNS Doctoring がイネーブルになっていない場合、イベントのパケット キャプチャは次のようになります。
-
クライアントが DNS クエリーを送信します。
No. Time Source Destination Protocol Info 1 0.000000 192.168.100.2 172.22.1.161 DNS Standard query A server.example.com Frame 1 (78 bytes on wire, 78 bytes captured) Ethernet II, Src: Cisco_c8:e4:00 (00:04:c0:c8:e4:00), Dst: Cisco_9c:c6:1f (00:0a:b8:9c:c6:1f) Internet Protocol, Src: 192.168.100.2 (192.168.100.2), Dst: 172.22.1.161 (172.22.1.161) User Datagram Protocol, Src Port: 50879 (50879), Dst Port: domain (53) Domain Name System (query) [Response In: 2] Transaction ID: 0x0004 Flags: 0x0100 (Standard query) Questions: 1 Answer RRs: 0 Authority RRs: 0 Additional RRs: 0 Queries server.example.com: type A, class IN Name: server.example.com Type: A (Host address) Class: IN (0x0001) -
DNS クエリーに対する PAT が ASA によって実行され、クエリーが転送されます。パケットの送信元アドレスが ASA の outside インターフェイスに変更されていることに注意してください。
No. Time Source Destination Protocol Info 1 0.000000 172.20.1.2 172.22.1.161 DNS Standard query A server.example.com Frame 1 (78 bytes on wire, 78 bytes captured) Ethernet II, Src: Cisco_9c:c6:1e (00:0a:b8:9c:c6:1e), Dst: Cisco_01:f1:22 (00:30:94:01:f1:22) Internet Protocol, Src: 172.20.1.2 (172.20.1.2), Dst: 172.22.1.161 (172.22.1.161) User Datagram Protocol, Src Port: 1044 (1044), Dst Port: domain (53) Domain Name System (query) [Response In: 2] Transaction ID: 0x0004 Flags: 0x0100 (Standard query) Questions: 1 Answer RRs: 0 Authority RRs: 0 Additional RRs: 0 Queries server.example.com: type A, class IN Name: server.example.com Type: A (Host address) Class: IN (0x0001) -
DNS サーバが WWW サーバのマップ アドレスを使用して応答します。
No. Time Source Destination Protocol Info 2 0.005005 172.22.1.161 172.20.1.2 DNS Standard query response A 172.20.1.10 Frame 2 (94 bytes on wire, 94 bytes captured) Ethernet II, Src: Cisco_01:f1:22 (00:30:94:01:f1:22), Dst: Cisco_9c:c6:1e (00:0a:b8:9c:c6:1e) Internet Protocol, Src: 172.22.1.161 (172.22.1.161), Dst: 172.20.1.2 (172.20.1.2) User Datagram Protocol, Src Port: domain (53), Dst Port: 1044 (1044) Domain Name System (response) [Request In: 1] [Time: 0.005005000 seconds] Transaction ID: 0x0004 Flags: 0x8580 (Standard query response, No error) Questions: 1 Answer RRs: 1 Authority RRs: 0 Additional RRs: 0 Queries server.example.com: type A, class IN Name: server.example.com Type: A (Host address) Class: IN (0x0001) Answers server.example.com: type A, class IN, addr 172.20.1.10 Name: server.example.com Type: A (Host address) Class: IN (0x0001) Time to live: 1 hour Data length: 4 Addr: 172.20.1.10 -
ASA が DNS 応答の宛先アドレスの変換を元に戻し、パケットをクライアントに転送します。DNS Doctoring がイネーブルになっていない場合、応答に含まれる Addr は WWW サーバのマップ アドレスのままです。
No. Time Source Destination Protocol Info 2 0.005264 172.22.1.161 192.168.100.2 DNS Standard query response A 172.20.1.10 Frame 2 (94 bytes on wire, 94 bytes captured) Ethernet II, Src: Cisco_9c:c6:1f (00:0a:b8:9c:c6:1f), Dst: Cisco_c8:e4:00 (00:04:c0:c8:e4:00) Internet Protocol, Src: 172.22.1.161 (172.22.1.161), Dst: 192.168.100.2 (192.168.100.2) User Datagram Protocol, Src Port: domain (53), Dst Port: 50879 (50879) Domain Name System (response) [Request In: 1] [Time: 0.005264000 seconds] Transaction ID: 0x0004 Flags: 0x8580 (Standard query response, No error) Questions: 1 Answer RRs: 1 Authority RRs: 0 Additional RRs: 0 Queries server.example.com: type A, class IN Name: server.example.com Type: A (Host address) Class: IN (0x0001) Answers server.example.com: type A, class IN, addr 172.20.1.10 Name: server.example.com Type: A (Host address) Class: IN (0x0001) Time to live: 1 hour Data length: 4 Addr: 172.20.1.10 -
この時点で、クライアントは 172.20.1.10 の WWW サーバにアクセスしようとします。ASA がこの通信の接続エントリを作成します。ただし、inside から outside を経由して inside にトラフィックを流すことは許可されないため、接続はタイムアウトします。ASA ログには次のように表示されます。
%ASA-6-302013: Built outbound TCP connection 54175 for
outside:172.20.1.10/80 (172.20.1.10/80) to inside:192.168.100.2/11001
(172.20.1.2/1024)

%ASA-6-302014: Teardown TCP connection 54175 for outside:172.20.1.10/80 to
inside:192.168.100.2/11001 duration 0:00:30 bytes 0 SYN Timeout
解決策:「dns」キーワード
「dns」キーワードを使用した DNS Doctoring
dns キーワードを伴う DNS Doctoring では、セキュリティ アプライアンスが DNS サーバからクライアントへの応答を代行受信して、内容を書き換えられるようになります。適切に設定されている場合、セキュリティ アプライアンスは「問題:クライアントが WWW サーバにアクセスできない」セクションで説明されているような状況にあるクライアントが接続できるように A レコードを変更できます。この状況で DNS Doctoring がイネーブルになっている場合、セキュリティ アプライアンスは、172.20.1.10 ではなく 192.168.100.10 にクライアントを誘導するように A レコードを書き換えます。DNS Doctoring は、スタティック NAT 設定に dns キーワードを追加するとイネーブルになります。DNS Doctoring がイネーブルになっている場合、設定の NAT 部分は次のようになります。
ciscoasa(config)#show run
: Saved
:
ASA Version 7.2(1)
!
hostname ciscoasa


!--- Output suppressed.

access-list OUTSIDE extended permit tcp any host 172.20.1.10 eq www


!--- Output suppressed.

global (outside) 1 interface
nat (inside) 1 192.168.100.0 255.255.255.0
static (inside,outside) 172.20.1.10 192.168.100.10 netmask 255.255.255.255 dns

!--- The "dns" keyword is added to instruct the security appliance to modify !--- DNS records related to this entry.

access-group OUTSIDE in interface outside


!--- Output suppressed.
ASDM で DNS Doctoring を設定するには、次の手順を実行します。
-
Configuration > NAT に移動し、修正するスタティック NAT ルールを選択します。[Edit] をクリックします。
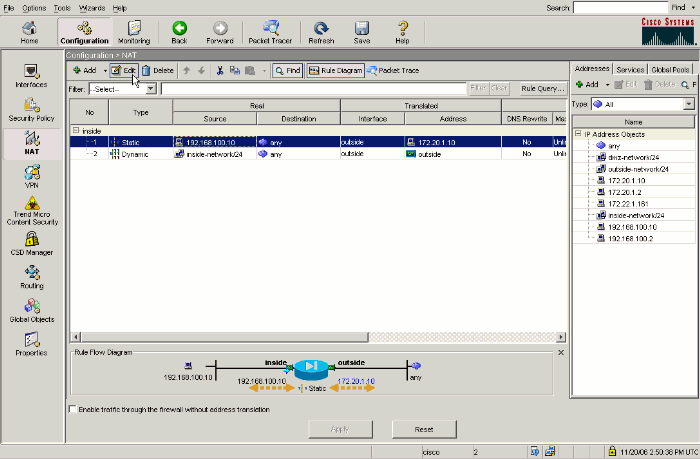
-
NAT Options... をクリックします。
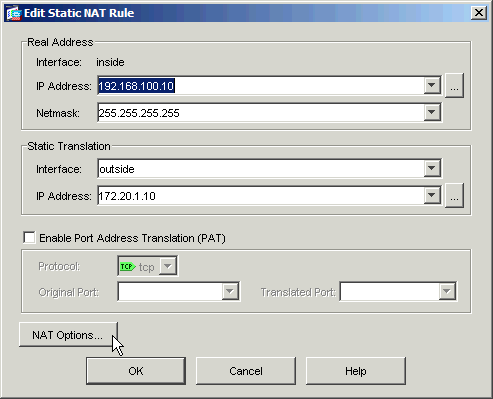
-
Translate DNS replies that match the rule チェックボックスにチェックマークを付けます。
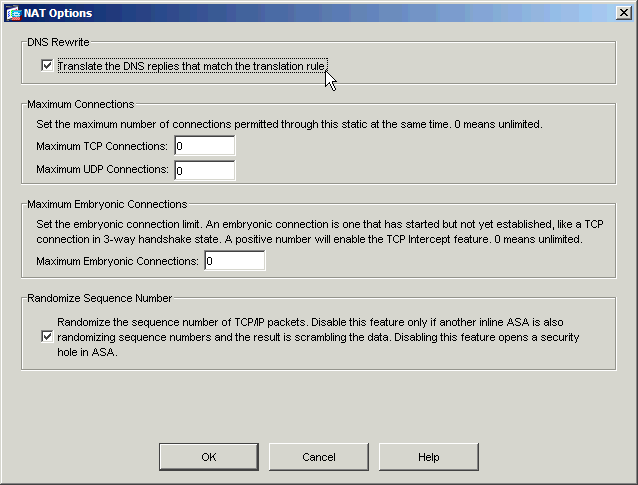
-
OK をクリックして、NAT Options ウィンドウを閉じます。OK をクリックして、Edit Static NAT Rule ウィンドウを閉じます。Apply をクリックして、セキュリティ アプライアンスに設定を送信します。
DNS Doctoring がイネーブルになっている場合、イベントのパケット キャプチャは次のようになります。
-
クライアントが DNS クエリーを送信します。
No. Time Source Destination Protocol Info 1 0.000000 192.168.100.2 172.22.1.161 DNS Standard query A server.example.com Frame 1 (78 bytes on wire, 78 bytes captured) Ethernet II, Src: Cisco_c8:e4:00 (00:04:c0:c8:e4:00), Dst: Cisco_9c:c6:1f (00:0a:b8:9c:c6:1f) Internet Protocol, Src: 192.168.100.2 (192.168.100.2), Dst: 172.22.1.161 (172.22.1.161) User Datagram Protocol, Src Port: 52985 (52985), Dst Port: domain (53) Domain Name System (query) [Response In: 2] Transaction ID: 0x000c Flags: 0x0100 (Standard query) Questions: 1 Answer RRs: 0 Authority RRs: 0 Additional RRs: 0 Queries server.example.com: type A, class IN Name: server.example.com Type: A (Host address) Class: IN (0x0001) -
DNS クエリーに対する PAT が ASA によって実行され、クエリーが転送されます。パケットの送信元アドレスが ASA の outside インターフェイスに変更されていることに注意してください。
No. Time Source Destination Protocol Info 1 0.000000 172.20.1.2 172.22.1.161 DNS Standard query A server.example.com Frame 1 (78 bytes on wire, 78 bytes captured) Ethernet II, Src: Cisco_9c:c6:1e (00:0a:b8:9c:c6:1e), Dst: Cisco_01:f1:22 (00:30:94:01:f1:22) Internet Protocol, Src: 172.20.1.2 (172.20.1.2), Dst: 172.22.1.161 (172.22.1.161) User Datagram Protocol, Src Port: 1035 (1035), Dst Port: domain (53) Domain Name System (query) [Response In: 2] Transaction ID: 0x000c Flags: 0x0100 (Standard query) Questions: 1 Answer RRs: 0 Authority RRs: 0 Additional RRs: 0 Queries server.example.com: type A, class IN Name: server.example.com Type: A (Host address) Class: IN (0x0001) -
DNS サーバが WWW サーバのマップ アドレスを使用して応答します。
No. Time Source Destination Protocol Info 2 0.000992 172.22.1.161 172.20.1.2 DNS Standard query response A 172.20.1.10 Frame 2 (94 bytes on wire, 94 bytes captured) Ethernet II, Src: Cisco_01:f1:22 (00:30:94:01:f1:22), Dst: Cisco_9c:c6:1e (00:0a:b8:9c:c6:1e) Internet Protocol, Src: 172.22.1.161 (172.22.1.161), Dst: 172.20.1.2 (172.20.1.2) User Datagram Protocol, Src Port: domain (53), Dst Port: 1035 (1035) Domain Name System (response) [Request In: 1] [Time: 0.000992000 seconds] Transaction ID: 0x000c Flags: 0x8580 (Standard query response, No error) Questions: 1 Answer RRs: 1 Authority RRs: 0 Additional RRs: 0 Queries server.example.com: type A, class IN Name: server.example.com Type: A (Host address) Class: IN (0x0001) Answers server.example.com: type A, class IN, addr 172.20.1.10 Name: server.example.com Type: A (Host address) Class: IN (0x0001) Time to live: 1 hour Data length: 4 Addr: 172.20.1.10 -
ASA が DNS 応答の宛先アドレスの変換を元に戻し、パケットをクライアントに転送します。DNS Doctoring がイネーブルになっている場合、応答に含まれる Addr は WWW サーバのリアル アドレスに書き換えられます。
No. Time Source Destination Protocol Info 2 0.001251 172.22.1.161 192.168.100.2 DNS Standard query response A 192.168.100.10 Frame 2 (94 bytes on wire, 94 bytes captured) Ethernet II, Src: Cisco_9c:c6:1f (00:0a:b8:9c:c6:1f), Dst: Cisco_c8:e4:00 (00:04:c0:c8:e4:00) Internet Protocol, Src: 172.22.1.161 (172.22.1.161), Dst: 192.168.100.2 (192.168.100.2) User Datagram Protocol, Src Port: domain (53), Dst Port: 52985 (52985) Domain Name System (response) [Request In: 1] [Time: 0.001251000 seconds] Transaction ID: 0x000c Flags: 0x8580 (Standard query response, No error) Questions: 1 Answer RRs: 1 Authority RRs: 0 Additional RRs: 0 Queries server.example.com: type A, class IN Name: server.example.com Type: A (Host address) Class: IN (0x0001) Answers server.example.com: type A, class IN, addr 192.168.100.10 Name: server.example.com Type: A (Host address) Class: IN (0x0001) Time to live: 1 hour Data length: 4 Addr: 192.168.100.10 !--- 172.20.1.10 has been rewritten to be 192.168.100.10. -
この時点で、クライアントは 192.168.100.10 の WWW サーバにアクセスしようとします。接続は成功します。クライアントとサーバが同じサブネット上にあるため、ASA ではトラフィックは何もキャプチャされません。
「dns」キーワードを使用した最終的な設定
これは、dns キーワードと 2 つの NAT インターフェイスを使用した DNS Doctoring を実行するための ASA の最終的な設定です。
| 最終的な ASA 7.2(1) の設定 |
|---|
ciscoasa(config)#show running-config : Saved : ASA Version 7.2(1) ! hostname ciscoasa enable password 9jNfZuG3TC5tCVH0 encrypted names dns-guard ! interface Ethernet0/0 nameif outside security-level 0 ip address 172.20.1.2 255.255.255.0 ! interface Ethernet0/1 nameif inside security-level 100 ip address 192.168.100.1 255.255.255.0 ! interface Ethernet0/2 shutdown no nameif no security-level no ip address ! interface Management0/0 shutdown no nameif no security-level no ip address management-only ! passwd 2KFQnbNIdI.2KYOU encrypted ftp mode passive access-list OUTSIDE extended permit tcp any host 172.20.1.10 eq www !--- Simple access-list that permits HTTP access to the mapped !--- address of the WWW server. pager lines 24 logging enable logging buffered debugging mtu outside 1500 mtu inside 1500 asdm image disk0:/asdm512-k8.bin no asdm history enable arp timeout 14400 global (outside) 1 interface nat (inside) 1 192.168.100.0 255.255.255.0 static (inside,outside) 172.20.1.10 192.168.100.10 netmask 255.255.255.255 dns !--- PAT and static NAT configuration. The DNS keyword instructs !--- the security appliance to rewrite DNS records related to this entry. access-group OUTSIDE in interface outside !--- The Access Control List (ACL) that permits HTTP access !--- to the WWW server is applied to the outside interface. route outside 0.0.0.0 0.0.0.0 172.20.1.1 1 timeout xlate 3:00:00 timeout conn 1:00:00 half-closed 0:10:00 udp 0:02:00 icmp 0:00:02 timeout sunrpc 0:10:00 h323 0:05:00 h225 1:00:00 mgcp 0:05:00 mgcp-pat 0:05:00 timeout sip 0:30:00 sip_media 0:02:00 sip-invite 0:03:00 sip-disconnect 0:02:00 timeout uauth 0:05:00 absolute username cisco password ffIRPGpDSOJh9YLq encrypted http server enable no snmp-server location no snmp-server contact snmp-server enable traps snmp authentication linkup linkdown coldstart telnet timeout 5 ssh timeout 5 console timeout 0 ! class-map inspection_default match default-inspection-traffic ! ! policy-map type inspect dns MY_DNS_INSPECT_MAP parameters message-length maximum 512 !--- DNS inspection map. policy-map global_policy class inspection_default inspect ftp inspect h323 h225 inspect h323 ras inspect rsh inspect rtsp inspect esmtp inspect sqlnet inspect skinny inspect sunrpc inspect xdmcp inspect sip inspect netbios inspect tftp inspect dns MY_DNS_INSPECT_MAP !--- DNS inspection is enabled using the configured map. inspect icmp policy-map type inspect dns migrated_dns_map_1 parameters message-length maximum 512 ! service-policy global_policy global prompt hostname context Cryptochecksum:a4a38088109887c3ceb481efab3dcf32 : end |
代替ソリューション:ヘアピニング
スタティック NAT によるヘアピニング
 注意:スタティックNATによるヘアピニングには、セキュリティアプライアンスを介したクライアントとWWWサーバ間のすべてのトラフィックの送信が含まれます。このソリューションを実装する前に、トラフィックの予想量とセキュリティ アプライアンスの能力を慎重に考慮してください。
ヘアピニングとは、トラフィックを到達したのと同じインターフェイスに戻すプロセスです。この機能は、セキュリティ アプライアンス ソフトウェア バージョン 7.0 で導入されています。7.2(1) よりも前のバージョンでは、ヘアピニングされるトラフィックの少なくとも 1 つのアーム(インバウンドまたはアウトバウンド)を暗号化する必要があります。7.2(1) 以降では、この条件は不要です。7.2(1) を使用する際には、インバウンド トラフィックとアウトバウンド トラフィックの両方とも暗号化されている必要はありません。
ヘアピニングをスタティック NAT 設定文と組み合わせると、DNS Doctoring と同じ効果が得られます。この方法では、DNS サーバからクライアントに返される DNS A レコードの内容は変更されません。その代わり、このドキュメントで説明しているようなシナリオでヘアピニングを使用すると、クライアントは DNS サーバから返されるアドレス 172.20.1.10 を使用して接続できます。
ヘアピニングとスタティック NAT を使用して DNS Doctoring と同じ効果を得る場合の、関連する部分の設定は次のようになります。太字で示すコマンドについては、この出力の後で詳細に説明します。
ciscoasa(config)#show run
: Saved
:
ASA Version 7.2(1)
!
hostname ciscoasa

!--- Output suppressed.

same-security-traffic permit intra-interface

!--- Enable hairpinning.

global (outside) 1 interface

!--- Global statement for client access to the Internet.

global (inside) 1 interface

!--- Global statment for hairpinned client access through !--- the security appliance.

nat (inside) 1 192.168.100.0 255.255.255.0

!--- The NAT statement defines which traffic should be natted. !--- The whole inside subnet in this case.

static (inside,outside) 172.20.1.10 192.168.100.10 netmask 255.255.255.255

!--- Static NAT statement mapping the WWW server's real address to a !--- public address on the outside interface.

static (inside,inside) 172.20.1.10 192.168.100.10 netmask 255.255.255.255

!--- Static NAT statment mapping requests for the public IP address of !--- the WWW server that appear on the inside interface to the WWW server's !--- real address of 192.168.100.10.
-
same-security-traffic:このコマンドは、同じセキュリティレベルのトラフィックがセキュリティアプライアンスを通過できるようにします。permit intra-interface キーワードは、same-security-traffic が同じインターフェイスで着発信できるようにするものであり、これによってヘアピニングがイネーブルになります。
注:ヘアピニングとsame-security-trafficコマンドについての詳細は、same-security-trafficを参照してください。
-
グローバル(内部)1インターフェイス:セキュリティアプライアンスを通過するすべてのトラフィックは、NATの対象となる必要があります。このコマンドでは、セキュリティアプライアンスのInsideインターフェイスアドレスを使用して、Insideインターフェイスに入るトラフィックがInsideインターフェイスからヘアピニングで戻される際にPATの対象になるようにします。
-
static (inside,inside) 172.20.1.10 192.168.100.10 netmask 255.255.255.255:このスタティックNATエントリでは、WWWサーバのパブリックIPアドレスに対する2番目のマッピングを作成します。しかし、1 番目のスタティック NAT エントリと異なり、ここではアドレス 172.20.1.10 がセキュリティ アプライアンスの inside インターフェイスにマップされます。これによって、セキュリティ アプライアンスが、inside インターフェイスで検出したこのアドレスについての要求に対応できるようになります。この後、これらの要求をアプライアンス自体を経由して WWW サーバの実アドレスにリダイレクトします。
ASDM でスタティック NAT を設定するには、次の手順を実行します。
-
Configuration > Interfacesの順に移動します。
-
ウィンドウの下部にある Enable traffic between two or more hosts connected to the same interface チェック ボックスにチェック マークを入れます。
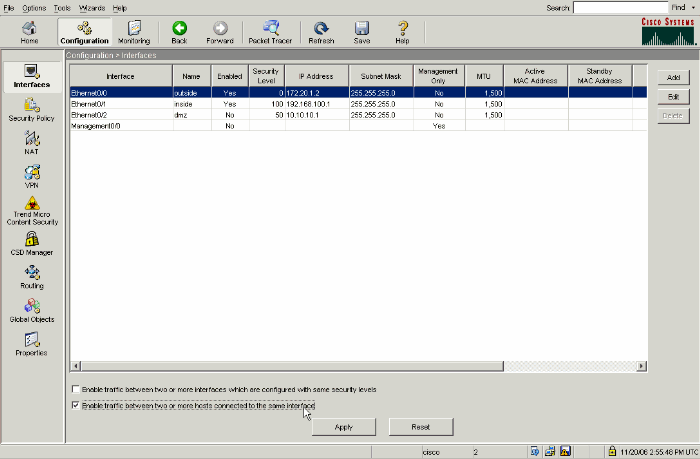
-
[APPLY] をクリックします。
-
Configuration > NAT に移動し、Add > Add Static NAT Rule... の順に選択します。
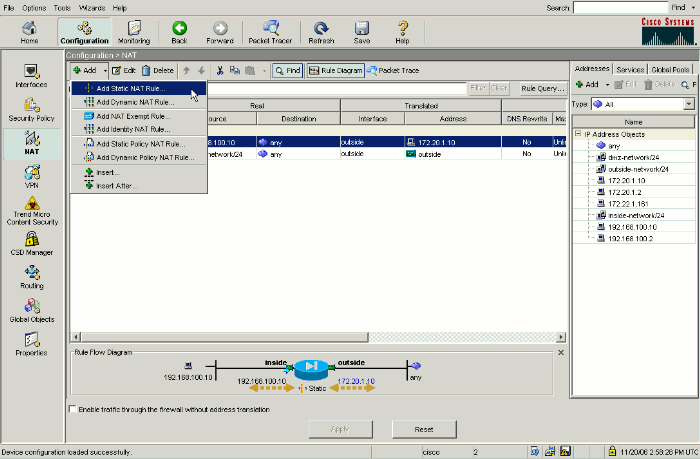
-
新しいスタティック変換の設定を入力します。
-
Real Address 領域に、WWW サーバの情報を入力します。
-
Static Translation 領域に、WWW サーバにマッピングするアドレスとインターフェイスを入力します。
この例では、inside インターフェイス上のホストが、マップ アドレス 172.20.1.10 を介して WWW サーバにアクセスできるように inside インターフェイスが選択されています。
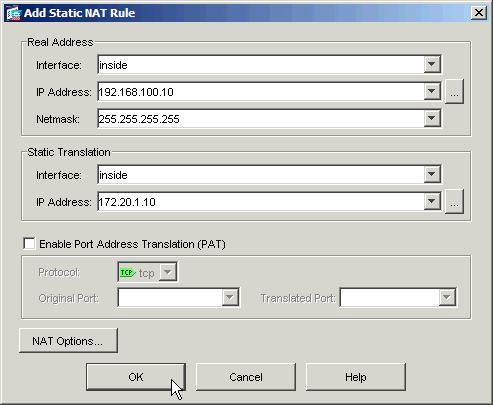
-
-
OK をクリックして、Add Static NAT Rule ウィンドウを閉じます。
-
既存のダイナミック PAT トランスレーションを選択して、Edit をクリックします。
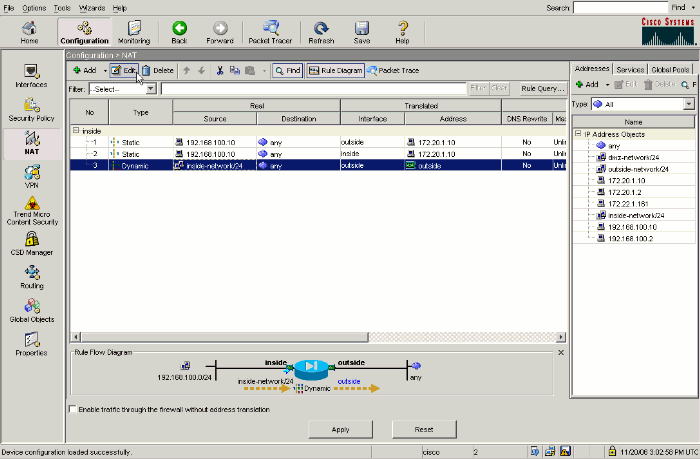
-
Interface プルダウン ボックスから inside を選択します。
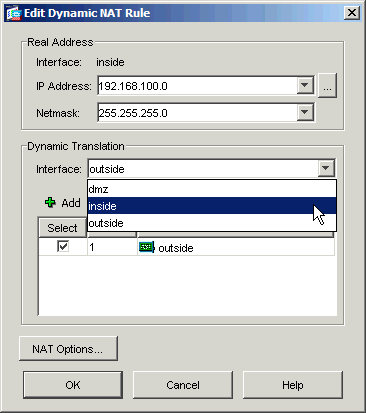
-
[Add] をクリックします。
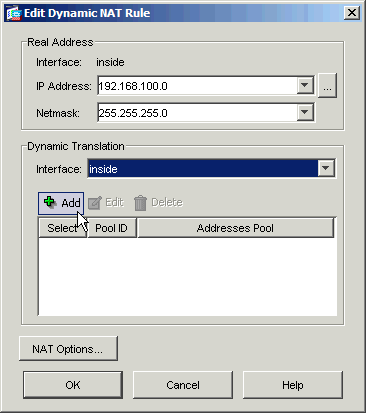
-
Port Address Translation (PAT) using IP address of the interface オプション ボタンを選択します。[Add] をクリックします。
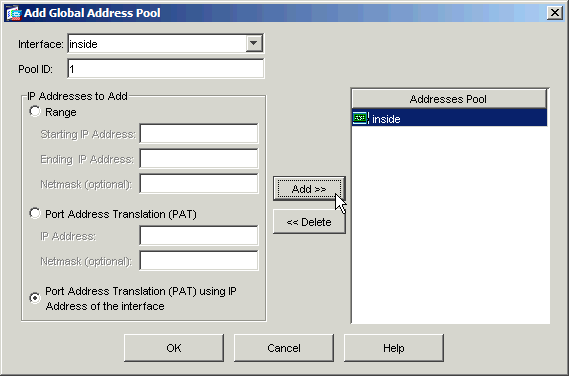
-
OK をクリックして、Add Global Address Pool ウィンドウを閉じます。OK をクリックして、Edit Dynamic NAT Rule ウィンドウを閉じます。Apply をクリックして、セキュリティ アプライアンスに設定を送信します。
ヘアピニングが設定されている場合に発生する一連のイベントを次に示します。クライアントはすでに DNS サーバへ問い合せを行い、WWW サーバのアドレスは 172.20.1.10 であるという応答を受信したと仮定します。
-
クライアントが 172.20.1.10 の WWW サーバに接続しようと試みます。
%ASA-7-609001: Built local-host inside:192.168.100.2
-
セキュリティ アプライアンスが要求を確認し、WWW サーバが 192.168.100.10 であることを認識します。
%ASA-7-609001: Built local-host inside:192.168.100.10
-
セキュリティ アプライアンスがクライアント用のダイナミック PAT トランスレーションを作成します。この時点で、クライアント トラフィックの発信元が、セキュリティ アプライアンスの inside インターフェイスである 192.168.100.1 になります。
%ASA-6-305011: Built dynamic TCP translation from inside:192.168.100.2/11012 to
inside:192.168.100.1/1026
-
セキュリティ アプライアンスがクライアントと WWW サーバの間の自身を経由する TCP 接続を確立します。カッコで囲まれた各ホストのマップ アドレスに注意してください。
%ASA-6-302013: Built inbound TCP connection 67399 for inside:192.168.100.2/11012
(192.168.100.1/1026) to inside:192.168.100.10/80 (172.20.1.10/80)
-
セキュリティ アプライアンスで show xlate コマンドを実行すると、クライアントのトラフィックがセキュリティ アプライアンスを介して変換されていることが確認されます。
ciscoasa(config)#show xlate
3 in use, 9 most used
Global 172.20.1.10 Local 192.168.100.10
Global 172.20.1.10 Local 192.168.100.10
PAT Global 192.168.100.1(1027) Local 192.168.100.2(11013)
-
セキュリティ アプライアンスで show conn コマンドを実行すると、クライアントに代わって、セキュリティ アプライアンスと WWW サーバの間の接続が正しく行われていることを確認できます。カッコで囲まれたクライアントの WWW サーバの実アドレスに注意してください。
ciscoasa#show conn
TCP out 192.168.100.1(192.168.100.2):11019 in 192.168.100.10:80
idle 0:00:03 bytes 1120 flags UIOB
ヘアピニングとスタティック NAT を使用した最終的な設定
これは、ヘアピニングとスタティック NAT を使用して 2 つの NAT インターフェイスで DNS Doctoring の効果を得る、ASA の最終的な設定です。
| 最終的な ASA 7.2(1) の設定 |
|---|
ciscoasa(config-if)#show running-config : Saved : ASA Version 7.2(1) ! hostname ciscoasa enable password 9jNfZuG3TC5tCVH0 encrypted names dns-guard ! interface Ethernet0/0 nameif outside security-level 0 ip address 172.20.1.2 255.255.255.0 ! interface Ethernet0/1 nameif inside security-level 100 ip address 192.168.100.1 255.255.255.0 ! interface Ethernet0/2 shutdown no nameif no security-level no ip address ! interface Management0/0 shutdown no nameif no security-level no ip address management-only ! passwd 2KFQnbNIdI.2KYOU encrypted ftp mode passive same-security-traffic permit intra-interface access-list OUTSIDE extended permit tcp any host 172.20.1.10 eq www !--- Simple access-list that permits HTTP access to the mapped !--- address of the WWW server. pager lines 24 logging enable logging buffered debugging mtu outside 1500 mtu inside 1500 asdm image disk0:/asdm512-k8.bin no asdm history enable arp timeout 14400 global (outside) 1 interface !--- Global statement for client access to the Internet. global (inside) 1 interface !--- Global statment for hairpinned client access through !--- the security appliance. nat (inside) 1 192.168.100.0 255.255.255.0 !--- The NAT statement defines which traffic should be natted. !--- The whole inside subnet in this case. static (inside,outside) 172.20.1.10 192.168.100.10 netmask 255.255.255.255 !--- Static NAT statement mapping the WWW server's real address to a public !--- address on the outside interface. static (inside,inside) 172.20.1.10 192.168.100.10 netmask 255.255.255.255 !--- Static NAT statement mapping requests for the public IP address of the !--- WWW server that appear on the inside interface to the WWW server's real address !--- of 192.168.100.10. access-group OUTSIDE in interface outside !--- The ACL that permits HTTP access to the WWW server is applied !--- to the outside interface. route outside 0.0.0.0 0.0.0.0 172.20.1.1 1 timeout xlate 3:00:00 timeout conn 1:00:00 half-closed 0:10:00 udp 0:02:00 icmp 0:00:02 timeout sunrpc 0:10:00 h323 0:05:00 h225 1:00:00 mgcp 0:05:00 mgcp-pat 0:05:00 timeout sip 0:30:00 sip_media 0:02:00 sip-invite 0:03:00 sip-disconnect 0:02:00 timeout uauth 0:05:00 absolute username cisco password ffIRPGpDSOJh9YLq encrypted http server enable no snmp-server location no snmp-server contact snmp-server enable traps snmp authentication linkup linkdown coldstart telnet timeout 5 ssh timeout 5 console timeout 0 ! class-map inspection_default match default-inspection-traffic ! ! policy-map type inspect dns MY_DNS_INSPECT_MAP parameters message-length maximum 512 policy-map global_policy class inspection_default inspect ftp inspect h323 h225 inspect h323 ras inspect rsh inspect rtsp inspect esmtp inspect sqlnet inspect skinny inspect sunrpc inspect xdmcp inspect sip inspect netbios inspect tftp inspect dns MY_DNS_INSPECT_MAP inspect icmp policy-map type inspect dns migrated_dns_map_1 parameters message-length maximum 512 ! service-policy global_policy global prompt hostname context Cryptochecksum:7c9b4e3aff085ba90ee194e079111e1d : end |
注:ヘアピニングを使用できるさまざまなシナリオの詳細については、このビデオ「Cisco ASAでのヘアピニング ![]() 」(登録ユーザ専用)を参照してください。
」(登録ユーザ専用)を参照してください。
DNS インスペクションの設定
(DNS インスペクションを以前にディセーブルにしている場合)DNS インスペクションをイネーブルにするには、次の手順を実行します。この例では、DNS インスペクションをデフォルトのグローバル インスペクション ポリシーに追加しています。このポリシーは、ASA のデフォルト設定から作業を開始した場合と同様に、service-policy コマンドによってグローバルに適用されます。サービス ポリシーおよびインスペクションについての詳細は、『モジュラ ポリシー フレームワークの使用』を参照してください。
-
DNS 用のインスペクション ポリシー マップを作成します。
ciscoasa(config)#policy-map type inspect dns MY_DNS_INSPECT_MAP
-
policy-map 設定モードから、インスペクション エンジンのパラメータを指定するためにパラメータ設定モードに入ります。
ciscoasa(config-pmap)#parameters
-
policy-map パラメータ設定モードで、DNS メッセージの最大長を 512 に設定します。
ciscoasa(config-pmap-p)#message-length maximum 512
-
policy-map パラメータ設定モードと policy-map 設定モードを終了します。
ciscoasa(config-pmap-p)#exit
ciscoasa(config-pmap)#exit
-
インスペクション ポリシーマップが正しく作成されたことを確認します。
ciscoasa(config)#show run policy-map type inspect dns
!
policy-map type inspect dns MY_DNS_INSPECT_MAP
 parameters
  message-length maximum 512
!
-
global_policy の policy-map 設定モードに入ります。
ciscoasa(config)#policy-map global_policy
ciscoasa(config-pmap)#
-
policy-map 設定モードで、デフォルトのレイヤ 3/4 クラス マップ inspection_default を指定します。
ciscoasa(config-pmap)#class inspection_default
ciscoasa(config-pmap-c)#
-
policy-map クラス設定モードで、手順 1 ~ 3 で作成したインスペクション ポリシー マップを使用して DNS を検査するように指定します。
ciscoasa(config-pmap-c)#inspect dns MY_DNS_INSPECT_MAP
-
policy-map クラス設定モードと policy-map 設定モードを終了します。
ciscoasa(config-pmap-c)#exit
ciscoasa(config-pmap)#exit
-
global_policy ポリシーマップが正しく設定されたことを確認します。
ciscoasa(config)#show run policy-map
!

!--- The configured DNS inspection policy map.

policy-map type inspect dns MY_DNS_INSPECT_MAP
 parameters
  message-length maximum 512
policy-map global_policy
 class inspection_default
  inspect ftp
  inspect h323 h225
  inspect h323 ras
  inspect rsh
  inspect rtsp
  inspect esmtp
  inspect sqlnet
  inspect skinny
  inspect sunrpc
  inspect xdmcp
  inspect sip
  inspect netbios
  inspect tftp
  inspect dns MY_DNS_INSPECT_MAP

!--- DNS application inspection enabled.

!
-
global_policy が service-policy によってグローバルに適用されることを確認します。
ciscoasa(config)#show run service-policy
service-policy global_policy global
スプリット DNS の設定
split-dns コマンドをグループ ポリシー コンフィギュレーション モードで発行して、ドメインのリストを入力し、スプリット トンネルを経由して解決されるようにします。 いいえ リストを削除します。
スプリット トンネリングのドメイン リストがない場合は、ユーザはデフォルトのグループ ポリシーにあるものを継承します。スプリット トンネリングのドメイン リストを継承しないようにするには、split-dns none コマンドを発行します。
ドメイン リスト内の各エントリを分けるには、スペースを 1 つ使用します。エントリの数に制限はありませんが、全体の文字列は 255 文字を超えることはできません。使用できる文字は、英数字、ハイフン(-)、ピリオド(.)だけです。 no split-dns コマンドを引数なしで使用すると、現在の値がすべて削除されます。これには、split-dns none コマンドを発行した際に作成されたヌルの値も含まれます。
この例では、Domain1、Domain2、Domain3、および Domain4 というドメインを設定して、FirstGroup という名前のグループ ポリシーに対するスプリット トンネルによって解決されるようにしています。
hostname(config)#group-policy FirstGroup attributes
hostname(config-group-policy)#split-dns value Domain1 Domain2 Domain3 Domain4
確認
このセクションでは、設定が正常に動作していることを確認します。
Output Interpreter Tool(OIT)(登録ユーザ専用)では、特定の show コマンドがサポートされています。OIT を使用して show コマンド出力の解析を表示します。
DNS トラフィックのキャプチャ
セキュリティ アプライアンスが DNS レコードを正しく書き換えているかどうかを確認する方法の 1 つは、上の例で説明したように、該当するパケットをキャプチャすることです。ASA でトラフィックをキャプチャするには、次の手順を実行します。
-
作成するキャプチャ インスタンスごとにアクセス リストを作成します。
キャプチャするトラフィックが ACL で指定されている必要があります。この例では、2 つ ACL を作成します。
-
outside インターフェイスのトラフィックに対する ACL:
access-list DNSOUTCAP extended permit ip host 172.22.1.161 host 172.20.1.2

!--- All traffic between the DNS server and the ASA.

access-list DNSOUTCAP extended permit ip host 172.20.1.2 host 172.22.1.161

!--- All traffic between the ASA and the DNS server.
-
inside インターフェイスのトラフィックに対する ACL:
access-list DNSINCAP extended permit ip host 192.168.100.2 host 172.22.1.161

!--- All traffic between the client and the DNS server.

access-list DNSINCAP extended permit ip host 172.22.1.161 host 192.168.100.2

!--- All traffic between the DNS server and the client.
-
-
キャプチャ インスタンスを作成します。
ciscoasa#capture DNSOUTSIDE access-list DNSOUTCAP interface outside

!--- This capture collects traffic on the outside interface that matches !--- the ACL DNSOUTCAP.

ciscoasa#capture DNSINSIDE access-list DNSINCAP interface inside

!--- This capture collects traffic on the inside interface that matches !--- the ACL DNSINCAP.
-
キャプチャを表示します。
DNS トラフィックが通過した後、この例のキャプチャは次のようになります。
ciscoasa#show capture DNSOUTSIDE
2 packets captured
   1: 14:07:21.347195 172.20.1.2.1025 > 172.22.1.161.53:  udp 36
   2: 14:07:21.352093 172.22.1.161.53 > 172.20.1.2.1025:  udp 93
2 packets shown
ciscoasa#show capture DNSINSIDE
2 packets captured
   1: 14:07:21.346951 192.168.100.2.57225 > 172.22.1.161.53:  udp 36
   2: 14:07:21.352124 172.22.1.161.53 > 192.168.100.2.57225:  udp 93
2 packets shown
-
(オプション)他のアプリケーションで分析できるように pcap 形式でキャプチャを TFTP サーバにコピーします。
pcap 形式を解析できるアプリケーションでは、DNS A レコードに含まれる名前や IP アドレスなどの詳細情報も表示できます。
ciscoasa#copy /pcap capture:DNSINSIDE tftp
...
ciscoasa#copy /pcap capture:DNSOUTSIDE tftp
トラブルシュート
このセクションでは、設定のトラブルシューティングに役立つ情報を紹介します。
DNS 書き換えが実行されない
セキュリティ アプライアンスで DNS インスペクションが設定されていることを確認してください。「DNS インスペクションの設定」セクションを参照してください。
変換の作成に失敗する
クライアントと WWW サーバの間で接続を確立できない場合は、NAT の設定ミスが原因である可能性があります。セキュリティ アプライアンスのログを開いて、プロトコルがセキュリティ アプライアンスを介して変換を作成することに失敗したことを示すメッセージがないかどうかを確認してください。そのようなメッセージがある場合は、適切なトラフィックに対して NAT が設定されていて、アドレスに誤りがないことを確認してください。
%ASA-3-305006: portmap translation creation failed for tcp src
inside:192.168.100.2/11000 dst dmz:10.10.10.10/23
このエラーを解決するには、xlateエントリをクリアしてから、NATステートメントを削除して再適用します。
UDP DNS応答のドロップ
DNSパケットのドロップが原因で次のエラーメッセージが表示される可能性があります。
 %PIX|ASA-4-410001: UDP DNS request from source_interface:source_address/source_port
to dest_interface:dest_address/dest_port; (label length | domain-name length)
52 bytes exceeds remaining packet length of 44 bytes.
この問題を解決するには、DNSパケットの長さを512 ~ 65535に増やします。
例:
ciscoasa(config)#policy-map type inspect dns MY_DNS_INSPECT_MAP
ciscoasa(config-pmap)#parameters
ciscoasa(config-pmap-p)#message-length maximum <512-65535>
関連情報
更新履歴
| 改定 | 発行日 | コメント |
|---|---|---|
1.0 |
29-Sep-2006 |
初版 |


 フィードバック