はじめに
このドキュメントでは、Cisco Catalyst 9000シリーズスイッチでのゼロタッチプロビジョニング(ZTP)の設定とプロビジョニングについて説明します。
前提条件
要件
次の項目に関する知識があることが推奨されます。
- スイッチでのDynamic Host Configuration Protocol(DHCP)サーバの設定
- Pythonコードの基礎
- HTTP/TFTPサービスの基本
ライセンス要件
- Network AdvantageライセンスまたはNetwork Essentialsライセンスがアクティブである必要があります。
対応プラットフォーム
- 16.5.1aバージョンが稼働するCatalyst 9300シリーズスイッチ
- 16.5.1aバージョンが稼働するCatalyst 9500シリーズスイッチ
- 16.6.2バージョンが稼働するCatalyst 9400シリーズスイッチ

注:この機能は、C9600ではサポートされていません。
使用するコンポーネント
このドキュメントの情報は、次のソフトウェアとハードウェアのバージョンに基づいています。
- Cisco IOS® XE 17.6.4上のCisco Catalyst 9300スイッチ
- Cisco Catalyst 3850スイッチは、オプション67設定のDHCPサーバとして動作します
- HTTPサービスとともにインストールされたエンドホストには、Pythonファイルが含まれています。
このドキュメントの情報は、特定のラボ環境にあるデバイスに基づいて作成されました。このドキュメントで使用するすべてのデバイスは、クリアな(デフォルト)設定で作業を開始しています。本稼働中のネットワークでは、各コマンドによって起こる可能性がある影響を十分確認してください。
背景説明
ゼロタッチプロビジョニング(ZTP)は、ネットワークデバイスを手動による介入なしで数分以内に正確にプロビジョニングするために使用されます。
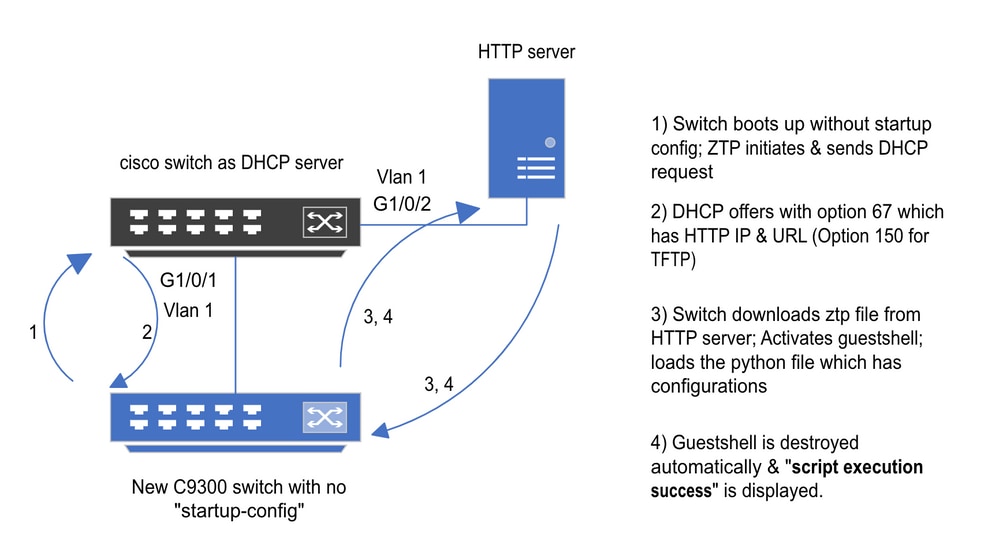
ネットワーク図
 ゼロタッチプロビジョニングの基本的な設定と手順
ZTPの動作(詳細な手順)
ZTPは、Catalyst 9000シリーズスイッチを既存のネットワークに導入する際に、スタートアップコンフィギュレーションを使用せずに設定を自動化します。これは手動による介入なしで発生します。手順の詳細は、次のとおりです。
ステップ 1:新しいスイッチの接続
新しいスイッチを既存のインフラストラクチャに接続し、デバイスの電源をオンにします。スイッチは、スタートアップコンフィギュレーションなしで起動します。
ステップ 2:ZTPの開始
ZTPプロセスは、スイッチによって自動的に開始されます。
ステップ 3:DHCP Request
スイッチはDHCP discoverメッセージを送信します。
ステップ 4:DHCP応答
DHCPサーバは、HTTPサーバIPとURLを持つオプション67を含むオファーで応答します。
ステップ 5:HTTPのURL
スイッチはオファーを受信し、自身の通信用のIPアドレスを取得します。また、HTTPサーバのIPアドレスと、ZTP.pyファイルをダウンロードするための完全なURLも受信します。
手順 6:ダウンロード
スイッチはHTTPサーバに到達し、ZTP.pyファイルをダウンロードします。
手順 7:ゲストシェル
スイッチはゲストシェルを自動的にアクティブにします。
ステップ 8:構成の展開
スイッチはPythonファイルを実行し、設定は自動的に適用されます。
ステップ 9:成功
スイッチがguestshellを破棄すると、script execution is a successのメッセージが表示されます。
コンフィギュレーション
HTTPサービスの設定
ステップ 1:エンドホストへのHTTPサービスのインストール(例:Linux)
sudo apt update
sudo apt install apache2
ステップ 2:Pythonファイルztp_http.pyの作成
権限の問題が発生した場合は、chmod 777を使用してファイルに完全な権限を付与します。
Pythonファイルには、次のタスクで作成されたコードが含まれています。
1. showコマンド
2. ループバックの設定
3. 設定の確認
Pythonコード
#Importing cli module
import cli

print "\n\n Running show version \n\n"
cli.executep('show version')

print "\n\n Configure a Loopback Interface \n\n"
cli.configurep(["interface loop 25", "ip address 192.168.0.25 255.255.255.255", "end"])

print "\n\n Running show ip interface brief \n\n"
cli.executep('show ip int brief | i up')

print "\n\n ZTP is success \n\n"
Pythonファイルの場所。
このファイルは、Linuxマシンの/var/www/htmlに保存する必要があります。
vm: /var/www/html$ ls -l ztp_http.py
-rwxrwxrwx 1 root root 346 Apr 04 14:14 ztp_http.py
ステップ 3:HTTPサービスとリスニングポートの確認
serviceコマンドを使用して、HTTPサービスが現在起動し、実行されているかどうかを確認します。
vm: /var/www/html$ sudo service apache2 status
Active: active (running)
現在、HTTPサービスがリッスンしているポートを確認します。
vm: /var/www/html$ sudo netstat -anp | grep apache
tcp6 0 :::80 :::* LISTEN 1998/apache2               <<<< Listens at 80
ステップ 4:ブラウザによるポート番号の確認
ファイルがWebブラウザ経由でダウンロード可能かどうかを確認します。
1. 同じマシン内の任意のブラウザ(Linuxなど)を開きます。
2. 検索バーに次のURLを入力します。 localhost:80/ztp_http.py
3. ファイルは自動的にダウンロードされます。
DHCPサービスの設定
ステップ 1:インターフェイス設定のプロビジョニング(新しいデバイス)
新しいスイッチはG1/0/1に接続される予定です。
enable
configure terminal
interface g1/0/1
description New_9300_switch
switchport
switchport mode access
switchport access vlan 1
ステップ 2:HTTPサーバ接続インターフェイスの設定
HTTPサーバ(Linux)が3850スイッチ(インターフェイスG1/0/2など)に直接接続されている。
enable
configure terminal
interface g1/0/2
description Linux_is_connected_here
switchport
switchport mode access
switchport access vlan 1
ステップ 3:DHCPスコープの設定
オプション67を使用したDHCPプールの設定例。
enable
configure terminal
ip dhcp pool ZTP_Pool
network 10.0.0.0 255.255.255.0
default-router 10.0.0.1
option 67 ascii http://10.0.0.2:80/ztp_http.py
end
検証
現在、この設定に使用できる確認手順はありません。
作業コンソールログ
No startup-config, starting autoinstall/pnp/ztp...
Autoinstall will terminate if any input is detected on console

--- System Configuration Dialog ---

Would you like to enter the initial configuration dialog? [yes/no]:   <<<< Do not provide any input during this time.
Autoinstall trying DHCPv6 on Vlan1
Autoinstall trying DHCPv4 on Vlan1
Acquired IPv4 address 10.0.0.10 on Interface Vlan1
Received following DHCPv4 options:
bootfile : http://10.0.0.2:80/ztp_http.py
stop Autoip process
OK to enter CLI now...
pnp-discovery can be monitored without entering enable mode
Entering enable mode will stop pnp-discovery
Attempting bootfile http://10.0.0.2:80/ztp_http.py

Loading http://10.0.0.2:80/ztp_http.py
Loading http://10.0.0.2:80/ztp_http.py day0guestshell activated successfully
Current state is: ACTIVATED
day0guestshell started successfully
Current state is: RUNNING
Guestshell enabled successfully


Running show version                           <<<< show command executed


Cisco IOS XE Software, Version 17.06.04
Cisco IOS Software [Bengaluru], Catalyst L3 Switch Software (CAT9K_IOSXE), Version 17.6.4, RELEASE SOFTWARE (fc1)

<snipped>

Model Number : C9300L-48T-4X
System Serial Number : FOC2531LGM8
CLEI Code Number :
Switch Ports Model SW Version SW Image Mode
------ ----- ----- ---------- ---------- ----
* 1 53 C9300L-48T-4X 17.06.04 CAT9K_IOSXE BUNDLE

Configure a Loopback interface                              <<<< configuration

Line 1 SUCCESS: interface loop 25
Line 2 SUCCESS: ip address 192.168.0.25 255.255.255.255
Line 3 SUCCESS: end


Running show ip int brief                                    <<<< Config Verification


Vlan1 10.0.0.10 YES DHCP up up
Vlan4094 192.168.2.1 YES manual up down
GigabitEthernet0/0 unassigned YES unset up up
GigabitEthernet1/0/2 unassigned YES unset up up
GigabitEthernet1/0/3 unassigned YES unset up up
Ap1/0/1 unassigned YES unset up up
Loopback25 192.168.0.25 YES other up up


ZTP is success


Guestshell destroyed successfully
Script execution success!                                   <<<< Success
トラブルシュート
このセクションでは、設定のトラブルシューティングに役立つ情報を紹介します。
一般的な問題
1. ネットワーク内の別のDHCPサーバの存在
No startup-config, starting autoinstall/pnp/ztp...
Autoinstall will terminate if any input is detected on console
--- System Configuration Dialog ---
Would you like to enter the initial configuration dialog? [yes/no]:
Autoinstall trying DHCPv6 on Vlan1
Autoinstall trying DHCPv4 on Vlan1
Acquired IPv4 address 192.168.45.117 on Interface Vlan1           <<<< Gets Different IP from another DHCP server.
Received following DHCPv4 options:
hostname : Switch

stop Autoip process
OK to enter CLI now...
pnp-discovery can be monitored without entering enable mode
Entering enable mode will stop pnp-discovery
Guestshell destroyed successfully

stop Autoip process
% Please answer 'yes' or 'no'.
Would you like to enter the initial configuration dialog? [yes/no]: no
2. Pythonコードエラー
--- System Configuration Dialog ---

Would you like to enter the initial configuration dialog? [yes/no]:
Autoinstall trying DHCPv6 on Vlan1

Autoinstall trying DHCPv4 on Vlan1

Acquired IPv4 address 10.106.37.69 on Interface Vlan1
Received following DHCPv4 options:
bootfile : http://10.106.37.59:80/ztp_http.py

stop Autoip process
OK to enter CLI now...

pnp-discovery can be monitored without entering enable mode

Entering enable mode will stop pnp-discovery

Attempting bootfile http://10.106.37.59:80/ztp_http.py

Loading http://10.106.37.59:80/ztp_http.py
Loading http://10.106.37.59:80/ztp_http.py day0guestshell activated successfully
Current state is: ACTIVATED
day0guestshell started successfully
Current state is: RUNNING
Guestshell enabled successfully
File "/bootflash/guest-share/downloaded_script.py", line 1
print "\n\n Running show version \n\n"
^
SyntaxError: Missing parentheses in call to 'print'. Did you mean print("\n\n Running show version \n\n")?      <<<< Code Error

Guestshell destroyed successfully
Script execution success!
3. HTTPサービスポート番号
HTTPサービスは8080などの異なるポートでリッスンしていますが、オプション67のDHCP設定は80を指しています。
enable
configure terminal
ip dhcp excluded-address 10.0.0.2
ip dhcp pool ZTP_Pool
network 10.0.0.0 255.255.255.0
default-router 10.0.0.1
option 67 ascii http://10.0.0.2:80/ztp_http.py             <<<< Change to 8080
4. 重複IPアドレス
DHCPスコープを確認し、HTTPサーバに割り当てられているIPアドレスを除外します。
enable
configure terminal
ip dhcp excluded-address 10.0.0.2                          <<<< Exclude HTTP server address.
ip dhcp pool ZTP_Pool
network 10.0.0.0 255.255.255.0
default-router 10.0.0.1
option 67 ascii http://10.0.0.2:80/ztp_http.py
5. HTTPサービスの確認、停止および再起動
vm: /var/www/html$ sudo service apache2 stop
vm: /var/www/html$ sudo service apache2 start
vm: /var/www/html$ sudo service apache2 status
パケットの詳細サンプル
HTTP交換の概要:
10.0.0.10    10.0.0.2    HTTP  183  GET /http_ztp.py HTTP/1.1           <<<< HTTPGETrequest
10.0.0.2     10.0.0.10   HTTP  245  HTTP/1.1 200 OK (text/x-python)     <<<< Response
HTTP応答の詳細:
Hypertext Transfer Protocol
HTTP/1.1 200 OK\r\n
Content-Type: text/x-python\r\n
Content-Length: 20\r\n
Date: Tue, 04 Apr 2023 12:24:02 GMT\r\n
Connection: keep-alive\r\n
Keep-Alive: timeout=5\r\n
\r\n
[HTTP response 1/2]
[Time since request: 0.204568243 seconds]
[Request in frame: 21]
[Next request in frame: 25]
[Next response in frame: 26]
[Request URI: http://10.0.0.2:80/http_ztp.py]                 >>>> URL


 フィードバック