概要
このドキュメントでは、Cisco Unified Communications Manager Express(CUCME/CME)を設定する手順について説明します。
前提条件
要件
次の項目に関する知識があることが推奨されます。
- Cisco IOS®ルータ
- IP フォン
- PSTN への接続(オプション)
使用するコンポーネント
このドキュメントの情報は、次のソフトウェアとハードウェアのバージョンに基づいています。
このドキュメントの情報は、特定のラボ環境にあるデバイスに基づいて作成されました。ここで使用するすべてのデバイスは、初期(デフォルト)設定の状態から起動しています。対象のネットワークが実稼働中である場合には、どのようなコマンドについても、その潜在的な影響について確実に理解しておく必要があります。
設定
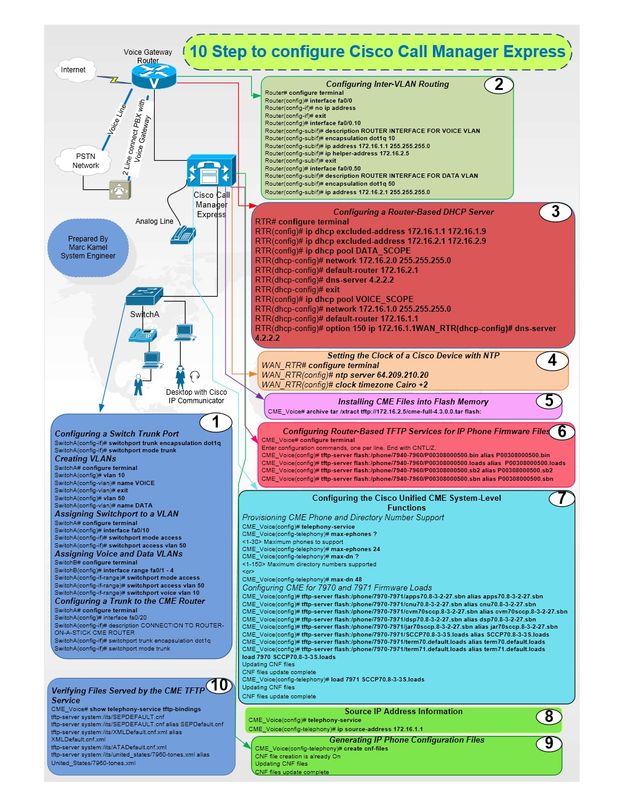
Cisco Call Manager Expressを設定するには、次の図と説明されている手順を参照してください。

ステップ1:スイッチトランクポートの設定
SwitchA(config-if)#switchport trunk encapsulation dot1q

SwitchA(config-if)# switchport mode trunk
ステップ1.1:VLANの作成
SwitchA# configure terminal

SwitchA(config)# vlan 10

SwitchA(config-vlan)# name VOICE

SwitchA(config-vlan)# exit

SwitchA(config)# vlan 50

SwitchA(config-vlan)# name DATA
ステップ1.2:スイッチポートのVLANへの割り当て
SwitchA# configure terminal

SwitchA(config)# interface fa0/10

SwitchA(config-if)# switchport mode access

SwitchA(config-if)# switchport access vlan 50
ステップ1.3:音声VLANとデータVLANの割り当て
SwitchA# configure terminal

SwitchA(config)#interfac range fa0/1 - 4

SwitchA(config-if-range)# switchport mode access

SwitchA(config-if-range)# switchport access vlan 50

SwitchA(config-if-range)# switchport voice vlan 10
ステップ1.4:CMEルータへのトランクの設定
SwitchA# configure terminal

SwitchA(config)# interface fa0/20

SwitchA(config-if)# description CONNECTION TO ROUTER-ON-A-STICK CME ROUTER

SwitchA(config-if)# switchport trunk encapsulation dot1q

SwitchA(config-if)# switchport mode trunk
手順2. VLAN間ルーティングの設定
Router# configure terminal

Router(config)# interface fa0/0

Router(config-if)# no ip address

Router(config-if)#exit

Router(config)# interface fa0/0.10

Router(config-subif)# description ROUTER INTERFACE FOR VOICE VLAN

Router(config-subif)# encapsulation dot1q 10

Router(config-subif)# ip address 172.16.1.1 255.255.255.0

Router(config-subif)# ip helper-address 172.16.2.5

Router(config-subif)#exit

Router(config)# interface fa0/0.50

Router(config-subif)# description ROUTER INTERFACE FOR DATA VLAN

Router(config-subif)# encapsulation dot1q 50

Router(config-subif)# ip address 172.16.2.1 255.255.255.0
手順3.ルータベースのDHCPサーバの設定
RTR# configure terminal

RTR(config)# ip dhcp excluded-address 172.16.1.1 172.16.1.9

RTR(config)# ip dhcp excluded-address 172.16.2.1 172.16.2.9

RTR(config)# ip dhcp pool DATA_SCOPE

RTR(dhcp-config)# network 172.16.2.0 255.255.255.0

RTR(dhcp-config)# default-router 172.16.2.1

RTR(dhcp-config)# dns-server 4.2.2.2

RTR(dhcp-config)# exit

RTR(config)# ip dhcp pool VOICE_SCOPE

RTR(dhcp-config)#netowrk 172.16.1.0 255.255.255.0

RTR(dhcp-config)# default-router 172.16.1.1

RTR(dhcp-config)# option 150 ip 172.16.1.1

RTR(dhcp-config)# dns-server 4.2.2.2
ステップ4:NTPを使用したシスコデバイスのクロックの設定
RTR# configure terminal

RTR(config)# ntp server 64.209.210.20

RTR(config)# clock timezone Cairo +2
ステップ5:フラッシュメモリへのCMEファイルのインストール
CME_Voice# archive tar /xtract tftp://172.16.2.5/<file name> flash:
ステップ6:IP Phoneファームウェアファイル用のルータベースのTFTPサービスの設定
CME_Voice# configure terminal

CME_Voice(config)# tftp-server flash:/phone/<file name>
ステップ7:Cisco Unified CMEシステムレベル機能の設定
CME電話と電話番号のプロビジョニング:
CME_Voice# configure terminal

CME_Voice(config)# telephony-service

CME_Voice(config-telephony)# max ephone x

CME_Voice(config-telephony)# max dn x
ファームウェアロード用のCMEの設定:
CME_Voice# configure terminal

CME_Voice(config)# tftp-server flash:/phone/<phone model>/<file name>
各電話機のファームウェアロードを設定します。
CME_Voice# configure terminal

CME_Voice(config)# load <phone model> <firmware load>
ステップ8:送信元IPアドレス情報
CME_Voice# configure terminal

CME_Voice(config)# telephony-service

CME_Voice(config-telephony)# ip souerce address 172.16.1.1
ステップ9:IP Phone設定ファイルの生成
CME_Voice# configure terminal

CME_Voice(config)# telephony-service

CME_Voice(config-telephony)# creat cnf-files
ステップ10:CME TFTPサービスが提供するファイルの確認
CME_Voice# show telephony-service tftp-bindings
確認
現在、この設定に使用できる確認手順はありません。
トラブルシュート
現在、この設定に関する特定のトラブルシューティング情報はありません。