Unified Wireless Network ローカル サーバの設定例 EAP☆
内容
概要
このドキュメントでは、ワイヤレス ユーザの認証のために Cisco Wireless LAN Controller(WLC)でローカル拡張認証プロトコル(EAP)サーバを設定する方法について説明します。
ローカル EAP は認証方法であり、これを使用して、ユーザとワイヤレス クライアントをローカルに認証できます。この機能は、バックエンド システムが中断したり外部認証サーバが停止したりした場合でもワイヤレス クライアントとの接続を維持する必要があるリモート オフィスでの使用を想定して作られています。ローカル EAP を有効にすると、コントローラは認証サーバおよびローカル ユーザ データベースとして機能するため、外部認証サーバへの依存が排除されます。ローカル EAP は、ローカル ユーザ データベースまたは Lightweight Directory Access Protocol(LDAP)バックエンド データベースからユーザ クレデンシャルを受け取り、ユーザを認証します。ローカル EAP は、コントローラとワイヤレス クライアント間で Lightweight EAP(LEAP)、EAP-Flexible Authentication via Secure Tunneling(EAP-FAST)および EAP-Transport Layer Security(EAP-TLS)認証をサポートします。
ローカル EAP サーバは、WLC にグローバル外部 RADIUS サーバ設定がある場合だけ使用できません。すべての認証要求は、ローカル EAP サーバが使用可能になるまで、グローバル外部 RADIUS サーバに転送されます。WLC が外部 RADIUS サーバとの接続を失うと、ローカル EAP サーバがアクティブになります。グローバル RADIUS サーバ設定がない場合、ローカル EAP サーバはすぐにアクティブになります。ローカル EAP サーバは、他の WLC に接続されている、クライアントの認証に使用できません。つまり、WLC は、認証のために別の WLC に EAP 要求を転送できません。すべての WLC には、その独自のローカル EAP サーバと個別データベースが必要です。
注:WLCが外部RADIUSサーバ(ACS)に要求を送信するのを停止するには、次のコマンドを使用します。
config wlan disable
        config wlan radius_server auth disable
        config wlan enable
ローカル EAP サーバは、次のプロトコルを 4.1.171.0 ソフトウェア リリース以降で使用します。
-
LEAP
-
EAP-FAST(ユーザ名とパスワードの両方および証明書)
-
EAP-TLS
前提条件
要件
次の項目に関する知識があることが推奨されます。
-
WLC と Lightweight アクセス ポイント(LAP)の基本動作のための設定方法に関する知識
-
Lightweight アクセス ポイント プロトコル(LWAPP)とワイヤレスのセキュリティ方式に関する知識
-
ローカル EAP 認証に関する基礎知識
使用するコンポーネント
このドキュメントの情報は、次のソフトウェアとハードウェアのバージョンに基づいています。
-
CB21AG アダプタ カードと Cisco Secure Services Client バージョン 4.05 を伴う Windows XP
-
Cisco 4400 Wireless LAN Controller 4.1.171.0
-
Microsoft Certification Authority(Windows 2000 サーバ)
表記法
ドキュメント表記の詳細は、『シスコ テクニカル ティップスの表記法』を参照してください。
Cisco Wireless LAN Controller でのローカル EAP の設定
このドキュメントでは、WLC の基本的な設定がすでに完了していることが想定されています。
ローカル EAP の設定
ローカル EAP を設定するには、次の手順を実行します。
-
ローカル ネット ユーザを追加するには、次の手順を実行します。
GUIから、[Security] > [Local Net Users] > [New] を選択し、[User Name]、[Password]、[Guest User]、[WLAN ID]、および[Description]を入力して、[Apply]をクリックします。
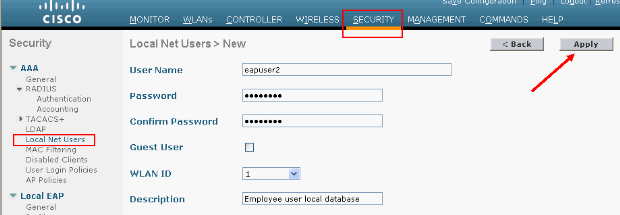
CLIから、config netuser add <username> <password> <WLAN id> <description>コマンドを使用できます。
注:このコマンドは、スペースの制約により2行にわたって表記されています。
(Cisco Controller) >config netuser add eapuser2 cisco123 1 Employee user local database -
ユーザ クレデンシャルの取得順を指定します。
GUI から、[Security] > [Local EAP] > [Authentication Priority] を選択します。次に、[LDAP]を選択し、[<]ボタンをクリックして[Apply]をクリックします。これにより、まずユーザ クレデンシャルがローカル データベースに置かれます。
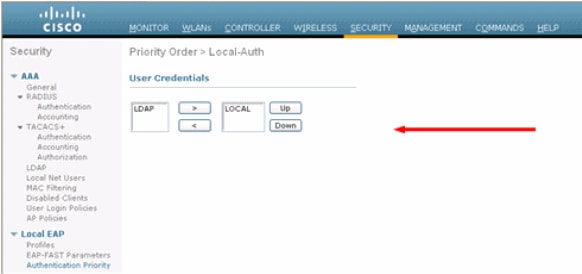
CLI から、
(Cisco Controller) >config local-auth user-credentials local
-
EAP プロファイルを追加します。
これを GUI から行うには、[Security] > [Local EAP] > [Profiles] を選択して、[New] をクリックします。新しいウィンドウが表示されたら、[Profile Name] を入力して、[Apply] をクリックします。
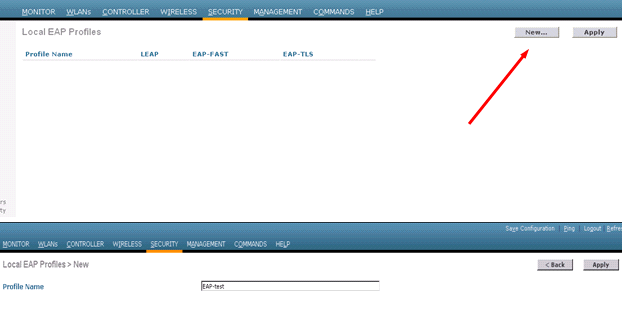
これは、CLI コマンド config local-auth eap-profile add <profile-name> を使用して行うこともできます。 この例では、プロファイル名は EAP-test です。
(Cisco Controller) >config local-auth eap-profile add EAP-test -
方式を EAP プロファイルに追加します。
GUI から、[Security] > [Local EAP] > [Profiles] を選択して、認証方式を追加するプロファイル名をクリックします。この例では、LEAP、EAP-FAST および EAP-TLS を使用します。[Apply] をクリックして、方式を設定します。
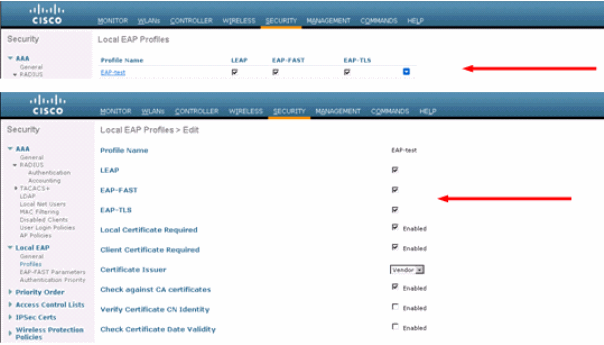
CLIコマンドconfig local-auth eap-profile method add <method-name> <profile-name>を使用できます。この設定例では、3 つの方式をプロファイル EAP-test に追加します。追加する方式は、LEAP、EAP-FAST および EAP-TLS で、名前はそれぞれ leap、fast および tls です。次に、CLI コンフィギュレーション コマンドの出力を示します。
(Cisco Controller) >config local-auth eap-profile method add leap EAP-test
(Cisco Controller) >config local-auth eap-profile method add fast EAP-test
(Cisco Controller) >config local-auth eap-profile method add tls EAP-test
-
EAP 方式のパラメータを設定します。これは、EAP-FAST だけで使用されます。設定するパラメータは次のとおりです。
-
[Server Key (server-key)]:Protected Access Credential(PAC)(16 進数)を暗号化/復号化するサーバ キー。
-
[Time to Live for PAC (pac-ttl)]:PAC の存続可能時間を設定します。
-
[Authority ID (authority-id)]:任意 ID を設定します。
-
[Annonymous Provision (anon-provn)]:匿名プロビジョニングを許可するかどうかを設定します。このコマンドはデフォルトで有効になっています。
GUI から設定する場合、[Security] > [Local EAP] > [EAP-FAST Parameters] を選択して、[Server key]、[Time to live for the PAC]、[authority ID (in hex)] および [Authority ID Information] の値を入力します。
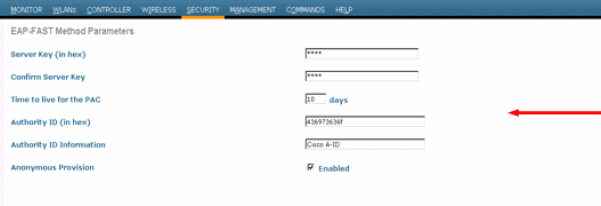
次に、これらの EAP-FAST のパラメータを設定するときに使用する CLI コンフィギュレーション コマンドを示します。
(Cisco Controller) >config local-auth method fast server-key 12345678
(Cisco Controller) >config local-auth method fast authority-id 43697369f1 CiscoA-ID
(Cisco Controller) >config local-auth method fast pac-ttl 10
-
-
WLAN でのローカル認証を有効にします。
GUI から、トップ メニューの [WLANs] を選択し、ローカル認証を設定する WLAN を選択します。新しいウィンドウが表示されます。[Security] > [AAA] タブをクリックします。[Local EAP authentication] チェックボックスをオンにして、この例に示すように、プルダウン メニューから正しい EAP プロファイル名を選択します。
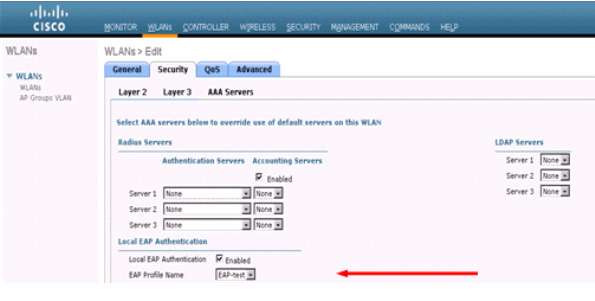
また、次に示すように、CLI config wlan local-auth enable <profile-name> <wlan-id>設定コマンドを発行することもできます。
(Cisco Controller) >config wlan local-auth enable EAP-test 1
-
[Layer 2 Security] パラメータを設定します。
GUI インターフェイスから、[WLAN Edit] ウィンドウで、[Security] > [Layer 2] タブに移動して、[Layer 2 Security] プルダウン メニューから [WPA+WPA2] を選択します。[WPA+WPA2 Parameters] セクションで、[WPA Encryption] を [TKIP]、[WPA2 Encryption] を [AES] に設定します。次に [Apply] をクリックします。
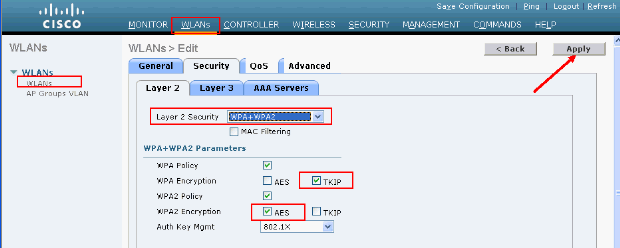
CLI から、次のコマンドを使用します。
(Cisco Controller) >config wlan security wpa enable 1
(Cisco Controller) >config wlan security wpa wpa1 ciphers tkip enable 1
(Cisco Controller) >config wlan security wpa wpa2 ciphers aes enable 1
-
設定を確認します。
(Cisco Controller) >show local-auth config

User credentials database search order:
    Primary ..................................... Local DB

Timer:
    Active timeout .............................. Undefined

Configured EAP profiles:
    Name ........................................ EAP-test
      Certificate issuer ........................ cisco
      Peer verification options:
        Check against CA certificates ........... Enabled
        Verify certificate CN identity .......... Disabled
        Check certificate date validity ......... Enabled
      EAP-FAST configuration:
        Local certificate required .............. No
        Client certificate required ............. No
      Enabled methods ........................... leap fast tls
      Configured on WLANs ....................... 1

EAP Method configuration:
    EAP-FAST:
--More-- or (q)uit
      Server key ................................ <hidden>
      TTL for the PAC ........................... 10
      Anonymous provision allowed ............... Yes
      Authority ID .............................. 43697369f10000000000000000000
      Authority Information ..................... CiscoA-ID
wlan 1の特定のパラメータは、show wlan <wlan id>コマンドで確認できます。
(Cisco Controller) >show wlan 1


WLAN Identifier.................................. 1
Profile Name..................................... austinlab
Network Name (SSID).............................. austinlab
Status........................................... Disabled
MAC Filtering.................................... Disabled
Broadcast SSID................................... Enabled
AAA Policy Override.............................. Disabled
Number of Active Clients......................... 0
Exclusionlist Timeout............................ 60 seconds
Session Timeout.................................. 1800 seconds
Interface........................................ management
WLAN ACL......................................... unconfigured
DHCP Server...................................... Default
DHCP Address Assignment Required................. Disabled
Quality of Service............................... Silver (best effort)
WMM.............................................. Disabled
CCX - AironetIe Support.......................... Enabled
CCX - Gratuitous ProbeResponse (GPR)............. Disabled
Dot11-Phone Mode (7920).......................... Disabled
Wired Protocol................................... None
--More-- or (q)uit
IPv6 Support..................................... Disabled
Radio Policy..................................... All
Local EAP Authentication......................... Enabled (Profile 'EAP-test')
Security

   802.11 Authentication:........................ Open System
   Static WEP Keys............................... Disabled
   802.1X........................................ Disabled
   Wi-Fi Protected Access (WPA/WPA2)............. Enabled
      WPA (SSN IE)............................... Enabled
         TKIP Cipher............................. Enabled
         AES Cipher.............................. Disabled
      WPA2 (RSN IE).............................. Enabled
         TKIP Cipher............................. Disabled
         AES Cipher.............................. Enabled
                                                            Auth Key Management
         802.1x.................................. Enabled
         PSK..................................... Disabled
         CCKM.................................... Disabled
   CKIP ......................................... Disabled
   IP Security................................... Disabled
   IP Security Passthru.......................... Disabled
   Web Based Authentication...................... Disabled
--More-- or (q)uit
   Web-Passthrough............................... Disabled
   Conditional Web Redirect...................... Disabled
   Auto Anchor................................... Disabled
   Cranite Passthru.............................. Disabled
   Fortress Passthru............................. Disabled
   H-REAP Local Switching........................ Disabled
   Infrastructure MFP protection................. Enabled
                                          (Global Infrastructure MFP Disabled)
   Client MFP.................................... Optional
   Tkip MIC Countermeasure Hold-down Timer....... 60

 Mobility Anchor List
 WLAN ID     IP Address       Status
アクティブ タイムアウト タイマーなど、その他のローカル認証パラメータを設定できます。このタイマーは、すべての RADIUS サーバで障害が発生した後でローカル EAP が使用される期間を設定します。
GUI から、[Security] > [Local EAP] > [General] を選択して、時間値を設定します。次に [Apply] をクリックします。
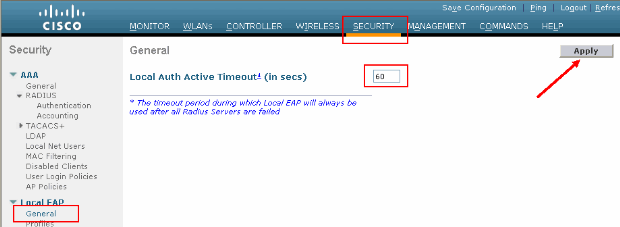
CLI から、次のコマンドを実行します。
(Cisco Controller) >config local-auth active-timeout ?
<1 to 3600> Enter the timeout period for the Local EAP to remain active,
in seconds.
(Cisco Controller) >config local-auth active-timeout 60
show local-auth config コマンドを実行すると、このタイマーが設定されている値を確認できます。
(Cisco Controller) >show local-auth config User credentials database search order: Primary ..................................... Local DB Timer: Active timeout .............................. 60 Configured EAP profiles: Name ........................................ EAP-test ... Skip -
手動 PAC を生成およびロードする必要がある場合、GUI または CLI のいずれかを使用できます。
GUI から、トップ メニューから [COMMANDS] を選択して、右側のリストから [Upload File] を選択します。[File Type] プルダウン メニューから [PAC (Protected Access Credential)] を選択します。すべてのパラメータを入力して、[Upload] をクリックします。
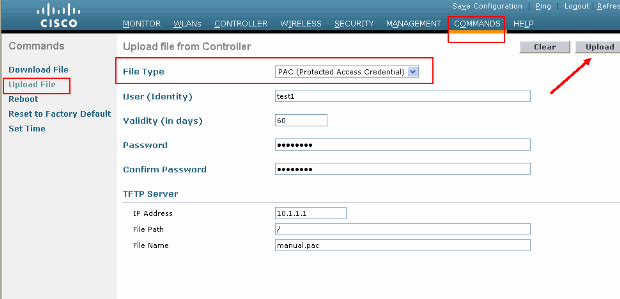
CLI から、次のコマンドを入力します。
(Cisco Controller) >transfer upload datatype pac
(Cisco Controller) >transfer upload pac ?

username     Enter the user (identity) of the PAC

 (Cisco Controller) >transfer upload pac test1 ?

<validity>     Enter the PAC validity period (days)

(Cisco Controller) >transfer upload pac test1 60 ?

<password>     Enter a password to protect the PAC

 (Cisco Controller) >transfer upload pac test1 60 cisco123

(Cisco Controller) >transfer upload serverip 10.1.1.1

(Cisco Controller) >transfer upload filename manual.pac

(Cisco Controller) >transfer upload start

Mode............................................. TFTP
TFTP Server IP................................... 10.1.1.1
TFTP Path........................................ /
TFTP Filename.................................... manual.pac
Data Type........................................ PAC
PAC User......................................... test1
PAC Validity..................................... 60 days
PAC Password..................................... cisco123

Are you sure you want to start? (y/N) y
PAC transfer starting.
File transfer operation completed successfully.
Microsoft Certification Authority
EAP-FAST バージョン 2 および EAP-TLS 認証を使用するには、WLC およびすべてのクライアント デバイスが、有効な証明書を使用し、Certification Authority のパブリック証明書を認識する必要があります。
設置
Windows 2000 サーバに Certification Authority サービスがインストールされていない場合はインストールする必要があります。
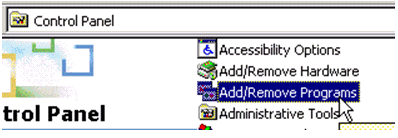
Windows 2000 サーバで Microsoft Certification Authority をアクティブにするには、次の手順を実行します。
-
コントロール パネルから、[Add/Remove Programs] を選択します。:
-
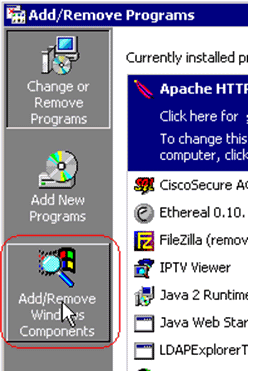
左側の [Add/Remove Windows Components] を選択します。
-
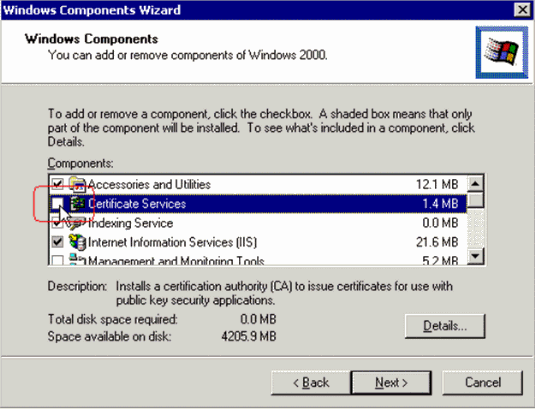
[Certificate Services] チェックボックスをオンにします。
次の警告を確認して、次に進みます。

-
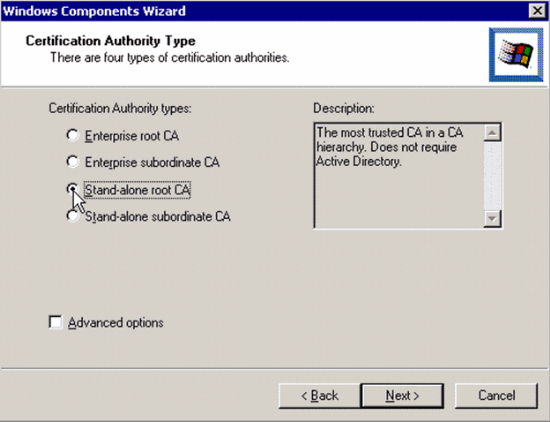
インストールする Certification Authority のタイプを選択します。簡単なスタンドアロン認証局を作成するには、[Stand-alone root CA] を選択します。
-
Certification Authority についての必要な情報を入力します。この情報は、Certification Authority の自己署名証明書を作成します。使用する CA 名を覚えておきます。
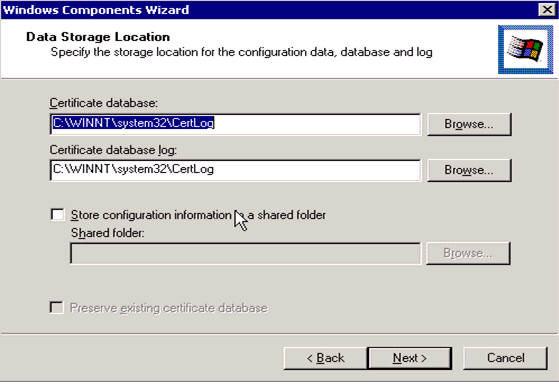
Certification Authority は、証明書をデータベースに保存します。この例では、Microsoft により推奨されるデフォルト設定を使用します。
-
Microsoft Certification Authority サービスは、IIS Microsoft Web サーバを使用して、クライアントおよびサーバ証明書を作成および管理します。この場合、IIS サービスを再起動する必要があります。

Microsoft Windows 2000 サーバにより、新しいサービスがインストールされます。新しい Windows コンポーネントをインストールするには、Windows 2000 サーバ インストール CD が必要です。
Certification Authority がインストールされます。
Cisco Wireless LAN Controller での証明書のインストール
Cisco Wireless LAN コントローラのローカル EAP サーバで EAP-FAST バージョン 2 および EAP-TLS を使用するには、次の 3 つの手順を実行する必要があります。
このドキュメントの例では、Access Control Server(ACS)が Microsoft Active Directory および Microsoft Certification Authority と同じホストにインストールされていますが、ACS サーバが別のサーバにある場合でも設定は同じでなければなりません。
Wireless LAN Controller でのデバイス証明書のインストール
次のステップを実行します。
-
.証明書を生成して WLC にインポートするには、次の手順を実行します。
-
http://<serverIpAddr>/certsrv に移動します。
-
[Request a Certificate] を選択して、[Next] をクリックします。
-
[Advanced Request] を選択して、[Next] をクリックします。
-
[Submit a certificate request to this CA using a form] を選択してから [Next] をクリックします。
-
Certificate Template の [Web server] を選択して、関連する情報を入力します。次に、キーに exportable というマークを付けます。
-
マシンにインストールする必要がある証明書を受け取ります。
-
-
証明書を PC から受け取るには、次の手順を実行します。
-
Internet Explorer ブラウザを開いて、[Tools] > [Internet Options] > [Content] を選択します。
-
[Certificates] をクリックします。
-
新しくインストールされた証明書をプルダウン メニューから選択します。
-
[Export] をクリックします。
-
[Next] を 2 回クリックして、[Yes export the private key] を選択します。このフォーマットは、PKCS#12(.PFX フォーマット)です。
-
[Enable strong protection] を選択します。
-
パスワードを入力します。
-
ファイル <tme2.pfx> に保存します。
-
-
Openssl がインストールされている任意のコンピュータに PKCS#12 フォーマットで証明書をコピーし、PEM フォーマットに変換します。
openssl pkcs12 -in tme2.pfx -out tme2.pem !--- The command to be given, -in. Enter Import Password: !--- Enter the password given previously, from step 2g. MAC verified OK Enter PEM pass phrase: !--- Enter a phrase. Verifying - Enter PEM pass phrase: -
変換後の PEM フォーマット デバイス証明書を WLC にダウンロードします。
(Cisco Controller) >transfer download datatype eapdevcert

(Cisco Controller) >transfer download certpassword password

!--- From step 3.

Setting password to <cisco123>

(Cisco Controller) >transfer download filename tme2.pem

(Cisco Controller) >transfer download start

Mode............................................. TFTP
Data Type........................................ Vendor Dev Cert
TFTP Server IP................................... 10.1.1.12
TFTP Packet Timeout.............................. 6
TFTP Max Retries................................. 10
TFTP Path........................................ /
TFTP Filename.................................... tme2.pem

This may take some time.
Are you sure you want to start? (y/N) y

TFTP EAP Dev cert transfer starting.

Certificate installed.
  Reboot the switch to use new certificate.
-
再起動したら、証明書を確認します。
(Cisco Controller) >show local-auth certificates

Certificates available for Local EAP authentication:

Certificate issuer .............................. vendor
  CA certificate:
    Subject: C=US, ST=ca, L=san jose, O=cisco, OU=wnbu, CN=tme
     Issuer: C=US, ST=ca, L=san jose, O=cisco, OU=wnbu, CN=tme
      Valid: 2007 Feb 28th, 19:35:21 GMT to 2012 Feb 28th, 19:44:44 GMT
  Device certificate:
    Subject: C=US, ST=ca, L=san jose, O=cisco, OU=wnbu, CN=tme2
     Issuer: C=US, ST=ca, L=san jose, O=cisco, OU=wnbu, CN=tme
      Valid: 2007 Mar 28th, 23:08:39 GMT to 2009 Mar 27th, 23:08:39 GMT
Wireless LAN Controller へのベンダー CA 証明書のダウンロード
次のステップを実行します。
-
ベンダー CA 証明書を取得するには、次の手順を実行します。
-
http://<serverIpAddr>/certsrv に移動します。
-
[Retrieve the CA Certificate] を選択して、[Next] をクリックします。
-
[CA Certificate] を選択します。
-
[DER encoded] をクリックします。
-
[Download CA certificate] をクリックして、証明書を rootca.cer として保存します。
-
-
openssl x509 -in rootca.cer -inform DER -out rootca.pem -outform PEM コマンドを使用して、DER フォーマットから PEM フォーマットにベンダー CA を変換します。
出力ファイルは、PEM フォーマットの rootca.pem です。
-
ベンダー CA 証明書をダウンロードします。
(Cisco Controller) >transfer download datatype eapcacert

(Cisco Controller) >transfer download filename ?

<filename>     Enter filename up to 16 alphanumeric characters.

(Cisco Controller) >transfer download filename rootca.pem

(Cisco Controller) >transfer download start ?

(Cisco Controller) >transfer download start

Mode............................................. TFTP
Data Type........................................ Vendor CA Cert
TFTP Server IP................................... 10.1.1.12
TFTP Packet Timeout.............................. 6
TFTP Max Retries................................. 10
TFTP Path........................................ /
TFTP Filename.................................... rootca.pem

This may take some time.
Are you sure you want to start? (y/N) y

TFTP EAP CA cert transfer starting.

Certificate installed.
  Reboot the switch to use new certificate.
EAP-TLS を使用するための Wireless LAN Controller の設定
次のステップを実行します。
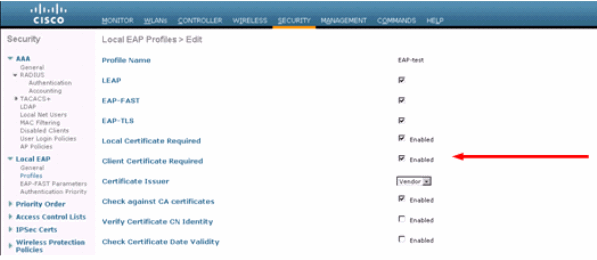
GUI から、[Security] > [Local EAP] > [Profiles] を選択し、プロファイルを選択して、次のように設定します。
-
[Local Certificate Required]:オン
-
[Client Certificate Required]:オン
-
[Certificate Issuer]:[Vendor]
-
[Check against CA certificates]:オン
クライアント デバイスへの認証局証明書のインストール
クライアント用ルート CA 証明書のダウンロードとインストール
クライアントは、ルート CA 証明書を Certification Authority サーバから取得する必要があります。クライアント証明書を取得して、Windows XP マシンにインストールする方法はいくつかあります。有効な証明書を取得するには、Windows XP ユーザは、そのユーザ ID を使用してログインし、ネットワーク接続を確立する必要があります。
Windows XP クライアントの Web ブラウザおよびネットワークの有線接続を使用して、プライベート ルート Certification Authority サーバからクライアント証明書を取得しました。この手順は Microsoft Certification Authority サーバからクライアント証明書を取得するために使用します。
-
クライアントの Web ブラウザを使用して、ブラウザで Certification Authority サーバを指定します。これを行うには、http://IP-address-of-Root-CA/certsrv と入力します。
-
Domain_Name\user_name を使用してログインします。XP クライアントを使用するユーザのユーザ名を使用してログインする必要があります。
-
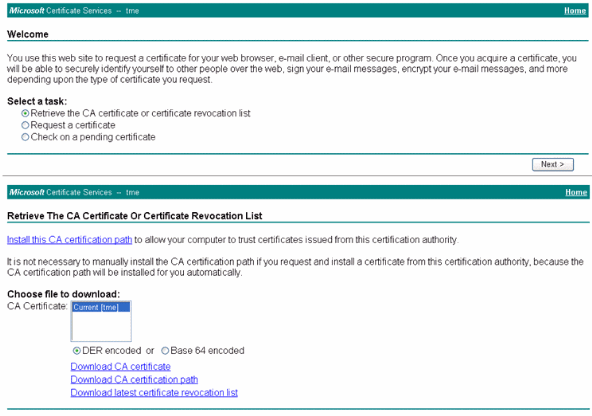
[Welcome] ウィンドウで、[Retrieve a CA certificate] を選択して、[Next] をクリックします。
-
[Base64 Encoding] および [Download CA certificate] を選択します。
-
[Certificate Issued] ウィンドウで、[Install this certificate] をクリックして、[Next] をクリックします。
-
[Automatically select the certificate store] を選択し、[Next] をクリックします。インポートの成功を示すメッセージが表示されます。
-
Certification Authority に接続して、Certificate Authority 証明書を取得します。
-
[Download CA certificate] をクリックします。
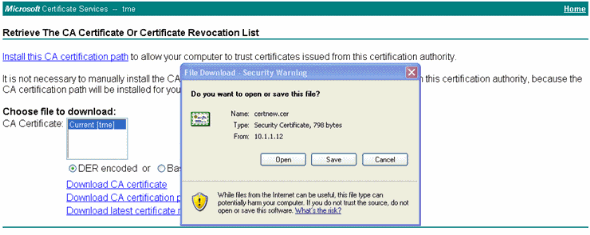
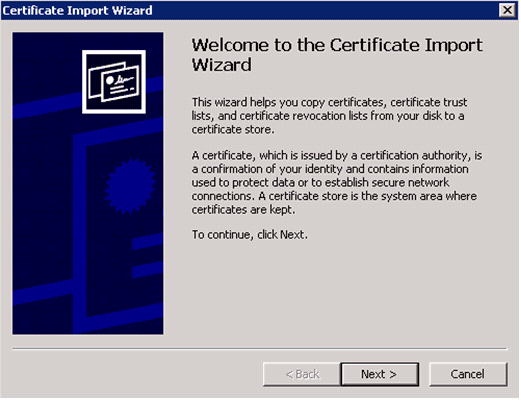
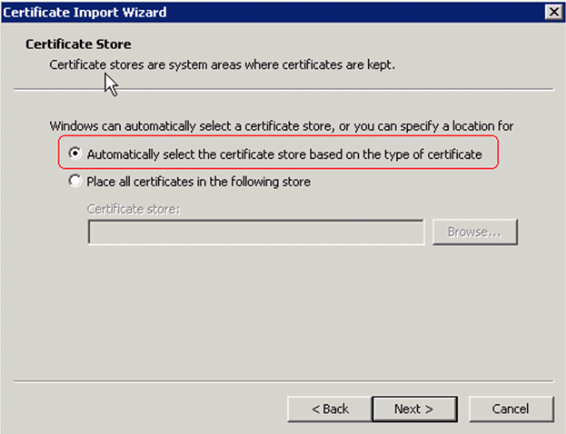
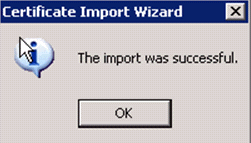
-
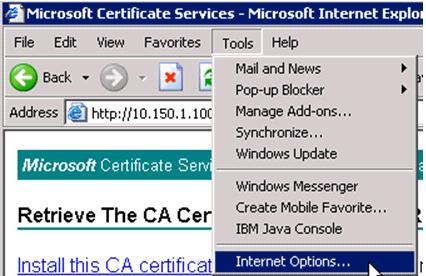
Certification Authority 証明書が正しくインストールされているか確認するには、Internet Explorer を開き、[Tools] > [Internet Options] > [Content] > [Certificates] を選択します。
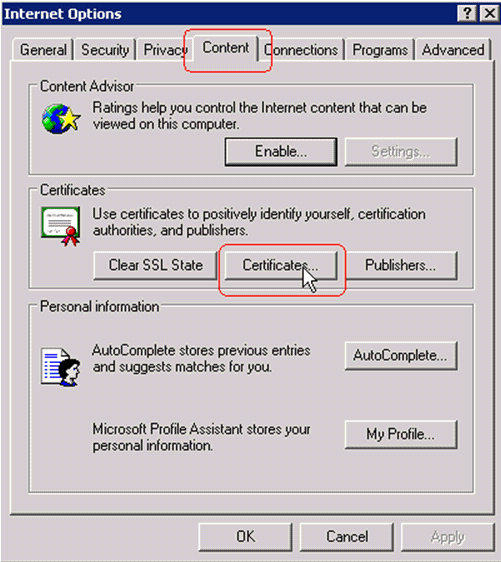
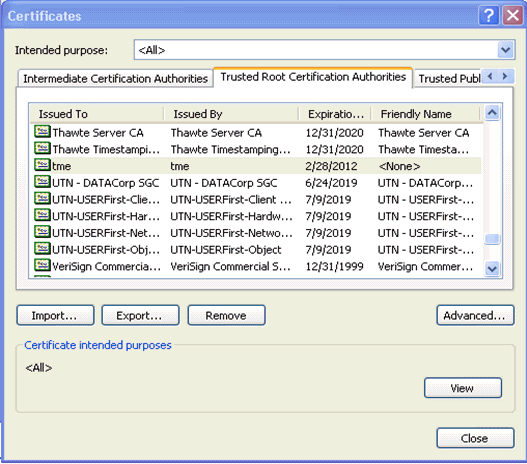
[Trusted Root Certification Authority] に、新しくインストールした Certification Authority が表示されます。
クライアント デバイス用のクライアント証明書の生成
クライアントは、WLC で WLAN EAP-TLS クライアントを認証するために、Certification Authority サーバから証明書を取得する必要があります。クライアント証明書を取得して、Windows XP マシンにインストールする方法はいくつかあります。有効な証明書を取得するには、Windows XP ユーザは、そのユーザ ID を使用してログインし、ネットワーク接続(優先接続または 802.1x セキュリティを無効にした WLAN 接続のいずれか)を確立する必要があります。
Windows XP クライアントの Web ブラウザおよびネットワークの有線接続を使用して、プライベート ルート Certification Authority サーバからクライアント証明書を取得しました。この手順は Microsoft Certification Authority サーバからクライアント証明書を取得するために使用します。
-
クライアントの Web ブラウザを使用して、ブラウザで Certification Authority サーバを指定します。これを行うには、http://IP-address-of-Root-CA/certsrv と入力します。
-
Domain_Name\user_name を使用してログインします。XP クライアントを使用するユーザのユーザ名を使用してログインする必要があります(ユーザ名は、クライアント証明書に組み込まれます)。
-
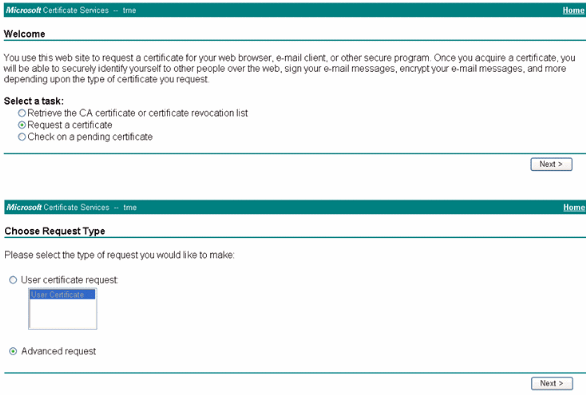
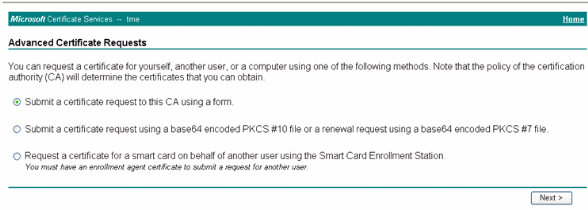
[Welcome] ウィンドウで、[Request a certificate] を選択して、[Next] をクリックします。
-
[Advanced Request] を選択して、[Next] をクリックします。
-
[Submit a certificate request to this CA using a form] を選択してから [Next] をクリックします。
-
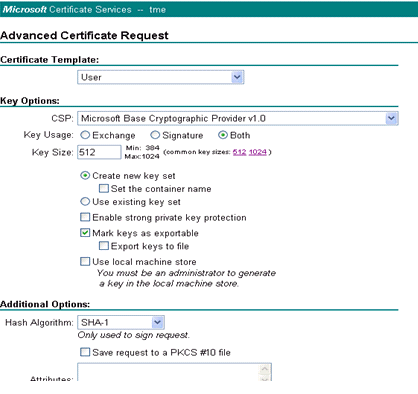
[Advanced Certificate Request] フォームで、[Certificate Template] の [User] を選択し、[Key Size] に [1024] を指定して、[Submit] をクリックします。
-
[Certificate Issued] ウィンドウで、[Install this certificate] をクリックします。これにより、クライアント証明書が Windows XP クライアントに正常にインストールされます。
-
[Client Authentication Certificate] を選択します。
クライアント証明書が作成されます。
-
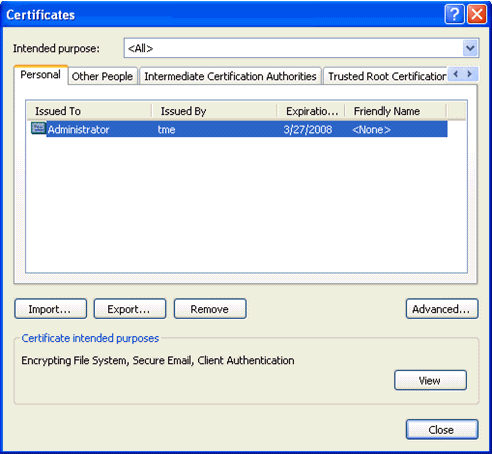
証明書がインストールされているか確認するには、Internet Explorer を開き、[Tools] > [Internet Options] > [Content] > [Certificates] を選択します。[Personal] タブに証明書が表示されます。
クライアント デバイス上での Cisco Secure Services Client による EAP-TLS の指定
次のステップを実行します。
-
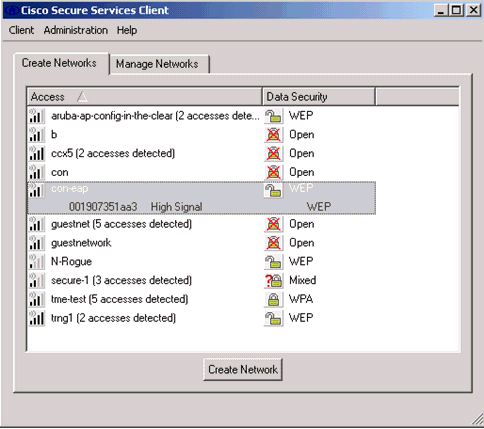
デフォルトでは WLC は SSID をブロードキャストするため、その SSID が、スキャンされた SSID の [Create Networks] リストに表示されます。Network Profile を作成するには、[Enterprise] リストの [SSID] をクリックし、[Create Network] をクリックします。
WLAN インフラストラクチャでブロードキャスト SSID が無効にされている場合、SSID を手動で追加する必要があります。これを行うには、[Access Devices] で [Add] をクリックして、適切な SSID(たとえば、Enterprise)を入力します。 クライアントのアクティブ プローブ動作を設定します。これで、クライアントがアクティブに設定済み SSID をプローブします。[Add Access Device] ウィンドウで [SSID] を入力したら、[Actively search for this access device] を指定します。
注:EAP認証設定がプロファイルに対して最初に設定されていない場合、ポート設定ではエンタープライズモード(802.1X)は許可されません。
-
[Create Network] オプション ボタンを押すと [Network Profile] ウィンドウが表示され、このウィンドウでは選択済み(または設定済み)の SSID を認証メカニズムとアソシエーションすることができます。プロファイルに説明的な名前を割り当てます。
注:この認証プロファイルでは、複数のWLANセキュリティタイプまたはSSIDを関連付けることができます。
-
認証を有効にして、EAP-TLS 方式を確認します。次に、[Configure] をクリックして、[EAP-TLS] プロパティを設定します。
-
[Network Configuration Summary] の下で [Modify] をクリックして EAP/クレデンシャルを設定します。
-
[Turn On Authentication] を指定し、[Protocol] で [EAP-TLS] を選択して、[Identity] で [Username] を選択します。
-
ネットワーク認証用のログオン クレデンシャルを使用するには、[Use Single Sign on Credentials] を指定します。[Configure] をクリックして EAP-TLS のパラメータを設定します。
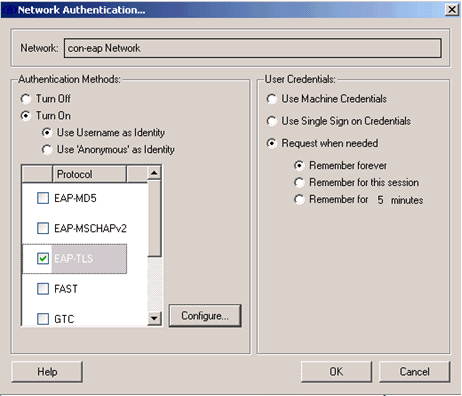
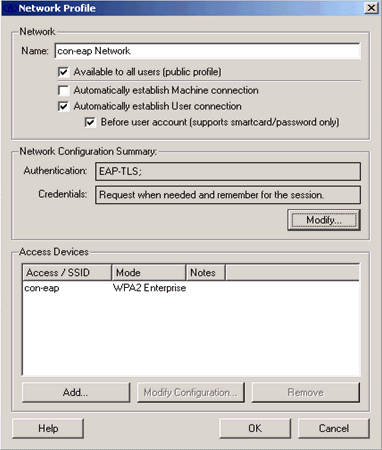
-
EAP-TLS を安全に設定するには、RADIUS サーバ証明書を確認する必要があります。これを行うには、[Validate Server Certificate] チェックボックスをオンにします。
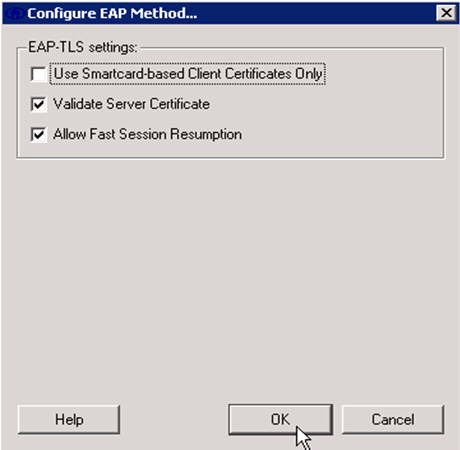
-
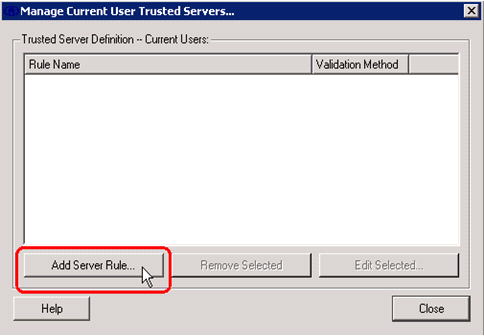
RADIUS サーバ証明書を検証するには、Cisco Secure Services Client 情報を提供して、正しい証明書だけを取得する必要があります。[Client] > [Trusted Servers] > [Manage Current User Trusted Servers] を選択します。
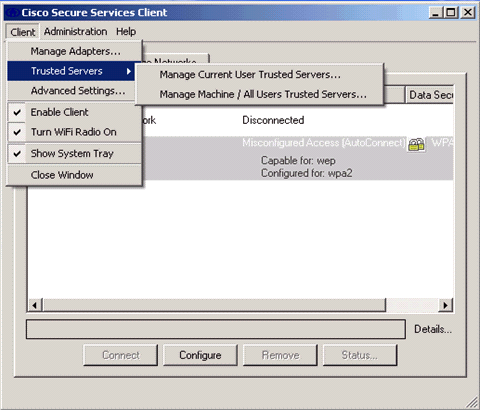
-
ルールに名前を付けて、サービス証明書の名前を確認します。
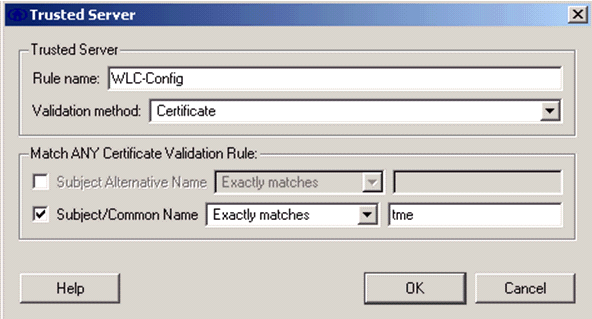
EAP-TLS 設定は終了です。
-
ワイヤレス ネットワーク プロファイルに接続します。Cisco Secure Services Client により、ユーザ ログインが求められます。
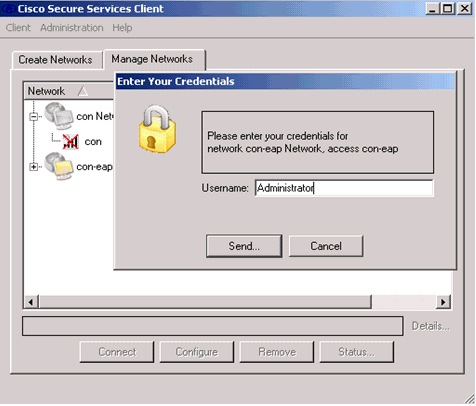
Cisco Secure Services Client は、サーバ証明書を受け取り、これを確認します(ルールが設定され、Certification Authority がインストールされている場合)。 ユーザに使用する証明書を求められます。
-
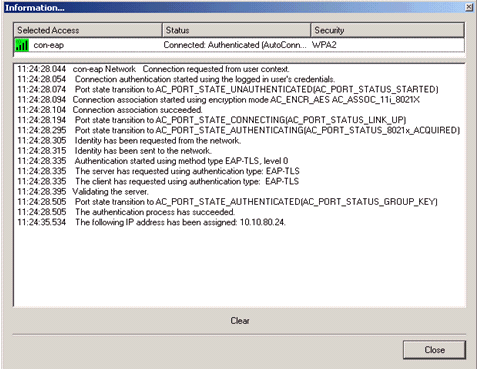
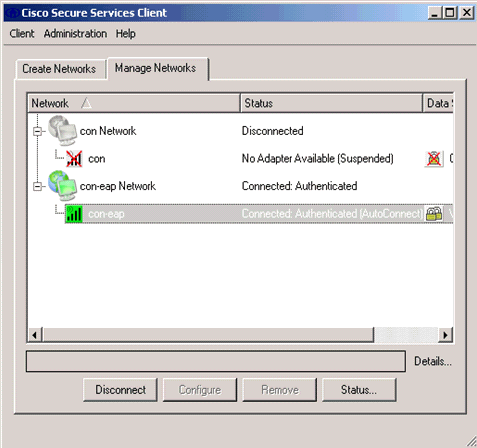
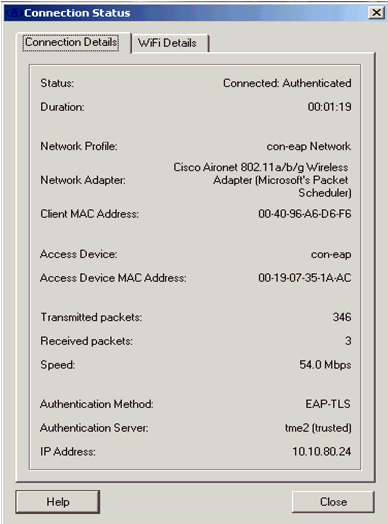
クライアントが認証を行った後、接続の詳細情報を照会するには、[Manage Networks] タブの [Profile] の下で [SSID] を選択し、[Status] をクリックします。
[Connection Details] ウィンドウには、クライアント デバイス、接続の状態と統計、および認証方式に関する情報が表示されます。[WiFi Details] タブには、802.11 の接続状態に関する詳細情報が表示されますが、これには RSSI、802.11 チャネル、および認証/暗号化が含まれます。
デバッグ コマンド
アウトプット インタープリタ ツール(登録ユーザ専用)(OIT)は、特定の show コマンドをサポートします。OIT を使用して、show コマンドの出力の分析を表示します。
注:debug コマンドを使用する前に、『debug コマンドの重要な情報』を参照してください。
認証交換の進行状況を監視するために、WLC では次の debug コマンドが使用できます。
-
debug aaa events enable
-
debug aaa detail enable
-
debug dot1x events enable
-
debug dot1x states enable
-
debug aaa local-auth eap events enable
または
-
debug aaa all enable
関連情報
更新履歴
| 改定 | 発行日 | コメント |
|---|---|---|
1.0 |
01-Dec-2013 |
初版 |
 フィードバック