Active Directory の使用
パッシブ ID サービス 用の Active Directoryプローブを設定する前に、次のことを確認します。
-
Microsoft Active Directory サーバがネットワーク アドレス トランスレータの背後にないこと、およびネットワーク アドレス変換(NAT)アドレスを持たないこと。
-
参加操作用の Microsoft Active Directory アカウントが有効であり、[次回ログイン時にパスワードを変更(Change Password on Next Login)] を使用して設定されていないこと。
-
DNS サーバを適切に設定していることを確認します。これには、ISE-PIC からのクライアント マシンの逆引きの設定も含まれます。詳細については、DNS サーバを参照してください。
-
NTP サーバのクロック設定を同期します。詳細については、システム時刻と NTP サーバ設定の指定を参照してください。
 (注) |
Cisco ISE-PICが Active Directory に接続されているときに操作に関する問題がある場合は、[レポート(Reports)] の下にある [AD コネクタ操作レポート(AD Connector Operations Report )] を参照してください。詳細については、使用可能なレポートを参照してください。 |
PassiveID セットアップの使用を開始する
始める前に
-
Microsoft Active Directory サーバがネットワーク アドレス トランスレータの背後にないこと、およびネットワーク アドレス変換(NAT)アドレスを持たないことを確認します。
-
参加操作用の Microsoft Active Directory アカウントが有効であり、[次回ログイン時にパスワードを変更(Change Password on Next Login)] を使用して設定されていないことを確認します。
-
ISE-PIC のエントリがドメイン ネーム サーバ(DNS)にあることを確認します。ISE-PIC からのクライアント マシンの逆引き参照を適切に設定していることを確認します。詳細については、DNS サーバを参照してください。
手順
| ステップ 1 |
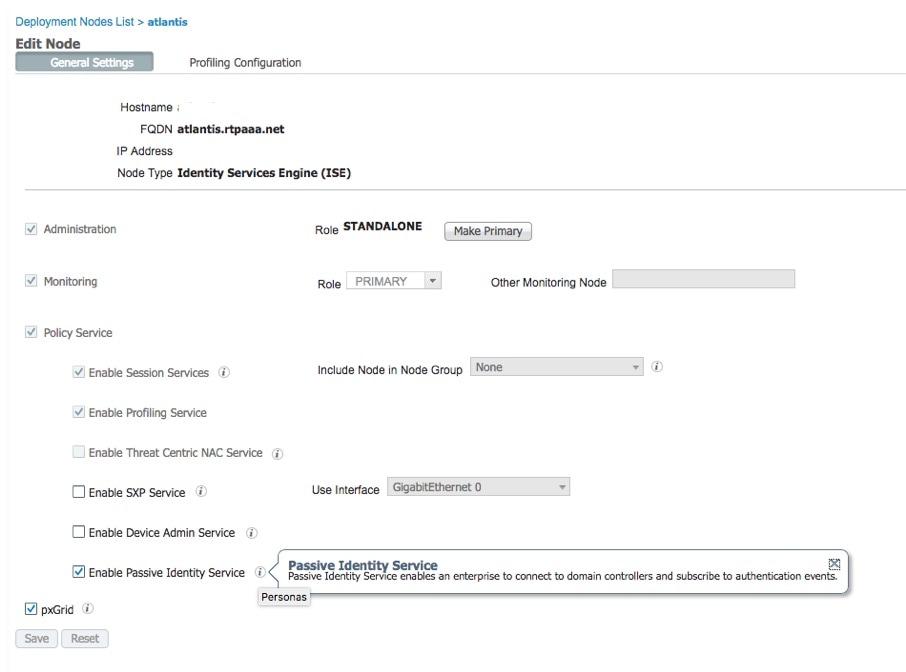
を選択します。[パッシブ ID コネクタの概要(Passive Identity Connector Overview)] 画面で [パッシブ ID ウィザード(Passive Identity Wizard)] をクリックします。 [PassiveID セットアップ(PassiveID Setup)] が表示されます。  |
| ステップ 2 |
[次へ(Next)] をクリックしてウィザードを開始します。 |
| ステップ 3 |
[Active Directory] ステップで、設定されているこの Active Directory 参加ポイントを容易に区別できる一意の名前を [参加ポイント名(Join Point Name)] に入力し、Active Directory ドメインから、このノードが接続している Active Directory ドメインのドメイン名を入力し、Active Directory 管理者ユーザの名前とパスワードを入力します。Active Directory のこの設定とその他の設定の詳細については、Active Directory の設定を参照してください。 |
| ステップ 4 |
[次へ(Next)] をクリックし、Active Directory グループを定義し、追加してモニタするユーザ グループをすべてオンにします。 |
| ステップ 5 |
[次へ(Next)] を再度クリックして、[ドメイン コントローラ(Domain Controllers)] ステップに進みます。[ドメイン コントローラ(Domain Controllers)] ステップから、モニタ対象 DC を選択します。[カスタム(Custom)] を選択した場合は、次の画面でモニタする特定の DC を選択します。完了したら、[次へ(Next)] をクリックします。 |
| ステップ 6 |
[終了(Exit)] をクリックして、ウィザードを終了します。 |
次のタスク
最初のプロバイダーとして Active Directory の設定を完了したら、追加のプロバイダー タイプも容易に設定できます。詳細については、を参照してくださいプロバイダー。さらに、定義したいずれかのプロバイダーが収集したユーザ ID 情報を受信するためのサブスクライバも設定できるようになりました。詳細については、サブスクライバを参照してください。
Active Directory(WMI)プローブの段階的なセットアップ
パッシブ ID サービス に Active Directory とWMI を設定するには、PassiveID セットアップの使用を開始するを使用するか、この章の次の手順を実行します。
-
Active Directory プローブを設定します。Active Directory 参加ポイントの追加および参加ポイントへの Cisco ISE-PIC ノードの参加を参照してください。
-
AD ログイン イベントを受信する 1 つ以上の WMI 設定ノードの Active Directory ドメイン コントローラのリストを作成します。ドメイン コントローラの追加を参照してください。
-
Active Directory を ISE-PIC と統合するため Active Directory を設定します。パッシブ ID 用の WMI の設定を参照してください。
-
(オプション)Active Directory プロバイダーの管理。
Active Directory 参加ポイントの追加および参加ポイントへの Cisco ISE-PIC ノードの参加
始める前に
Cisco ISE-PIC ノードが、NTP サーバ、DNS サーバ、ドメインコントローラ、グローバルカタログサーバが配置されているネットワークと通信できることを確認します。
Active Directory と、エージェント、syslog、SPAN、およびエンドポイントの各プローブを使用するには、参加ポイントを作成する必要があります。
Active Directory と統合する際に IPv6 を使用する場合は、関連する ISE-PIC ノードで IPv6 アドレスが設定されていることを確認する必要があります。
手順
| ステップ 1 |
ISE-PIC GUI で [メニュー(Menu)] アイコン( |
||||||
| ステップ 2 |
[追加(Add)] をクリックして、Active Directory 参加ポイント名設定のドメイン名と ID ストア名を入力します。詳細については、表 1を参照してください。 |
||||||
| ステップ 3 |
[送信(Submit)] をクリックします。 新しく作成された参加ポイントをドメインに参加させるかどうかを確認するポップアップ ウィンドウが表示されます。すぐに参加させる場合は [はい(Yes)] をクリックします。 [いいえ(No)] をクリックした場合、設定を保存すると、Active Directory ドメインの設定がグローバルに保存されますが、いずれの Cisco ISE-PIC ノードもまだドメインに参加しません。 |
||||||
| ステップ 4 |
作成した新しい Active Directory 参加ポイントの横にあるチェックボックスをオンにして [編集(Edit)] をクリックします。展開の参加/脱退テーブルに、すべての Cisco ISE-PIC ノード、ノードのロール、およびそのステータスが表示されます。詳細については、表 2を参照してください。 |
||||||
| ステップ 5 |
参加ポイントがステップ 3 の間にドメインに参加しなかった場合は、関連する Cisco ISE-PIC ノードの横にあるチェックボックスをオンにし、[参加(Join)] をクリックして Active Directory ドメインに Cisco ISE-PIC ノードを参加させます。 設定を保存した場合も、これを明示的に実行する必要があります。1 回の操作で複数の Cisco ISE-PIC ノードをドメインに参加させるには、使用するアカウントのユーザ名とパスワードがすべての参加操作で同じである必要があります。各 Cisco ISE-PIC ノードを追加するために異なるユーザ名とパスワードが必要な場合は、Cisco ISE-PIC ノードごとに参加操作を個別に実行する必要があります。 |
||||||
| ステップ 6 |
表示される [ドメインへの参加(Join Domain)] ダイアログボックスで Active Directory のユーザ名とパスワードを入力します。 参加操作に使用するユーザは、ドメイン自体に存在する必要があります。ユーザが異なるドメインまたはサブドメインに存在する場合、ユーザ名は jdoe@acme.com のように、UPN 表記で表記する必要があります。 |
||||||
| ステップ 7 |
(任意) [組織ユニットの指定(Specify Organizational Unit)] チェックボックスをオンにします。 このチェックボックスは、Cisco ISE-PIC ノードのマシンアカウントを CN=Computers,DC=someDomain,DC=someTLD 以外の特定の組織ユニットに配置する場合に、オンにする必要があります。Cisco ISE-PIC は、指定された組織ユニットの下にマシン アカウントを作成するか、またはマシン アカウントがすでにある場合は、この場所に移動します。組織ユニットが指定されない場合、Cisco ISE-PIC はデフォルトの場所を使用します。値は完全識別名(DN)形式で指定する必要があります。構文は、Microsoft のガイドラインに準拠する必要があります。特別な予約文字(/'+,;=<> など)、改行、スペース、およびキャリッジ リターンは、バックスラッシュ(\)によってエスケープする必要があります。たとえば、OU=Cisco ISE\,US,OU=IT Servers,OU=Servers\ や Workstations,DC=someDomain,DC=someTLD のようにします。マシン アカウントがすでに作成されている場合、このチェックボックスをオンにする必要はありません。Active Directory ドメインに参加したマシン アカウントのロケーションを後で変更することもできます。 |
||||||
| ステップ 8 |
[OK] をクリックします。 Active Directory ドメインに参加する複数のノードを選択できます。 参加操作に失敗した場合、失敗メッセージが表示されます。各ノードの失敗メッセージをクリックして、そのノードの詳細なログを表示します。
|
次のタスク
ドメイン コントローラの追加
手順
| ステップ 1 |
ISE-PIC GUI で [メニュー(Menu)] アイコン( |
||
| ステップ 2 |
作成した Active Directory 参加ポイントの隣にあるチェックボックスをオンにし、[編集(Edit)] をクリックします。展開の参加/脱退テーブルが、すべての Cisco ISE-PIC ノード、ノードのロール、およびそのステータスとともに表示されます。 |
||
| ステップ 3 |
[PassiveID] タブに移動し、[DC の追加(Add DCs)] をクリックします。
|
||
| ステップ 4 |
モニタ対象として参加ポイントに追加するドメイン コントローラの隣にあるチェックボックスをオンにし、[OK] をクリックします。 |
||
| ステップ 5 |
ドメイン コントローラを設定します。
|
DC フェールオーバー メカニズムは DC 優先順位リストに基づいて管理されます。このリストは、フェールオーバーの発生時に DC が選択される順序を決定します。ある DC がオフラインであるか、何らかのエラーのため到達不能な場合には、優先順位リストにおける優先順位が下がります。DC がオンラインに戻ると、優先順位リストにおけるその優先順位が適宜調整されます(上がります)。
(注) |
Cisco ISE は、認証フローの読み取り専用ドメイン コントローラをサポートしていません。 |
Active Directory ユーザ グループの設定
Active Directory からユーザ ID 情報を収集するさまざまなプローブを使用する場合に、Active Directory ユーザ グループを使用できるようにするため、Active Directory ユーザ グループを設定します。内部的には、Cisco ISE はグループ名のあいまいさの問題を解決し、グループ マッピングを向上させるためにセキュリティ ID(SID)を使用します。SID により、グループ割り当てが正確に一致します。
手順
| ステップ 1 |
ISE-PIC GUI で [メニュー(Menu)] アイコン( |
||
| ステップ 2 |
[グループ(Groups)] タブをクリックします。 |
||
| ステップ 3 |
次のいずれかを実行します。
|
||
| ステップ 4 |
グループを手動で選択する場合は、フィルタを使用してグループを検索できます。たとえば、admin* をフィルタ基準として入力し、[グループの取得(Retrieve Groups)] をクリックすると、admin で始まるユーザ グループが表示されます。アスタリスク(*)ワイルドカード文字を入力して、結果をフィルタリングすることもできます。一度に取得できるのは 500 グループのみです。 |
||
| ステップ 5 |
許可ポリシーで使用可能にするグループの隣にあるチェックボックスをオンにし、[OK] をクリックします。 |
||
| ステップ 6 |
グループを手動で追加する場合は、新しいグループの名前と SID を入力します。 |
||
| ステップ 7 |
[OK] をクリックします。 |
||
| ステップ 8 |
[保存(Save)] をクリックします。
|
パッシブ ID 用の WMI の設定
始める前に
手順
| ステップ 1 |
ISE-PIC GUI で [メニュー(Menu)] アイコン( |
| ステップ 2 |
作成した Active Directory 参加ポイントの隣にあるチェックボックスをオンにし、[編集(Edit)] をクリックします。展開の参加/脱退テーブルが、すべての Cisco ISE-PIC ノード、ノードのロール、およびそのステータスとともに表示されます。 |
| ステップ 3 |
[パッシブ ID(Passive ID)] タブに移動し、該当するドメイン コントローラの隣にあるチェックボックスをオンにし、[WMI の設定(Config WMI)] をクリックして、選択したドメイン コントローラが ISE-PIC により自動的に設定されるようにします。 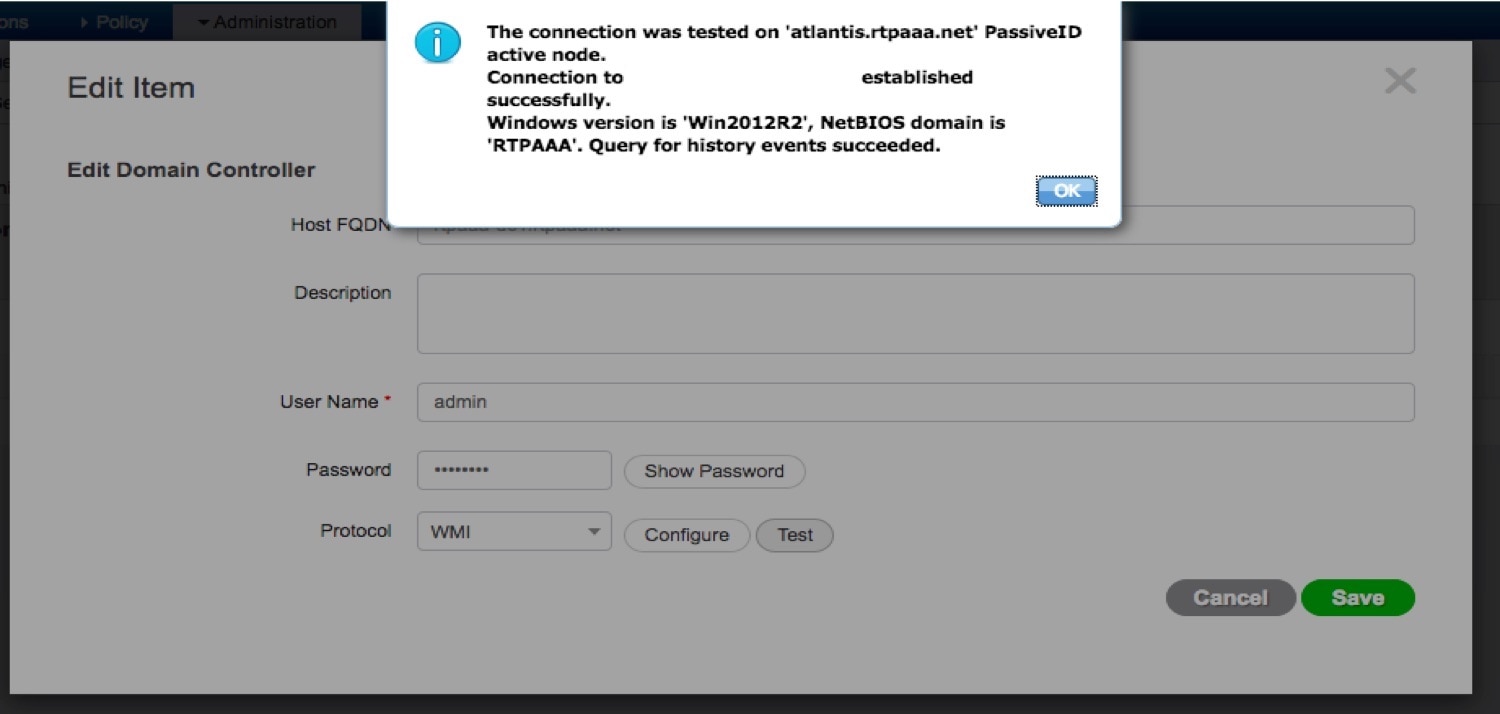
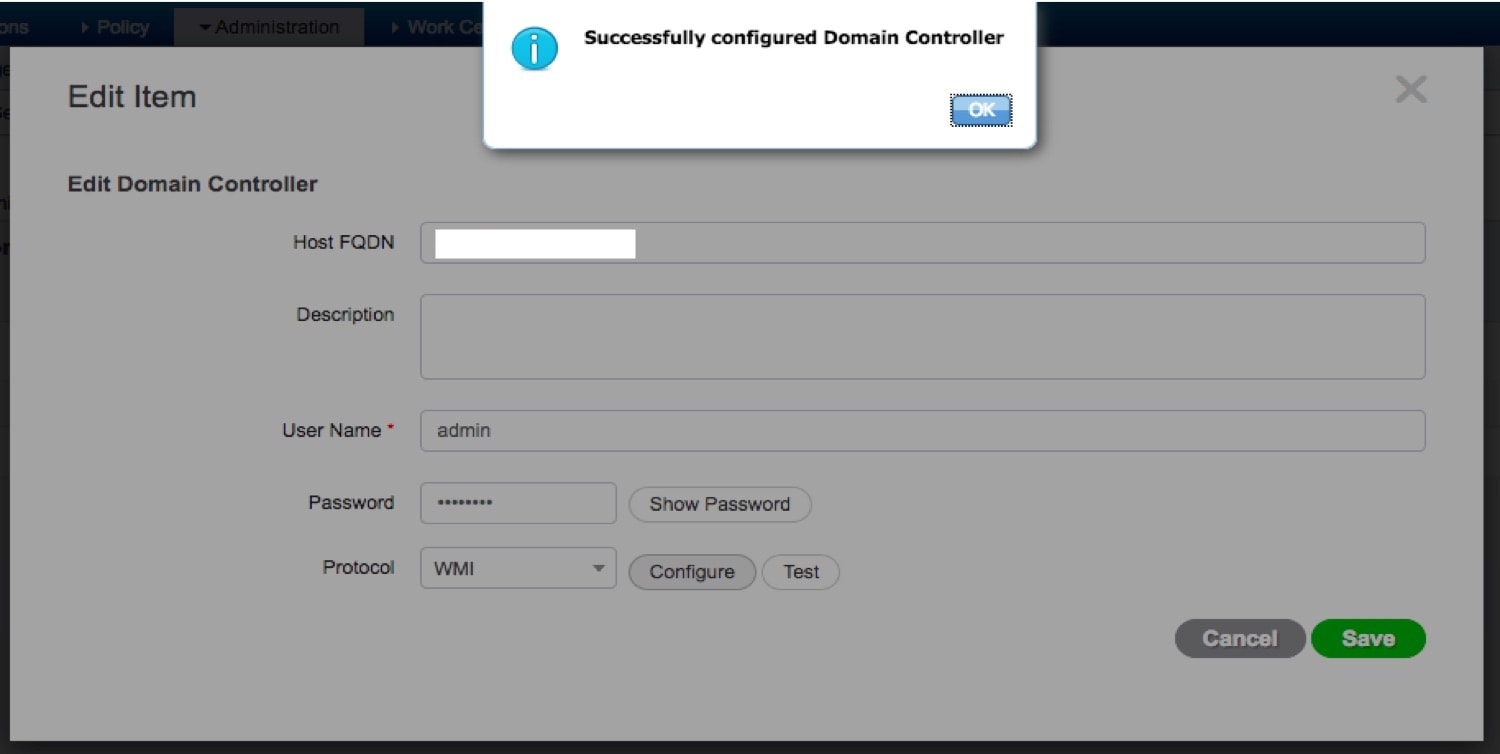
|
Active Directory プロバイダーの管理
Active Directory 参加ポイントの作成と設定が完了したら、次の作業を行い Active Directory プローブを管理します。
Active Directory グループのためのユーザのテスト
Active Directory からユーザ グループを検証するには、[ユーザのテスト(Test User)] ツールを使用できます。単一の参加ポイントまたはスコープのテストを実行できます。
手順
| ステップ 1 |
ISE-PIC GUI で [メニュー(Menu)] アイコン( |
| ステップ 2 |
次のいずれかのオプションを選択します。
|
| ステップ 3 |
Active Directory のユーザ(またはホスト)のユーザ名とパスワードを入力します。 |
| ステップ 4 |
認証タイプを選択します。ステップ 3 のパスワード入力は、ルックアップ オプションを選択する場合には必要ありません。 |
| ステップ 5 |
すべての参加ポイントに対してこのテストを実行する場合は、このテストを実行する Cisco ISE-PIC ノードを選択します。 |
| ステップ 6 |
Active Directory からグループを取得するには、[グループを取得(Retrieve Groups)] および [属性の取得(Retrieve Attributes)] チェック ボックスをオンにします。 |
| ステップ 7 |
[テスト(Test)] をクリックします。 また、Active Directory がそれぞれの処理手順を実行するのに要する時間(ミリ秒単位)を表示することもできます。操作にかかる時間がしきい値を超えると、Cisco ISE-PIC に警告メッセージが表示されます。 |
ノードの Active Directory の参加の表示
特定の Cisco ISE-PIC ノードのすべての Active Directory 参加ポイントのステータスまたはすべての Cisco ISE-PIC ノードのすべての参加ポイントのリストを表示するには、[Active Directory] ページの [ノード ビュー(Node View)] ボタンを使用できます。
手順
| ステップ 1 |
ISE-PIC GUI で [メニュー(Menu)] アイコン( |
| ステップ 2 |
[ノード ビュー(Node View)] をクリックします。 |
| ステップ 3 |
[ISE Node(ISE ノード)] ドロップダウン リストからノードを選択します。 |
| ステップ 4 |
その Active Directory 参加ポイントのページに移動し、その他の特定のアクションを実行するには、参加ポイントの [名前(Name)] リンクをクリックします。 |
| ステップ 5 |
[診断ツール(Diagnostic Tools)] ページに移動して特定の問題のトラブルシューティングを行うには、[診断概要(Diagnostic Summary)] 列のリンクをクリックします。診断ツールでは、ノードごとに各参加ポイントの最新の診断結果が表示されます。 |
Active Directory の問題の診断
診断ツールは、各 Cisco ISE-PIC ノードで実行されるサービスです。診断ツールを使用して、Active Directory 展開を自動的にテストおよび診断したり、Cisco ISE-PIC によって Active Directory が使用される場合に機能やパフォーマンスの障害の原因となる可能性がある問題を検出するための一連のテストを実行したりすることができます。
Cisco ISE-PIC が Active Directory に参加できない、または Active Directory に対して認証できない理由は、複数あります。このツールは、Cisco ISE-PIC を Active Directory に接続するための前提条件が正しく設定されていることを確認するのに役立ちます。また、ネットワーク、ファイアウォール設定、クロック同期、ユーザ認証などの問題の検出に役立ちます。このツールは、手順をステップごとに説明したガイドとして機能し、必要に応じて、中間の各レイヤの問題の修正を支援します。
手順
| ステップ 1 |
ISE-PIC GUI で [メニュー(Menu)] アイコン( |
| ステップ 2 |
[拡張ツール(Advanced Tools)] ドロップダウン リストをクリックし、[診断ツール(Diagnostic Tools)] を選択します。 |
| ステップ 3 |
診断を実行する Cisco ISE-PIC ノードを選択します。 Cisco ISE-PIC ノードを選択しない場合は、すべてのノードでテストが実行されます。 |
| ステップ 4 |
特定の Active Directory 参加ポイントを選択します。 Active Directory 参加ポイントを選択しない場合は、すべての参加ポイントでテストが実行されます。 |
| ステップ 5 |
オンデマンドで、またはスケジュールに基づいて診断テストを実行できます。
|
| ステップ 6 |
警告ステータスまたは失敗ステータスのテストの詳細を確認するには、[テストの詳細の表示(View Test Details)] をクリックします。 |
Active Directory ドメインの脱退
この Active Directory ドメインまたはこの参加ポイントを使用してユーザ ID を収集する必要がない場合は、Active Directory ドメインを脱退できます。
コマンドライン インターフェイスから Cisco ISE-PIC アプリケーション設定をリセットする場合、またはバックアップやアップグレードの後に設定を復元する場合、脱退操作が実行され、Cisco ISE-PIC ノードがすでに参加している場合は、Active Directory ドメインから切断されます。ただし、Cisco ISE-PIC ノードのアカウントは、Active Directory ドメインから削除されません。脱退操作では Active Directory ドメインからノード アカウントも削除されるため、脱退操作は管理者ポータルから Active Directory クレデンシャルを使用して実行することを推奨します。これは、Cisco ISE-PIC ホスト名を変更する場合にも推奨されます。
手順
| ステップ 1 |
ISE-PIC GUI で [メニュー(Menu)] アイコン( |
||
| ステップ 2 |
作成した Active Directory 参加ポイントの隣にあるチェックボックスをオンにし、[編集(Edit)] をクリックします。展開の参加/脱退テーブルが、すべての Cisco ISE-PIC ノード、ノードのロール、およびそのステータスとともに表示されます。詳細については、表 2を参照してください。 |
||
| ステップ 3 |
Cisco ISE-PIC ノードの隣にあるチェックボックスをオンにして [脱退(Leave)] をクリックします。 |
||
| ステップ 4 |
Active Directory のユーザ名とパスワードを入力し、[OK] をクリックしてドメインを脱退し、Cisco ISE-PIC データベースからマシン アカウントを削除します。 Active Directory クレデンシャルを入力すると、Cisco ISE-PIC ノードは Active Directory ドメインを脱退し、Active Directory データベースから Cisco ISE-PIC マシン アカウントが削除されます。
|
||
| ステップ 5 |
Active Directory クレデンシャルがない場合は、[使用可能なクレデンシャルなし(No Credentials Available)] チェックボックスをオンにして、[OK] をクリックします。 [クレデンシャルなしでドメインを脱退(Leave domain without credentials)] チェックボックスをオンにすると、プライマリ Cisco ISE-PIC ノードが Active Directory ドメインから脱退します。参加時に Active Directory で作成されたマシン アカウントは、Active Directory 管理者が手動で削除する必要があります。 |
Active Directory の設定の削除
特定の Active Directory 設定をプローブとして使用しない場合は、Active Directory の設定を削除する必要があります。別の Active Directory ドメインに参加する場合は、設定を削除しないでください。現在参加しているドメインから脱退し、新しいドメインに参加できます。この設定は唯一の設定であるため、削除しないでください。 ISE-PIC
始める前に
Active Directory ドメインが残っていることを確認します。
手順
| ステップ 1 |
ISE-PIC GUI で [メニュー(Menu)] アイコン( |
| ステップ 2 |
設定された Active Directory の横のチェックボックスをオンにします。 |
| ステップ 3 |
[ローカル ノード ステータス(Local Node Status)] が [参加していない(Not Joined)] としてリストされていることを確認します。 |
| ステップ 4 |
[削除(Delete)] をクリックします。 Active Directory データベースから設定を削除しました。後で Active Directory を使用する場合は、有効な Active Directory の設定を再送信できます。 |
Active Directory デバッグ ログの有効化
Active Directory デバッグ ログはデフォルトでは記録されません。Active Directory のデバッグ ログを有効にすると、ISE-PIC のパフォーマンスに影響する場合があります。
手順
| ステップ 1 |
ISE-PIC GUI で [メニュー(Menu)] アイコン( |
| ステップ 2 |
Active Directory のデバッグ情報を取得する Cisco ISE-PIC ノードの隣のオプション ボタンをクリックし、[編集(Edit)] をクリックします。 |
| ステップ 3 |
[Active Directory] オプション ボタンをクリックし、[編集(Edit)] をクリックします。 |
| ステップ 4 |
[Active Directory] の隣にあるドロップダウン リストから [DEBUG] を選択します。これにはエラー、警告、および verbose ログが含まれます。完全なログを取得するには、[TRACE] を選択します。 |
| ステップ 5 |
[保存(Save)] をクリックします。 |
 Feedback