소개
이 문서에서는 Cisco DNA Center 2.3.5.x 릴리스에서 제공되는 외부 컨피그레이션 아카이브 기능을 사용하는 방법에 대해 설명합니다.
사전 요구 사항
요구 사항
다음 주제에 대한 지식을 보유하고 있으면 유용합니다.
- 2.3.5 릴리스를 실행하는 Cisco DNA Center
- Linux SFTP(Secure File Transfer Protocol) 서버
사용되는 구성 요소
이 문서의 정보는 다음 소프트웨어 및 하드웨어 버전을 기반으로 합니다.
- 2.3.5 이상 릴리스를 실행하는 Cisco DNA Center
- 이 문서에서는 SFTP 서버, Linux RedHat 8 서버가 사용됩니다
이 문서의 정보는 특정 랩 환경의 디바이스를 토대로 작성되었습니다. 이 문서에 사용된 모든 디바이스는 초기화된(기본) 컨피그레이션으로 시작되었습니다. 현재 네트워크가 작동 중인 경우 모든 명령의 잠재적인 영향을 미리 숙지하시기 바랍니다.
구성
SFTP 설정 구성
1단계. FTP(File Transfer Protocol)와 달리 SFTP를 사용하기 위해 추가 패키지를 설치할 필요가 없습니다. SFTP는 SSH 하위 시스템을 사용합니다. 따라서 명령을 실행하면 rpm -qa|grep ssh 필요한 SSH 패키지가 이미 있는지 확인합니다.
출력은 다음과 같아야 합니다.
[admin@backup-server ~]$ rpm -qa|grep ssh
libssh-0.9.4-3.el8.x86_64
openssh-clients-8.0p1-10.el8.x86_64
openssh-8.0p1-10.el8.x86_64
libssh-config-0.9.4-3.el8.noarch
openssh-server-8.0p1-10.el8.x86_64
openssh-askpass-8.0p1-10.el8.x86_64
qemu-kvm-block-ssh-4.2.0-59.module+el8.5.0+12817+cb650d43.x86_64
2단계. 새 폴더를 만들고 적절한 사용 권한을 할당합니다.
[admin@backup-server data]$ mkdir -p /data/sftp
[admin@backup-server data]$ chmod 700 /data
3단계. 새 디렉터리로 이동합니다.
[admin@backup-server data]$ cd /data/sftp
4단계. 생성 group 및 a userSFTP 액세스 권한을 가진 사용자를 규제합니다.
[admin@backup-server sftp]$ groupadd sftpusers
5단계. 사용자 생성(예: digranad sftpusers 그룹과 1단계에서 만든 폴더 모두에 바인딩합니다.
[admin@backup-server sftp]$ useradd -g sftpusers -d /data/sftp digranad
사용자에게 비밀번호를 할당합니다.
[admin@backup-server sftp]$ passwd digranad
Changing password for user digranad.
New password:
Retype new password:
passwd: all authentication tokens updated successfully.
6단계. 이전 단계에서 생성한 그룹 및 사용자를 사용하여 디렉토리에 대한 올바른 권한을 구성합니다. 다음 명령을 사용하여 sudo chown user:group directory/.
[admin@backup-server data]$ pwd
/data

[admin@backup-server data]$ sudo ls -lrt
[sudo] password for admin:
total 0
drwxr-xr-x. 2 root root       6 Feb  3 18:22 sftp

[admin@backup-server data]$ sudo chown digranad:sftpusers sftp/

[admin@backup-server data]$ sudo ls -lrt
total 0
drwxr-xr-x. 3 digranad sftpusers 38 May 18 15:04 sftp
[admin@backup-server data]$
이 시점에서 SFTP 설정을 성공적으로 구성했습니다. 이제 Cisco DNA Center에서 컨피그레이션을 진행합니다.
Cisco DNA Center GUI에서 SFTP 외부 리포지토리 구성
1단계. Cisco DNA Center GUI에 로그인하고 Cisco의 System > Settings > Configuration Archive.
2단계. 의 Configuration Archive 창에서 외부 탭을 클릭합니다.
3단계. 외부 저장소의 컨피그레이션을 시작하려면 추가 아이콘을 클릭합니다.

참고: SFTP 서버는 하나만 추가할 수 있습니다.
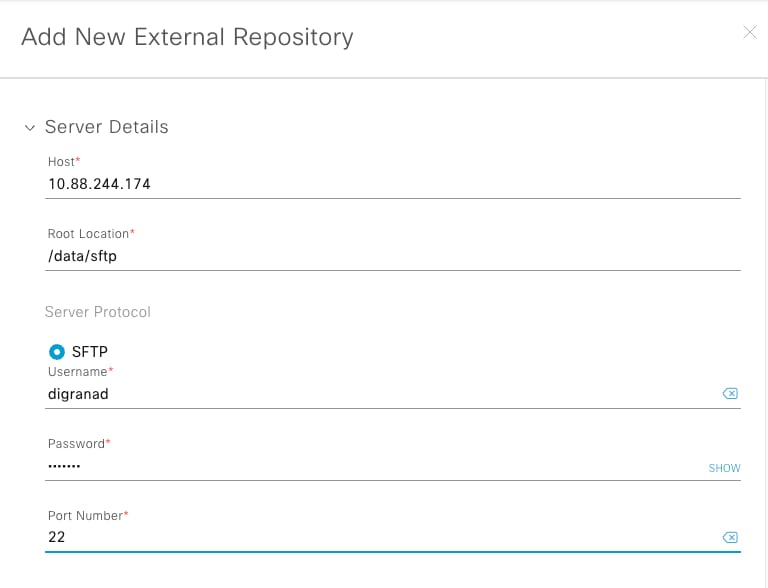
4단계. 의 Add New External Repository슬라이드 인 창에서 다음 세부 정보를 완료합니다.
-
호스트: 서버 IP 주소를 입력합니다.
-
루트 위치: 루트 폴더의 위치를 입력합니다.
-
서버 프로토콜: SFTP 서버의 사용자 이름, 비밀번호 및 포트 번호를 입력합니다(포트 22가 기본 SFTP 포트).
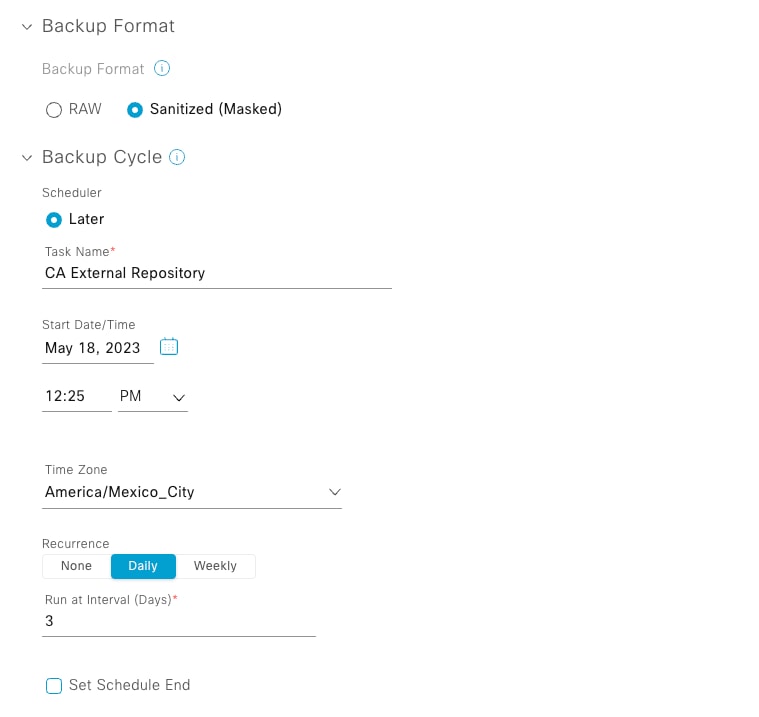
- 백업 형식을 선택합니다.
- RAW: 전체 실행 컨피그레이션이 공개됩니다. 모든 민감한/개인 컨피그레이션은 백업 데이터에서 마스킹되지 않습니다. 백업 파일을 잠그려면 암호를 입력하십시오.

주의: 파일 암호는 Cisco DNA Center에 저장되지 않습니다. SFTP 서버의 파일에 액세스하려면 비밀번호를 기억해야 합니다.

참고: 비밀번호는 원시 백업 형식을 선택한 경우에만 적용됩니다.
e. 백업 주기 예약 백업 날짜, 시간, 시간대 및 되풀이 간격을 입력합니다.

참고: 이 문서의 SFTP 설정 구성 섹션에 구성된 설정을 사용하십시오.
 외부 리포지토리 컨피그레이션 1

5단계. 저장을 클릭합니다.
다음을 확인합니다.
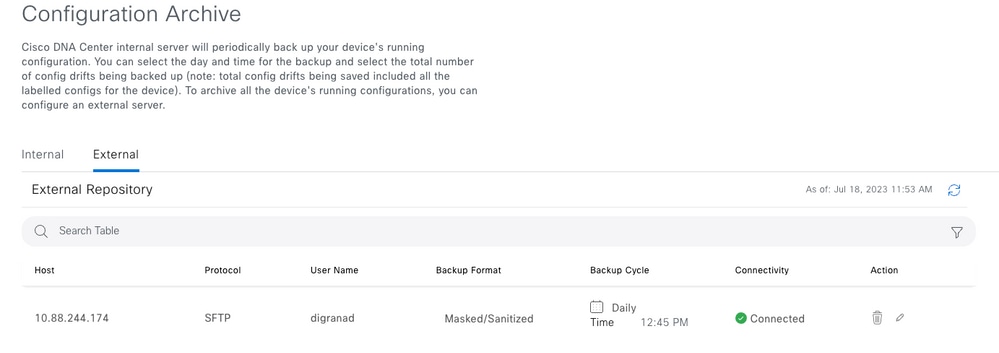
외부 리포지토리 컨피그레이션이 저장되고 Configuration Archive(컨피그레이션 아카이브) 섹션에 표시되는지 확인합니다.

데이터 사용 방법
Cisco DNA Center는 네트워크 디바이스 컨피그레이션의 저장소 역할을 합니다. 다음은 의 컨피그레이션을 시각화하기 위한 단계입니다 SFTP Server.
디렉터리 변경( cd )를 SFTP 서버로 Root Location Cisco의 pwd 명령을 사용하여 확인합니다.
[admin@backup-server ~]$ cd /data/sftp/

[admin@backup-server sftp]$ pwd
/data/sftp
Cisco DNA Center에서 device_config_export라는 디렉토리를 구성해야 합니다. Use ls -lrt 나열할 수 있습니다
[admin@backup-server sftp]$ ls -lrt
total 4
drwxr-xr-x. 25 digranad sftpusers 4096 Jul 18 20:24 device_config_export
디렉터리 변경 cd 파일을 다시 나열합니다. 각 주기 및 실행된 날짜에 대해 하나의 디렉토리가 표시되어야 합니다.
[admin@backup-server sftp]$ cd device_config_export/

[admin@backup-server device_config_export]$ ls -lrt
total 0
drwxr-xr-x. 2 digranad sftpusers 61 May 18 15:31 1eeb097b-1d13-4e90-ba38-aace54dcdab5
drwxr-xr-x. 2 digranad sftpusers 61 May 19 14:45 a1a06766-feec-41b0-adf0-50e94def3901
drwxr-xr-x. 2 digranad sftpusers 61 May 22 14:45 28dd5439-c1e9-4a76-bd25-5292d46a1fe6
drwxr-xr-x. 2 digranad sftpusers 61 May 25 14:45 5dbf1ad5-a1a7-42ed-8367-ba90d09fffad
5월 18일부터 파일을 확인하기 위해서 cd 컨피그레이션과 함께 .zip 파일을 찾기 위해 해당 디렉토리에 내용을 나열합니다.
[admin@backup-server device_config_export]$ cd 1eeb097b-1d13-4e90-ba38-aace54dcdab5
[admin@backup-server 1eeb097b-1d13-4e90-ba38-aace54dcdab5]$ ls -lrt
total 364
-rw-r--r--. 1 digranad sftpusers 371393 May 18 15:31 Export_Configs-17_May_2023_23_50_00_212-w8Q.zip
.zip 파일 내의 파일을 확인하려면 다음 두 가지 옵션을 사용할 수 있습니다.
옵션 1. Export_Configs 파일 압축 해제
실행 unzip .zip 파일에 대한 명령입니다.

참고: 관리자 사용자 이름으로 로그인했으므로 이 예에서는 Sudo 옵션이 필요합니다.
[admin@backup-server 1eeb097b-1d13-4e90-ba38-aace54dcdab5]$ sudo unzip Export_Configs-17_May_2023_23_50_00_212-w8Q.zip
Archive: Export_Configs-17_May_2023_23_50_00_212-w8Q.zip
이 옵션은 인벤토리의 모든 디바이스에 대한 디렉토리를 생성합니다. 해당 내용을 ls 명령을 실행합니다.
[admin@backup-server 1eeb097b-1d13-4e90-ba38-aace54dcdab5]$ ls -lrt
total 364
-rw-r--r--. 1 digranad sftpusers 371393 May 18 15:31 Export_Configs-17_May_2023_23_50_00_212-w8Q.zip
drwxr-xr-x. 2 root root 151 Jul 19 15:45 x.x.x.x-Border2.Pod2.example.com
drwxr-xr-x. 2 root root 151 Jul 19 15:45 x.x.x.x-FIAB.Pod8.example.com
drwxr-xr-x. 2 root root 151 Jul 19 15:45 x.x.x.x-Border2.Pod8.example.com
drwxr-xr-x. 2 root root 106 Jul 19 15:45 x.x.x.x-MXC.L.11-9300
drwxr-xr-x. 2 root root 106 Jul 19 15:45 x.x.x.x-MXC.N.04-9300
drwxr-xr-x. 2 root root 151 Jul 19 15:45 x.x.x.x-Edge1.Pod8.example.com
drwxr-xr-x. 2 root root 151 Jul 19 15:45 x.x.x.x-WLC.Pod8.example.com
drwxr-xr-x. 2 root root 151 Jul 19 15:45 x.x.x.x-Edge2.Pod2.example.com
drwxr-xr-x. 2 root root 151 Jul 19 15:45 x.x.x.x-Border1_node.example.com
drwxr-xr-x. 2 root root 151 Jul 19 15:45 x.x.x.x-Border2_node.example.com
drwxr-xr-x. 2 root root 151 Jul 19 15:45 x.x.x.x-Edge-1
drwxr-xr-x. 2 root root 151 Jul 19 15:45 x.x.x.x-Interm.Pod8.example.com
drwxr-xr-x. 2 root root 151 Jul 19 15:45 x.x.x.x-Edge2.Pod8.example.com
drwxr-xr-x. 2 root root 151 Jul 19 15:45 x.x.x.x-MXC.I.12-9500
drwxr-xr-x. 2 root root 151 Jul 19 15:45 x.x.x.x-Edge1.Pod2.example.com
drwxr-xr-x. 2 root root 151 Jul 19 15:45 x.x.x.x-Border1.Pod8.example.com
drwxr-xr-x. 2 root root 151 Jul 19 15:45 x.x.x.x-Switch.Pod2.example.com
drwxr-xr-x. 2 root root 106 Jul 19 15:45 x.x.x.x-MXC.D.10-9300
drwxr-xr-x. 2 root root 106 Jul 19 15:45 x.x.x.x-Fusion_Router.example.com
drwxr-xr-x. 2 root root 151 Jul 19 15:45 x.x.x.x-Border1.Pod2.example.com
drwxr-xr-x. 2 root root 151 Jul 19 15:45 x.x.x.x-LanAauto-5.Pod8.example.com
drwxr-xr-x. 2 root root 151 Jul 19 15:45 x.x.x.x-Router-Lab.cisco
drwxr-xr-x. 2 root root 151 Jul 19 15:45 x.x.x.x-Edge-1
drwxr-xr-x. 2 root root 151 Jul 19 15:45 x.x.x.x-WLC1.Pod2.example.com
drwxr-xr-x. 2 root root 106 Jul 19 15:45 x.x.x.x-Router
drwxr-xr-x. 2 root root 151 Jul 19 15:45 x.x.x.x-Edge-2
drwxr-xr-x. 2 root root 106 Jul 19 15:45 x.x.x.x-sw2.example.com
drwxr-xr-x. 2 root root 151 Jul 19 15:45 x.x.x.x-Fusion.Pod8.example.com
drwxr-xr-x. 2 root root 151 Jul 19 15:45 x.x.x.x-9800-5-jdv.example.com
각 디렉터리는 x.x.x.x-DeviceHostname 위치 x.x.x.x 은 디바이스 관리 IP 주소를 나타냅니다.
저장된 데이터는 디바이스 유형에 따라 달라질 수 있습니다. 다음은 두 가지 예입니다. x.x.x.x-Edge1.Pod8.example.com 다른 하나는 x.x.x.x-Fusion_Router.cisco.com.
저장된 파일을 보려면 cd 디바이스 디렉토리로 이동하여 해당 내용을 나열합니다.
[admin@backup-server 1eeb097b-1d13-4e90-ba38-aace54dcdab5]$ cd x.x.x.x-Edge1.Pod8.example.com

[admin@backup-server x.x.x.x-Edge1.Pod8.example.com]$ ls -lrt
total 140
-rw-r--r--. 1 root root 556 May 17 23:50 17_May_2023_23_50_00_212_vlan.dat.bat
-rw-r--r--. 1 root root 67990 May 17 23:50 17_May_2023_23_50_00_212_STARTUPCONFIG.cfg
-rw-r--r--. 1 root root 68055 May 17 23:50 17_May_2023_23_50_00_212_RUNNINGCONFIG.cfg
[admin@backup-server 1eeb097b-1d13-4e90-ba38-aace54dcdab5]$ cd x.x.x.x-Fusion_Router.example.com
[admin@backup-server x.x.x.x-Fusion_Router.example.com]$ ls -lrt
total 32
-rw-r--r--. 1 root root 15578 May 17 23:50 17_May_2023_23_50_00_212_STARTUPCONFIG.cfg
-rw-r--r--. 1 root root 15578 May 17 23:50 17_May_2023_23_50_00_212_RUNNINGCONFIG.cfg

참고: 라우터 기반 디바이스는 VLAN 데이터를 저장하지 않습니다.
마지막으로, Linux cat
admin@backup-server x.x.x.x-Fusion_Router.cisco.com]$ cat 17_May_2023_23_50_00_212_STARTUPCONFIG.cfg
service timestamps debug datetime msec
service timestamps log datetime msec
service password-encryption
service call-home
...
...
...
snmp-server host x.x.x.x version 2c ********
snmp-server host x.x.x.x version 2c ********
control-plane
line con 0
stopbits 1
line aux 0
line vty 0 4
transport input ssh
destination transport-method http
event manager applet catchall
event cli pattern ".*" sync no skip no
action 1 syslog msg "$_cli_msg"
netconf-yang
end
옵션 2. Linux Vim Tool을 사용하여 .zip 탐색
Vim 도구를 사용하면 압축을 풀지 않고 .zip 파일을 탐색할 수 있습니다. 이를 위해 vim 명령을 .zip 파일과 함께 사용합니다.
[admin@backup-server 1eeb097b-1d13-4e90-ba38-aace54dcdab5]$ vim Export_Configs-17_May_2023_23_50_00_212-w8Q.zip
Vim은 파일을 탐색하기 위해 화살표 키와 Enter 키를 사용하여 .zip 파일 내의 모든 파일을 탐색할 수 있는 탐색 환경을 로드합니다.
" zip.vim version v28
" Browsing zipfile /data/sftp/device_config_export/1eeb097b-1d13-4e90-ba38-aace54dcdab5/Export_Configs-17_May_2023_23_50_00_212-w8Q.zip
" Select a file with cursor and press ENTER

/x.x.x.x-Border2.Pod2.example.com/17_May_2023_23_50_00_212_RUNNINGCONFIG.cfg
/x.x.x.x-Border2.Pod2.example.com/17_May_2023_23_50_00_212_STARTUPCONFIG.cfg
/x.x.x.x-Border2.Pod2.example.com/17_May_2023_23_50_00_212_vlan.dat.bat
/x.x.x.x-FIAB.Pod8.example.com/17_May_2023_23_50_00_212_STARTUPCONFIG.cfg
/x.x.x.x-FIAB.Pod8.example.com/17_May_2023_23_50_00_212_vlan.dat.bat
/x.x.x.x-FIAB.Pod8.example.com/17_May_2023_23_50_00_212_RUNNINGCONFIG.cfg
/x.x.x.x-Border2.Pod8.example.com/17_May_2023_23_50_00_212_vlan.dat.bat

참고: 파일 또는 Vim 환경에서 종료하려면 명령을 사용합니다 :q!.
문제 해결
일반 오류
1. 시작 시간이 현재 시간보다 큽니다.
외부 리포지토리 서버를 구성한 후 백업 주기에 대해 구성된 StartTime이 현재 시간보다 오래된 경우 다음 오류가 나타납니다.

이를 변경하려면 현재 시간보다 큰 다른 StartTime을 선택하면 됩니다.
2. 루트 위치 디렉터리가 비어 있지 않습니다.
루트 위치 폴더가 처음부터 생성되지 않았거나 Cisco DNA Center에서 외부 리포지토리를 재구성하는 경우 다음 오류가 나타납니다.

이 오류를 해결하려면 SFTP 서버에서 루트 위치를 정리합니다. SFTP 서버에 로그인하고 cd 명령을 실행하고 이 명령으로 정리를 수행합니다. sudo rm -r.
[admin@backup-server sftp]$ cd /data/sftp
[admin@backup-server sftp]$ sudo rm -r
이 ls -lrt 명령을 실행하여 파일이 없음을 확인하고 ls -la 명령을 실행하여 숨겨진 파일이 있는지 확인합니다.
[admin@backup-server sftp]$ sudo ls -lrt
total 0

[admin@backup-server sftp]$ sudo ls -la
total 4
drwxr-xr-x. 3 digranad sftpusers 38 May 18 15:23 .
drwx-----x. 4 root     root      34 Feb  3 18:27 ..
drwx------. 3 digranad sftpusers 19 May 18 15:03 .config
-rw-------. 1 digranad sftpusers 16 May 18 15:03 .esd_auth
숨겨진 파일이 있는 경우 명령을 사용하여 제거합니다 sudo rm -r .* Cisco의 ls -la명령을 다시 실행하여 모든 파일이 제거되었는지 확인합니다.
[admin@backup-server sftp]$ sudo rm -r .*
rm: refusing to remove '.' or '..' directory: skipping '.'
rm: refusing to remove '.' or '..' directory: skipping '..'
[admin@backup-server sftp]$

[admin@backup-server sftp]$ sudo ls -la
total 0
drwxr-xr-x. 2 digranad sftpusers  6 May 18 15:25 .
drwx-----x. 4 root     root      34 Feb  3 18:27 ..
[admin@backup-server sftp]$
3. 루트 위치 폴더가 없거나 권한이 올바르게 부여되지 않았습니다.
SFTP 서버에 루트 위치 폴더가 없거나 적절한 권한이 없는 경우 이 오류가 표시됩니다.

위에서부터 아래까지 권한을 추적합니다. 이 예에서는 권한 또는 /sftp /data 디렉터리에 저장할 수 있습니다.
다음 명령을 사용하여 pwd 현재 폴더의 위치를 알 수 있습니다.
[admin@backup-server data]$ pwd
/data
를 사용하여 ls -lrt 명령에서 /sftp 폴더가 있으며 해당 사용 권한을 확인합니다.
[admin@backup-server data]$ ls -lrt
total 0
drwxr-xr-x. 2 root root       6 Feb  3 18:22 sftp
디렉터리 /sftp 권한이 루트로 설정되어 있습니다. 다른 사용자가 의 4단계에서 사용된 경우 Configure SFTP server on Cisco DNA Center GUI 그런 다음 GUI Settings(GUI 설정)에서 사용자 이름을 변경하거나 SFTP Server에서 권한을 변경해야 합니다. 의 6단계를 사용할 수 있습니다. Configure SFTP Settings 섹션을 참조하십시오.


 피드백
피드백