UCCE SSO용 AD FS 로그인 페이지에서 사용자 ID를 자동으로 채우는 구성
다운로드 옵션
편견 없는 언어
본 제품에 대한 문서 세트는 편견 없는 언어를 사용하기 위해 노력합니다. 본 설명서 세트의 목적상, 편견 없는 언어는 나이, 장애, 성별, 인종 정체성, 민족 정체성, 성적 지향성, 사회 경제적 지위 및 교차성에 기초한 차별을 의미하지 않는 언어로 정의됩니다. 제품 소프트웨어의 사용자 인터페이스에서 하드코딩된 언어, RFP 설명서에 기초한 언어 또는 참조된 서드파티 제품에서 사용하는 언어로 인해 설명서에 예외가 있을 수 있습니다. 시스코에서 어떤 방식으로 포용적인 언어를 사용하고 있는지 자세히 알아보세요.
이 번역에 관하여
Cisco는 전 세계 사용자에게 다양한 언어로 지원 콘텐츠를 제공하기 위해 기계 번역 기술과 수작업 번역을 병행하여 이 문서를 번역했습니다. 아무리 품질이 높은 기계 번역이라도 전문 번역가의 번역 결과물만큼 정확하지는 않습니다. Cisco Systems, Inc.는 이 같은 번역에 대해 어떠한 책임도 지지 않으며 항상 원본 영문 문서(링크 제공됨)를 참조할 것을 권장합니다.
소개
이 문서에서는 UCCE(Unified Contact Center Enterprise) SSO(Single Sign-On) 로그인의 최종 사용자 경험을 개선하는 방법에 대해 설명합니다. 사용자가 IdP(Identity Provider) 로그인 페이지에서 두 번째로 로그인 ID를 입력하지 않을 경우 이 기능이 개선될 수 있습니다.
사전 요구 사항
요구 사항
다음 주제에 대한 지식을 보유하고 있으면 유용합니다.
- UCCE SSO 로그인 흐름 및 AD FS
- HTTP(Hyper-Text Transfer Protocol)
- HTML(Hyper-Text Markup Language)
- SAMLv2(Security Assertion Markup Language 2.0)
- Open Authorization 2.0(OAuthv2)
- Windows PowerShell(PS)에 익숙함
- JavaScript(JS)에 대해 잘 알고 있음
사용되는 구성 요소
이 문서의 정보는 다음 소프트웨어 및 하드웨어 버전을 기반으로 합니다.
- UCCE 11.5(1) 이상
- Finesse 11.5(1) 이상
- Cisco CUIC(Unified Intelligence Center) 11.5(1) 이상
- Microsoft AD(Active Directory) - Windows Server에 설치된 AD
- AD FS 2.0/3.0
- Windows Server 2012 R2
이 문서의 정보는 특정 랩 환경의 디바이스를 토대로 작성되었습니다.이 문서에 사용된 모든 디바이스는 초기화된(기본) 컨피그레이션으로 시작되었습니다.네트워크가 작동 중인 경우 모든 명령의 잠재적인 영향을 이해해야 합니다.
배경 정보
UCCE SSO 로그인에서 사용자는 로그인 ID를 두 번 입력해야 합니다. 첫 번째는 UCCE 애플리케이션 로그인 페이지(Finesse, CUIC 등)에서, 두 번째는 IdP 로그인 페이지(Forms 인증 방법이 사용되는 경우)에서 입력합니다. 이 문서의 예에서 AD FS(Active Directory Federation Service)는 IdP로 사용됩니다.
UCCE에서 SSO가 활성화된 경우 로그인 ID가 입력되고 CUIC/Finesse에서 Submit/Login 버튼을 누르면 입력된 로그인 ID가 cookie cc_username에 저장되고, IdS(Identity Server) 및 IdP로 리디렉션되도록 유지됩니다.IdP 로그인 페이지에서 이 쿠키를 사용하여 로그인 ID를 자동으로 채울 수 있습니다.
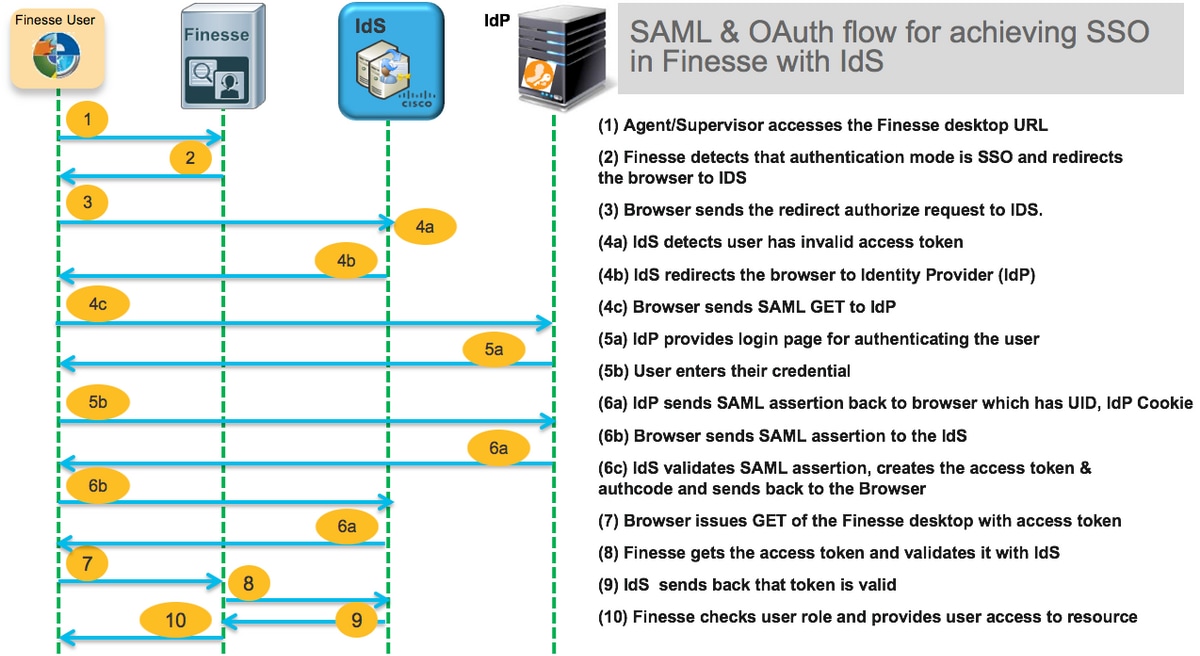
검토를 위해, 최종 사용자가 Finesse 에이전트이고 UCCE 애플리케이션이 Finesse 서버인 HTTP/SAML 플로우 다이어그램의 예를 살펴보겠습니다.

이것은 최종 사용자 웹 브라우저에서 AD FS(IdP)로 보낸 4c단계 HTTP 요청 헤더의 예입니다.
Request URL: https://dc01.omozol.lab/adfs/ls/?SAMLRequest=tZTBjtowEIbv%2BxSR...
Accept: text/html,application/xhtml+xml,application/xml;q=0.9,image/webp,image/apng,*/*;q=0.8
Accept-Encoding: gzip, deflate, br
Accept-Language: en-US,en;q=0.9
Cache-Control: no-cache
Connection: keep-alive
Cookie: cc_username=agent1%40omozol.lab
Host: dc01.omozol.lab
Pragma: no-cache
Referer: https://fns01p.omozol.lab/desktop/container/landing.jsp?locale=en_US
Upgrade-Insecure-Requests: 1
User-Agent: Mozilla/5.0 (Windows NT 6.3; Win64; x64) AppleWebKit/537.36 (KHTML, like Gecko) Chrome/69.0.3497.100 Safari/537.36
구성
AD FS 3.0을 IdP로 사용하면 onload.js 파일을 수정하여 컨피그레이션을 수행할 수 있습니다. 이 파일은 AD FS가 https://<AD FS FQDN>/adfs/ls/ls/에 대한 요청에 대한 응답으로 사용자에게 반환되는 HTML 페이지에 삽입됩니다.
1단계. onload.js 파일을 수정하려면 PowerShell cmdlet을 통해 파일을 파일 시스템으로 내보내십시오.
PS C:\> Export-AdfsWebTheme -Name default -DirectoryPath c:\temp\adfs\
onload.js 파일은 다음 디렉토리에 있습니다.
C:\temp\adfs\script
2단계. 로그인 형식에 따라, 이미 존재하는 코드 구조/로직 외부에 있는 파일에 적절한 JS 코드 조각을 추가합니다.쉽게 파일의 아래쪽에 추가합니다.
기본적으로 Windows Server 2012 R2에서 AD FS가 SSO 사용자에게 제공하는 로그인 페이지에는 UPN(userPrincipalName) 형식의 사용자 이름이 필요합니다. 전자 메일 형식(예: user@cisco.com)입니다.단일 도메인 컨택 센터에서 AD FS 로그인 페이지를 수정하여 사용자 이름의 일부로 도메인 이름을 포함하지 않는 간단한 sAMAccountNameUser ID(UID)를 허용할 수 있습니다.
AD FS 로그인 페이지에서 UPN 사용자 이름을 입력해야 하는 경우 다음 코드 조각을 사용합니다.
// Get cc_username as login ID from HTTP Cookie header
if (document.cookie) {
    // If the position of cc_username in the cookie is the first position, 0...
    if (document.cookie.indexOf('cc_username') == 0) {
        // Split the cookie into an array with the delimitor being '='
        var cookies = document.cookie.split('=');
        // If the first element of the array is cc_username then...
        if (cookies[0] == 'cc_username') {
            // ...the second element will be the actual username and we should save that.
            var cc_login_name = cookies[1];
        }
        // Customize Login page: add domain if needed as AD FS by default require login ID in UPN form
        // If the parsed login is not null, do the following logic
        if (cc_login_name != null) {
            // If %40 (encoded '=') does not exist in the login name...
            if (cc_login_name.indexOf('%40') == -1) {
                // ...then add '@domain.com' to ensure a UPN format is input
                var userNameValue = cc_login_name + '@' + 'domain.com';
                // Populate the UPN into the userNameInput of the page, and put the focus
                // on the password.
                document.getElementById("userNameInput").value = userNameValue;
                document.getElementById("passwordInput").focus();
            } else {
                // Otherwise, if %40 does exist in the username, replace it with the @ sign
                // and populate the UPN into the userNameInput of the page, and put the
                // focus on the password.
                var userNameValue = cc_login_name.replace('%40', '@');
                document.getElementById("userNameInput").value = userNameValue;
                document.getElementById("passwordInput").focus();
            }
        }
    }
}
UPN이 로그인 UID로 사용되는 경우 이 행에서 domain.com을 수정하여 UCCE 에이전트의 도메인과 일치해야 합니다.
var userNameValue = cc_login_name + '@' + 'domain.com';
참고: AD FS는 기본적으로 UPN 로그인을 사용합니다.sAMAccountName 로그인을 허용하기 위해 AD FS 로그인 페이지를 구성하는 방법에 대한 자세한 내용은 Windows Server 2012 R2의 AD FS 로그인 페이지 사용자를 허용하기 위해 Windows Server 2012 R2에서 AD FS 로그인 페이지 사용자 지정을 위한 UCCE 기능 설명서, Single Sign-On 장을 참조하십시오.
sAMAccountName(도메인이 없는 UID) 사용자 이름을 AD FS 로그인 페이지에 입력해야 하는 경우 다음 코드 조각을 사용합니다.
// Get cc_username as login ID from HTTP Cookie header
if (document.cookie) {
    // If the position of cc_username in the cookie is the first position, 0...
    if (document.cookie.indexOf('cc_username') == 0) {
        // Split the cookie into an array with the delimitor being '='
        var cookies = document.cookie.split('=');
        // If the first element of the array is cc_username then...
        if (cookies[0] == 'cc_username') {
            // ...the second element will be the actual username and we should save that.
            var cc_login_name = cookies[1];
        }
        // Customize Login page: remove domain if needed to use login ID in sAMAccount form
        // If the parsed login is not null, do the following logic
        if (cc_login_name != null) {
            // If %40 (encoded '=') DOES exist in the login name...
            if (cc_login_name.indexOf('%40') != -1) {
                // ...then split the login into an array about the @ sign and only keep the username.
                var domainLogin = cc_login_name.replace('%40', '@')
                var noDomainLogin = domainLogin.split('@');
                var userNameValue = noDomainLogin[0];
                // Populate the sAMAccountName into the userNameInput of the page, and put the focus
                // on the password.
                document.getElementById("userNameInput").value = userNameValue;
                document.getElementById("passwordInput").focus();
            } else {
                // Otherwise, if %40 does not exist in the username, there is no "@domain",
                // so populate the sAMAccountName into the userNameInput of the page,
                // and put the focus on the password.
                document.getElementById("userNameInput").value = cc_login_name;
                document.getElementById("passwordInput").focus();
            }
        }
    }
}
참고: 코드의 //기호는 주석을 나타냅니다.원하는 경우 해당 라인을 제거할 수 있습니다.이 프로그램의 목적은 Javascript 코드를 이해하는 데 도움이 됩니다.
3단계. onload.js를 저장하고 다음 PowerShell 명령을 사용하여 새 AD FS 웹 테마에 다시 로드합니다.
기본 테마의 템플릿으로 사용자 지정 AD FS 테마를 만듭니다.
PS C:\> New-AdfsWebTheme -Name custom -SourceName default
사용자 지정 AD FS 테마를 활성으로 설정합니다.
PS C:\> Set-AdfsWebConfig -ActiveThemeName 사용자 지정
수정된 onload.js 파일을 사용자 지정 테마에 로드합니다.
PS C:\> Set-AdfsWebTheme -TargetName custom -AdditionalFileResource @{Uri='/adfs/portal/script/onload.js';path="c:\temp\adfs\script\onload.js"}
참고:AD FS를 다시 시작할 필요가 없습니다.활성 테마가 자동으로 수정됩니다.
다음을 확인합니다.
이 섹션을 사용하여 컨피그레이션이 제대로 작동하는지 확인합니다.
sAMAccountName 또는 UPN을 로그인 ID로 사용하는 SSO 사용 계정으로 Finesse 또는 CUIC에 로그인하고(AD FS 구성에 따라 다름) AD FS 로그인 페이지에서 사용자 ID가 자동으로 암호 프롬프트 필드에 포커스가 입력됩니다. 로그인을 계속하려면 암호만 입력해야 합니다.

문제 해결
이 섹션에서는 컨피그레이션 문제를 해결하는 데 사용할 수 있는 정보를 제공합니다.
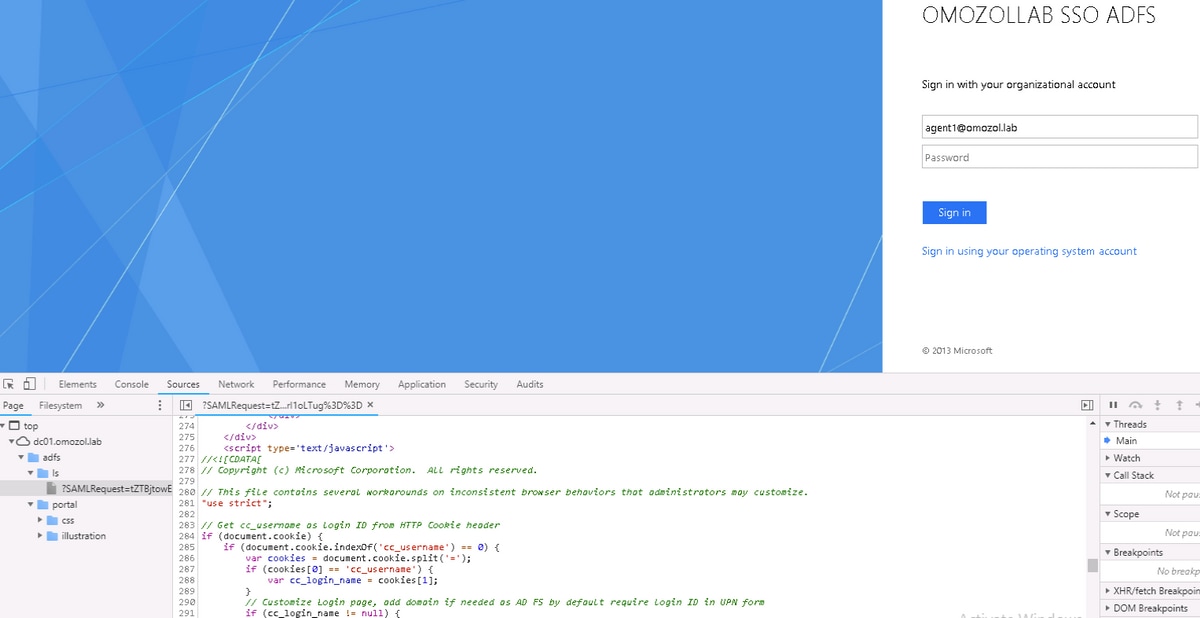
문제가 발생할 경우 웹 브라우저 개발자 도구를 사용하여 onload.js의 수정 사항이 반환된 HTML 페이지에 삽입되는지 여부와 웹 브라우저 콘솔에서 오류가 발견되었는지 확인합니다.
관련 정보
Cisco 엔지니어가 작성
- Oleksandr MozolCisco TAC 엔지니어
- Jared CompianoCisco TAC 엔지니어
지원 문의
- 지원 케이스 접수

- (시스코 서비스 계약 필요)
 피드백
피드백