소개
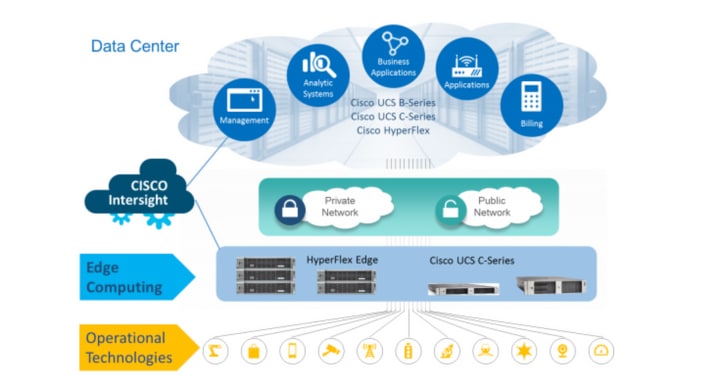
Cisco Intersight는 시스템 관리를 서비스 형태로 제공하여 데이터 센터 운영을 간소화하고, 고립된 온프레미스 관리 인프라를 유지할 필요성을 줄입니다.
Cisco Intersight는 Cisco HyperFlex 클러스터(HX Edge 및 FI 연결)를 설치, 구성 및 구축하는 설치 마법사를 제공합니다. 마법사는 HX 클러스터 프로필이라고 하는 클러스터의 사전 구성 정의를 구성합니다. 이 정의는 HX 클러스터에 있는 HX 노드를 논리적으로 나타낸 것으로 다음을 포함합니다.
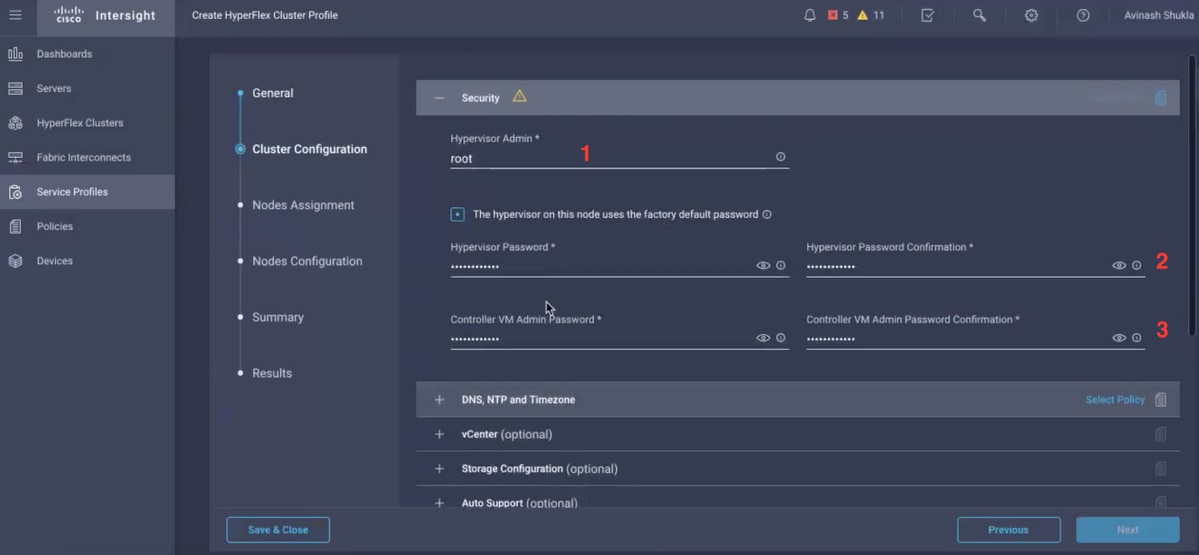
- 보안 - 컨트롤러 VM 비밀번호, 하이퍼바이저 사용자 이름, 비밀번호 등 HyperFlex 클러스터에 대한 자격 증명입니다.
- 컨피그레이션 — 서버 요구 사항, 펌웨어 등
- 연결 — 업스트림 네트워크, 가상 네트워크 등
이 문서에서는 intersight를 사용하여 FI 연결 Hyperflex 클러스터를 구축하는 방법에 대한 단계와 스크린샷을 제공합니다.
사전 요구 사항
요구 사항
HX FI 연결 클러스터 구축에 지원되는 버전
구성 요소 |
버전/릴리스 |
M4, M5 서버 |
HX220C-M4S HXAF220C-M4S HX240C-M4SX HXAF240C-M4S HX220C-M5SX HXAF220C-M5SX HX240C-M5SX HXAF240C-M5SX |
디바이스 커넥터 |
Cisco Intersight에서 자동 업그레이드 |
Intersight 연결
Intersight 연결과 관련된 다음 전제 조건을 고려하십시오.
-
해당 UCS Manager 인스턴스의 디바이스 커넥터가 Cisco Intersight에 연결하고 청구되도록 올바르게 구성되었는지 확인합니다.
-
모든 디바이스 커넥터는 svc.ucs-connect.com을 올바르게 확인하고 포트 443에서 아웃바운드 시작 HTTPS 연결을 허용해야 합니다.
-
3.5(2a)까지의 Hyperflex Installer 버전은 HTTP 프록시 사용을 지원합니다. 단, 클러스터가 재구축되어 공장 출하 시 새로운 버전이 아닌 경우는 예외입니다.
-
모든 컨트롤러 VM 관리 인터페이스는 download.intersight.com을 올바르게 확인하고 포트 443에서 아웃바운드로 시작된 HTTPS 연결을 허용해야 합니다. 클러스터가 재배포되고 공장에서 새로 만들어지지 않은 경우를 제외하고 직접 인터넷 연결을 사용할 수 없는 경우 HX Installer의 현재 버전은 HTTP 프록시 사용을 지원합니다.
-
UCS Fabric Interconnect 관리 인터페이스를 통해 원하는 ESX 서버, HX 컨트롤러 네트워크 및 vCenter 호스트에 액세스할 수 있어야 합니다.
-
HXDP 릴리스 3.5(2a)부터는 Intersight 설치 프로그램에서 HyperFlex 서버에 공장 출하 시 설치된 컨트롤러 VM이 없어도 됩니다. 그러나 HTTP 프록시를 통해 Intersight에 연결하는 경우에도 이 요구 사항이 적용됩니다. 모든 새 HX 서버는 HTTP 프록시와 함께 있는 그대로 구축할 수 있습니다.
기타 요구 사항
소프트웨어 요구 사항
물리적 요구 사항
네트워크 요구 사항
포트 요구 사항
구축 정보
사용되는 구성 요소
- Cisco Intersight
- Cisco UCSM
- Cisco HX 서버
- Cisco Hyperflex
- VMware ESXi
- VMware vCenter
구성
네트워크 다이어그램
- Cisco Intersight는 모든 Cisco Intersight 에디션에 HyperFlex Installer를 포함하여 HyperFlex 클러스터를 쉽게 구축할 수 있는 방법을 제공합니다.
![](/c/dam/en/us/support/docs/hyperconverged-infrastructure/hyperflex-hx-data-platform/214268-cisco-intersight-hyperflex-installatio-00.png)
컨피그레이션 단계
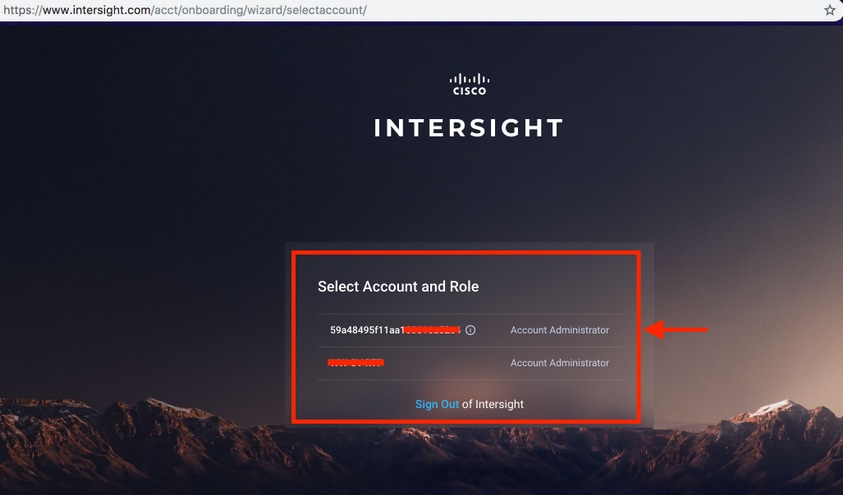
1단계. Cisco Intersight에 로그인하고 아래와 같이 사용자 계정을 선택합니다.
![](/c/dam/en/us/support/docs/hyperconverged-infrastructure/hyperflex-hx-data-platform/214268-cisco-intersight-hyperflex-installatio-01.png)
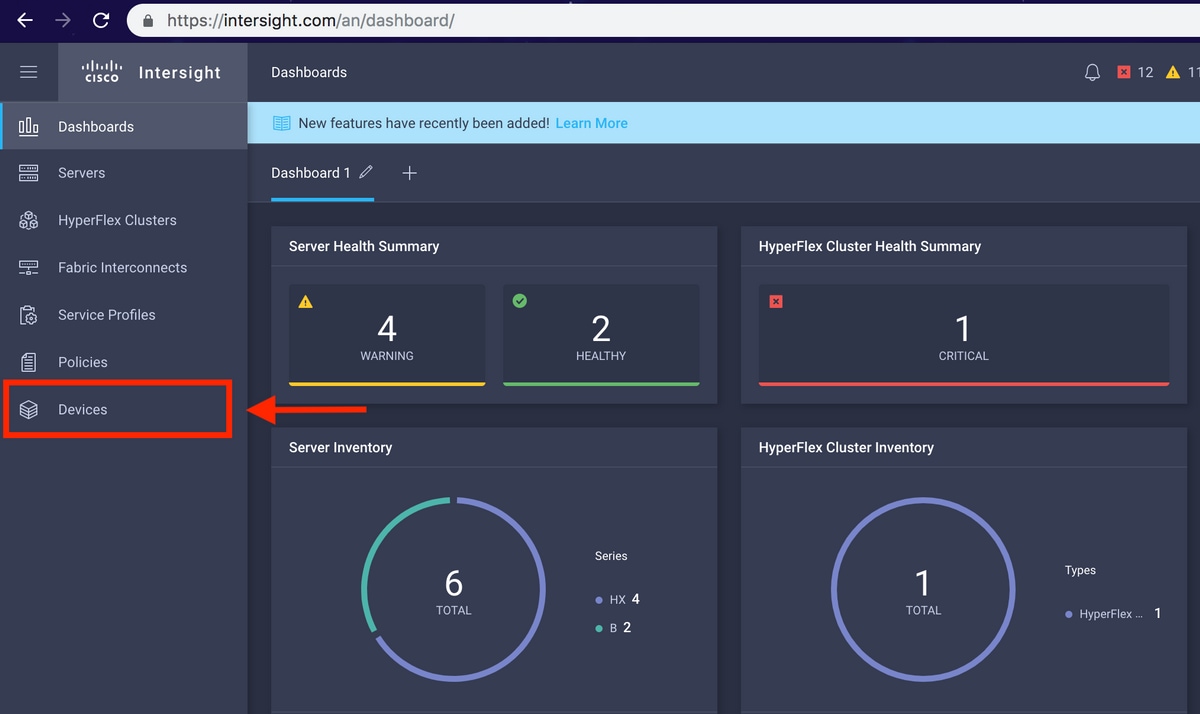
2단계. 대시보드에서 오른쪽 창의 Devices 탭을 클릭합니다.
![](/c/dam/en/us/support/docs/hyperconverged-infrastructure/hyperflex-hx-data-platform/214268-cisco-intersight-hyperflex-installatio-02.png)
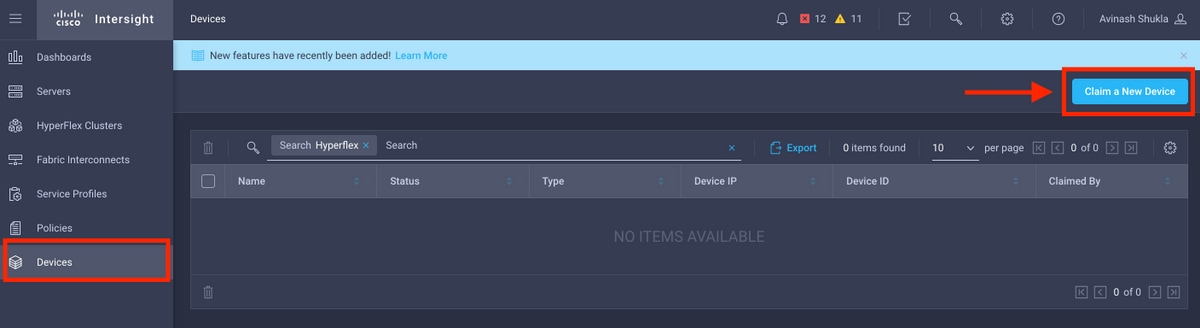
3단계. Devices(디바이스)에서 Claim a New Device(새 디바이스 클레임)를 클릭합니다.
![](/c/dam/en/us/support/docs/hyperconverged-infrastructure/hyperflex-hx-data-platform/214268-cisco-intersight-hyperflex-installatio-03.png)
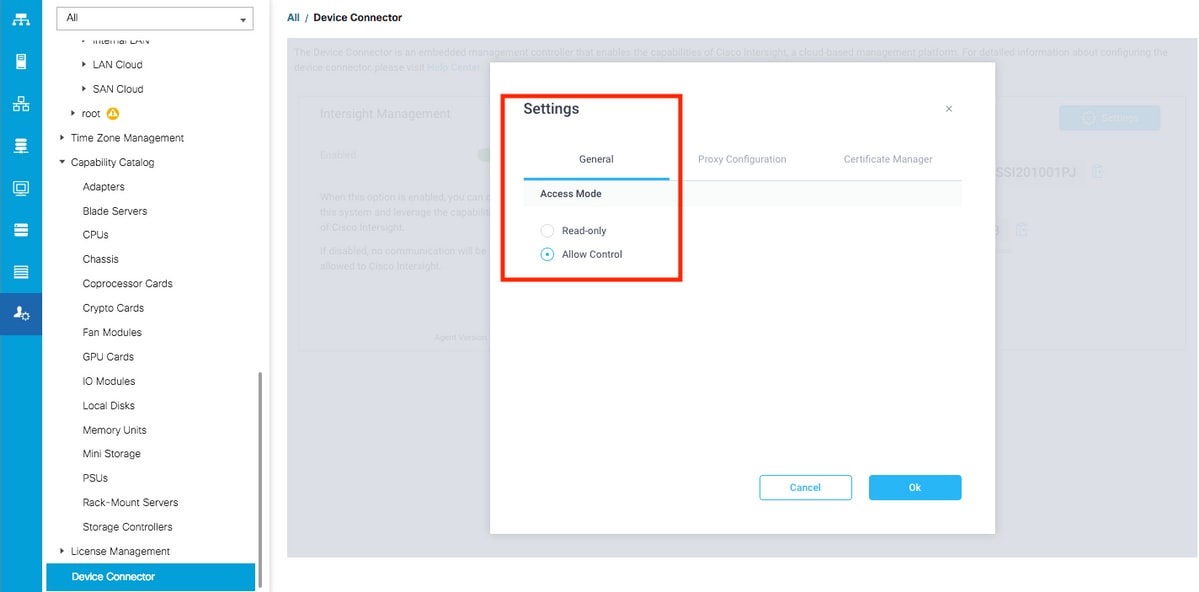
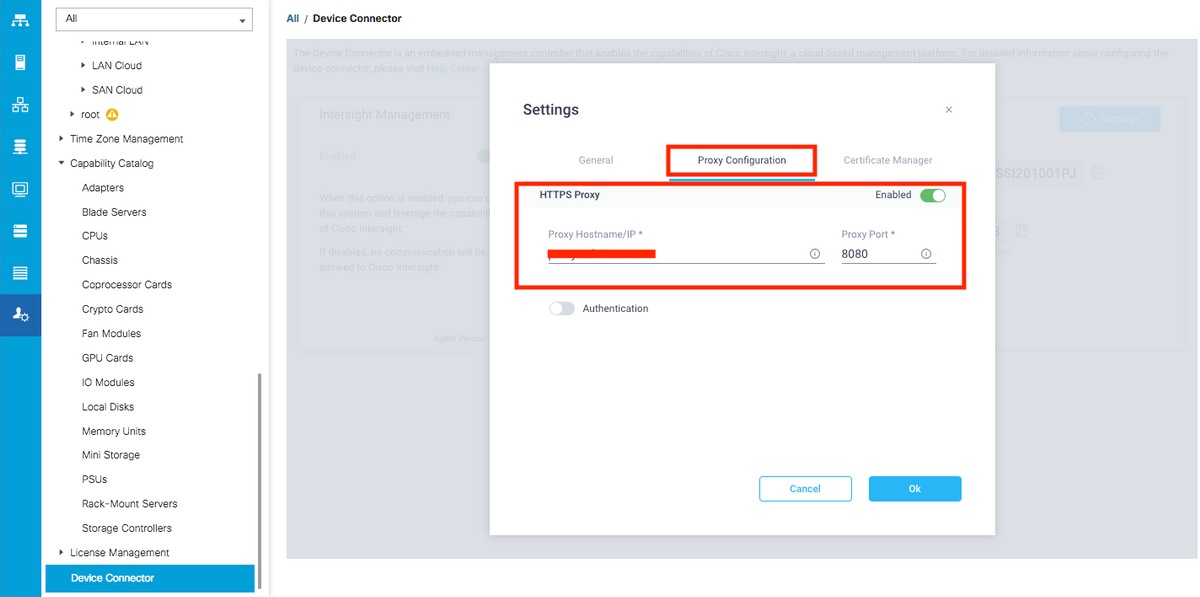
4단계. UCS Manager에 로그인하고 Admin(관리) -> Device Connector(디바이스 커넥터)로 이동합니다. Settings(설정)를 클릭하여 액세스 모드 및 프록시 구성을 구성합니다
![](/c/dam/en/us/support/docs/hyperconverged-infrastructure/hyperflex-hx-data-platform/214268-cisco-intersight-hyperflex-installatio-04.png)
![](/c/dam/en/us/support/docs/hyperconverged-infrastructure/hyperflex-hx-data-platform/214268-cisco-intersight-hyperflex-installatio-05.png)
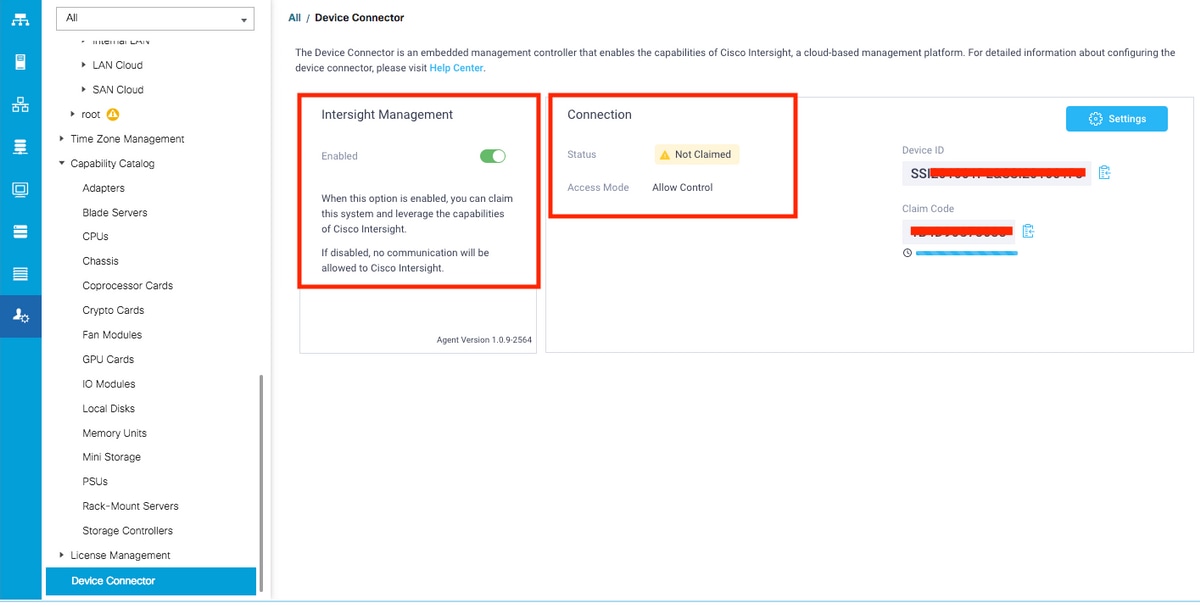
5단계. UCS Manager에서 Admin(관리) -> Device Connector(디바이스 커넥터)로 이동합니다. Intersight Management 토글 버튼을 활성화하고 디바이스 ID와 클레임 코드를 가져옵니다.
![](/c/dam/en/us/support/docs/hyperconverged-infrastructure/hyperflex-hx-data-platform/214268-cisco-intersight-hyperflex-installatio-06.png)
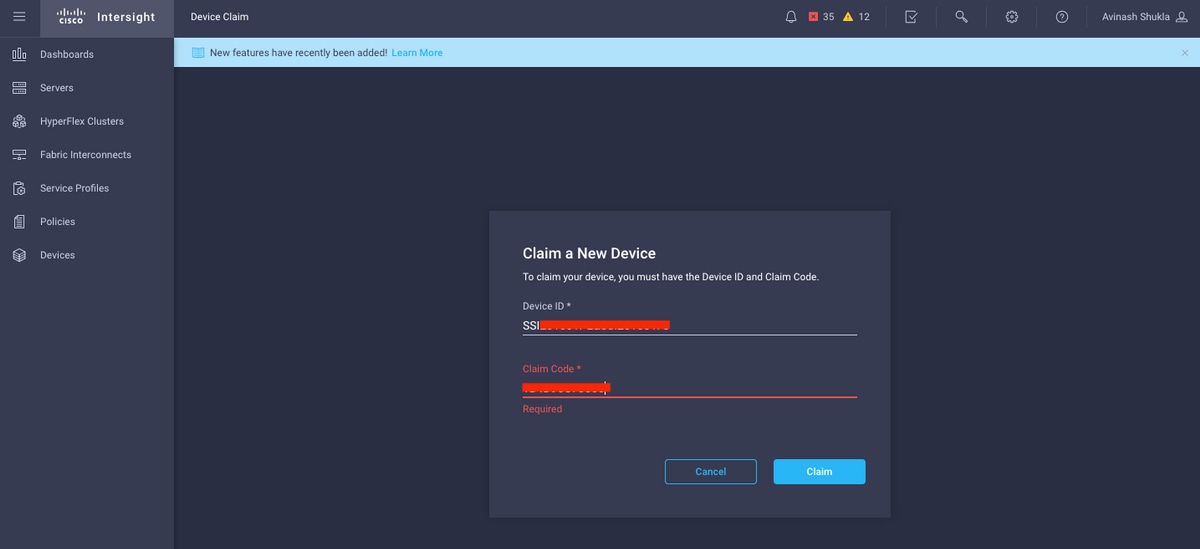
6단계. Intersight 계정에서 클레임 코드와 디바이스 ID(5단계에서 캡처됨)를 사용하여 디바이스를 클레임합니다. 이제 UCSM 도메인이 클레임됩니다.
![](/c/dam/en/us/support/docs/hyperconverged-infrastructure/hyperflex-hx-data-platform/214268-cisco-intersight-hyperflex-installatio-07.png)
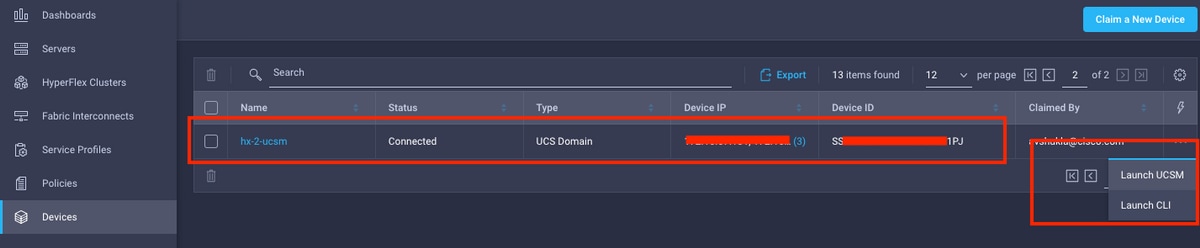
7단계. Devices(디바이스)에서 새 도메인에 "Connected(연결됨)" 및 "Claimed(클레임됨)"가 표시되는지 확인합니다. 또한 이제 Intersight에서 UCSM UI 및 UCSM CLI를 교차 실행할 수 있는 옵션이 있는지 확인합니다.
![](/c/dam/en/us/support/docs/hyperconverged-infrastructure/hyperflex-hx-data-platform/214268-cisco-intersight-hyperflex-installatio-08.png)
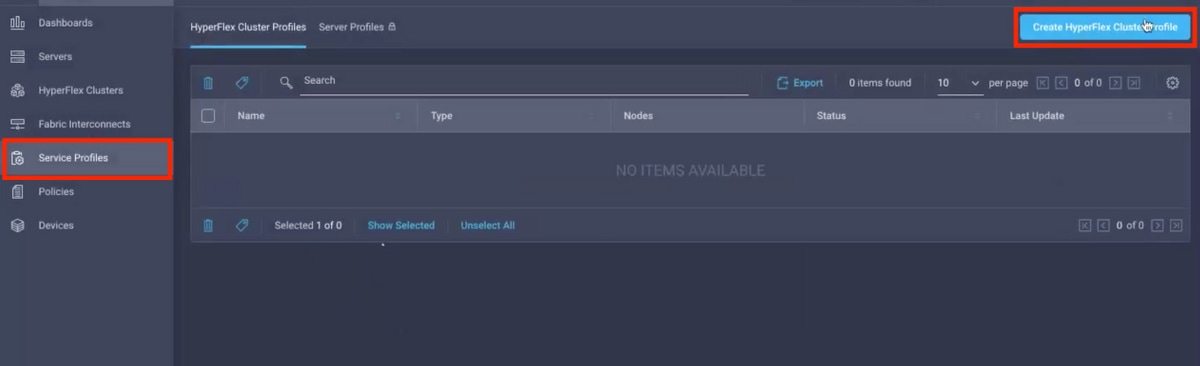
8단계. Service Profiles(서비스 프로필) 아래에서 Create Hyperflex Cluster Profile(Hyperflex 클러스터 프로필 생성)을 클릭합니다
![](/c/dam/en/us/support/docs/hyperconverged-infrastructure/hyperflex-hx-data-platform/214268-cisco-intersight-hyperflex-installatio-09.png)
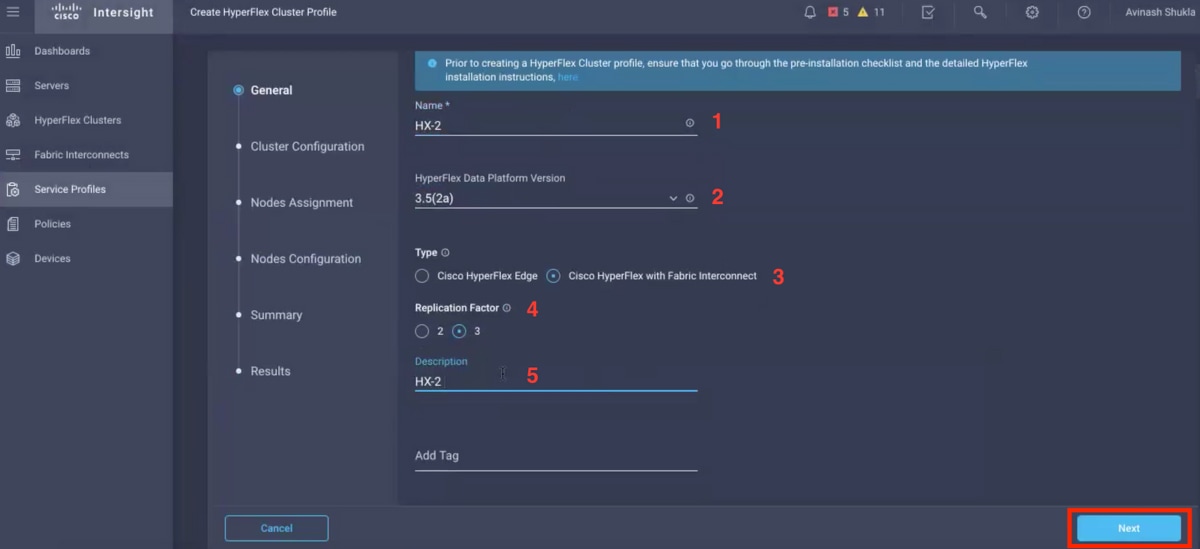
9단계. 다음 단계를 사용하여 서비스 프로필을 구성합니다.
일반 작업
![](/c/dam/en/us/support/docs/hyperconverged-infrastructure/hyperflex-hx-data-platform/214268-cisco-intersight-hyperflex-installatio-10.png)
클러스터 컨피그레이션 - 보안
![](/c/dam/en/us/support/docs/hyperconverged-infrastructure/hyperflex-hx-data-platform/214268-cisco-intersight-hyperflex-installatio-11.png)
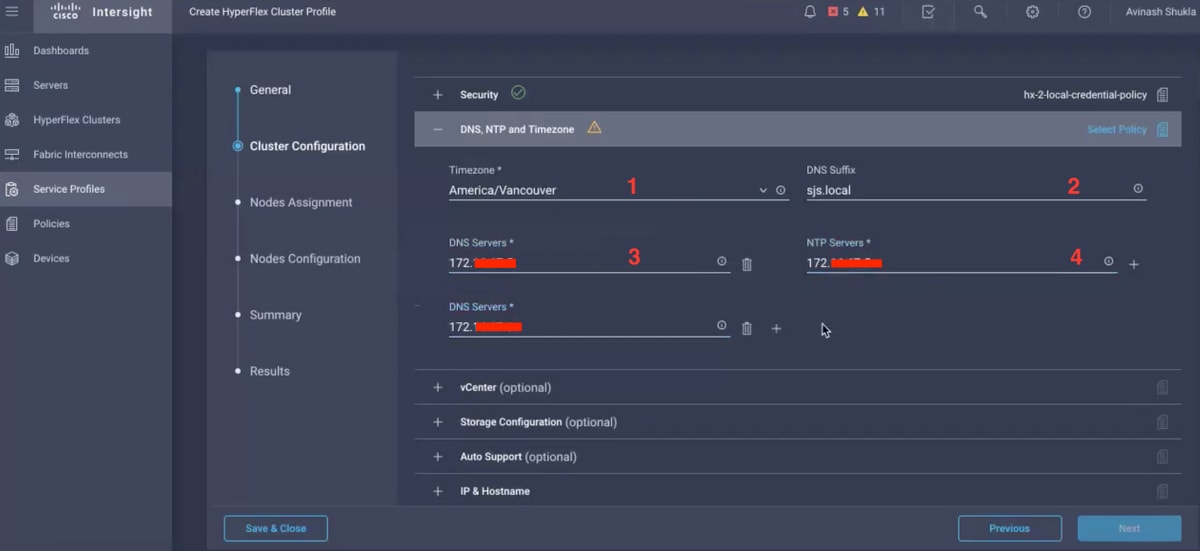
클러스터 컨피그레이션 - DNS, NTP 및 시간대
![](/c/dam/en/us/support/docs/hyperconverged-infrastructure/hyperflex-hx-data-platform/214268-cisco-intersight-hyperflex-installatio-12.png)
클러스터 컨피그레이션 - vCenter 컨피그레이션
![](/c/dam/en/us/support/docs/hyperconverged-infrastructure/hyperflex-hx-data-platform/214268-cisco-intersight-hyperflex-installatio-13.png)
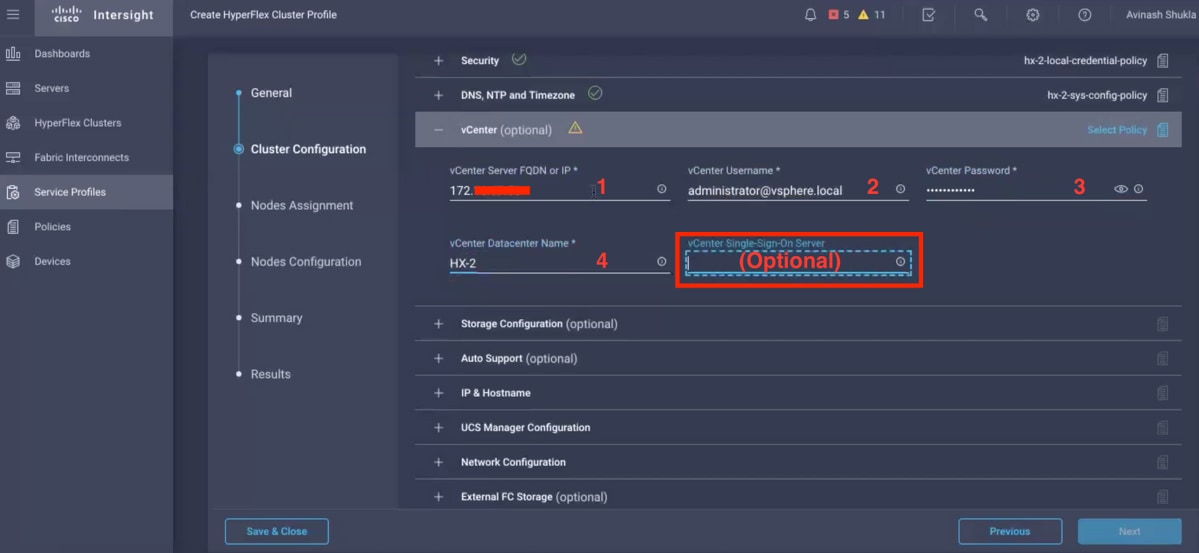
참고:- vCenter 컨피그레이션의 경우 vCenter Single-Sign-On 서버를 건너뛰는 것이 좋습니다. 아래 문서 27페이지를 확인하십시오.
https://www.cisco.com/c/dam/en/us/products/collateral/hyperconverged-infrastructure/hyperflex-hx-series/whitepaper-c11-740456.pdf
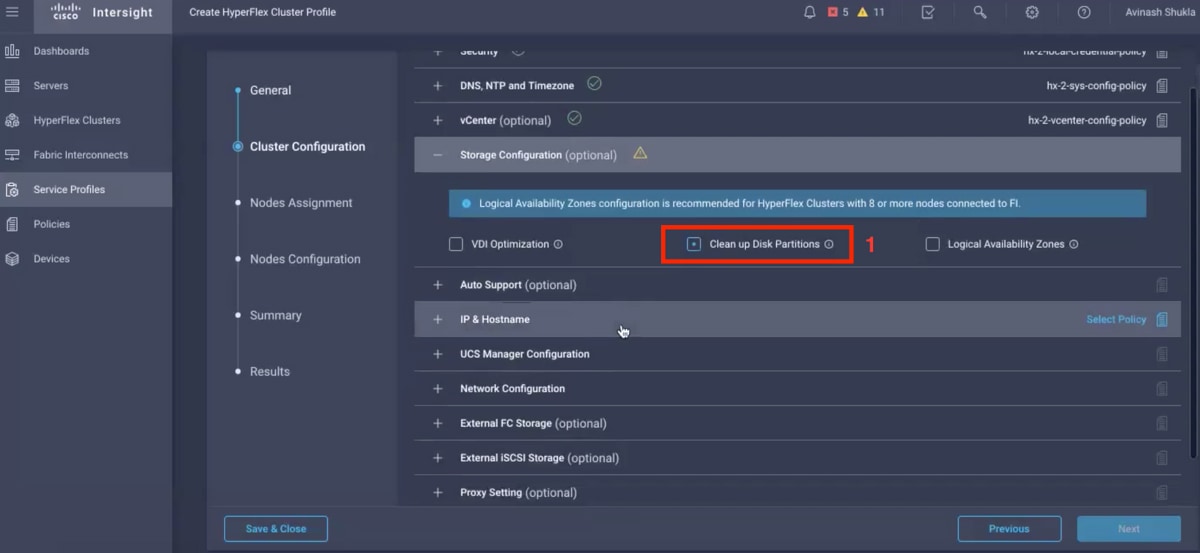
클러스터 컨피그레이션 - 스토리지 컨피그레이션
![](/c/dam/en/us/support/docs/hyperconverged-infrastructure/hyperflex-hx-data-platform/214268-cisco-intersight-hyperflex-installatio-14.png)
클러스터 컨피그레이션 - 자동 지원
![](/c/dam/en/us/support/docs/hyperconverged-infrastructure/hyperflex-hx-data-platform/214268-cisco-intersight-hyperflex-installatio-15.png)
클러스터 컨피그레이션 - IP 및 호스트 이름
![](/c/dam/en/us/support/docs/hyperconverged-infrastructure/hyperflex-hx-data-platform/214268-cisco-intersight-hyperflex-installatio-16.png)
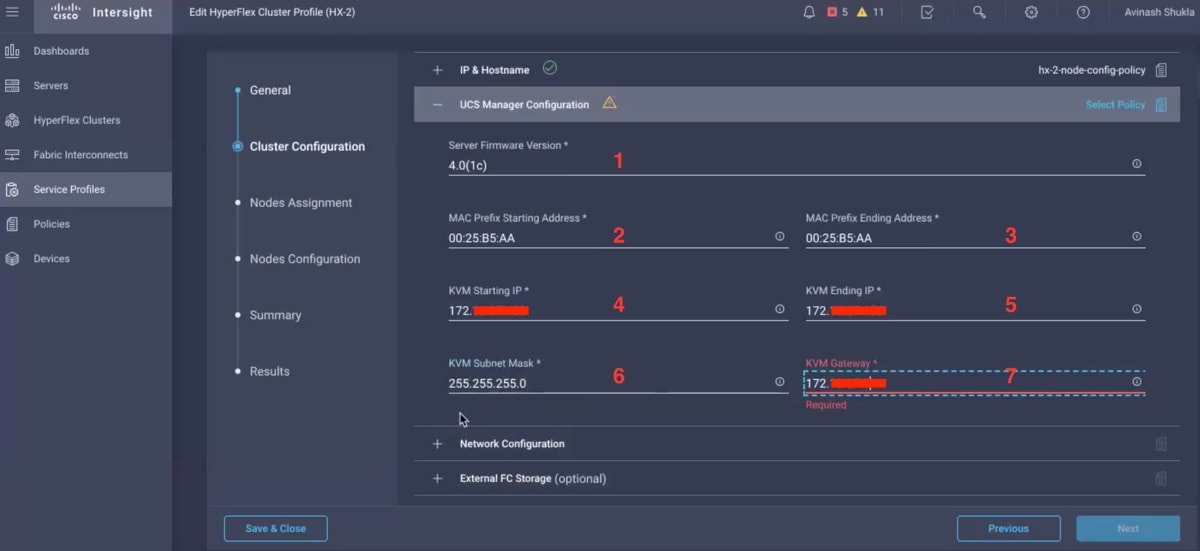
클러스터 컨피그레이션 - UCSM 컨피그레이션
![](/c/dam/en/us/support/docs/hyperconverged-infrastructure/hyperflex-hx-data-platform/214268-cisco-intersight-hyperflex-installatio-17.png)
클러스터 컨피그레이션 - 네트워크
![](/c/dam/en/us/support/docs/hyperconverged-infrastructure/hyperflex-hx-data-platform/214268-cisco-intersight-hyperflex-installatio-18.png)
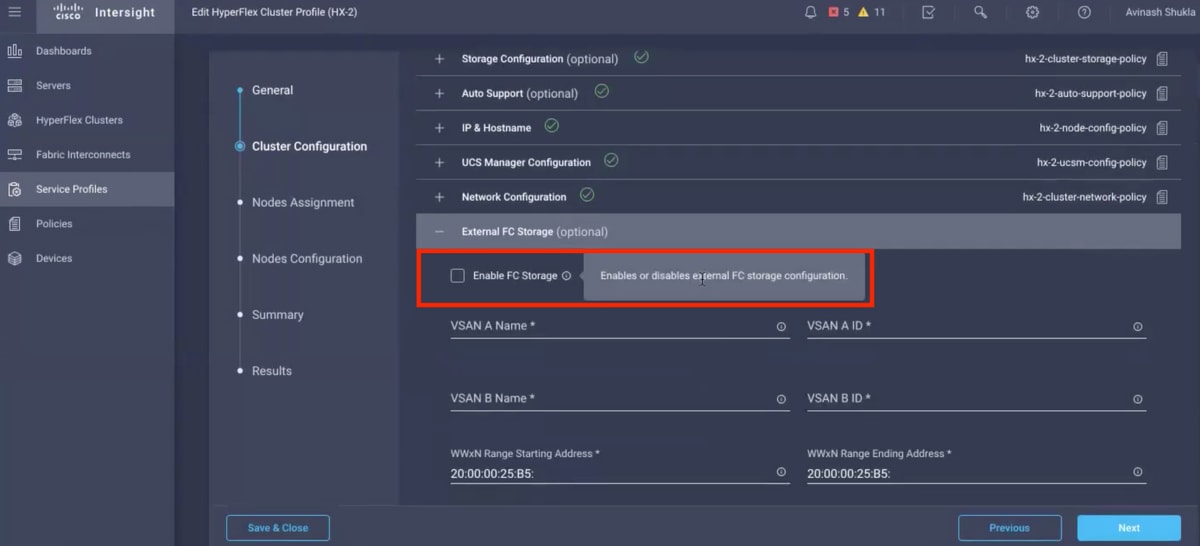
클러스터 컨피그레이션 - 외부 스토리지(선택 사항)
활성화된 경우 FI A와 FI B의 VSAN 이름과 VSAN ID를 각각 입력합니다.
![](/c/dam/en/us/support/docs/hyperconverged-infrastructure/hyperflex-hx-data-platform/214268-cisco-intersight-hyperflex-installatio-19.png)
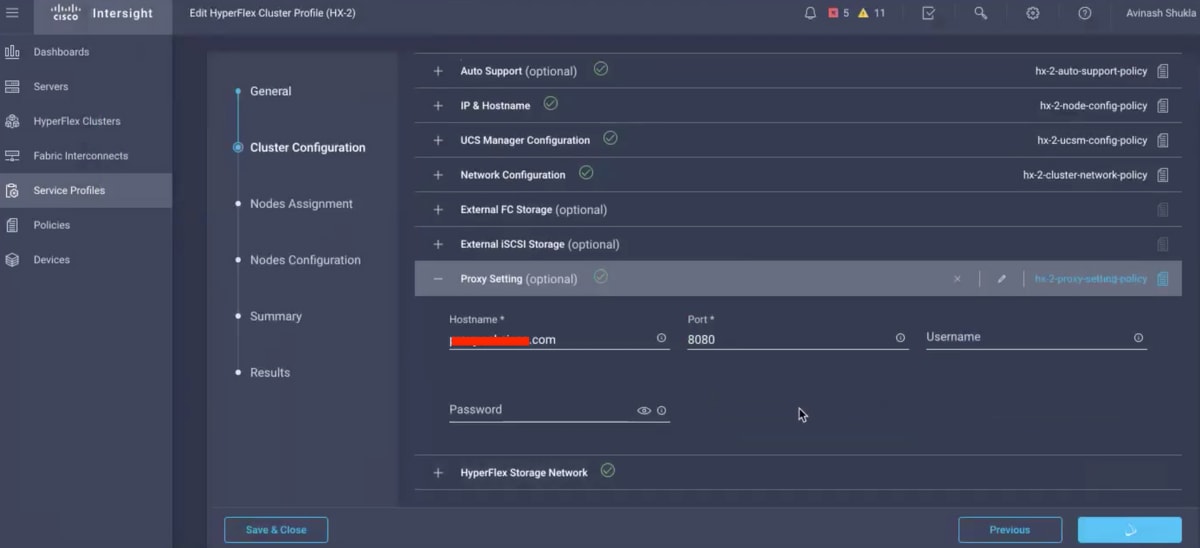
클러스터 컨피그레이션 - 프록시 설정(선택 사항)
![](/c/dam/en/us/support/docs/hyperconverged-infrastructure/hyperflex-hx-data-platform/214268-cisco-intersight-hyperflex-installatio-20.png)
클러스터 컨피그레이션 - Hyperflex 스토리지 네트워크
![](/c/dam/en/us/support/docs/hyperconverged-infrastructure/hyperflex-hx-data-platform/214268-cisco-intersight-hyperflex-installatio-21.png)
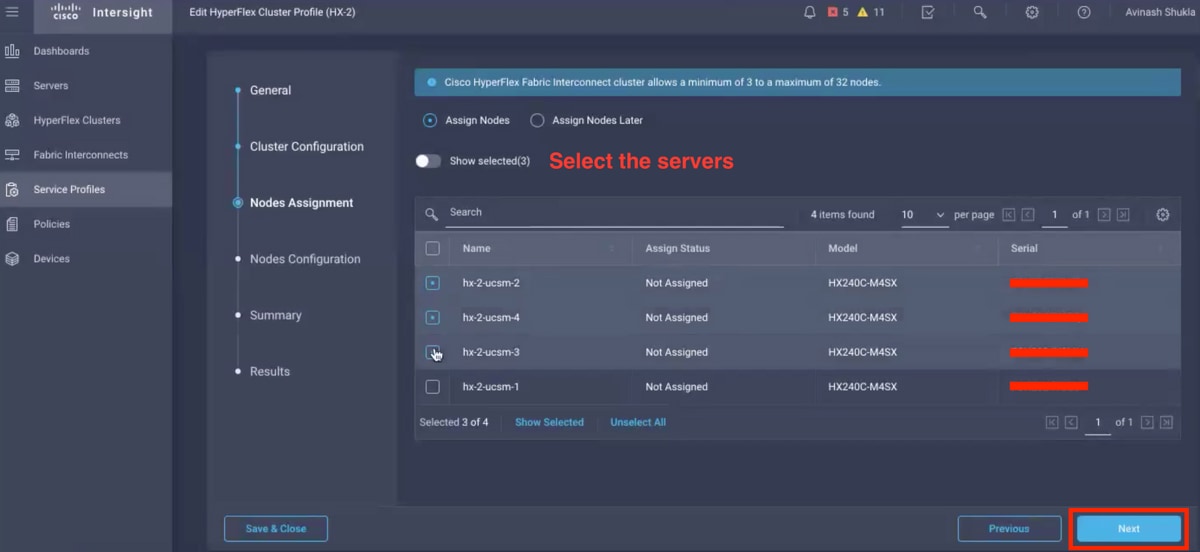
10단계. 노드 지정의 일부로 서버를 선택합니다.
![](/c/dam/en/us/support/docs/hyperconverged-infrastructure/hyperflex-hx-data-platform/214268-cisco-intersight-hyperflex-installatio-22.png)
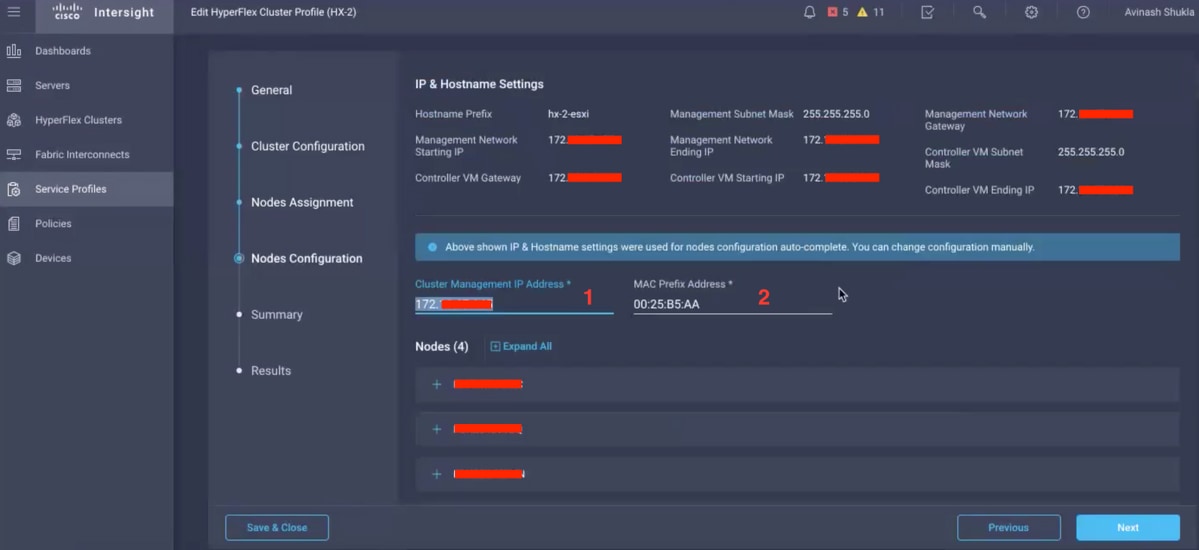
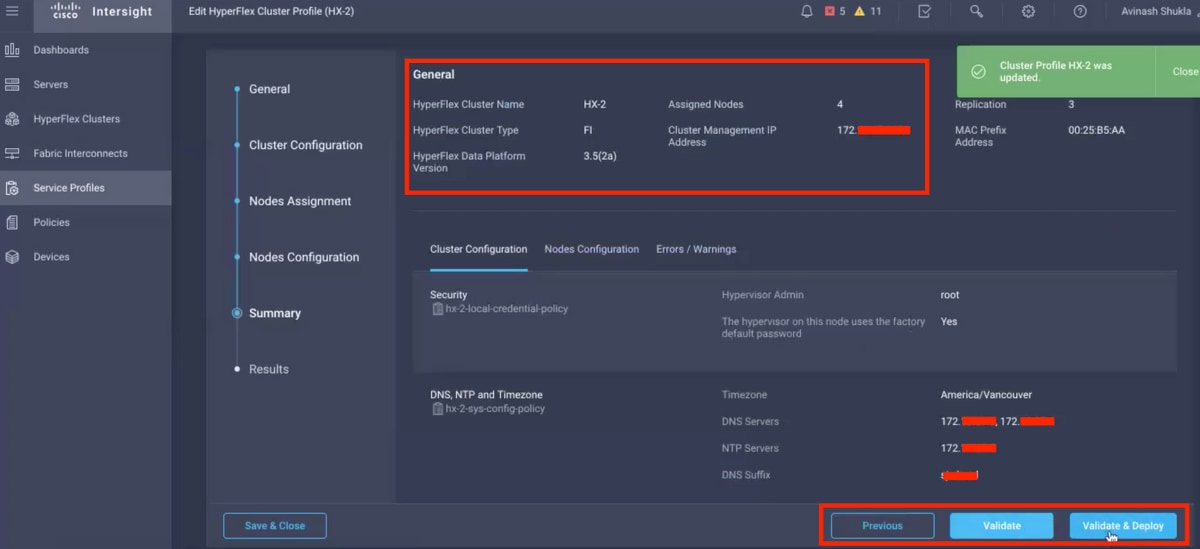
11단계. 노드 컨피그레이션을 위한 하이퍼바이저 IP 및 스토리지 컨트롤러 IP 주소를 구성하고 확인합니다.
![](/c/dam/en/us/support/docs/hyperconverged-infrastructure/hyperflex-hx-data-platform/214268-cisco-intersight-hyperflex-installatio-23.png)
![](/c/dam/en/us/support/docs/hyperconverged-infrastructure/hyperflex-hx-data-platform/214268-cisco-intersight-hyperflex-installatio-24.png)
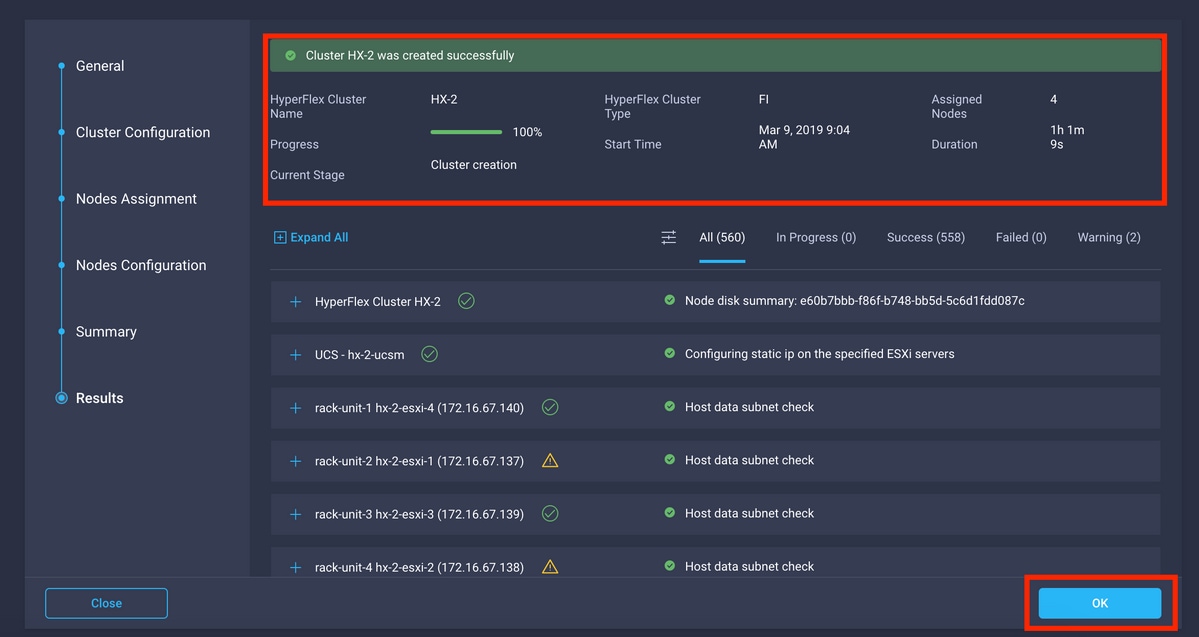
12단계. Validate & Deploy(검증 및 구축)를 클릭하고 진행 상태를 확인한 후 설치가 완료될 때까지 기다립니다.
![](/c/dam/en/us/support/docs/hyperconverged-infrastructure/hyperflex-hx-data-platform/214268-cisco-intersight-hyperflex-installatio-25.png)
13단계. 진행 상태를 확인하고 설치가 완료될 때까지 기다립니다.
![](/c/dam/en/us/support/docs/hyperconverged-infrastructure/hyperflex-hx-data-platform/214268-cisco-intersight-hyperflex-installatio-26.png)
![](/c/dam/en/us/support/docs/hyperconverged-infrastructure/hyperflex-hx-data-platform/214268-cisco-intersight-hyperflex-installatio-27.png)
14단계. 클러스터가 ONLINE 및 HEALTHY인지 확인하고 post_install.py 스크립트를 실행하십시오.
- 클러스터 관리 IP 주소에 SSH를 연결하고 설치 중에 제공된 <root>(HX 4.0 이하) 또는 <admin>(HX 4.5 이상) 사용자 이름과 컨트롤러 VM 비밀번호를 사용하여 로그인합니다.
- 셸에 다음 명령을 붙여넣고 enter 키를 누릅니다. hx_post_install
다음을 확인합니다.
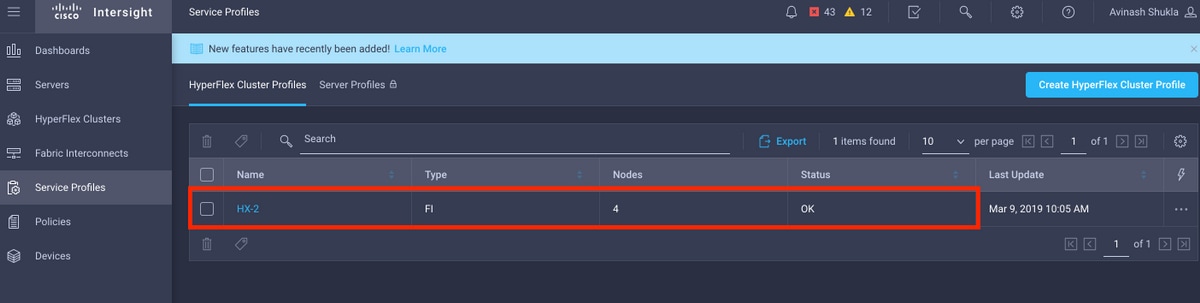
1단계. Service Profiles(서비스 프로필) 아래에서 서비스 프로필 상태를 확인합니다.
![](/c/dam/en/us/support/docs/hyperconverged-infrastructure/hyperflex-hx-data-platform/214268-cisco-intersight-hyperflex-installatio-28.png)
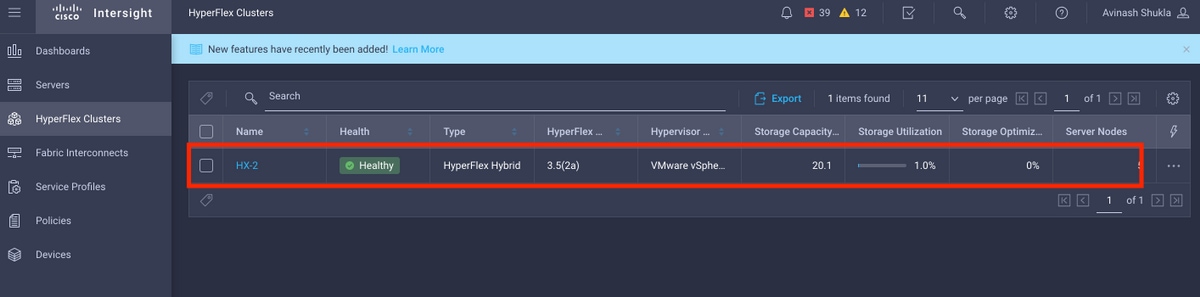
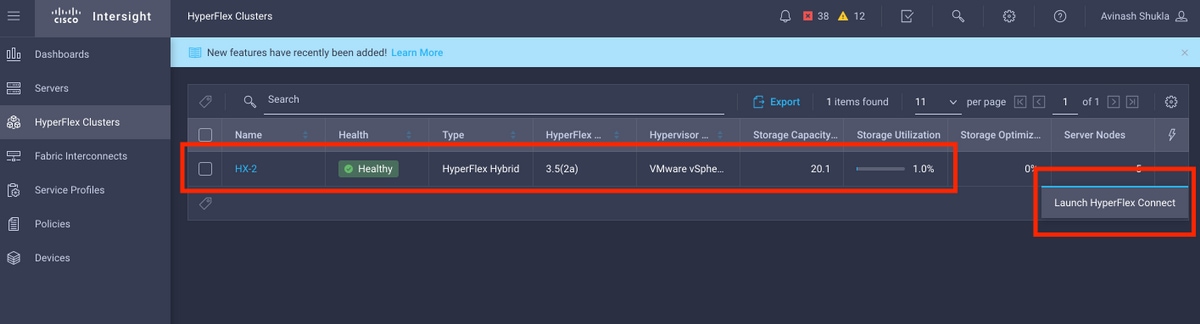
2단계. Hyperflex Cluster에서 HX Cluster Health 및 기타 세부 사항을 확인합니다.
![](/c/dam/en/us/support/docs/hyperconverged-infrastructure/hyperflex-hx-data-platform/214268-cisco-intersight-hyperflex-installatio-29.png)
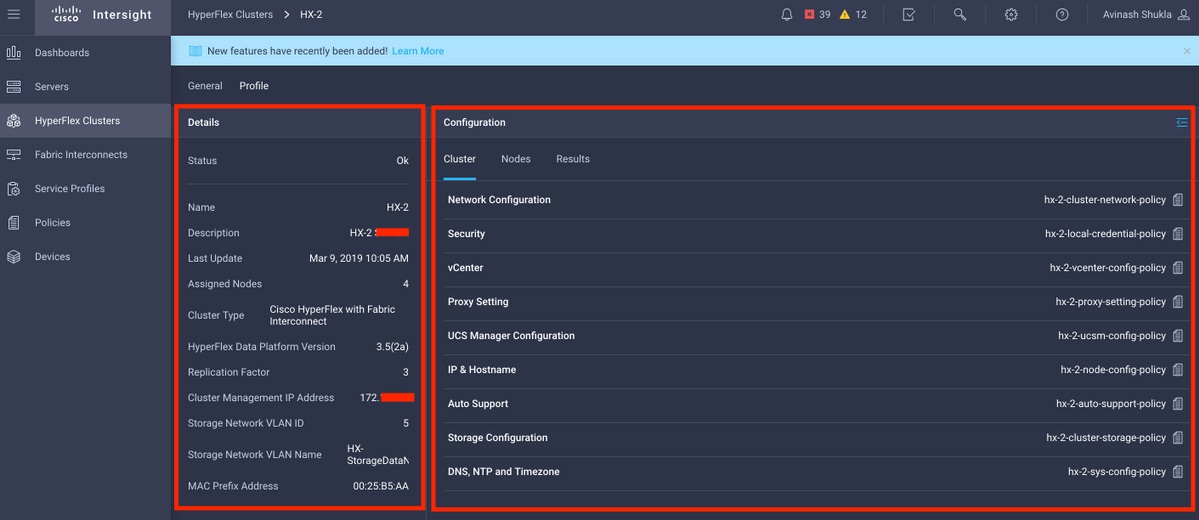
3단계. Name HX-2(이름 HX-2)를 클릭하고 Profile details(프로파일 세부사항)를 찾은 다음 Details(세부사항)에서 다음을 확인합니다.
- 클러스터 관리 IP 주소
- 스토리지 VLAN ID
- 복제 인자
- 클러스터 유형
Configuration(컨피그레이션) 아래의 다양한 정책 및 노드 세부 정보를 확인합니다.
![](/c/dam/en/us/support/docs/hyperconverged-infrastructure/hyperflex-hx-data-platform/214268-cisco-intersight-hyperflex-installatio-30.png)
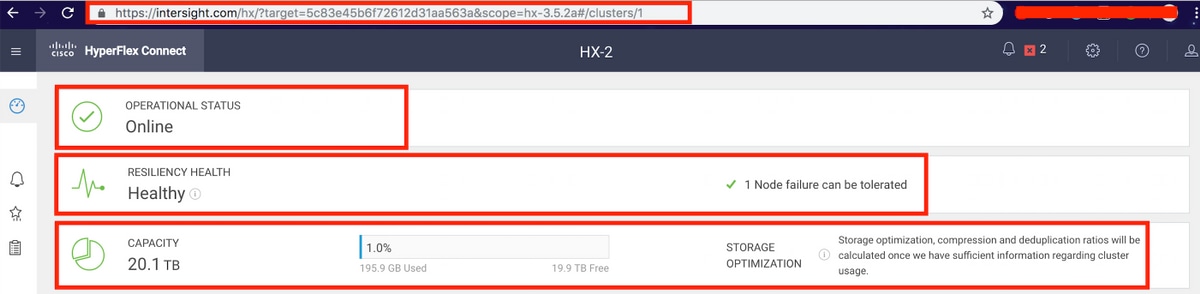
4단계. Intersight의 Hyperflex Clusters에서 Hyperflex Connect를 교차 실행하고 Hyperflex Connect에서 클러스터 상태를 확인합니다.
![](/c/dam/en/us/support/docs/hyperconverged-infrastructure/hyperflex-hx-data-platform/214268-cisco-intersight-hyperflex-installatio-31.png)
![](/c/dam/en/us/support/docs/hyperconverged-infrastructure/hyperflex-hx-data-platform/214268-cisco-intersight-hyperflex-installatio-32.png)