소개
이 문서에서는 JBOD(Just a Bunch Of Disks)에서 UG(Unconfigured Good)로 드라이브 상태를 구성하는 다양한 방법에 대해 설명합니다.
사전 요구 사항
요구 사항
다음 주제에 대한 지식을 보유하고 있으면 유용합니다.
- UCSM(Unified Computing System Manager)
- UCSC(Unified Computing System Central)
- CIMC(Cisco Integrated Management Controller)
- Cisco Intersight
- HDD 및 RAID(Redundant Array of Independent Disks)에 대한 일반적인 지식
사용되는 구성 요소
이 문서는 특정 소프트웨어 및 하드웨어 버전으로 한정되지 않습니다.
이 문서의 정보는 특정 랩 환경의 디바이스를 토대로 작성되었습니다. 이 문서에 사용된 모든 디바이스는 초기화된(기본) 컨피그레이션으로 시작되었습니다. 현재 네트워크가 작동 중인 경우 모든 명령의 잠재적인 영향을 미리 숙지하시기 바랍니다.
배경 정보
- 이 문서에서는 UCSM, UCSC, CIMC, Intersight, MegaRAID, WebBIOS 및 StorCLI에서 JBOD에서 UG로의 드라이브 상태 컨피그레이션을 보여줍니다.
- 이 문서에서는 자동 디스크 상태 컨피그레이션을 지원할 수 있는 UCSM, CIMC 및 Intersight의 일부 기능도 중점적으로 설명합니다.
- 일반적으로 RMA(Return Material Authorization) 또는 OOB(out-of-box) 디스크는 JBOD 드라이브 상태입니다. JBOD인 드라이브를 RAID 컨피그레이션에서 사용하려면 UG 드라이브 상태로 변경해야 하는 경우가 있습니다. JBOD를 UG로 변경하는 또 다른 일반적인 이유는 내결함성 RAID의 일부인 디스크에 장애가 발생한 경우입니다. 이 시나리오에서 RMA 디스크가 JBOD 드라이브 상태인 경우 UG를 변경하면 재구축 프로세스를 트리거하는 데 도움이 될 수 있습니다.
- 일부 UCS 정책에서는 JBOD 디스크에서 RAID 생성을 허용하지만, 이는 명시적으로 선택해야 합니다.
- 많은 애플리케이션이 RAID를 통해 JBOD를 활용하므로 UG 이외의 다른 상태로 드라이브를 변경해야 할 수 있습니다. 이 문서에서는 JBOD에서 UG로의 변경 사항을 중점적으로 설명하지만, UG에서 JBOD로의 드라이브 상태와 같은 동일한 단계를 수행하여 드라이브 상태를 설정할 수 있습니다.
JBOD에서 UG로 디스크 상태 구성
주의: 컨피그레이션 변경 사항을 커밋하기 전에 디스크를 관리하는 RAID 컨트롤러와 구성해야 하는 디스크 슬롯을 알아야 합니다.
UCSM
해당 서버로 이동하여 Inventory > Storage > Disks. 변경해야 할 디스크를 선택하고 Set JBOD to Unconfigured Good > Yes 그림에 표시된 것과 같습니다.
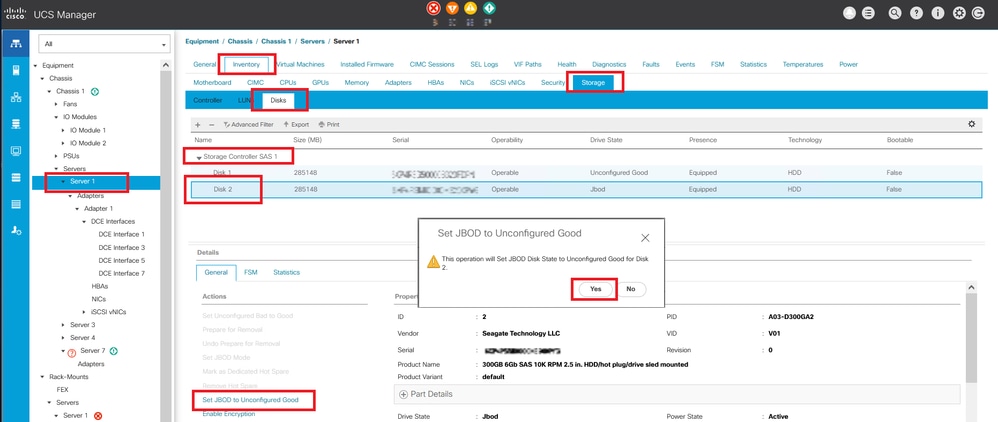
참고: 디스크 상태 변경이 커밋되면 FSM(Finite State Machine) 탭을 확인하여 디스크 컨피그레이션 진행 상황을 확인합니다.
UCSM CLI:
UCS-NYEST-A# scope server 1
UCS-NYEST-A /server# show raid-controller <-- Run this command to determine the RAID Controller Type and ID.
RAID Controller:
ID TYPE PCI Addr
-- ---- --------
1 SAS 07:00.0 <-- This example shows the RAID Controller TYPE is SAS and the ID is 1.
7 PCH 00:31.2
UCS-NYEST-A /server# scope raid-controller 1 sas
UCS-NYEST-A /server/raid-controller# scope local-disk 1 <-- In this example physical disk in slot 1 is scoped to.
UCS-NYEST-A /server/raid-controller/local-disk# set admin-state unconfigured-good
UCS-NYEST-A /server/raid-controller/local-disk*# commit-buffer
UCS Central
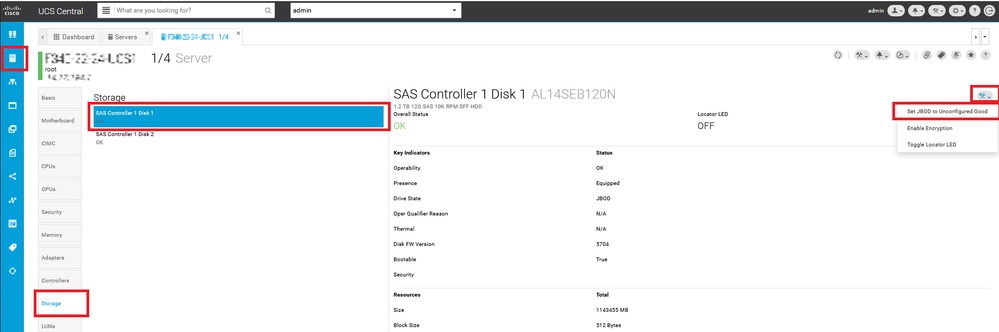
해당 서버로 이동하여 Storage, 그런 다음 변경해야 할 디스크를 선택합니다. 다음을 선택합니다. Tools Icon > Set JBOD to Unconfigured Good 그림에 표시된 것과 같습니다.
CIMC
탐색 Storage 적절한 RAID 컨트롤러를 선택합니다. 선택 Physical Drives 변경할 디스크를 선택하고 Set State as Unconfigured Good 그림에 표시된 것과 같습니다.

CIMC CLI:
C220-NYEST-1# scope chassis
C220-NYEST-1 /chassis# show storageadapter <-- Run this command to determine the RAID Controller PCI Slot.
----------------------------------------------------------------------------------------------------------
PCI Slot Health Controller Status R O C Temperature Product Name Serial Number
Firmware Package Build Product ID Battery Status Cache Memory Size Boot Drive Boot Drive is PD
Product PID
----------------------------------------------------------------------------------------------------------
MRAID Good Optimal 62 Degrees C Cisco 12G Modular Raid Controller
51.10.0-36 12 LSI Logic Optimal 0 MB 3 true UCSC-RAID-M5
C220-NYEST-1 /chassis# scope storageadapter MRAID <-- Use the previous PCI Slot here.
C220-NYEST-1 /chassis/storageadapter# scope physical-drive 1 <-- In this example physical disk in slot 1 has been scoped to.
C220-NYEST-1 /chassis/storageadapter/physical-drive# make-unconfigured-good
Intersight
해당 서버로 이동하여 Inventory > Storage Controllers. 적절한 RAID 컨트롤러로 이동하여 Physical Drives 변경할 디스크를 선택합니다. 다음을 선택합니다. Ellipsis 오른쪽 위에 Set State > Unconfigured Good > Set 그림에 표시된 것과 같습니다.

메가RAID
KVM(Keyboard Video Monitor)을 실행하고 서버의 전원을 껐다가 켭니다. 누르기 Ctrl - R MegaRAID가 화면에 표시되는 경우 누르기 Ctrl - N Cisco의 Advanced Threat Solutions PD Mgmt 탭을 클릭합니다. 탐색 F2-Operations > Make Unconfigured Good > Enter 그림에 표시된 것과 같습니다.

웹바이오스
KVM을 실행하고 서버의 전원을 껐다가 켭니다. 누르기 Ctrl - H WebBIOS가 표시되면 Drives 적절한 디스크를 선택합니다. 탐색 Make Unconf Good > Go 그림에 표시된 것과 같습니다.

StorCLI
storcli /c0 /eall /sall show <-- Run this command to determine the Enclosure ID and Disk slot.
Controller = 0
Status = Success
Description = Show Drive Information Succeeded.

Drive Information :
=====================

-----------------------------------------------------------------------------------------------
EID:Slt  DID  State  DG     Size  Intf  Med  SED  PI  SeSz  Model                          SP
-----------------------------------------------------------------------------------------------
252:1    6    UBad   0   462.25   GB   SATA   HDD   N   N   512B   WDC   WD5003ABYX-01WERA1  U <-- In this example the Enclosure ID is 252 and the Disk slot is 1. The drive also shows UBad.
-----------------------------------------------------------------------------------------------

storcli /c0 /e252 /s1 set good <-- Use the Enclosure ID and Slot ID above.
Controller = 0
Status = Success
Description = Show Drive information Succeeded.

Drive Information :
=====================

-----------------------------------------------------------------------------------------------
EID:Slt   DID    State    DG    Size    Intf    Med    SED    PI    SeSz    Model           SP
-----------------------------------------------------------------------------------------------
252:1    6    UGood    0    462.25   GB   SATA   HDD   N N   512B   WDC  WD5003ABYX-01WERA1  U <-- The Drive state is now UGood.
-----------------------------------------------------------------------------------------------
디스크 자동 컨피그레이션
UCSM 및 CIMC에서 특정 RAID 컨트롤러 및 펌웨어 버전은 자동 컨피그레이션 모드를 지원합니다. 자동 구성은 새로 삽입된 디스크의 상태를 선택한 디스크 상태로 자동으로 설정합니다. UCSM에서 자동 컨피그레이션은 서버와 연결된 서비스 프로필에 연결된 스토리지 프로필에 의해 구축됩니다. 독립형 C-Series 서버를 사용하면 RAID 컨트롤러에서 직접 자동 컨피그레이션을 설정할 수 있습니다.
UCSM
탐색 Storage > Storage Profiles > Create Storage Profile 또는 현재 파일을 편집합니다. 내부 Auto Config Mode 상자에서 Unconfigured Good > Ok 그림에 표시된 것과 같습니다.

CIMC
탐색 Storage 적절한 RAID 컨트롤러를 선택합니다. 탐색 Set Physical Drive Status Auto Config Mode > Unconfigured Good > Save 그림에 표시된 것과 같습니다.

디스크의 기본 드라이브 모드
Cisco Intersight에서는 스토리지 정책을 사용하여 특정 RAID 컨트롤러 및 펌웨어 버전에 기본 드라이브 모드를 설정할 수 있습니다. 기본 드라이브 모드는 스토리지 정책에 정의되어 서버 프로필에 연결됩니다. 스토리지 정책에서 선택한 디스크 상태가 해당 서버에 대해 새로 삽입된 디스크에 자동으로 설정됩니다.
Intersight
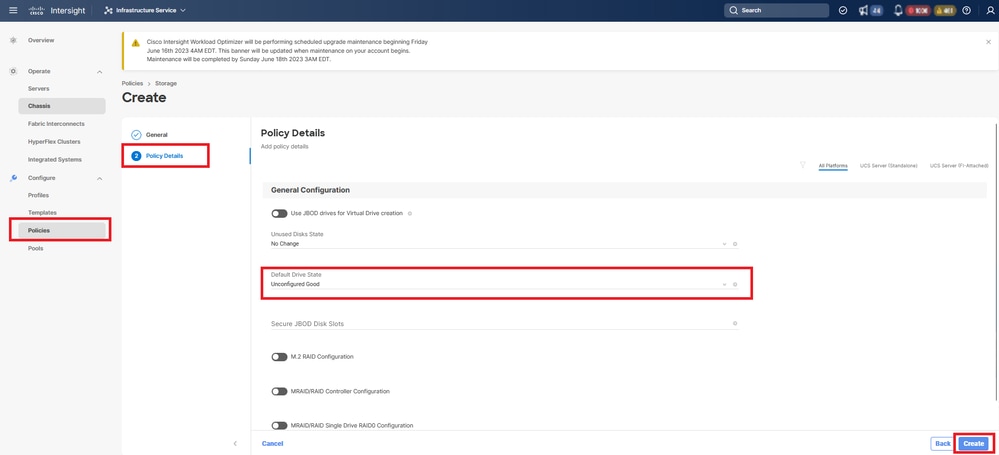
탐색 Policies > Create Policy 또는 현재 파일을 편집합니다. 다음으로 이동 Storage Policy > Policy Details > Default Drive State > Unconfigured Good > Create 그림에 표시된 것과 같습니다.
관련 정보
 피드백
피드백