UCS Central에서 로컬 서비스 프로필을 글로벌로 마이그레이션하기 위한 컨피그레이션 가이드
다운로드 옵션
편견 없는 언어
본 제품에 대한 문서 세트는 편견 없는 언어를 사용하기 위해 노력합니다. 본 설명서 세트의 목적상, 편견 없는 언어는 나이, 장애, 성별, 인종 정체성, 민족 정체성, 성적 지향성, 사회 경제적 지위 및 교차성에 기초한 차별을 의미하지 않는 언어로 정의됩니다. 제품 소프트웨어의 사용자 인터페이스에서 하드코딩된 언어, RFP 설명서에 기초한 언어 또는 참조된 서드파티 제품에서 사용하는 언어로 인해 설명서에 예외가 있을 수 있습니다. 시스코에서 어떤 방식으로 포용적인 언어를 사용하고 있는지 자세히 알아보세요.
이 번역에 관하여
Cisco는 전 세계 사용자에게 다양한 언어로 지원 콘텐츠를 제공하기 위해 기계 번역 기술과 수작업 번역을 병행하여 이 문서를 번역했습니다. 아무리 품질이 높은 기계 번역이라도 전문 번역가의 번역 결과물만큼 정확하지는 않습니다. Cisco Systems, Inc.는 이 같은 번역에 대해 어떠한 책임도 지지 않으며 항상 원본 영문 문서(링크 제공됨)를 참조할 것을 권장합니다.
목차
소개
이 문서에서는 로컬 서비스 프로필을 글로벌로 마이그레이션하는 방법 또는 도메인이 실수로 중앙에서 등록되지 않은 경우에 대해 설명합니다
사전 요구 사항
요구 사항
다음 주제에 대한 지식을 보유하고 있으면 유용합니다.
- Cisco Unified Computing System
- UCS Central
- 로컬 프로파일을 글로벌 프로파일로 마이그레이션하는 절차
아래 절차에서는 각 서비스 프로필 내의 WWPN(Target Initiators)으로 이미 조닝된 가장 까다로운 UseCase, Boot from SAN with Remote Storage Boot LUN(원격 스토리지 부팅 LUN 포함 SAN에서 부팅)을 가정합니다.마이그레이션 중에는 ID가 동일해야 합니다.
사용되는 구성 요소
이 문서의 정보는 다음 소프트웨어 및 하드웨어 버전을 기반으로 합니다.
- Cisco UCSM(Unified Computing System Manager)
- 패브릭 인터커넥트(FI)
- ESXi VM에서 실행되는 UCS 중앙
이 문서의 정보는 특정 랩 환경의 디바이스를 토대로 작성되었습니다.이 문서에 사용된 모든 디바이스는 초기화된(기본) 컨피그레이션으로 시작되었습니다.현재 네트워크가 작동 중인 경우, 모든 명령어의 잠재적인 영향을 미리 숙지하시기 바랍니다.
마이그레이션 단계
- 로컬 SP의 문서 풀 ID/정책/VLAN/VSANs/템플릿
- UCS Central에서 모든 ID/정책/VLAN/VSANs/템플릿 및 GLOBAL-SP를 다시 생성합니다.
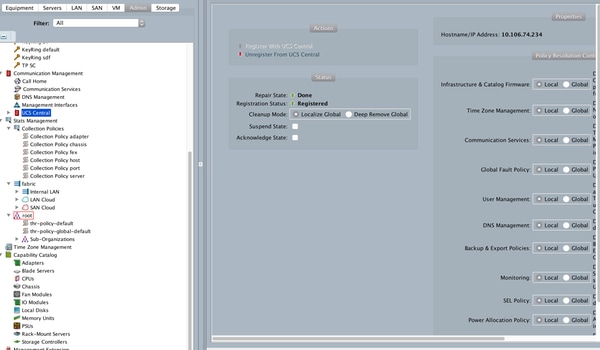
- UCS Central에 UCSM을 등록합니다.
- 로컬 프로필을 전역 프로필로 마이그레이션합니다.
- ID가 새 GLOBAL-SP의 특정 영역 지정 서버에 대한 올바른 ID인지 확인합니다.
- GLOBAL-SP를 지정된 서버에 연결합니다.
- SAN LUN에서 서버를 부팅합니다.
1단계. 아래 강조 표시된 로컬 SP의 문서 풀 ID/정책/VLAN/VSANs/템플릿.
UCS-FI # scope org /
UCS-FI /org # show service-profile status
Service Profile Name Server Assignment Association   Power State   Op State
-------------------- ------- ---------- -------------- -------------- --------
SP01                1/3     Assigned   Associated     On             Ok

UCS-FI /org # scope service-profile SP01

UCS-FI /org/service-profile # show detail
Service Profile:
 Service Profile Name: SP01
 Boot Policy: LocalDisk
 BIOS Policy: ESX_BIOS
 Host f/w Policy: global-default
 Local Disk Policy: LocalDisk
 Maintenance Policy: UserAck
 Power Policy: PowerCap
 Stats Policy: TemThreshold
  Scrub Policy: global-default
UCS-FI /org/service-profile # show identity
Service Profile Name: SP01
UUID Suffix Pool: P_1
Dynamic UUID: c9fe0fd0-d051-11e3-00ff-000000000101
VNIC FC Node:
WWNN Pool: P_N_1
       Dynamic WWNN: 20:FF:00:25:B5:00:01:01
UCS-FI /org/service-profile # show vnic identity
vNIC:
Name       Type   Fabric ID Dynamic MAC Addr
---------- ------- --------- ----------------
ESX_Dat_A1 Ether   A         00:25:B5:0A:04:01
ESX_Dat_A2 Ether   A         00:25:B5:0A:04:02
ESX_Dat_A3 Ether   A         00:25:B5:0A:04:03
ESX_Dat_A4 Ether   A         00:25:B5:0A:04:04
vHBA:
Name       Type   Fabric ID Dynamic WWPN
---------- ------- --------- ------------
ESX_FCDat_A1 Fc     A         20:FF:00:25:B5:0A:04:01
ESX_FCDat_A2 Fc     A         20:FF:00:25:B5:0A:04:02
ESX_FCDat_B1 Fc     B         20:FF:00:25:B5:0B:04:01

UCS-FI /org/service-profile # show vnic ESX_Vcon detail
vNIC:
   Adapter Policy: global-VMWare
   QoS Policy: ESX_QoS
      Network Control Policy: CDP_EN
      Stats Policy: TemThreshold

UCS-FI /org/service-profile # show vhba ESX_SB_A1 detail
vHBA:
   Adapter Policy: global-VMWare
   Stats Policy: G-TemThreshold
2단계. UCS Central에서 모든 ID/정책/VLAN/VSAN/템플릿 및 GLOBAL-SP를 다시 생성합니다.
-
전역 풀, 정책, VLAN, VSAN, vNIC 템플릿, vHBA 템플릿, LAN 생성
-
연결 정책, SAN 연결 정책, 글로벌 서비스 프로파일 템플릿 및 글로벌 서비스 프로파일
-
UCS Manager에서 로컬로 정의된 VSAN과 동일한 ID를 가진 전역 VSAN을 생성할 때, 전역 이름이 고유한지 확인하고, VSAN 이름 앞에 "G-"를 고려하고, 새로 생성된 전역 VSAN의 FCoE VLAN ID가 FCoE VLAN에 정확히 일치하는지 확인합니다. 해당 로컬 VSAN입니다.VSAN ID가 동일하고 FCoE ID가 다른 경우 글로벌 서비스 프로파일 연결 시 결함이 제기됩니다.
-
글로벌 SP를 생성하면 해당 글로벌 ID 풀에서 새 UUID, MAC, WWNN 및 WWPN이 할당됩니다.
-
새 전역 템플릿에 이 새 정책을 적용합니다.
-
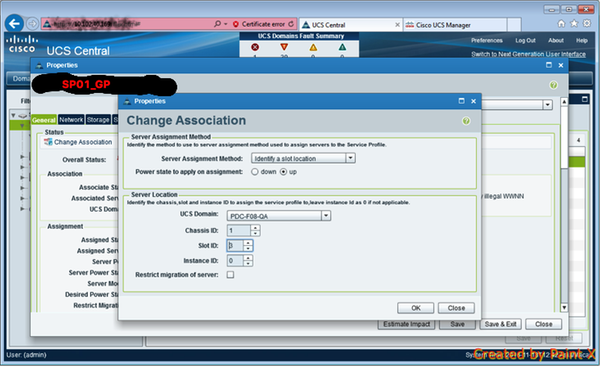
템플릿에서 글로벌 서비스 프로필 SP01_GP 구축
-
WWNN/WWPN/MAC를 새 글로벌 프로파일 SP01_GP로 설정하여 동일한 ID를 유지합니다.
참고:글로벌 SP를 생성하면 해당 글로벌 ID 풀에서 새 UUID, MAC, WWNN 및 WWPN이 할당됩니다.
CLI를 통해 ID를 할당하는 방법은 컨피그레이션 가이드를 참조하십시오.
UCS-CENTRAL# connect resource-mgr
UCS-CENTRAL(resource-mgr)# scope org /
UCS-CENTRAL(resource-mgr) /org # scope service-profile SP01_GP
UCS-CENTRAL(resource-mgr) /org/service-profile # set identity dynamic-wwnn 20:FF:00:25:B5:00:01:01
UCS-CENTRAL(resource-mgr) /org/service-profile* # commit-buffer
UCS-CENTRAL(resource-mgr) /org/service-profile # scope vnic ESX_Dat_A1
UCS-CENTRAL(resource-mgr) /org/service-profile/vnic # set identity dynamic-mac 00:25:B5:0A:04:01
UCS-CENTRAL(resource-mgr) /org/service-profile/vnic* # commit-buffer
UCS-CENTRAL((resource-mgr) /org/service-profile # scope vhba ESX_FCDat_A1
UCS-CENTRAL((resource-mgr) /org/service-profile/vhba # set identity dynamic-wwpn 20:FF:00:25:B5:0A:04:01
CODVQUCSCEN01(resource-mgr) /org/service-profile/vhba* # commit-buffer
간단한 UCS Central PowerTool 스크립트를 활용하여 원래(올바르게 영역 지정) WWPN 및 기타 ID를 스왑 또는 할당합니다.이러한 ID는 생성된 글로벌 풀의 일부이며 ID Universe는 이러한 ID가 올바르게 할당되면 "사용 중" 상태를 반영합니다.
이것은 UCS Central PowerTools 스크립트의 예일 뿐 Cisco에서 공식적으로 지원하는 제품은 아닙니다.위험을 감수하고 먼저 실습에서 테스트한 후 프로덕션 환경에서 사용하십시오.글로벌 SP 설정, 조직, ID, 정책 등에 따라 스크립트를 편집하십시오.
자세한 내용은 가이드를 참조하십시오.
 Change To (from Local SP) UUID: dc81c8de-3b00-11e5-0000-000000000025 Change To (from Local SP) MAC for vnic0: 00:25:B5:00:00:25
 Change To (from Local SP) MAC for vnic1: 00:25:B5:00:00:26
 Change To (from Local SP) WWNN ID: 20:00:00:25:B5:00:00:25
 Change To (from Local SP) WWPN for A Fabric: 20:00:00:25:B5:AA:00:25 Change To (from Local SP) WWPN for B Fabric: 20:00:00:25:B5:BB:00:25
Start-UcsCentralTransaction
 $mo = Get-UcsCentralOrg -Name root | Add-UcsCentralServiceProfile -Name “SP01_GP” -ModifyPresent -Uuid "0909ac8a-2411-11e4-0000-181401000099”
 $mo_1 = $mo | Add-UcsCentralVnic -ModifyPresent -Name “eth0" -Addr "00:25:B5:0A:04:01”
 $mo_2 = $mo | Add-UcsCentralVnic -ModifyPresent -Name “eth1" -Addr "00:25:B5:0A:04:02”
 $mo_3 = $mo | Add-UcsCentralVhba -ModifyPresent -Name “fc0" -Addr "20:FF:00:25:B5:0A:04:01”
 $mo_4 = $mo | Add-UcsCentralVhba -ModifyPresent -Name “fc1" -Addr "20:FF:00:25:B5:0A:04:02”
 $mo_5 = $mo | Add-UcsCentralVnicFcNode -ModifyPresent -Addr "20:01:00:25:B5:14:01:99” Complete-UcsCentralTransaction
Start-UcsCentralTransaction
 $mo = Get-UcsCentralOrg -Name root | Add-UcsCentralServiceProfile -Name “SP01_GP” -ModifyPresent -Uuid derived
 $mo_1 = $mo | Add-UcsCentralVnic -ModifyPresent -Name “eth0" -Addr derived
 $mo_2 = $mo | Add-UcsCentralVnic -ModifyPresent -Name “eth1" -Addr derived
 $mo_3 = $mo | Add-UcsCentralvhba -ModifyPresent -Name “fc0" -Addr derived
 $mo_4 = $mo | Add-UcsCentralvhba -ModifyPresent -Name “fc1" -Addr derived
 $mo_5 = $mo | Add-UcsCentralVnicFcNode -ModifyPresent -Addr pool-derived
수동으로 할당하려면 각 ID에 대해 반복합니다.
3단계. UCS Central에 UCSM을 등록합니다.

4단계. 로컬 프로파일을 글로벌 프로파일로 마이그레이션합니다.
- 로컬 SP로 서버 정상적으로 종료
- 로컬 SP 연결 해제
- 로컬 SP 삭제((할당된 ID를 사용되지 않은 상태로 풀로 다시 복구)
UCSM에서 서비스 프로필을 관리하는 방법에 대한 자세한 내용은 컨피그레이션 가이드를 참조하십시오.
5단계. 새 글로벌 프로파일을 확인합니다.
UCS-FI /org # show service-profile status
Central(resource-mgr) /org/service-profile # show identity
6단계. GLOBAL-SP를 지정된 서버에 연결합니다.
중앙 SP에서 SP를 연결하는 방법 구성 가이드를 참조하십시오.

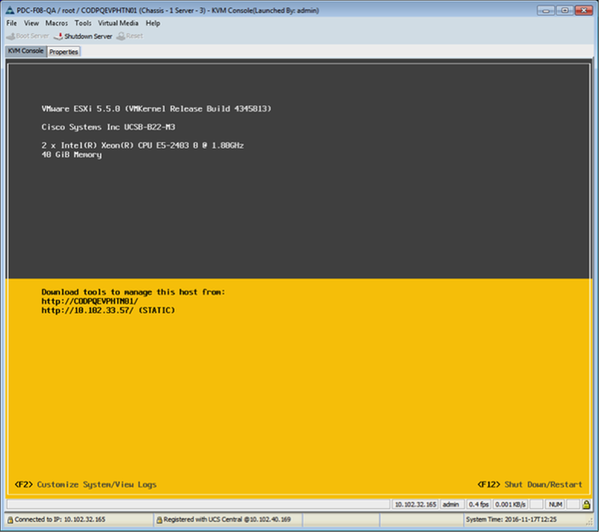
7단계. 새 글로벌 SP가 할당된 후 SAN LUN에서 서버를 부팅합니다.
서버가 KVM 콘솔을 통해 SAN에서 부팅할 수 있는지 확인
관련 정보
- 중앙 모범 사례
https://communities.cisco.com/servlet/JiveServlet/downloadBody/66619-102-3-120435/UCS%20Central%20Operations%20and%20Best%20Practice%20Guide.pdf - 중앙 구성 가이드
http://www.cisco.com/c/en/us/support/servers-unified-computing/ucs-manager/products-installation-and-configuration-guides-list.html - PowerTools 제품군
https://communities.cisco.com/docs/DOC-37154

 피드백
피드백