Configure and Troubleshoot External Web-Authentication on 9800 WLC
Available Languages
Download Options
Bias-Free Language
The documentation set for this product strives to use bias-free language. For the purposes of this documentation set, bias-free is defined as language that does not imply discrimination based on age, disability, gender, racial identity, ethnic identity, sexual orientation, socioeconomic status, and intersectionality. Exceptions may be present in the documentation due to language that is hardcoded in the user interfaces of the product software, language used based on RFP documentation, or language that is used by a referenced third-party product. Learn more about how Cisco is using Inclusive Language.
Contents
Introduction
This document describes how to configure and troubleshoot external web-authentication (EWA) on a Catalyst 9800 Wireless LAN Controller (WLC).
Prerequisites
This document assumes that web server is properly configured to allow external communication and web page is properly configured to send all the necessary parameters for the WLC to authenticate the user and move client sessions to RUN state.
Note: Since external resource access is restricted by the WLC through access-list permissions, all the scripts, fonts, images, and so on. that are used in the web-page need to be downloaded and remain local to the web server.
Necessary parameters for user authentication are:
- buttonClicked: This parameter needs to be set to value "4" for the WLC to detect the action as an authentication attempt.
- redirectUrl: The value in this parameter is used by the controller to direct the client to a specific website upon successful authentication.
- err_flag: This parameter is used to indicate some error such as incomplete information or incorrect credentials, on successful authentications it is set to "0".
- username: This parameter is only used for webauth parameter maps, if parameter map is set to consent then it can be ignored. It must be filled with the wireless client username.
- password: This parameter is only used for webauth parameter maps, if parameter map is set to consent then it can be ignored. It must be filled with the wireless client password.
Requirements
Cisco recommends that you have knowledge of these topics:
- Hyper Text Markup Language (HTML) web development
- Cisco IOS®-XE wireless features
- Web browser developer tools
Components Used
The information in this document is based on these software and hardware versions:
- C9800-CL WLC Cisco IOS®-XE Version 17.3.3
- Microsoft Windows Server 2012 with Internet Information Services (IIS) capabilities
- 2802 and 9117 Access Points
The information in this document was created from the devices in a specific lab environment. All of the devices used in this document started with a cleared (default) configuration. If your network is live, ensure that you understand the potential impact of any command.
Background Information
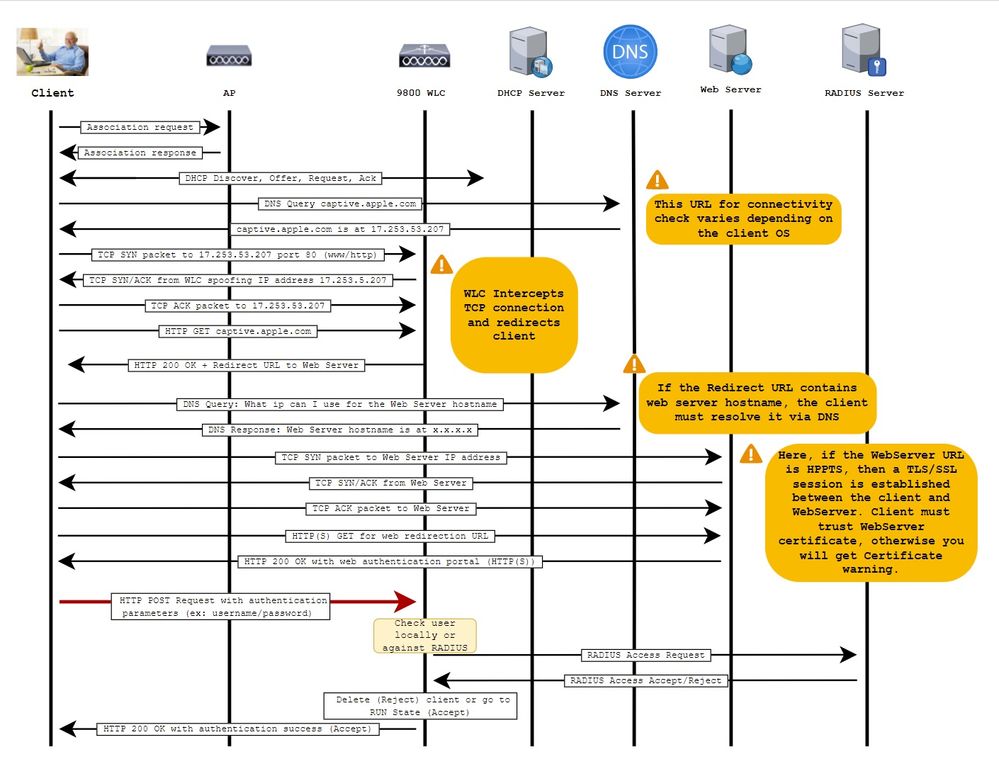
External web authentication leverages a web portal hosted outside of WLC on a dedicated web server or multi-purpose servers like Identity Services Engine (ISE) that allow granular access and management of web components. The handshake involved to successfully onboard a client to an external web authentication WLAN is rendered in the image. The image lists sequential interactions between wireless client, WLC, Domain Name system (DNS) server that resolves Uniform Resource Location (URL) and Webserver where WLC validates user credentials locally. This workflow is helpful to troubleshoot any failure conditions.
Note: Before HTTP POST call from client to WLC, if secure web-authentication is enabled in the parameter-map and if the WLC does not have a trustpoint signed by a trusted Certification Authority, then a security alert is displayed in the browser. The client needs to bypass this warning and accept form re-submission in order for the controller to place client sessions in RUN state.
Configure
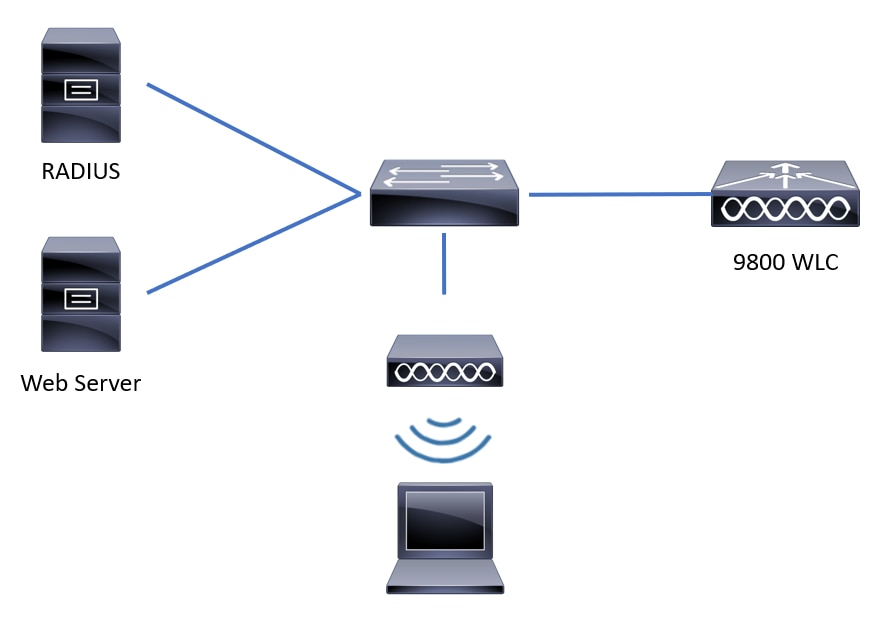
Network Diagram
Configure Web Parameter Settings
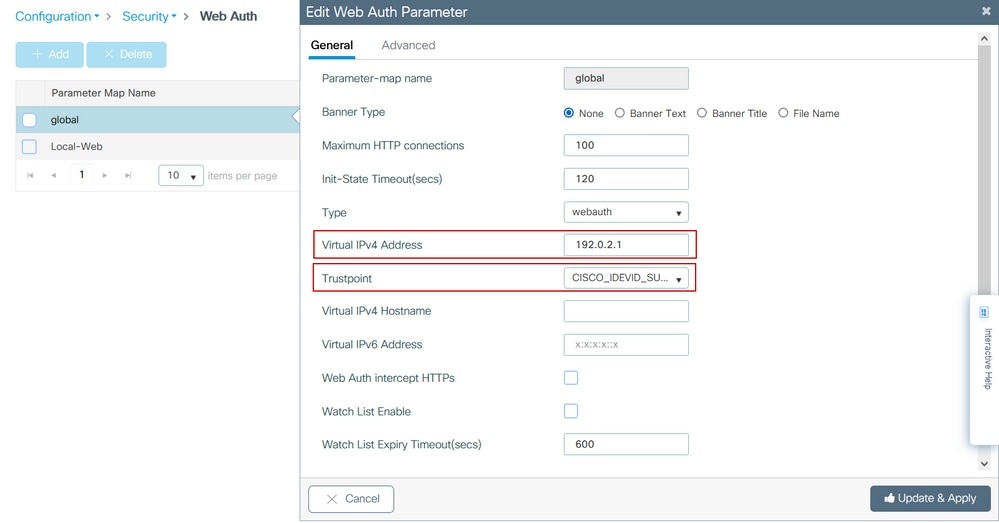
Step 1. Navigate to Configuration > Security > Web Auth and choose the global parameter map. Verify that Virtual IPv4 Address and Trustpoint are configured in order to provide proper redirection capabilities. If you have IPv6 enabled in your network, it is also mendatory to have a Virtual IPv6 address configured. Without virtual IPs, the redirection might not take place and credentials can be sent in an unsecure manner.
Note: By default, browsers use an HTTP website to initiate redirection process, if HTTPS redirection is needed then Web Auth intercept HTTPs has to be checked; this configuration is not recommended, however, as it increases CPU usage.
CLI configuration:
9800#configure terminal
9800(config)#parameter-map type webauth global
9800(config-params-parameter-map)#virtual-ip ipv4 192.0.2.1
9800(config-params-parameter-map)#trustpoint CISCO_IDEVID_SUDI
9800(config-params-parameter-map)#secure-webauth-disable
9800(config-params-parameter-map)#webauth-http-enable
Step 2. Select + Add and configure a name for the new parameter map that points to the external server. Optionally, configure maximum number of HTTP authentication failures before client gets excluded and time (in seconds) that a client can remain in web-authentication state.
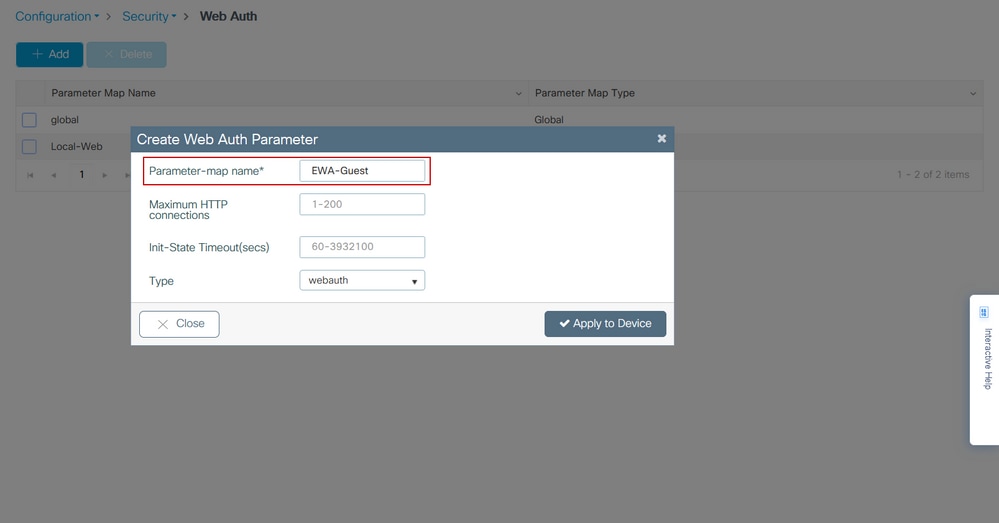
Step 3. Select the newly created parameter map, within the General tab configure the authentication type from the Type drop down list.
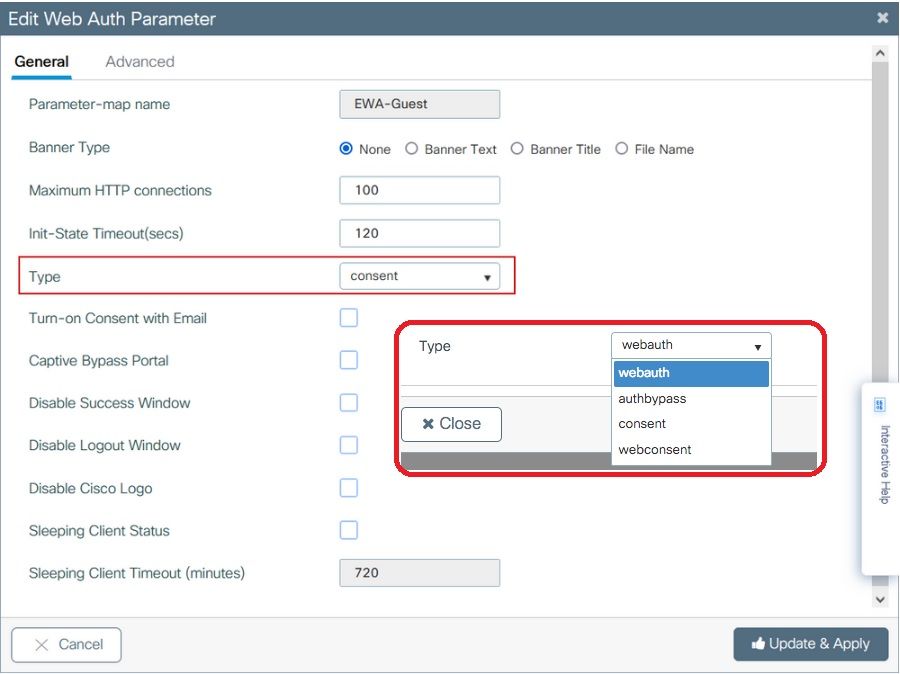
- Parameter-map name = Name assigned to the WebAuth Parameter map
- Maximum HTTP connections = Number of authentication failures before client gets excluded
- Init-State Timeout (secs) = Seconds a client can be on web authentication status
- Type = Type of web authentication
| webauth | authbypass | consent | webconsent |
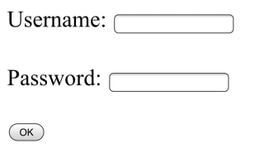 |
Client connects to the SSID and gets an IP address, then the 9800 WLC checks if the MAC address is allowed to enter the network, if yes, it is moved to RUN state, if it is not it is not allowed to join. (It does not fall back to web authentication) |
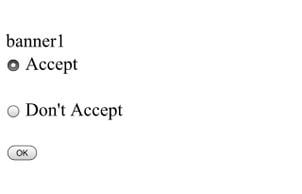 |
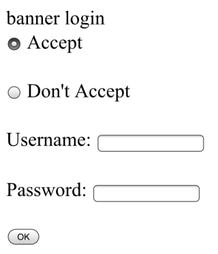 |
Step 4. From the Advanced tab configure the Redirect for log-in and Portal IPV4 Address with the specific server site URL and IP address respectively.
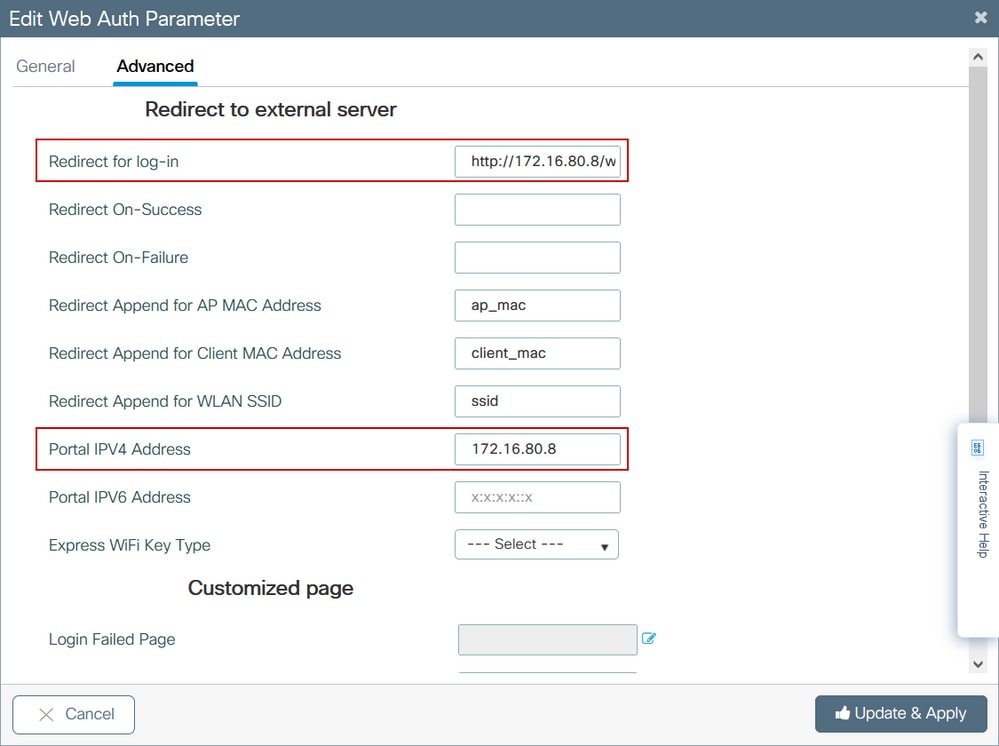
CLI configuration for Steps 2, 3 and 4:
9800(config)#parameter-map type webauth EWA-Guest
9800(config-params-parameter-map)#type consent
9800(config-params-parameter-map)#redirect for-login http://172.16.80.8/webauth/login.html
9800(config-params-parameter-map)#redirect portal ipv4 172.16.80.8
Step 5. (Optional) WLC can send the additional parameters through Query String. This is often required to make 9800 compatible with third party external portals. The fields "Redirect Append for AP MAC Address", "Redirect Append for Client MAC Address" and "Redirect Append for WLAN SSID" allow additional parameters to be appended to the redirect ACL with a custom name. Select the newly created parameter map and navigate to the Advanced tab, configure the name for the necessary parameters. Available parameters are:
- AP MAC Address (in aa:bb:cc:dd:ee:ff format)
- Client MAC Address (in aa:bb:cc:dd:ee:ff format)
- SSID Name
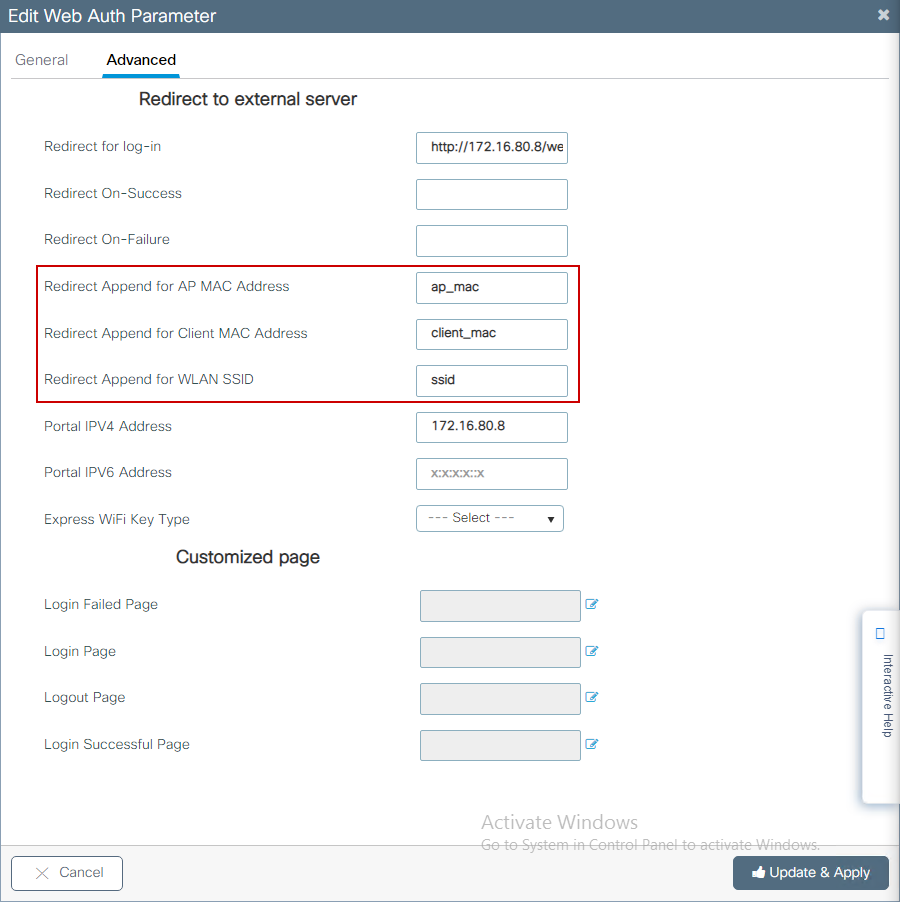
CLI configuration:
9800(config)#parameter-map type webauth EWA-Guest
9800(config-params-parameter-map)#redirect append ap-mac tag ap_mac
9800(config-params-parameter-map)#redirect append wlan-ssid tag ssid
9800(config-params-parameter-map)#redirect append client-mac tag client_mac
For this example, redirection URL sent to the client results in:
http://172.16.80.8/webauth/consent.html?switch_url=http://192.0.2.1/login.html&ap_mac=&ssid=&client_mac=
Note: When you add the Portal IPV4 Address information it automatically adds an ACL that allows the HTTP and HTTPS traffic from the wireless clients to the external web authentication server, so you do not have to configure any extra pre-auth ACL In case you would like to allow several IP addresses or URLs, the only option is to configure a URL filter so that any IP matching given URL(s) are allowed before authentication takes place. It is not possible to statically add more than one portal IP address unless you use URL filters.
Note: Global parameter map is the only one where you can define Virtual IPv4 and IPv6 address, Webauth intercept HTTPs, captive bypass portal, watch list enable and watch list expiry timeout settings.
Summary of CLI configuration:
Local web server
parameter-map type webauth <web-parameter-map-name>
 type { webauth | authbypass | consent | webconsent }
 timeout init-state sec 300
 banner text ^Cbanner login^C
External web server
parameter-map type webauth <web-parameter-map-name>
 type webauth
 timeout init-state sec 300
 redirect for-login <URL-for-webauth>
 redirect portal ipv4 <external-server's-IP
 max-http-conns 10
Configure AAA Settings
This configuration section is only needed for parameters maps that are configured for either webauth or webconsent authentication type.
Step 1. Navigate to Configuration > Security > AAA, then select AAA Method List. Configure a new method list, select + Add and fill in the list details; ensure that Type is set to "login" as shown in the image.
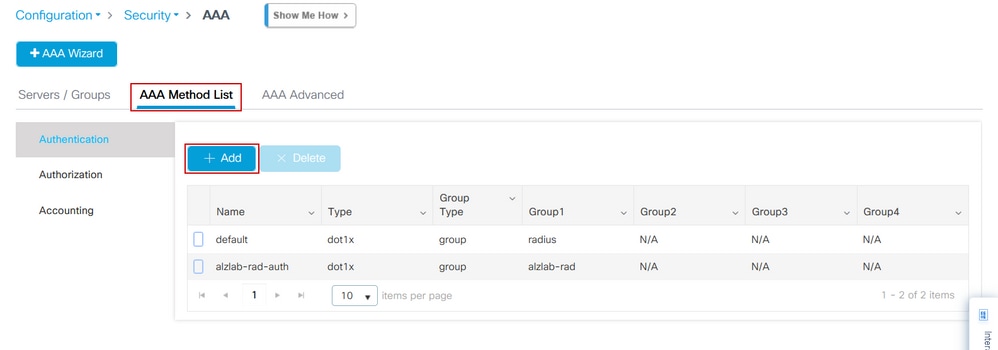
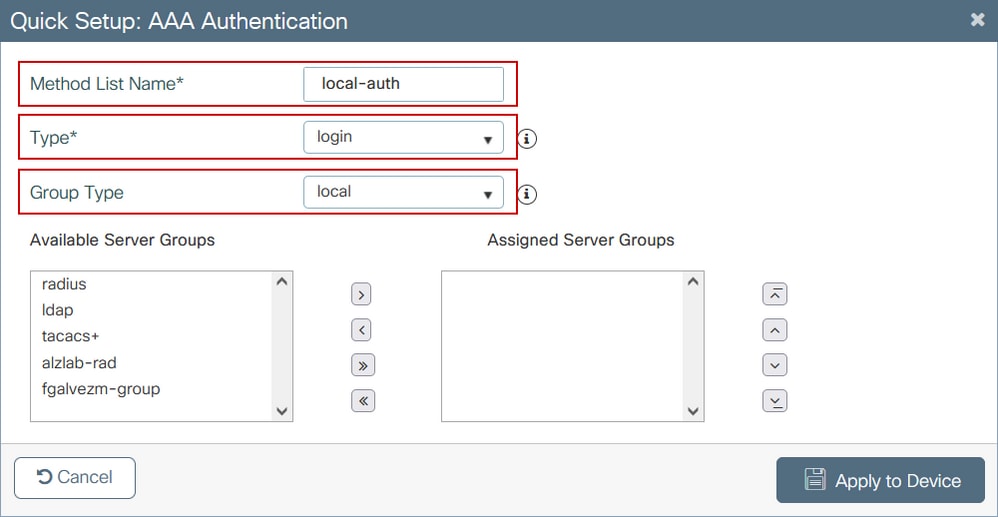
Step 2. Select Authorization and then select + Add to create a new method list. Name it default with Type as network as shown in the image.

Note: As it is advertised by the controller during the WLAN layer 3 security configuration: For Local Login Method List to work, please make sure the configuration 'aaa authorization network default local' exists on the device. This means that the authorization method list with name default must be defined in order to configure local web-authentication properly. In this section, this particular authorization method list is configured.

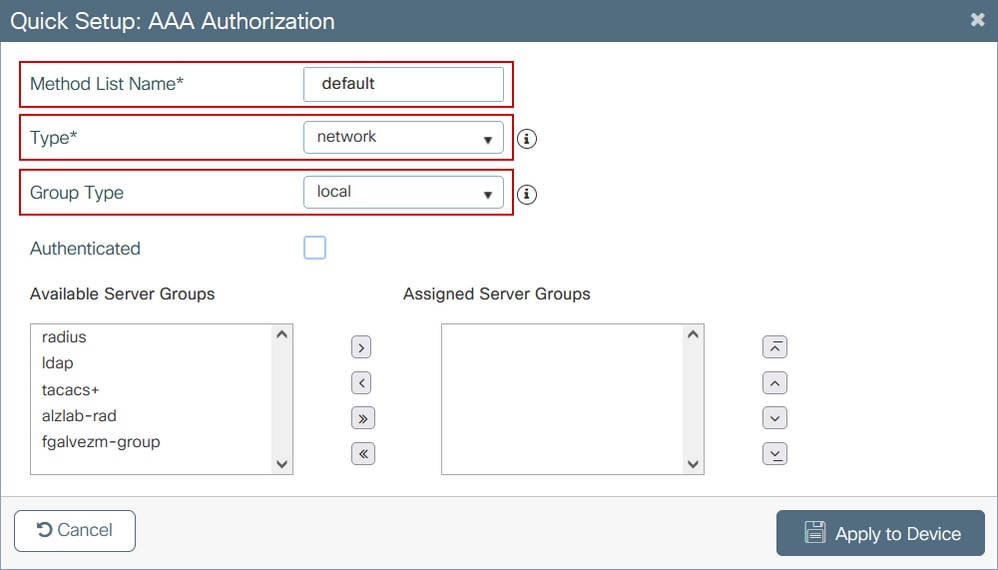
CLI configuration for Steps 1 and 2:
9800(config)#aaa new-model
9800(config)#aaa authentication login local-auth local
9800(config)#aaa authorization network default local
Note: If external RADIUS authentication is necessary, please read these instructions related to RADIUS server configuration on 9800 WLCs: AAA Config on 9800 WLC. Ensure that the authentication method list has "login" set as type instead of dot1x.
Step 3. Navigate to Configuration > Security > Guest User. Select + Add and configure guest user account details.
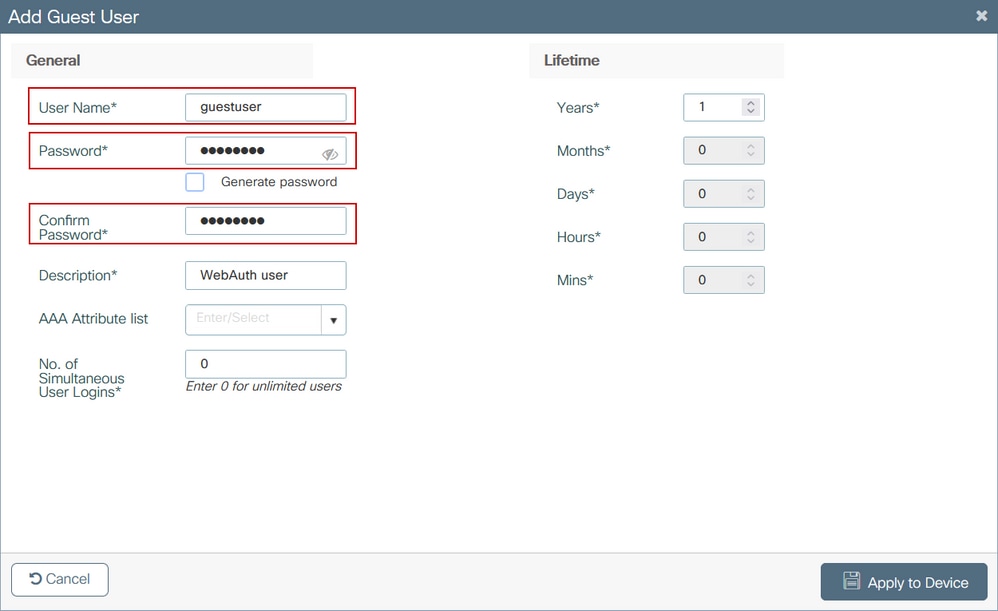
CLI configuration:
9800(config)#user-name guestuser
9800(config-user-name)#description "WebAuth user"
9800(config-user-name)#password 0 <password>
9800(config-user-name)#type network-user description "WebAuth user" guest-user lifetime year 1
If permanent users are needed then use this command:
9800(config)#username guestuserperm privilege 0 secret 0 <password>
Step 4. (Optional) Upon parameter map definition, a couple of access control lists (ACLs) are automatically created. These ACLs are used to define which traffic triggers a redirection to web server and which traffic is allowed to pass through. If specific requirements, such as multiple web server IP addresses or URL filters, exist, then navigate to Configuration > Security > ACL select + Add and define necessary rules; permit statements are redirected while deny statements define traffic passes through.
Automatically created ACLs rules are:
alz-9800#show ip access-list
Extended IP access list WA-sec-172.16.80.8
10 permit tcp any host 172.16.80.8 eq www
20 permit tcp any host 172.16.80.8 eq 443
30 permit tcp host 172.16.80.8 eq www any
40 permit tcp host 172.16.80.8 eq 443 any
50 permit tcp any any eq domain
60 permit udp any any eq domain
70 permit udp any any eq bootpc
80 permit udp any any eq bootps
90 deny ip any any (1288 matches)
Extended IP access list WA-v4-int-172.16.80.8
10 deny tcp any host 172.16.80.8 eq www
20 deny tcp any host 172.16.80.8 eq 443
30 permit tcp any any eq www
40 permit tcp any host 192.0.2.1 eq 443
Configure Policies and Tags
Step 1. Navigate to Configuration > Tags & Profiles > WLANs, select + Add to create a new WLAN. Define profile and SSID name, and Status in the General tab.
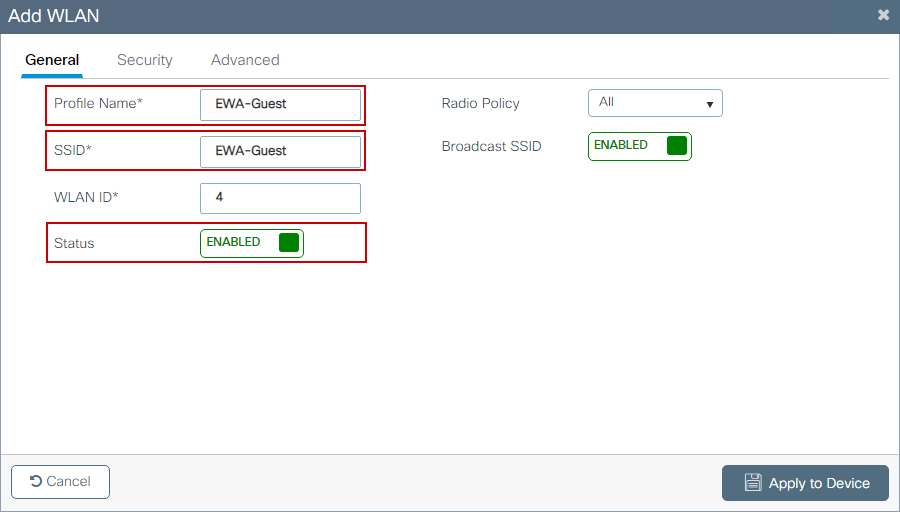
Step 2. Select Security tab and set Layer 2 authentication to None if you do not need any over the air encryption mechanism. In the Layer 3 tab, check the Web Policy box, select the parameter map from drop-down menu, and chose the authentication list from the drop-down menu. Optionally, if a custom ACL was defined earlier, select Show Advanced Settings and select the appropriate ACL from the drop-down menu.
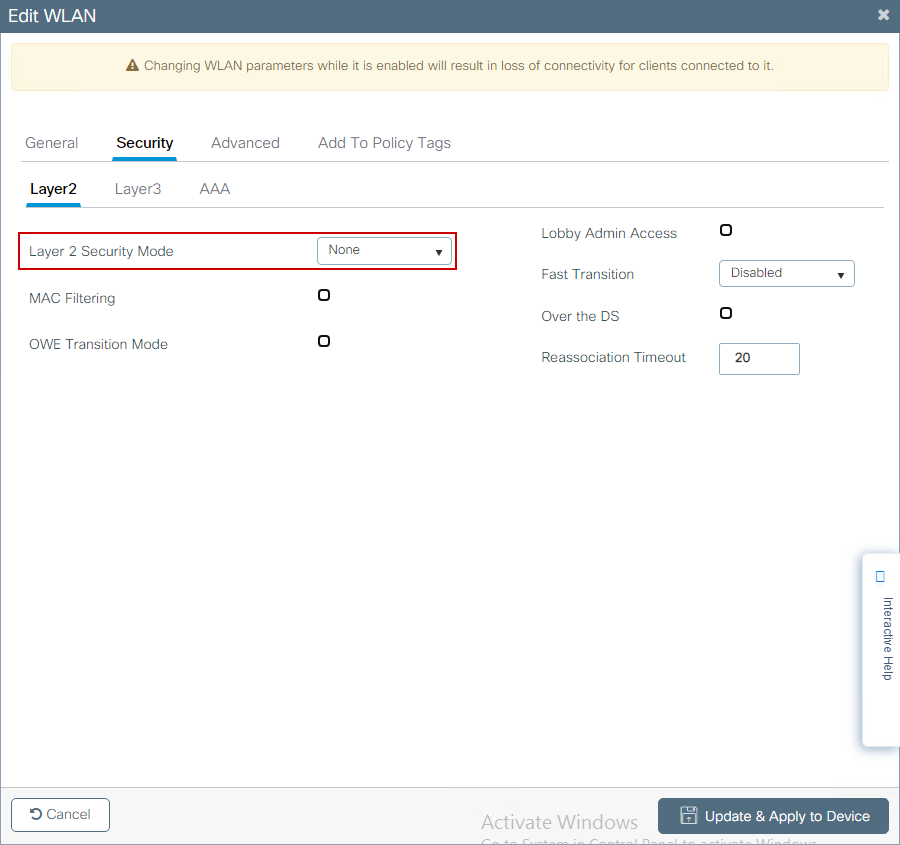
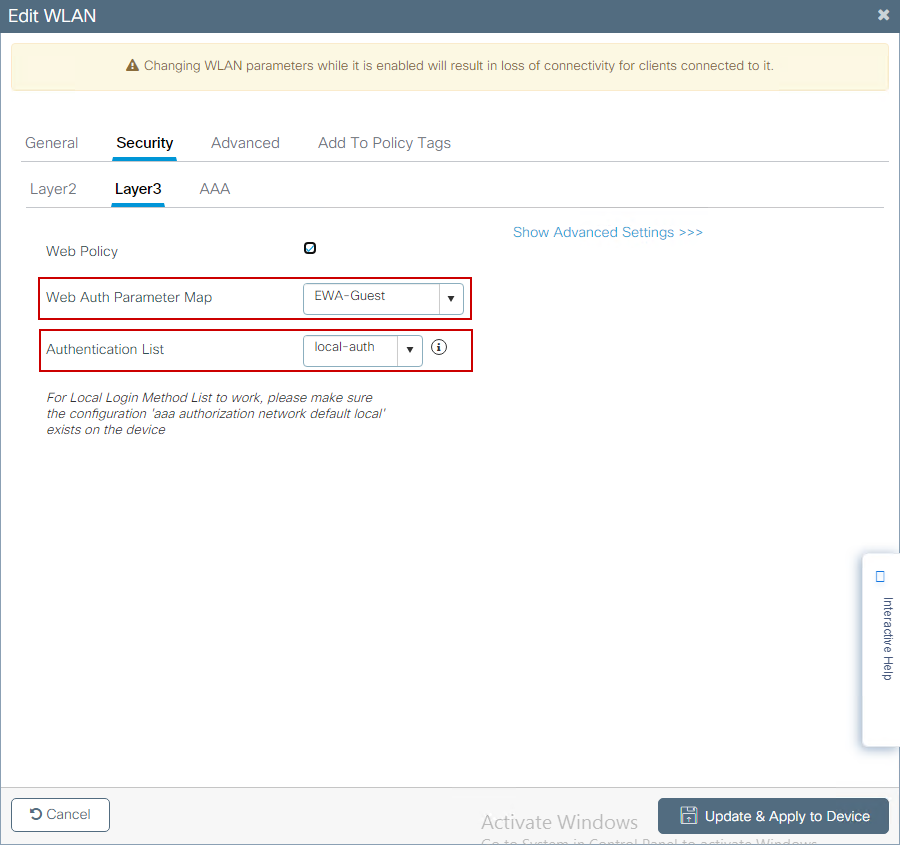
CLI configurations:
9800(config)#wlan EWA-Guest 4 EWA-Guest
9800(config-wlan)# no security ft adaptive
9800(config-wlan)# no security wpa
9800(config-wlan)# no security wpa wpa2
9800(config-wlan)# no security wpa wpa2 ciphers aes
9800(config-wlan)# no security wpa akm dot1x
9800(config-wlan)# security web-auth
9800(config-wlan)# security web-auth authentication-list local-auth
9800(config-wlan)# security web-auth parameter-map EWA-Guest
9800(config-wlan)# no shutdown
Step 3. Navigate to Configuration > Tags & Profiles > Policy and select + Add. Define policy name and status; ensure that Central settings under WLAN Switching Policy are Enabled for Local mode APs. Within the Access Policies tab, select the correct VLAN from the VLAN/VLAN Group drop-down menu as shown in the image.
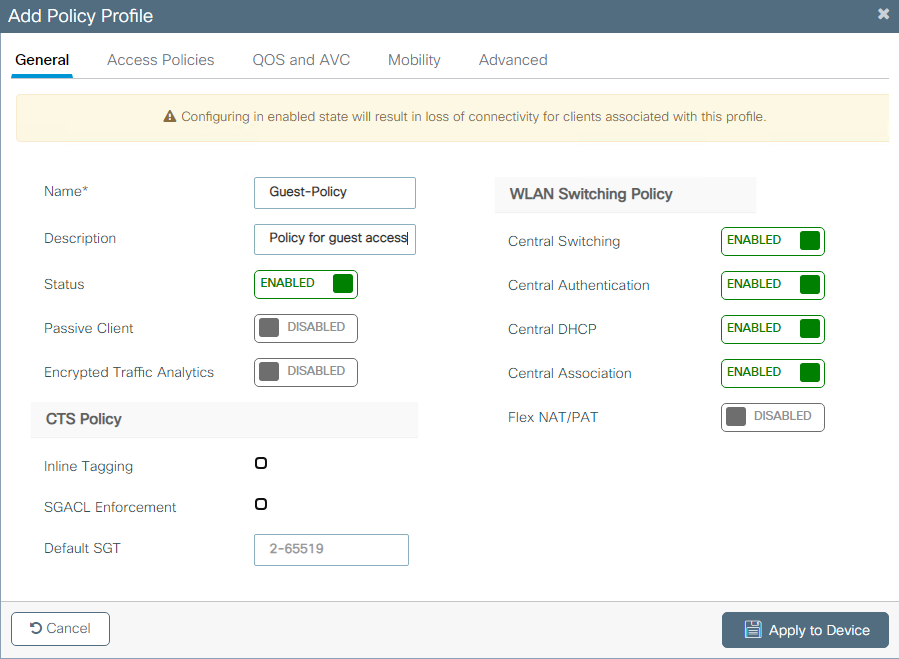
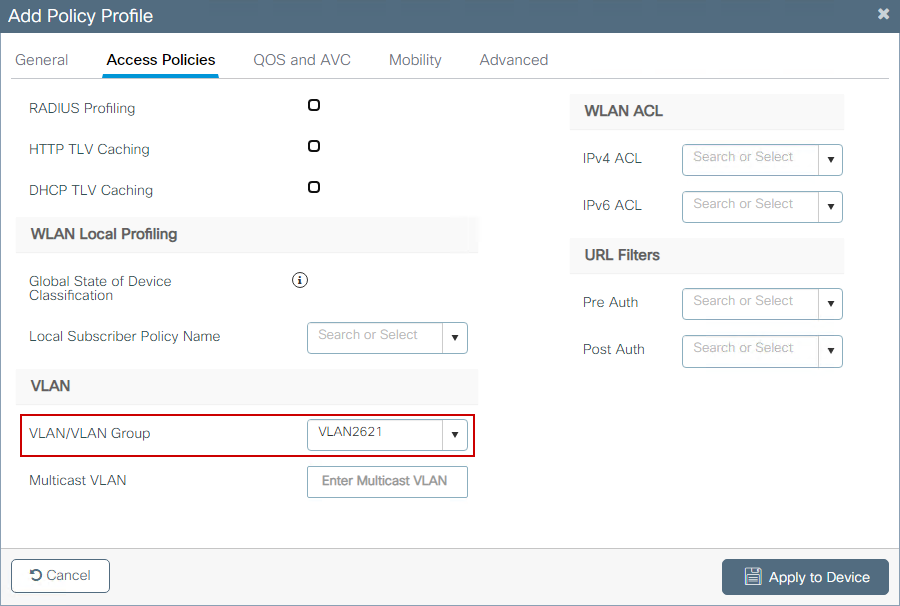
CLI configuration:
9800(config)#wireless profile policy Guest-Policy
9800(config-wireless-policy)#description "Policy for guest access"
9800(config-wireless-policy)#vlan VLAN2621
9800(config-wireless-policy)#no shutdown
Step 4. Navigate to Configuration > Tags & Profiles > Tags, within the Policy tab select + Add. Define a tag name, then under WLAN-POLICY Maps select + Add and add the previously created WLAN and Policy Profile.
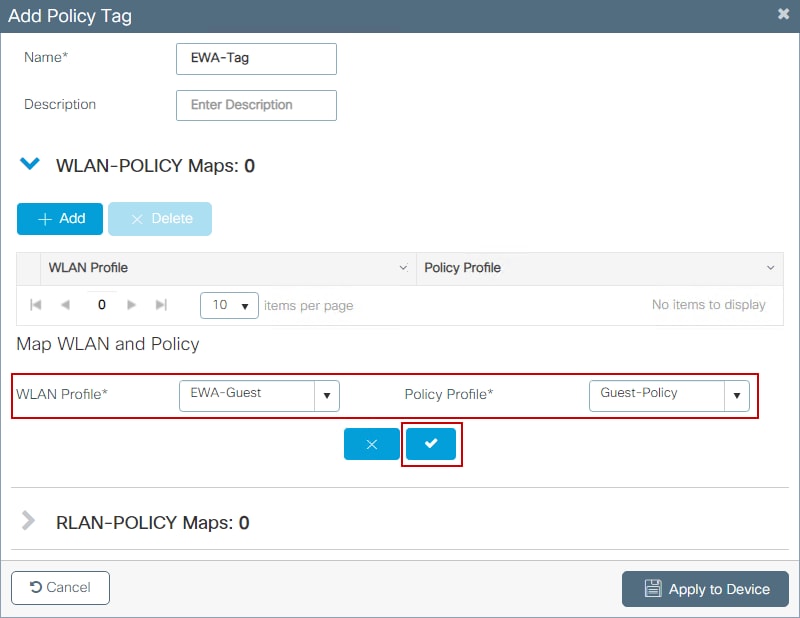
CLI configuration:
9800(config)#wireless tag policy EWA-Tag
9800(config-policy-tag)#wlan EWA-Guest policy Guest-Policy
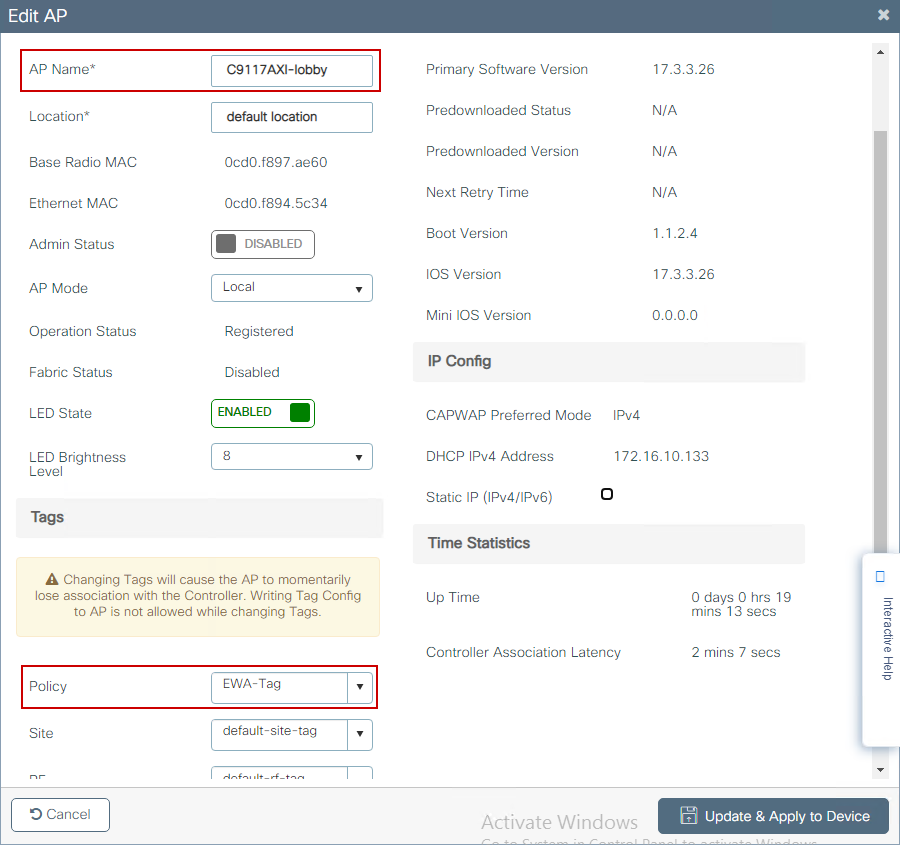
Step 5. Navigate to Configuration > Wireless > Access Points and select the AP that is used to broadcast this SSID. From the Edit AP menu, select the newly created tag from the Policy drop-down menu.
If multiple APs need to be tagged at the same time, then there are two available options:
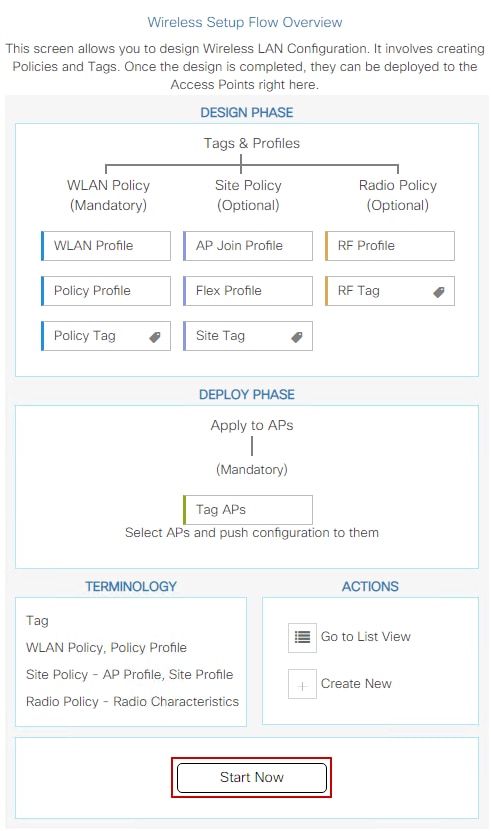
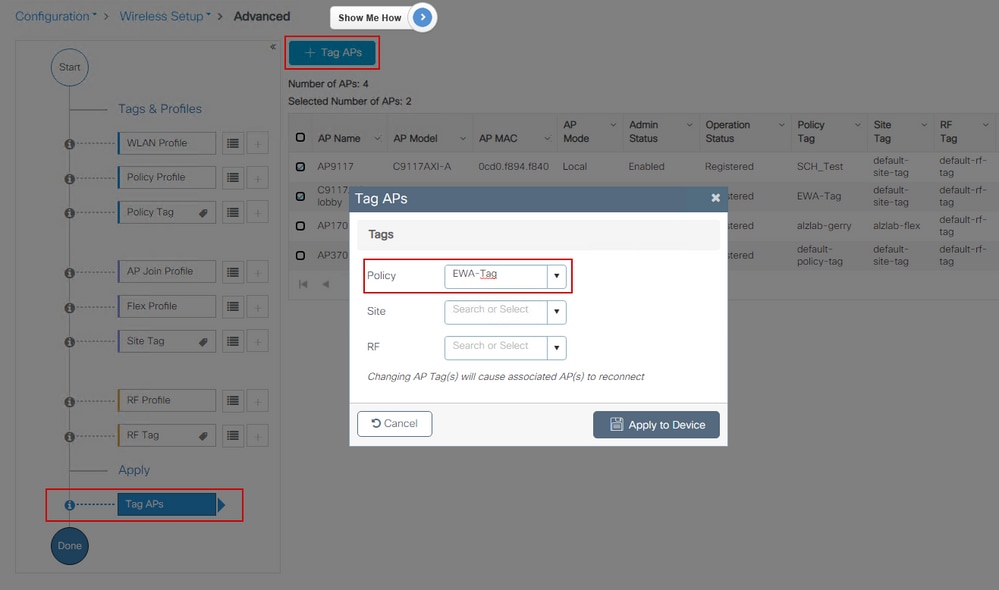
Option A. Navigate to Configuration > Wireless Setup > Advanced from there select Start Now to display the configuration menu list. Select the list icon next to Tag APs, this displays the list of all APs in Join state, check the necessary APs and then select + Tag APs, select the created Policy Tag from the drop down menu.
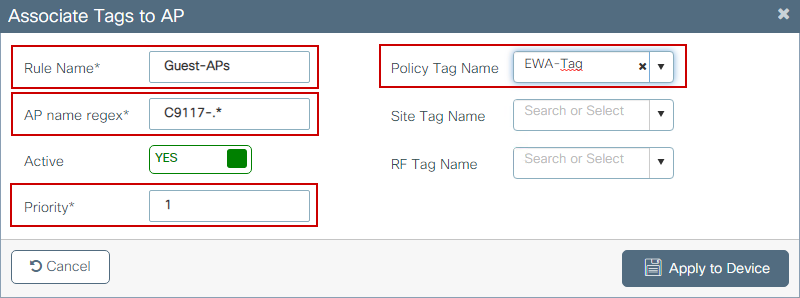
Option B. Navigate to Configuration > Tags & Profiles > Tags. then select the AP tab. Within the Filter tab, select + Add. Define rule name, AP name regex (this setting allows the controller to define which APs are tagged), priority (lower numbers have greater priority), and necessary tags.
Verify
Use this section in order to confirm that your configuration works properly:
9800#show running-config wlan
9800#show running-config aaa
9800#show aaa servers
9800#show ap tag summary
9800#show ap name <ap-name> config general
9800#show ap name <ap-name> tag detail
9800#show wlan [summary | id | name | all]
9800#show wireless tag policy detailed <policy-tag name>
9800#show wireless profile policy detailed <policy-profile name>
Verify http server status and availability with show ip http server status:
9800#show ip http server status
HTTP server status: Enabled
HTTP server port: 80
HTTP server active supplementary listener ports: 21111
HTTP server authentication method: local
HTTP server auth-retry 0 time-window 0
HTTP server digest algorithm: md5
HTTP server access class: 0
HTTP server IPv4 access class: None
HTTP server IPv6 access class: None
[...]
HTTP server active session modules: ALL
HTTP secure server capability: Present
HTTP secure server status: Enabled
HTTP secure server port: 443
HTTP secure server ciphersuite: rsa-aes-cbc-sha2 rsa-aes-gcm-sha2
dhe-aes-cbc-sha2 dhe-aes-gcm-sha2 ecdhe-rsa-aes-cbc-sha2
ecdhe-rsa-aes-gcm-sha2 ecdhe-ecdsa-aes-gcm-sha2
HTTP secure server TLS version: TLSv1.2 TLSv1.1
HTTP secure server client authentication: Disabled
HTTP secure server PIV authentication: Disabled
HTTP secure server PIV authorization only: Disabled
HTTP secure server trustpoint: CISCO_IDEVID_SUDI
HTTP secure server peer validation trustpoint:
HTTP secure server ECDHE curve: secp256r1
HTTP secure server active session modules: ALL
Verify ACL plumb to client session with these commands:
9800#show platform software wireless-client chassis active R0 mac-address <Client mac in aaaa.bbbb.cccc format>
ID : 0xa0000002
MAC address : aaaa.bbbb.cccc
Type : Normal
Global WLAN ID : 4
SSID : EWA-Guest
Client index : 0
Mobility state : Local
Authentication state : L3 Authentication
VLAN ID : 2621
[...]
Disable IPv6 traffic : No
Dynamic policy template : 0x7b 0x73 0x0b 0x1e 0x46 0x2a 0xd7 0x8f 0x23 0xf3 0xfe 0x9e 0x5c 0xb0 0xeb 0xf8

9800#show platform software cgacl chassis active F0
Template ID Group Index Lookup ID Number of clients
---------------------------------------------------------------------------------------------------------------------------------------------
0x7B 0x73 0x0B 0x1E 0x46 0x2A 0xD7 0x8F 0x23 0xF3 0xFE 0x9E 0x5C 0xB0 0xEB 0xF8 0x0000000a 0x0000001a 1

9800#show platform software cgacl chassis active F0 group-idx <group index> acl
Acl ID Acl Name CGACL Type Protocol Direction Sequence
---------------------------------------------------------------------------------------------------------
16 IP-Adm-V6-Int-ACL-global Punt IPv6 IN 1
25 WA-sec-172.16.80.8 Security IPv4 IN 2
26 WA-v4-int-172.16.80.8 Punt IPv4 IN 1
19 implicit_deny Security IPv4 IN 3
21 implicit_deny_v6 Security IPv6 IN 3
18 preauth_v6 Security IPv6 IN 2
Troubleshoot
Always-On Tracing
WLC 9800 provides ALWAYS-ON trace capabilities. This ensures all client connectivity related errors, warning, and notice level messages are constantly logged and you can view logs for an incident or failure condition after it has occurred.
Note: Based on the volume of logs generated you can go back from few hours to several days.
In order to view the traces that 9800 WLC collected by default, you can connect via SSH/Telnet to the 9800 WLC and read these steps (ensure you log the session to a text file).
Step 1. Check the controller current time so you can track the logs in the time back to when the issue happened.
9800#show clock
Step 2. Collect syslogs from the controller buffer or the external syslog as dictated by the system configuration. This provides a quick view of the system health and errors if any.
9800#show logging
Step 3. Verify if any debug conditions are enabled.
9800#show debugging
IOSXE Conditional Debug Configs:
Conditional Debug Global State: Stop
IOSXE Packet Tracing Configs:
Packet Infra debugs:
Ip Address                                               Port
------------------------------------------------------|----------
Note: If you see any condition listed, it means the traces are logged up to debug level for all the processes that encounter the enabled conditions (mac address, IP address, and so on). This would increase the volume of logs. Therefore, it is recommended to clear all conditions when not actively debugging.
Step 4. WIth the assumption that the mac address under test was not listed as a condition in Step 3. Collect the always-on notice level traces for the specific mac address.
9800# show logging profile wireless filter [mac | ip] [<aaaa.bbbb.cccc> | <a.b.c.d>] to-file always-on-<FILENAME.txt>
You can either display the content on the session or you can copy the file to an external TFTP server.
9800# more bootflash:always-on-<FILENAME.txt>
or
9800# copy bootflash:always-on-<FILENAME.txt> tftp://<a.b.c.d>/<path>/always-on-<FILENAME.txt>
Conditional Debugging and Radio Active Tracing
If the always-on traces do not give you enough information in order to determine the trigger for the problem under investigation, you can enable conditional debugging and capture Radio Active (RA) trace, which provides debug level traces for all processes that interact with the specified condition (client mac address in this case). In order to enable conditional debugging, read these steps.
Step 1. Ensure there are no debug conditions are enabled.
9800#clear platform condition all
Step 2. Enable the debug condition for the wireless client mac address that you want to monitor.
These commands start to monitor the provided mac address for 30 minutes (1800 seconds). You can optionally increase this time to up to 2085978494 seconds.
9800#debug wireless mac <aaaa.bbbb.cccc> {monitor-time <seconds>}Note: In order to monitor more than one client at a time, run debug wireless mac command per mac address.
Note: The wireless client activity is not displayed on the terminal session as all the logs are buffered internally in order to be viewed later.
Step 3. Reproduce the issue or behavior that you want to monitor.
Step 4. Stop the debugs if the issue is reproduced before the default or configured monitor time is up.
9800#no debug wireless mac <aaaa.bbbb.cccc>
Once the monitor-time has elapsed or the debug wireless has been stopped, the 9800 WLC generates a local file with the name:
ra_trace_MAC_aaaabbbbcccc_HHMMSS.XXX_timezone_DayWeek_Month_Day_year.log
Step 5. Collect the file of the mac address activity. You can either copy the ra trace .log to an external server or display the output directly on the screen.
Check the name of the RA traces file.
9800#dir bootflash: | inc ra_trace
Copy the file to an external server:
9800#copy bootflash:ra_trace_MAC_aaaabbbbcccc_HHMMSS.XXX_timezone_DayWeek_Month_Day_year.log tftp://<a.b.c.d>/ra-FILENAME.txt
Display the content:
9800#more bootflash:ra_trace_MAC_aaaabbbbcccc_HHMMSS.XXX_timezone_DayWeek_Month_Day_year.log
Step 6. If the root cause is still not obvious, collect the internal logs which are a more verbose view of debug level logs. You do not need to debug the client again as the command provides debug logs that have been already collected and internally stored.
9800#show logging profile wireless internal filter [mac | ip] [<aaaa.bbbb.cccc> | <a.b.c.d>] to-file ra-internal-<FILENAME>.txt
Note: This command output returns traces for all logging levels for all processes and is quite voluminous. Please contact Cisco TAC in order to help parse through these traces.
9800#copy bootflash:ra-internal-<FILENAME>.txt tftp://<a.b.c.d>/ra-internal-<FILENAME>.txt
Display the content:
9800#more bootflash:ra-internal-<FILENAME>.txt
Step 7. Remove the debug conditions.
Note: Ensure that you always remove the debug conditions after a troubleshoot session.
Embedded Packet Captures
9800 controllers can sniff packets natively; this allows for easier troubleshoot as control plane packet processing visibility.
Step 1. Define an ACL to filter traffic of interest. For web-authentication, it is recommended to allow traffic from and to the web server, as well as traffic from and to a couple of APs were clients are connected.
9800(config)#ip access-list extended EWA-pcap
9800(config-ext-nacl)#permit ip any host <web server IP>
9800(config-ext-nacl)#permit ip host <web server IP> any
9800(config-ext-nacl)#permit ip any host <AP IP>
9800(config-ext-nacl)#permit ip host <AP IP> any
Step 2. Define the monitor capture parameters. Ensure that control plane traffic is enabled in both directions, interface refers to the physical uplink of your controller.
9800#monitor capture EWA buffer size <buffer size in MB>
9800#monitor capture EWA access-list EWA-pcap
9800#monitor capture EWA control-plane both interface <uplink interface> both
9800#show monitor capture EWA
Status Information for Capture EWA
Target Type:
Interface: Control Plane, Direction: BOTH
Interface: TenGigabitEthernet0/1/0, Direction: BOTH
Status : Inactive
Filter Details:
Access-list: EWA-pcap
Inner Filter Details:
Buffer Details:
Buffer Type: LINEAR (default)
Buffer Size (in MB): 100
Limit Details:
Number of Packets to capture: 0 (no limit)
Packet Capture duration: 0 (no limit)
Packet Size to capture: 0 (no limit)
Packet sampling rate: 0 (no sampling)
Step 3. Start the monitor capture and reproduce the issue.
9800#monitor capture EWA start
Started capture point : EWA
Step 4. Stop the monitor capture and export it.
9800#monitor capture EWA stop
Stopped capture point : EWA
9800#monitor capture EWA export tftp://<a.b.c.d>/EWA.pcap
Alternatively, the capture can be downloaded from GUI, navigate to Troubleshooting > Packet Capture and select Export on the configured capture. Select desktop from drop-down menu to download the capture through HTTP into the desired folder.

Client Side Troubleshoot
Web authentication WLANs are dependant on client behavior, upon this basis, client-side behavior knowledge and information is key to identify root cause of web authentication misbehaviors.
HAR Browser Troubleshoot
Many modern browsers, such as Mozilla Firefox and Google Chrome, provide console developer tools to debug web application interactions. HAR files are records of client-server interactions and provide a timeline of HTTP interactions along with request and response information (headers, status code, parameters, and so on).
HAR files can be exported from the client browser and imported on a different browser for further analysis. This document outlines how to collect the HAR file from Mozilla Firefox.
Step 1. Open Web Developer Tools with Ctrl + Shift + I, alternatively right-click within the browser content and select Inspect.
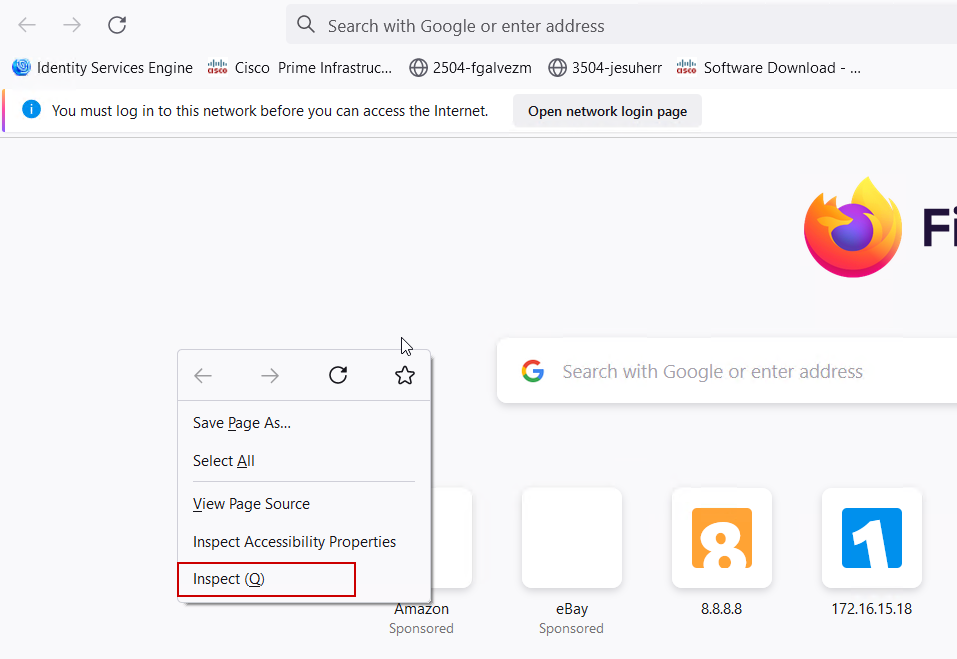
Step 2. Navigate to Network, ensure that "All" is selected to capture all request types. Select the gear icon and ensure that Persist Logs has an arrow next to it, otherwise logs request are cleared whenever a domain change is triggered.

Step 3. Reproduce the issue, ensure that browser logs all requests. Once, issue is reproduced stop network logging, then select on the gear icon and select Save All As HAR.

Client Side Packet Capture
Wireless clients with OS such as Windows or MacOS can sniff packets on their wireless card adapter. While not a direct replacement of over-the-air packet captures, they can provide a glance on the overall web authentication flow.
DNS request:

Initial TCP handshake and HTTP GET for redirection:

TCP handshake with external server:

HTTP GET to external server (captive portal request):

HTTP POST to virtual IP for authentication:

Example of a Successful Attempt
This is the output of a successful connection attempt from the Radio Active trace perspective, use this as a reference to identify client session stages for clients that connect to a Layer 3 web authentication SSID.
802.11 authentication and association:
2021/09/28 12:59:51.781967 {wncd_x_R0-0}{1}: [client-orch-sm] [26328]: (note): MAC: 3423.874c.6bf7 Association received. BSSID 0cd0.f897.ae60, WLAN EWA-Guest, Slot 0 AP 0cd0.f897.ae60, C9117AXI-lobby
2021/09/28 12:59:51.782009 {wncd_x_R0-0}{1}: [client-orch-sm] [26328]: (debug): MAC: 3423.874c.6bf7 Received Dot11 association request. Processing started,SSID: EWA-Guest, Policy profile: Guest-Policy, AP Name: C9117AXI-lobby, Ap Mac Address: 0cd0.f897.ae60 BSSID MAC0000.0000.0000 wlan ID: 4RSSI: -39, SNR: 0
2021/09/28 12:59:51.782152 {wncd_x_R0-0}{1}: [client-orch-state] [26328]: (note): MAC: 3423.874c.6bf7 Client state transition: S_CO_INIT -> S_CO_ASSOCIATING
2021/09/28 12:59:51.782357 {wncd_x_R0-0}{1}: [dot11-validate] [26328]: (info): MAC: 3423.874c.6bf7 WiFi direct: Dot11 validate P2P IE. P2P IE not present.
2021/09/28 12:59:51.782480 {wncd_x_R0-0}{1}: [dot11] [26328]: (debug): MAC: 3423.874c.6bf7 dot11 send association response. Sending association response with resp_status_code: 0
2021/09/28 12:59:51.782483 {wncd_x_R0-0}{1}: [dot11] [26328]: (debug): MAC: 3423.874c.6bf7 Dot11 Capability info byte1 1, byte2: 14
2021/09/28 12:59:51.782509 {wncd_x_R0-0}{1}: [dot11-frame] [26328]: (info): MAC: 3423.874c.6bf7 WiFi direct: skip build Assoc Resp with P2P IE: Wifi direct policy disabled
2021/09/28 12:59:51.782519 {wncd_x_R0-0}{1}: [dot11] [26328]: (info): MAC: 3423.874c.6bf7 dot11 send association response. Sending assoc response of length: 115 with resp_status_code: 0, DOT11_STATUS: DOT11_STATUS_SUCCESS
2021/09/28 12:59:51.782611 {wncd_x_R0-0}{1}: [dot11] [26328]: (note): MAC: 3423.874c.6bf7 Association success. AID 1, Roaming = False, WGB = False, 11r = False, 11w = False
2021/09/28 12:59:51.782626 {wncd_x_R0-0}{1}: [dot11] [26328]: (info): MAC: 3423.874c.6bf7 DOT11 state transition: S_DOT11_INIT -> S_DOT11_ASSOCIATED
2021/09/28 12:59:51.782676 {wncd_x_R0-0}{1}: [client-orch-sm] [26328]: (debug): MAC: 3423.874c.6bf7 Station Dot11 association is successful.
Layer 2 authentication skipped:
2021/09/28 12:59:51.782727 {wncd_x_R0-0}{1}: [client-orch-sm] [26328]: (debug): MAC: 3423.874c.6bf7 Starting L2 authentication. Bssid in state machine:0cd0.f897.ae60 Bssid in request is:0cd0.f897.ae60
2021/09/28 12:59:51.782745 {wncd_x_R0-0}{1}: [client-orch-state] [26328]: (note): MAC: 3423.874c.6bf7 Client state transition: S_CO_ASSOCIATING -> S_CO_L2_AUTH_IN_PROGRESS
2021/09/28 12:59:51.782785 {wncd_x_R0-0}{1}: [client-auth] [26328]: (note): MAC: 3423.874c.6bf7 L2 Authentication initiated. method WEBAUTH, Policy VLAN 2621,AAA override = 0
2021/09/28 12:59:51.782803 {wncd_x_R0-0}{1}: [sanet-shim-translate] [26328]: (ERR): 3423.874c.6bf7 wlan_profile Not Found : Device information attributes not populated
[...]
2021/09/28 12:59:51.787912 {wncd_x_R0-0}{1}: [client-auth] [26328]: (info): MAC: 3423.874c.6bf7 Client auth-interface state transition: S_AUTHIF_L2_WEBAUTH_PENDING -> S_AUTHIF_L2_WEBAUTH_PENDING
2021/09/28 12:59:51.787953 {wncd_x_R0-0}{1}: [client-auth] [26328]: (info): MAC: 3423.874c.6bf7 Client auth-interface state transition: S_AUTHIF_L2_WEBAUTH_PENDING -> S_AUTHIF_L2_WEBAUTH_DONE
2021/09/28 12:59:51.787966 {wncd_x_R0-0}{1}: [client-orch-sm] [26328]: (debug): MAC: 3423.874c.6bf7 L2 Authentication of station is successful., L3 Authentication : 1
ACL plumb:
2021/09/28 12:59:51.785227 {wncd_x_R0-0}{1}: [webauth-sm] [26328]: (info): [ 0.0.0.0]Starting Webauth, mac [34:23:87:4c:6b:f7],IIF 0 , audit-ID 041510AC0000000E2C7D71DB
2021/09/28 12:59:51.785307 {wncd_x_R0-0}{1}: [auth-mgr-feat_wireless] [26328]: (info): [0000.0000.0000:unknown] Retrieved zone id 0x0 for bssid 12364632846202045372
2021/09/28 12:59:51.785378 {wncd_x_R0-0}{1}: [webauth-acl] [26328]: (info): capwap_9000000b[3423.874c.6bf7][ 0.0.0.0]Applying IPv4 intercept ACL via SVM, name: WA-v4-int-172.16.80.8, priority: 50, IIF-ID: 0
2021/09/28 12:59:51.785738 {wncd_x_R0-0}{1}: [epm-redirect] [26328]: (info): [0000.0000.0000:unknown] URL-Redirect-ACL = WA-v4-int-172.16.80.8
2021/09/28 12:59:51.786324 {wncd_x_R0-0}{1}: [webauth-acl] [26328]: (info): capwap_9000000b[3423.874c.6bf7][ 0.0.0.0]Applying IPv6 intercept ACL via SVM, name: IP-Adm-V6-Int-ACL-global, priority: 52, IIF-ID: 0
2021/09/28 12:59:51.786598 {wncd_x_R0-0}{1}: [epm-redirect] [26328]: (info): [0000.0000.0000:unknown] URL-Redirect-ACL = IP-Adm-V6-Int-ACL-global
2021/09/28 12:59:51.787904 {wncd_x_R0-0}{1}: [client-auth] [26328]: (info): MAC: 3423.874c.6bf7 Client auth-interface state transition: S_AUTHIF_AWAIT_L2_WEBAUTH_START_RESP -> S_AUTHIF_L2_WEBAUTH_PENDING
IP Learn process:
2021/09/28 12:59:51.799515 {wncd_x_R0-0}{1}: [client-orch-state] [26328]: (note): MAC: 3423.874c.6bf7 Client state transition: S_CO_DPATH_PLUMB_IN_PROGRESS -> S_CO_IP_LEARN_IN_PROGRESS
2021/09/28 12:59:51.799716 {wncd_x_R0-0}{1}: [client-iplearn] [26328]: (info): MAC: 3423.874c.6bf7 IP-learn state transition: S_IPLEARN_INIT -> S_IPLEARN_IN_PROGRESS
2021/09/28 12:59:51.802213 {wncd_x_R0-0}{1}: [client-auth] [26328]: (info): MAC: 3423.874c.6bf7 Client auth-interface state transition: S_AUTHIF_L2_WEBAUTH_DONE -> S_AUTHIF_L2_WEBAUTH_DONE
2021/09/28 12:59:51.916777 {wncd_x_R0-0}{1}: [sisf-packet] [26328]: (debug): RX: ARP from interface capwap_9000000b on vlan 2621 Source MAC: 3423.874c.6bf7 Dest MAC: ffff.ffff.ffff ARP REQUEST, ARP sender MAC: 3423.874c.6bf7 ARP target MAC: 0000.0000.0000 ARP sender IP: 0.0.0.0, ARP target IP: 172.16.21.153
[...]
2021/09/28 12:59:52.810136 {wncd_x_R0-0}{1}: [client-iplearn] [26328]: (note): MAC: 3423.874c.6bf7 Client IP learn successful. Method: ARP IP: 172.16.21.153
2021/09/28 12:59:52.810185 {wncd_x_R0-0}{1}: [epm] [26328]: (info): [0000.0000.0000:unknown] HDL = 0x0 vlan 2621 fail count 0 dirty_counter 0 is_dirty 0
2021/09/28 12:59:52.810404 {wncd_x_R0-0}{1}: [auth-mgr] [26328]: (info): [3423.874c.6bf7:capwap_9000000b] auth mgr attr change notification is received for attr (8)
2021/09/28 12:59:52.810794 {wncd_x_R0-0}{1}: [auth-mgr-feat_wireless] [26328]: (info): [0000.0000.0000:unknown] Retrieved zone id 0x0 for bssid 12364632846202045372
2021/09/28 12:59:52.810863 {wncd_x_R0-0}{1}: [client-iplearn] [26328]: (info): MAC: 3423.874c.6bf7 IP-learn state transition: S_IPLEARN_IN_PROGRESS -> S_IPLEARN_COMPLETE
Layer 3 authentication and redirection process:
2021/09/28 12:59:52.811141 {wncd_x_R0-0}{1}: [client-auth] [26328]: (note): MAC: 3423.874c.6bf7 L3 Authentication initiated. LWA
2021/09/28 12:59:52.811154 {wncd_x_R0-0}{1}: [client-auth] [26328]: (info): MAC: 3423.874c.6bf7 Client auth-interface state transition: S_AUTHIF_L2_WEBAUTH_DONE -> S_AUTHIF_WEBAUTH_PENDING
2021/09/28 12:59:55.324550 {wncd_x_R0-0}{1}: [webauth-httpd] [26328]: (info): capwap_9000000b[3423.874c.6bf7][ 172.16.21.153]GET rcvd when in LOGIN state
2021/09/28 12:59:55.324565 {wncd_x_R0-0}{1}: [webauth-httpd] [26328]: (info): capwap_9000000b[3423.874c.6bf7][ 172.16.21.153]HTTP GET request
2021/09/28 12:59:55.324588 {wncd_x_R0-0}{1}: [webauth-httpd] [26328]: (info): capwap_9000000b[3423.874c.6bf7][ 172.16.21.153]Parse GET, src [172.16.21.153] dst [x.x.x.x] url [http://browser-test-website/]
[...]
2021/09/28 13:01:29.859434 {wncd_x_R0-0}{1}: [webauth-httpd] [26328]: (info): capwap_9000000b[3423.874c.6bf7][ 172.16.21.153]POST rcvd when in LOGIN state
2021/09/28 13:01:29.859636 {wncd_x_R0-0}{1}: [webauth-acl] [26328]: (info): capwap_9000000b[3423.874c.6bf7][ 172.16.21.153]Unapply IPv4 intecept ACL via SVM, name "WA-v4-int-172.16.80.8", pri 50, IIF 0
2021/09/28 13:01:29.860335 {wncd_x_R0-0}{1}: [webauth-acl] [26328]: (info): capwap_9000000b[3423.874c.6bf7][ 172.16.21.153]Unapply IPv6 intecept ACL via SVM, name "IP-Adm-V6-Int-ACL-global", pri 52, IIF 0
2021/09/28 13:01:29.861092 {wncd_x_R0-0}{1}: [auth-mgr] [26328]: (info): [3423.874c.6bf7:capwap_9000000b] Authc success from WebAuth, Auth event success
2021/09/28 13:01:29.861151 {wncd_x_R0-0}{1}: [ewlc-infra-evq] [26328]: (note): Authentication Success. Resolved Policy bitmap:0 for client 3423.874c.6bf7
2021/09/28 13:01:29.862867 {wncd_x_R0-0}{1}: [client-auth] [26328]: (note): MAC: 3423.874c.6bf7 L3 Authentication Successful. ACL:[]
2021/09/28 13:01:29.862871 {wncd_x_R0-0}{1}: [client-auth] [26328]: (info): MAC: 3423.874c.6bf7 Client auth-interface state transition: S_AUTHIF_WEBAUTH_PENDING -> S_AUTHIF_WEBAUTH_DONE
Transition to RUN state:
2021/09/28 13:01:29.863176 {wncd_x_R0-0}{1}: [client-auth] [26328]: (note): MAC: 3423.874c.6bf7 ADD MOBILE sent. Client state flags: 0x78 BSSID: MAC: 0cd0.f897.ae60 capwap IFID: 0x9000000b
2021/09/28 13:01:29.863272 {wncd_x_R0-0}{1}: [errmsg] [26328]: (info): %CLIENT_ORCH_LOG-6-CLIENT_ADDED_TO_RUN_STATE: Username entry (3423.874C.6BF7) joined with ssid (EWA-Guest) for device with MAC: 3423.874c.6bf7
2021/09/28 13:01:29.863334 {wncd_x_R0-0}{1}: [aaa-attr-inf] [26328]: (info): [ Applied attribute :bsn-vlan-interface-name 0 "VLAN2621" ]
2021/09/28 13:01:29.863336 {wncd_x_R0-0}{1}: [aaa-attr-inf] [26328]: (info): [ Applied attribute : timeout 0 1800 (0x708) ]
2021/09/28 13:01:29.863343 {wncd_x_R0-0}{1}: [aaa-attr-inf] [26328]: (info): [ Applied attribute : url-redirect-acl 0 "IP-Adm-V4-LOGOUT-ACL" ]
2021/09/28 13:01:29.863387 {wncd_x_R0-0}{1}: [ewlc-qos-client] [26328]: (info): MAC: 3423.874c.6bf7 Client QoS run state handler
2021/09/28 13:01:29.863409 {wncd_x_R0-0}{1}: [rog-proxy-capwap] [26328]: (debug): Managed client RUN state notification: 3423.874c.6bf7
2021/09/28 13:01:29.863451 {wncd_x_R0-0}{1}: [client-orch-state] [26328]: (note): MAC: 3423.874c.6bf7 Client state transition: S_CO_L3_AUTH_IN_PROGRESS -> S_CO_RUN
Revision History
| Revision | Publish Date | Comments |
|---|---|---|
6.0 |
26-Nov-2024 |
added a small note about the virtual ipv6 address requirement |
5.0 |
12-Jan-2023 |
added a small note about the default authorization method |
4.0 |
02-May-2022 |
Fixing typos and formatting |
2.0 |
11-Oct-2021 |
Initial Release |
1.0 |
12-Oct-2021 |
Initial Release |
Contributed by Cisco Engineers
- Jesus Herrera GarciaCisco TAC
- Tiago AntunesCisco TAC
Contact Cisco
- Open a Support Case

- (Requires a Cisco Service Contract)
 Feedback