가입자를 위한 pxGrid 인증서 생성
시작하기 전에
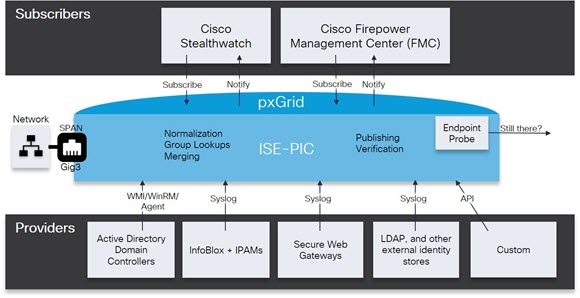
설치 시 ISE-PIC에서는 기본 ISE-PIC 노드에서 디지털 서명한 pxGrid 서비스용 자체 서명 인증서를 자동으로 생성합니다. 이후에는 pxGrid 가입자용 인증서를 생성하여 pxGrid와 가입자 간의 상호 신뢰를 보장하고, 궁극적으로는 사용자 ID가 ISE-PIC에서 가입자로 전달됩니다.
프로시저
| 단계 1 |
Subscribers(가입자)를 선택하고 Certificates(인증서) 탭으로 이동합니다. |
||
| 단계 2 |
I want to(수행할 작업) 드롭다운 목록에서 다음 옵션 중 하나를 선택합니다.
|
||
| 단계 3 |
(선택 사항) 이 인증서에 대한 설명을 입력합니다. |
||
| 단계 4 |
이 인증서가 기반으로 하는 pxGrid 인증서 템플릿을 보거나 수정합니다. 인증서 템플릿은 해당 템플릿을 기준으로 CA(Certificate Authority)에서 발급한 모든 인증서에 일반적인 속성을 포함합니다. 인증서 템플릿은 사용해야 하는 주체, SAN(Subject Alternative Name), 키 크기, SCEP RA 프로파일, 인증서의 유효 기간, 그리고 클라이언트 또는 서버 인증이나 두 인증에 모두 인증서를 사용해야 하는지 여부를 지정하는 EKU(Extended Key Usage: 확장 키 사용)를 정의합니다. 내부 Cisco ISE CA(ISE CA)는 인증서 템플릿을 사용하여 해당 템플릿을 기준으로 인증서를 발급합니다. PxGrid의 경우 Passive Identity(패시브 ID) 서비스를 사용할 때는 pxGrid 인증서 템플릿만 사용할 수 있으며, 이 템플릿에서는 Subject(주체) 정보만 수정할 수 있습니다. 이 템플릿을 수정하려면 다음을 선택합니다. . |
||
| 단계 5 |
SAN(대체 주체 이름)을 지정합니다. 여러 SAN을 추가해도 됩니다. 다음 옵션을 사용할 수 있습니다.
|
||
| 단계 6 |
Certificate Download Format(인증서 다운로드 형식) 드롭다운 목록에서 다음 옵션 중 하나를 선택합니다.
|
||
| 단계 7 |
인증서 비밀번호를 입력합니다. |
||
| 단계 8 |
Create(생성)를 클릭합니다. |
 피드백
피드백