Stappen om de APIC-controller opnieuw te installeren via HTTP-server
Downloadopties
Inclusief taalgebruik
De documentatie van dit product is waar mogelijk geschreven met inclusief taalgebruik. Inclusief taalgebruik wordt in deze documentatie gedefinieerd als taal die geen discriminatie op basis van leeftijd, handicap, gender, etniciteit, seksuele oriëntatie, sociaaleconomische status of combinaties hiervan weerspiegelt. In deze documentatie kunnen uitzonderingen voorkomen vanwege bewoordingen die in de gebruikersinterfaces van de productsoftware zijn gecodeerd, die op het taalgebruik in de RFP-documentatie zijn gebaseerd of die worden gebruikt in een product van een externe partij waarnaar wordt verwezen. Lees meer over hoe Cisco gebruikmaakt van inclusief taalgebruik.
Over deze vertaling
Cisco heeft dit document vertaald via een combinatie van machine- en menselijke technologie om onze gebruikers wereldwijd ondersteuningscontent te bieden in hun eigen taal. Houd er rekening mee dat zelfs de beste machinevertaling niet net zo nauwkeurig is als die van een professionele vertaler. Cisco Systems, Inc. is niet aansprakelijk voor de nauwkeurigheid van deze vertalingen en raadt aan altijd het oorspronkelijke Engelstalige document (link) te raadplegen.
Inhoud
Inleiding
Dit document beschrijft hoe u een nieuwe afbeelding van APIC kunt maken met behulp van HTTP-server.
Probleem
In het geval van een defect van een APIC-cluster of een hardwaremigratie van L2/M2 naar L4/M4, kunnen afzonderlijke APIC-apparaten een nieuwe image nodig hebben om de functionaliteit te herstellen. Deze procedure schetst een gestroomlijnde benadering om APIC's één voor één opnieuw te installeren met behulp van een HTTP-server, waardoor sneller clusterherstel mogelijk wordt met minimale onderbreking.
Herhaal het proces sequentieel voor elk APIC-apparaat dat een nieuwe afbeelding nodig heeft. Nadat alle APIC's een nieuwe image hebben gekregen, herstelt u de clusterconfiguratie naar wens en voert u grondige tests uit om de functionaliteit te valideren.
Deze beknopte procedure maakt efficiënt APIC-herstel mogelijk, waardoor beheerders clusterdefecten snel kunnen verhelpen en de netwerkbewerkingen effectief kunnen herstellen.
Voorwaarden
- CIMC moet worden geconfigureerd met OOB IP-adres.
- Controleer de opmerkingen van APIC release en bevestig aan welke APIC-softwareafbeelding u een nieuw image moet maken.
- Verkrijg een softwareafbeelding van software.cisco.com
- Controleer of de MD5-checksum van de afbeelding overeenkomt met de checksum op Cisco.com
- Upload de APIC-afbeelding op HTTP-server.
Oplossing
Om een nieuwe afbeelding van de APIC te maken met een HTTP-server zijn de volgende stappen nodig.
Stap 1.Eerst moet u de firmware downloaden van de Cisco-website.
Open software.cisco.com/download.
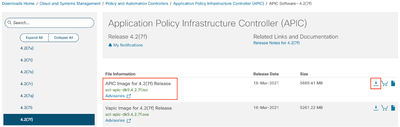
Stap 2. Voer hier APIC in en selecteer de juiste versie voor ACI. In dit geval wordt 4.2(7f) geselecteerd.
Voorbeeld:
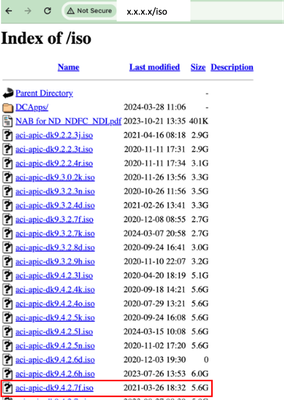
Stap 3. Kopieer de APIC software .iso afbeelding naar de HTTP server
Bijvoorbeeld:- http://x.x.x.x/iso/
Stap 4. SSH/console naar Cisco geïntegreerde beheercontroller
-
Log in op de CIMC-console vanuit een terminalvenster
# ssh admin@cimc_ip
Waar cimc_ip het CIMC IP-adres is. Voorbeeld:
# ssh admin@x.x.x.x
admin@x.x.x.x's password:
system#
-
Verander het bereik naar virtuele media:
system# scope vmedia
system /vmedia #
-
Breng de .iso afbeelding in kaart aan de HTTP server
system /vmedia # map-www volume_name http://http_server_ip_and_path iso_file_name
Waarbij:
- volume_name is de naam van het volume.
- http_server_ip_and_path is het IP-adres van de HTTP-server en het pad naar de .iso-bestandslocatie.
- iso_filename is de naam van het .iso bestand.
Opmerking: Er is ruimte tussen de http_server_ip_and_path en de iso_filename
Voorbeeld:
system /vmedia # map-www apic http://x.x.x.x/iso/ aci-apic-dk9.4.2.7f.iso
Server username: admin
Server password:
Confirm password:
Opmerking: /* Als hier geen verificatie vereist is, drukt u op ENTER
-
Controleer de afbeeldingsstatus:
system /vmedia # show mappings detail
De map-status moet worden weergegeven als OK.
Voorbeeld:
system /vmedia # show mappings detail
Volume apic:
    Map-Status: OK
    Drive-Type: CD
    Remote-Share: http://x.x.x.x/iso/

    Remote-File: aci-apic-dk9.4.2.7f.iso
    Mount-Type: www
    Mount-Options: noauto,username=admin,password=********3
    system /vmedia #
-
Aansluiten op SOL om het installatieproces te bewaken:
system /vmedia # connect host
CISCO Serial Over LAN:
Press Ctrl+x to Exit the session
Stap 5. Voedingscyclus vanaf de KVM-console van de CIMC GUI
Kies Power > Power Cycle System (koud opstarten) om de controller van stroom te voorzien

Vanaf de SOL-console: Bekijk het scherm tijdens het opstartproces en druk op F6 op het juiste moment om het opstartselectiemenu in te voeren.
Voorbeeld:
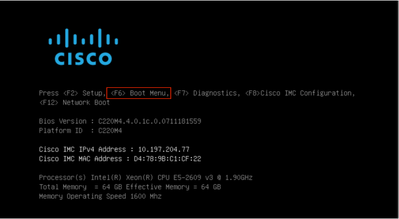
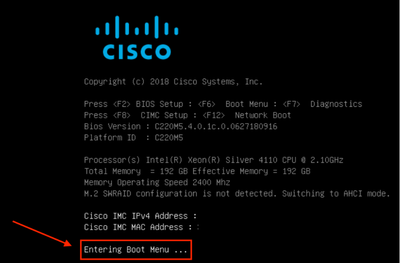
Na het indrukken van de F6
Opmerking: Als u de kans mist en niet in staat was om op het juiste moment op F6 te drukken, ga dan terug naar stap 5 om de controller aan te drijven en herhaal het proces tot u op F6 kunt drukken om het opstartkeuzemenu in te voeren.
U kunt ook het BIOS-wachtwoord invoeren. Het standaardwachtwoord is een wachtwoord
Selecteer in het menu opstartselectie de optie Cisco CIMC-Mapped v1.2 als het eenmalige opstartapparaat.

Stap 6. Ga terug naar de CIMC CLI en controleer de uitvoer van "Connect Host".
Controleer de CIMC-client, wanneer u het bericht krijgt "Om de installatie te versnellen, moet u in de volgende tien minuten iso-url invoeren" en vervolgens de URL van de enter http server met APIC-afbeelding.
++ grep /run/install/repo
++ cut -f 1 -d ' '
++ tr -d '[:digit:]'
+ usbdevice=/dev/sr
+ mkdir /mnt/usbdata
+ mount /dev/sr2 /mnt/usbdata
mount: special device /dev/sr2 does not exist
+ true
+ '[' -f /mnt/usbdata/ifabric.iso ']'
+ mountpoint -q /mnt/usbdata
+ true
+ echo 'INFO: found second partition on install media but did not find ifabric.iso. '
INFO: found second partition on install media but did not find ifabric.iso.
+ echo 'Continuing on to ISO URL prompt.'
Continuing on to ISO URL prompt.
+ '[' 0 -eq 0 ']'
+ read_iso_url
+ true,,
+ echo 'To speed up the install, enter iso url in next ten minutes: '      << Enter the http server URL with apic image  >>
To speed up the install, enter iso url in next ten minutes:
+ read -t 600 -p '? ' url
?
http://x.x.x.x/iso/aci-apic-dk9.4.2.7f.iso 5:program-log      << Enter the http server details  >>
[anaconda] 1:main* 2:shell  3:log  4:storage-lo> Switch tab: Alt+Tab | Help: F1
Opmerking: er is geen spatie tussen de http_server_ip_and_path en de iso_filename.
Stap 7: Na het invoeren van de HTTP-URL, zal het opstartproces doorgaan.
Opmerking: Als u voor de statische optie kiest, wordt u gevraagd om de interfacenaam, het IP-adres en de gateway voor beheer in te voeren.
+ '[' 0 -eq 0 ']'
+ read_iso_url
+ true
+ echo 'To speed up the install, enter iso url in next ten minutes: '
To speed up the install, enter iso url in next ten minutes:
+ read -t 600 -p '? ' url
?
[ahttp://x.x.x.x/iso/aci-apic-dk9.4.2.7f.iso 5:program-log
++ awk -F '/|:' '{print $4}'
+ urlip=x.x.x.x
+ '[' -z http://x.x.x.x/iso/aci-apic-dk9.4.2.7f.iso ']'
+ '[' -z x.x.x.x ']'
+ break
+ '[' -n http://x.x.x.x/iso/aci-apic-dk9.4.2.7f.iso ']'
+ set +e
+ configured=0
+ '[' 0 -eq 0 ']'
+ echo 'Configuring network interface'
Configuring network interface
+ echo 'type static, dhcp, bash for a shell to configure networking, or url to re-enter the url: '
>>
<< Type static and configure the APIC OOB IP address with it’s gateway>>
type static, dhcp, bash for a shell to configure networking, or url to re-enter the url:
+ read -p '? ' ntype
? static.   << Enter the static  to configure the networking >>
[anaconda] 1:main* 2:shell  3:log  4:storage-lo> Switch tab: Alt+Tab | Help: F1
Opmerking: na het typen van de statische interface zal het de CIMC-interface weergeven, selecteert u de juiste interface. als u de verkeerde interface hebt geselecteerd, dan zal het pakketverlies 100% zijn na drie mislukte pogingen om te pingen, zal het opnieuw vragen om de juiste interface te selecteren tot pakketverlies 0 is als u niet weet over de interface selecteert de alle interface één voor één.
Voorbeeld:
+ case $ntype in
+ configure_static
+ echo 'Available interfaces'
Available interfaces
+ ls -l /sys/class/net
total 0
lrwxrwxrwx. 1 root root 0 May  3 07:08 enp11s0 -> ../../devices/pci0000:00/0000:00:03.0/0000:06:00.0/0000:07:01.0/0000:09:00.0/0000:0a:00.0/0000:0b:00.0/net/enp11s0
lrwxrwxrwx. 1 root root 0 May  3 07:08 enp12s0 -> ../../devices/pci0000:00/0000:00:03.0/0000:06:00.0/0000:07:01.0/0000:09:00.0/0000:0a:01.0/0000:0c:00.0/net/enp12s0
lrwxrwxrwx. 1 root root 0 May  3 07:08 enp1s0f0 -> ../../devices/pci0000:00/0000:00:01.0/0000:01:00.0/net/enp1s0f0
lrwxrwxrwx. 1 root root 0 May  3 07:08 enp1s0f1 -> ../../devices/pci0000:00/0000:00:01.0/0000:01:00.1/net/enp1s0f1
lrwxrwxrwx. 1 root root 0 May  3 07:08 lo -> ../../devices/virtual/net/lo
+ read -p 'Interface to configure: ' interface
Interface to configure: enp1s0f0     <<  select the correct interface   >>
[anaconda] 1:main* 2:shell  3:log  4:storage-lo>
Stap 8: Correcte interfacecontrole
Na het invoeren van de interface zal het proberen om http server te pingelen en als geselecteerde interface correct is dan moet pakketverlies 0% zijn en het halen van de afbeelding van http server.
Bijvoorbeeld: Na het invoeren van de juiste interface met 0% pakketverlies.
+ read -p 'Interface to configure: ' interface
Interface to configure:  enp1s0f0
+ read -p 'address: ' addr
address: x.x.x.x/24
+ read -p 'gateway: ' gw
gateway: x.x.x.x
+ ip addr add x.x.x.x/24 dev enp1s0f0
+ ip link set enp1s0f0 up
+ ip route add default via x.x.x.x
++ seq 1 2
+ for count in '$(seq 1 2)'
+ ping -c 1 x.x.x.x
PING x.x.x.x (x.x.x.x) 56(84) bytes of data.
64 bytes from x.x.x.x: icmp_seq=1 ttl=64 time=55.0 ms
--- x.x.x.x ping statistics ---
1 packets transmitted, 1 received, 0% packet loss, time 0ms
rtt min/avg/max/mdev = 55.056/55.056/55.056/0.000 ms
+ configured=1
+ break
+ '[' 1 -eq 0 ']'
+ echo 'Fetching http://x.x.x.x/iso/aci-apic-dk9.4.2.7f.iso'

Fetching http://x.x.x.x/iso/aci-apic-dk9.4.2.7f.iso >> started fetching the apic image from HTTP server
+ wget -o /dev/null -O /tmp/cdrom.iso http://x.x.x.x/iso/aci-apic-dk9.4.2.7f.iso
Als u de verkeerde interface selecteerde dan zal het pakketverlies 100% zijn dan na drie mislukte pogingen van pingelen zal het opnieuw vragen om de juiste interface te selecteren.
Bijvoorbeeld: na het invoeren van de verkeerde interface met 100% pakketverlies
+ read -p 'Interface to configure: ' interface
Interface to configure: enp11s0
+ read -p 'address: ' addr
address: x.x.x.x/24
+ read -p 'gateway: ' gw
gateway: x.x.x.x
+ ip addr add x.x.x.x/24 dev enp11s0
+ ip link set enp11s0 up
+ ip route add default via x.x.x.x
++ seq 1 2
+ for count in '$(seq 1 2)'
+ ping -c 1 x.x.x.x
PING x.x.x.x (x.x.x.x) 56(84) bytes of data.
From x.x.x.x icmp_seq=1 Destination Host Unreachable

--- x.x.x.x ping statistics ---
1 packets transmitted, 0 received, +1 errors, 100% packet loss, time 0ms

+ sleep 20
+ for count in '$(seq 1 2)'
+ ping -c 1 x.x.x.x
PING x.x.x.x (x.x.x.x) 56(84) bytes of data.
From x.x.x.x icmp_seq=1 Destination Host Unreachable

--- x.x.x.x ping statistics ---
1 packets transmitted, 0 received, +1 errors, 100% packet loss, time 0ms

+ sleep 20
+ '[' 0 -eq 0 ']'
+ echo 'Configuring network interface'
Configuring network interface
+ echo 'type static, dhcp, bash for a shell to configure networking, or url to re-enter the url: ' <<Asking again to select the interface after selecting the type i,e static >>
type static, dhcp, bash for a shell to configure networking, or url to re-enter the url:
+ read -p '? ' ntype
?
Houd de CIMC CLI in de gaten en wacht op ongeveer 40-50 min. , u krijgt de volgende uitvoer op de client.
[anaconda] 1:main* 2:shell  3:log  4:storage-lo> Switch tab: Alt+Tab | Help: F1
[  OK  ] Started Show Plymouth Power Off Screen.
[  OK  ] Stopped Availability of block devices.
         Stopping Logout off all iSCSI sessions on shutdown...
         Stopping LVM2 metadata daemon...
[  OK  ] Stopped LVM2 metadata daemon.
[  OK  ] Stopped Logout off all iSCSI sessions on shutdown.
[  OK  ] Stopped target Network.
[  OK  ] Stopped Remount Root and Kernel File Systems.
         Stopping Remount Root and Kernel File Systems...
[  OK  ] Started Restore /run/initramfs.
[  OK  ] Reached target Shutdown.
dracut Warning: Killing all remaining processes
Powering off.
reboot: Power down
Stap 9: SOL na uitschakeling verlaten
Wacht tot u de berichtuitschakeling in de SOL-console ziet, ga dan uit SOL door op Ctrl en x (Ctrl+x) te drukken en opnieuw in te loggen op CIMC en verander het bereik opnieuw.
(i) Change the scope to virtual media again:
system# scope vmedia
system /vmedia #
 (ii) Unmap the .iso image that you mapped in 2.c:
 system /vmedia # unmap volume_name
 At the Save mapping prompt, enter yes if you want to save the mapping or no if you do not want to save the mapping. For example:
 system /vmedia # unmap apic
 Save mapping? Enther 'yes' or 'no' to confirm (CTRL-C to cancel) → yes
 system /vmedia #
 (iii) Connect back to SOL again:
       system /vmedia #  connect host
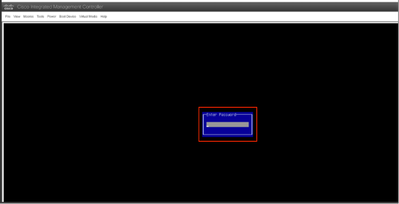
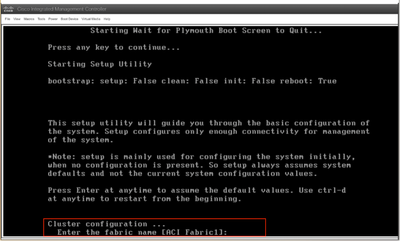
Stap 10: Eerste configuratie
Van de KVM-console: kies Power > Power on System om de controller in te schakelen en KVM te starten, zal het vragen om APIC Initial Configuration
Revisiegeschiedenis
| Revisie | Publicatiedatum | Opmerkingen |
|---|---|---|
1.0 |
03-Jun-2024 |
Eerste vrijgave |
Bijgedragen door Cisco-engineers
- Shivam TripathiTAC
 Feedback
Contact Cisco
- Een ondersteuningscase openen

- (Vereist een Cisco-servicecontract)