Introdução
Este documento descreve as etapas necessárias para adicionar tags aos recursos do Cisco Intersight.
Informações de Apoio
Uma tag é uma parte genérica de metadados de chave/valor que pode ser aplicada aos recursos dentro da Cisco Intersight. Esses recursos podem variar de endpoints de servidor a contas e muito mais.
Como um usuário, as tags podem ser usadas para agrupar recursos do Cisco Intersight, o que permitirá a consulta de recursos com base nesses valores de tag.
Na Cisco, há vários programas que dependem das tags de recursos da Cisco Intersight para ativar/desativar conjuntos de recursos específicos. Consulte a documentação do programa específico para obter mais informações sobre esses recursos e funcionalidades.
Marcas de Recurso da Conta
Requisitos
Quando conectado via interface do usuário, clique no menu de perfil na parte superior direita da interface do usuário para mostrar a Conta e a Função conectadas.

através da IU
- Clique no Seletor de serviços
- Selecione "Sistema"

3. Na visualização Configurações > Detalhes da conta, clique em "Configurar".

4. Na janela pop-up "Configure Account Settings" (Definir configurações de conta), um par key:value pode ser enviado para adicionar uma nova marca.
5. Depois de inserir, clique em "Configurar" para enviar

A marca deve ser inserida com um formato "chave:valor". Por exemplo, acima inserimos:
AutoRMAEmail:kmccabe2@cisco.com,sttardy@cisco.com
Isso criará uma marca no recurso Conta com uma chave de AutoRMAEmail e um valor de kmccabe2@cisco.com,sttardy@cisco.com.
Observação: ao adicionar uma nova marca net, a previsão do auxiliar automático não mostrará nenhuma opção. Insira a nova tag da rede exatamente como documentado e, em seguida, pressione Enter para enviar.
6. Etiquetas configuradas podem ser validadas a partir da visualização Detalhes da conta

Através da API
1. HTTP GET o recurso iam.Account para localizar o Moid do recurso de Conta específico (AccountMoid) a ser atualizado. Todas as marcas existentes a serem mantidas devem ser documentadas.
GET /api/v1/iam/Accounts

RESPONSE:
{
  "ObjectType": "iam.Account.List",
  "Results": [
    {
      "AccountMoid": "5eb2e1e47564612d307xxxxx",
      "Moid": "5eb2e1e47564612d307xxxxx",
      ...snip...
      "Tags": [{
        "Key":"existingKey",
        "Value":"existingVal"
      }]
    }]
}
2. HTTP POST o recurso iam.Account específico pelo Moid e inclui as Tags novas e existentes na carga útil da solicitação.
Nota: se o Recurso de Conta tiver Etiquetas existentes, elas deverão ser incluídas no POST para serem retidas. Se não estiverem incluídos no POST, eles serão excluídos do Recurso de conta.
POST /api/v1/iam/Accounts/5eb2e1e47564612d307xxxxx

PAYLOAD:
{
    "Tags": [{
        "Key": "existingKey",
        "Value": "existingVal"
    }, {
        "Key": "ACIProactive",
        "Value": "brvarney@cisco.com"
     }]
}
Etiquetas de recurso do serviço de infraestrutura
através da exibição de lista da interface do usuário
Os recursos exibidos em uma exibição de lista por meio do Serviço de infraestrutura podem ser marcados. Por exemplo, servidores, clusters, interconexões em malha, chassis, etc.
Observação: a RMA proativa não suporta nenhum recurso habilitado por meio de etiquetas de recurso de serviço de infraestrutura. Não use as etapas a seguir para configurar as marcas de RMA pró-ativo.
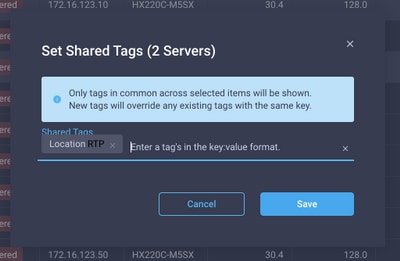
1. Em uma exibição de lista, marque a caixa dos recursos a serem marcados

2. Pressione o botão tag localizado ao lado das reticências

3. No pop-up "Definir Tags Compartilhadas", insira a tag key:value a ser aplicada a todos os objetos selecionados
4. Pressione "Salvar" para enviar

Observação: ao adicionar uma nova marca net, a previsão do auxiliar automático não mostrará nenhuma opção. Insira a nova tag da rede exatamente como documentado e, em seguida, pressione Enter para enviar.
Marcas de Recurso da Organização
Via API
1. Documentos API Abertos para Organizações
Navegue até a página do documento da api para Organizações.
Observação: se estiver usando o Connected Virtual Appliance, navegue para https://[FQDN do dispositivo]/apidocs/apirefs/organização/Organizations/model/ em vez disso
2. Identifique a Organização que deseja atualizar.
Consulte o Intersight API Query Guide para obter referência.
Os usuários podem simplesmente usar o endpoint GET para listar todas as organizações sem parâmetros. Se houver muitas organizações em sua conta para serem facilmente visualizadas em uma saída, os usuários podem usar um parâmetro de consulta $select para limitar os campos mostrados, mas certifique-se de incluir Marcas na instrução $select, por exemplo:

Na saída da API, o campo de que precisamos é o campo Moid, esse é um identificador exclusivo para essa organização no Intersight e será usado na próxima etapa. Também precisamos obter todas as marcas que estiverem lá para a próxima etapa.
3. Atualize as Marcas da Organização com o ponto final da API de PATCH da Organização no Moid das Organizações. Certifique-se de inserir novamente as marcas existentes reunidas no campo Corpo, caso contrário elas serão removidas.
O corpo da chamada PATCH de exemplo acima:
{"Tags":[{"Key":"AutoRMAEmail","Value":"joe@somedomain.com"}]}
Quaisquer marcas existentes que estejam no registradas podem ser adicionadas à matriz de marcas.
Observação: se você estiver seguindo este procedimento para configurar a RMA proativa, os endereços de e-mail aqui devem ser correlativos a uma conta CCO.
Marcas de Recurso de Registro de Dispositivo
Através da API
1. Documentos API Abertos para Dispositivos Registrados
Navegue até a página de documento da API para Dispositivos registrados
Se estiver usando o Connected Virtual Appliance, navegue para https://[FQDN do dispositivo]/apidocs/apirefs/asset/DeviceRegistrations/model/ em vez disso
2. Identificar o Dispositivo Registrado que precisa ser atualizado
Consulte o Intersight API Query Guide para obter referência
Uma das maneiras mais fáceis de consultar é pelo nome do host. Para fazer isso, uma consulta pode ser criada da seguinte forma:
DeviceHostname eq 'F340-21-22-UCS4'
Aproveitando $filter e $select, vemos uma saída mais gerenciável:

3. Use a API de PATCH para atualizar marcas
Extraia todas as marcas que já estão no dispositivo registrado, bem como o moid do dispositivo. Navegue até o endpoint PATCH, cole no Moid na entrada de moid superior. Por exemplo:

O corpo da chamada PATCH de exemplo acima:
{"Tags":[{"Key":"AutoRMAEmail","Value":"joe@somedomain.com"}]}
Quaisquer marcas existentes que estejam no registradas podem ser adicionadas à matriz de marcas.
Observação: se você estiver seguindo este procedimento para configurar a RMA proativa, os endereços de e-mail aqui devem ser registrados com um nome de usuário da conta Cisco válido/ID do CCO.
 Feedback