How to Create a Basic Voice Network using Raspberry Pi
Objective
This document provides instructions on how to configure a basic voice network with Raspberry Pi as the communication server using Asterisks. Virtual Local Area Network (VLAN) and Quality of Service (QoS) will be used to help prioritize traffic by separating voice and data traffic. The goal of this network is to set up internal testing. These tests will help you to scale your network appropriately, see if you have enough bandwidth for the voice volume you expect, and find any other possible contention between equipment. It can also help determine whether you want to host it locally or in the cloud. Once a company has reached a certain size, they might prefer to have their own local call controller like PBX, or IP PBX. This would make internal calls more efficient since calls between phones inside of the company would not have to be routed out of the building and then back in.
Important Note: The Raspberry Pi is not a Cisco supported product, this document is for support purposes only and is not a solution document.
Introduction
In order for a company to conduct effective business, employees need to have access to a voice network. This facilitates communication between employees and their customers as well as allowing employees the ability to communicate internally. Each employee can be provided with a landline phone and/or a cell phone, but this can get quite expensive. Companies often choose to set up a voice network that utilizes Voice over Internet Protocol (VoIP) instead.
VoIP technology allows you to use the internet to make and receive telephone calls from any location, to any location in the world with minimal, if any, long distance charges. This can be utilized on any device that uses the internet.
VoIP can save a company money while increasing productivity, communication, and customer satisfaction. Employees can utilize different features such as call routing, music on hold, and integrated voicemail.
A common feature of VoIP that many businesses use is call routing, also known as an automatic call distributor. Call routing distributes incoming calls to the next available agent instead of sending them to voicemail. This ensures that customer calls will be answered as efficiently as possible. After business hours, calls can be sent directly to voicemail.
Adding users and upgrading features is a simple process, which is helpful when your business is expanding or your needs change. Unlike a traditional phone system, no expensive wiring needs to be done.
To set up a VoIP network, you have options to consider. You can host a VoIP service for your own phone system using KSU, KSU-less, Private Branch Exchange (PBX) or another VoIP system.
Your budget, number of employees and locations, services available in your area, and growth of the company should all be considered. Training and additional equipment, such as headsets, may need to be available as well. VoIP can increase your data usage and you may need to raise your bandwidth to account for the voice network traffic.
You should also plan for a backup, "Plan B", in case your network ever goes down. If you lose power, your VoIP system will not connect. This redundancy should be implemented to immediately restore your phone services and prevent interruption of your business productivity.
In this article, we will be deploying our own phone system using Asterisk, a PBX on a Raspberry Pi.
Note: Once you have completed these steps and would also want the ability to call out of your internal network, you would need to choose an Internet Telephony Service Provider (ITSP).
Definitions
A Virtual Local Area Network (VLAN) allows you to logically segment a Local Area Network (LAN) into different broadcast domains. In scenarios where sensitive data may be broadcast on a network, VLANs can be created to enhance security by designating a broadcast to a specific VLAN. Users on a specific VLAN are the only ones that can access and manipulate data on that VLAN. VLANs can also be used to enhance performance by reducing the need to send broadcasts and multicasts to unnecessary destinations.
All ports, by default, are assigned to VLAN 1, so once you set up different VLANs, you need to manually assign each ports to the appropriate VLAN.
Each VLAN must be configured with a unique VLAN ID (VID) with a value from 1 to 4094. The device reserves VID 4095 as the Discard VLAN. All packets classified to the Discard VLAN are discarded at ingress, and are not forwarded to a port.
Quality of Service (QoS) allows you to prioritize traffic for different applications, users, or data flows. It can also be used to guarantee performance to a specified level, thus, affecting the QoS for the client. QoS is generally affected by the following factors: jitter, latency, and packet loss. Most often, video or VoIP is given priority as they are most affected by QoS.
Private Branch Exchange (PBX) is a telephone switching system that manages incoming and outgoing calls for internal users in a company. A PBX is connected to the public phone system and automatically routes incoming calls to specific extensions. It also shares and manages multiple lines. A typical small business PBX system includes external and internal phone lines, a computer server that manages call switching and routing, and a console for manual control.
An IP PBX can do everything a traditional small business PBX can do and more. It performs the switching and connecting of VoIP as well as landline calls. An IP PBX system runs on an IP data network, which saves costs and minimizes network management. You can use IP phones, softphones (which don't require any phone hardware beyond a computer and microphone headset), and landline phones on an IP PBX phone system.
A Raspberry Pi is an inexpensive, small, portable computer that functions like a desktop computer.
Asterisk is an open source framework that can make a computer, such as a Raspberry Pi, into a communication server. This allows you to build your own business PBX phone system. In this article, Asterisk uses FreePBX as a graphical user interface (GUI) that controls and manages Asterisk where you can configure extensions, users, etc.
Applicable Devices
- Router
- Power over Ethernet (PoE) Switch
- Raspberry Pi (Pi 3 B+, Pi 3, Pi 3, B+, B, and A models)
- 2 or more Cisco SPA/MPP IP Phones
Software Version
- 14.0.1.20 (FreePBX)
- 13.20.0 (Asterisk)
- 1.1.1.06 (RV325 Router)
- 1.1.4.1 (SF220-24P)
- 7.1.3 (SPA502G)
To configure Basic Voice Network with Raspberry Pi, follow the guideline below:
Topology:
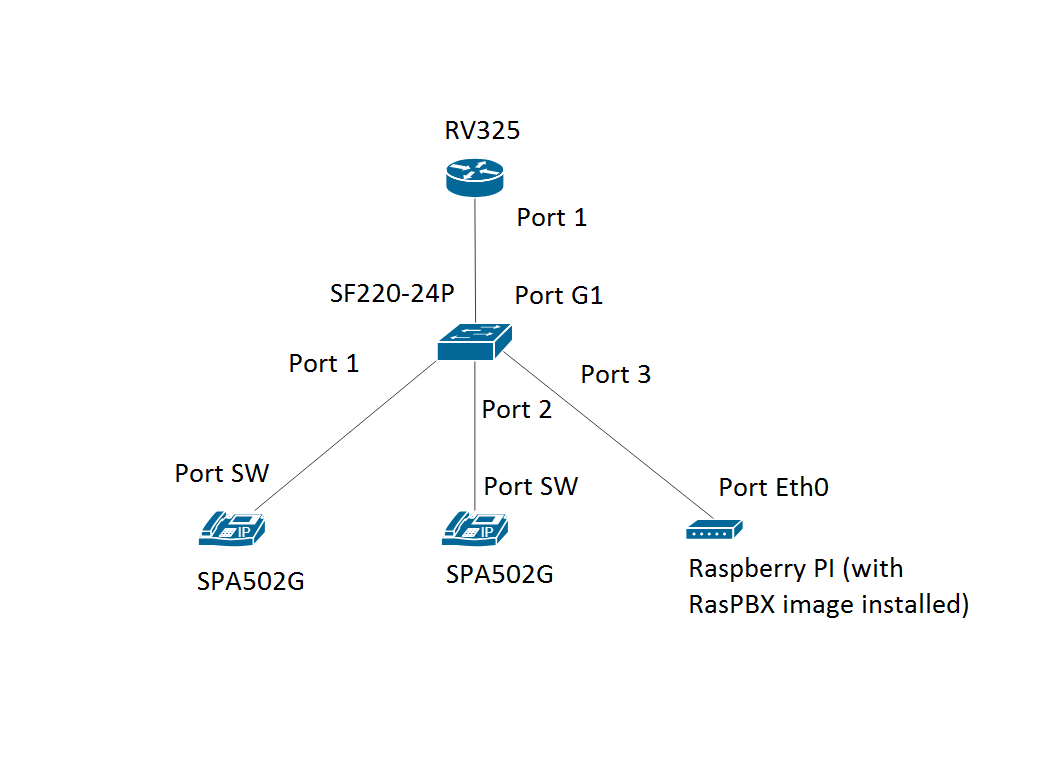
The image for the RasPBX can be found here. This image needs to be installed on the Raspberry Pi.
Note: In this document, the Raspberry Pi with the RasPBX image is already configured. To access the GUI of the Raspberry Pi, type in http://raspbx.local or the IP address of the Raspberry Pi in your browser to configure the PBX. The default FreePBX login is user: admin password: admin. Also, the Raspberry Pi was preconfigured to have a static IP address.
Table of Contents
- Setting Up VLANs on the Router
- Configuring SPA/MPP Phones
- Configuring VLANs on a Switch
- Setting Up Voice VLANs on a Switch
- Configuring Interface Settings on a Switch
- Configuring Port VLAN Membership on a Switch
- Changing Raspberry Pi's IP Address to be on a Different Subnet
- Conclusion
Setting Up VLANs on the Router
Step 1. Log in to the web-based utility and navigate to Port Management > VLAN Membership.
Note: This may vary depending on the model. In this example, RV325 is used. For more information about accessing the web-based setup page, click here.
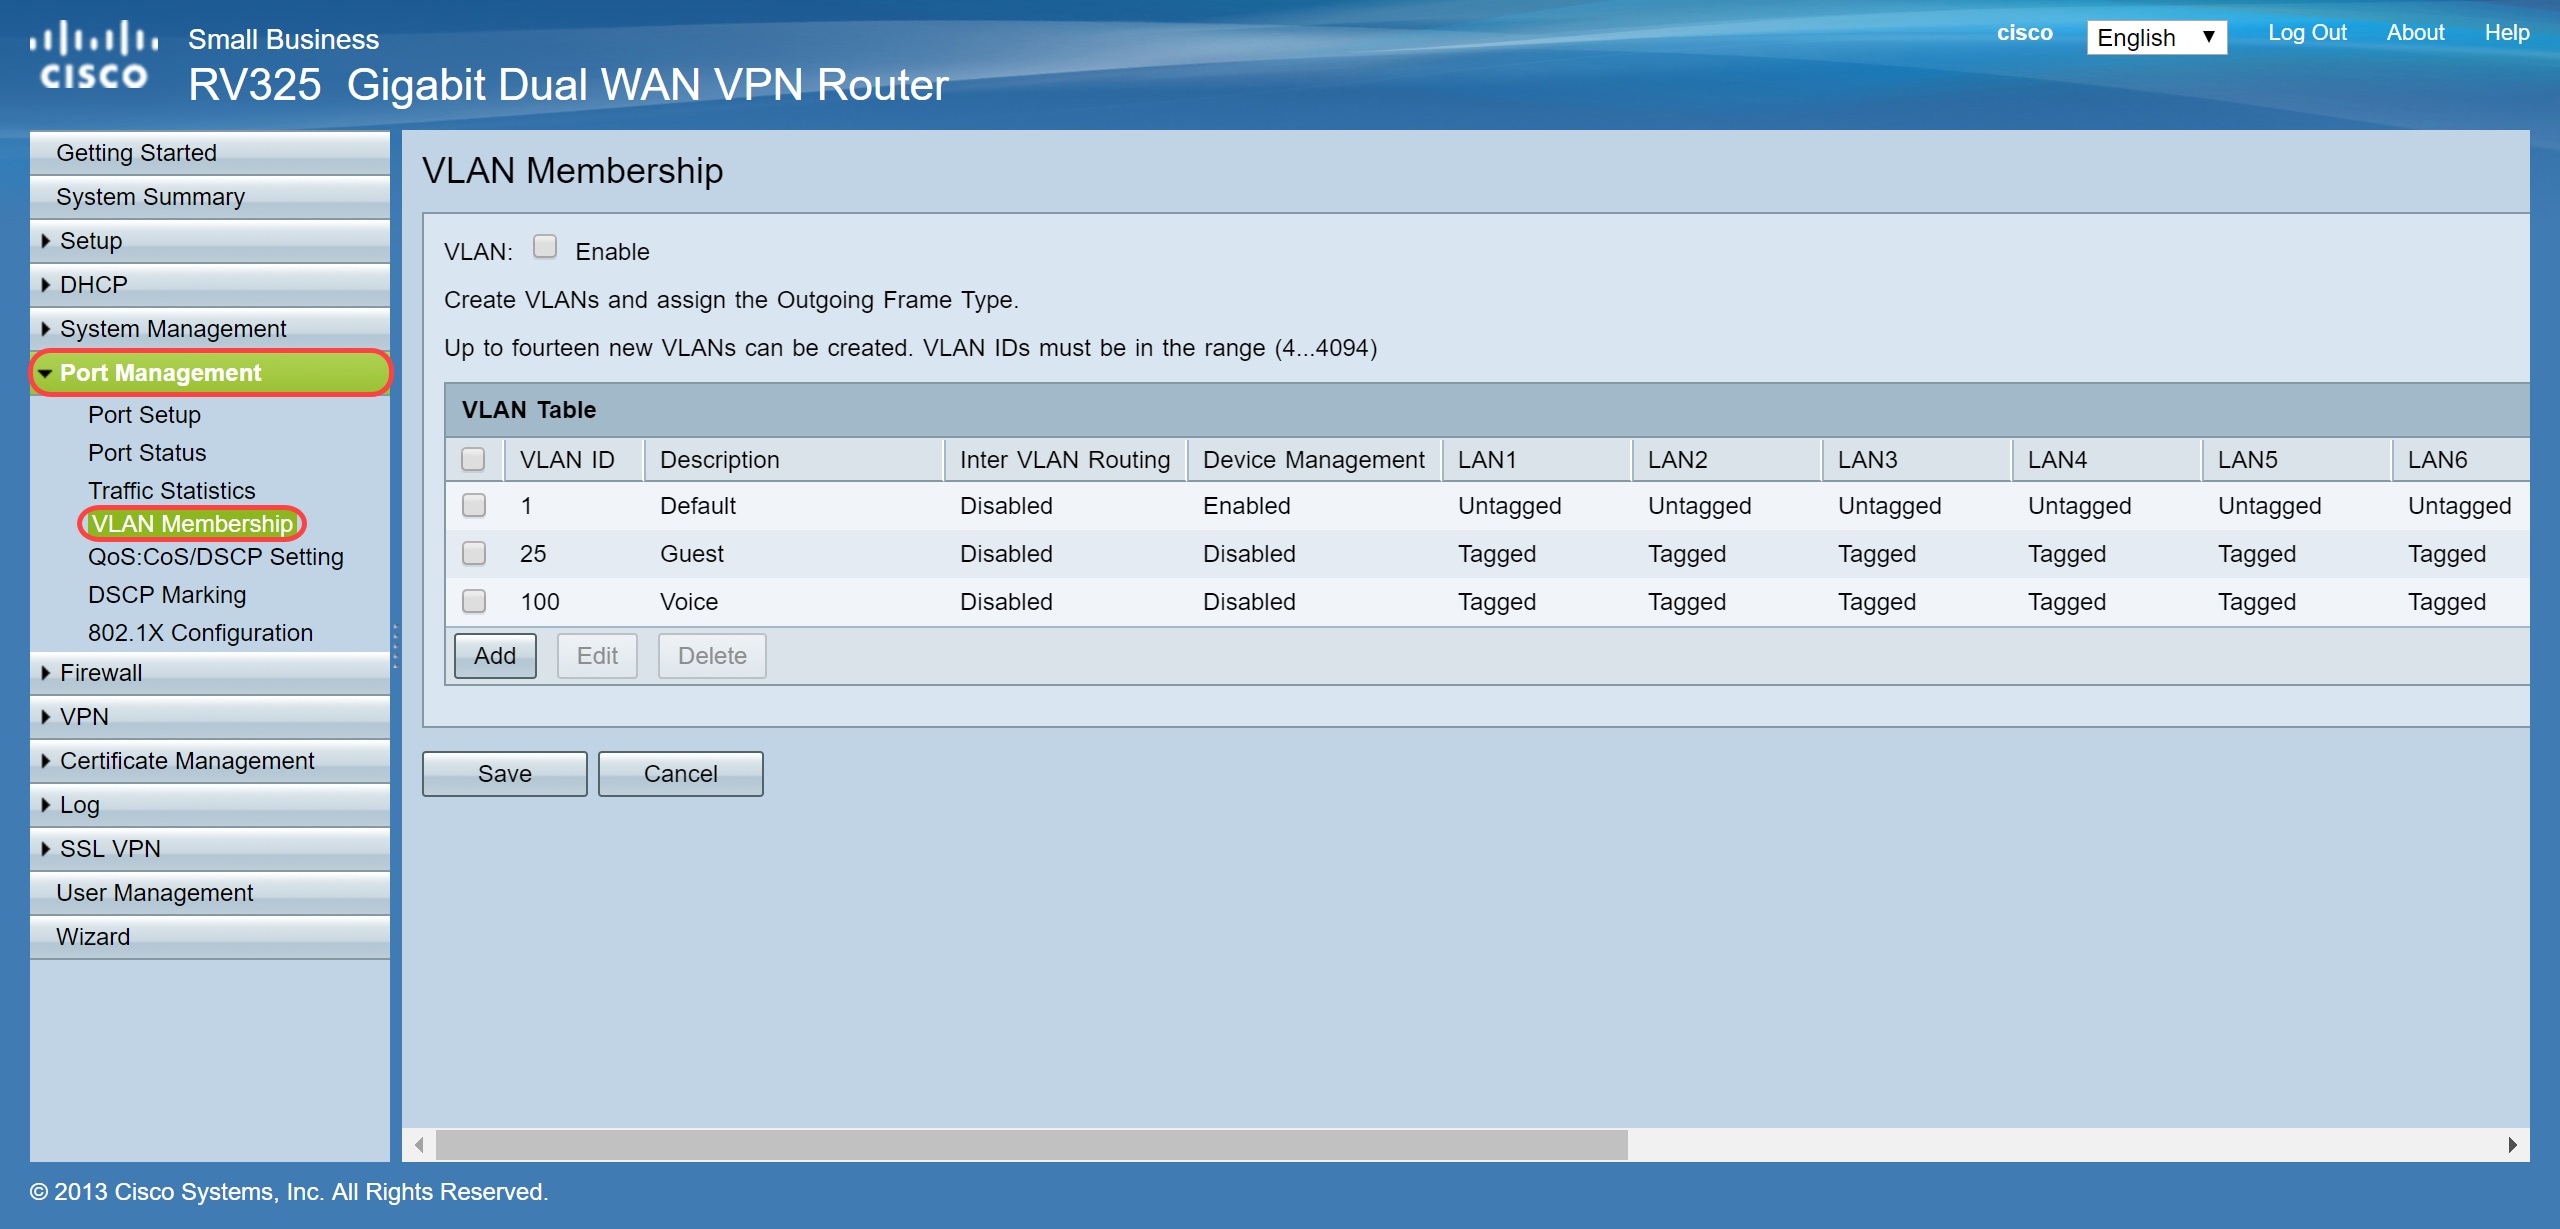
Step 2. Check the Enable checkbox to enable VLAN on the router.
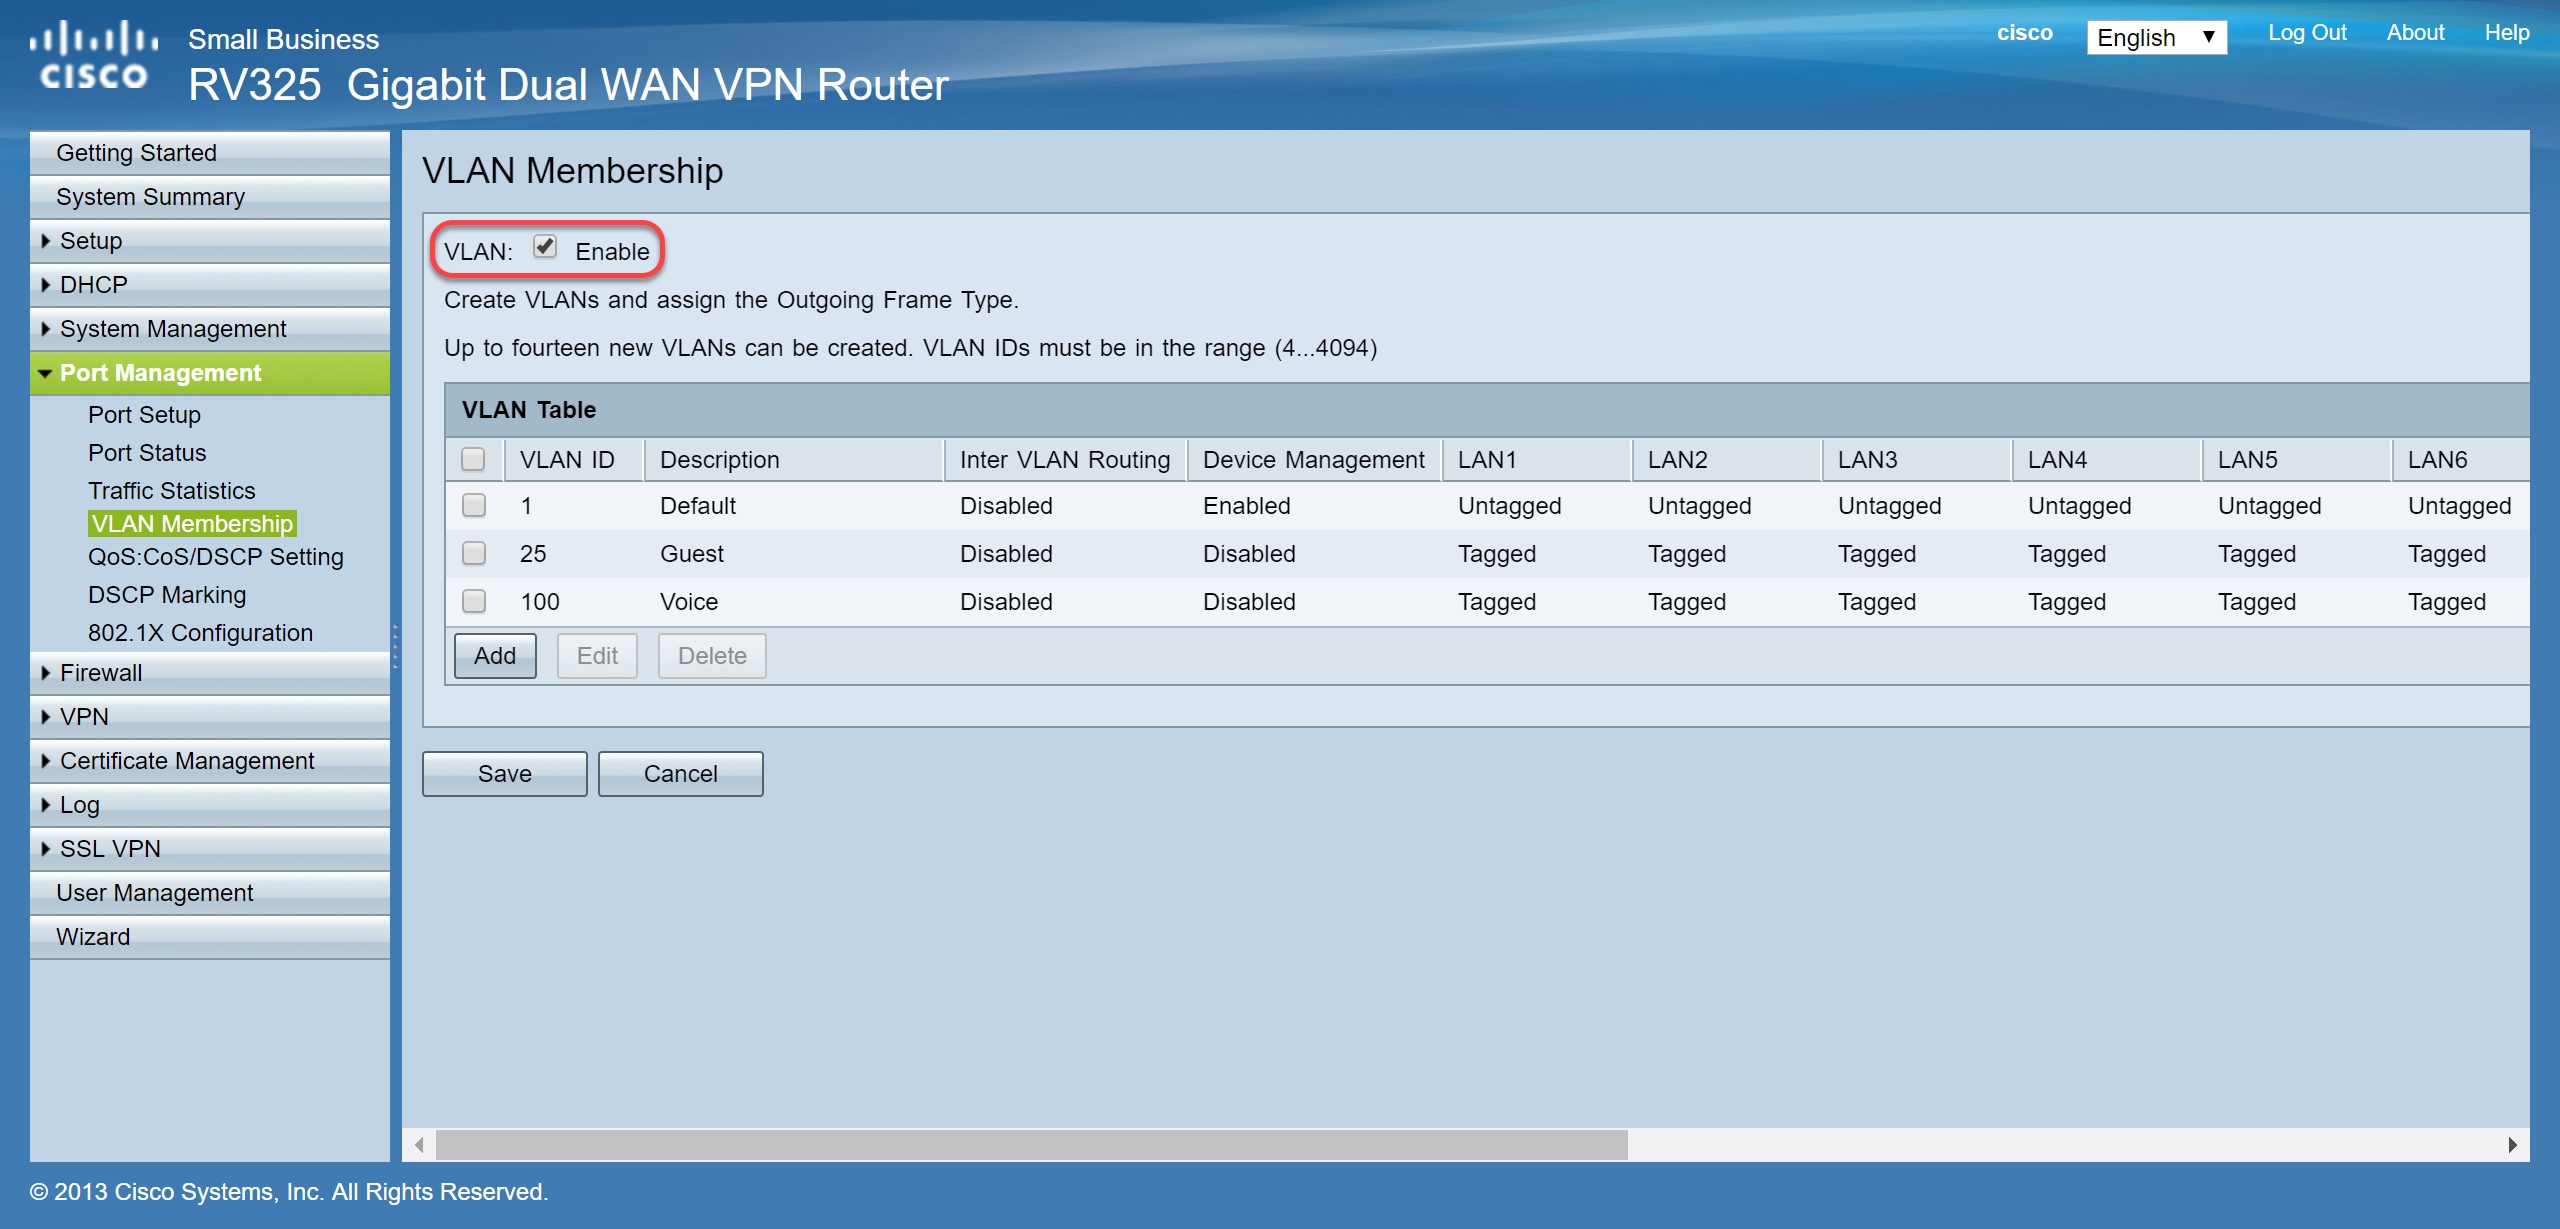
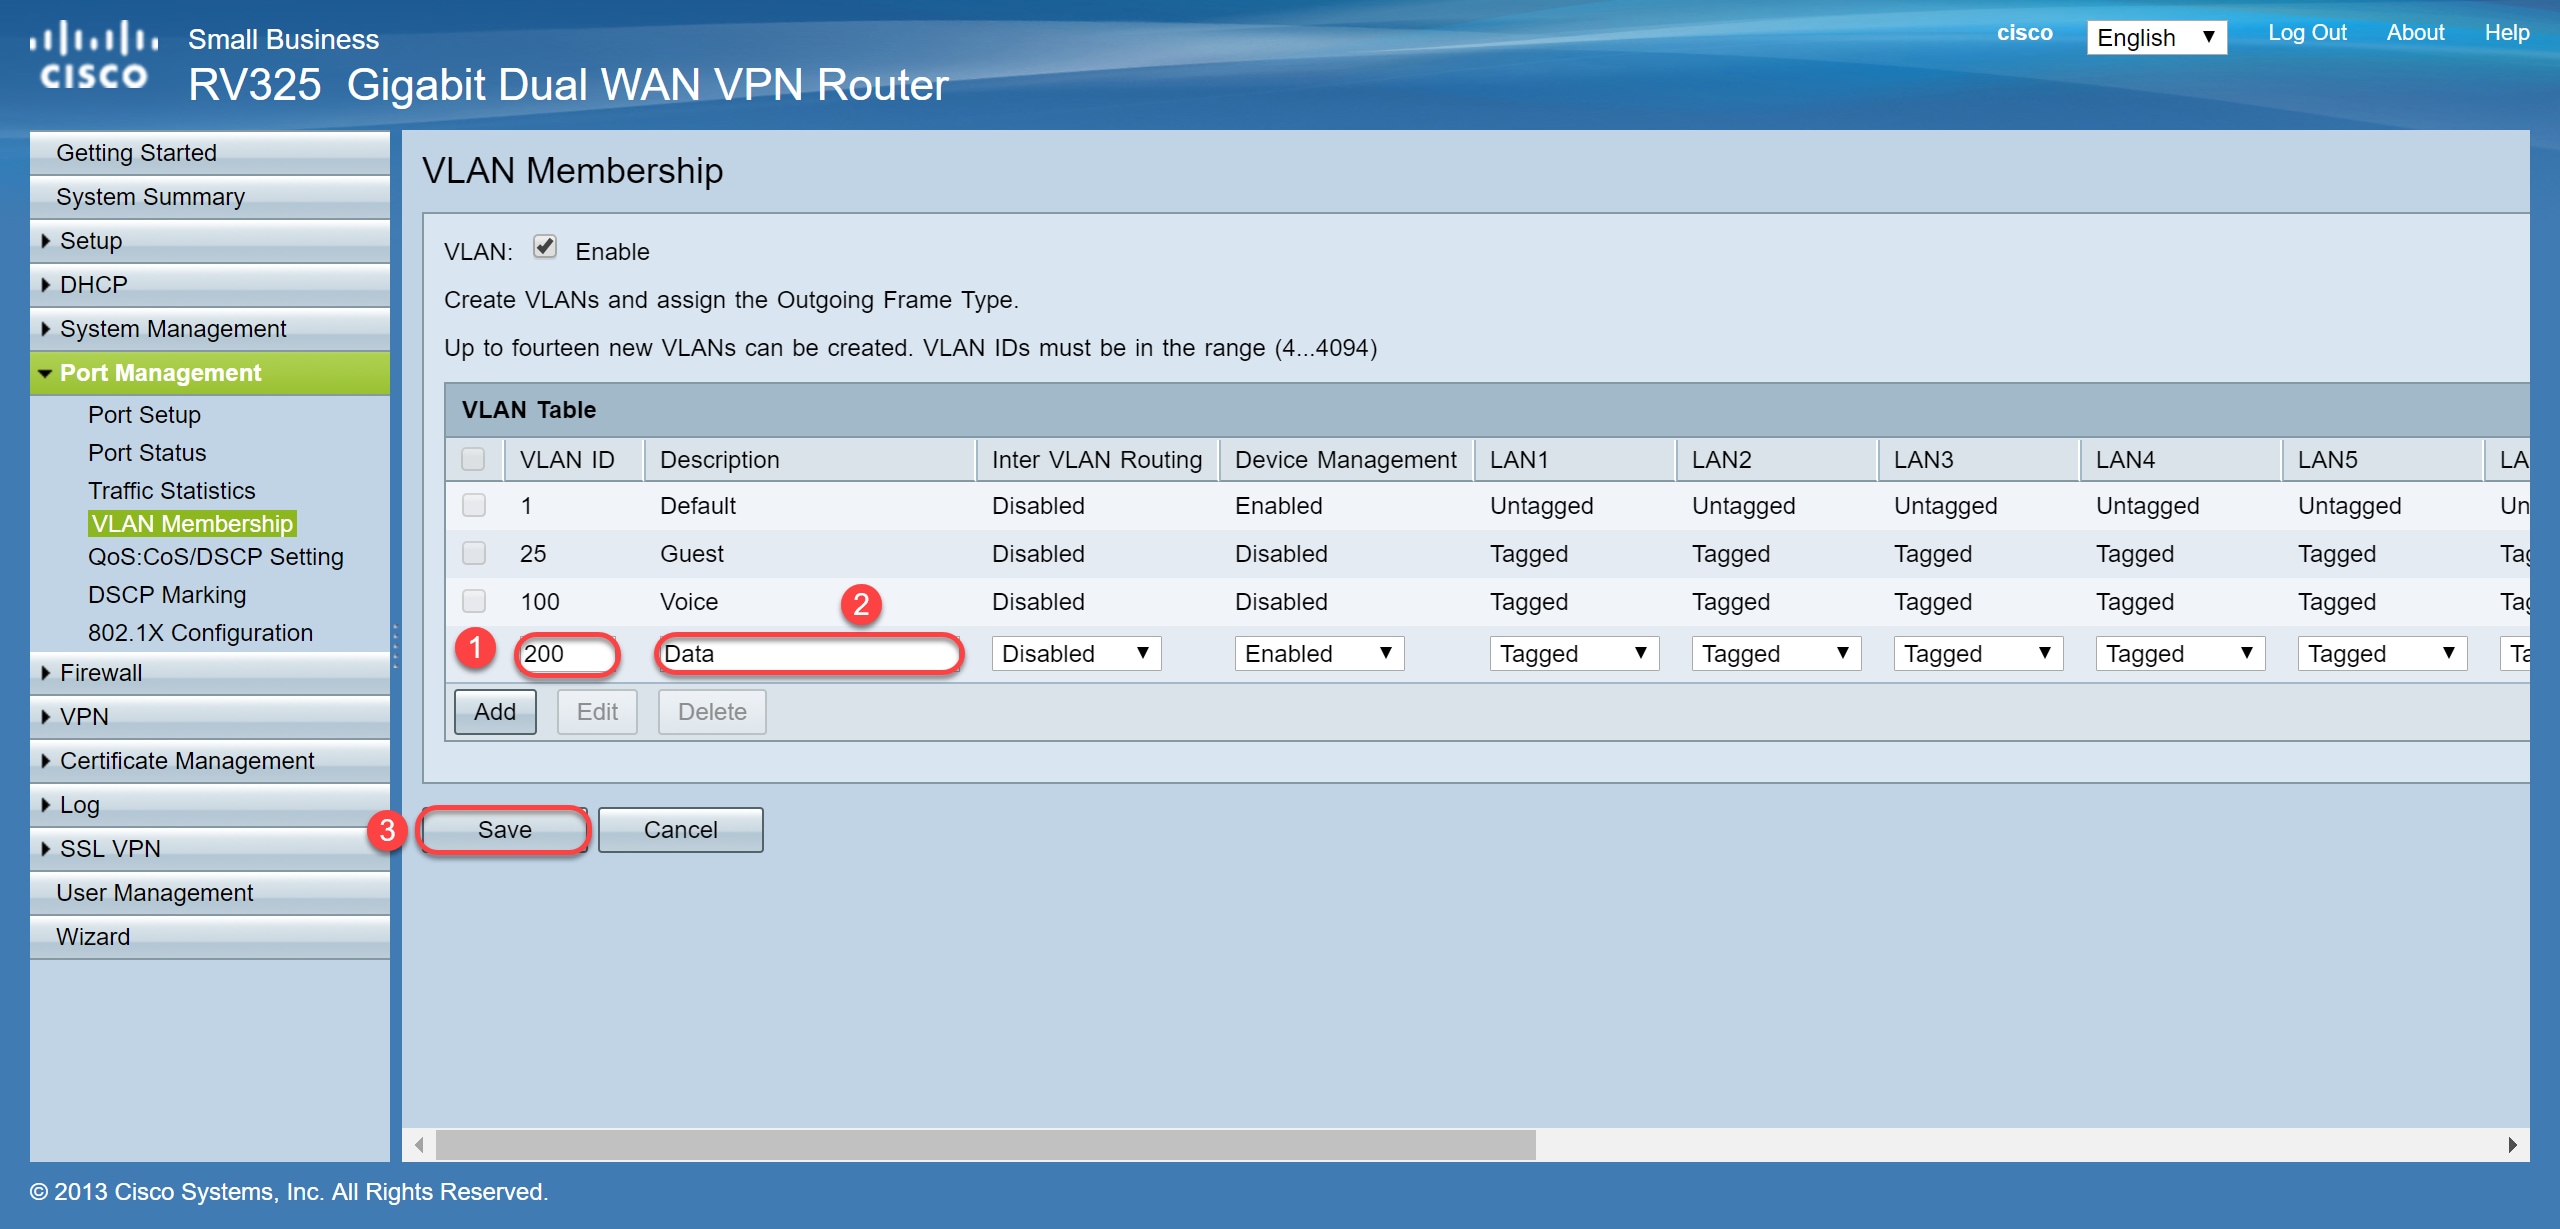
Step 3. In the VLAN Table section, Click Add to create a new VLAN ID.
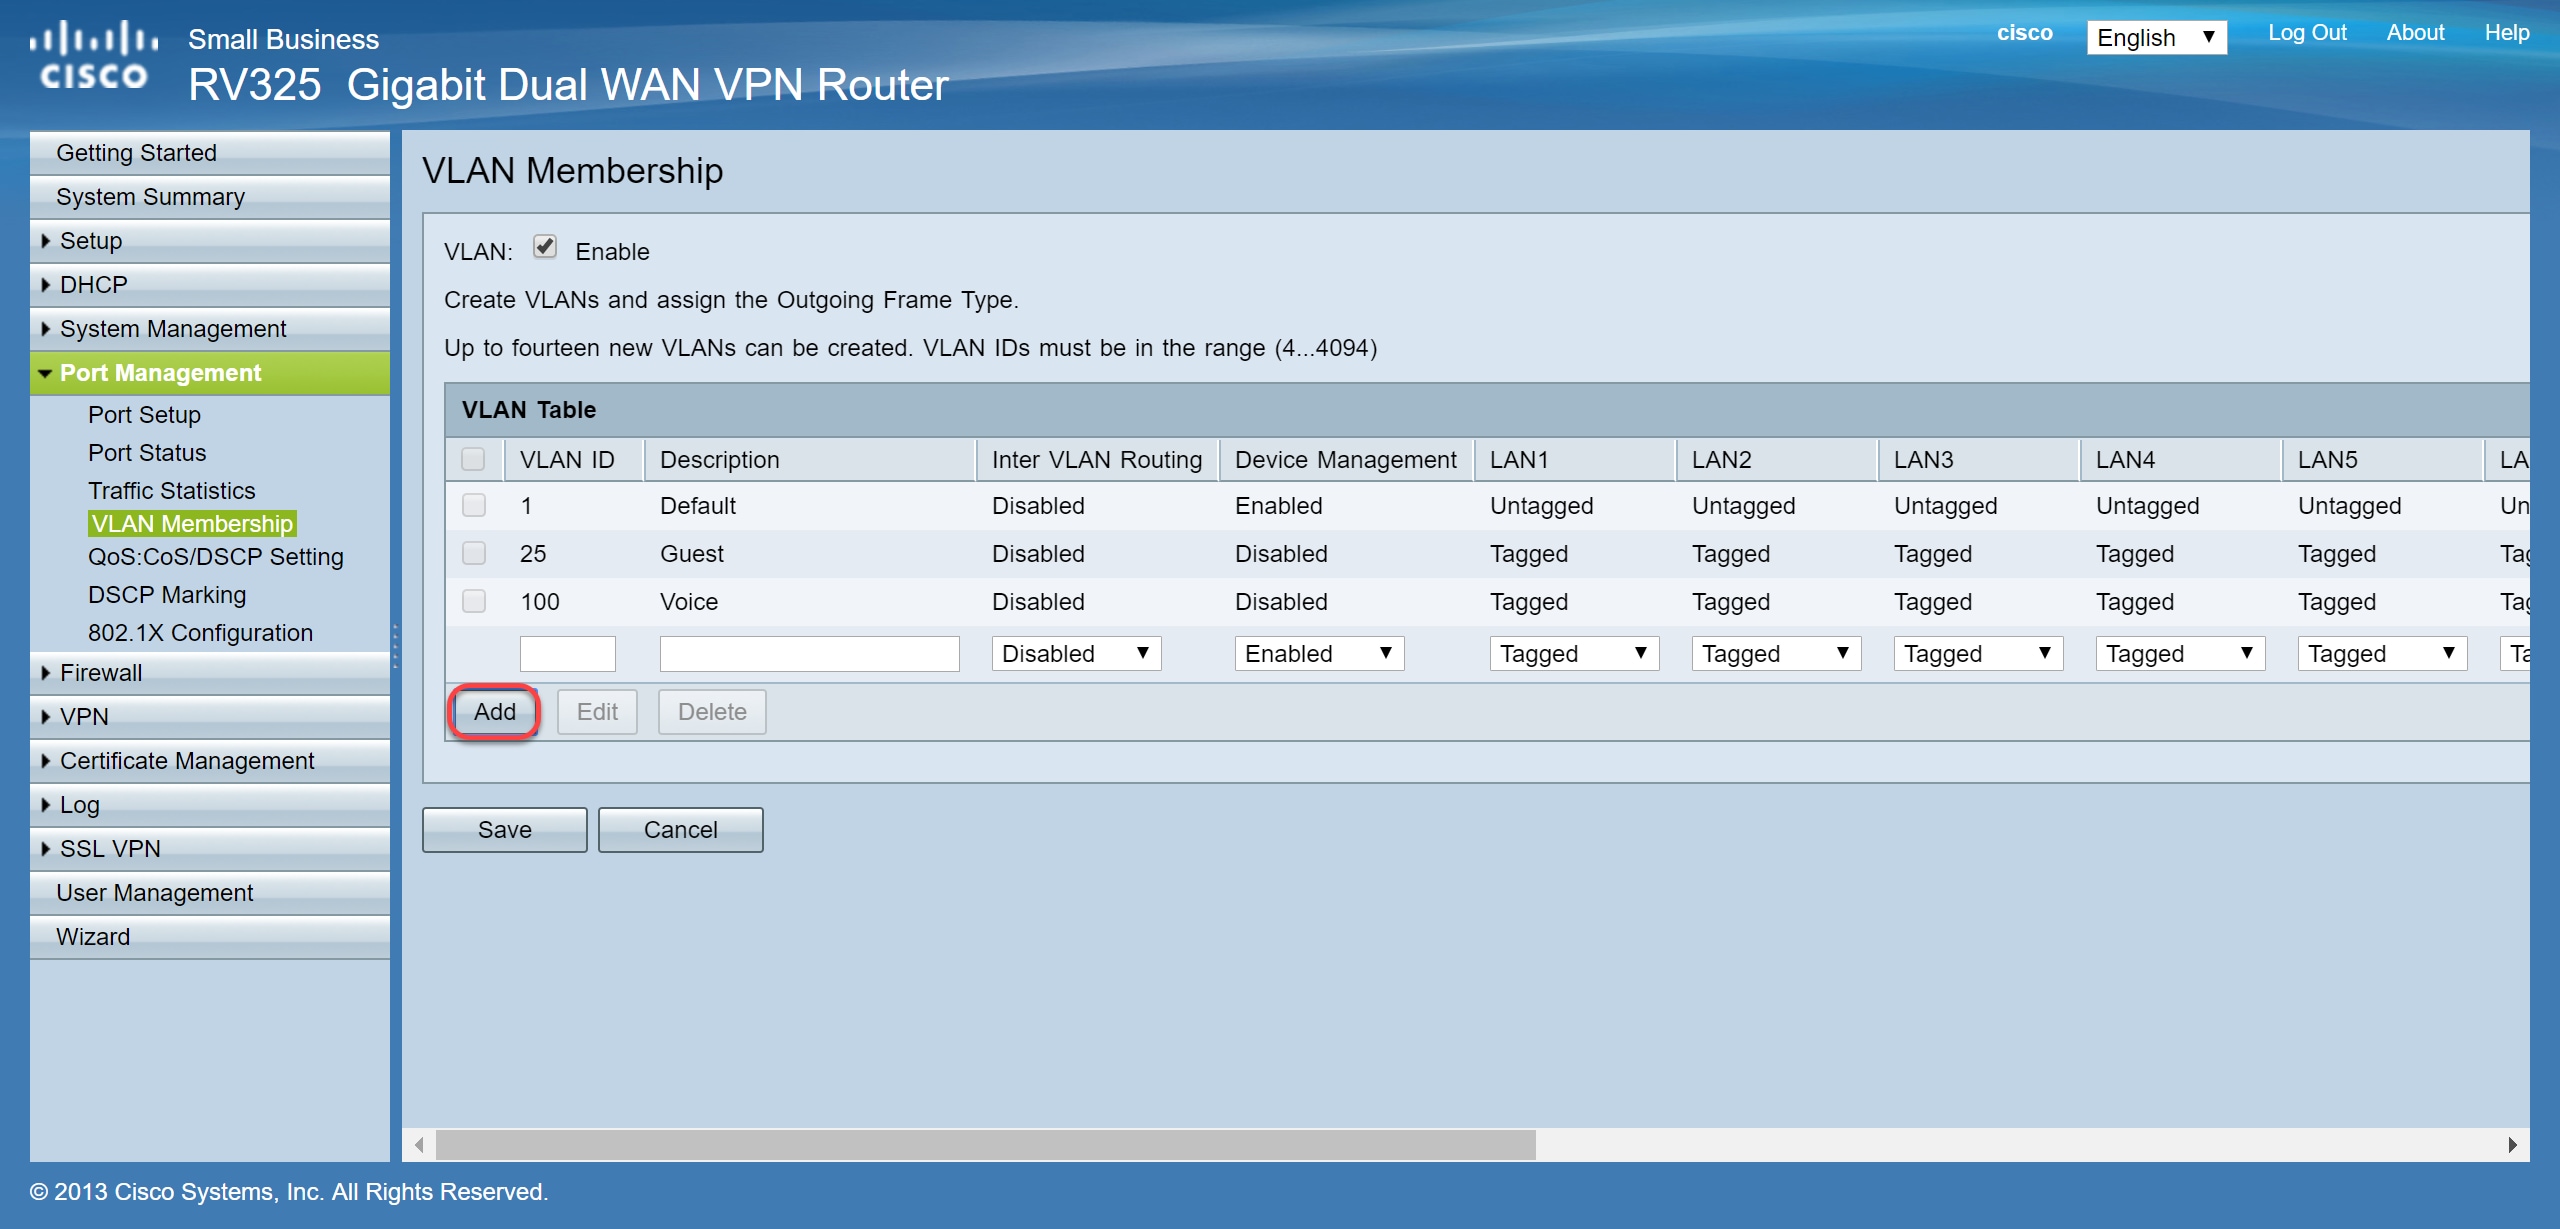
Step 4. Enter a VLAN number in the VLAN ID field. VLAN IDs must be in range 4 to 4094. In this example, 200 is used for data as VLAN ID. Next, enter a description for the VLAN in the Description field. Data is entered as the example for description. Then click Save.
Note: VLAN 100 for voice was created by default on this router. Up to fourteen new VLANs can be created.
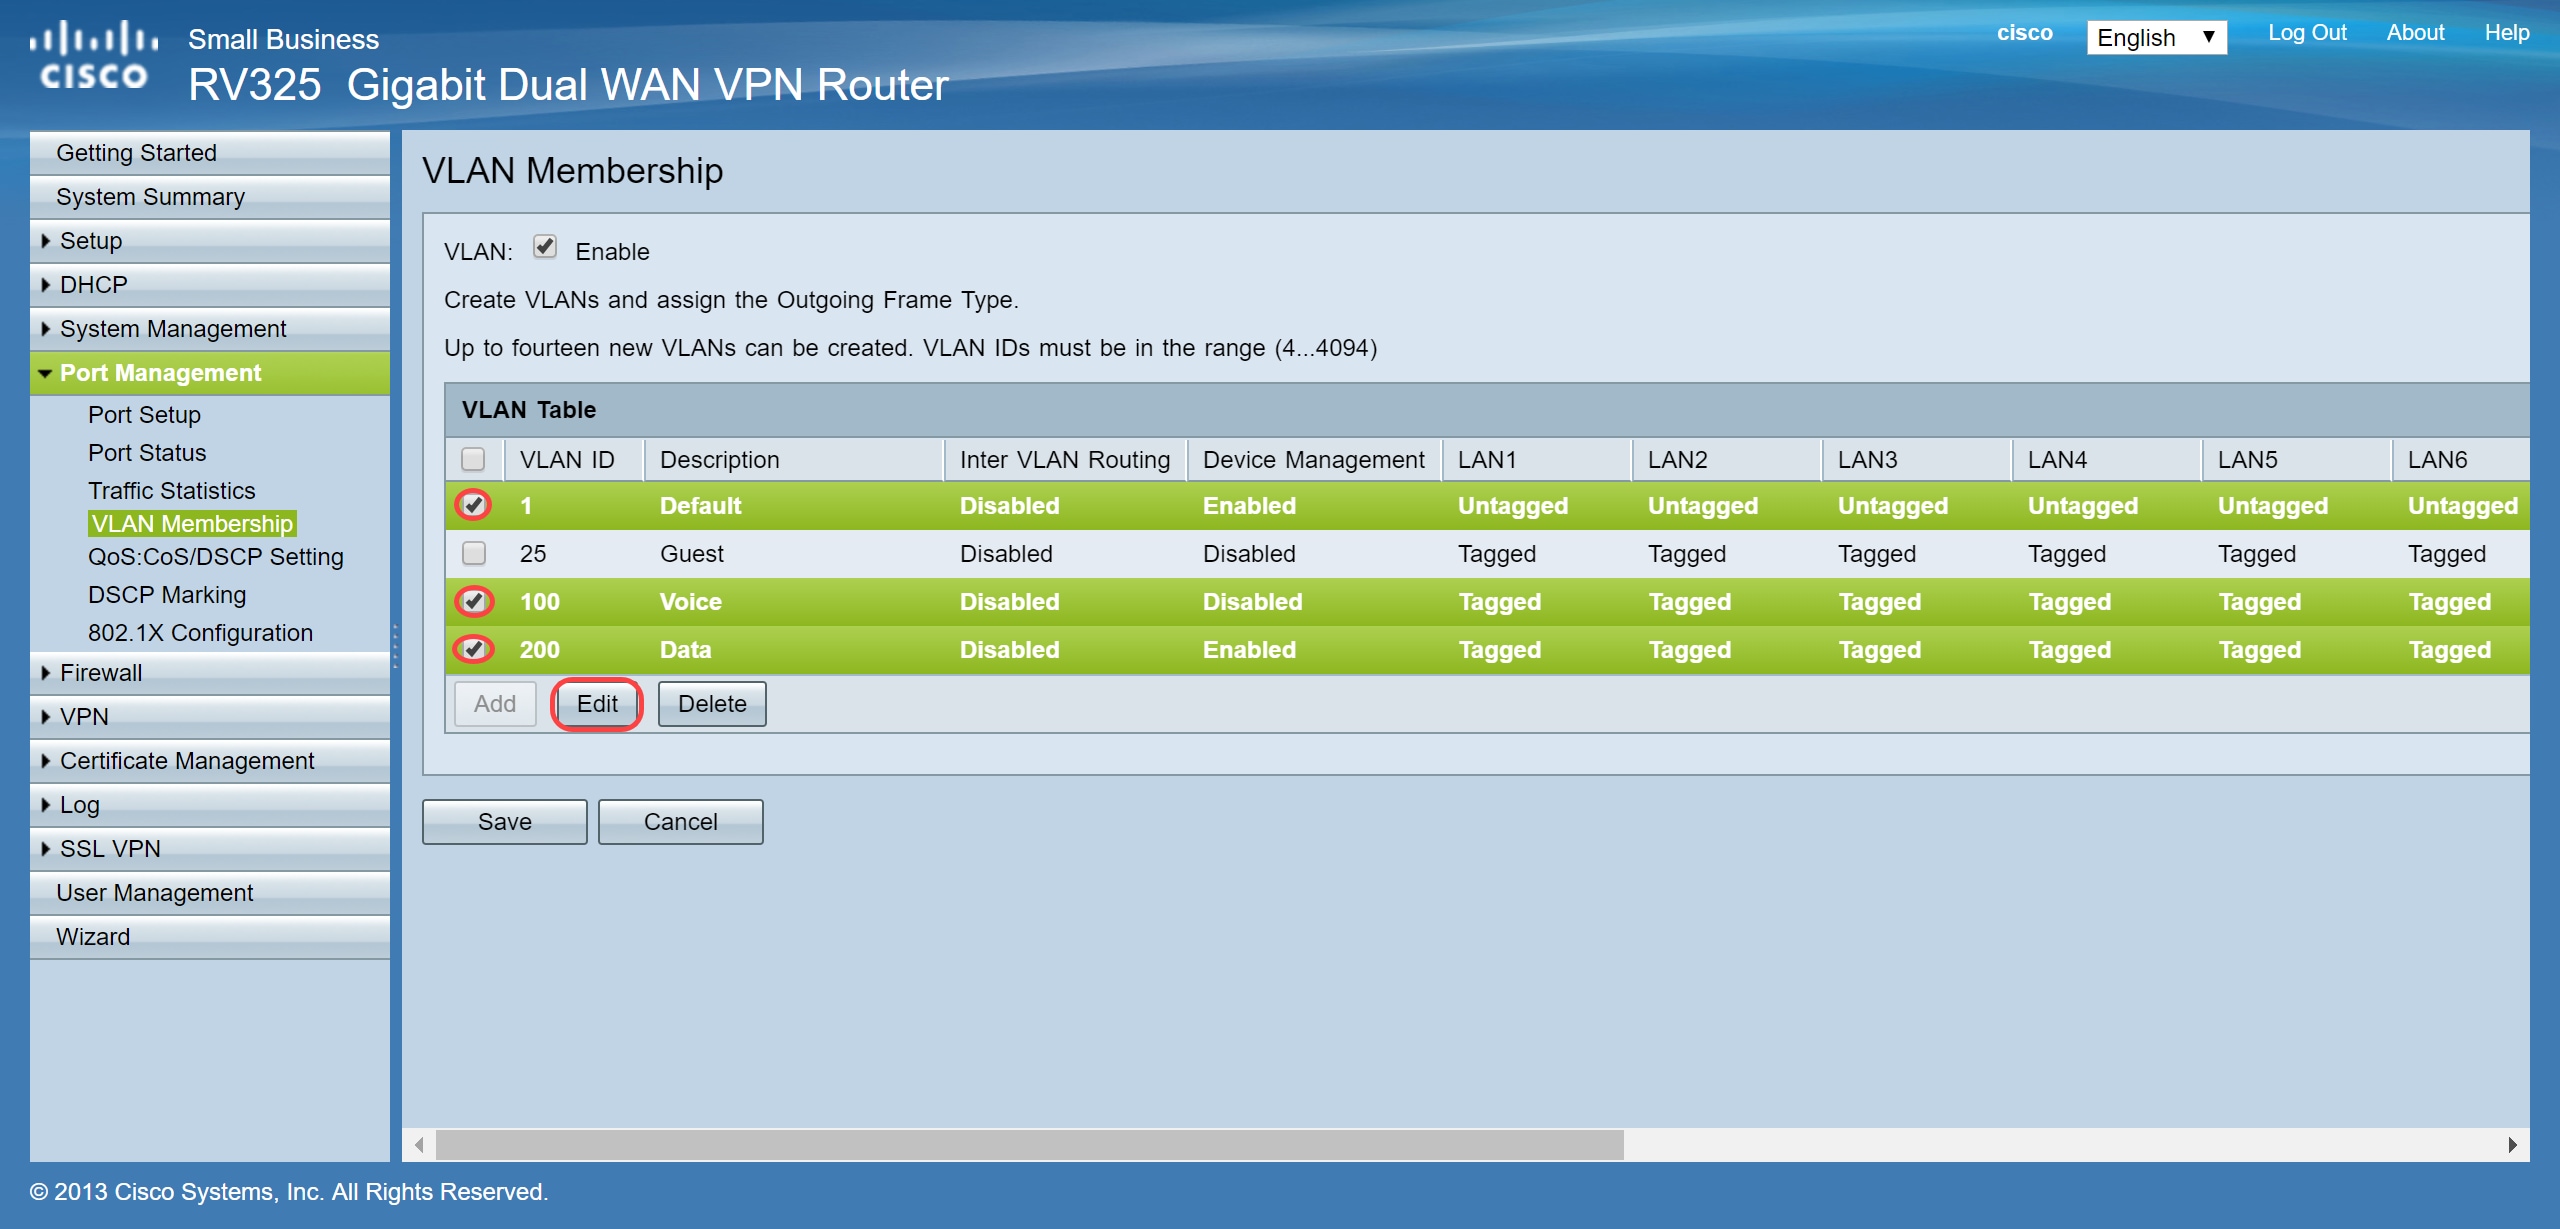
Step 5. To edit a VLAN, check the checkbox of the appropriate VLAN. In this example, VLAN 1, 100, and 200 will be edited. Then click Edit to edit the VLANs.
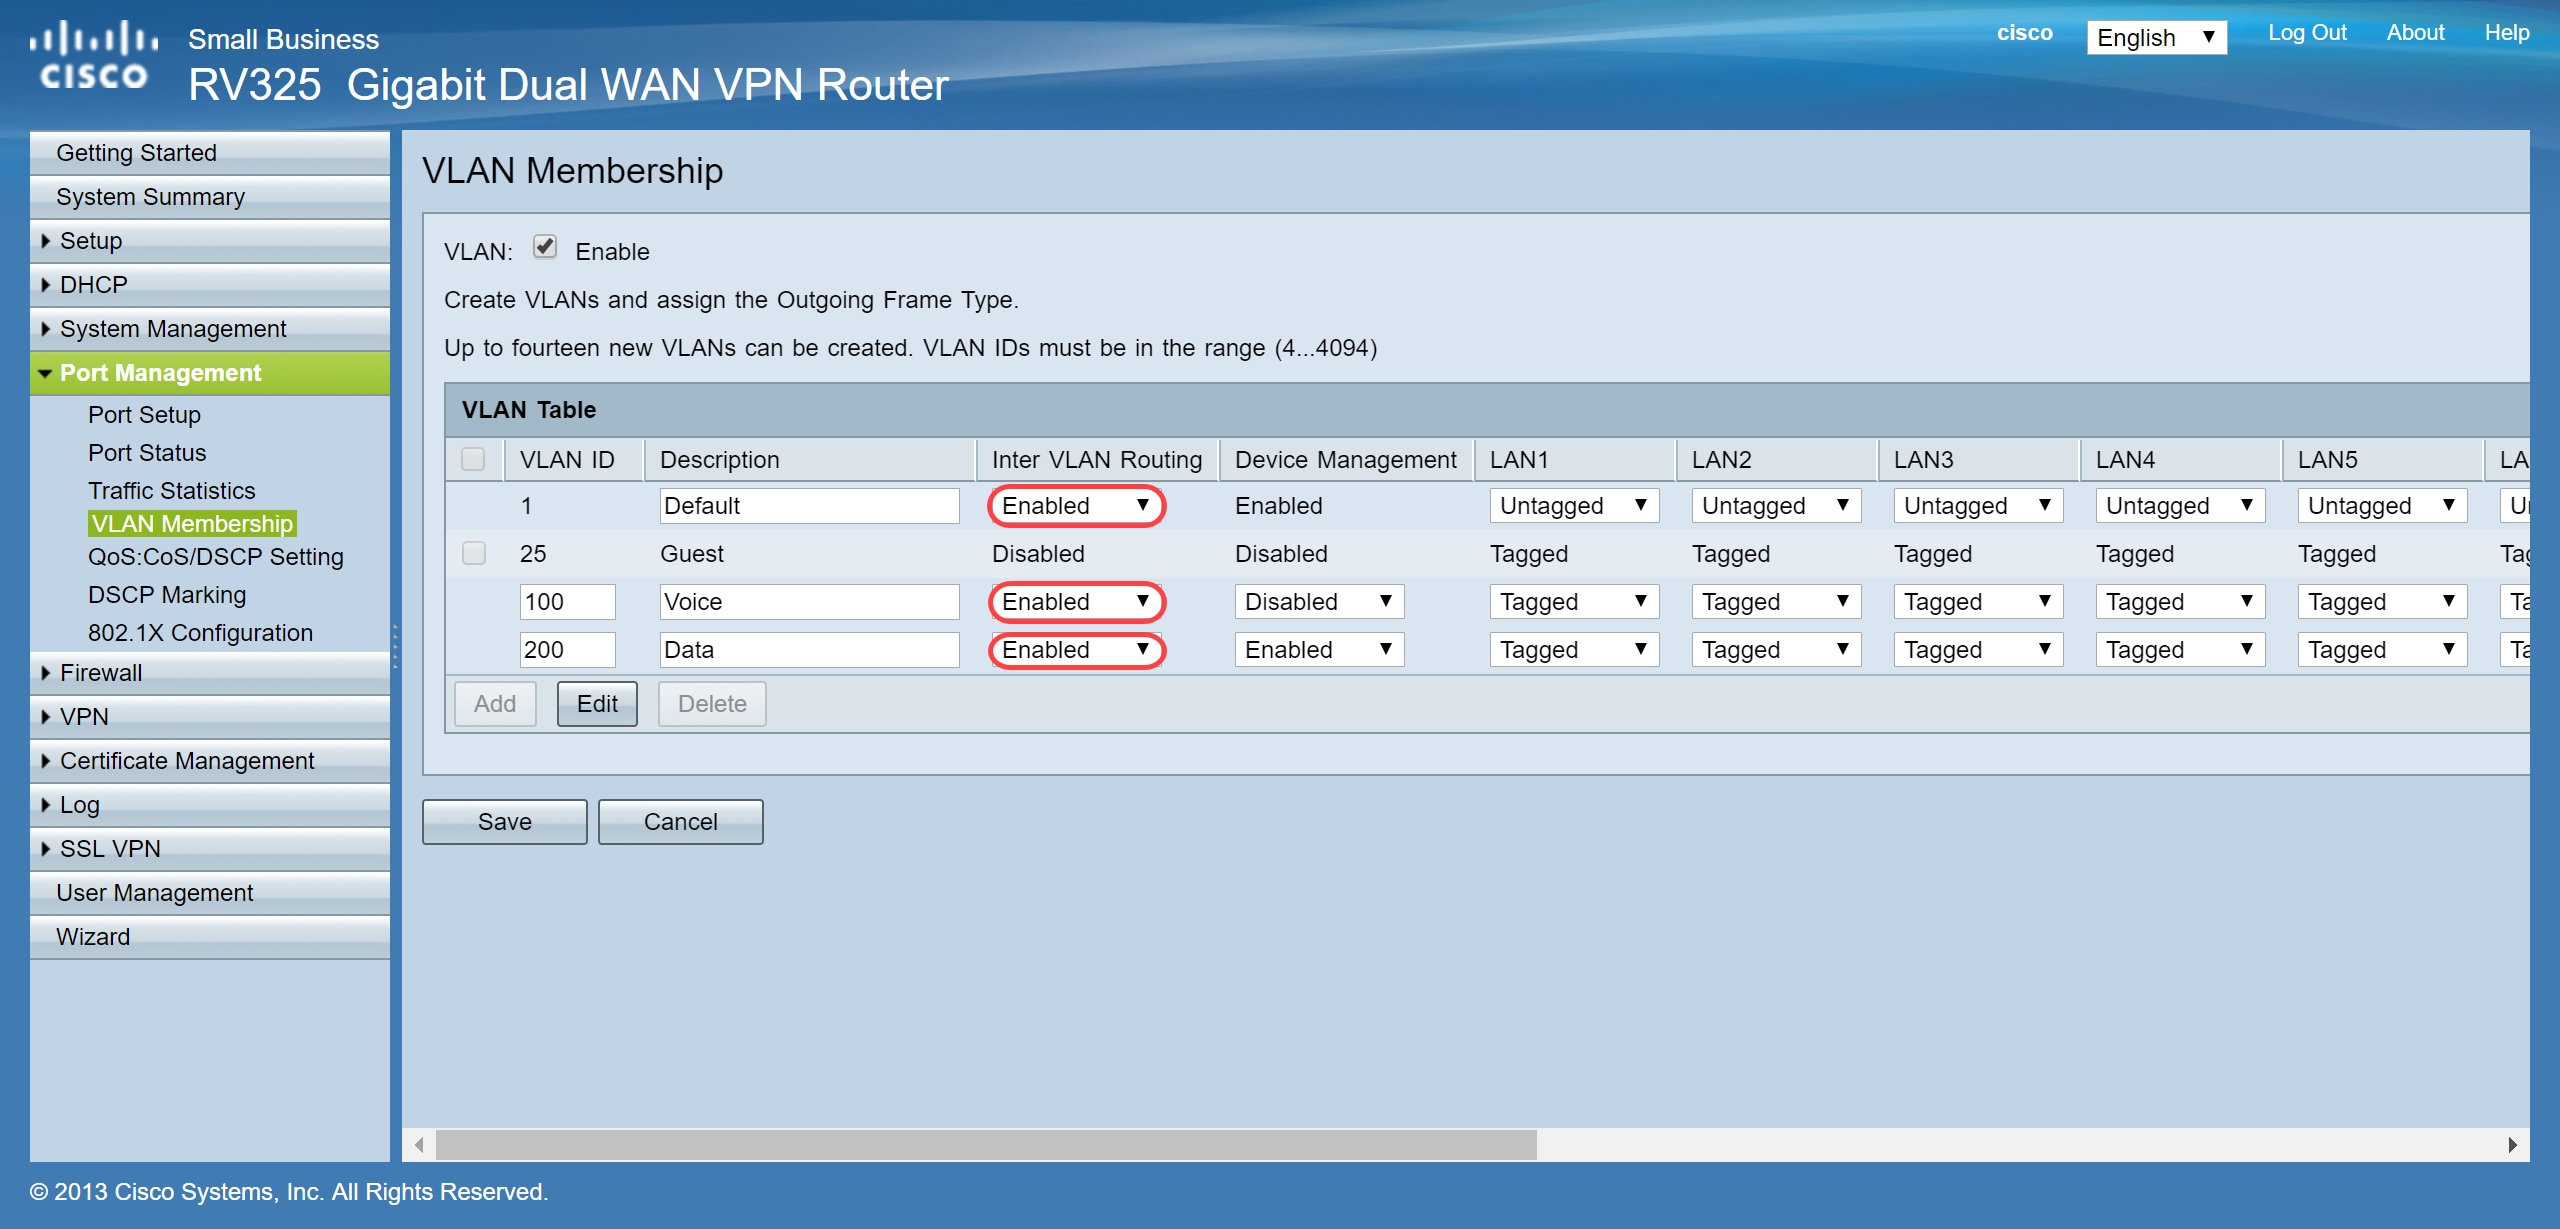
Step 6. (Optional) In the Inter VLAN Routing drop-down list, choose Enabled or Disabled to route packets from one VLAN to another VLAN. Having this enabled is useful because internal network administrators will be able to remotely access your devices to help troubleshoot your issues. This will reduce the time of having to constantly switch VLANs in order to access the devices.
- Disabled – It represents that Inter VLAN Routing is inactive
- Enabled – It represents that Inter VLAN Routing is active on this VLAN. Inter VLAN routing routes the packets only among those VLANs that have it enabled.
Note: In this example, we will be enabling Inter VLAN Routing for VLAN ID 1, 100, and 200.
Step 7. Choose the desired option from the drop-down list for the LAN port with which you are connected and the setting should be matched with the connected port. If you are connected with more than one port, for each port you are connected, you need to choose the same settings. The default is tagged but for VLAN 1 is untagged.
Note: If you enable inter VLAN routing in Step 6, you have to tag the VLAN to distinguish the traffic.
Tagged
- Represents that the association between the port and the VLAN as tagged.
- Tagged is used to determine which VLAN the traffic belongs through the unique VLAN ID when multiple VLANs are created for same port.
Untagged
- Represents that the association between the port and the VLAN is untagged.
- It is used when only one VLAN is created and the traffic is aware of the VLAN. Only one VLAN can be marked as untagged for each LAN port.
- If the default VLAN is on the port, it should always be untagged even if the port has multiple VLANs.
Excluded
- Represents that the interface is not a member of the VLAN.
- If you choose this option, traffic is disabled between the VLAN and the port.
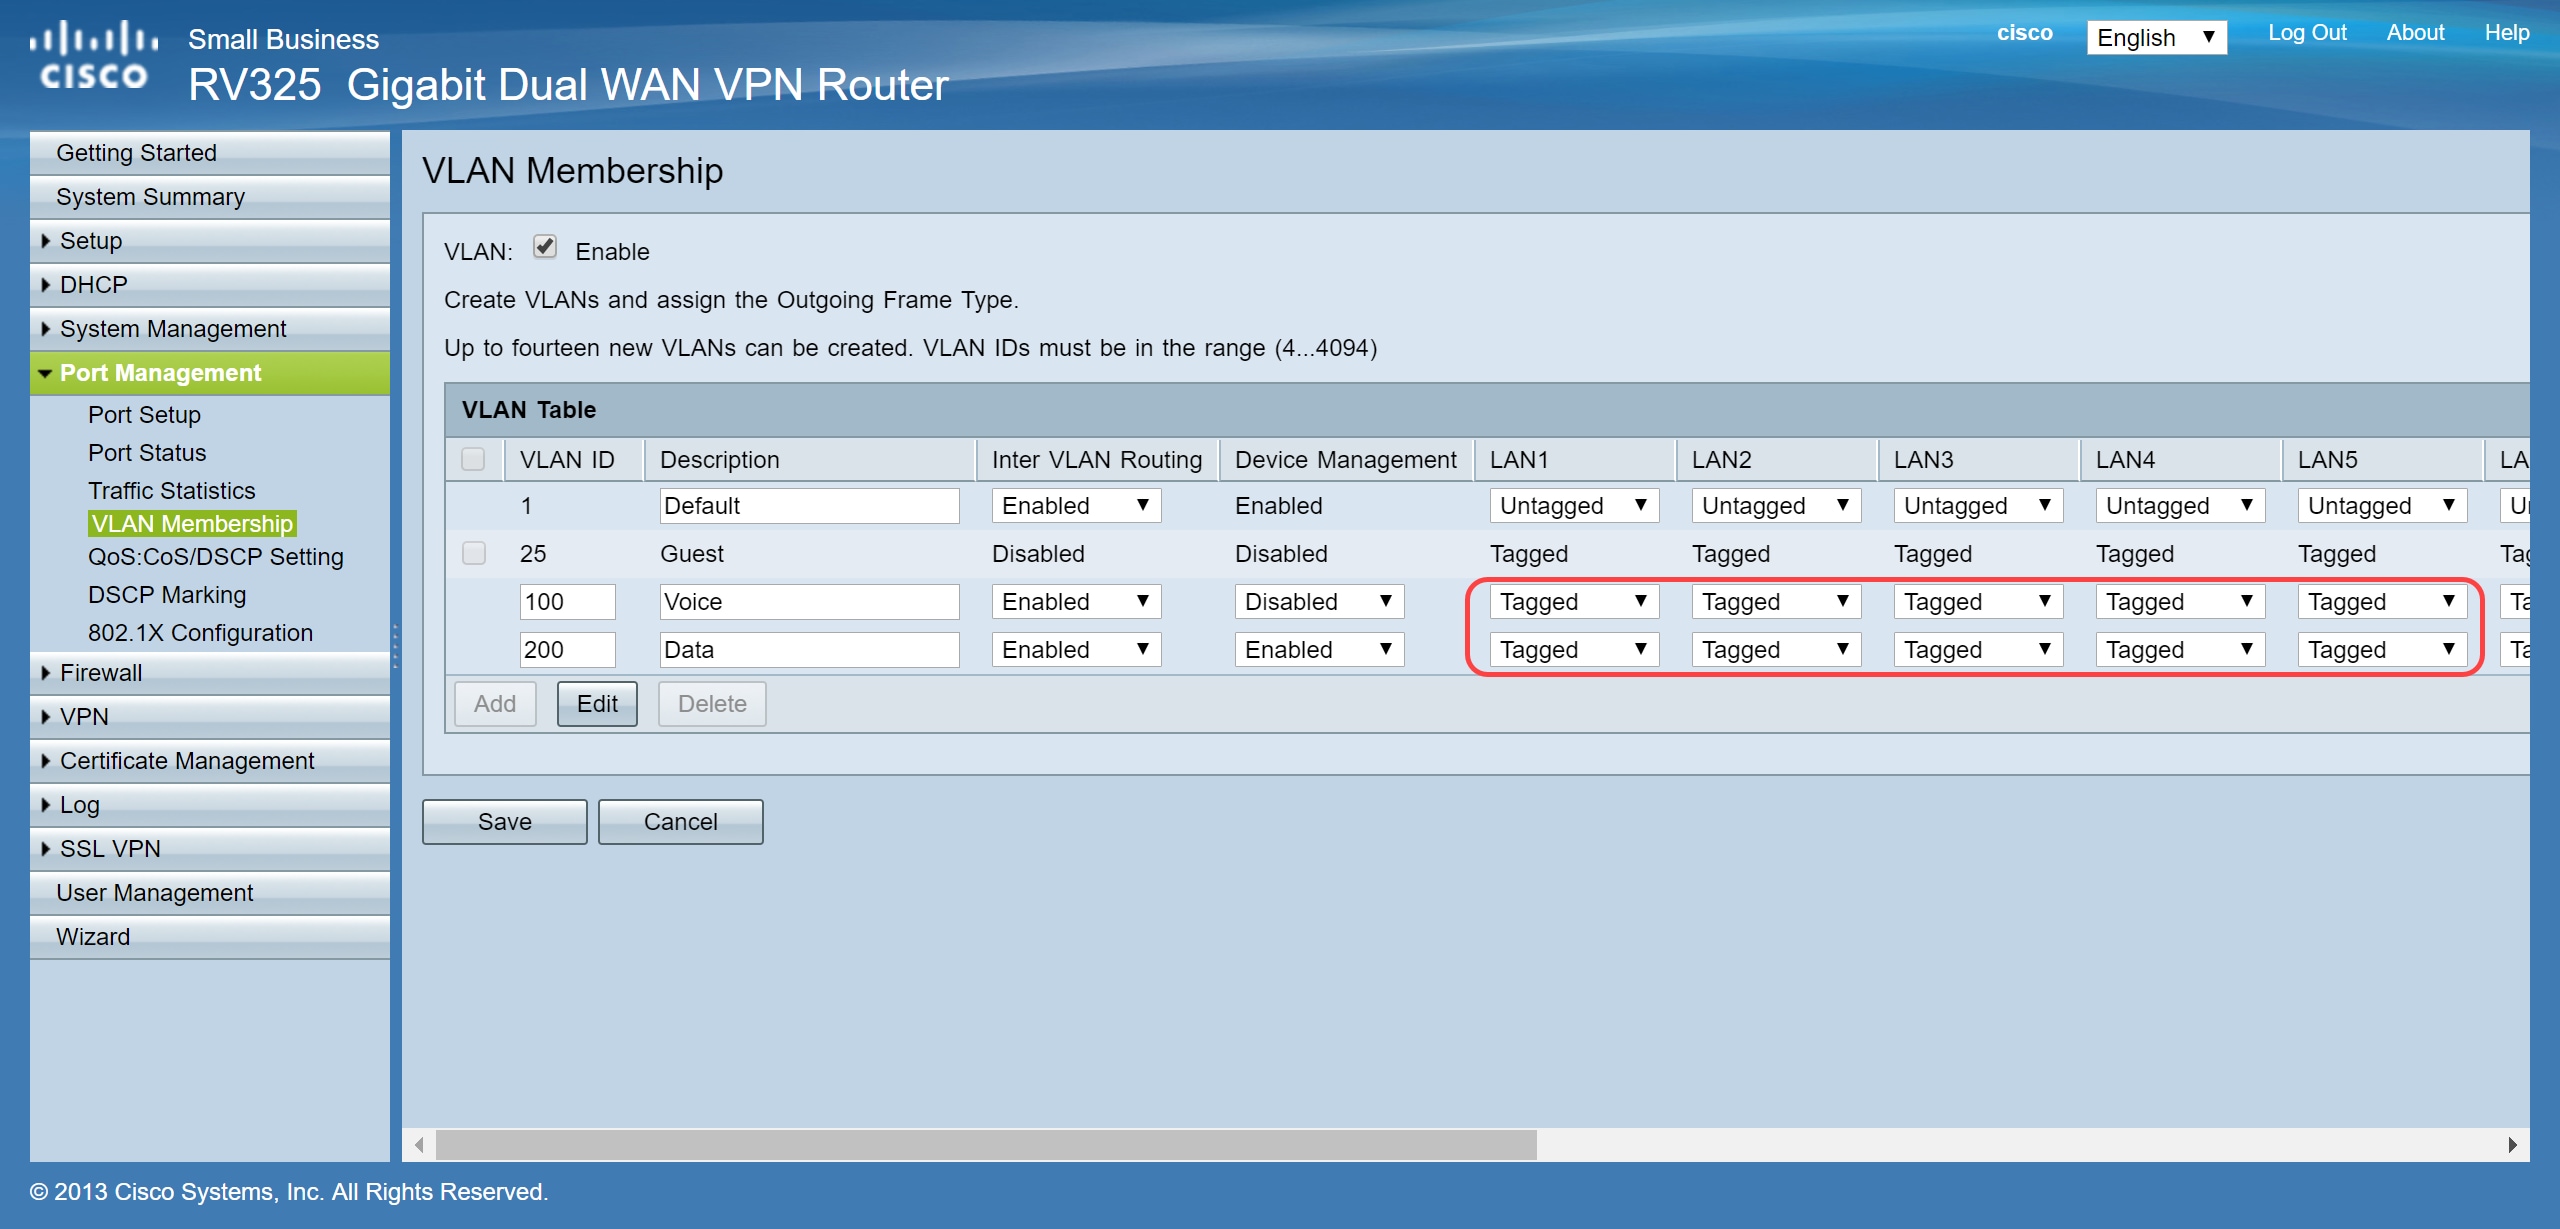
Step 8. Click Save to save the settings.
Note: On the router, you can log in to the web-based utility and navigate to DHCP > DHCP Setup to configure the VLANs to a specific subnet that you want. By default, the VLANs are configured to be on a different subnet.
Configuring SPA/MPP Phones
Users can also configure the phones to pull a profile from a manually configured profile location, a location found via DHCP option 150, or from a Cisco EDOS server. The following is an example of a manual configuration.
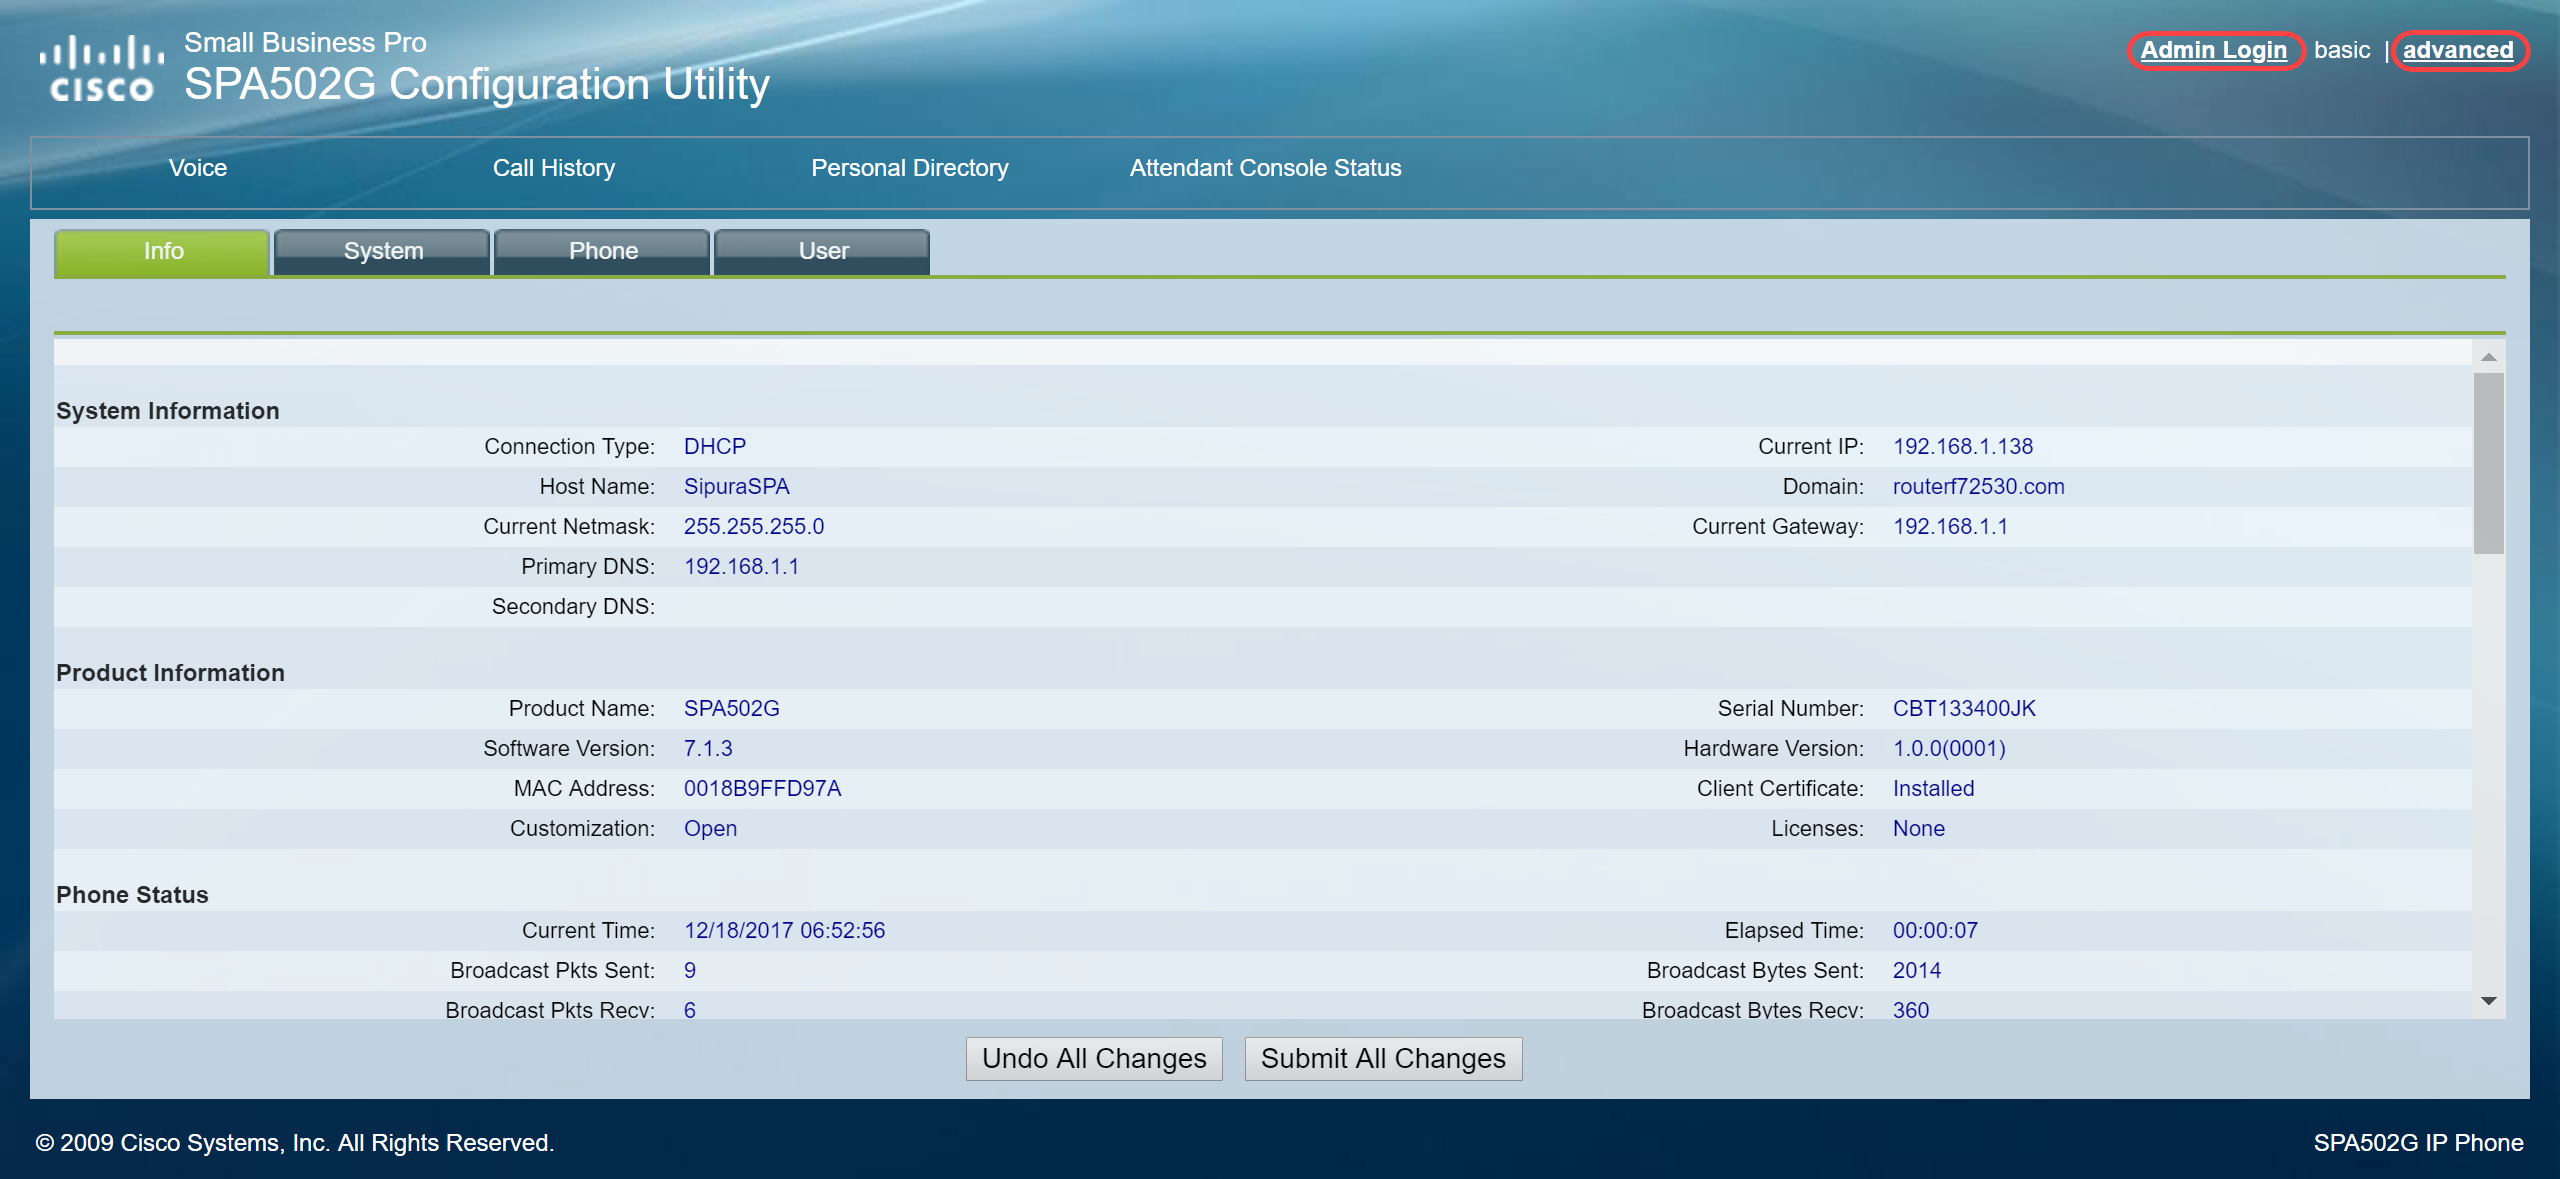
Step 1. Enter the IP address of the SPA/MPP on your browser and navigate to Admin Login and then advanced.
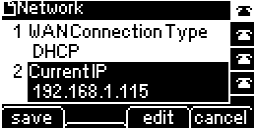
Note: The configuration for the SPA/MPP phone may vary depending on the model. In this example, we are using the SPA502G. To find the IP address of your IP phone, navigate to DHCP > DHCP Status on your router (may vary depending on the model). Another way is to press the Setup button and navigate to Network on your Cisco phone (menus and options may vary depending on the phone model).
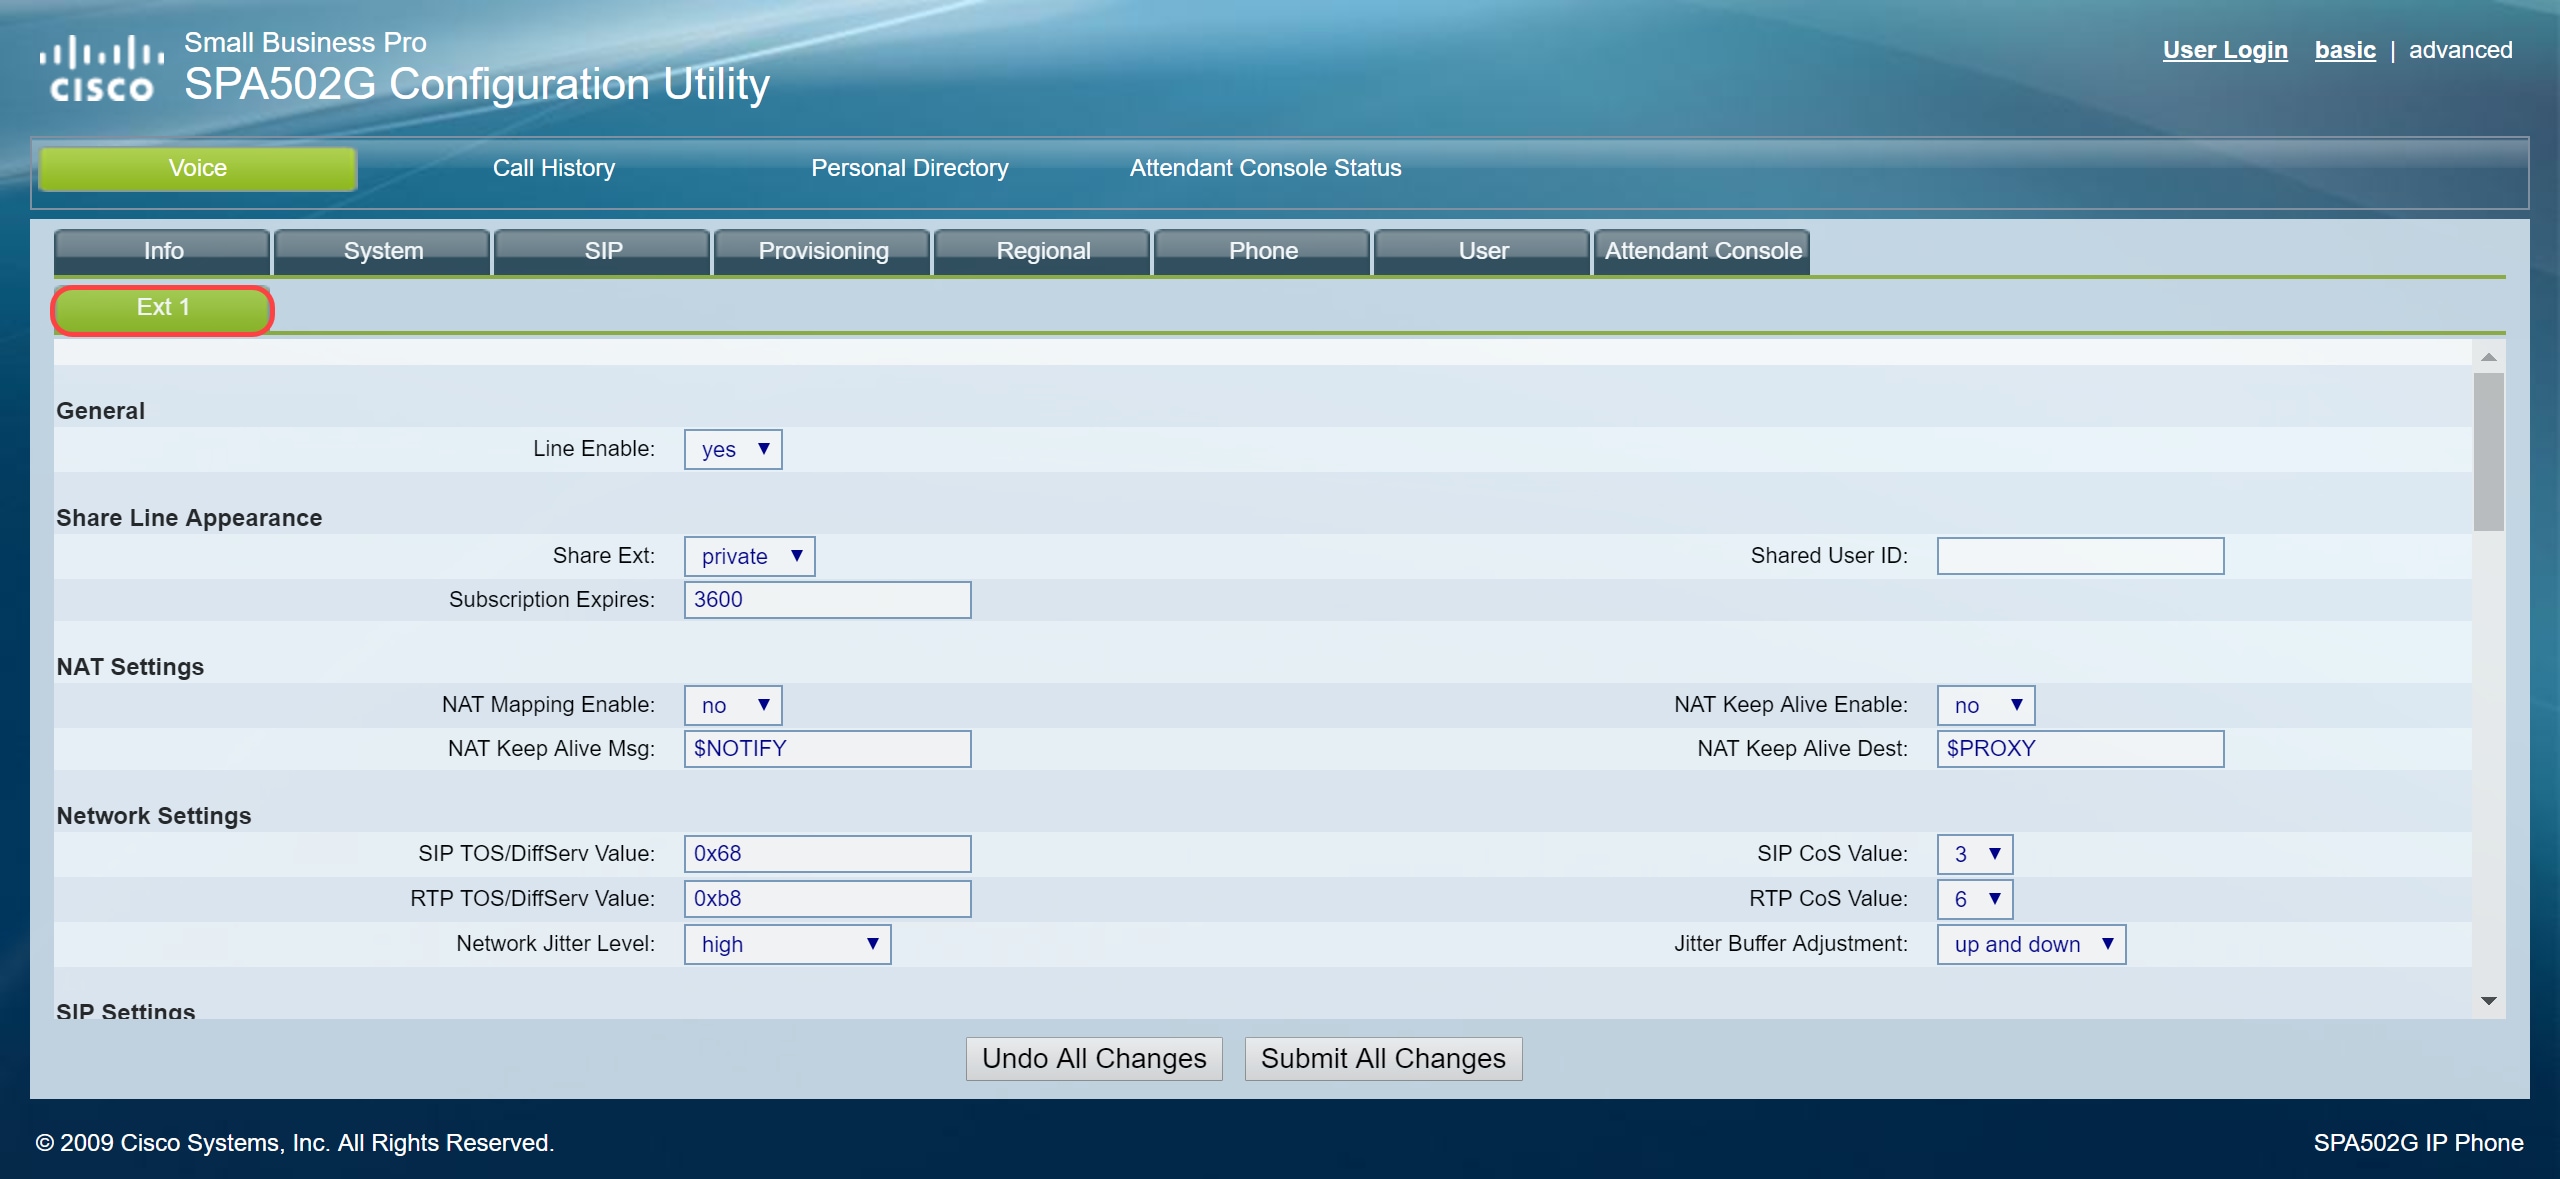
Step 2. Navigate to Voice > Ext 1, the extension page opens.
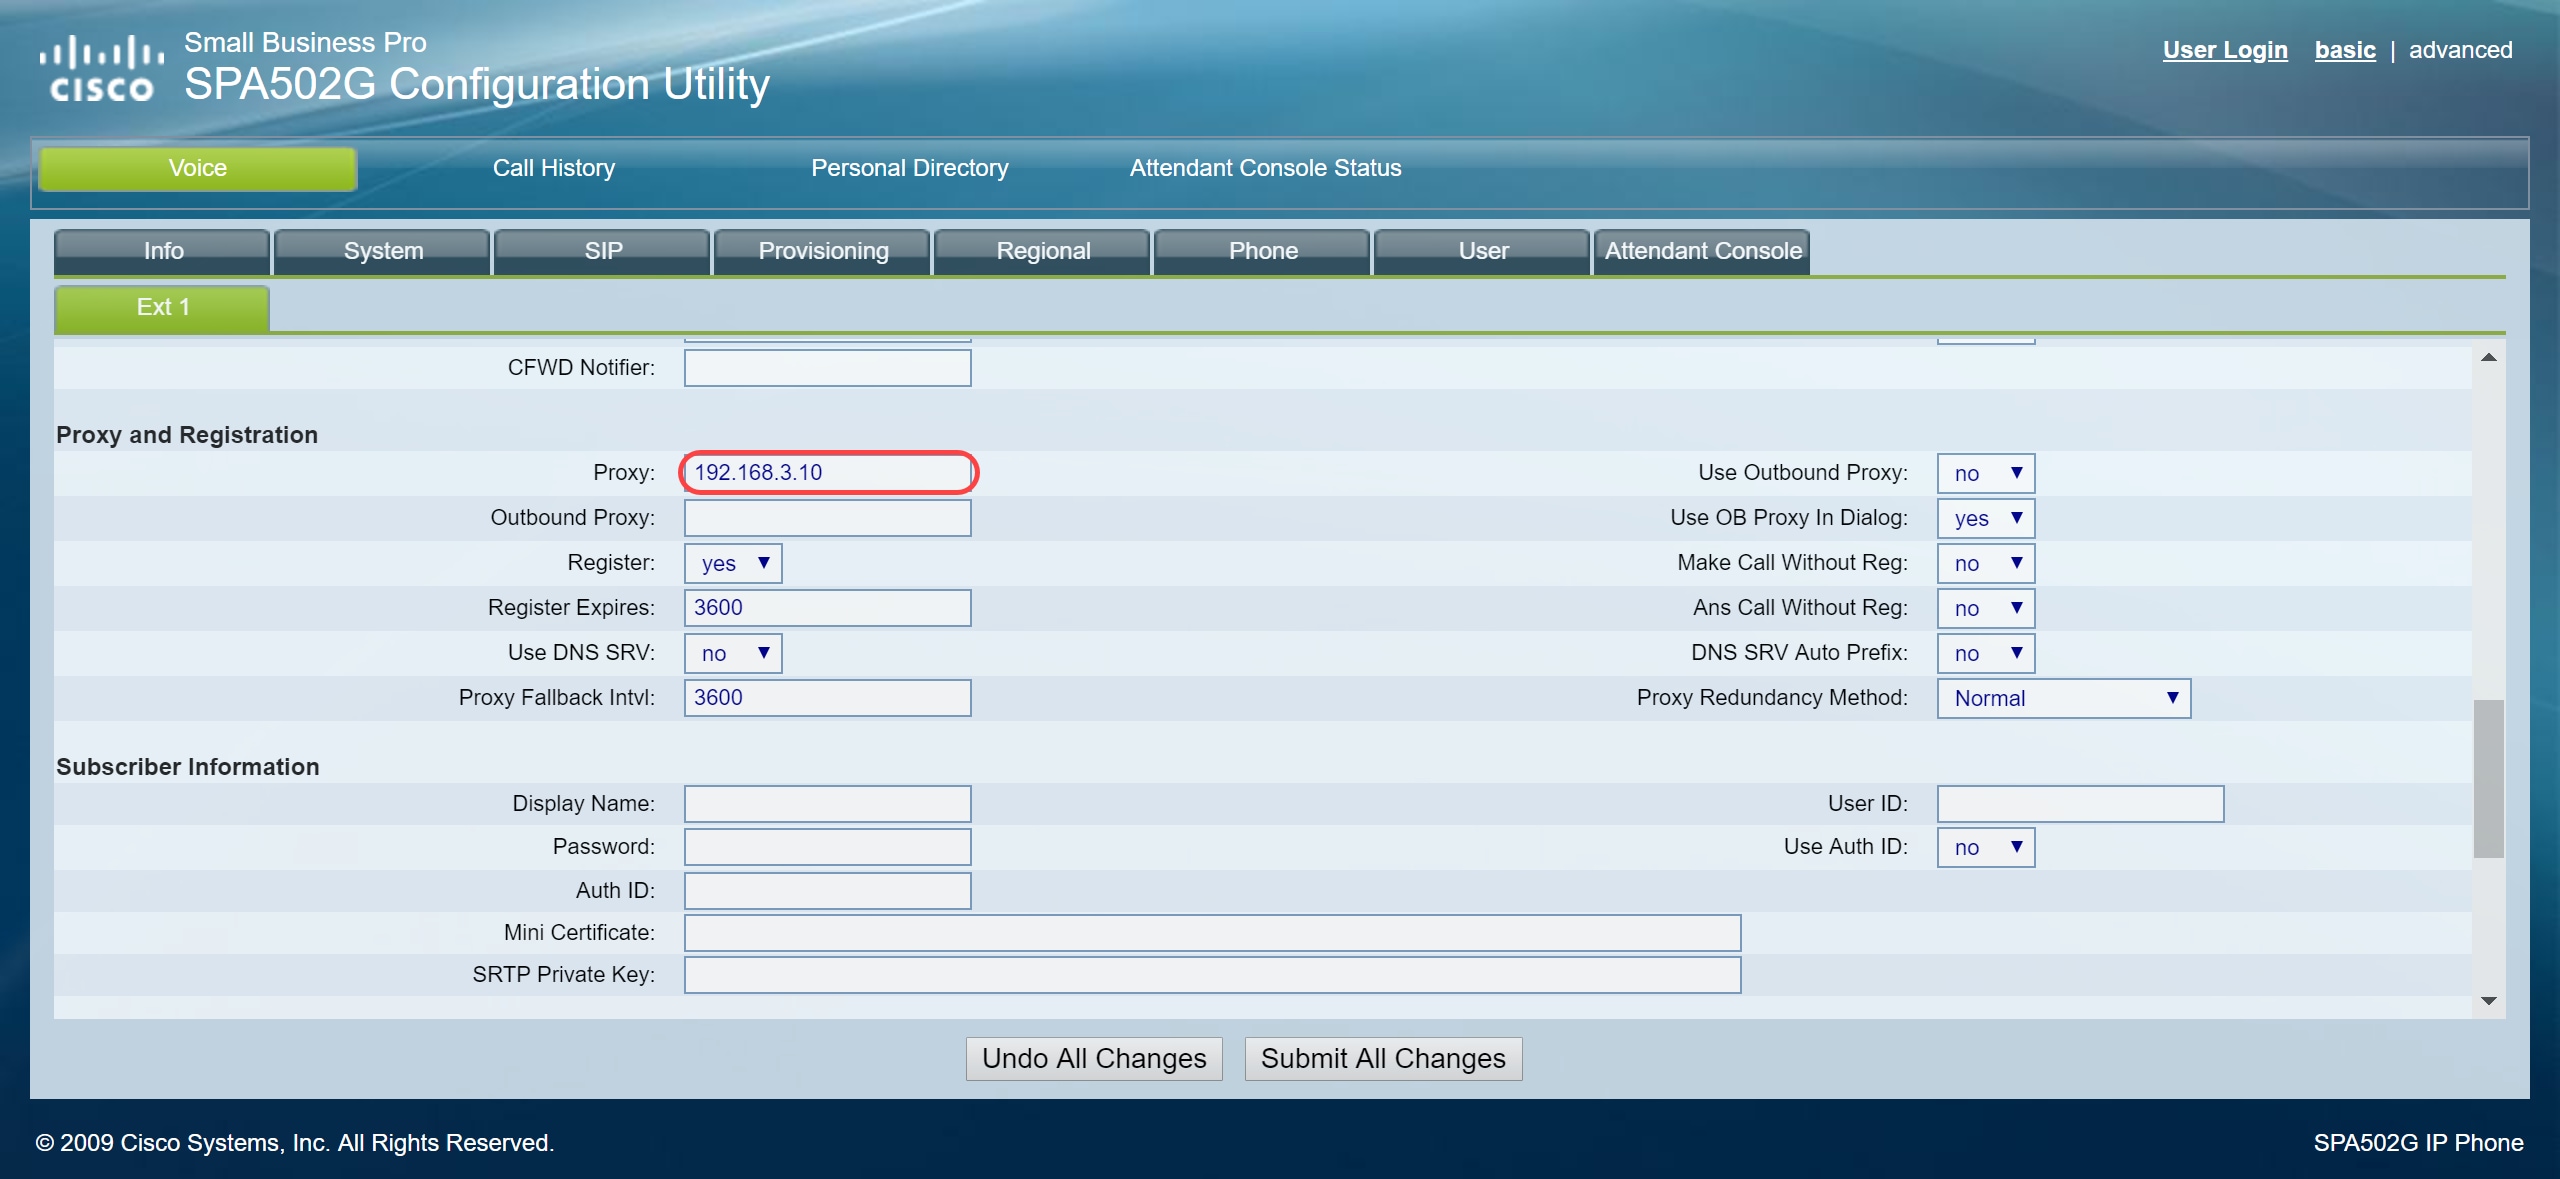
Step 3. In the Proxy and Registration section, type in the proxy server in the Proxy field. In this example, the address of the Raspberry Pi (192.168.3.10) will be used as the proxy server. VLAN 100 is on the subnet with 192.168.3.x.
Note: You'll be configuring the IP address of the Raspberry Pi later in this article, if you want to learn more click the link to be redirected to that section: Changing Address of the Raspberry Pi to be on a Different Subnet.
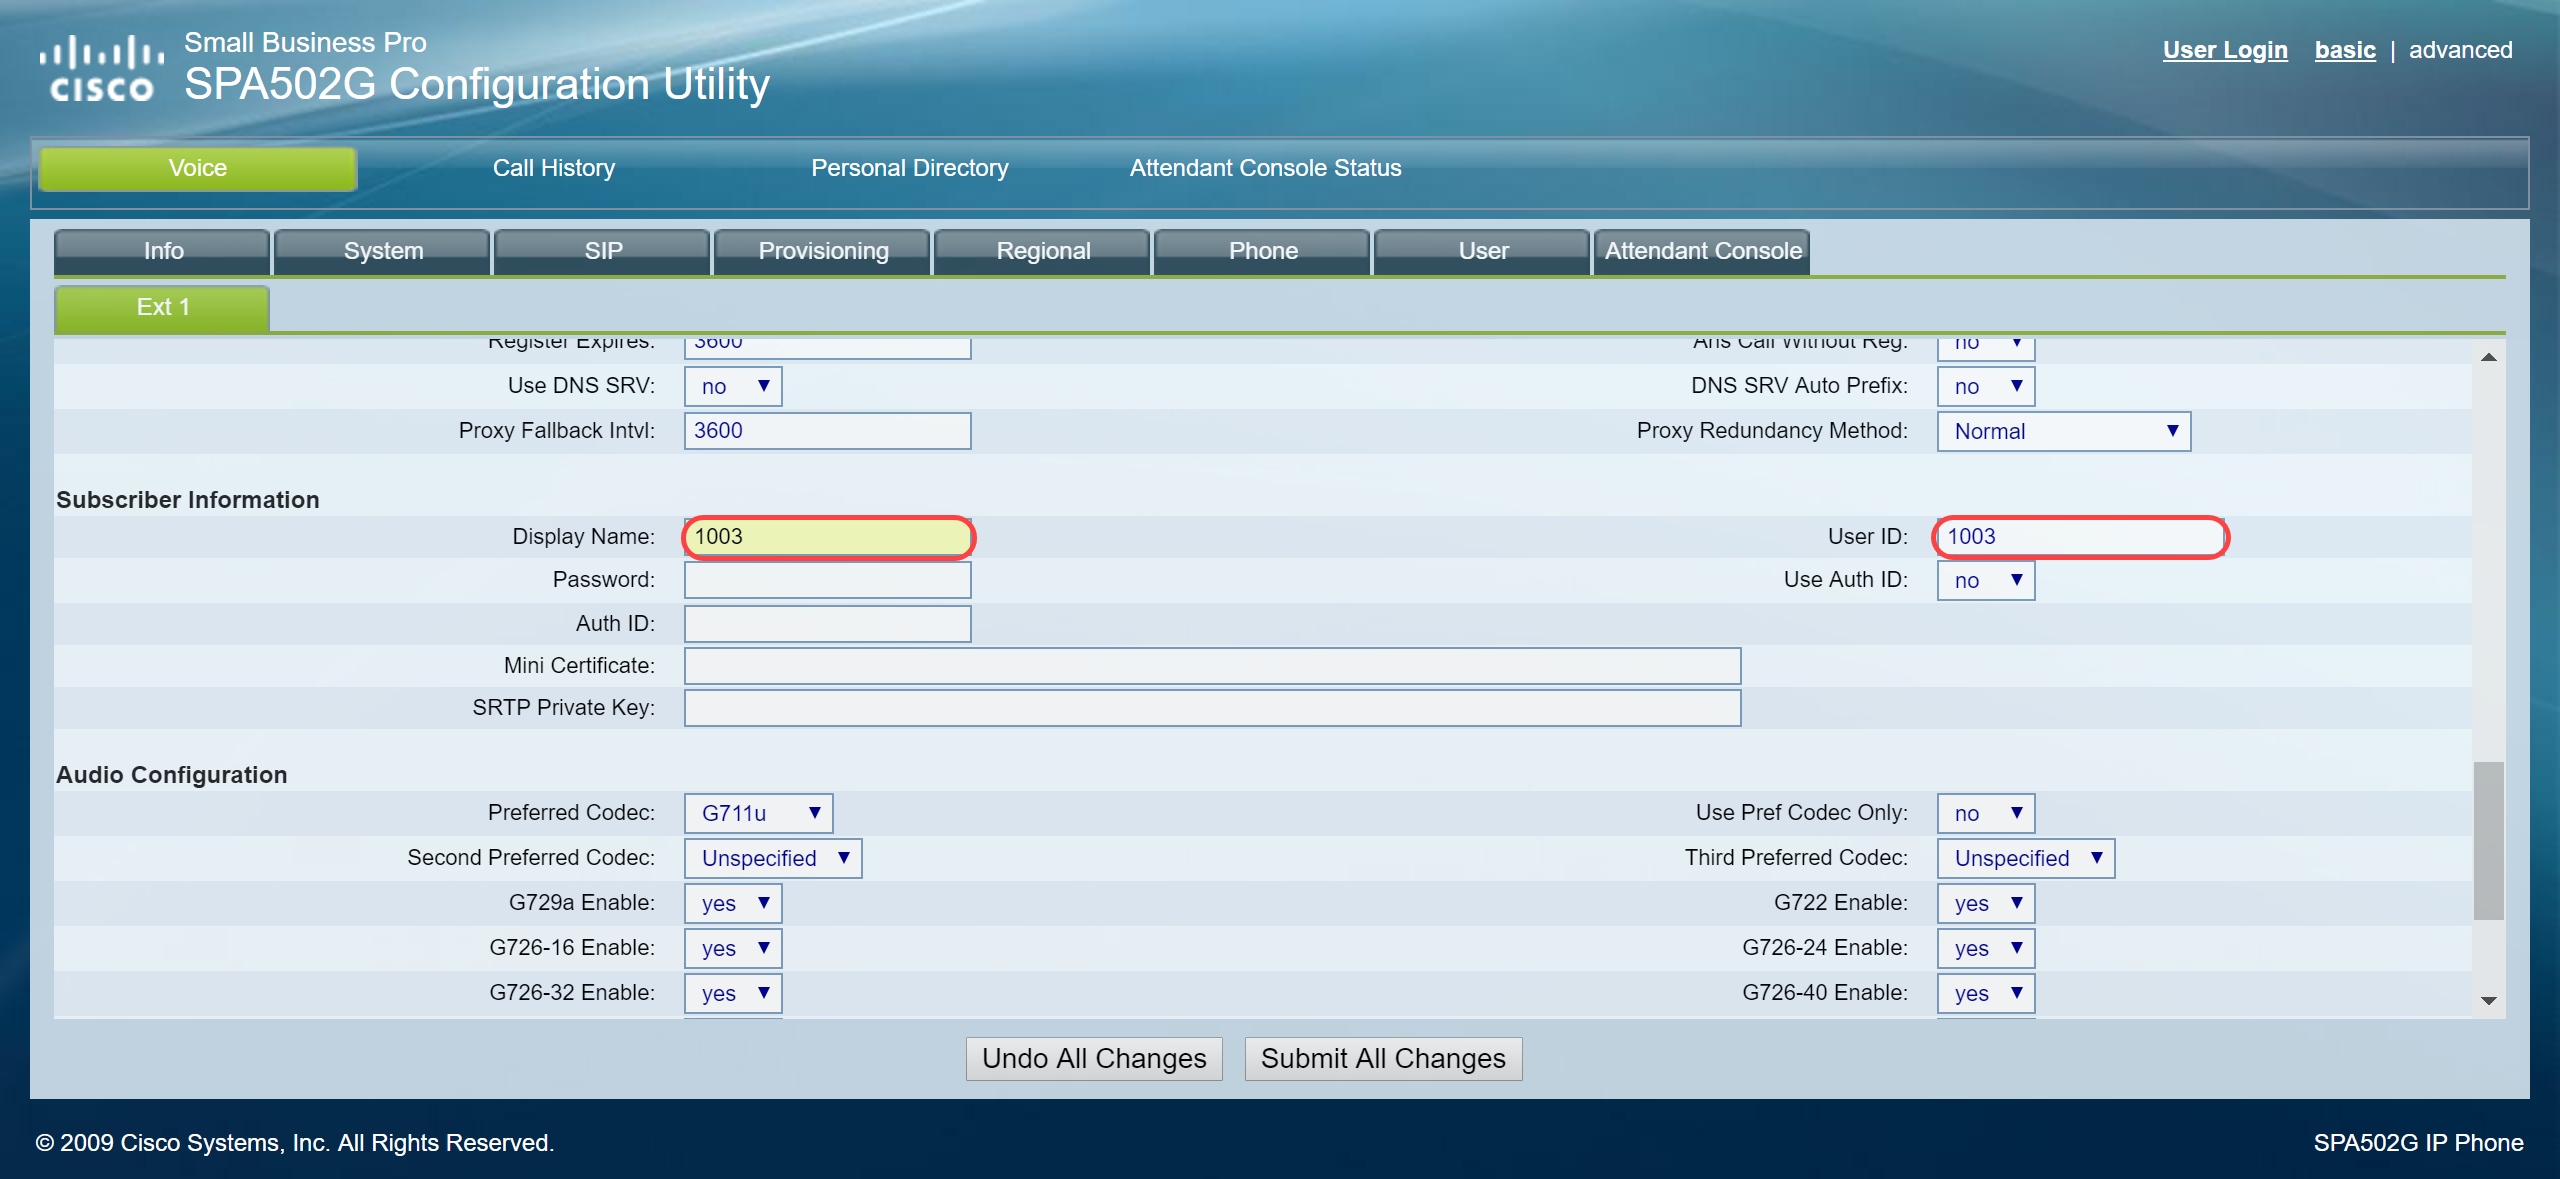
Step 4. Under the Subscriber Information, enter in the display name and user ID (extension number) for the shared extension. In this example, we will be using the extension 1003.
Note: Extension 1003 has already been created and configured on the Raspberry Pi.
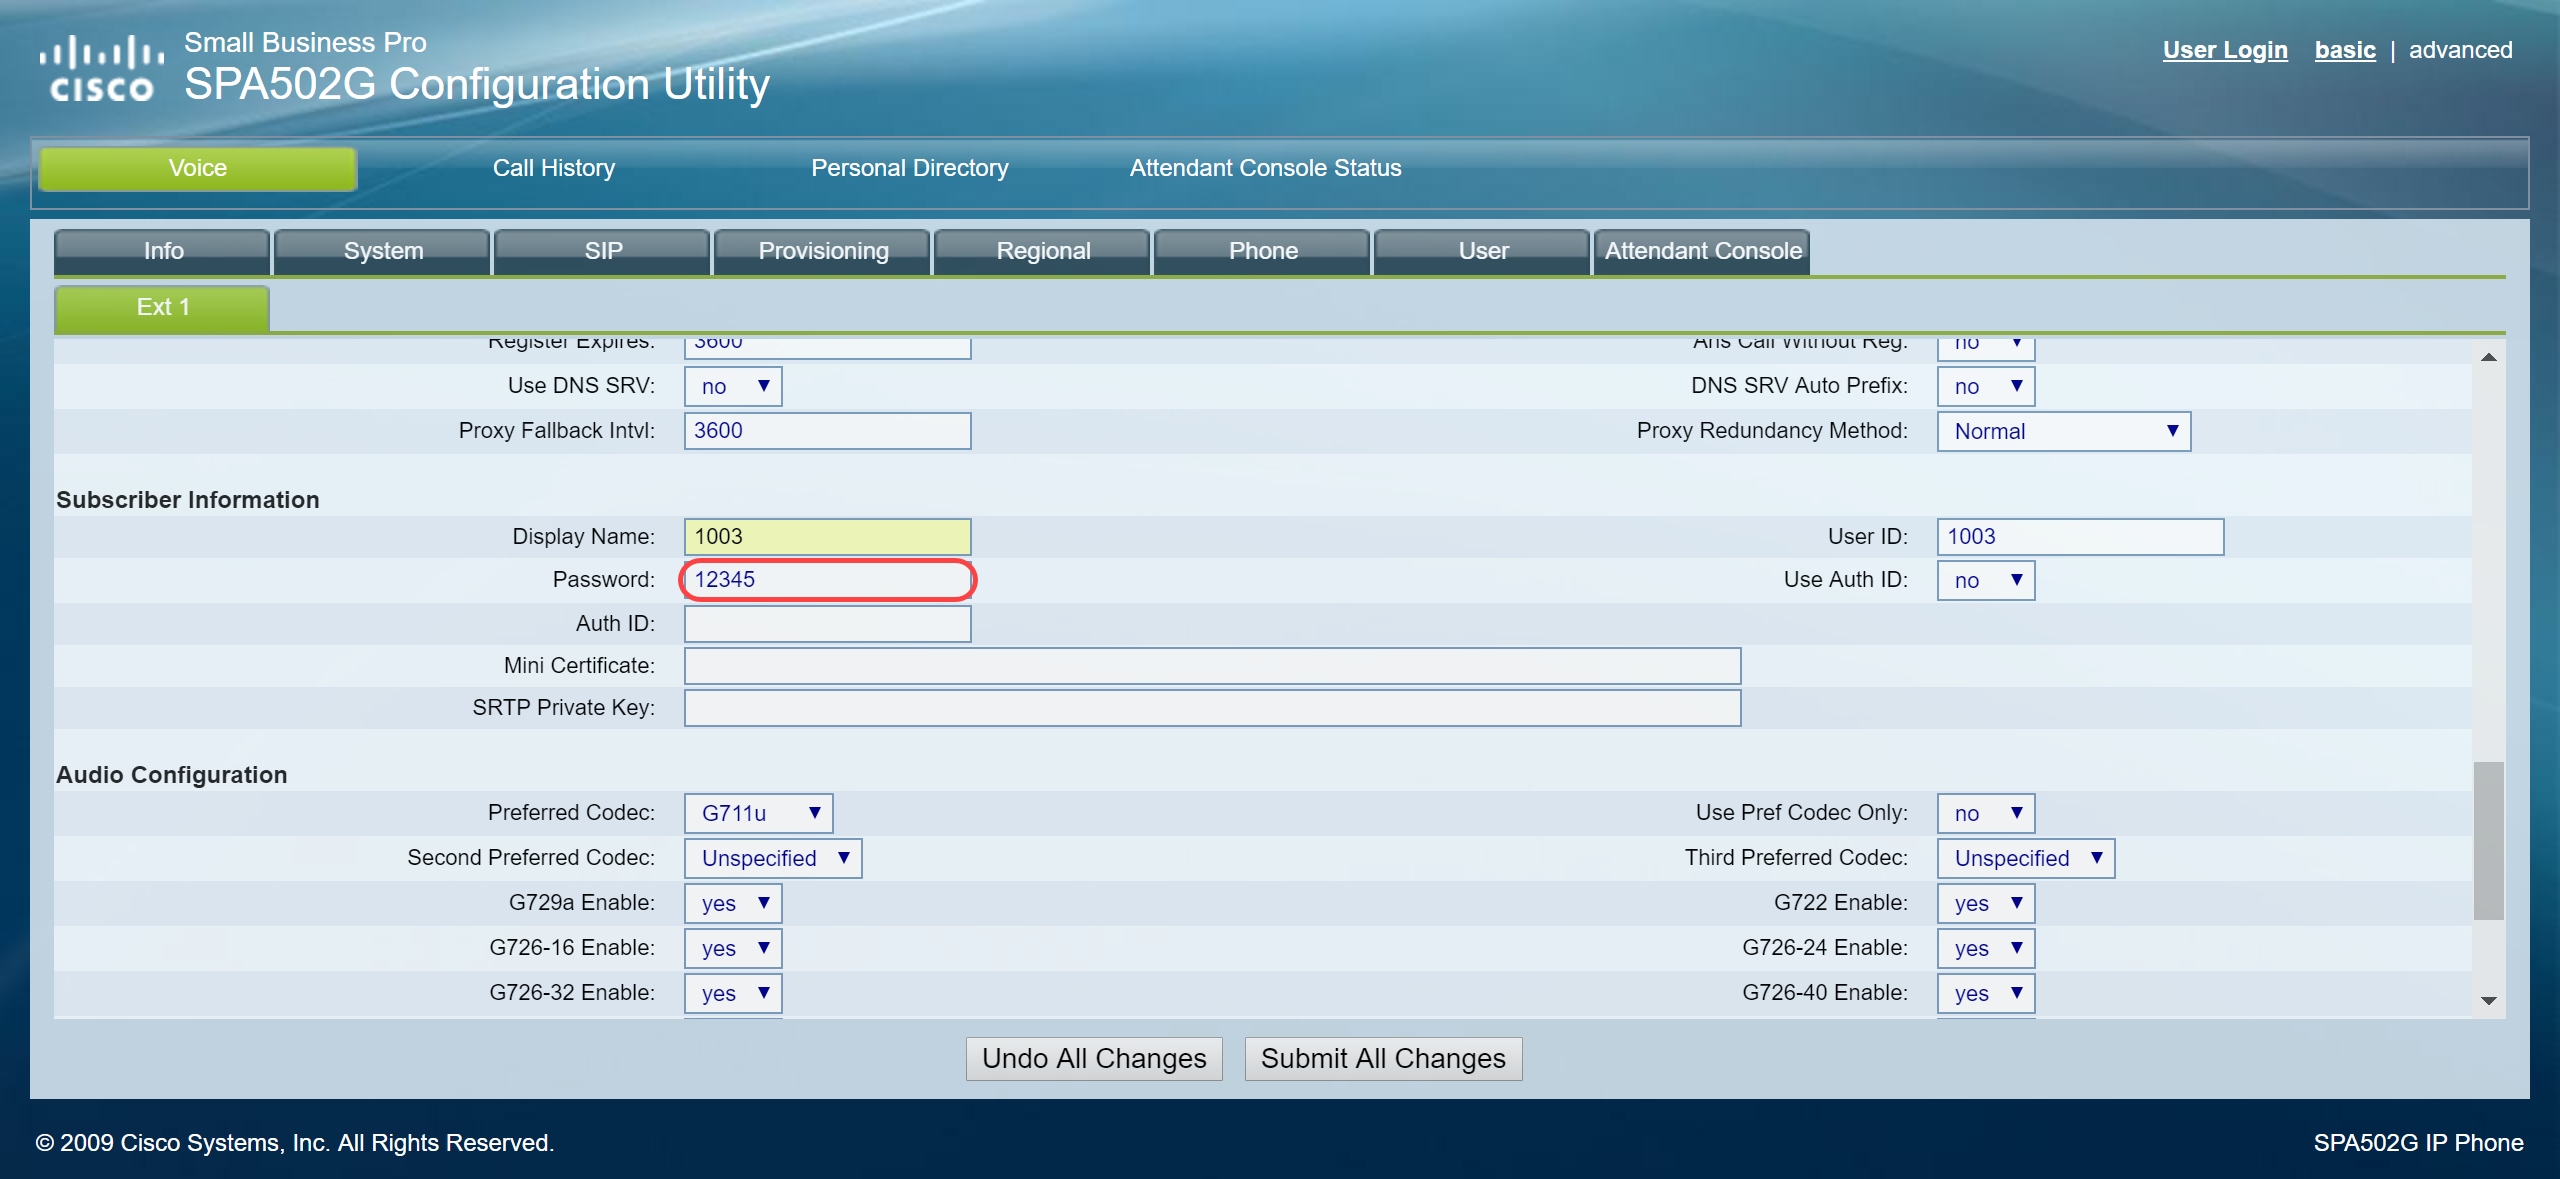
Step 5. Enter in the password of the extension that you have configured in the Raspberry Pi extension section. This is also known as Secret under the Edit Extension Section in the Raspberry Pi. In this example, the password 12345 was used.
Note: The password 12345 was only used as an example; a more complex password is recommended.
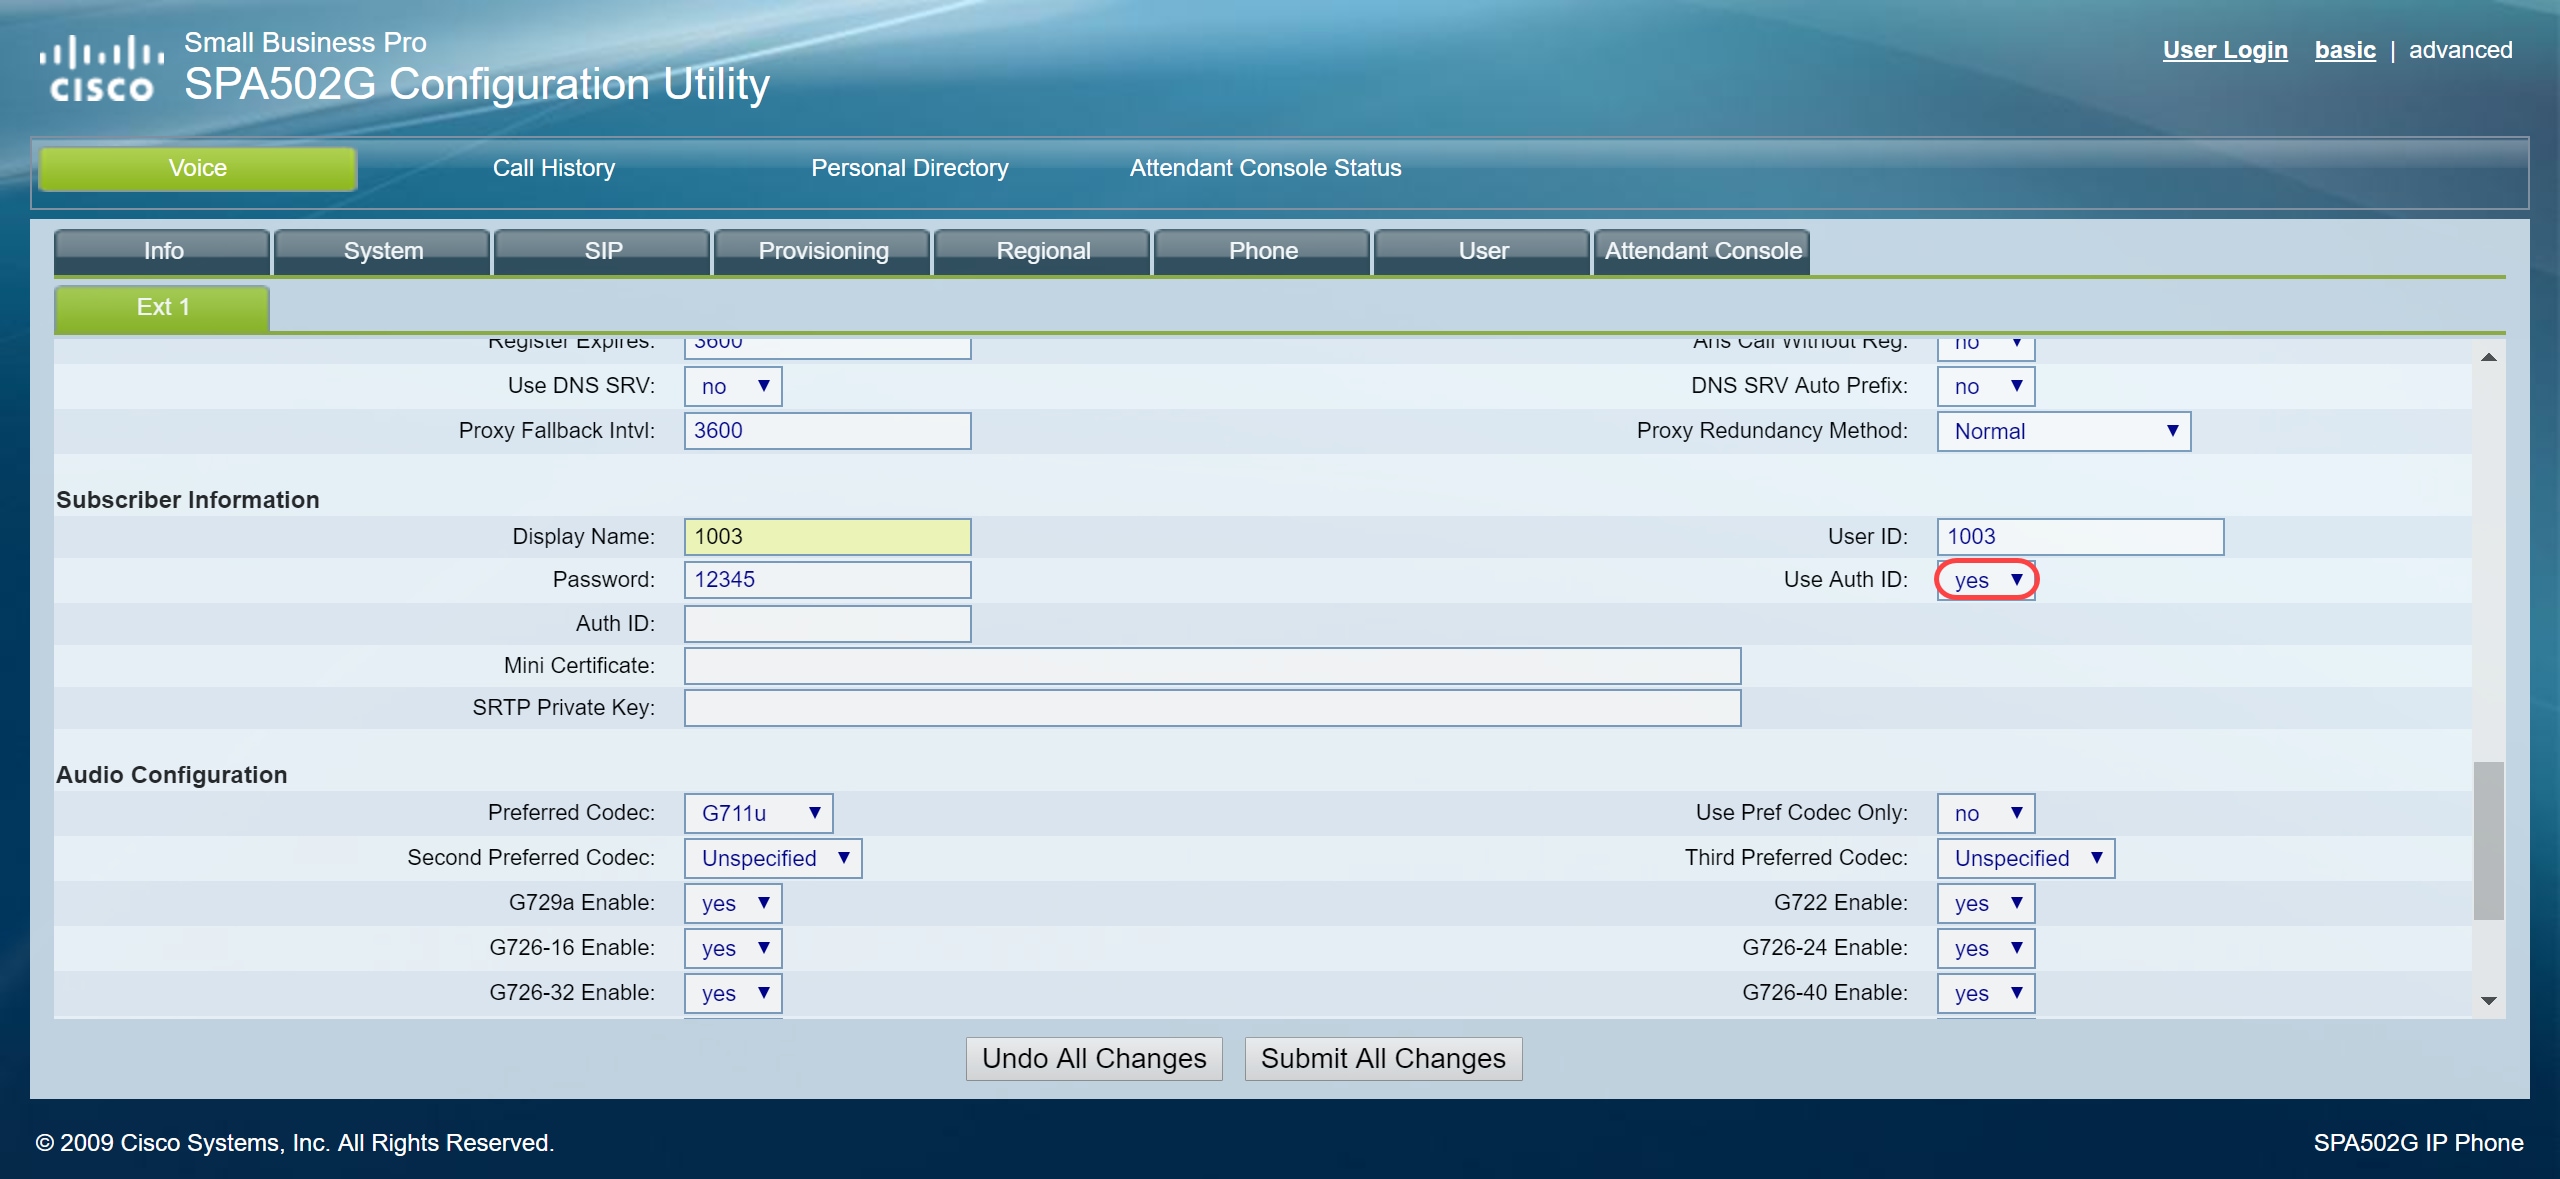
Step 6. Choose the desired option from the Use Auth ID drop-down list. The options are Yes and No. To enable Session Initiation Protocol (SIP) authentication, where SIP messages can be challenged to determine if it is authorized before they can transmit, choose Yes from the Auth ID drop-down list. In this example, we chose Yes.
Step 7. Enter the extension that you are trying to configure for this phone in the Auth ID field. The Authentication ID is for SIP authentication.
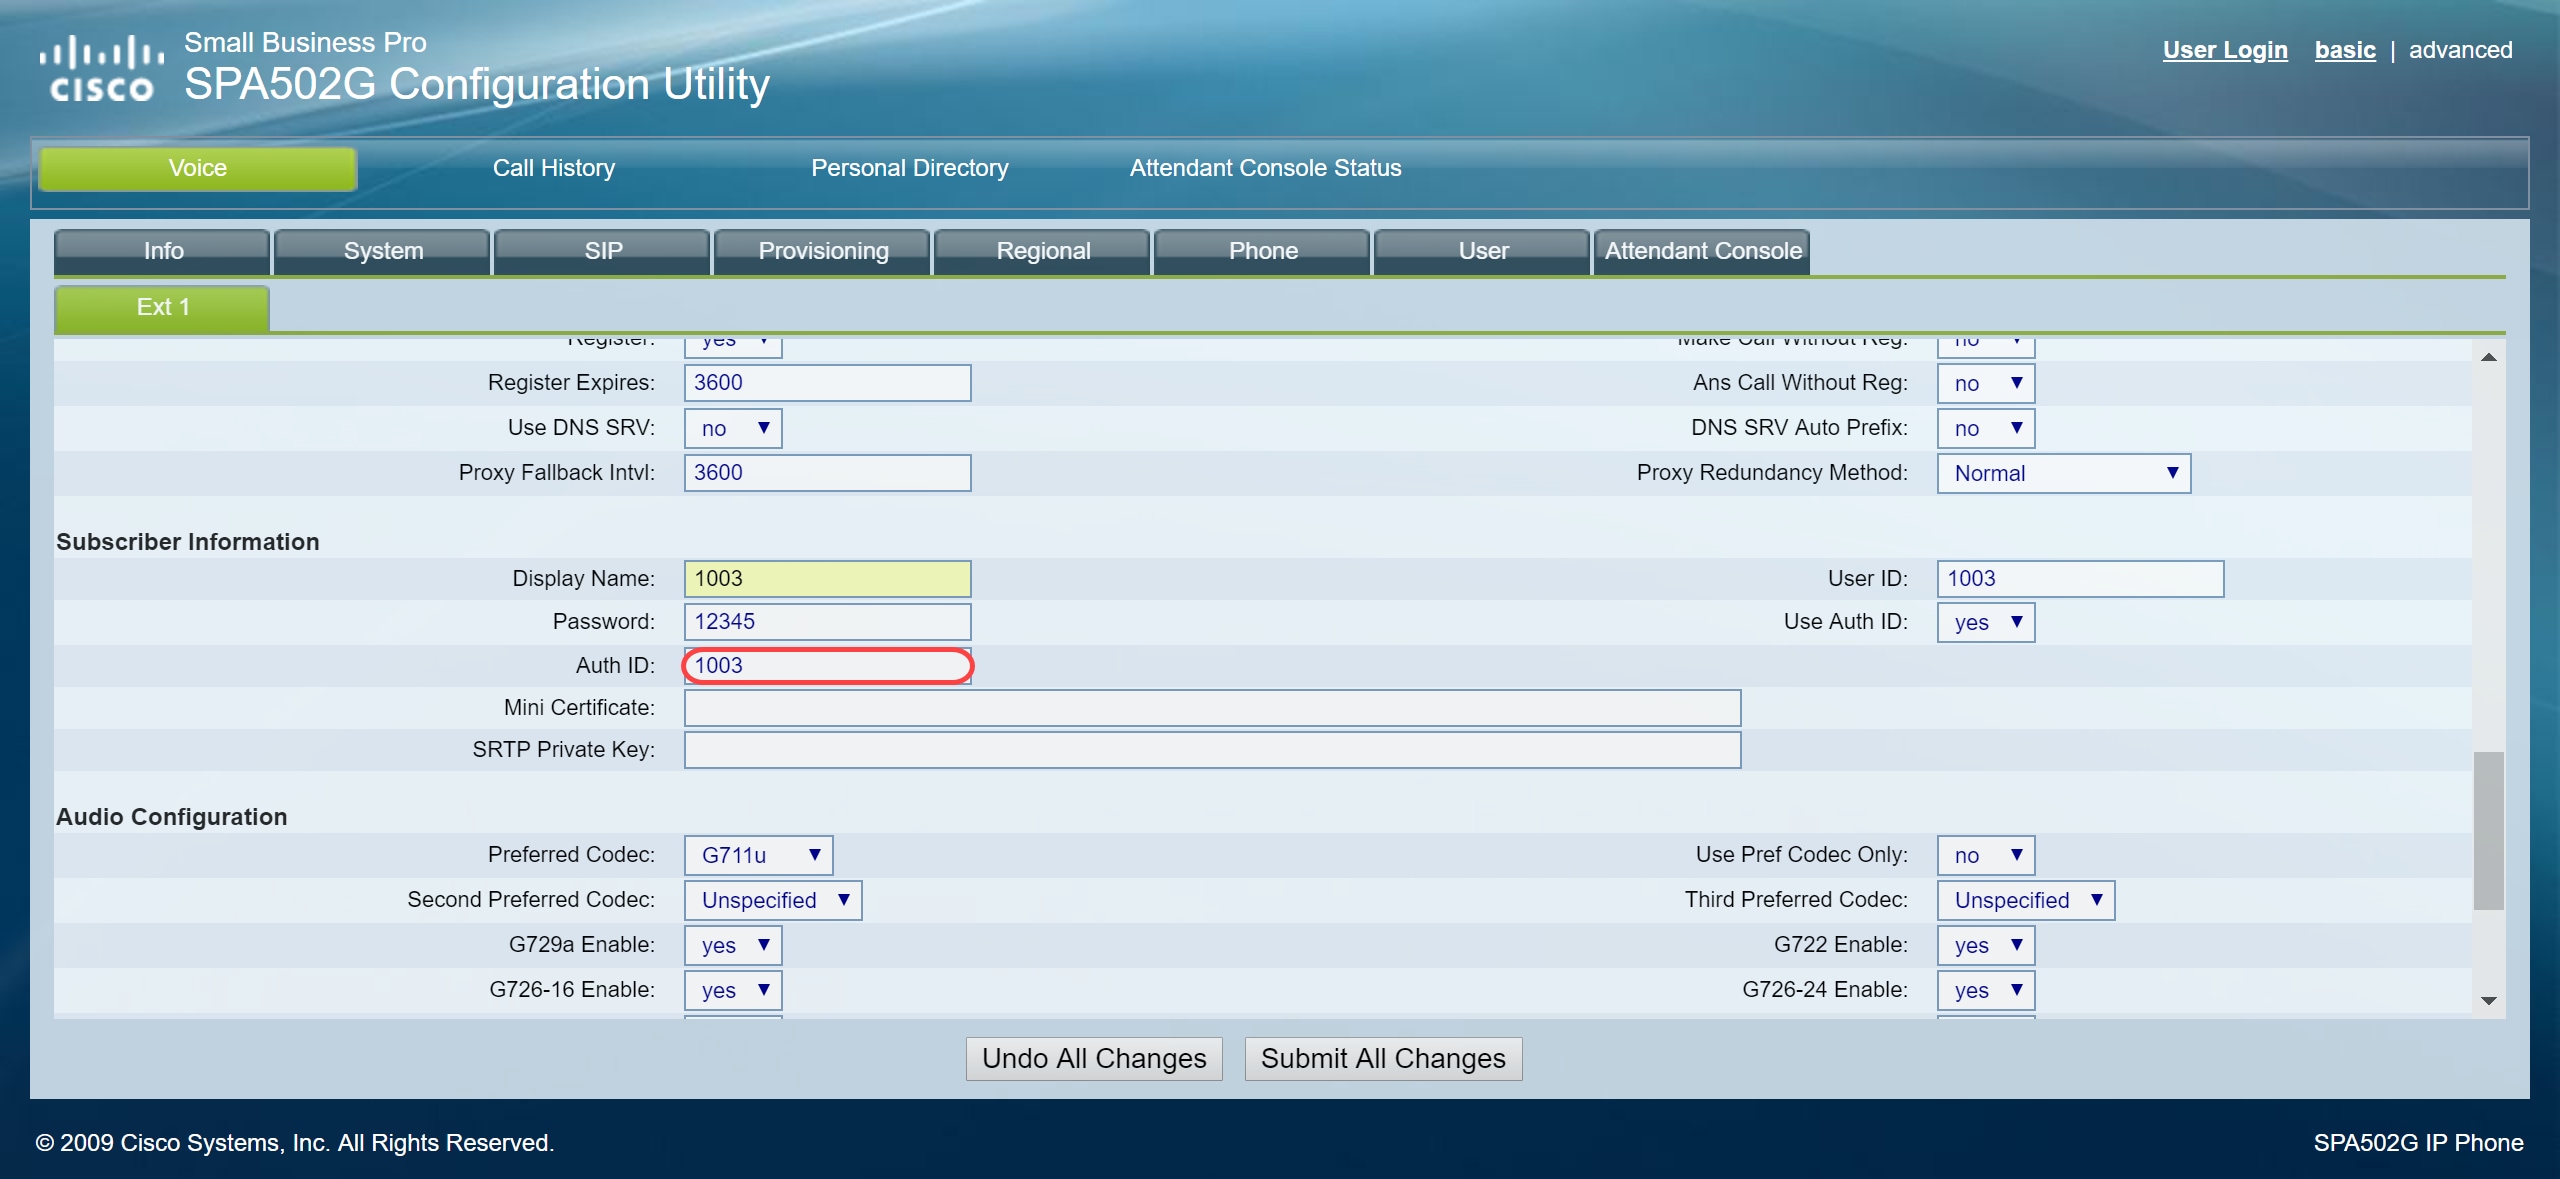
Step 8. Then click Submit All Changes.
Note: Go back to Step 1 of Configuring SPA/MPP Phones section if you have more SPA/MPP phones to configure.
Configuring VLANs on the Switch
Step 1. Log in to the web-based utility and navigate to VLAN Management > Create VLAN.
Note: The configuration may vary depending on the device. In this example, we are using the SF220-24P to configure VLANs.
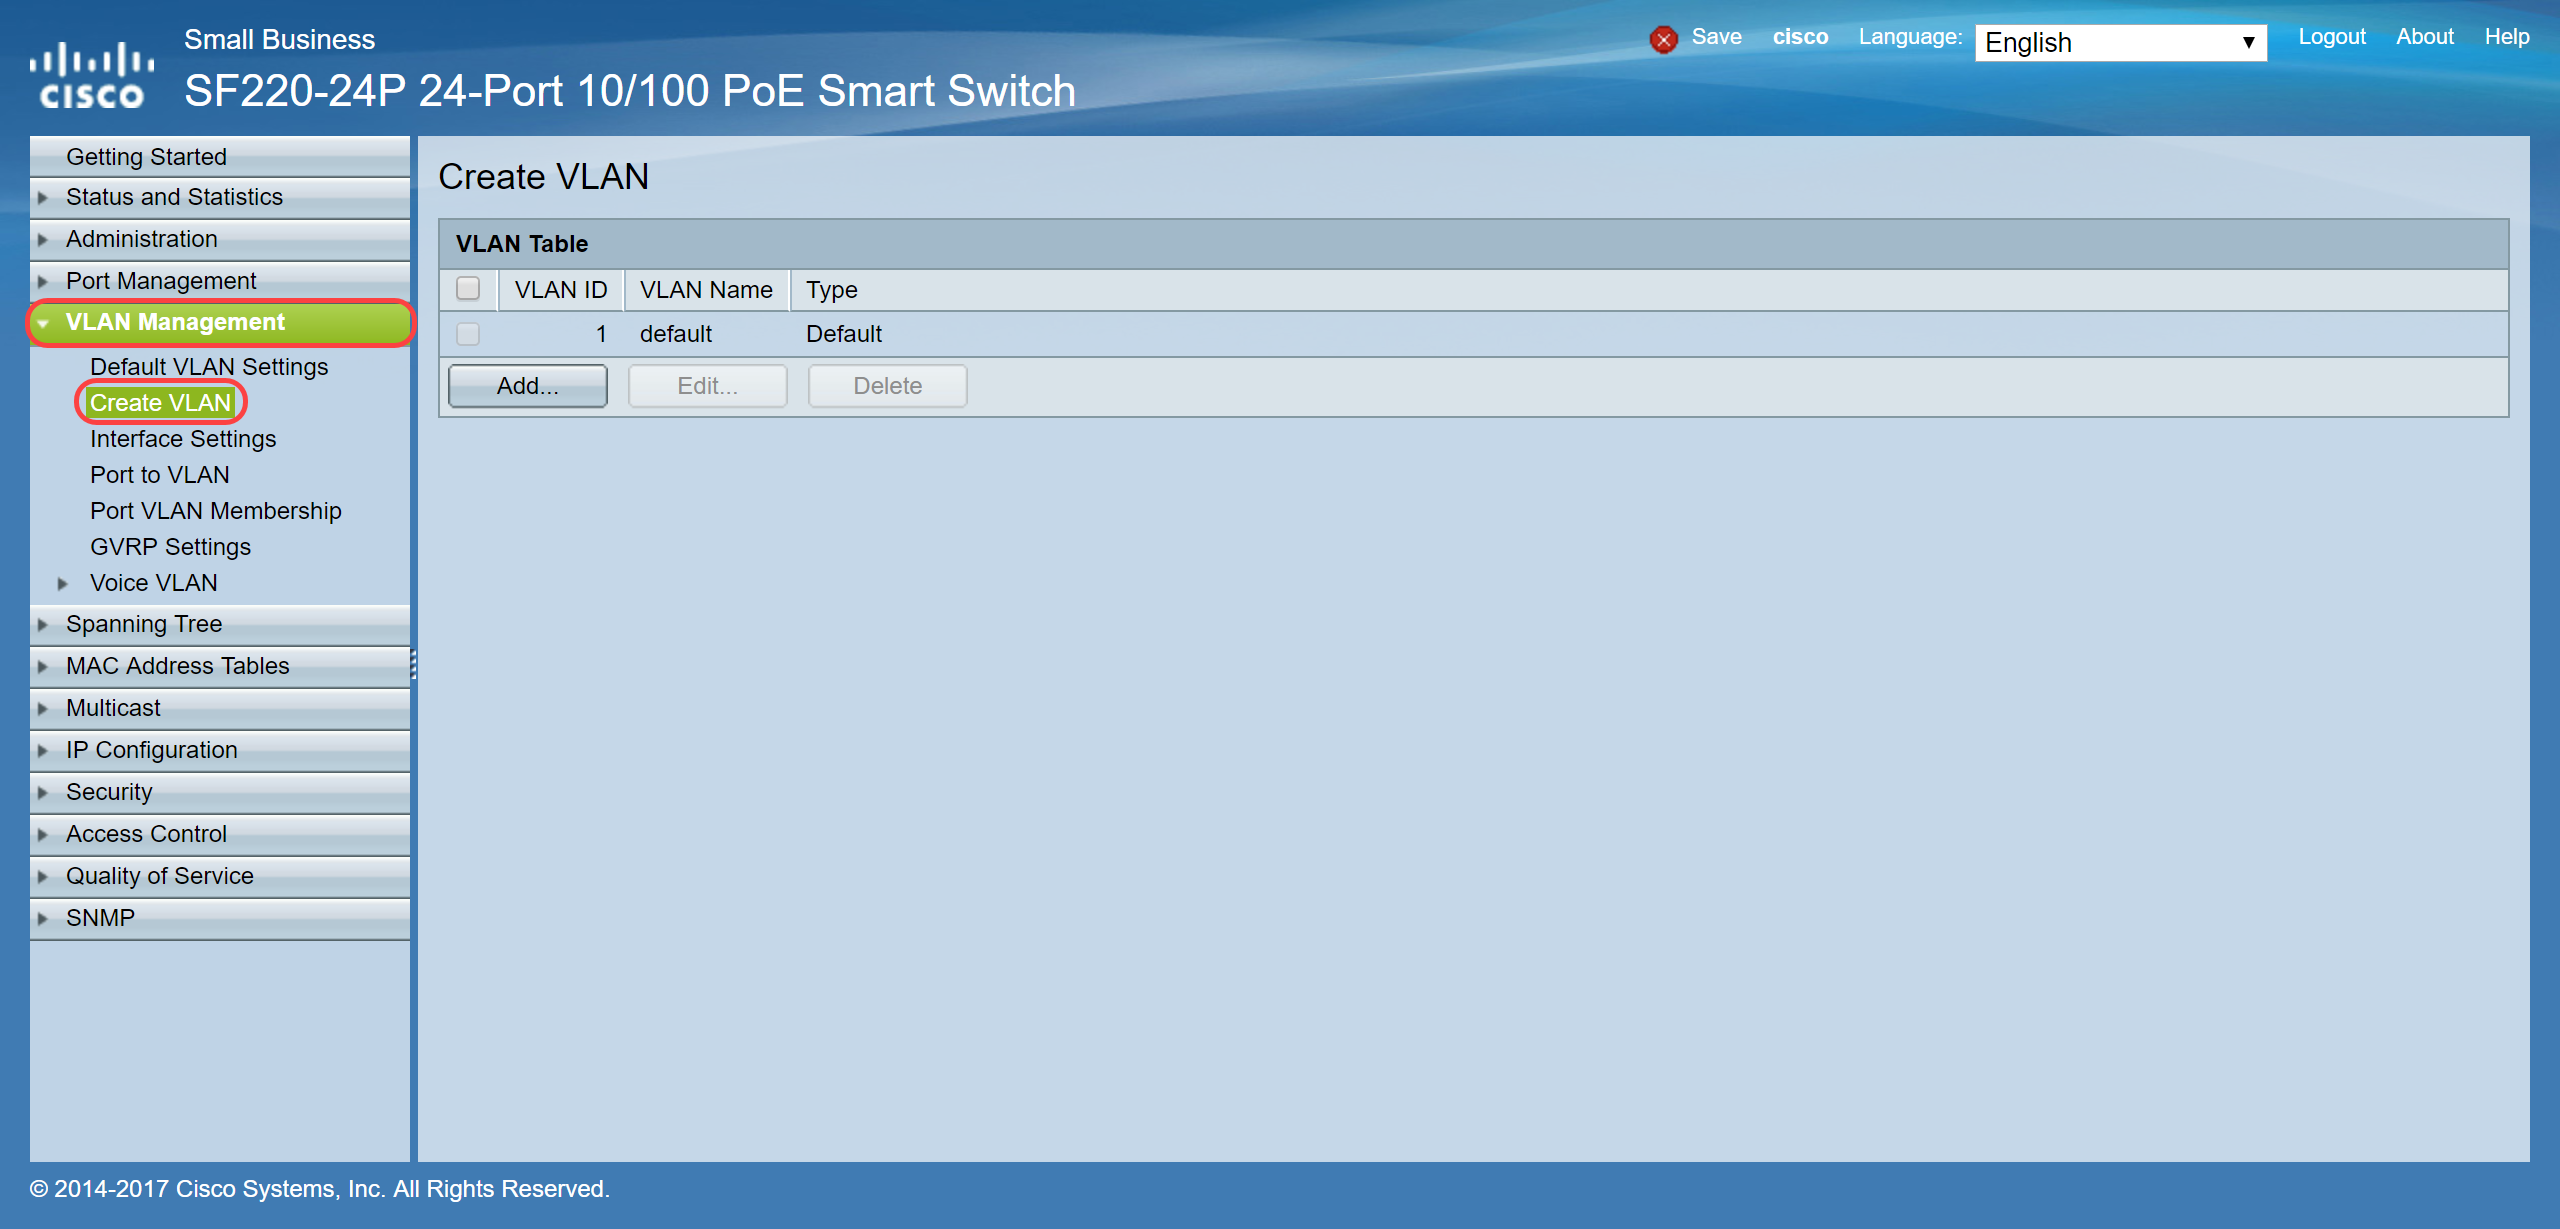
Step 2. Click Add... to create a new VLAN.
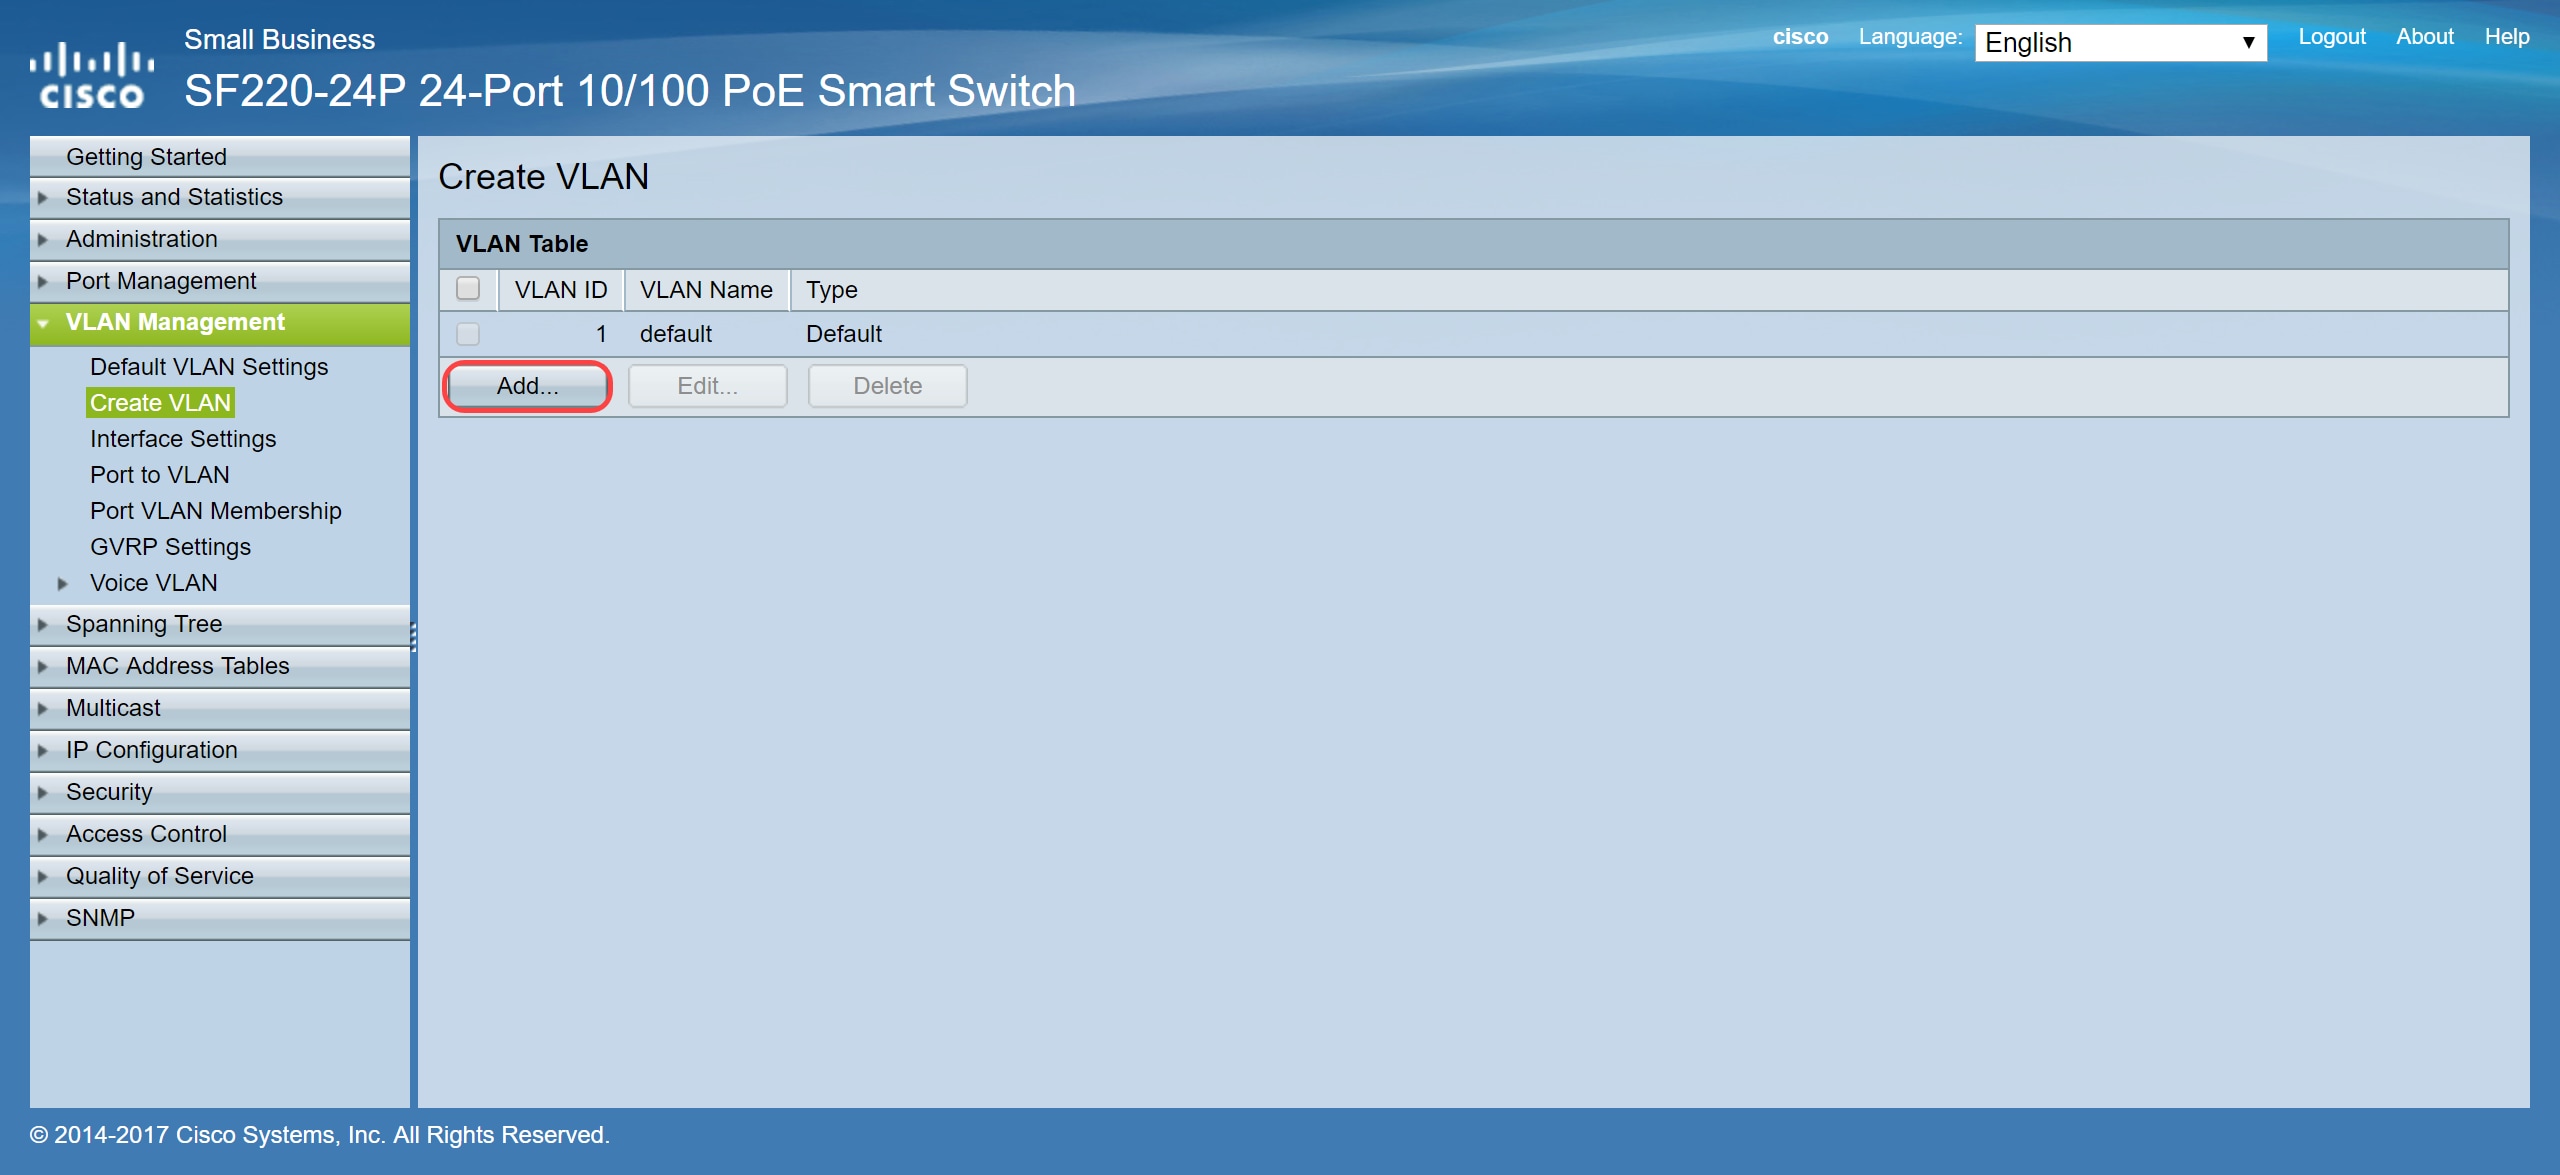
Step 3. To create a single VLAN, select VLAN radio button. Enter the VLAN ID and VLAN Name. Then click Apply to save the VLAN. In this example, we will be creating VLAN 100 for voice and 200 for data.
Note: Some VLANs are required by the system for internal system usage, and therefore cannot be created by entering the starting VID and ending VID, inclusive. When using the Range function, the maximum number of VLANs you can create at once is 100.
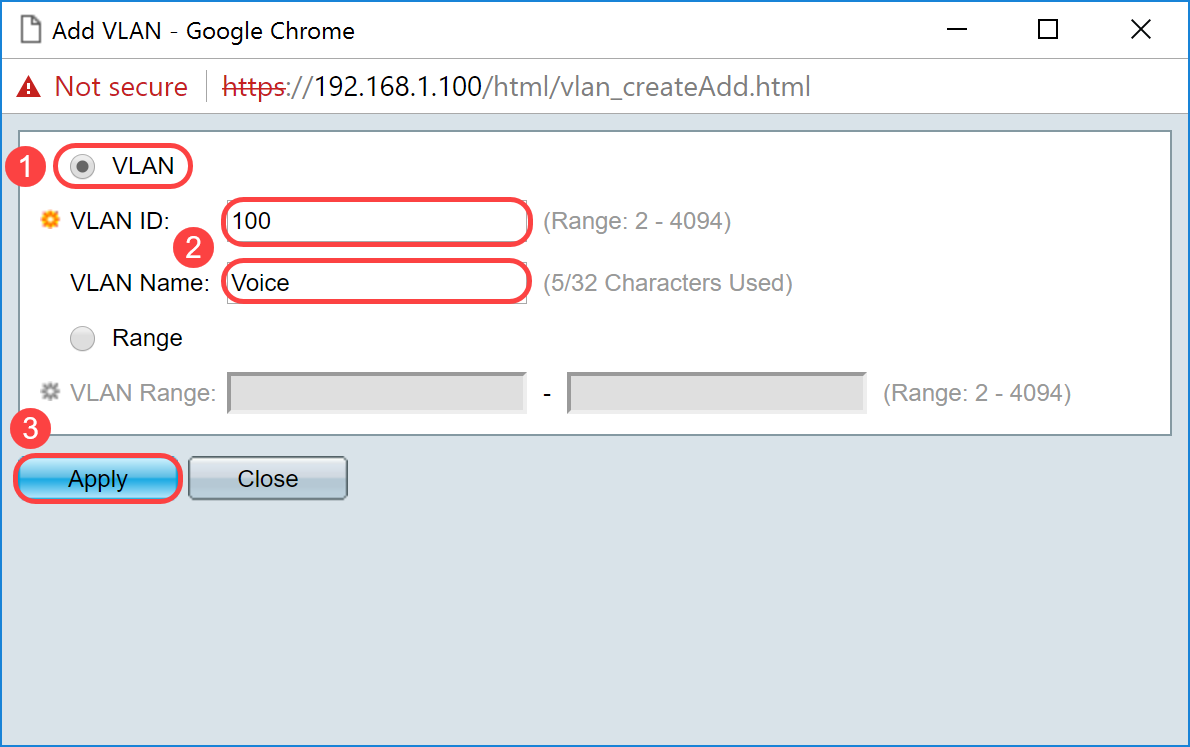
Note: Repeat Step 2 if you need to create another single VLAN.
Setting Up Voice VLAN on the Switch
Step 1. Log in to the web configuration and navigate to VLAN Management > Voice VLAN > Properties.
Note: Configuring Auto Voice VLAN will automatically apply QoS settings for voice VLAN and prioritize the voice traffic.
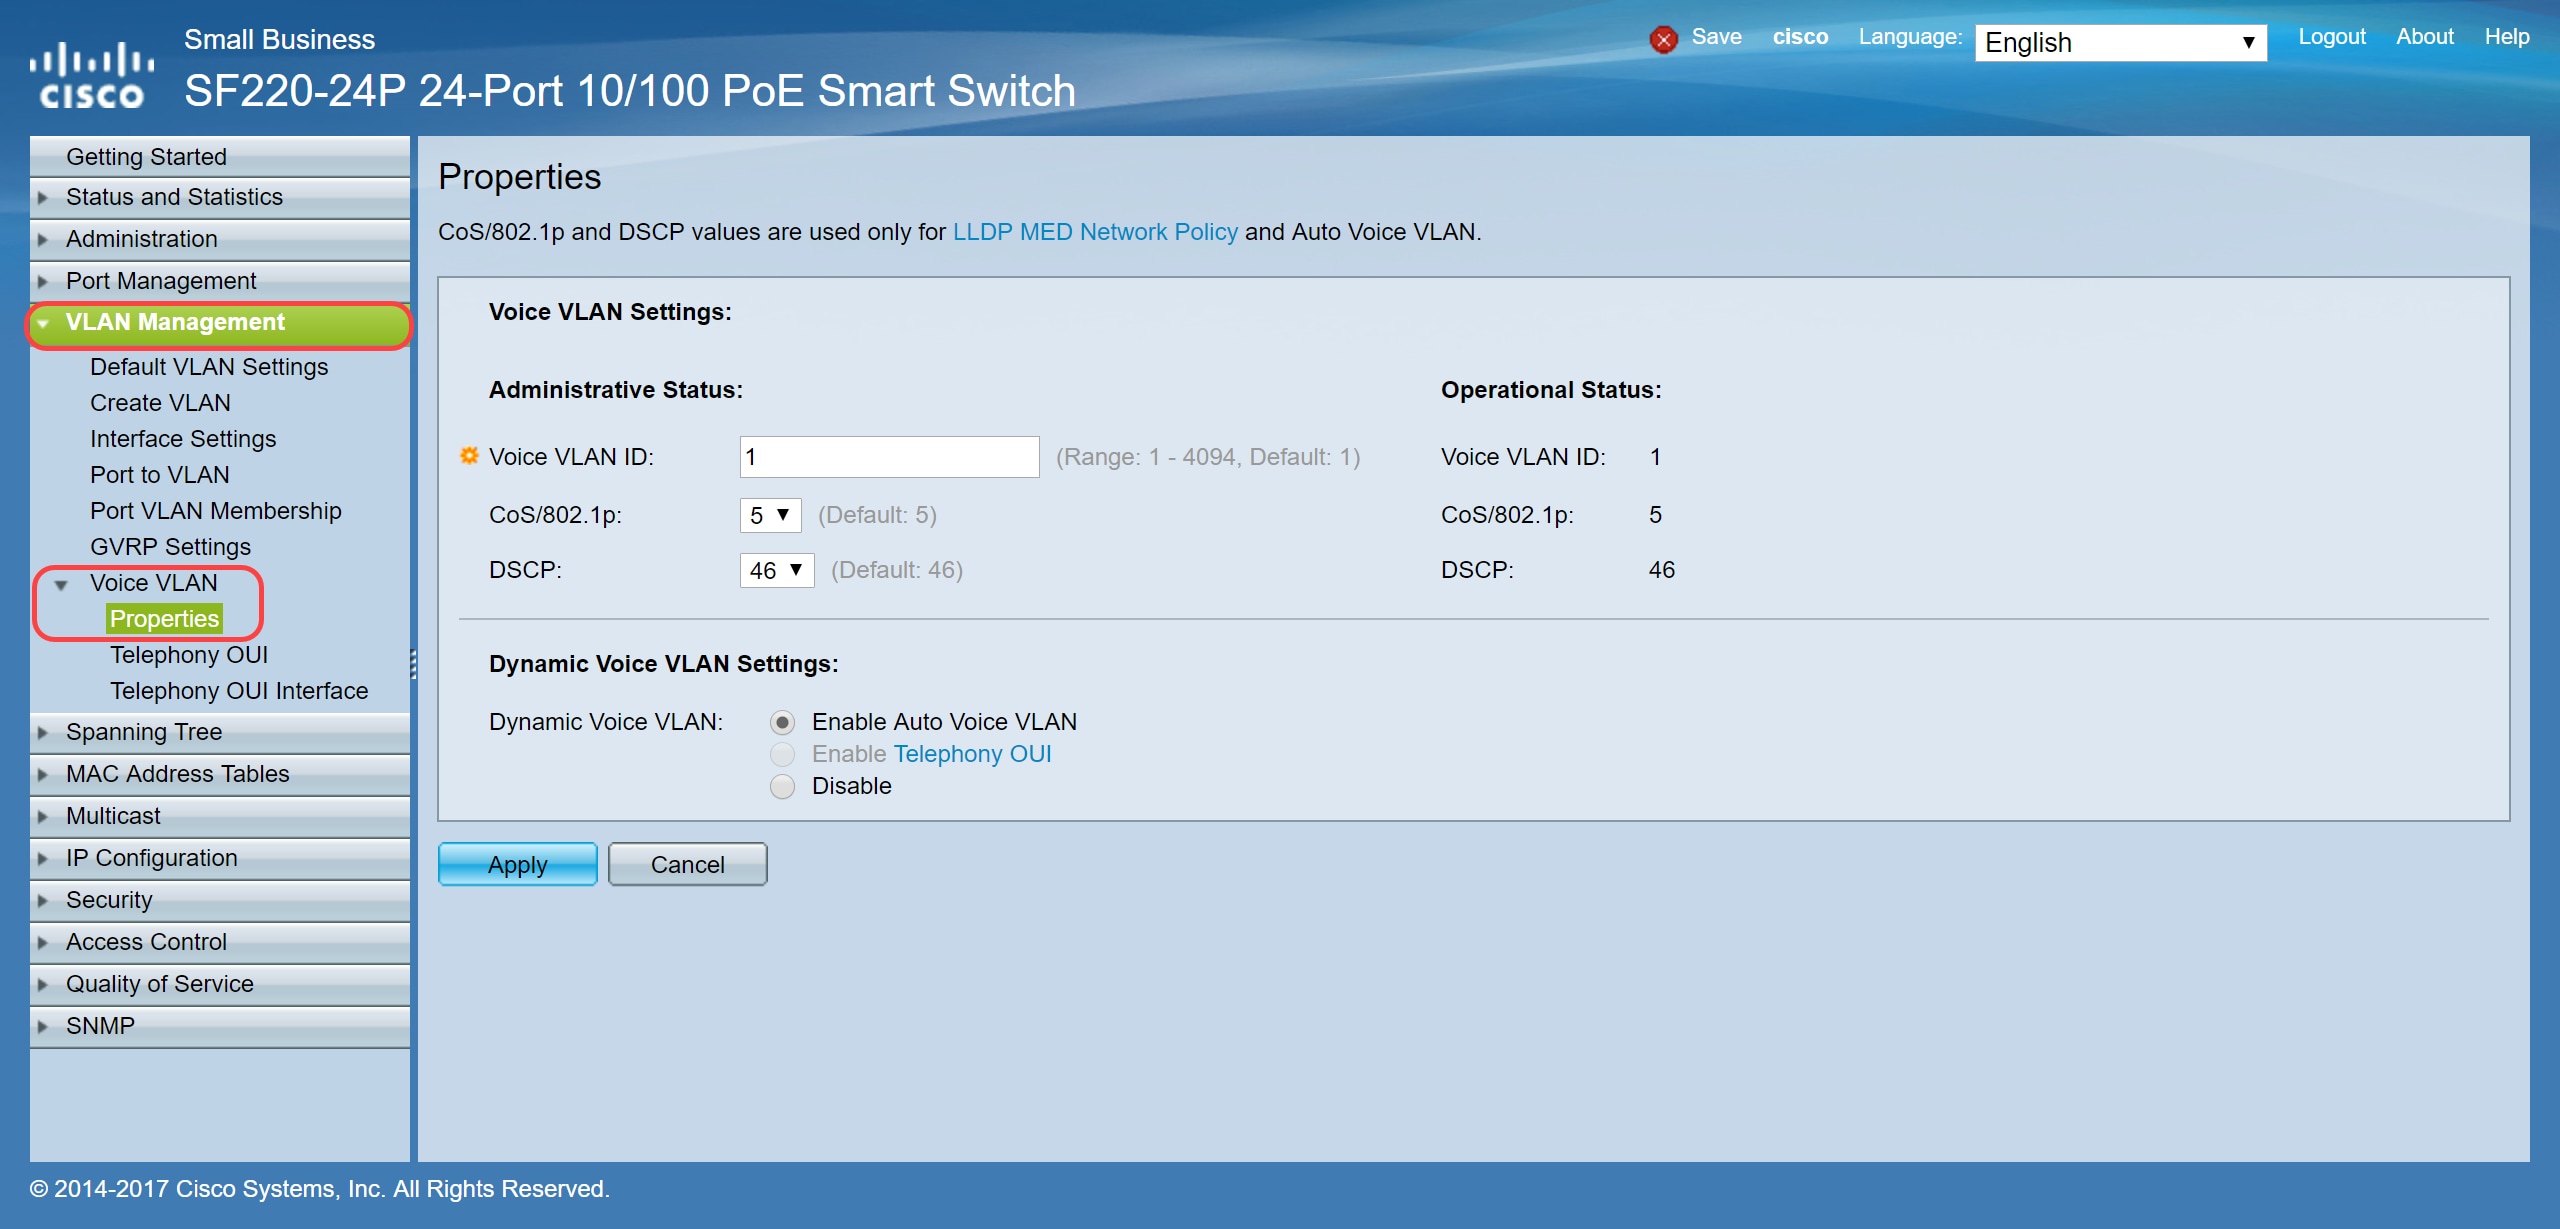
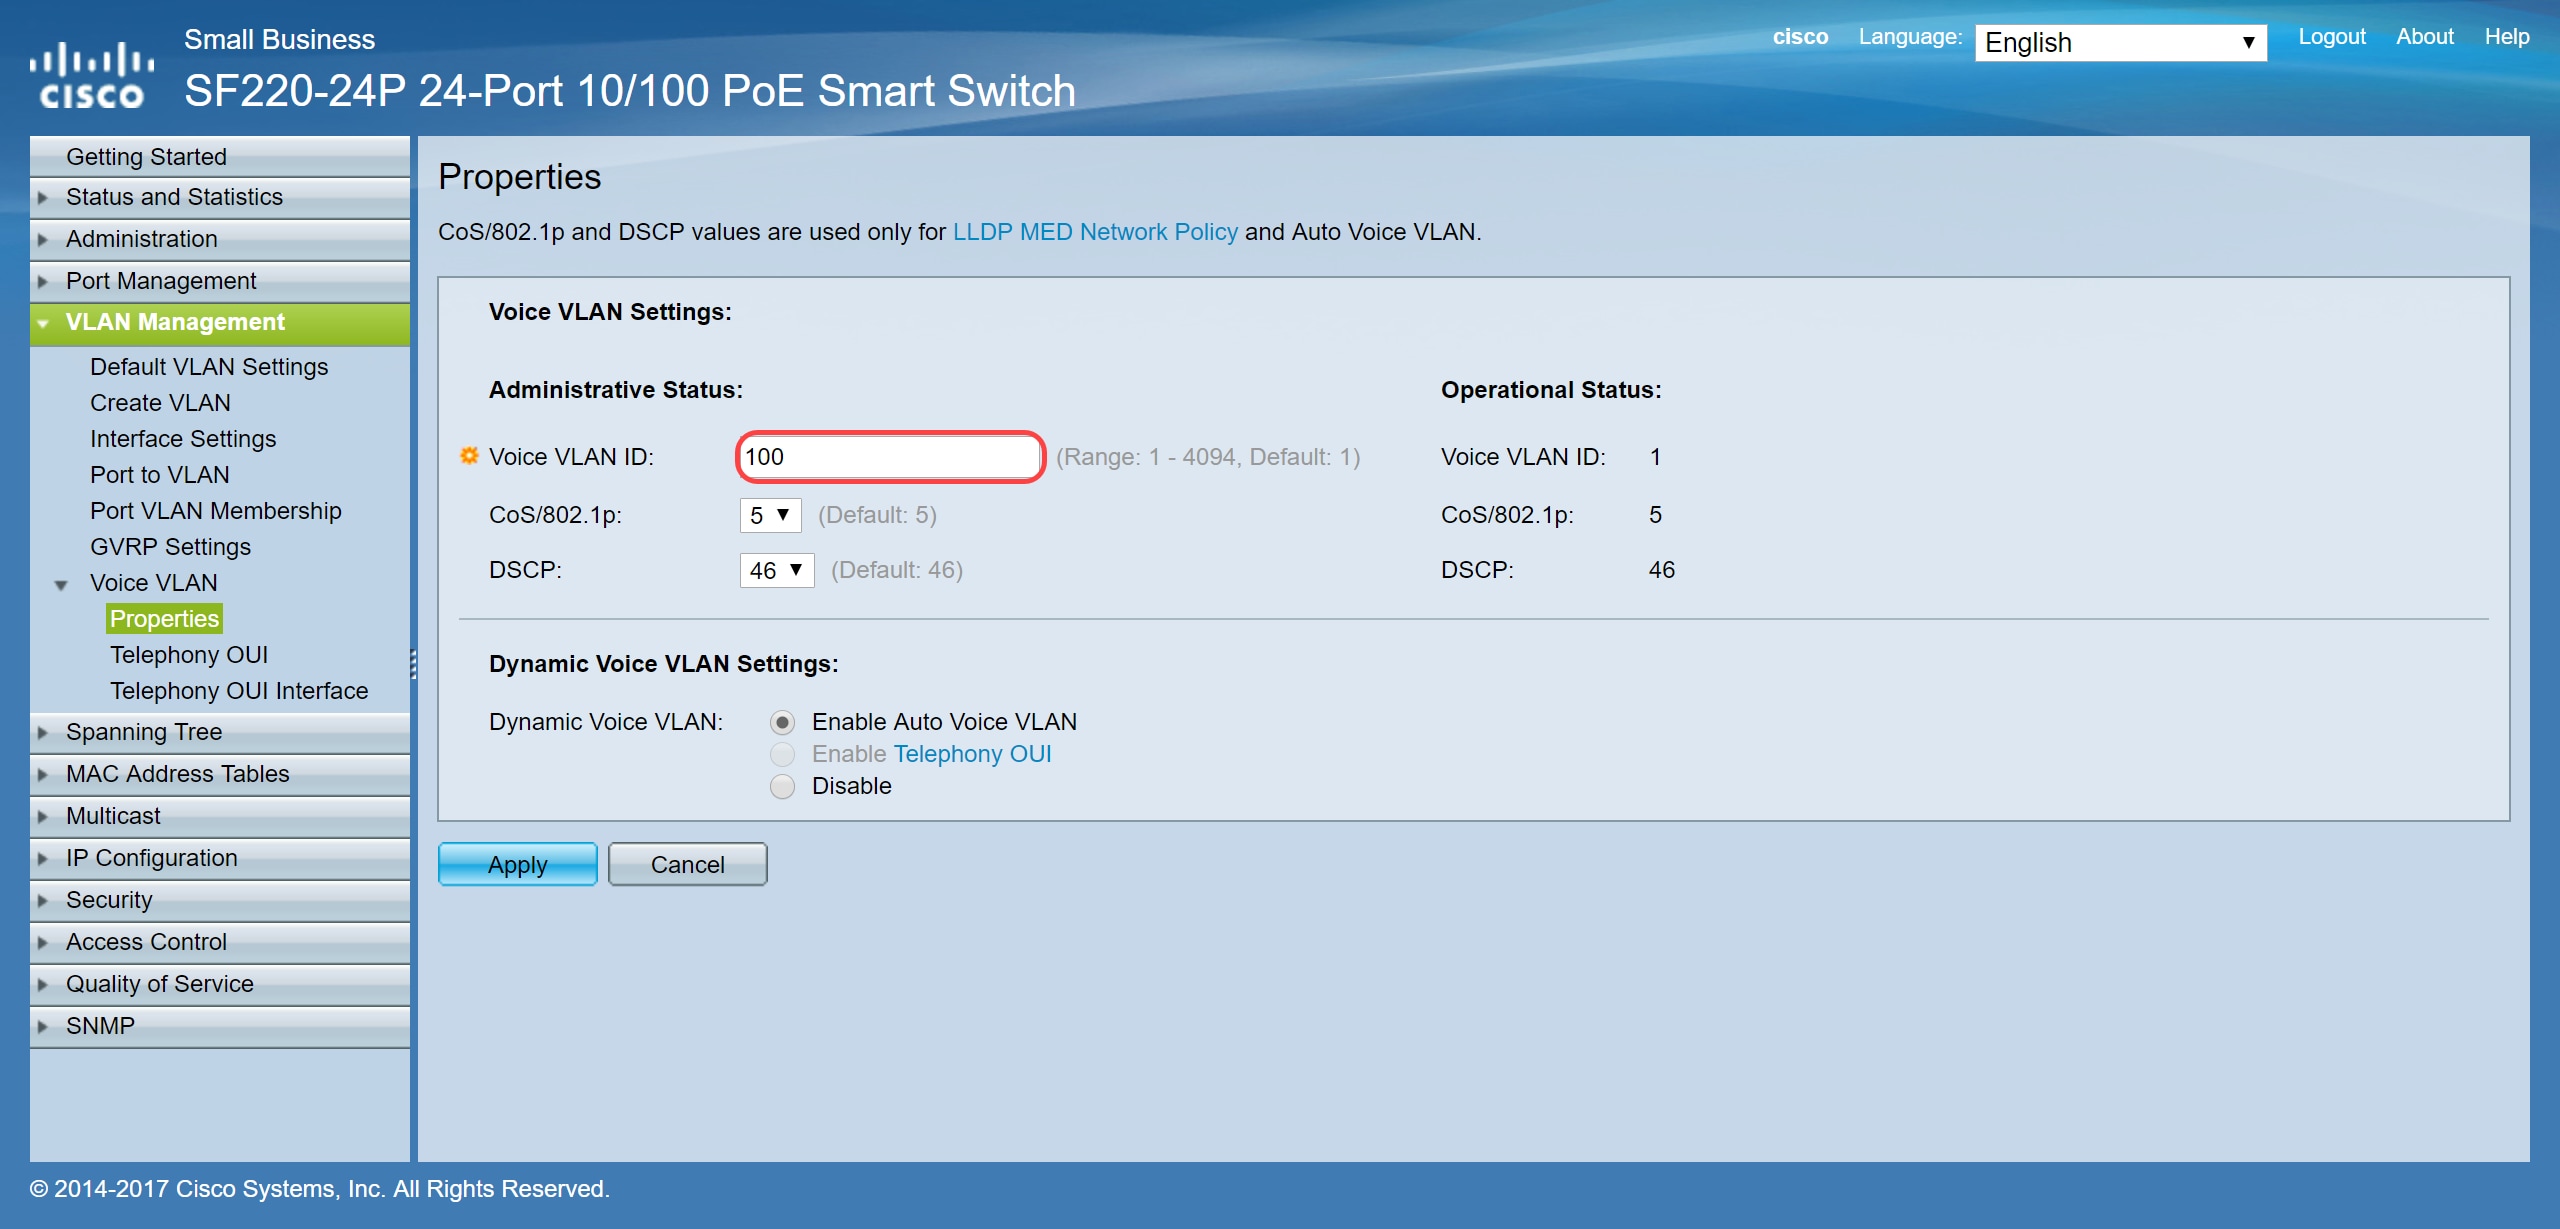
Step 2. Under the Administrative Status, enter the VLAN that is to be the voice VLAN in the Voice VLAN ID field. In this example, VLAN 100 is entered to be the voice VLAN.
Note: Changes in the voice VLAN ID, Class of Service (CoS)/802.1p, and/or Differentiated Service Code Point (DSCP) cause the device to advertise the administrative voice VLAN as a static voice VLAN. If the option Auto Voice VLAN activation triggered by external voice VLAN is selected, then the default values need to be maintained. In this example, CoS/802.1p is left as default of 5 and DSCP is left as default of 46.
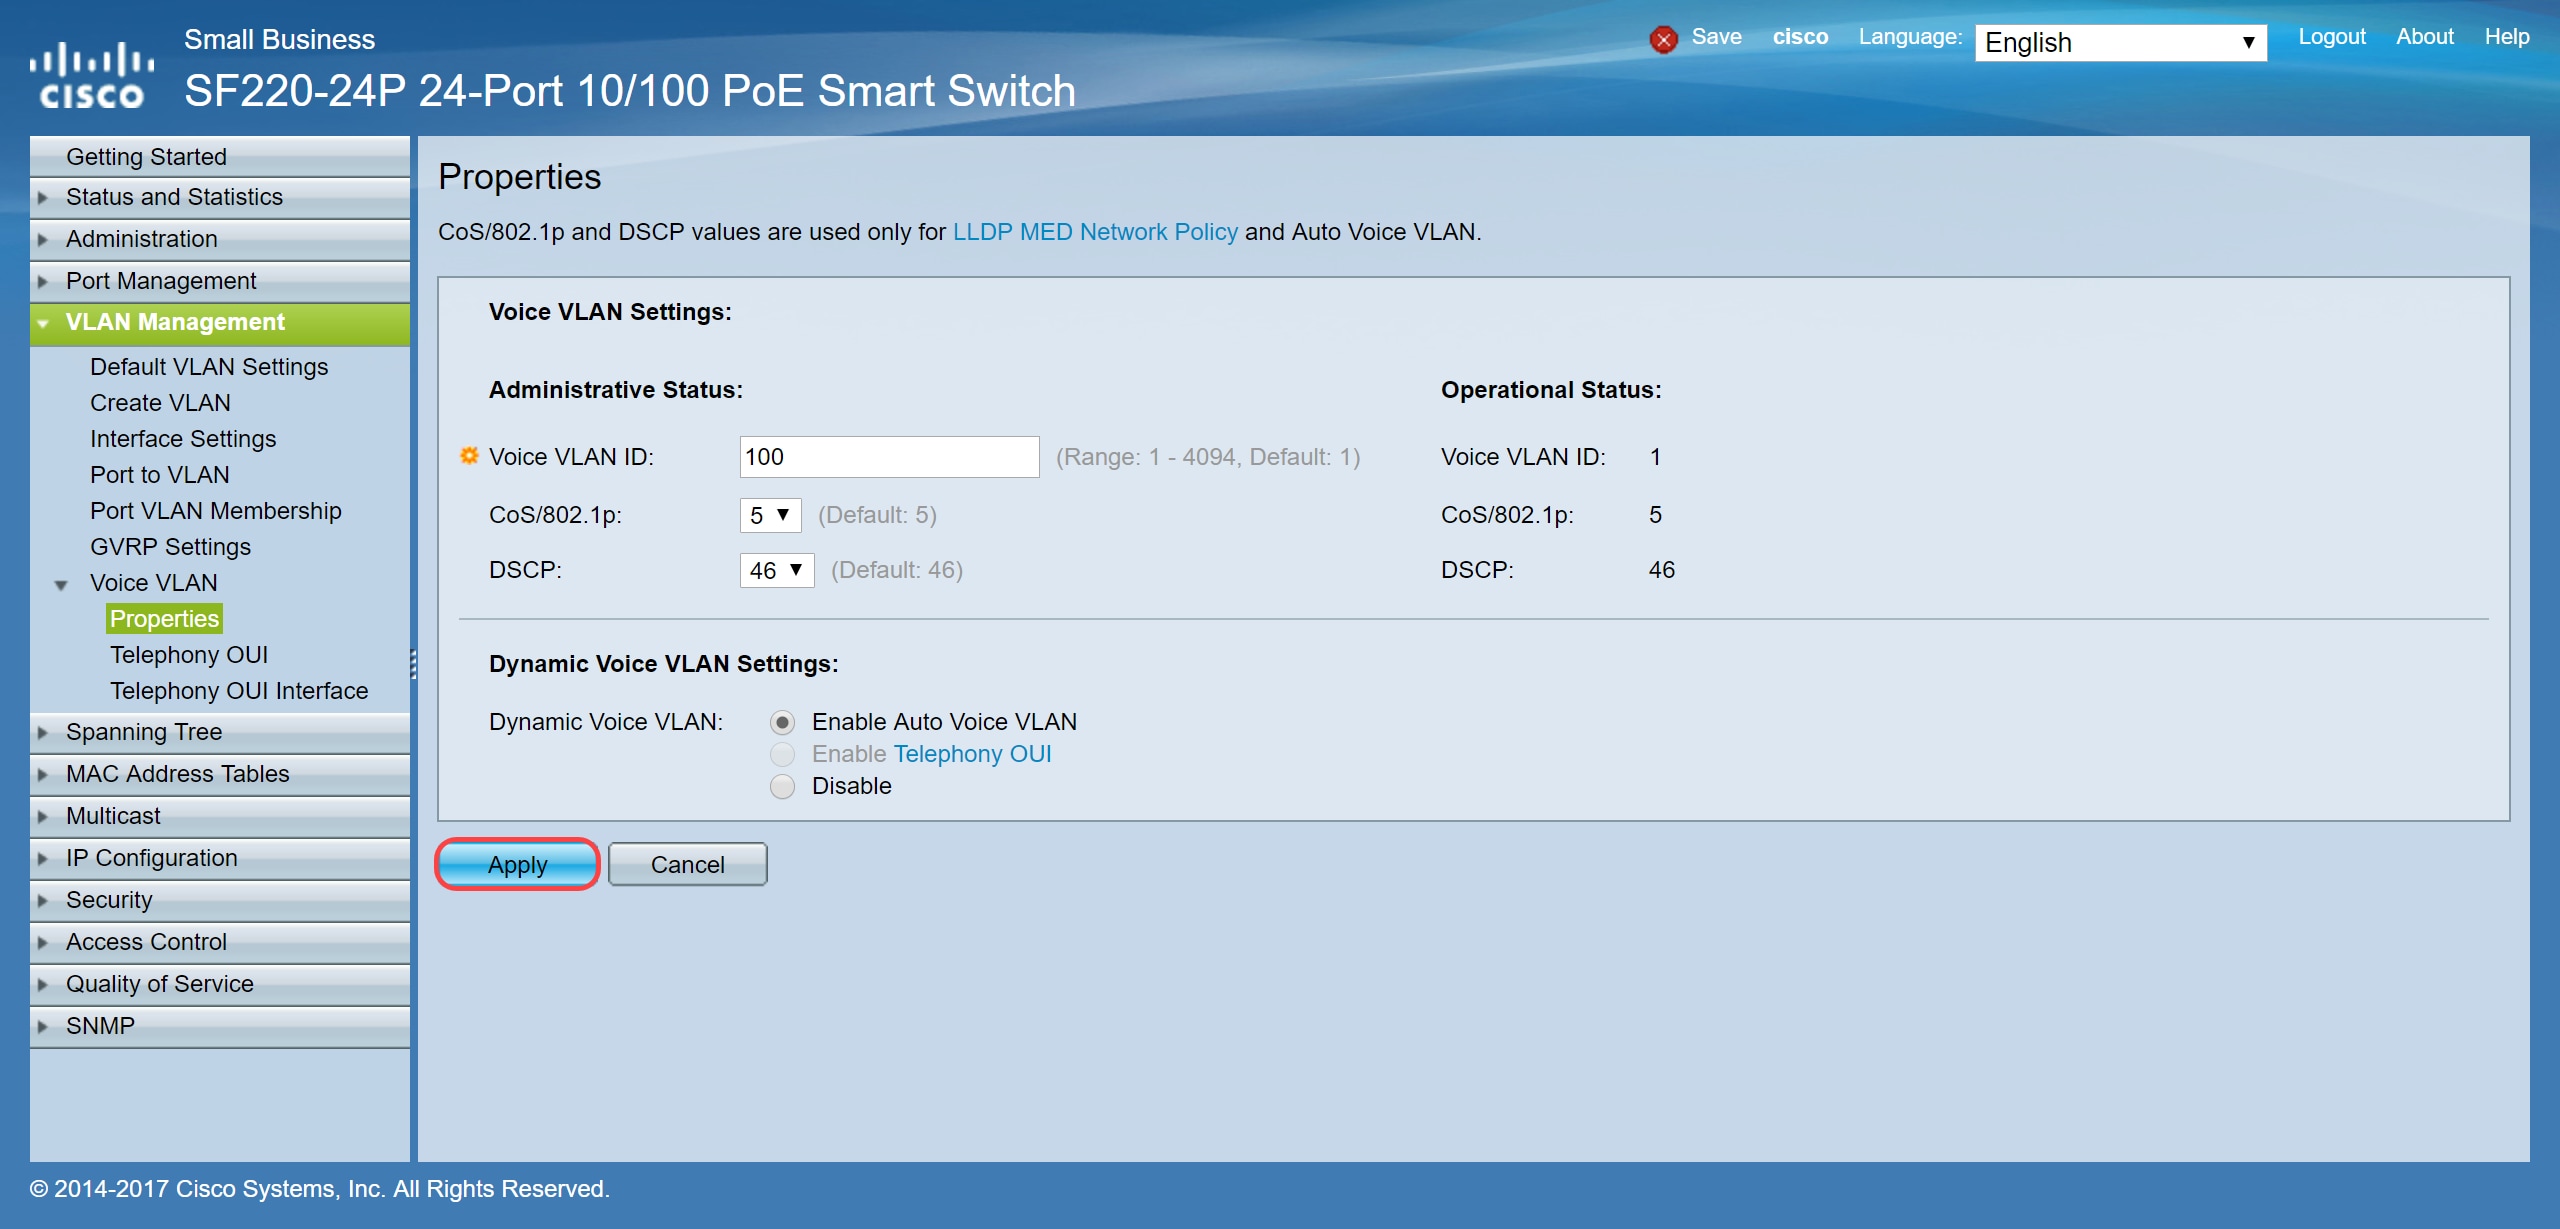
Step 3. Click Apply to save your settings.
Configuring Interface Settings on the Switch
Interfaces, the physical ports on the switch, can be assigned to one of the following settings:
- General: the port can support all functions as defined in the IEEE 802.1q specification. The interface can be a tagged or untagged member of one or more VLANs.
- Access: Can only have one VLAN configured on the interface and can only carry one VLAN.
- Trunk: Can carry the traffic of multiple VLANs over a single link and allow you to extend VLANs across the network.
- Dot1p-Tunnel: puts the interface in QinQ mode. This enables the user to use their own VLAN arrangements (PVID) across the provider network. The switch will be in QinQ mode when it has one or more dot1p-tunnel ports.
Step 1. Log in to the web configuration and navigate to VLAN Management > Interface Settings.
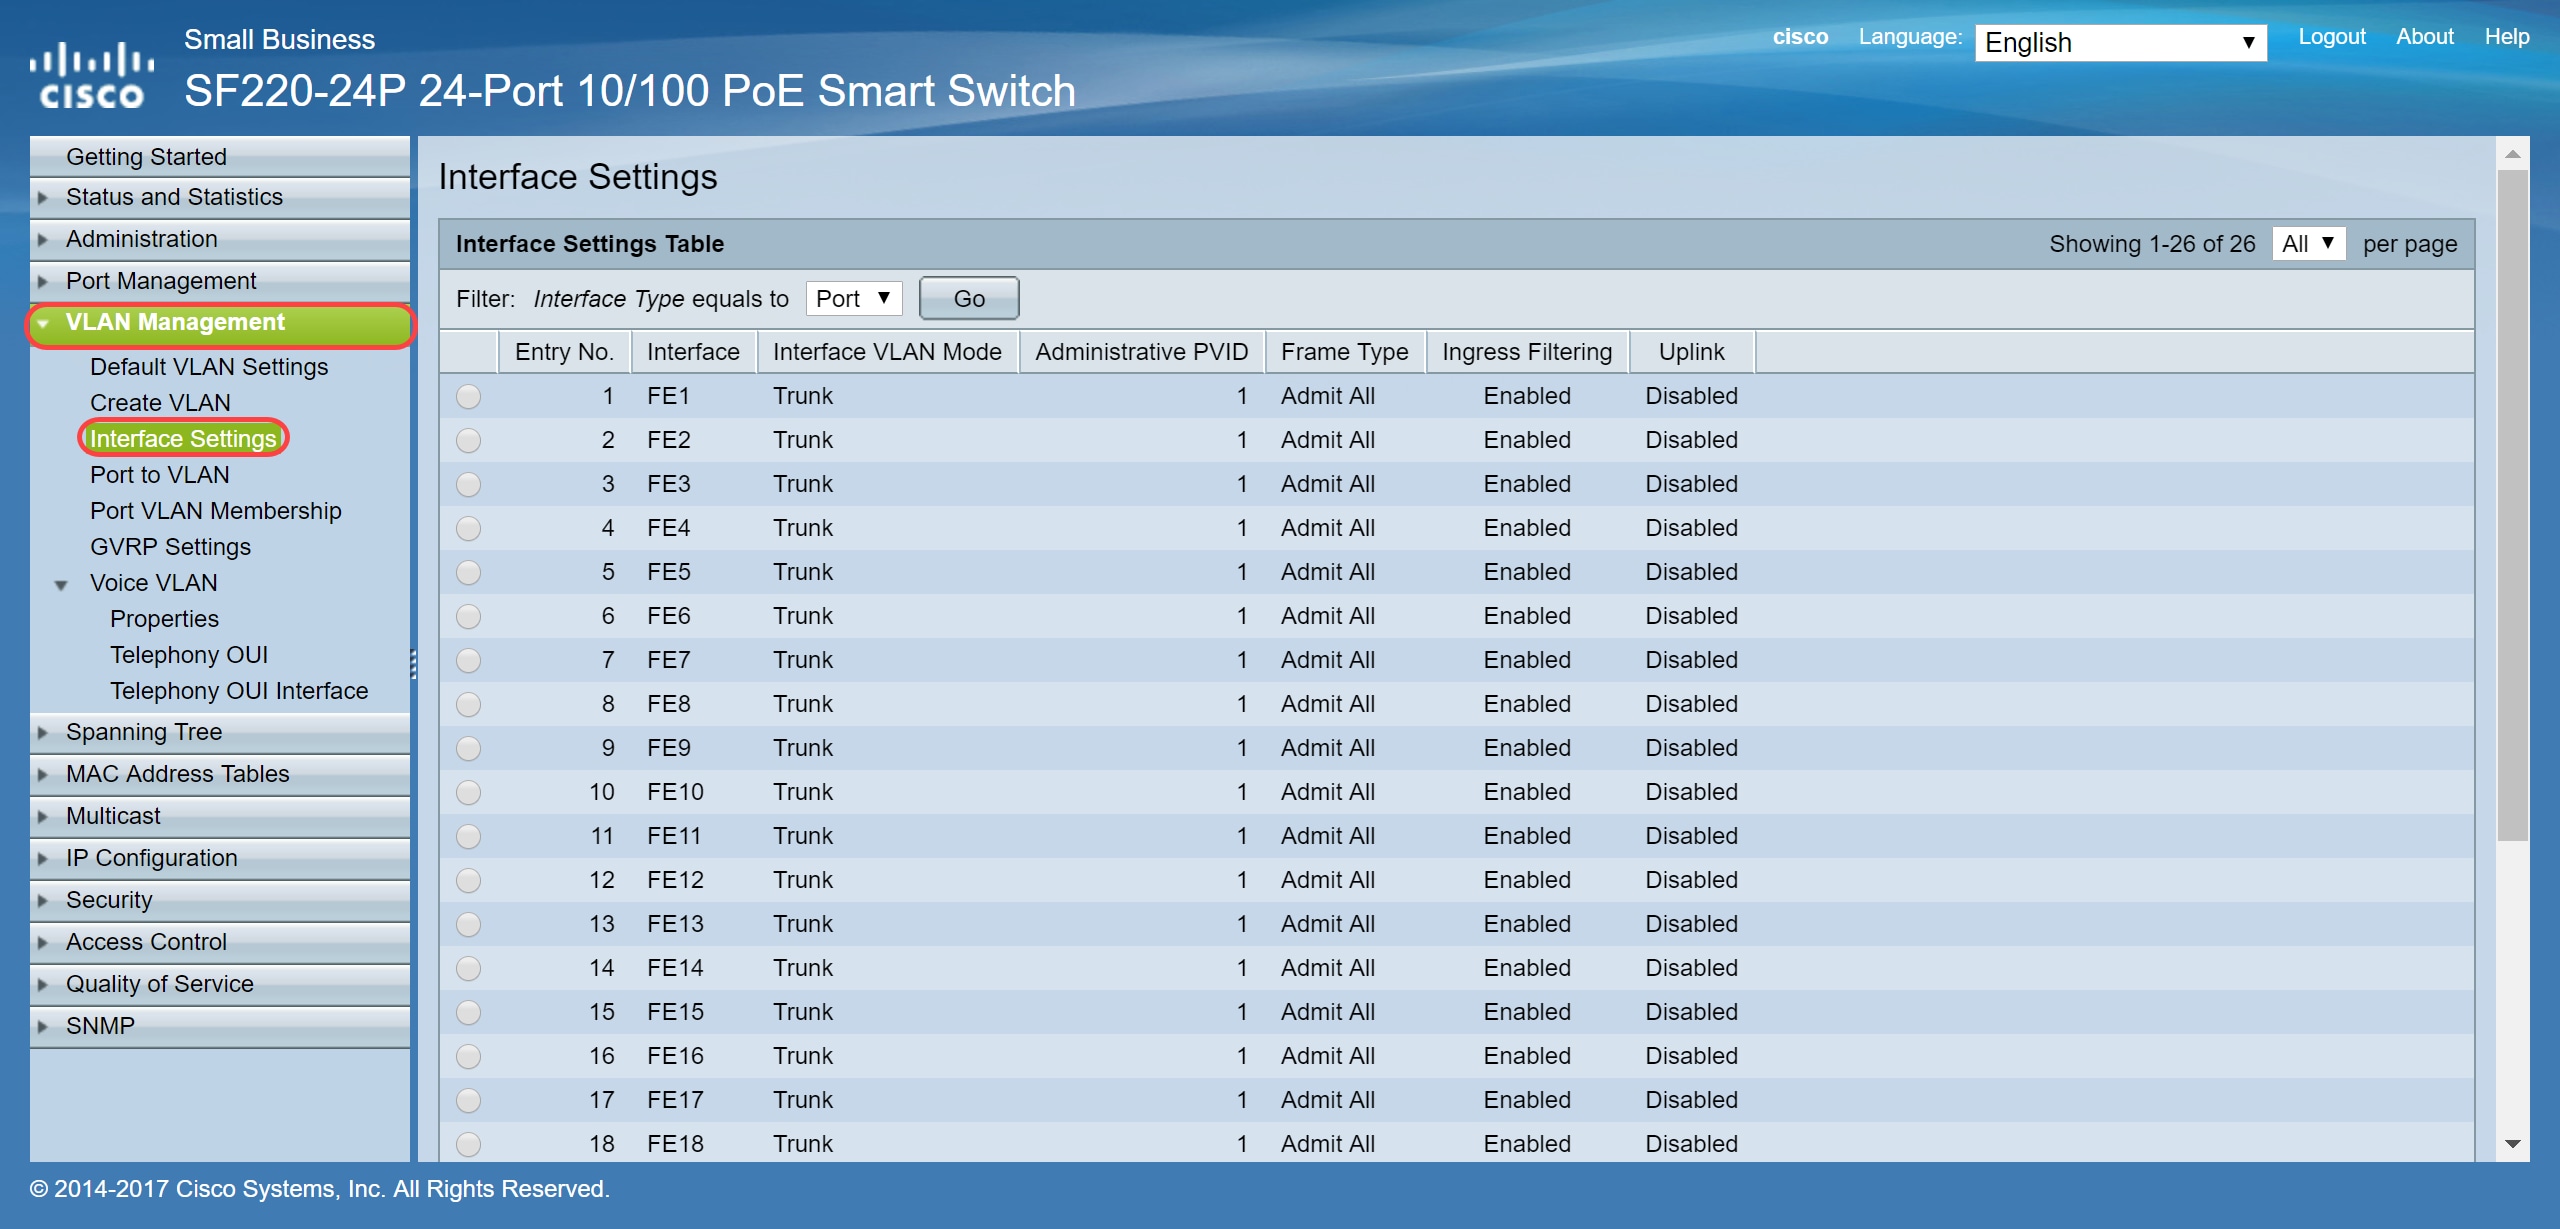
Step 2. Select the interface mode for the VLAN. In this example, we will be configuring the Raspberry Pi (port: FE3) to be an access port.
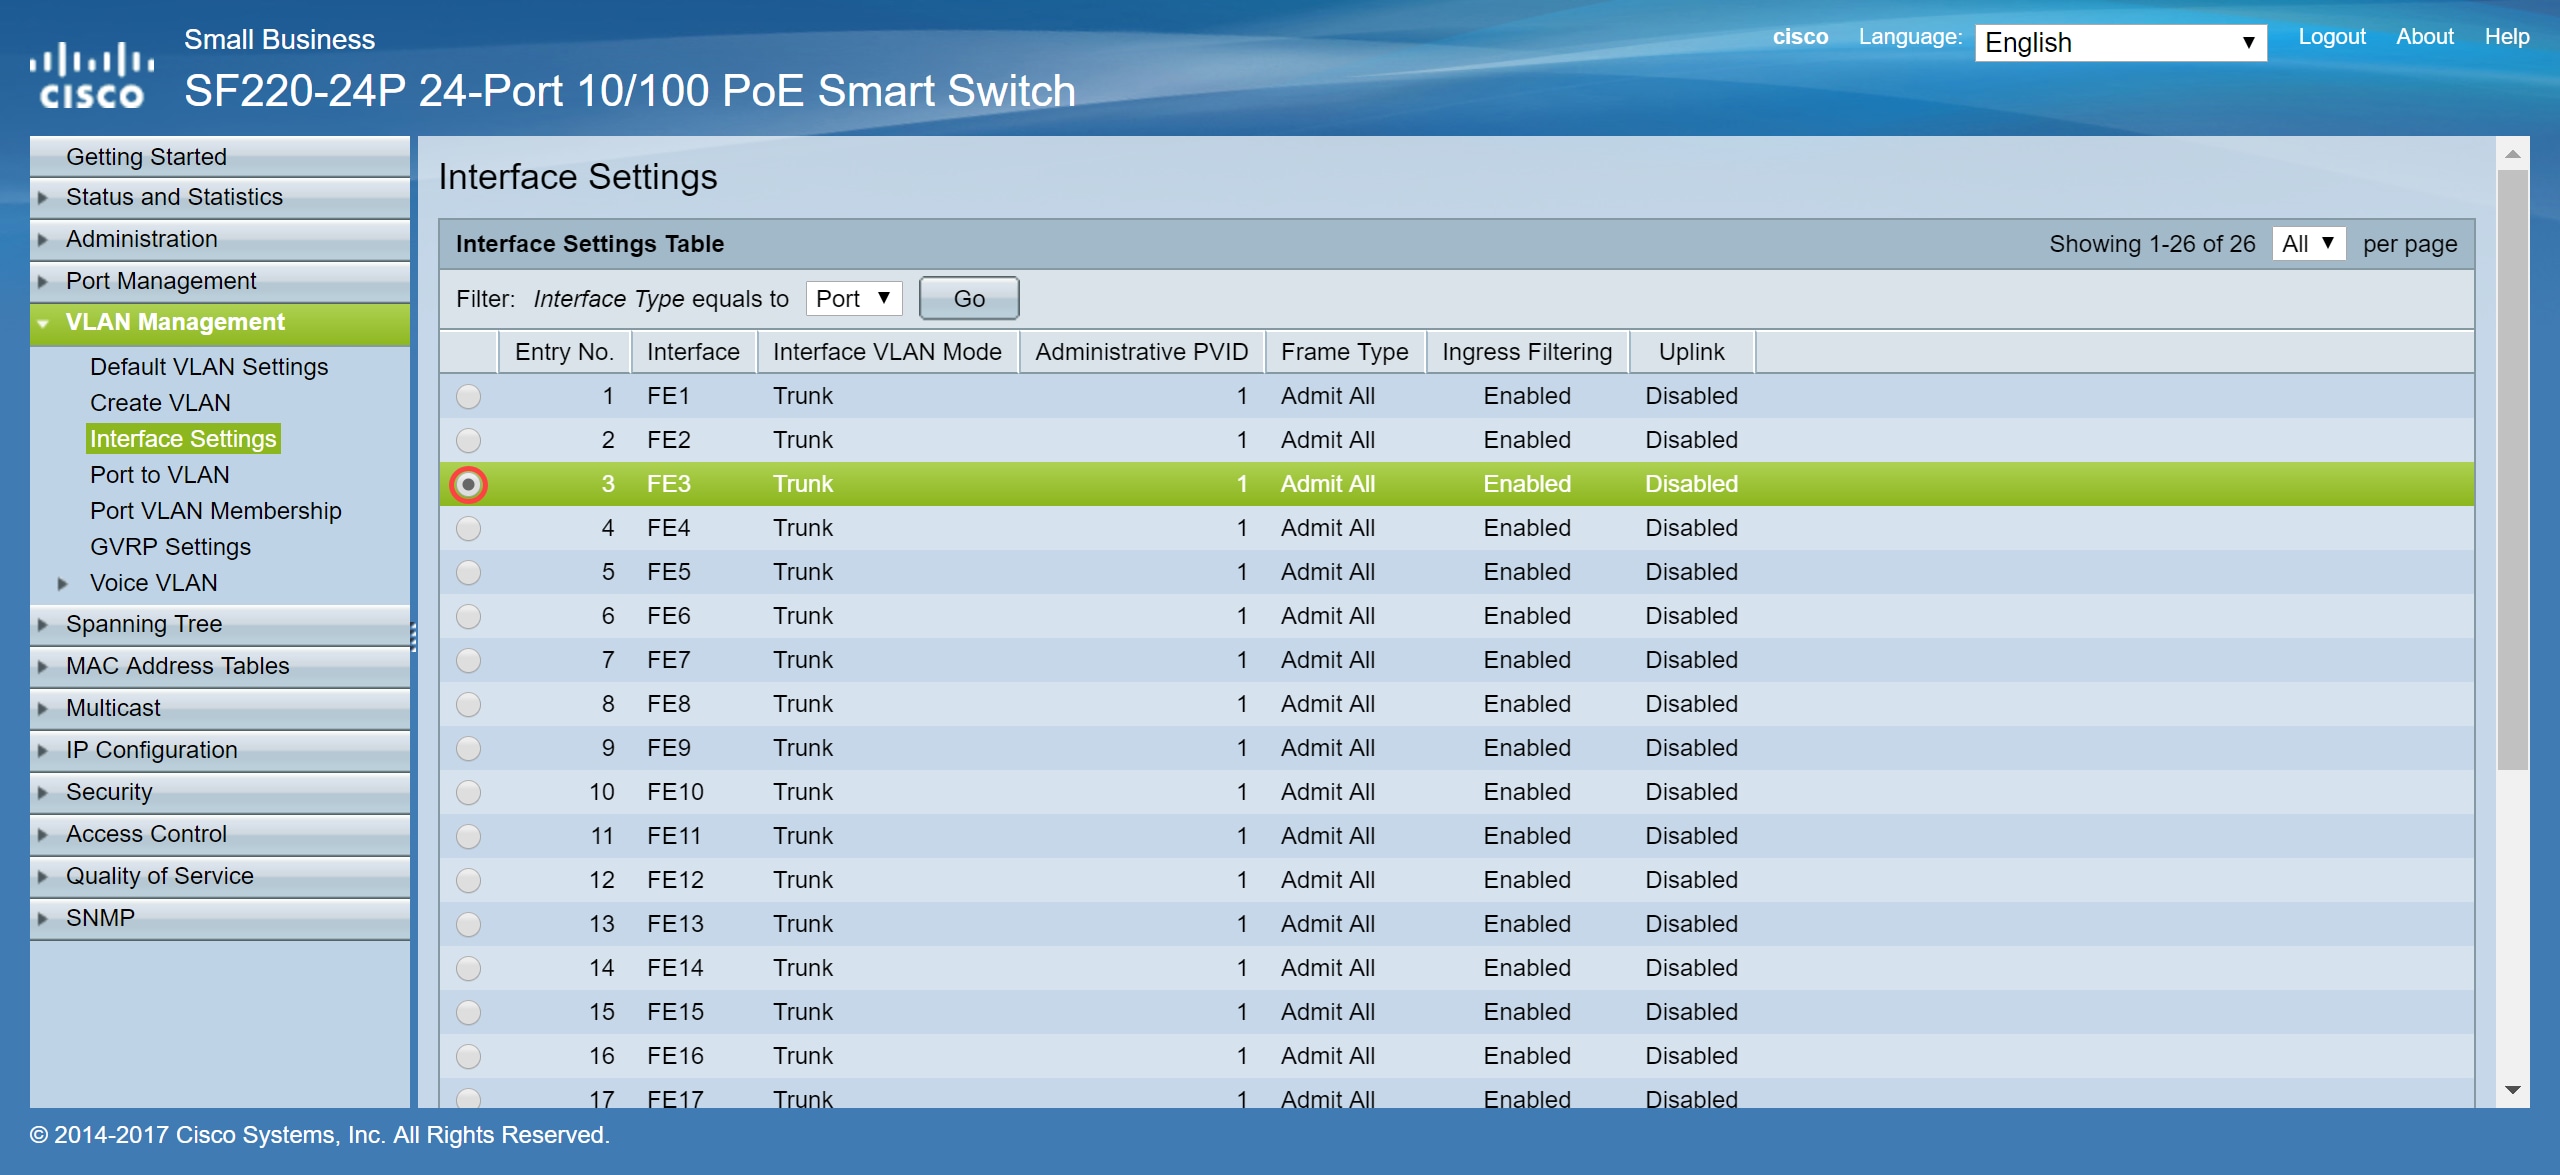
Step3. Then click Edit... to edit the interface.
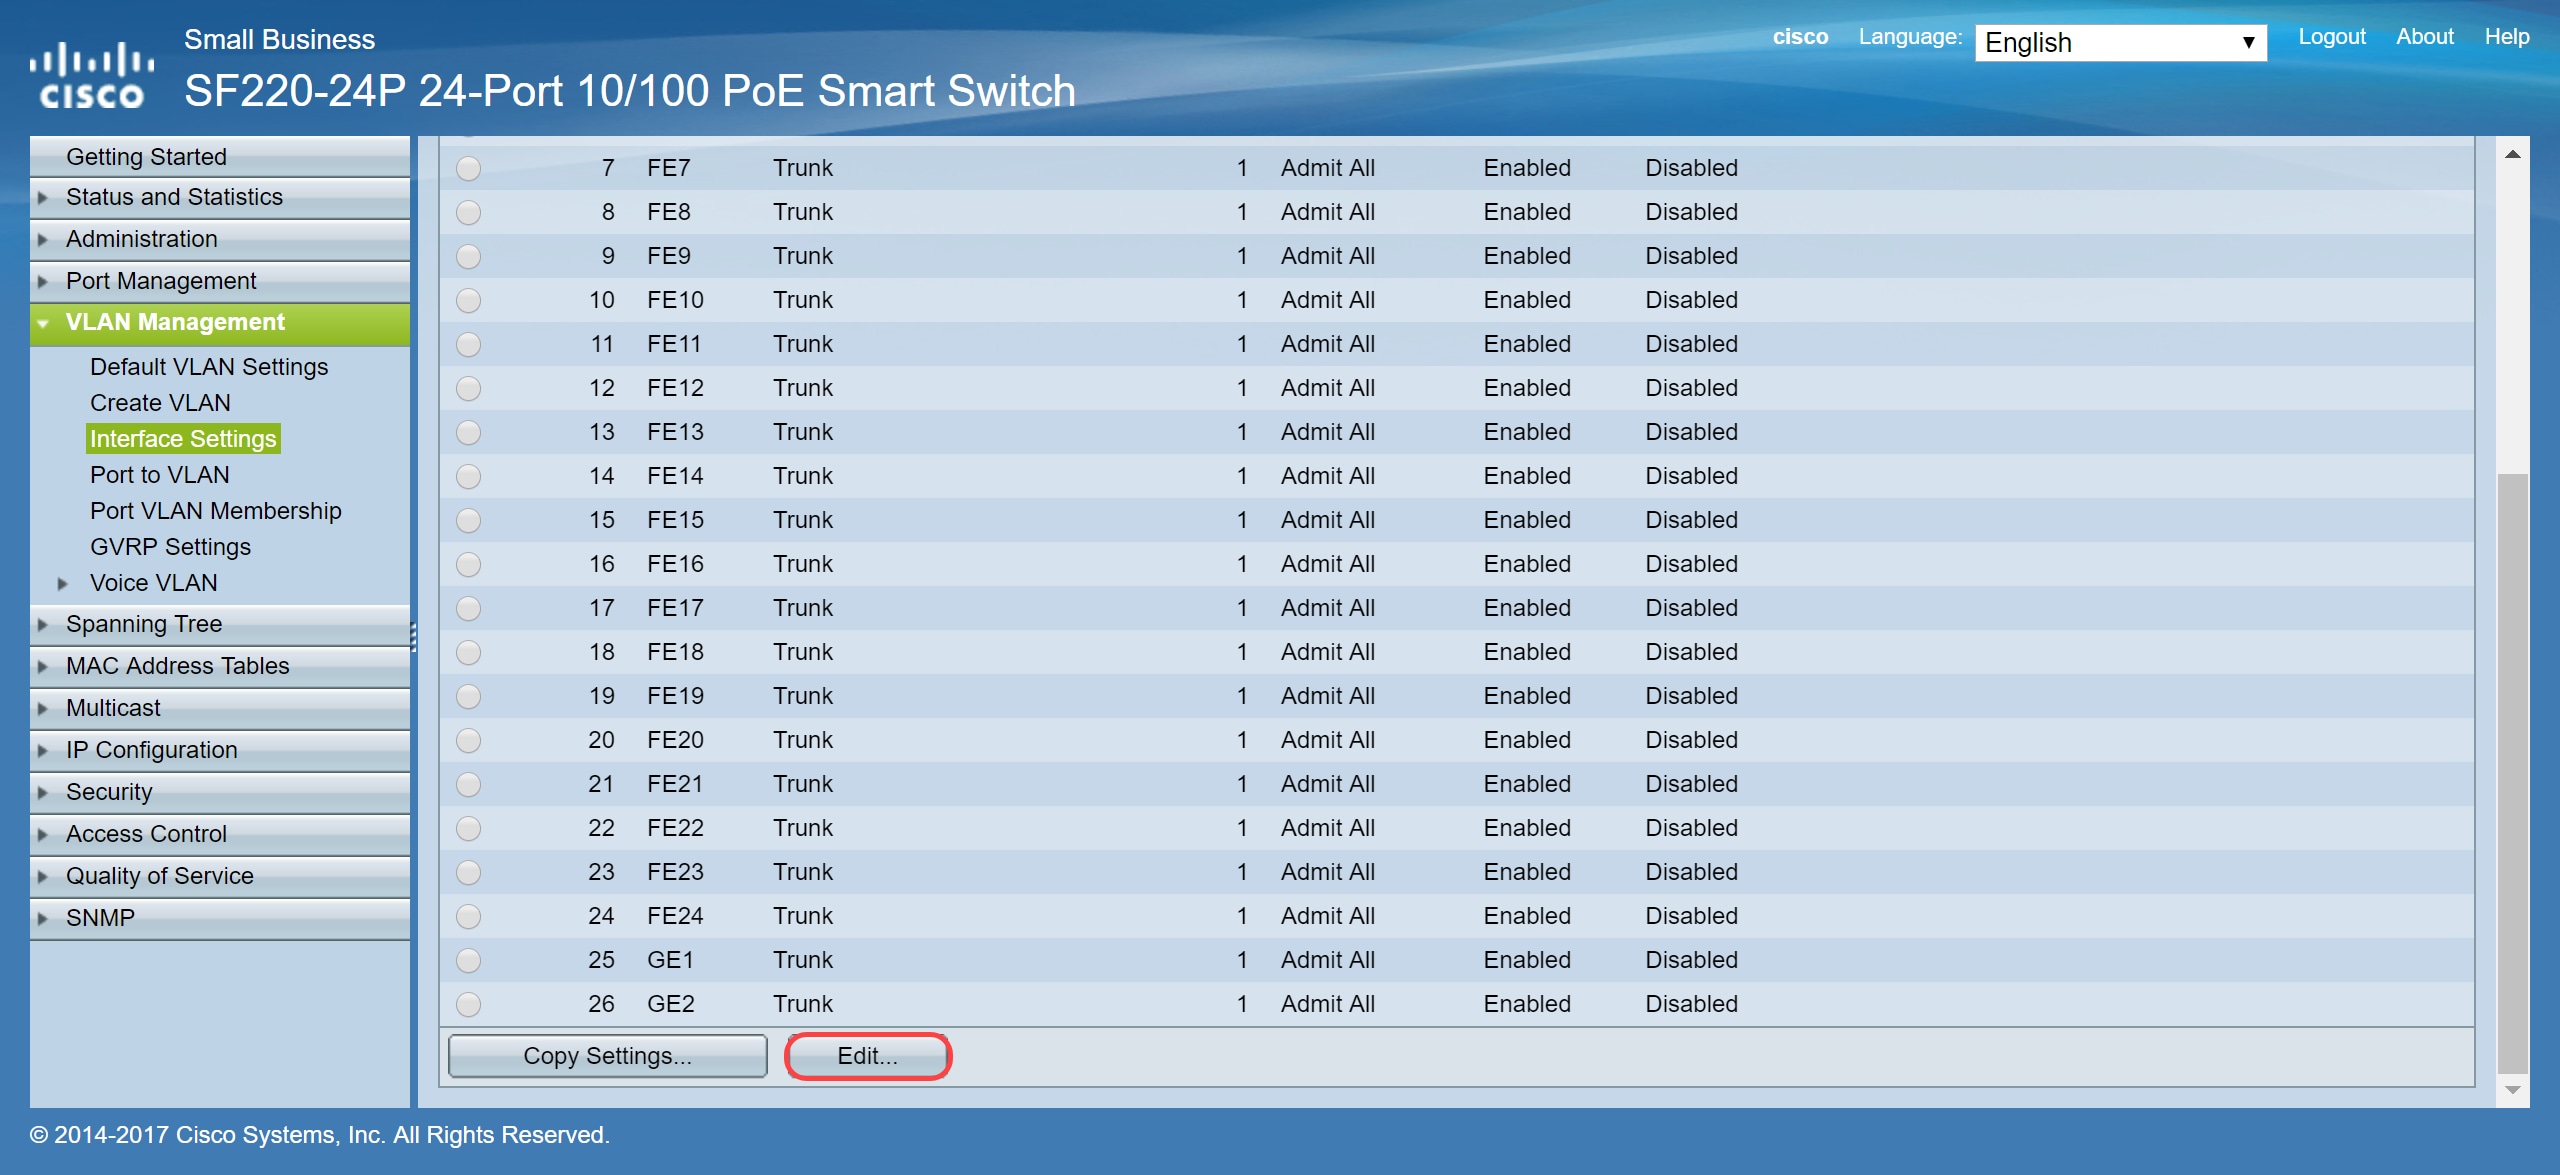
Step 4. In the Interface VLAN Mode field, choose Access to configure the interface as an untagged member of a single VLAN.
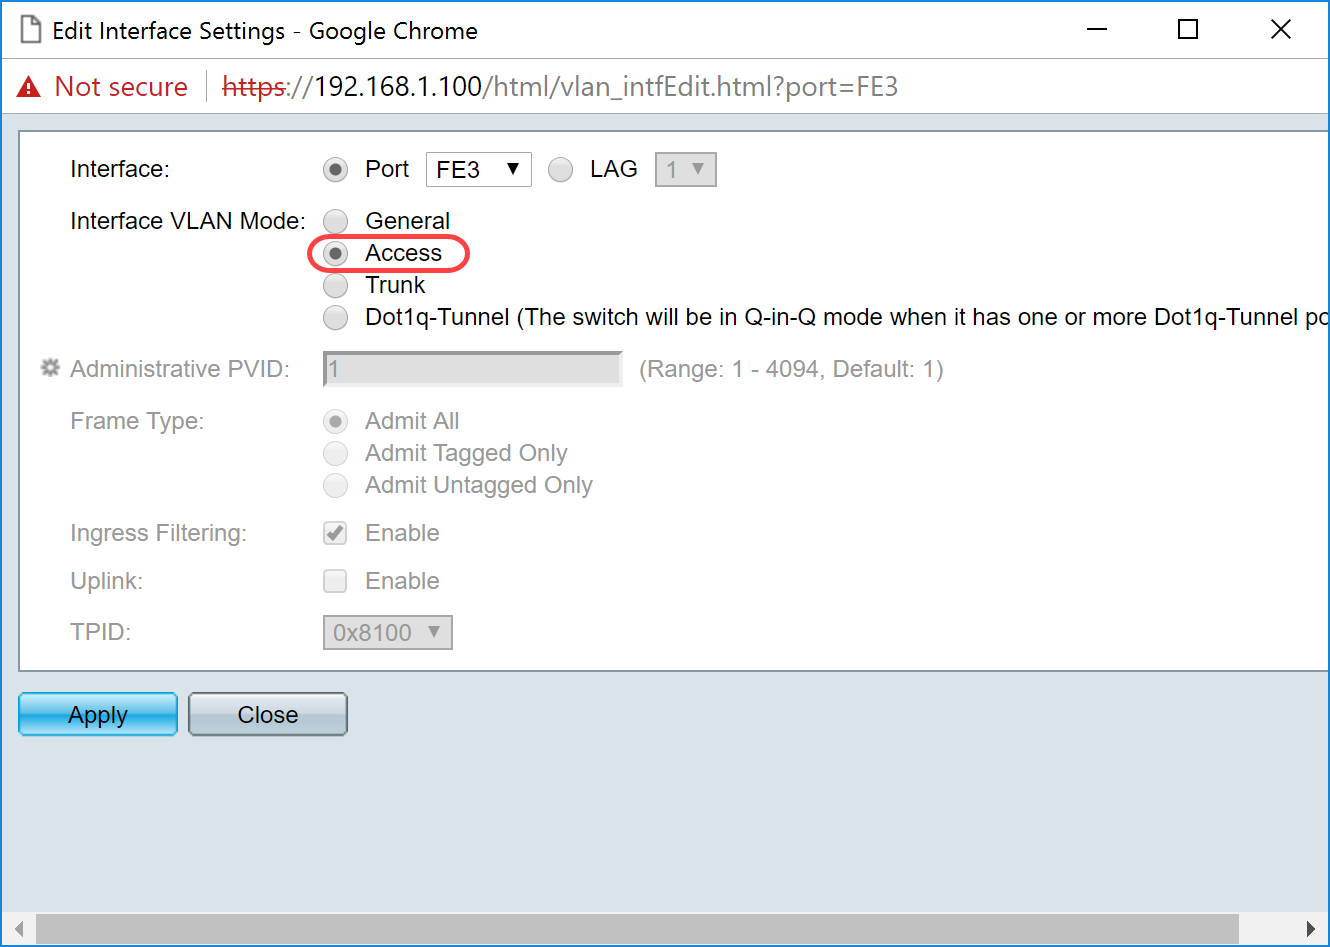
Step 5. Click Apply to save your settings.
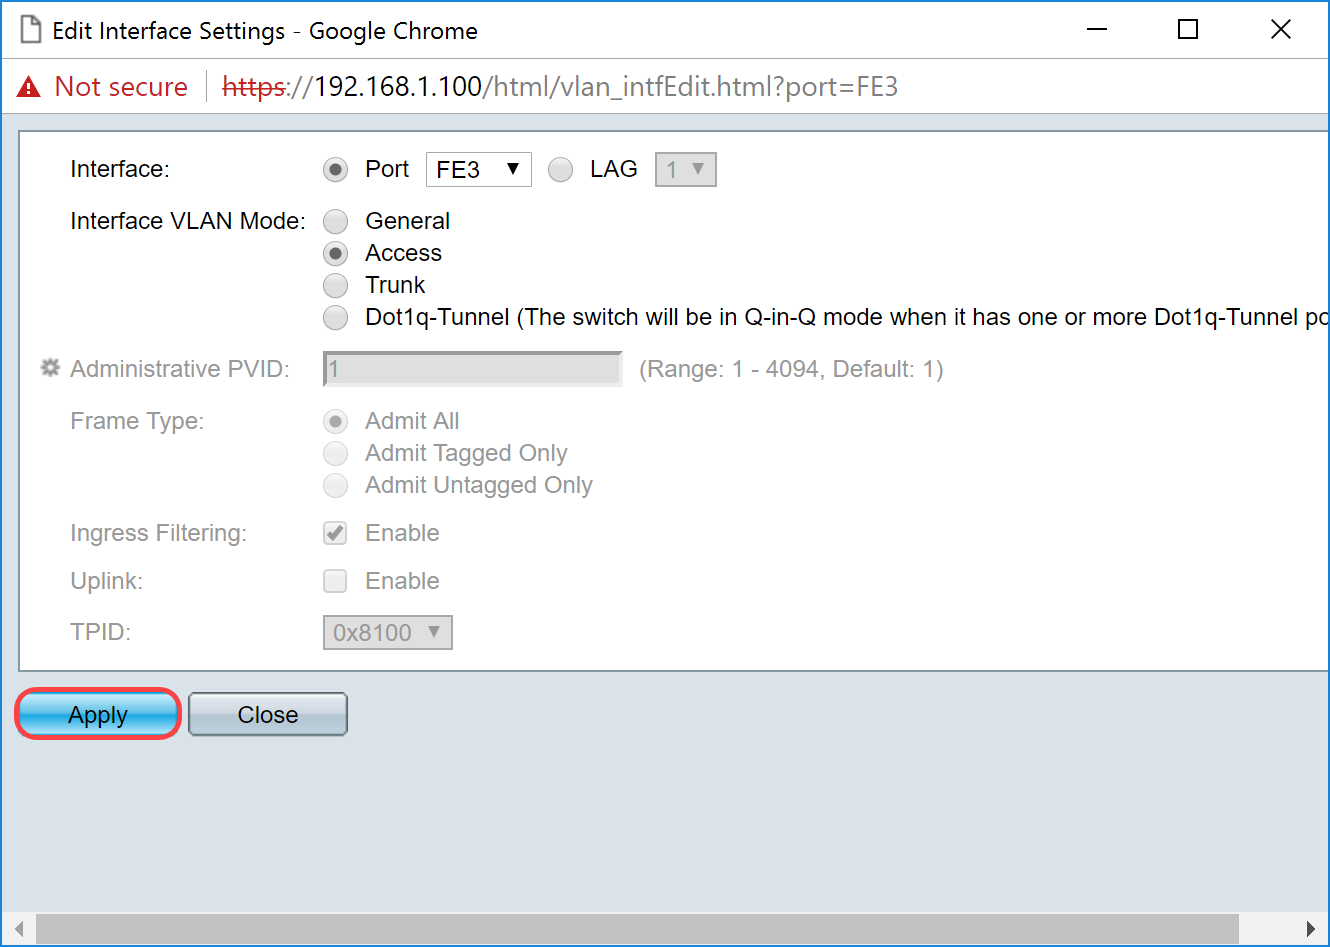
Configuring Port VLAN Membership on the Switch
Once the VLANs are created, you need to assign VLANs to the ports you wish to attach.
Step 1. Log in to the web configuration and navigate to VLAN Management > Port VLAN Membership.
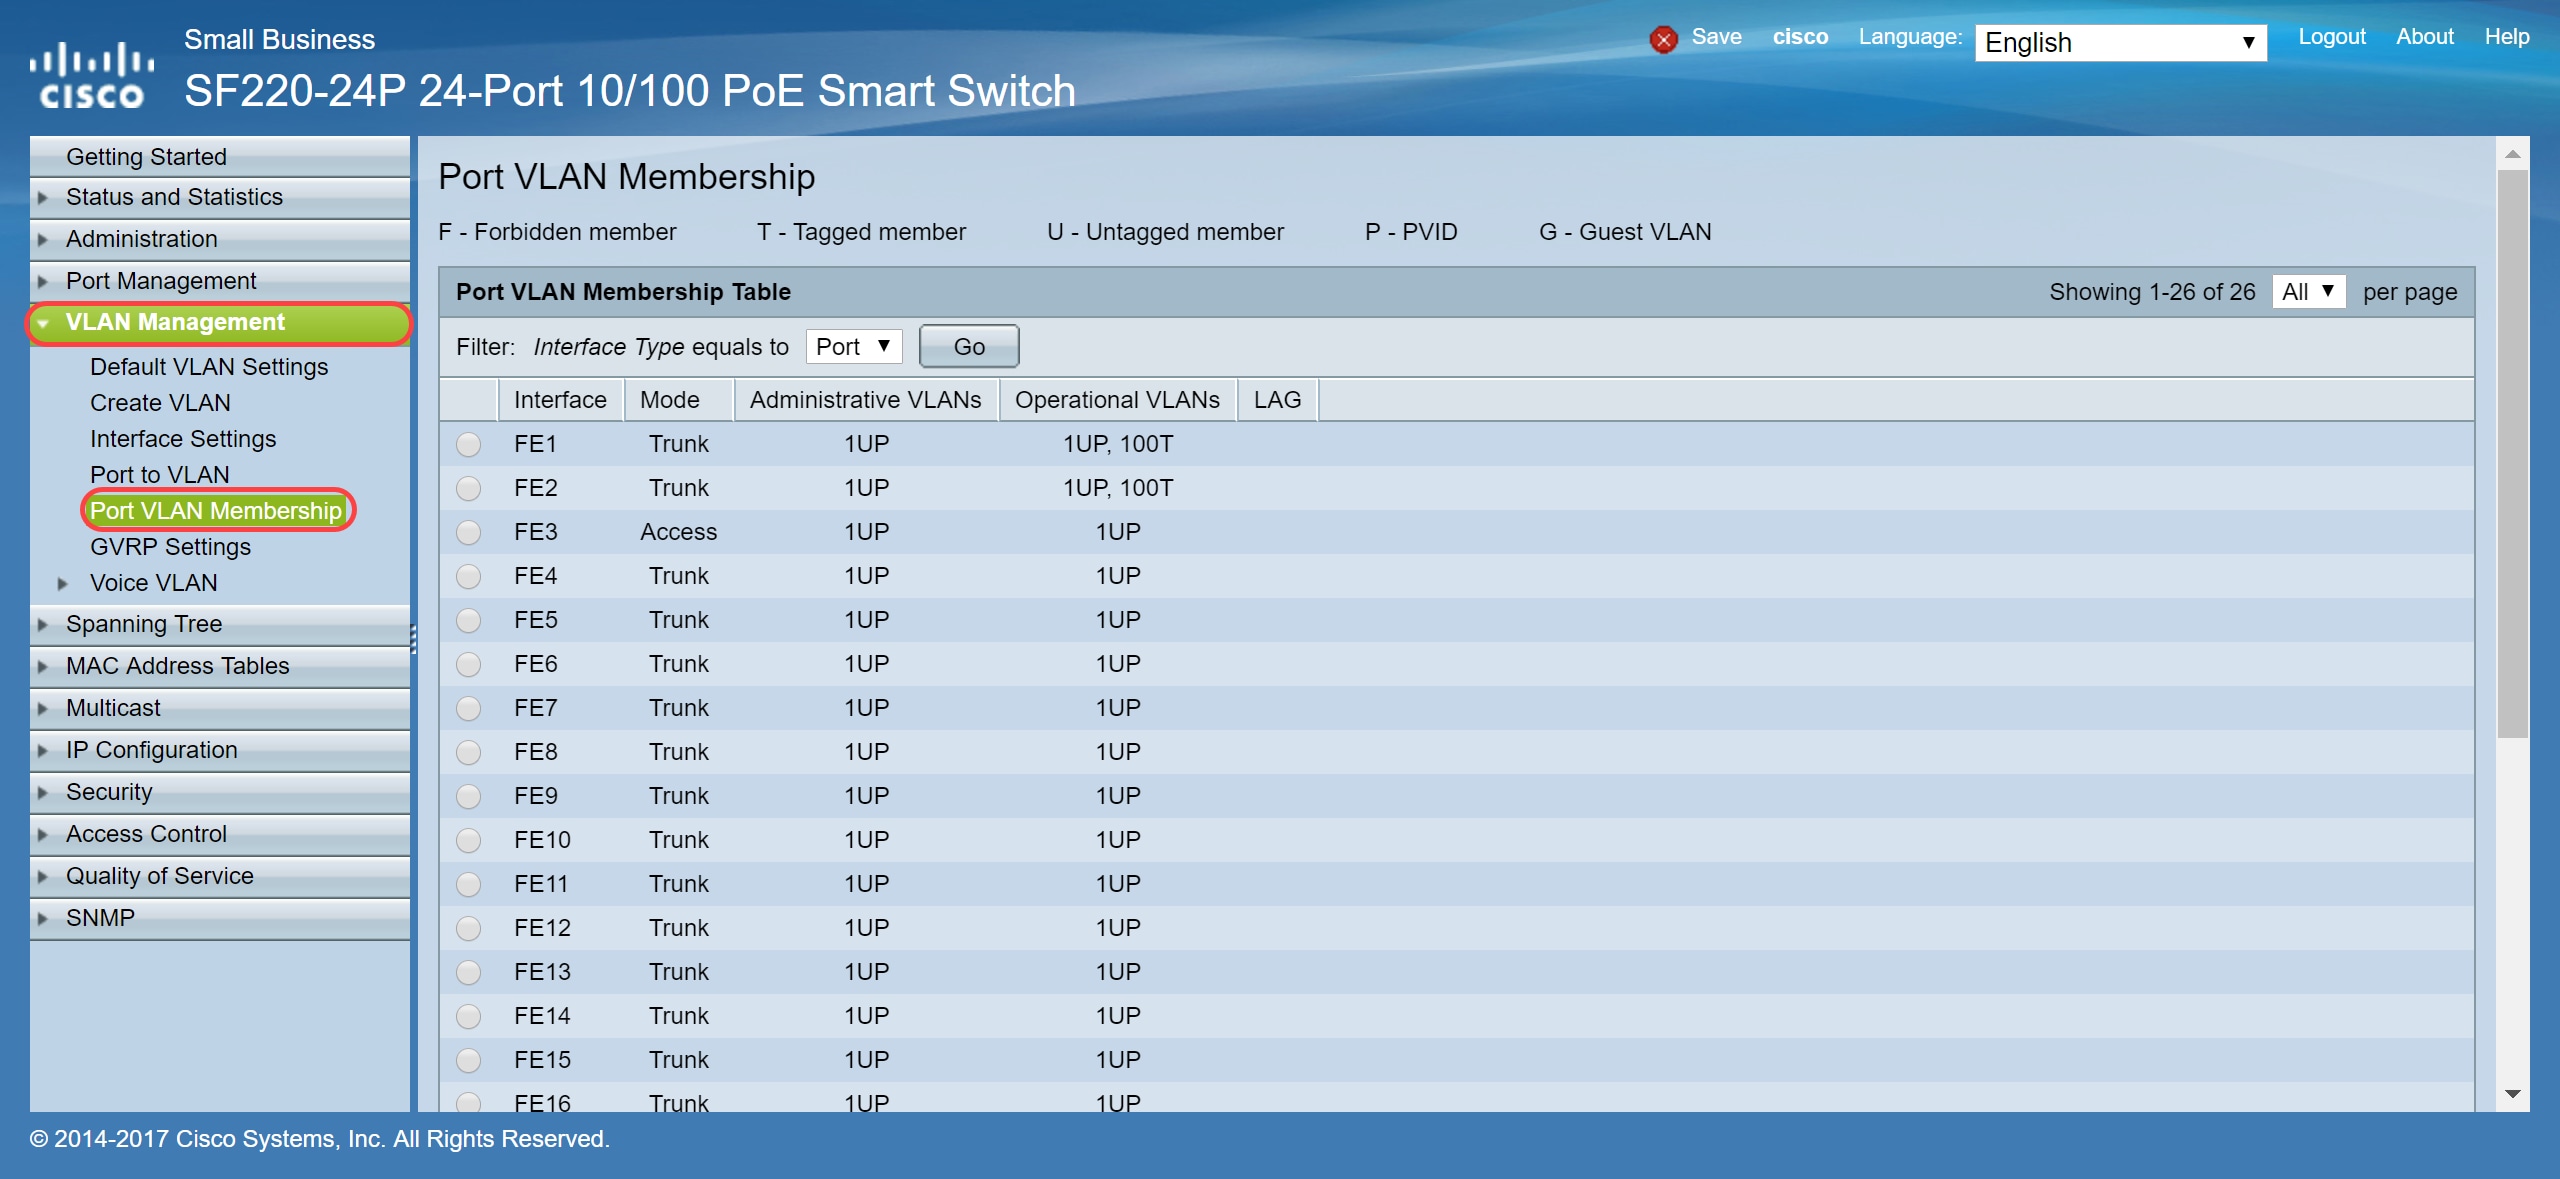
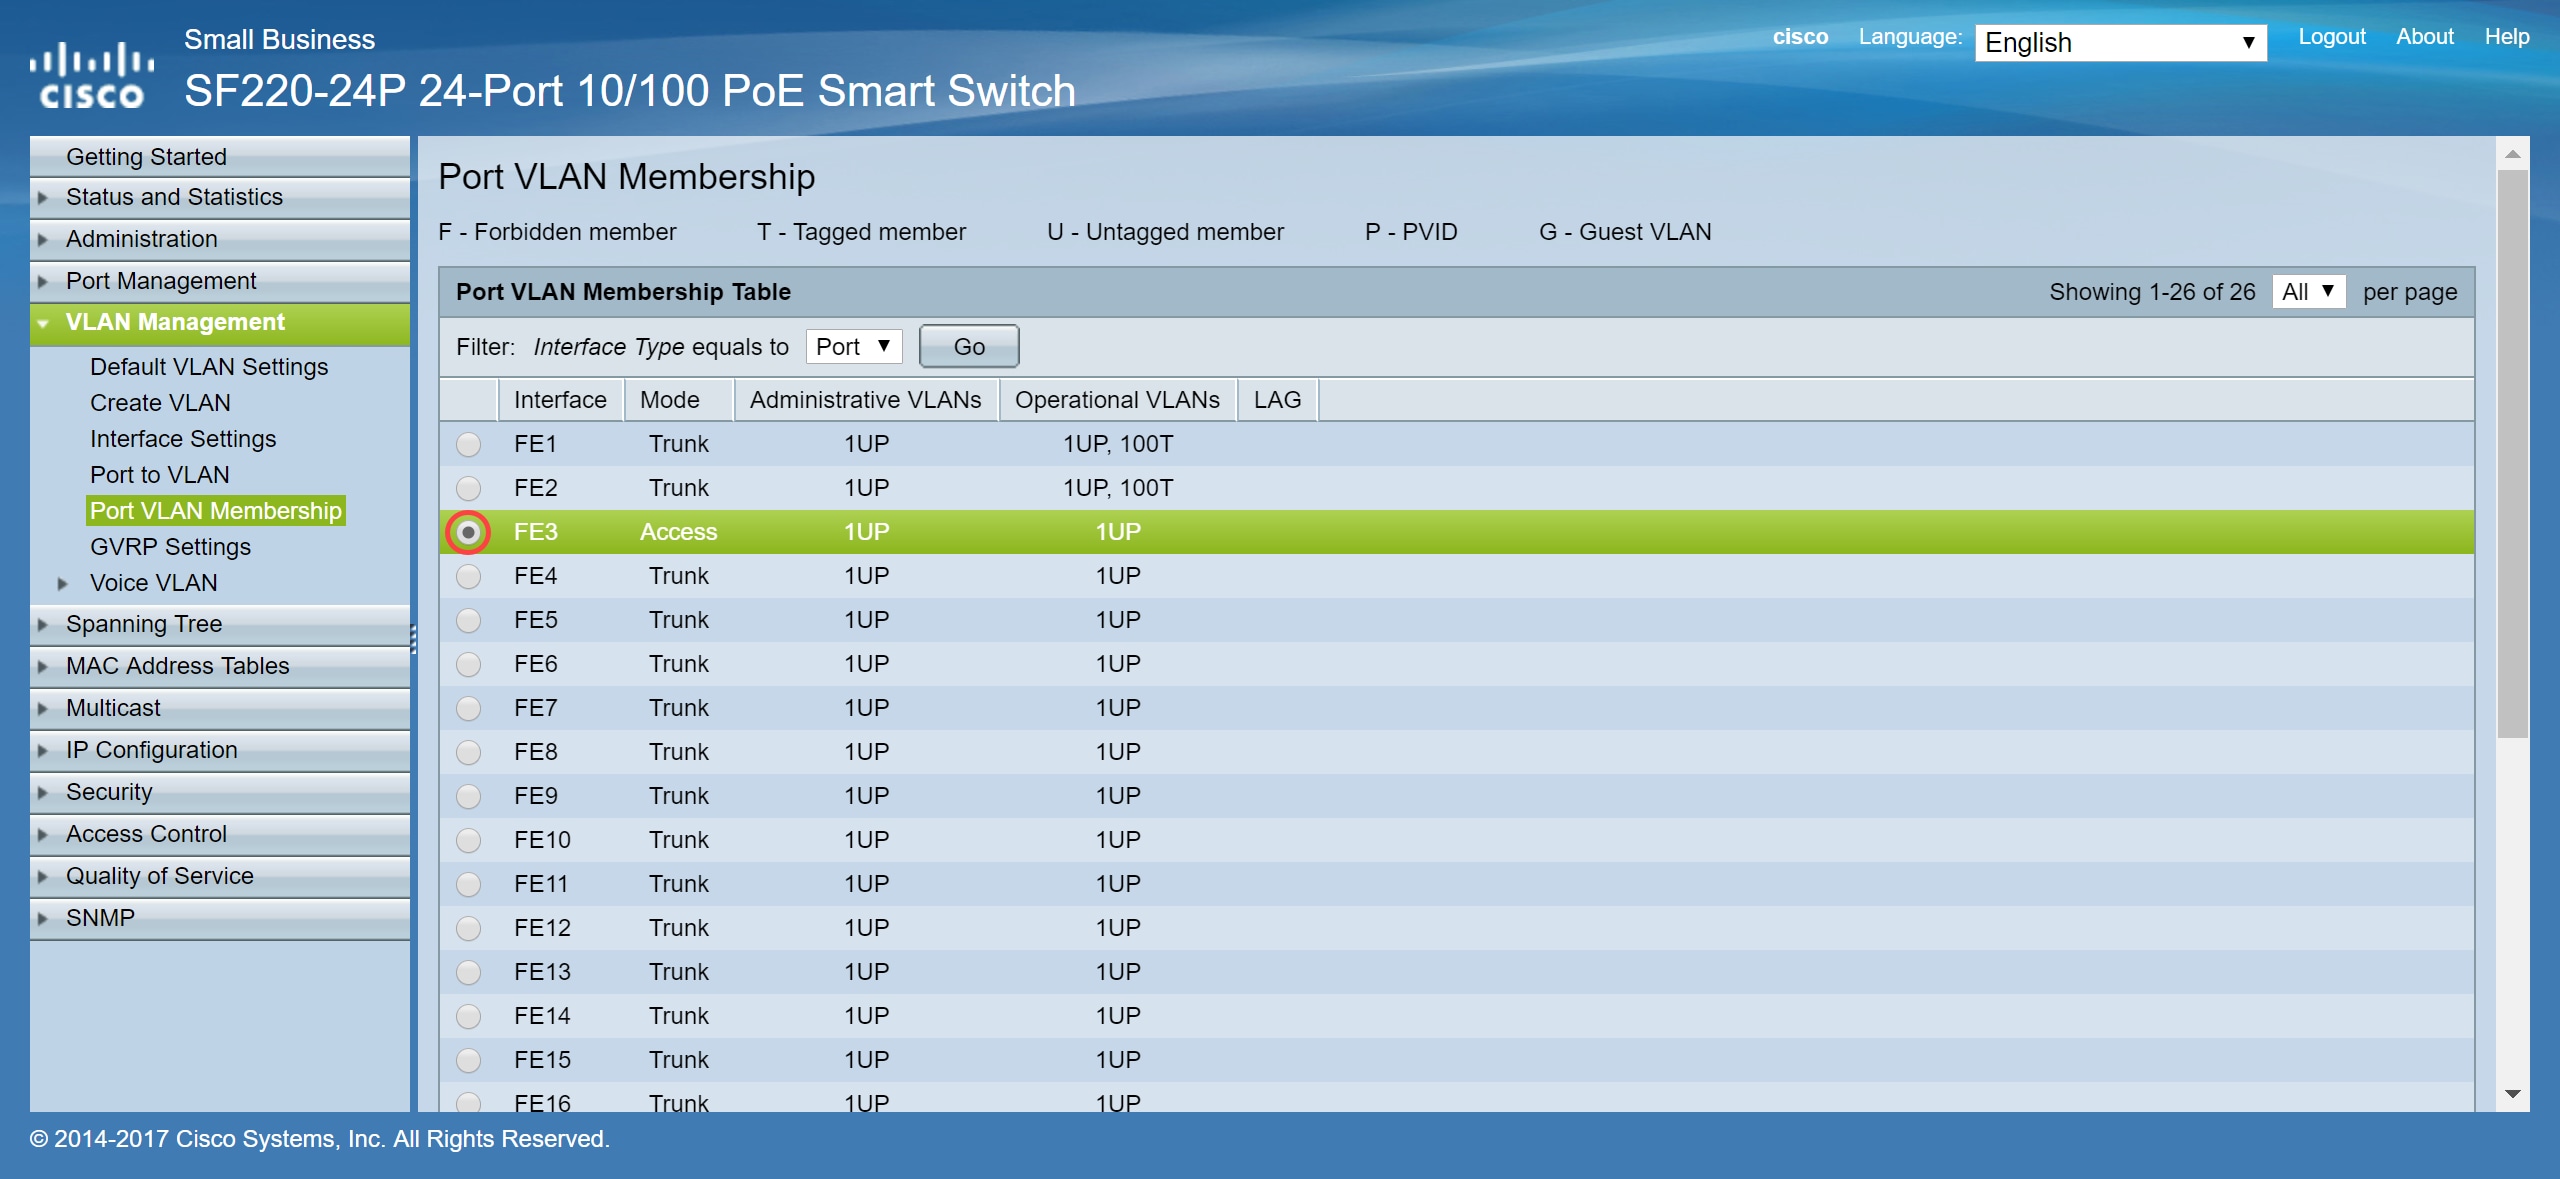
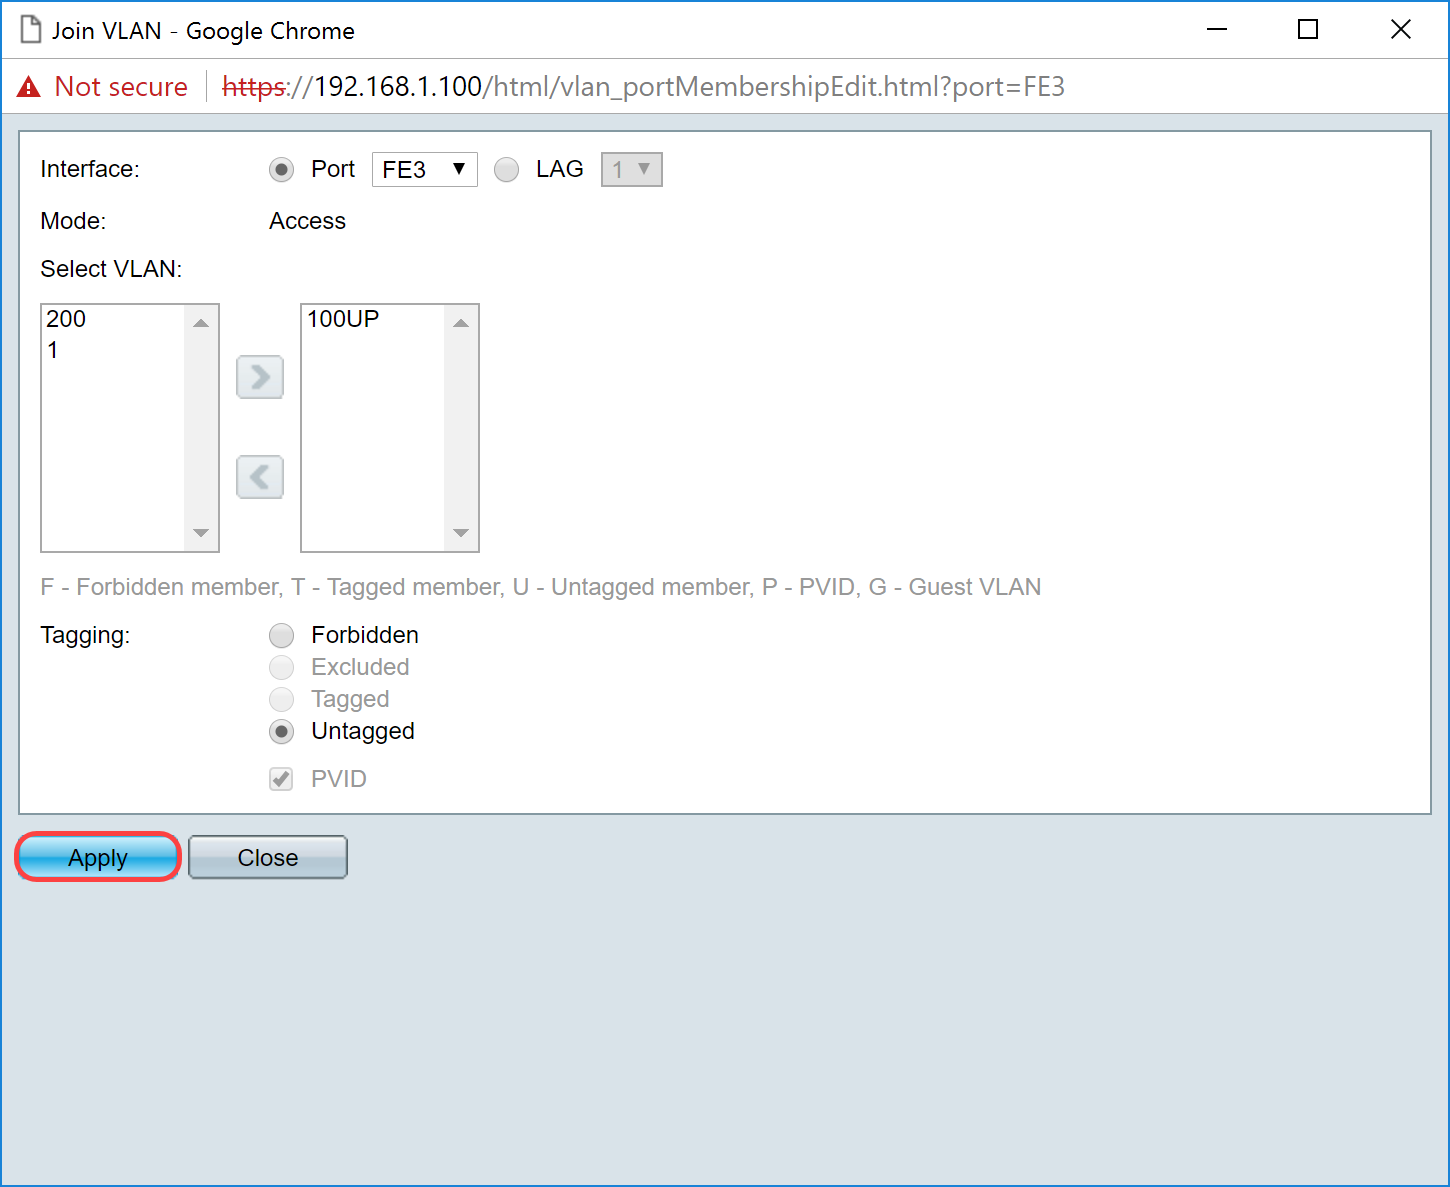
Step 2. In the Port VLAN Membership Table, select the interface that you want to configure the VLAN membership. In this example, we will be configuring the Raspberry Pi (Port: FE3) to be on VLAN 100.
Note: Any voice devices will already be configured to the voice VLAN that you have selected in the Setting Up Voice VLAN on the Switch section.
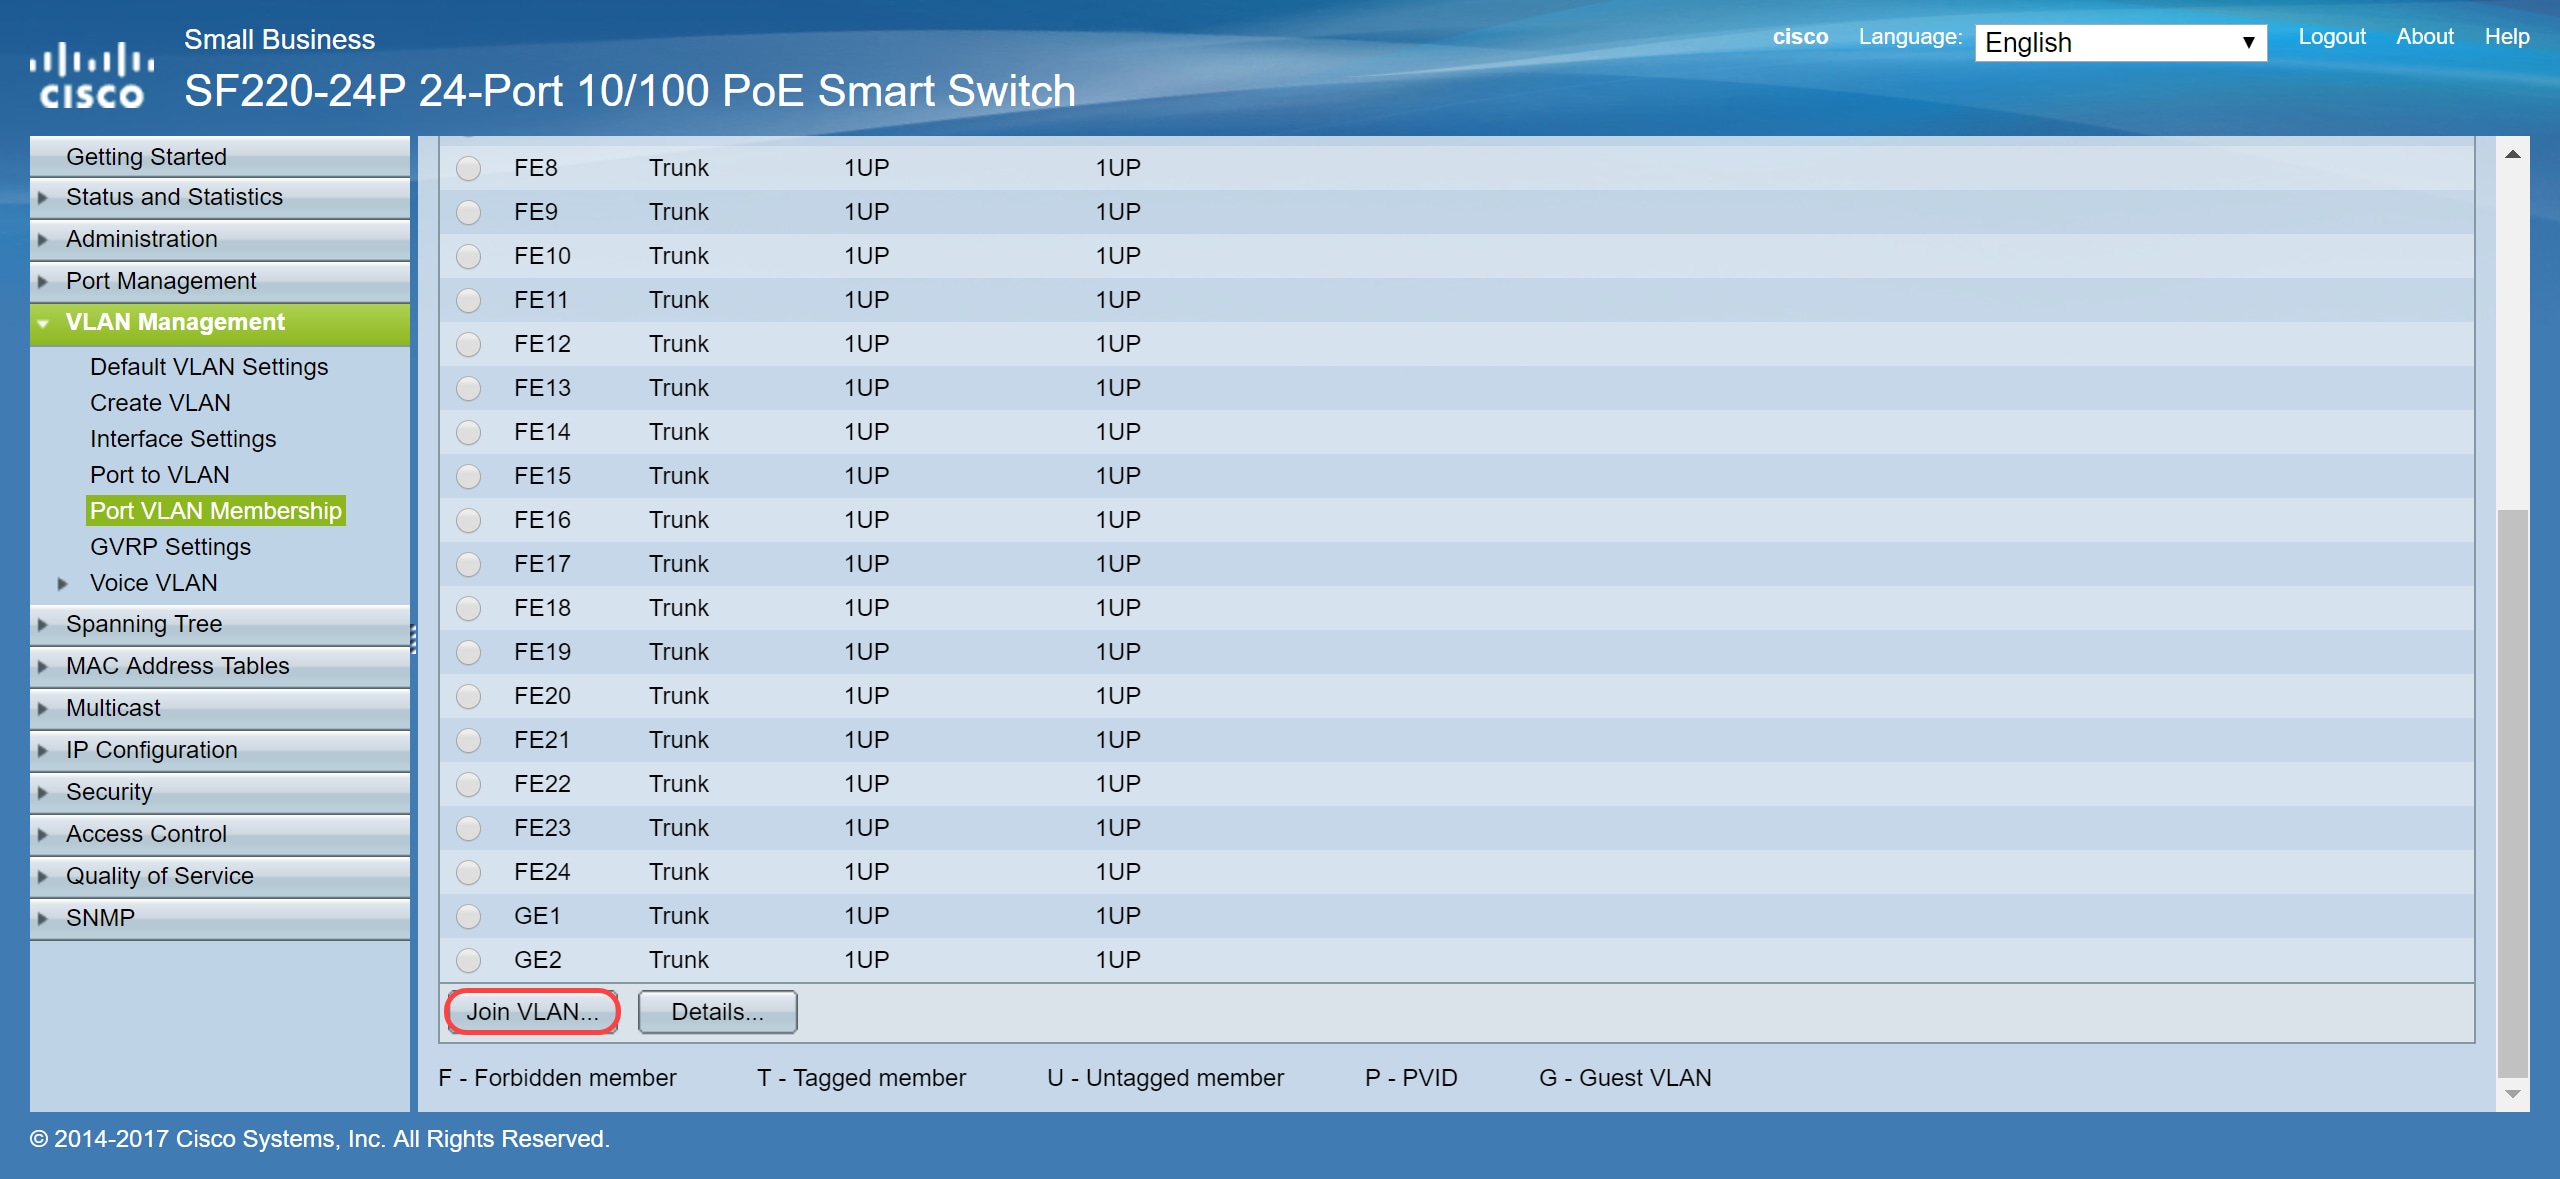
Step 3. Click Join VLAN... to modify the port that you want to configure VLANs.
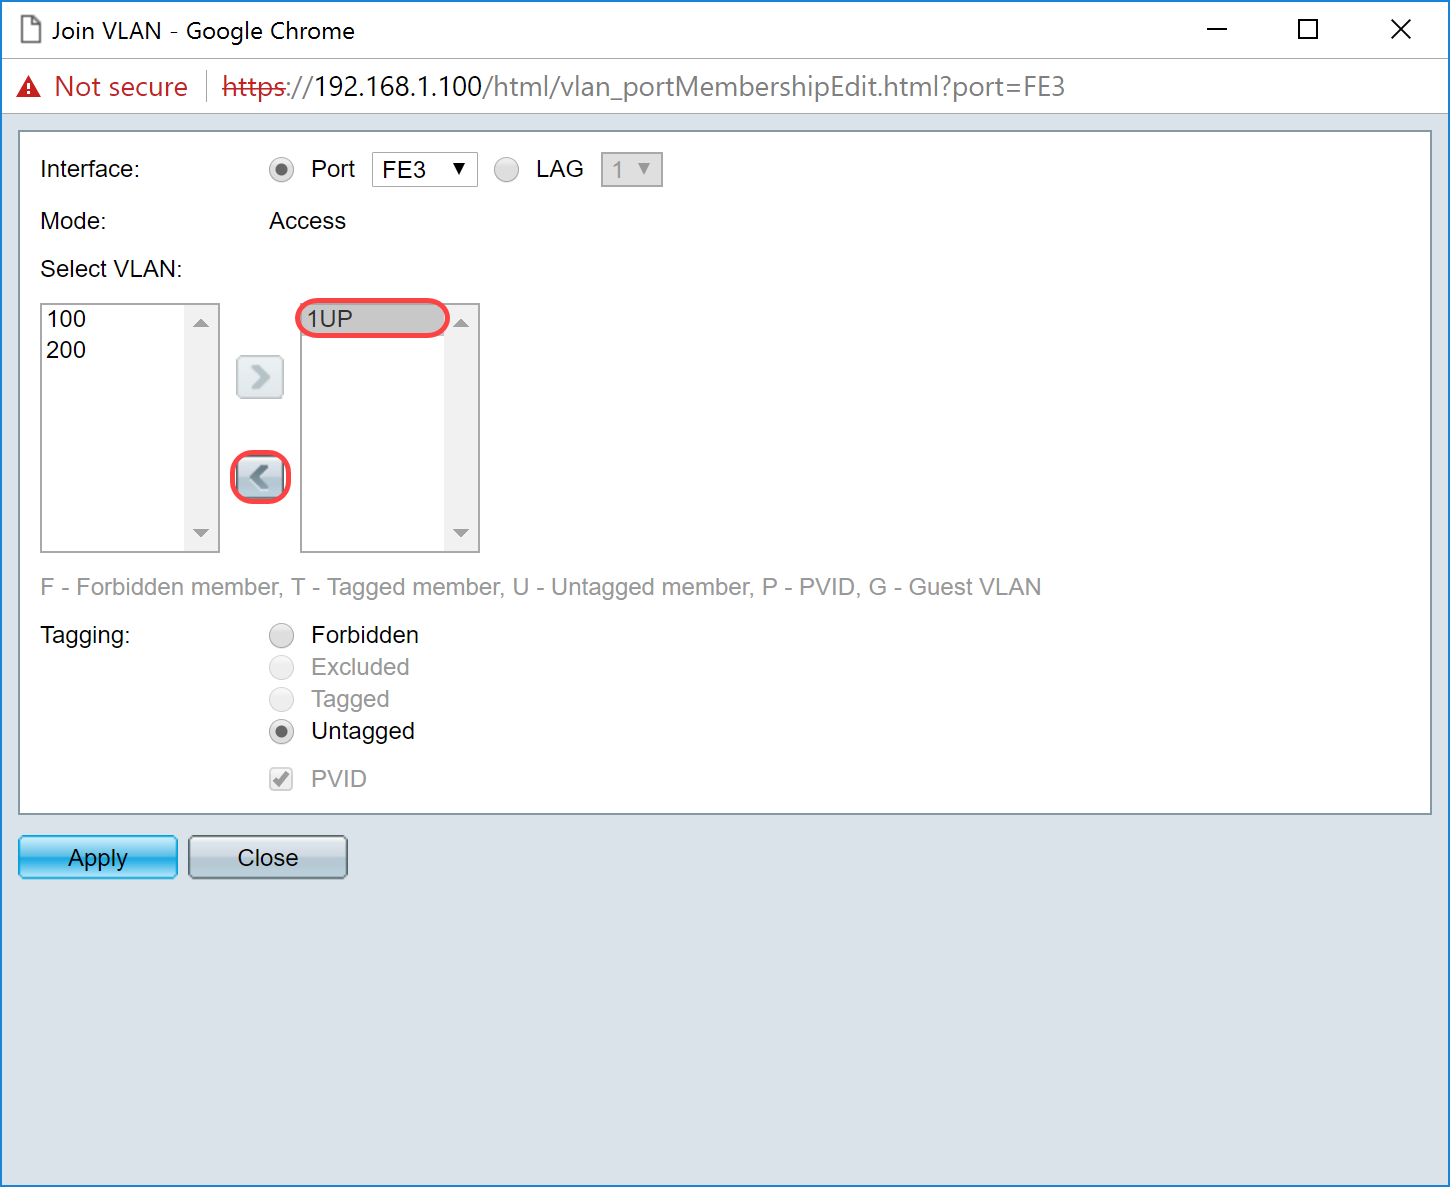
Step 4. Select 1UP and click the < to remove VLAN 1 from the interface in the Select VLAN section. Only 1 untagged VLAN can be added to the interface when it is an access port.
Step 5. Select 100 and click > to add the untagged VLAN to the interface.
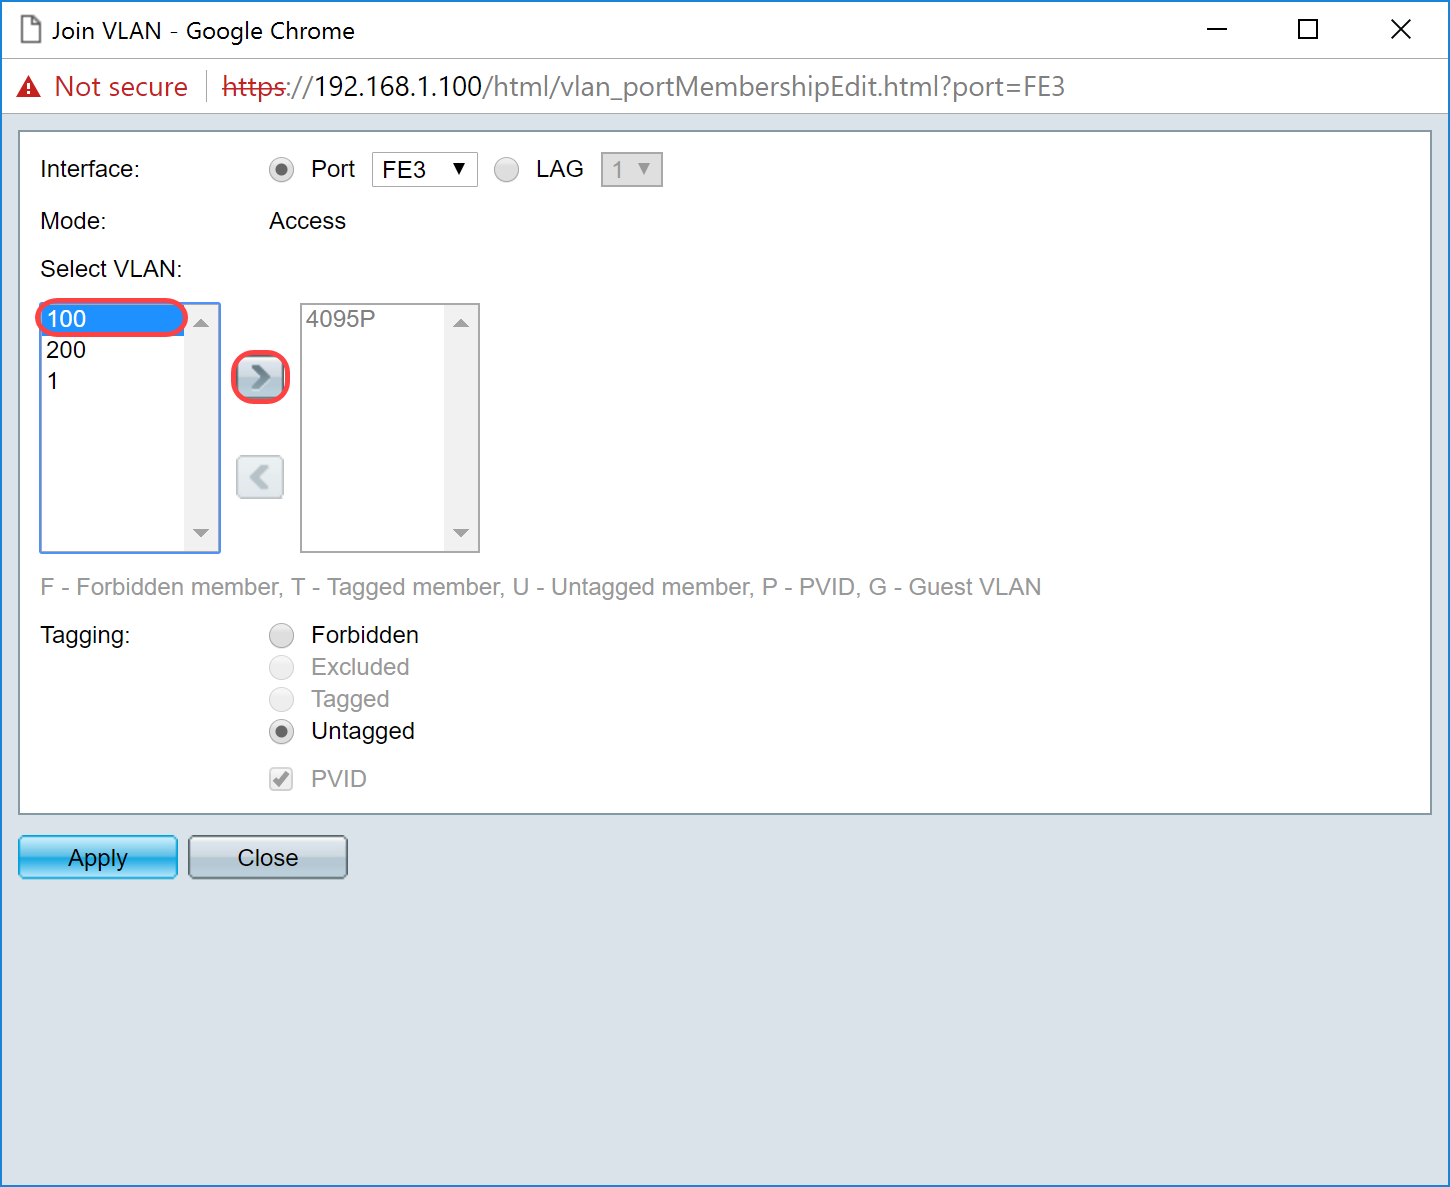
Step 6. Click Apply to save your settings.
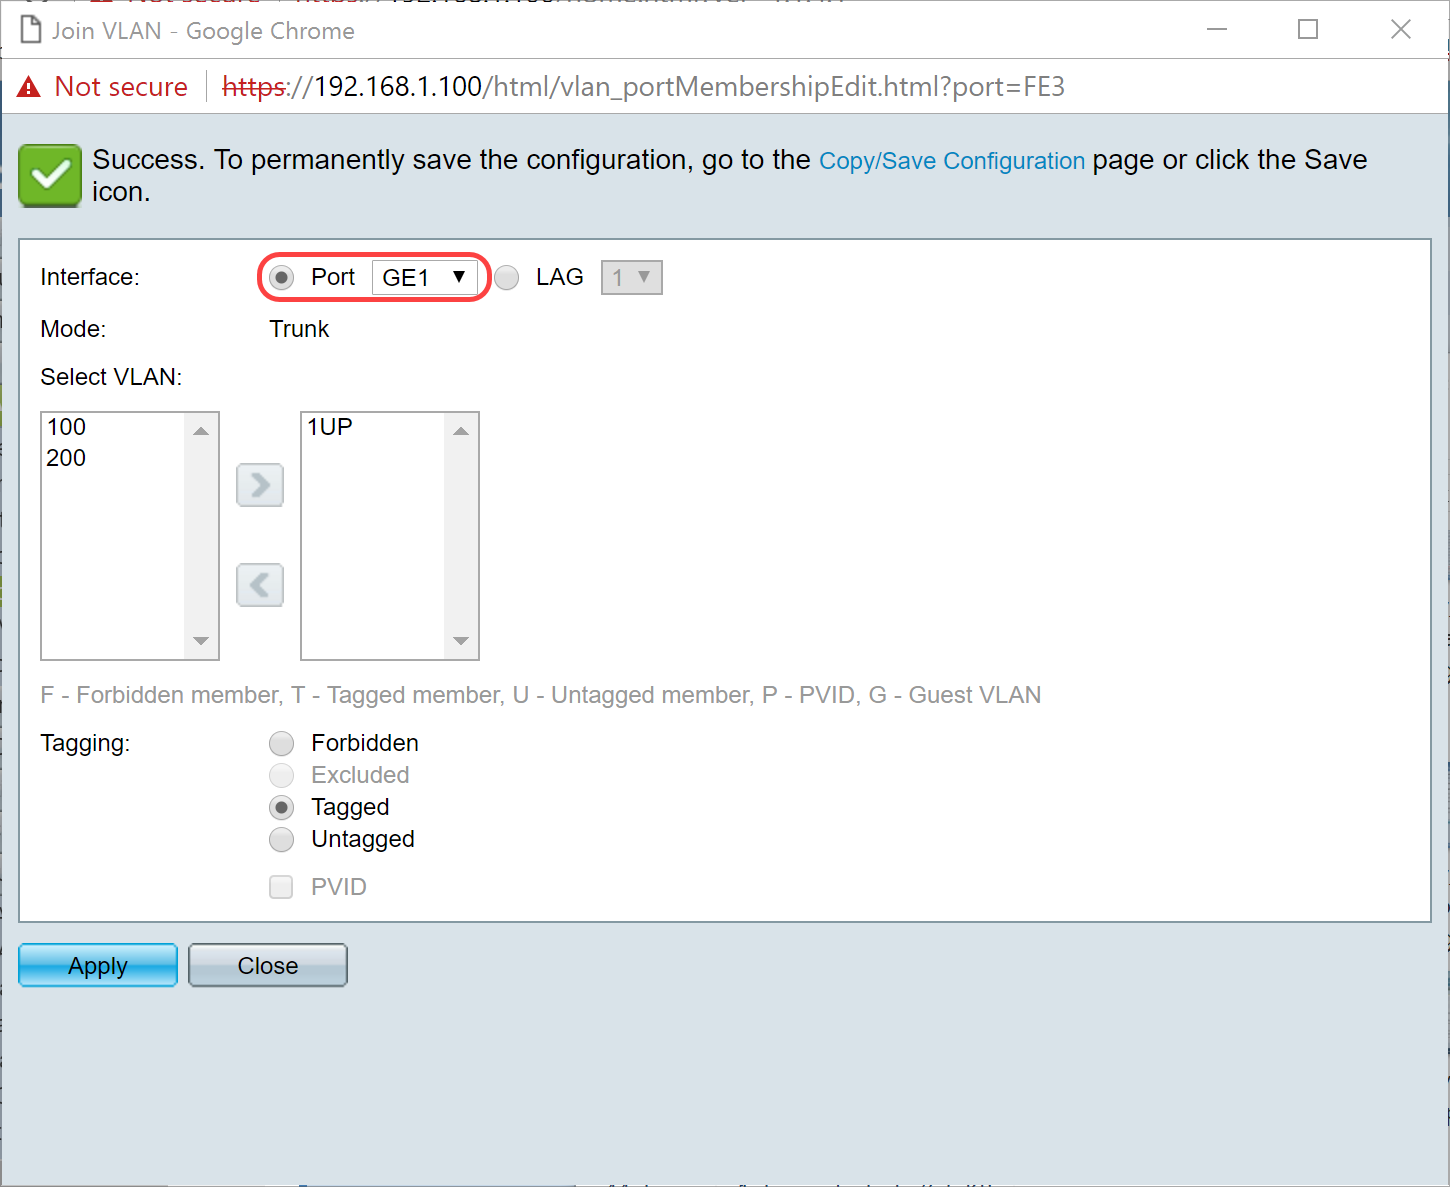
Step 7. Select the Interface port that is connected to the router in the Interface field. In this example, port GE1 is selected.
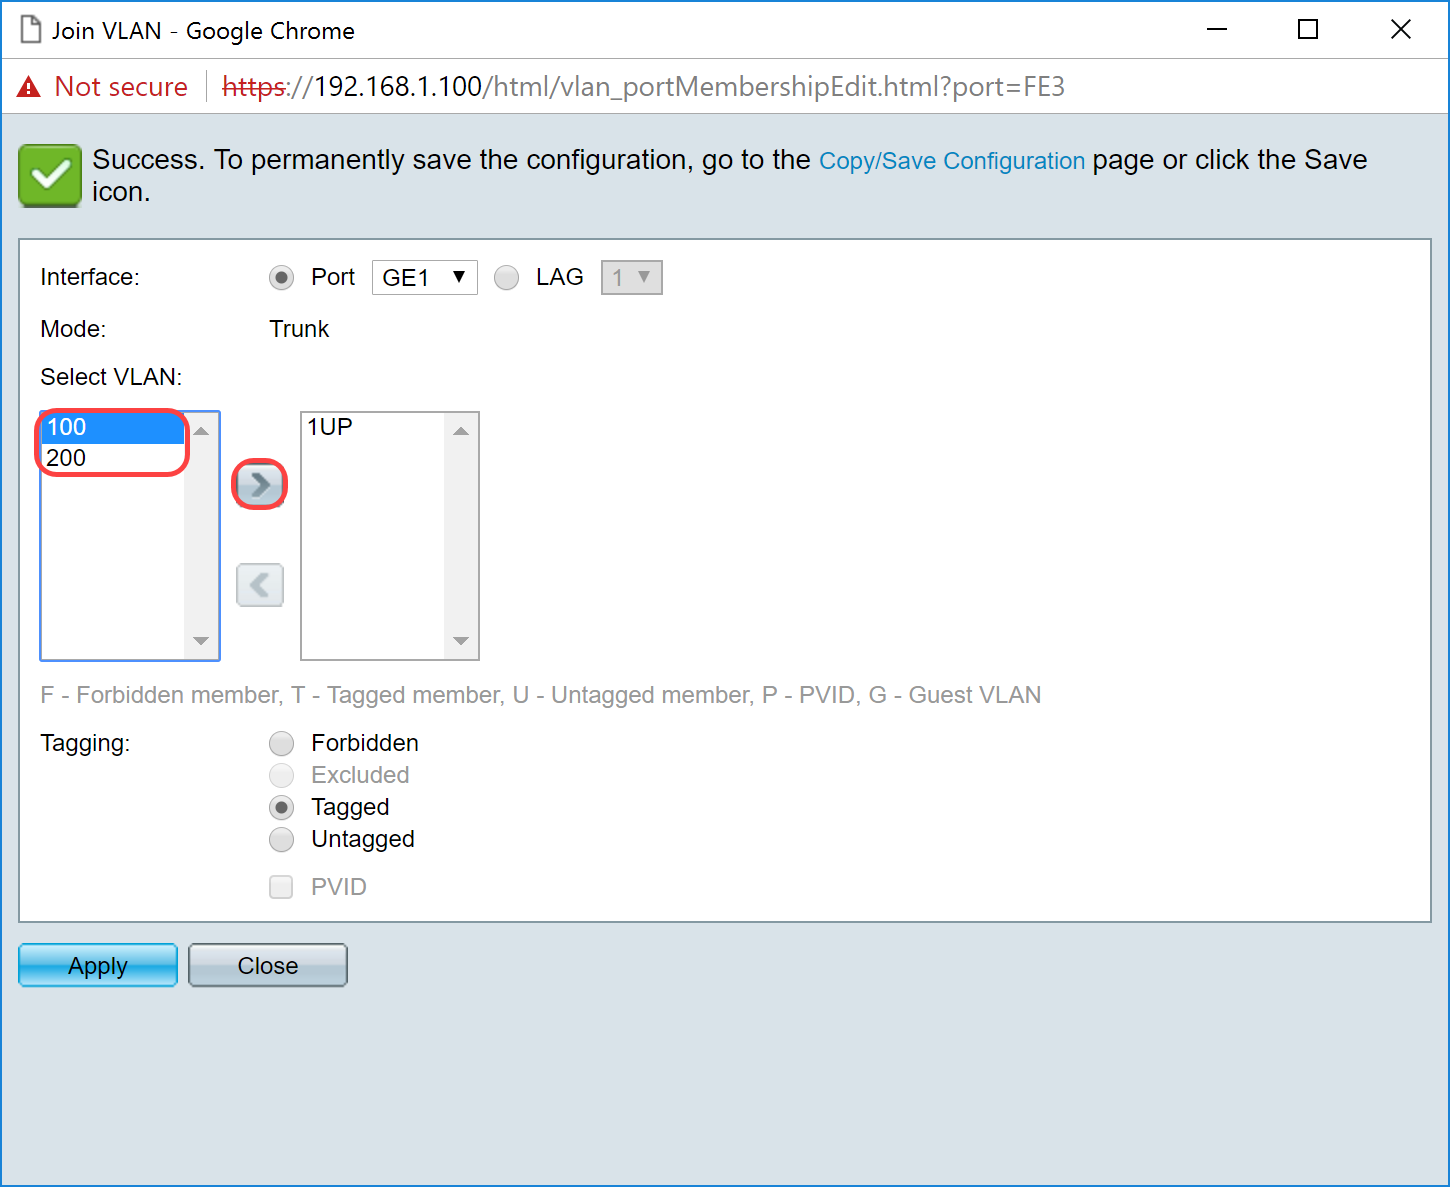
Step 8. Choose the VLAN that will be added to the selected interface and then click > to add them in the Select VLAN section. In this example, we will be selecting VLAN 100 and 200.
Step 9. Click Apply to save your settings.
Note: A reboot on the IP phones may be required in order for the IP address to change to the correct subnet.
Changing IP Address of Raspberry Pi to be on a Different Subnet
Step 1. Connect to your Raspberry Pi by Secure Shell (SSH) or connect your Raspberry Pi to a computer monitor. In this example, we will be using SSH to configure the Raspberry Pi.
Note: The port on the switch for your computer/laptop will need to be on the same VLAN as the Raspberry Pi and configured as an access port when setting up interface settings. Please see Configuring Interface Settings on a Switch and Configuring Port VLAN Membership on the Switch section of this article to review. Make sure that your IP address is on the same network as your Raspberry Pi in order to SSH into it. If your device is not on the same network as the Raspberry Pi, use a static IP address and manually change your IP address to be on the same network or you can type in the command ipconfig /release and ipconfig/renew in the command prompt to obtain a new IP address. SSH clients may vary depending on your operating system. In this example, PuTTY was used to SSH into the Raspberry Pi. For more details about SSH, click here.
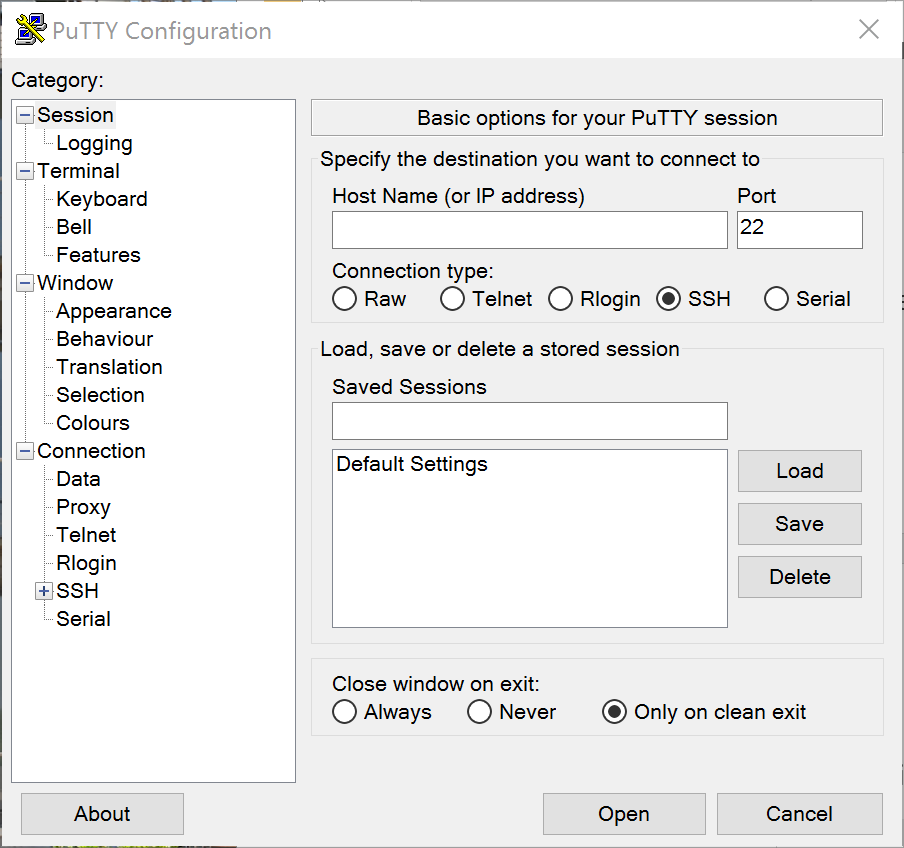
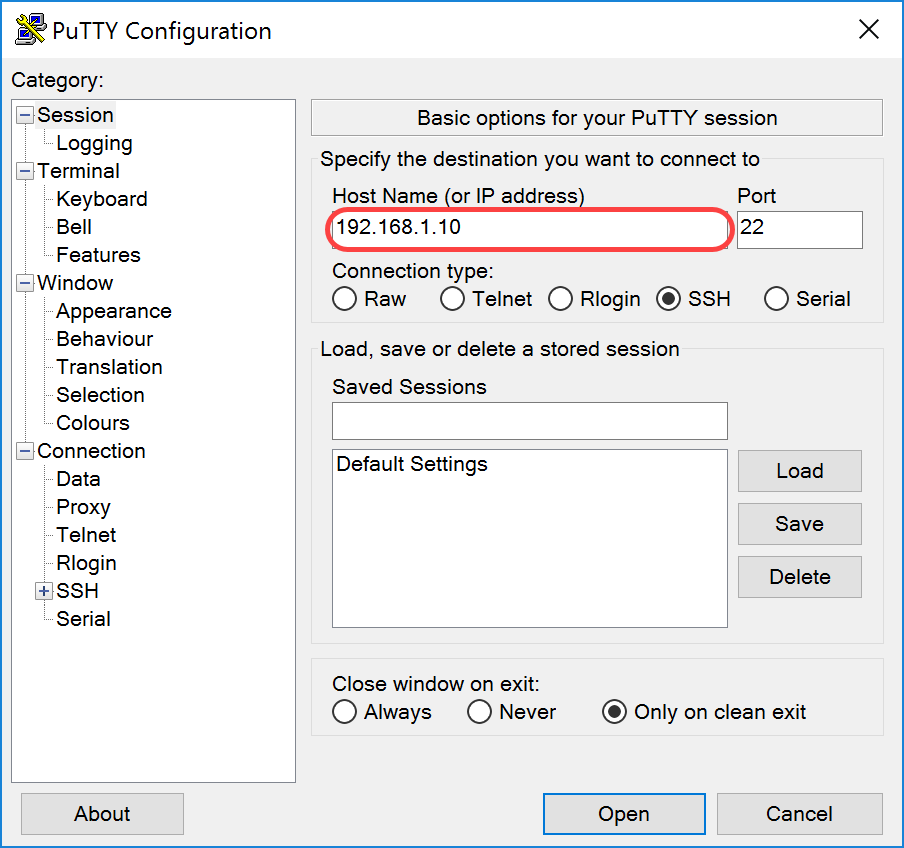
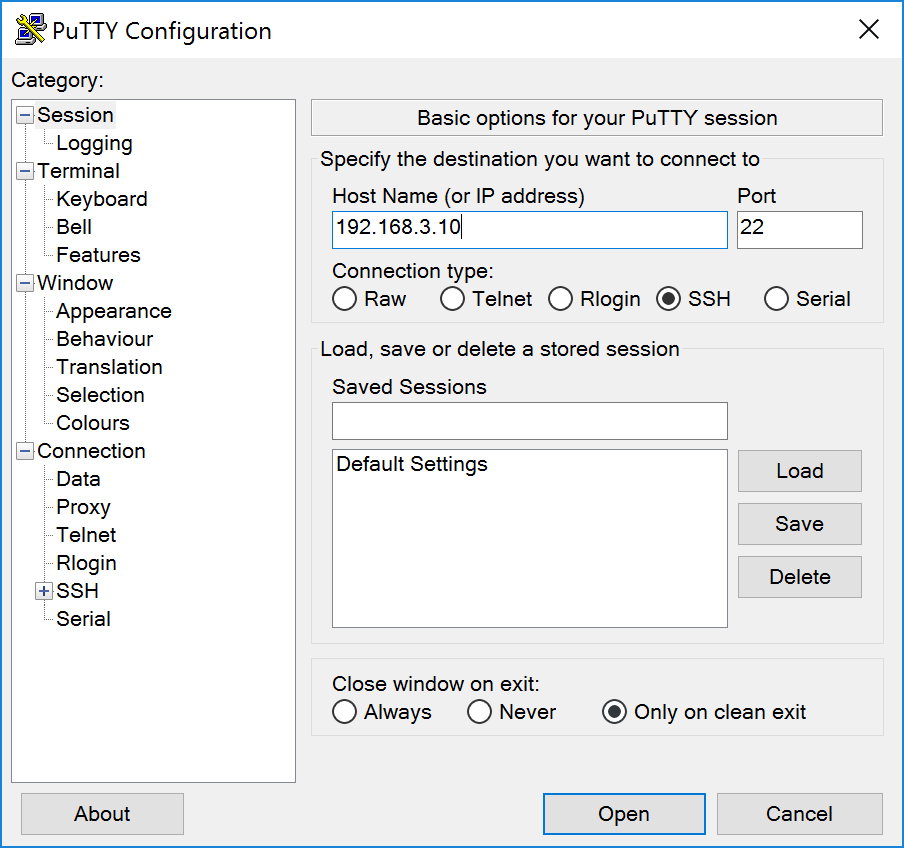
Step 2. Type in the IP address of your Raspberry Pi in the Host Name (or IP address) field. In this example, 192.168.1.10 is entered.
Note: You can use DHCP table in the router to find the address of the Raspberry Pi. In this document, this Raspberry Pi was preconfigured to have a static IP address.
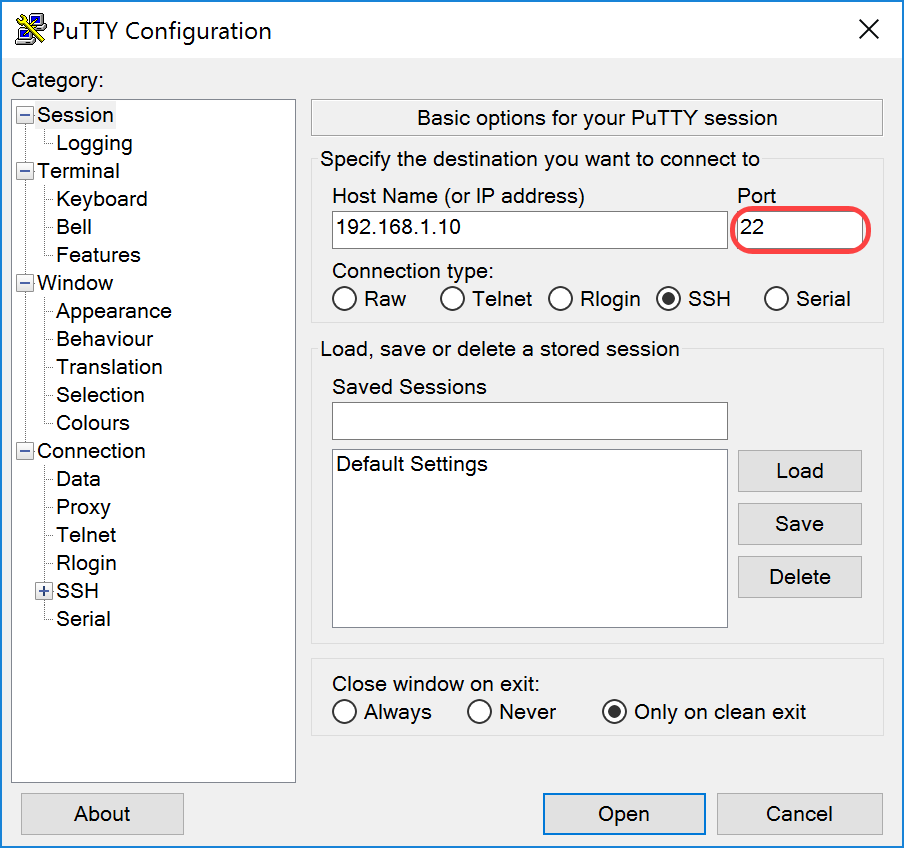
Step 3. Enter 22 as the port number in the Port field. Port 22 is the standard port for SSH protocol.
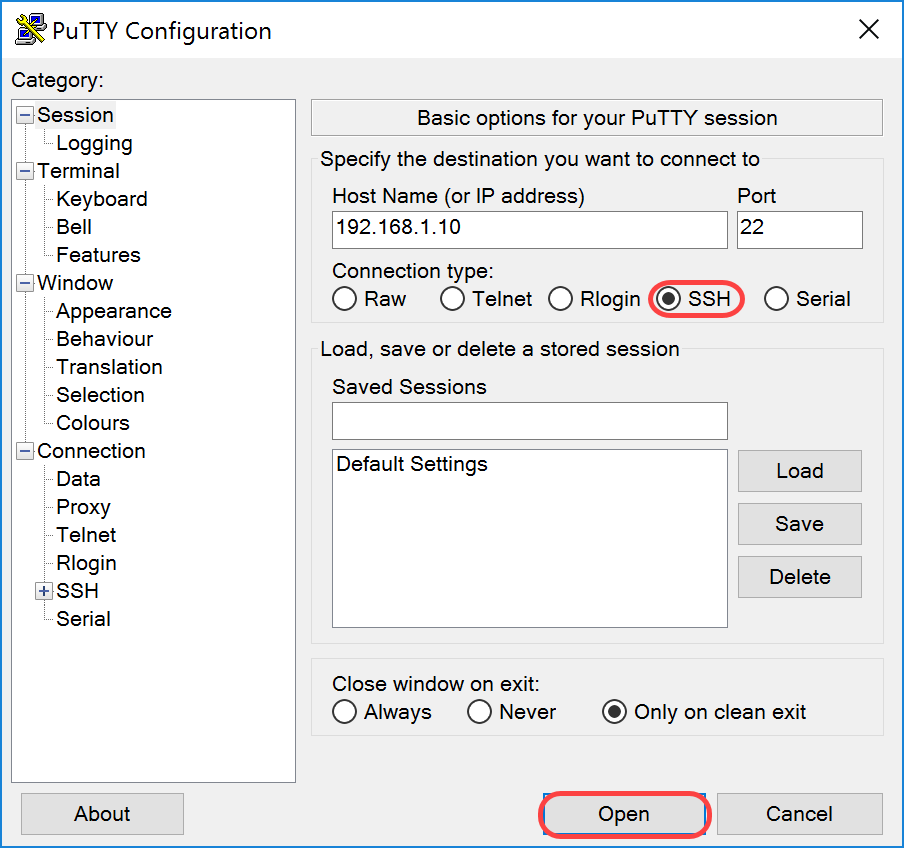
Step 4. In the Connection type: section, click the SSH radio button to choose SSH as your method of connection with the switch. Then click Open to start the session.
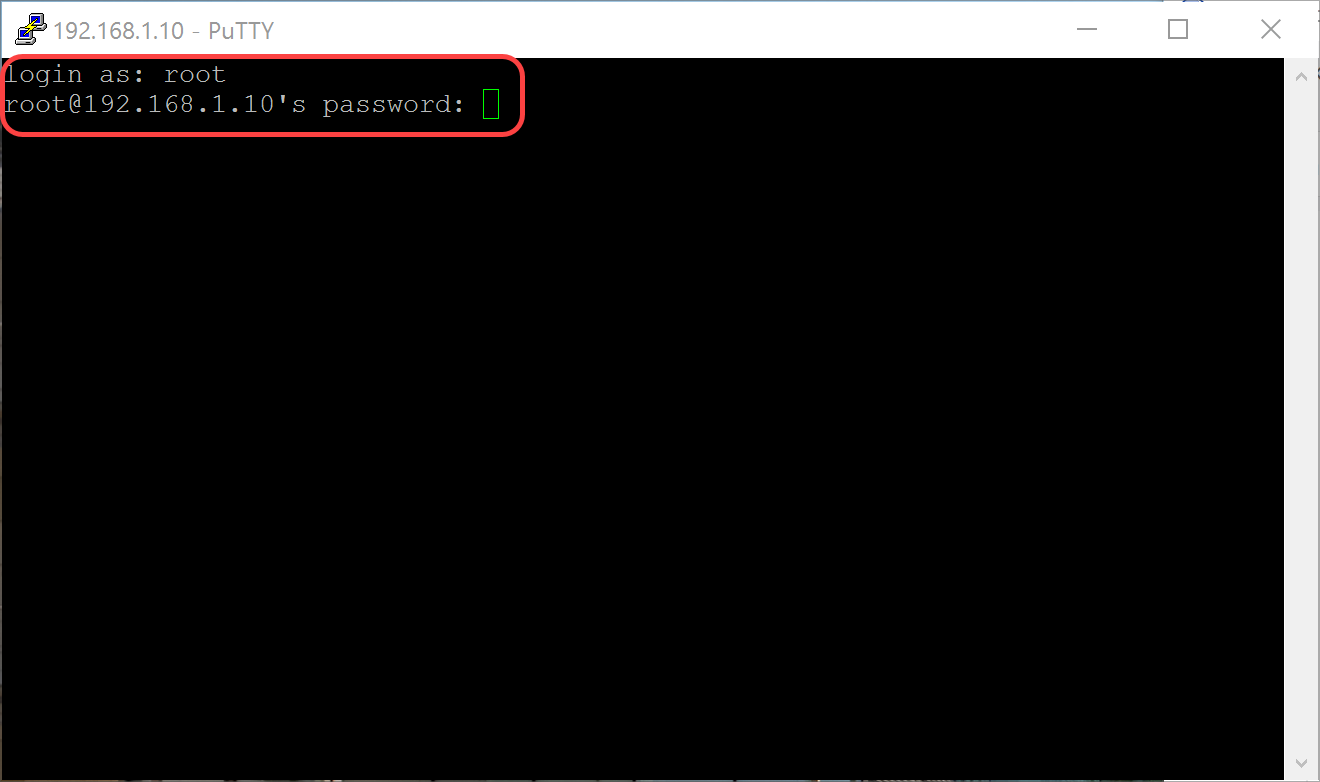
Step 5. Enter the username and password of the RasPBX in the login as and password field.
Note: The default user: root and the default password: raspberry
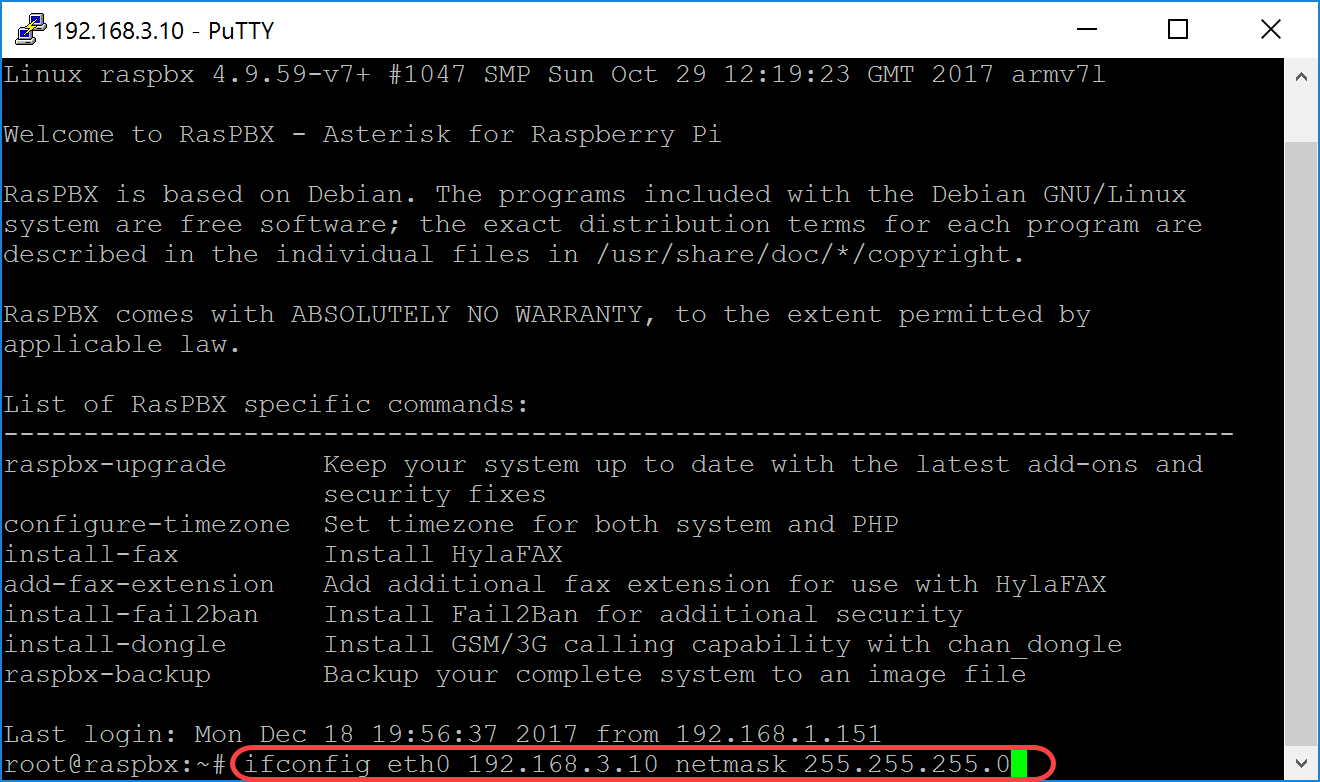
Step 6. To change the IP address of your Ethernet to be a static IP address, type in ifconfig eth0 [IP address] netmask [netmask]. In this example, we will be using 192.168.3.10 and the netmask of 255.255.255.0
ifconfig eth0 192.168.3.10 netmask 255.255.255.0
Note: You will be disconnected from the session when you change the IP address. In order to connect back to the Raspberry Pi, your computer/laptop needs to be on the same subnet as the Raspberry Pi (192.168.3.x).
Step 7. Connect back to your Raspberry Pi using the static IP address that was configured in step 6. In this example, we use 192.168.3.10 to connect back.
Note: Make sure that your computer/laptop is on the same subnet as the Raspberry Pi as well as the VLAN. If your computer/laptop is on the same VLAN as the Raspberry Pi and you don't have the correct IP address, you can go to your command prompt and type in ipconfig /release and then ipconfig /renew to request a new IP address or you can configure your device to have a static IP address in the Ethernet properties.
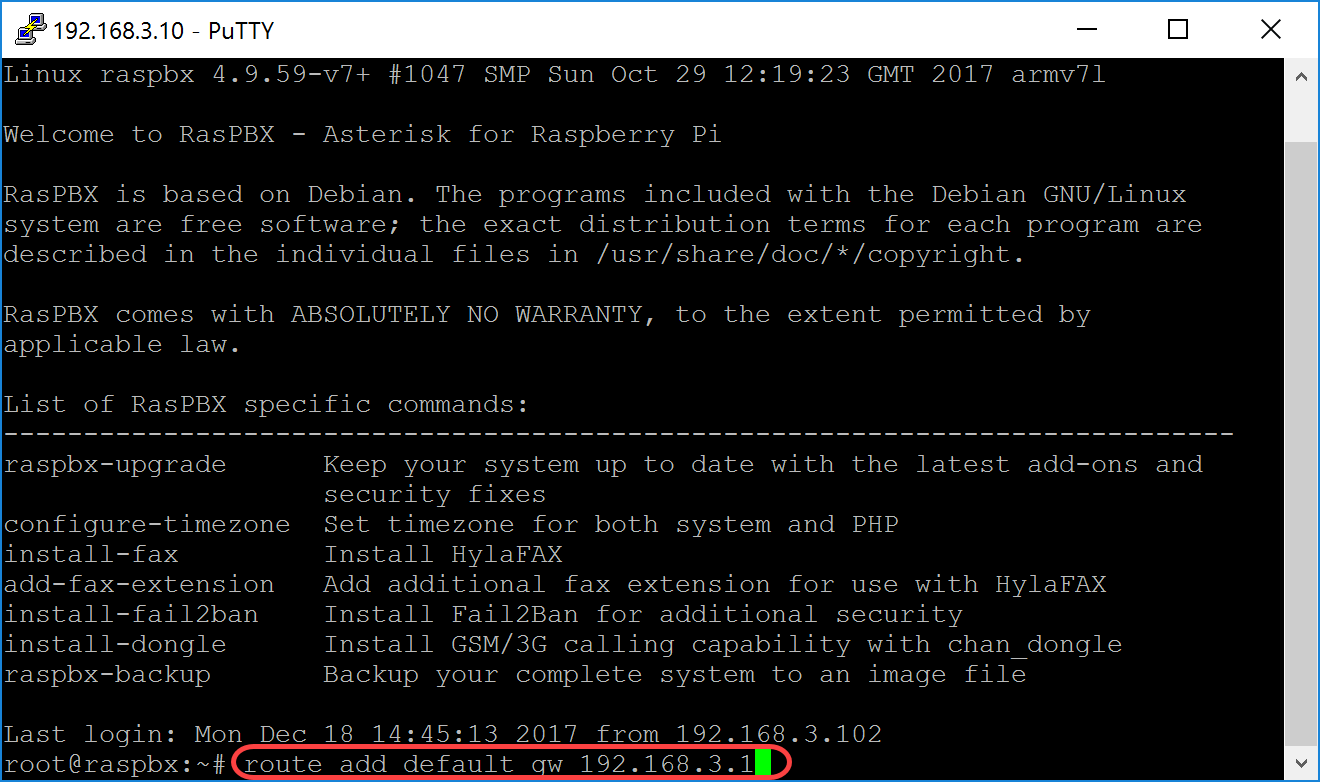
Step 8. In the command line, type in route add default gw [Router IP address of subnet] to add a default gateway.
Note: you can use the command route to see the routing table.
route add default gw 192.168.3.1
Conclusion
You should now have successfully set up a basic voice network. To verify this, pick up one of the SPA/MPP phones and you should hear a dial tone. In this document, one of the SPA/MPP phones has the extension 1002 and the other one has 1003. You should be able to call the extension 1003 when using extension 1002 SPA/MPP phone.
Histórico de revisões
| Revisão | Data de publicação | Comentários |
|---|---|---|
1.0 |
12-Dec-2018 |
Versão inicial |
 Feedback