配置IOx包签名验证
下载选项
非歧视性语言
此产品的文档集力求使用非歧视性语言。在本文档集中,非歧视性语言是指不隐含针对年龄、残障、性别、种族身份、族群身份、性取向、社会经济地位和交叉性的歧视的语言。由于产品软件的用户界面中使用的硬编码语言、基于 RFP 文档使用的语言或引用的第三方产品使用的语言,文档中可能无法确保完全使用非歧视性语言。 深入了解思科如何使用包容性语言。
关于此翻译
思科采用人工翻译与机器翻译相结合的方式将此文档翻译成不同语言,希望全球的用户都能通过各自的语言得到支持性的内容。 请注意:即使是最好的机器翻译,其准确度也不及专业翻译人员的水平。 Cisco Systems, Inc. 对于翻译的准确性不承担任何责任,并建议您总是参考英文原始文档(已提供链接)。
目录
简介
本文档详细描述如何在IOx平台上创建和使用签名软件包。
先决条件
要求
Cisco 建议您了解以下主题:
- 基本Linux知识
- 了解证书的工作原理
使用的组件
本文档中的信息基于以下软件和硬件版本:
- 为IOx配置的支持IOx的设备:
- 已配置IP地址
- 运行的访客操作系统(GOS)和思科应用框架(CAF)
- 为访问CAF(端口8443)配置的网络地址转换(NAT)
- 安装了开放式安全套接字层(SSL)的Linux主机
- IOx客户端安装文件,可从以下网址下载:https://software.cisco.com/download/release.html?mdfid=286306005&softwareid=286306762
本文档中的信息都是基于特定实验室环境中的设备编写的。本文档中使用的所有设备最初均采用原始(默认)配置。如果您使用的是真实网络,请确保您已经了解所有命令的潜在影响。
背景信息
自IOx发布以来,支持AC5应用包签名。此功能可确保应用程序包有效,并且设备上安装的软件包是从受信任源获取的。如果在平台中启用应用包签名验证,则只能部署已签名的应用。
配置
使用包签名验证需要执行以下步骤:
- 创建证书颁发机构(CA)密钥和证书。
- 生成用于IOx的信任锚点。
- 在IOx设备上导入信任锚点。
- 创建应用特定密钥和证书签名请求(CSR)。
- 使用CA对应用特定证书进行签名。
- 打包您的IOx应用,使用应用特定证书对其进行签名。
- 将已签名的IOx软件包部署到启用签名的设备上。
注意:本文在生产场景中使用自签名CA。最佳选择是使用官方CA或您公司的CA进行签名。
注意:CA、密钥和签名的选项仅用于实验目的,可能需要根据您的环境进行调整。
步骤1.创建CA密钥和证书
第一步是创建您自己的CA。只需为CA生成密钥和为该密钥生成证书即可:
要生成CA密钥,请执行以下操作:
[jedepuyd@KJK-SRVIOT-10 signing]$ openssl genrsa -out rootca-key.pem 2048
Generating RSA private key, 2048 bit long modulus
.........................................................................................+++
.......+++
e is 65537 (0x10001)
要生成CA证书,请执行以下操作:
[jedepuyd@KJK-SRVIOT-10 signing]$ openssl req -x509 -new -nodes -key rootca-key.pem -sha256 -days 4096 -out rootca-cert.pem
You are about to be asked to enter information that is incorporated
into your certificate request.
What you are about to enter is what is called a Distinguished Name (DN).
There are quite a few fields but you can leave some blank
For some fields there can be a default value,
If you enter '.', the field can be left blank.
-----
Country Name (2 letter code) [XX]:BE
State or Province Name (full name) []:WVL
Locality Name (eg, city) [Default City]:Kortrijk
Organization Name (eg, company) [Default Company Ltd]:Cisco
Organizational Unit Name (eg, section) []:IOT
Common Name (eg, your name or your server's hostname) []:ioxrootca
Email Address []:
必须调整CA证书中的值以匹配您的使用案例。
步骤2.生成用于IOx的信任锚点
现在,您拥有CA所需的密钥和证书,您可以创建信任锚点捆绑包,以在IOx设备上使用。信任锚点捆绑包必须包含完整的CA签名链(如果中间证书用于签名)和用于提供(自由格式)元数据的info.txt文件。
首先,创建info.txt文件,并将一些元数据放入其中:
[jedepuyd@KJK-SRVIOT-10 signing]$ echo "iox app root ca v1">info.txt
或者,如果您有多个CA证书,则要形成CA证书链,您需要将它们放在一个.pem中:
cat first_cert.pem second_cert.pem > combined_cert.pem注意:本文不需要此步骤,因为使用单个CA根证书来直接签名,因此不建议在生产中使用此步骤,并且根CA密钥对必须始终脱机存储。
CA证书链需要命名为ca-chain.cert.pem,因此准备以下文件:
[jedepuyd@KJK-SRVIOT-10 signing]$ cp rootca-cert.pem ca-chain.cert.pem
最后,您可以在gzipped tar中组合ca-chain.cert.pem和info.txt:
[jedepuyd@KJK-SRVIOT-10 signing]$ tar -czf trustanchorv1.tar.gz ca-chain.cert.pem info.txt
步骤3.在IOx设备上导入信任锚点
您在上一步中创建的trustanchorv1.tar.gz需要导入到IOx设备。捆绑包中的文件用于验证应用是否在允许安装之前使用正确CA的CA签名证书进行了签名。
信任锚点的导入可以通过ioxlcient完成:
[jedepuyd@KJK-SRVIOT-10 signing]$ ioxclient platform signedpackages trustanchor set trustanchorv1.tar.gz
Currently active profile :  default
Command Name:  plt-sign-pkg-ta-set
Response from the server:  Imported trust anchor file successfully
[jedepuyd@KJK-SRVIOT-10 signing]$ ioxclient platform signedpackages enable
Currently active profile :  default
Command Name:  plt-sign-pkg-enable
Successfully updated the signed package deployment capability on the device to true
另一个选项是通过本地管理器导入信任锚点:
导航至系统设置>导入信任锚点,如图所示。

选择在步骤2中生成的文件,然后单击“确定”,如图所示。

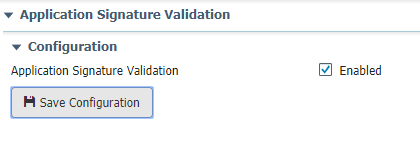
成功导入信任锚点后,选中“已启用应用签名验证”,然后单击保存配置,如图所示:

步骤4.创建应用特定密钥和CSR
接下来,您可以创建用于登录IOx应用的密钥和证书对。最佳实践是为计划部署的每个应用生成一个特定密钥对。
只要每个CA都使用同一CA签署,它们都被视为有效。
要生成应用特定密钥,请执行以下操作:
[jedepuyd@KJK-SRVIOT-10 signing]$ openssl genrsa -out app-key.pem 2048
Generating RSA private key, 2048 bit long modulus
.......+++
...+++
e is 65537 (0x10001)
要生成CSR:
[jedepuyd@KJK-SRVIOT-10 signing]$ openssl req -new -key app-key.pem -out app.csr
You are about to be asked to enter information that is incorporated
into your certificate request.
What you are about to enter is what is called a Distinguished Name (DN).
There are quite a few fields but you can leave some blank.
For some fields there can be a default value,
If you enter '.', the field can be left blank.
-----
Country Name (2 letter code) [XX]:BE
State or Province Name (full name) []:WVL
Locality Name (eg, city) [Default City]:Kortrijk
Organization Name (eg, company) [Default Company Ltd]:Cisco
Organizational Unit Name (eg, section) []:IOT
Common Name (eg, your name or your server's hostname) []:ioxapp
Email Address []:

Please enter the following 'extra' attributes
to be sent with your certificate request
A challenge password []:
An optional company name []:
与CA一样,必须调整应用证书中的值以匹配您的使用案例。
步骤5.使用CA签署应用特定证书
现在,您对CA和应用CSR有了要求,您可以使用CA签署CSR。结果是签名的应用特定证书:
[jedepuyd@KJK-SRVIOT-10 signing]$ openssl x509 -req -in app.csr -CA rootca-cert.pem -CAkey rootca-key.pem -CAcreateserial -out app-cert.pem -days 4096 -sha256
Signature ok
subject=/C=BE/ST=WVL/L=Kortrijk/O=Cisco/OU=IOT/CN=ioxapp
Getting CA Private Key
步骤6.打包您的IOx应用并使用应用特定证书进行签名
此时,您已准备好打包IOx应用,并使用步骤4中生成的密钥对进行签名。在步骤5中由CA签名。
为应用程序创建source和package.yaml的其余过程保持不变。
使用密钥对封装IOx应用:
[jedepuyd@KJK-SRVIOT-10 iox_docker_pythonsleep]$ ioxclient package --rsa-key ../signing/app-key.pem --certificate ../signing/app-cert.pem .
Currently active profile :  default
Command Name:  package
Using rsa key and cert provided via command line to sign the package
Checking if package descriptor file is present..
Validating descriptor file /home/jedepuyd/iox/iox_docker_pythonsleep/package.yaml with package schema definitions
Parsing descriptor file..
Found schema version  2.2
Loading schema file for version  2.2
Validating package descriptor file..
File /home/jedepuyd/iox/iox_docker_pythonsleep/package.yaml is valid under schema version 2.2
Created Staging directory at :  /tmp/666018803
Copying contents to staging directory
Checking for application runtime type
Couldn't detect application runtime type
Creating an inner envelope for application artifacts
Excluding  .DS_Store
Generated  /tmp/666018803/artifacts.tar.gz
Calculating SHA1 checksum for package contents..
Package MetaData file was not found at  /tmp/666018803/.package.metadata
Wrote package metadata file :  /tmp/666018803/.package.metadata
Root Directory :  /tmp/666018803
Output file:  /tmp/096960694
Path:  .package.metadata
SHA1 : 2a64461a921c2d5e8f45e92fe203127cf8a06146
Path:  artifacts.tar.gz
SHA1 : 63da3eb3d81e13249b799bf57845f3fc9f6f2f94
Path:  package.yaml
SHA1 : 0e6259e49ff22d6d38e6d1913759c5674c5cec6d
Generated package manifest at  package.mf
Signed the package and the signature is available at package.cert
Generating IOx Package..
Package generated at /home/jedepuyd/iox/iox_docker_pythonsleep/package.tar
步骤7.将已签名的IOx软件包部署到启用签名的设备上
流程的最后一步是将应用部署到IOx设备。与未签名的应用部署相比,没有区别:
[jedepuyd@KJK-SRVIOT-10 iox_docker_pythonsleep]$ ioxclient app install test package.tar
Currently active profile :  default
Command Name:  application-install
Saving current configuration
Installation Successful. App is available at : https://10.50.215.248:8443/iox/api/v2/hosting/apps/test
Successfully deployed
验证
使用本部分可确认配置能否正常运行。
要验证应用密钥是否与您的CA正确签名,您可以执行以下操作:
[jedepuyd@KJK-SRVIOT-10 signing]$ openssl verify -CAfile rootca-cert.pem app-cert.pem
app-cert.pem: OK
故障排除
本部分提供了可用于对配置进行故障排除的信息。
当您遇到应用部署问题时,您会看到以下错误之一:
[jedepuyd@KJK-SRVIOT-10 iox_docker_pythonsleep]$ ioxclient app install test package.tar
Currently active profile :  default
Command Name:  application-install
Saving current configuration
Could not complete your command :  Error. Server returned 500
{
 "description": "Invalid Archive file: Certificate verification failed: [18, 0, 'self signed certificate']",
 "errorcode": -1,
 "message": "Invalid Archive file"
}
使用CA签名应用证书时出错,或者它与受信任锚点捆绑包中的证书不匹配。
使用“验证”部分中提到的说明,检查证书以及受信任的锚点捆绑包。
这些错误表示您的包未正确签名,您可以再次查看步骤6。
[jedepuyd@KJK-SRVIOT-10 iox_docker_pythonsleep]$ ioxclient app install test2 package.tar
Currently active profile :  default
Command Name:  application-install
Saving current configuration
Could not complete your command :  Error. Server returned 500
{
 "description": "Package signature file package.cert or package.sign not found in package",
 "errorcode": -1009,
 "message": "Error during app installation"
}
 反馈
反馈