简介
本文介绍Webex联系中心的营销活动经理配置。这取决于语音营销活动在您的企业中的设置方式,您可以自行发起外拨营销活动呼叫,也可以由系统为您发起外拨呼叫。在“预览营销活动”中,当处于“空闲”状态时,您会从Webex联系中心请求外拨联系卡。接受联系卡后,Webex联系中心将发出呼出呼叫。如果联系中心先前已与您呼叫的人员通信,则这些呼叫的历史记录将显示在Agent Desktop的右面板中。在“累进营销活动”中,只要您处于“可用”状态,系统就会向您推送外拨呼叫。如果联系中心先前已与您呼叫的人员通信,则这些呼叫的历史记录会显示在Agent Desktop的右面板中。
要求
思科建议您了解以下主题:
- Webex联系中心入口点配置。
- Webex Contact Center的Campaign Manage基础知识。
- 出站活动的基本知识
注意:本文档面向已将Webex联系中心部署到其网络基础设施的客户和合作伙伴。
预览活动的出站入口点配置
正确配置的出站入口点(出站EP)是预览营销活动的前提条件。在您处理“预览营销活动”配置之前,请确保座席能够使用Agent Desktop Application(ADA)上的拨号盘进行简单的呼出呼叫。 如果座席无法发出外拨呼叫ADA,请参阅以下步骤以确保座席的配置正确。
步骤1.为使座席能够从ADA发出去话呼叫,需要将用户帐户分配给已正确配置去话入口点(去话EP)的座席配置文件。
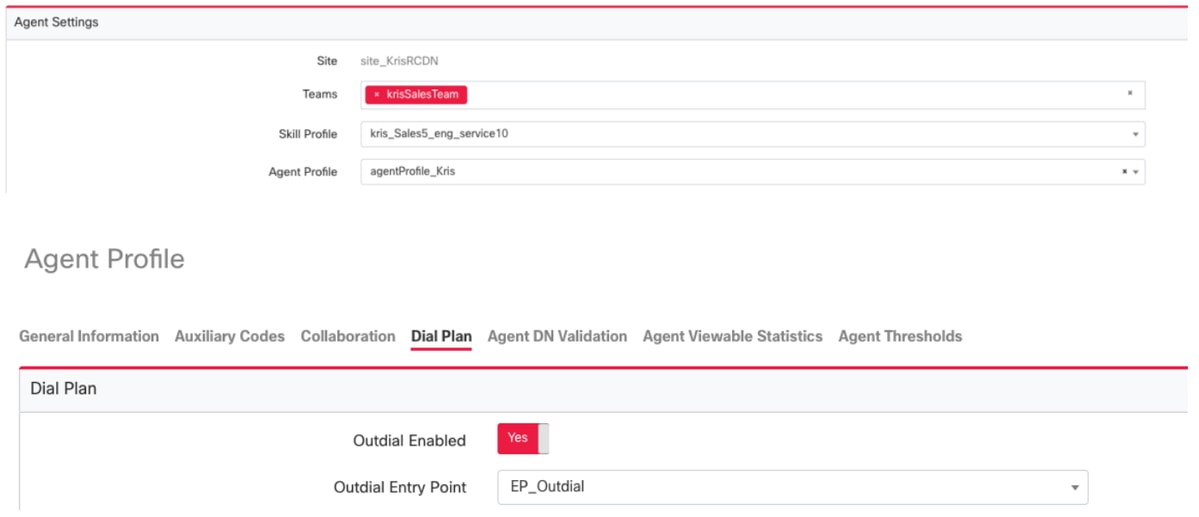
步骤2.出站EP路由策略必须配置OutdialEP控制脚本。
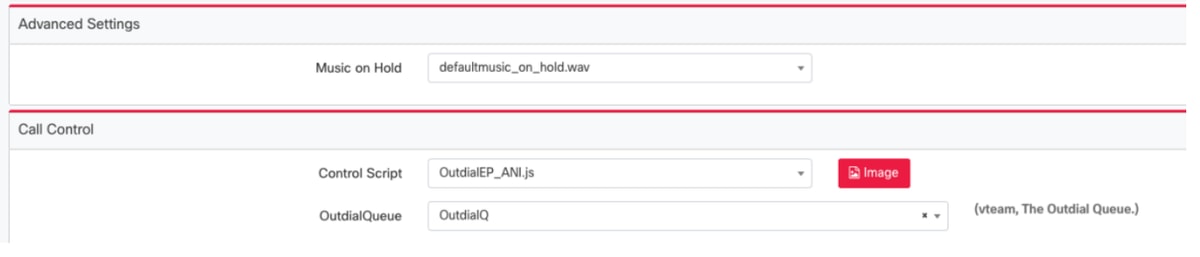
步骤3.必须使用OutdialQ控制脚本配置出站队列路由策略。

注意:入口点和队列的自定义控制脚本名称可能与您的租户具有不同的名称。
注意:任何新的外拨入点都需要由思科TAC/SA团队调配,以使其正常工作。
配置预览营销活动
步骤1.确保已配置外拨EP并将其分配给代理配置文件。
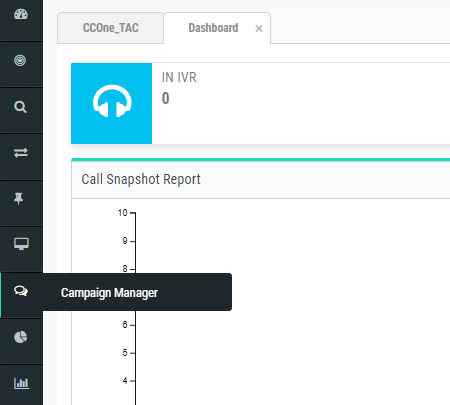
步骤2.从Webex联系中心门户打开Campaign Manager模块。
步骤3.导航System → Modes。添加语音模式。这可能已为您的租户预配置。
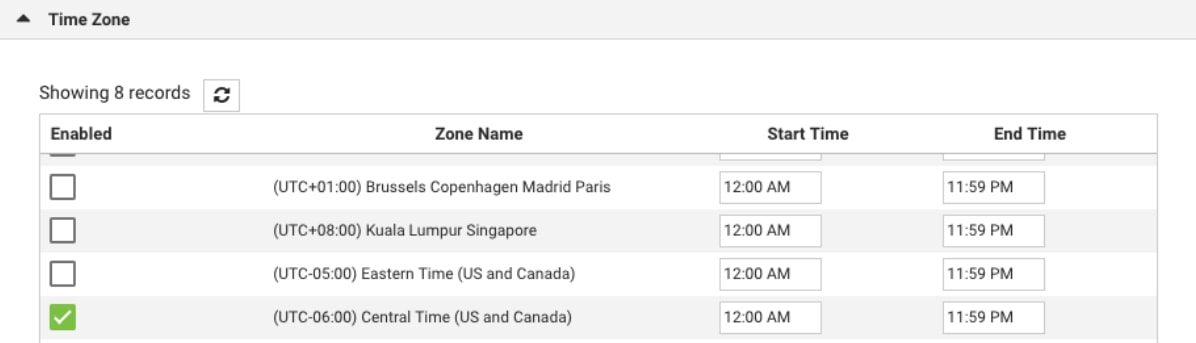
步骤4.导航System → Time Zone。启用适当的时区。
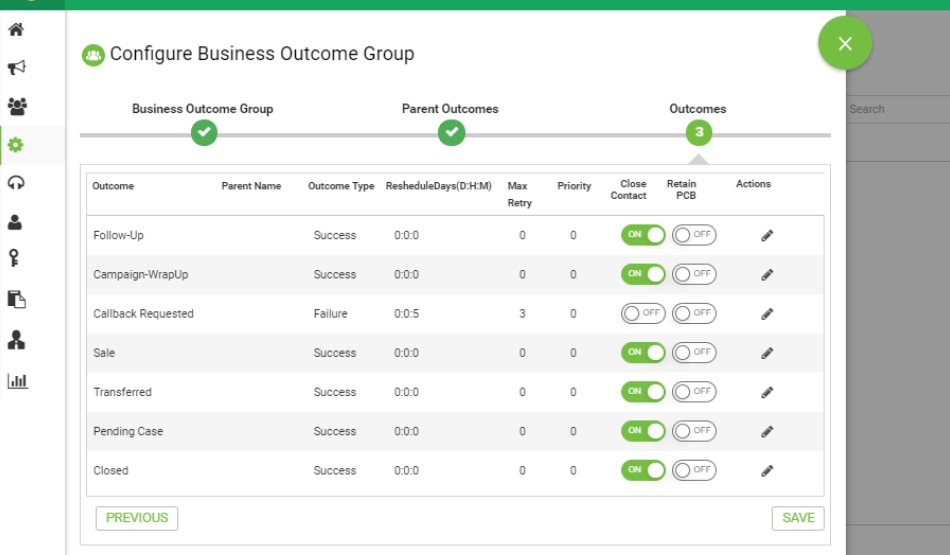
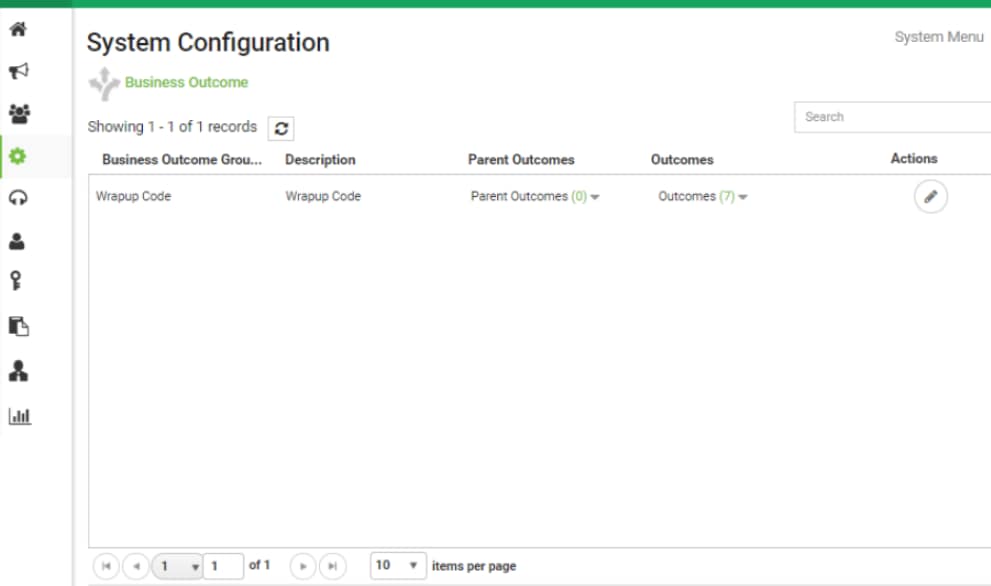
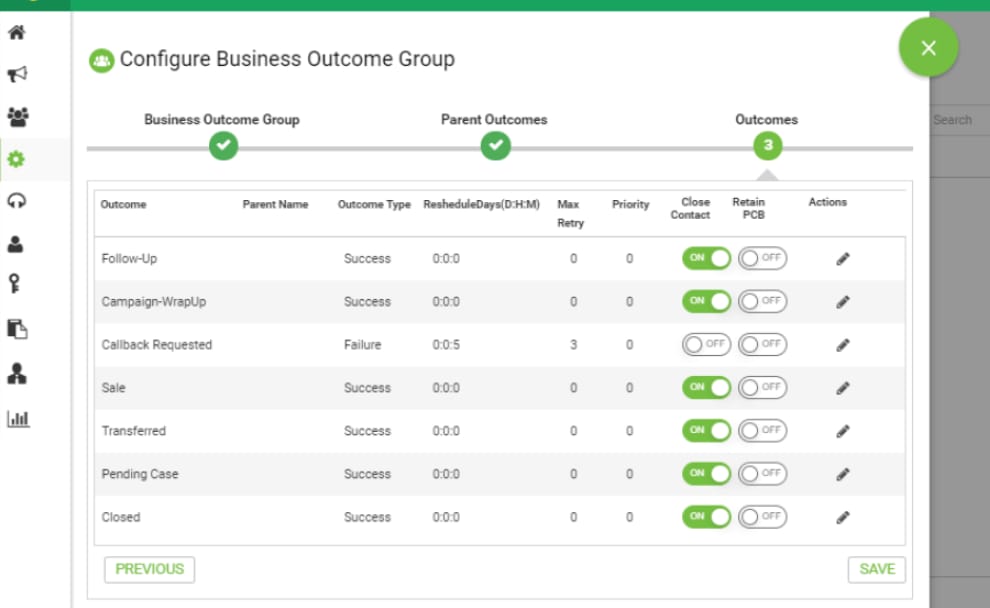
步骤5.定位System →配置业务成果组。默认情况下,在Webex联系中心预配模块中定义的摘要代码将作为业务成果添加到Campaign Manager。
点击业务成果图标,如下所示。

“业务成果”屏幕打开。
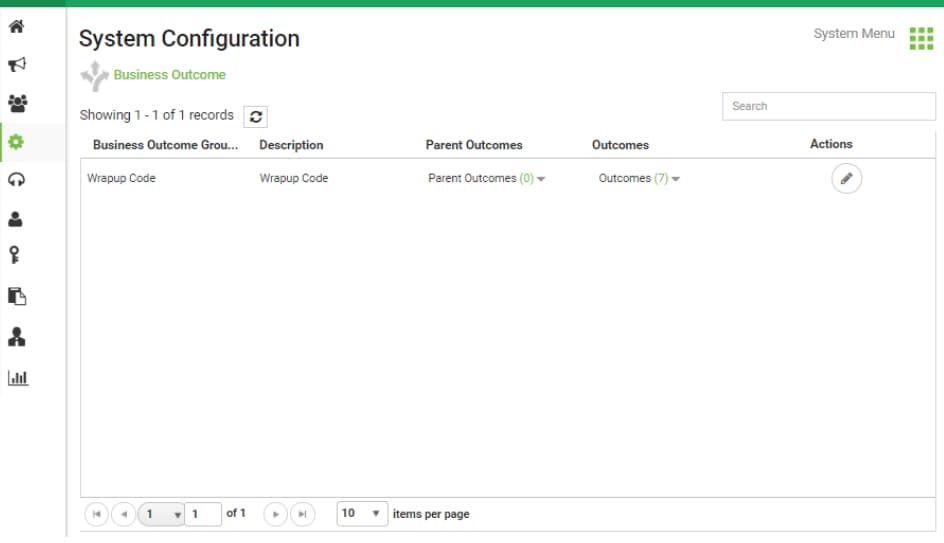
单击“操作”列中的“编辑”,然后单击“业务结果组”和“父结果组”向导上的“下一步”按钮,以导航到“结果”向导。
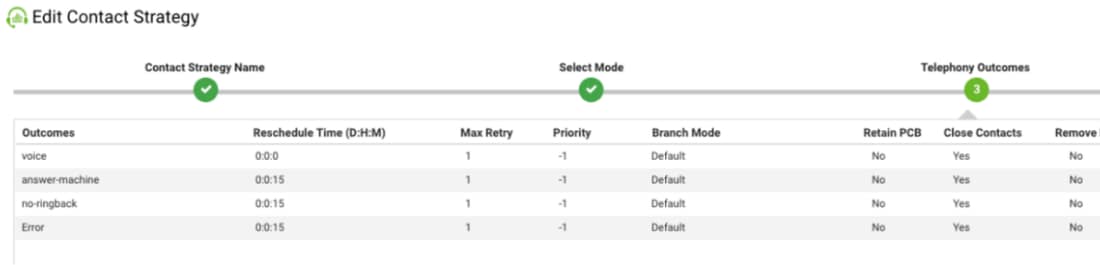
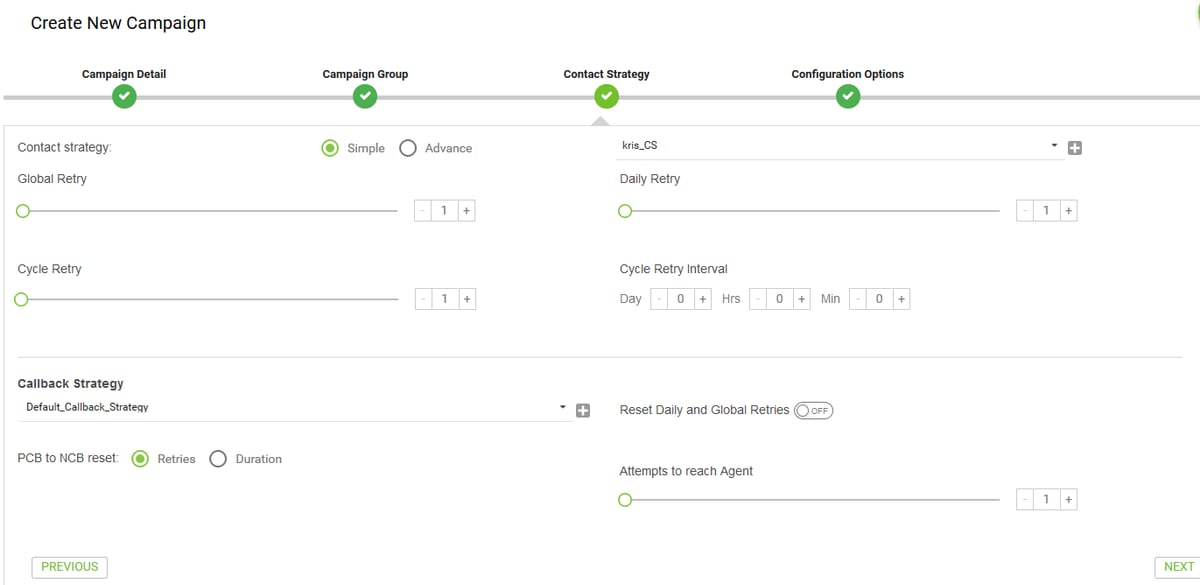
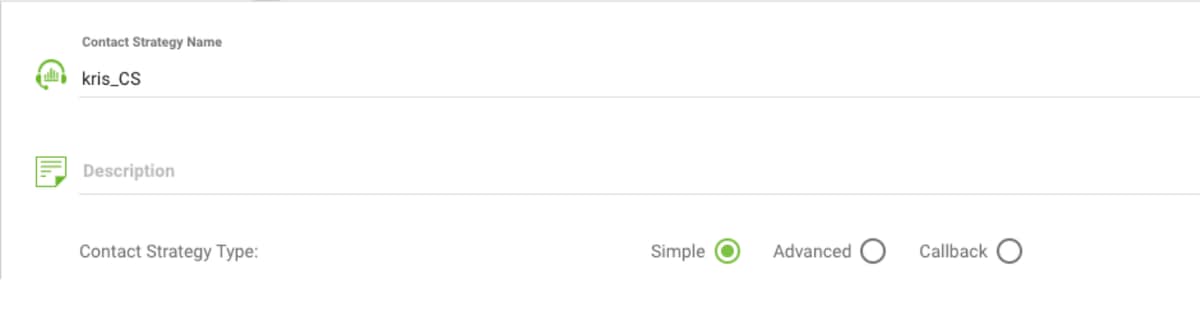
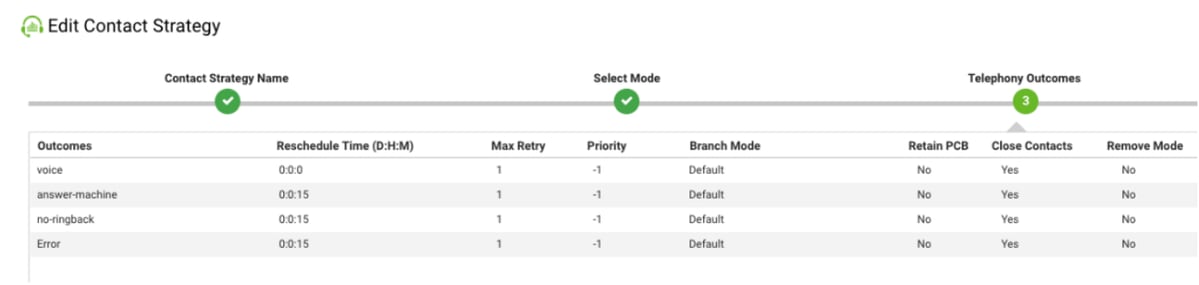
步骤6.导航“联系策略→添加”。保持类型简单。选择之前创建的模式。设置电话结果。

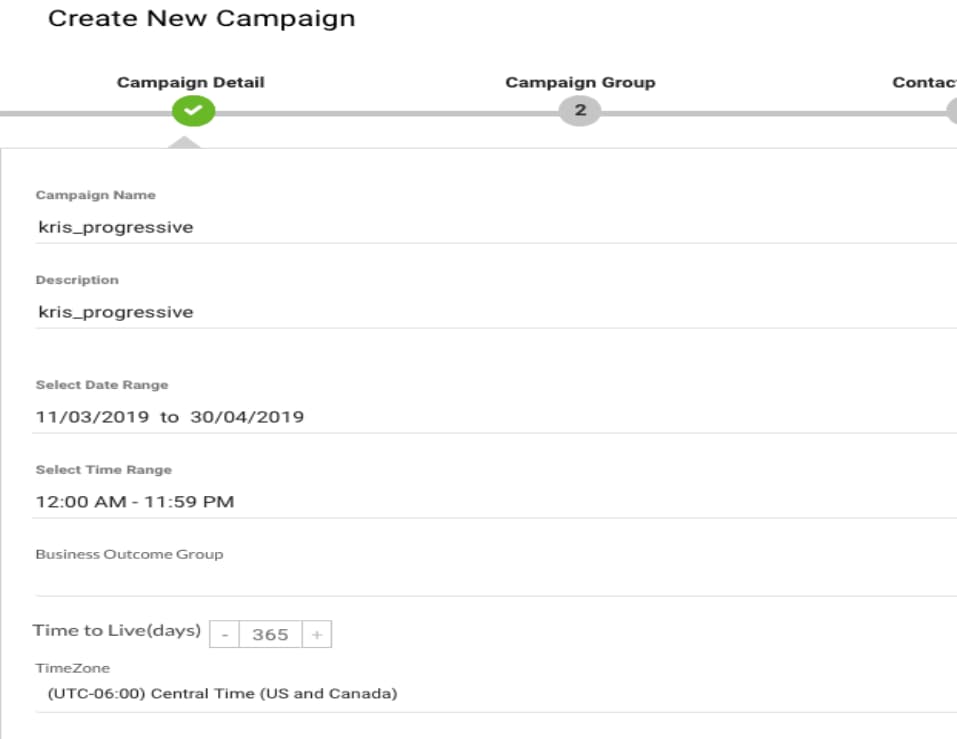
步骤7.定位“市场活动→添加市场活动”。选择“日期/时间范围”以运行市场活动,选择“生存时间”和“时区”。
注意:业务成果组是一组总结代码。“生存时间”是活动中联系人的有效时间。

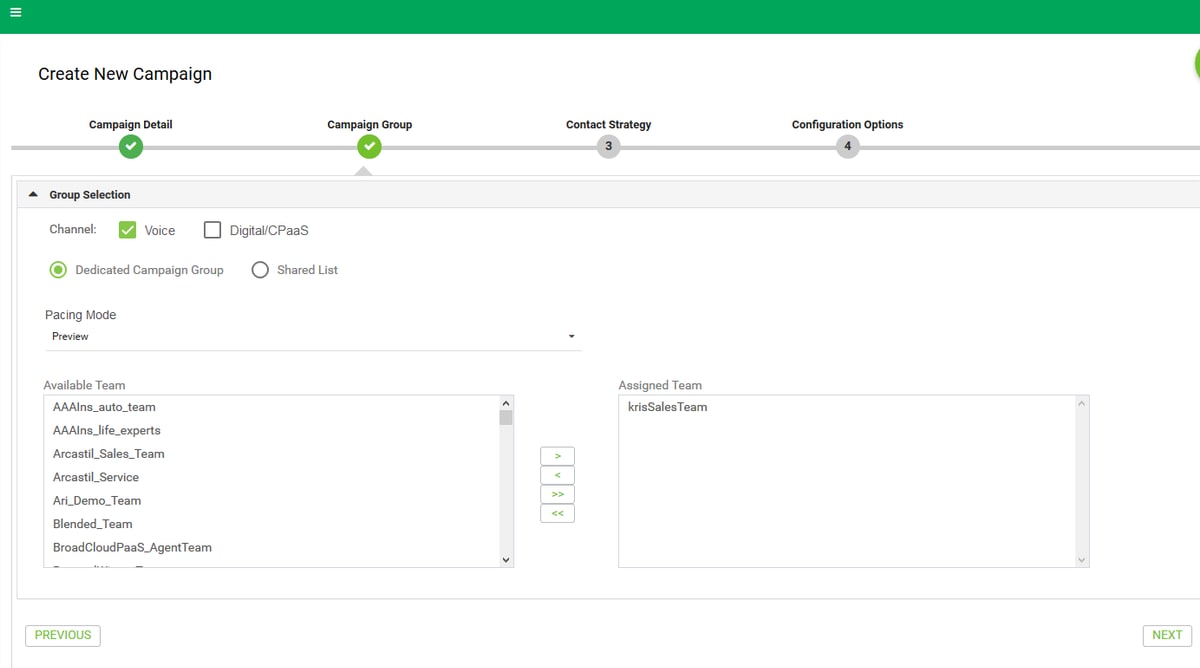
步骤8.选择模式预览并进行团队选择。组必须与您为座席配置的组相同。
步骤9.选择“联系策略”和“回叫策略”,建议使用Default_Callback_Strategy。单击Next 以创建“Campaign”。
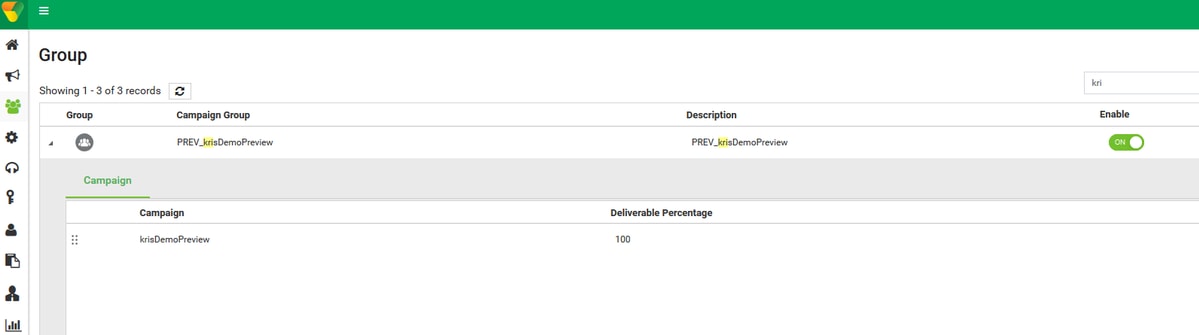
步骤10.定位“组”模块,确保“市场活动组”已启用且新创建的市场活动与其关联。
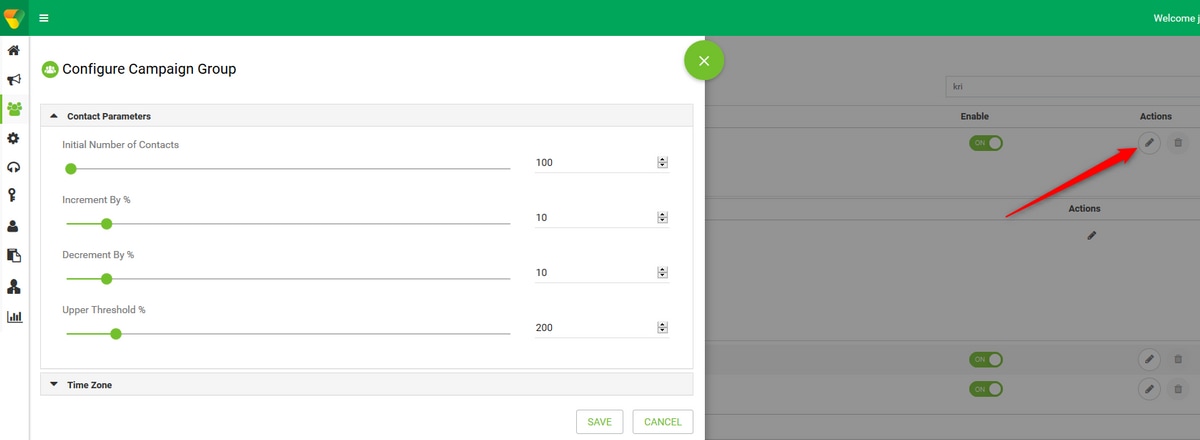
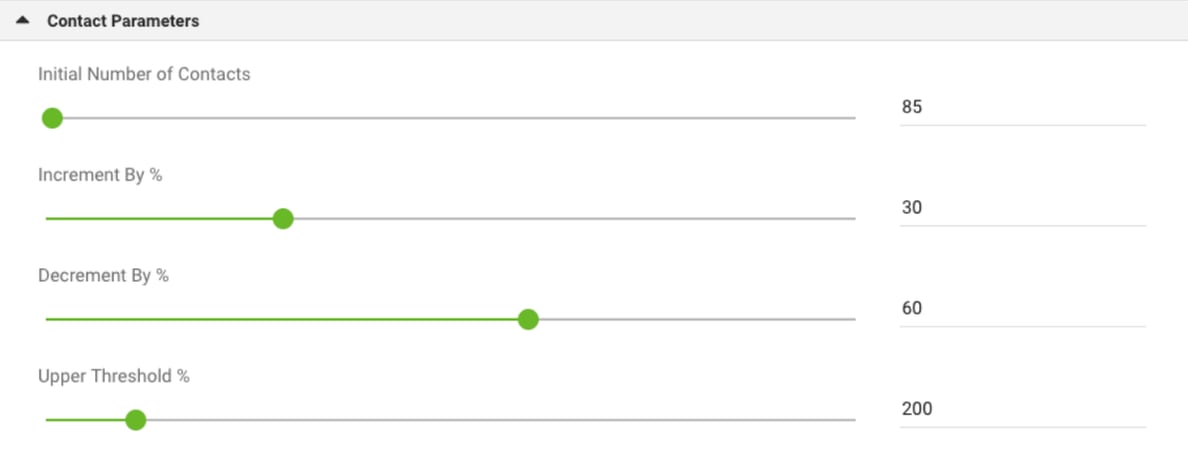
步骤11.单击“编辑”(Edit),并配置联系人参数。
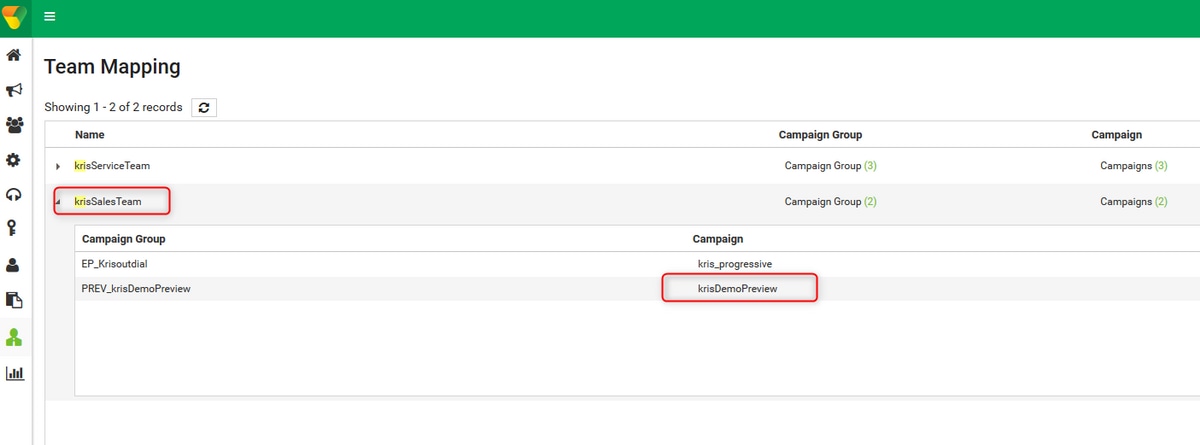
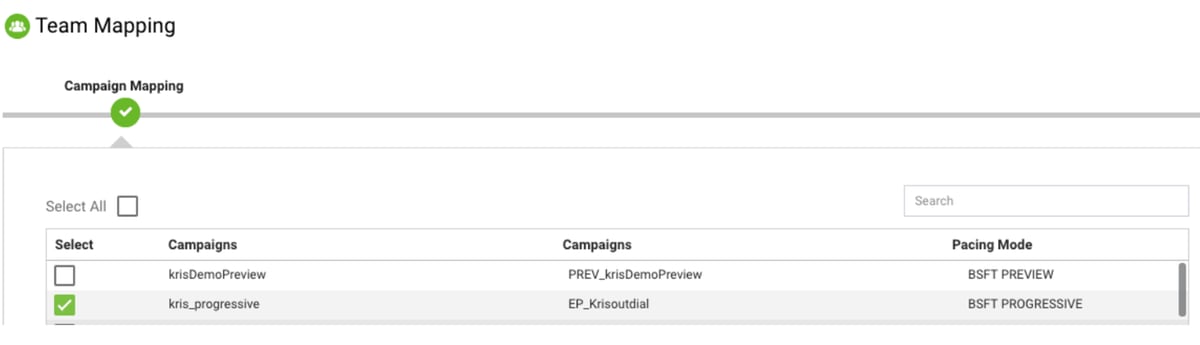
步骤12.导航团队并确保座席的团队与活动相关联。
步骤13.创建示例联系人文件。

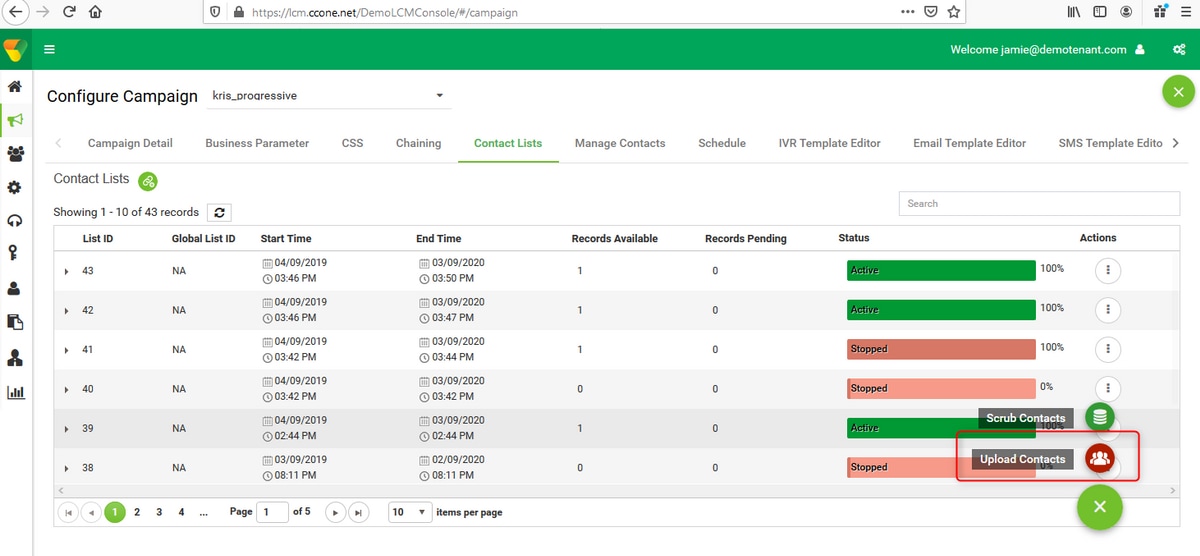
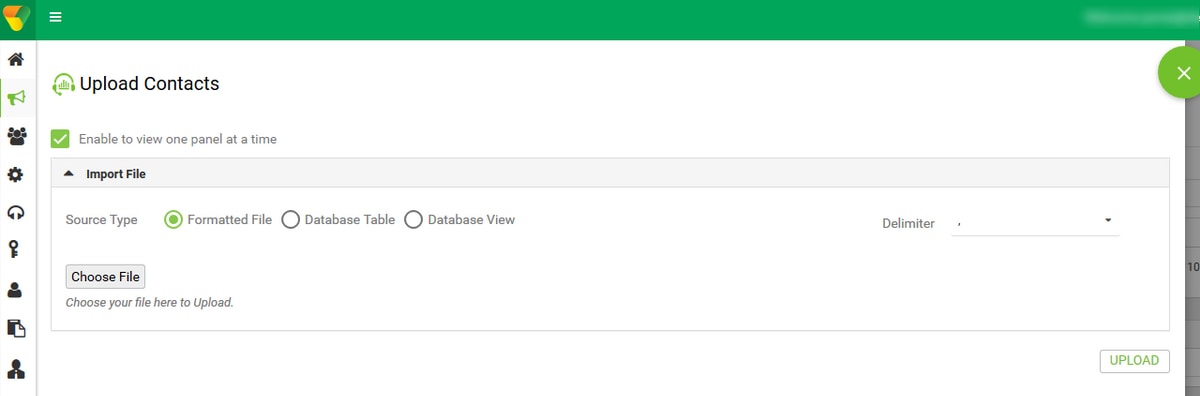
步骤14.从列表中导航正确的营销活动→编辑→联系人列→添加联系人列→上传联系人。
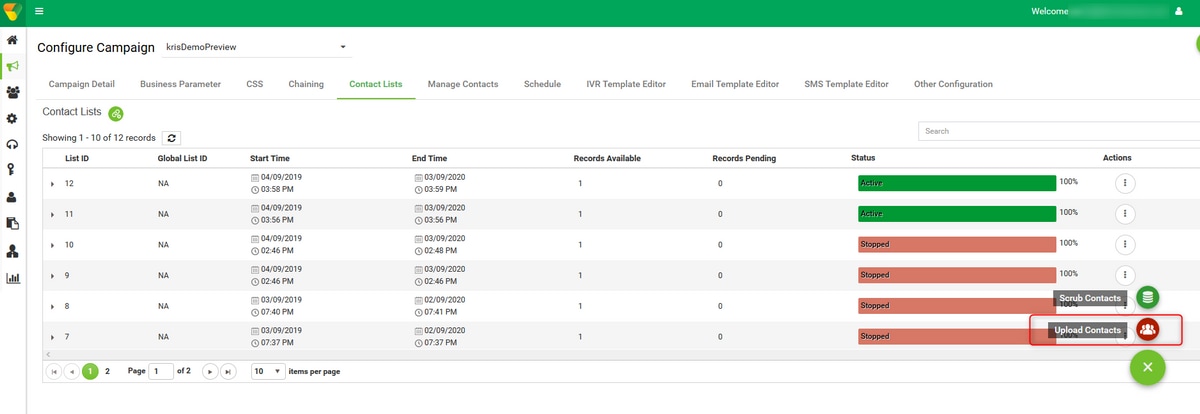
步骤15.在联系人文件(,)中选择正确的分隔符。 选择文件。

步骤16.选择ZoneName作为Campaign Specific TimeZone。

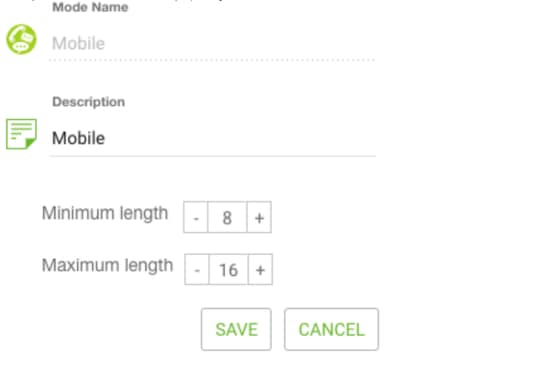
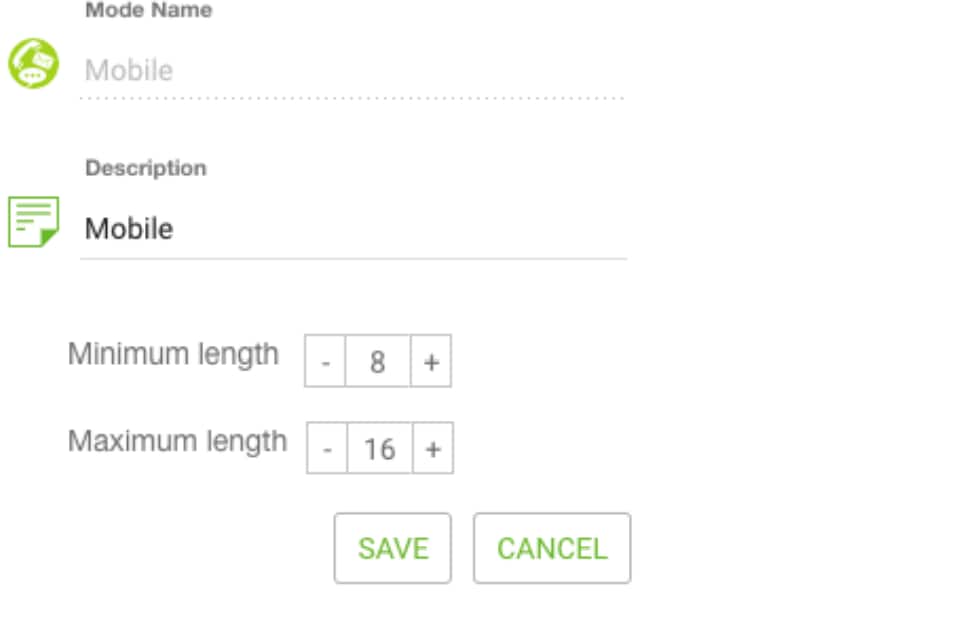
步骤17.从文件中选择Number字段进入Mobile模式或其他适用模式,如家庭、办公室等。

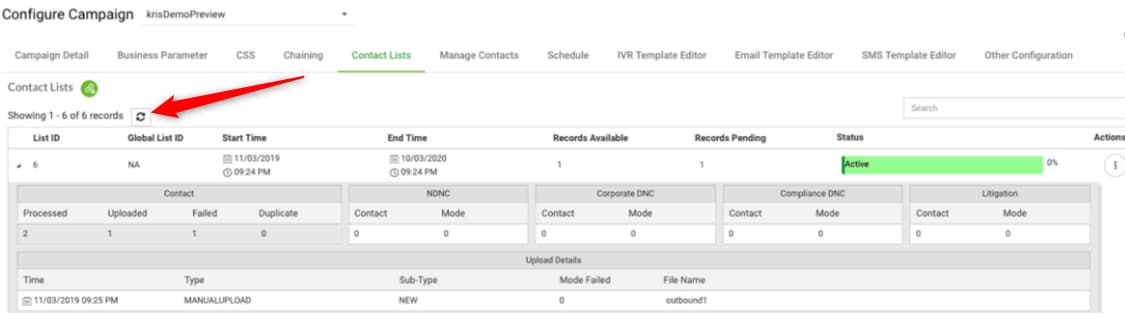
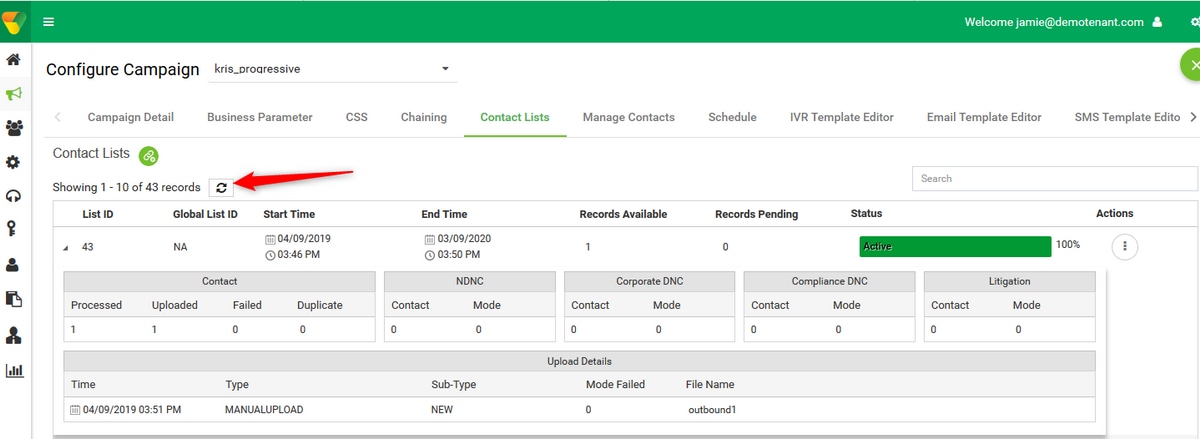
第18步点击Refresh。新联系人列表必须在几秒钟内显示。
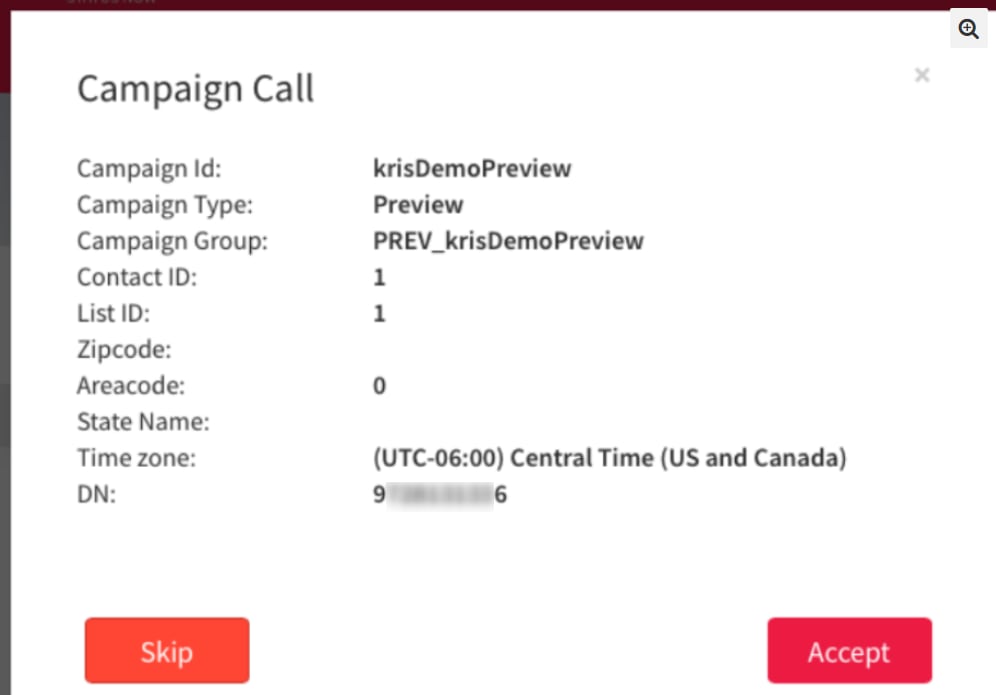
步骤19.在Agent Desktop Application中,将Agent状态更改为Idle,然后单击Campaign Call选项。座席在预览模式下发起营销活动呼叫。

呼叫将呈现给座席。接受或跳过呼叫。
累进营销活动的回叫外拨入口点配置
配置具有语音回叫功能的外拨入口点,使渐进式营销活动正常运行是前提条件。
注意:任何新的外拨入点都需要由思科TAC/SA团队调配,以使其正常工作。
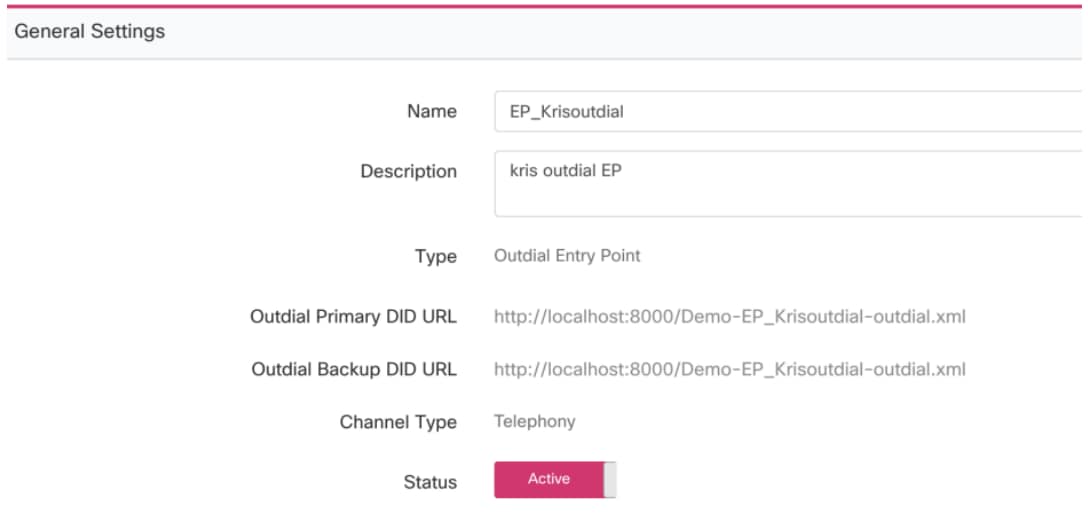
步骤1.创建外拨EP。
步骤2.配置出站EP的路由策略。选择WebCallbackEP作为控制脚本,然后选择出站队列。
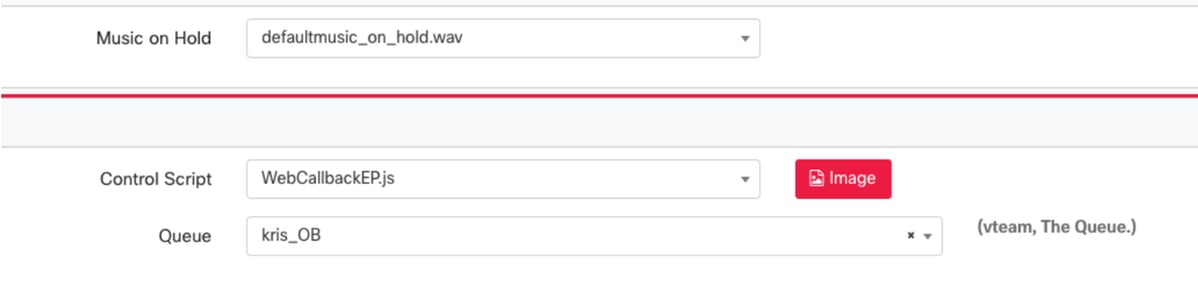
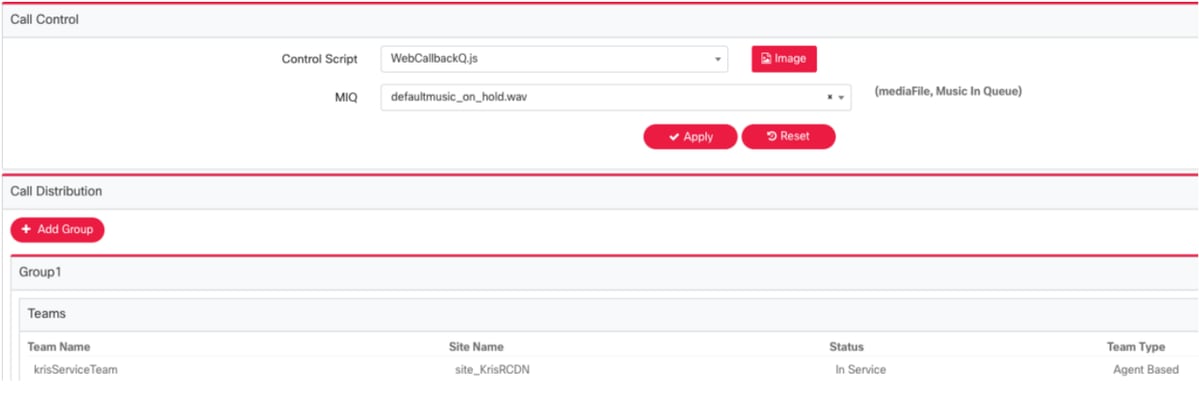
步骤3.配置外拨队列路由策略。选择WebcallbackQ控制脚本。添加必须处理累进营销活动呼叫的团队。
注意:可能需要PS参与才能获取WebCallbackEP.js和WebcallbackQ.js回调控制脚本。
配置渐进式营销活动
步骤1.确保已配置外拨EP,并且使用回叫控制脚本正常运行。
步骤2.打开Campaign Manager。
步骤3.导航System → Modes。添加语音模式。这可能已为您的租户预配置。
步骤4.导航System → Time Zone。启用适当的时区。
步骤5.定位System →配置业务成果组。默认情况下,Webex联系中心预配模块中定义的摘要代码将作为业务成果添加到Campaign Manager中。单击“业务成果”图标。“业务成果”屏幕将打开。
单击“操作”列中的“编辑”,然后单击“业务结果组”和“父结果组”向导上的“下一步”按钮,以导航到“结果”向导。
步骤6.导航“联系策略→添加”。保持类型简单。选择之前创建的模式。设置电话结果。
步骤7.定位“市场活动→添加市场活动”。选择日期/时间范围以运行市场活动。选择生存时间和时区。
注意:业务成果组是一组总结代码。“生存时间”是活动中联系人的有效时间。
选择语音通道和渐进步调模式。选择之前使用回叫控制脚本创建的出站入口点。

选择联系策略和回叫策略。

步骤8.导航组。确保“活动组”已启用,且“累进活动”已与其关联。

配置联系人参数。
选择正确的时区
步骤9.导航团队。将营销活动与正确的团队对应起来。

步骤10.创建示例联系人文件。

11.导航“营销活动”→编辑→联系人列→添加联系人列→“上传联系人”。
在联系人文件(,)中选择正确的分隔符。 选择文件。
选择区域名称作为市场活动特定时区

从文件中选择“号码”字段,进入移动模式或其他适用模式(可能是家庭、办公室等)。

点击上传(Upload),然后点击刷新(Refresh)。新联系人列表必须在几秒钟内显示。
12.打开Agent Desktop应用程序,将状态更改为“可用”。系统会自动开始呼叫您在联系人列表中上传的号码。

 反馈
反馈