在AWS、Azure和GCP上配置CSR1000v HA版本3
下载选项
非歧视性语言
此产品的文档集力求使用非歧视性语言。在本文档集中,非歧视性语言是指不隐含针对年龄、残障、性别、种族身份、族群身份、性取向、社会经济地位和交叉性的歧视的语言。由于产品软件的用户界面中使用的硬编码语言、基于 RFP 文档使用的语言或引用的第三方产品使用的语言,文档中可能无法确保完全使用非歧视性语言。 深入了解思科如何使用包容性语言。
关于此翻译
思科采用人工翻译与机器翻译相结合的方式将此文档翻译成不同语言,希望全球的用户都能通过各自的语言得到支持性的内容。 请注意:即使是最好的机器翻译,其准确度也不及专业翻译人员的水平。 Cisco Systems, Inc. 对于翻译的准确性不承担任何责任,并建议您总是参考英文原始文档(已提供链接)。
简介
本文档介绍在Amazon Web Services(AWS)、Microsoft Azure和Google云平台(GCP)上为高可用性第3版(HAv3)配置CSR1000v路由器的步骤。
先决条件
要求
Cisco 建议您了解以下主题:
- AWS、Azure或GCP云。
- CSR1000v路由器。
- 思科 IOS®-XE.
本文假设底层网络配置已完成,并重点介绍HAv3配置。
完整的配置详细信息可在Cisco CSR 1000v和Cisco ISRv软件配置指南中找到。
使用的组件
本文档中的信息基于以下软件和硬件版本:
- AWS、Azure或GCP帐户。
- 2台CSR1000v路由器。
- 最少16.11.1s的Cisco IOS®-XE Polaris
本文档中的信息都是基于特定实验室环境中的设备编写的。本文档中使用的所有设备最初均采用原始(默认)配置。如果您的网络处于活动状态,请确保您了解任何命令的潜在影响。
背景信息
思科建议您了解可用的不同HA版本:
- HAv1:HA配置作为IOS命令执行,并依赖BFD作为检测故障的机制。
- HAv2/HAv3:实现已作为python脚本移入guestshell容器。BFD是可选的,可编写自定义脚本以检测故障并触发故障切换。Azure HAv2配置与HAv3基本类似,在PIP安装包和IOS冗余配置方面存在细微差异。
- HAv3:HA的实施已基本从Cisco IOS®-XE代码中移出,并在guestshell容器中运行。
HAv3可从Cisco IOS®-XE Polaris 16.11.1s获得,并添加了以下几项新功能:
- 与云无关:此版本的高可用性在任何云服务提供商的CSR 1000v路由器上都可用。虽然云术语和参数有一些不同,但用于配置、控制和显示高可用性功能的一组功能和脚本在不同的云服务提供商之间是通用的。AWS、Azure和GCP上的CSR 1000v路由器支持高可用性第3版(HAv3)。在16.11.1中增加了对GCP提供商的支持。请咨询思科,了解单个提供商云中当前对高可用性的支持。
- 主用/主用操作:您可以将两台Cisco CSR 1000v路由器同时配置为活动路由器,这允许负载共享。在此操作模式下,路由表中的每条路由都有两台路由器中的一台用作主路由器,另一台用作辅助路由器。要启用负载共享,请获取所有路由并在两台Cisco CSR 1000v路由器之间分割它们。请注意,此功能是基于AWS的云的新功能。
- 故障恢复后恢复到主CSR:您可以指定Cisco CSR 1000v作为给定路由的主路由器。当此Cisco CSR 1000v处于启用状态时,它是路由的下一跳。如果此Cisco CSR 1000v发生故障,对等Cisco CSR 1000v将接管作为路由的下一跳,以保持网络连接。当原始路由器从故障中恢复时,它将收回路由的所有权,并成为下一跳路由器。此功能也是基于AWS的云的新功能。
- 用户提供的脚本:guestshell是一个容器,您可以在其中部署自己的脚本。HAv3向用户提供的脚本显示编程接口。这意味着您现在可以编写可触发故障切换和恢复事件的脚本。您还可以开发自己的算法和触发器,以控制哪个Cisco CSR 1000v为给定路由提供转发服务。此功能是基于AWS的云的新功能。
- 新配置和部署机制:HA的实施已从Cisco IOS®-XE代码中移出。高可用性代码现在在guestshell容器中运行。有关guestshell的详细信息,请参阅《可编程性配置指南》中的“Guest Shell”部分。在HAv3中,冗余节点的配置在使用一组Python脚本的guestshell中执行。此功能现已引入基于AWS的云。
注意:在AWS、Azure或GCP中通过本文档中的步骤部署的资源可能会产生成本。
拓扑
在开始配置之前,必须完全了解拓扑和设计。这有助于在以后排除任何潜在问题。
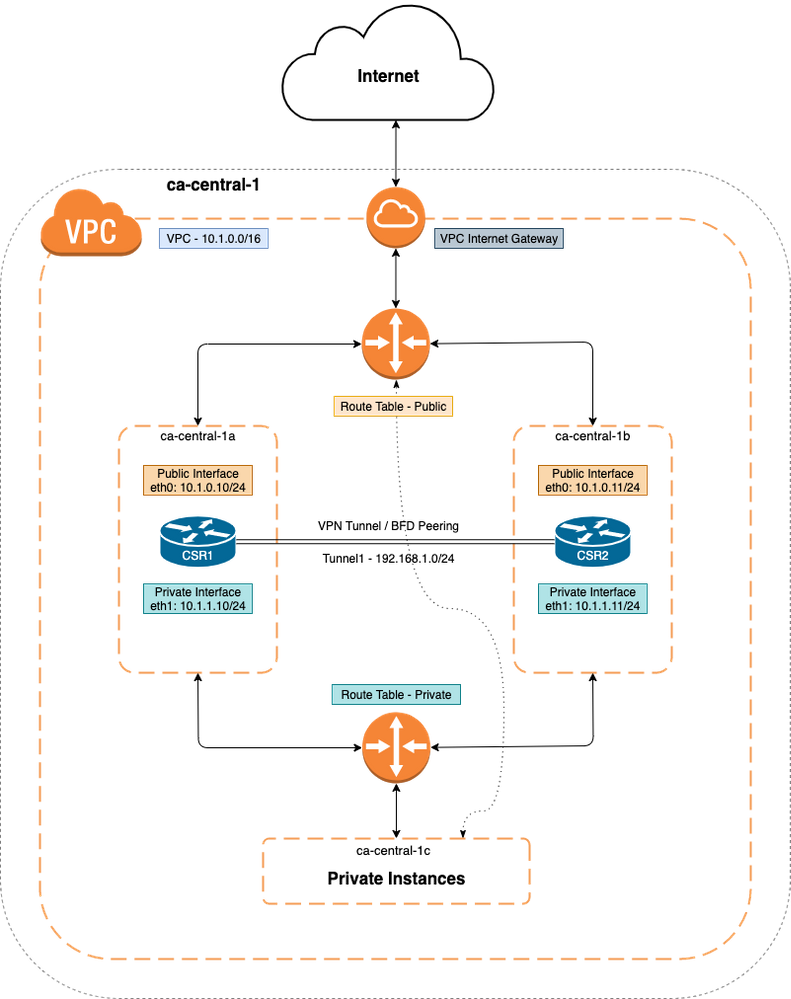
虽然网络拓扑图基于AWS,但云之间的底层网络部署相对相似。 网络拓扑也与所使用的HA版本无关,无论是HAv1、HAv2还是HAv3。
对于此拓扑示例,AWS中使用以下设置配置HA冗余:
- 1x — 区域
- 1x - VPC
- 3x — 可用区
- 4x — 网络接口/子网(2x面向公共/2x面向私有)
- 2x — 路由表(公有和私有)
- 2x - CSR1000v路由器(Cisco IOS®-XE 17.01.01)
HA对中有2个CSR1000v路由器,位于两个不同的可用区域。第三个区域是专用实例,用于模拟专用数据中心中的设备。通常,所有正常流量必须流经专用(或内部)路由表。
网络图
 网络图
网络图
配置CSR1000v路由器
云独立配置
步骤1.配置IOX应用托管和guestshell,这为guestshell提供ip可达性。 部署CSR1000v时,默认情况下可自动配置此步骤。
vrf definition GS
!
iox
app-hosting appid guestshell
 app-vnic gateway1 virtualportgroup 0 guest-interface 0
 guest-ipaddress 192.168.35.102 netmask 255.255.255.0
 app-default-gateway 192.168.35.101 guest-interface 0
 name-server0 8.8.8.8
!
interface VirtualPortGroup0
 vrf forwarding GS
 ip address 192.168.35.101 255.255.255.0
 ip nat inside
!
interface GigabitEthernet1
ip nat outside
!
ip access-list standard GS_NAT_ACL
 permit 192.168.35.0 0.0.0.255
!
ip nat inside source list GS_NAT_ACL interface GigabitEthernet1 vrf GS overload
!
! The static route points to the G1 ip address's gateway
ip route vrf GS 0.0.0.0 0.0.0.0 GigabitEthernet1 10.1.0.1 global
步骤2.启用并登录至guestshell。
Device#guestshell enable
Interface will be selected if configured in app-hosting
Please wait for completion
guestshell installed successfully
Current state is: DEPLOYED
guestshell activated successfully
Current state is: ACTIVATED
guestshell started successfully
Current state is: RUNNING
Guestshell enabled successfully

Device#guestshell
[guestshell@guestshell ~]$
注意:有关guestshell的详细信息,请参阅 — 可编程性配置指南
步骤3.确认guestshell能够与Internet通信。
[guestshell@guestshell ~]$ ping 8.8.8.8
PING 8.8.8.8 (8.8.8.8) 56(84) bytes of data.
64 bytes from 8.8.8.8: icmp_seq=1 ttl=109 time=1.74 ms
64 bytes from 8.8.8.8: icmp_seq=2 ttl=109 time=2.19 ms
64 bytes from 8.8.8.8: icmp_seq=3 ttl=109 time=2.49 ms
64 bytes from 8.8.8.8: icmp_seq=4 ttl=109 time=1.41 ms
64 bytes from 8.8.8.8: icmp_seq=5 ttl=109 time=3.04 ms
步骤4.(可选)启用双向转发检测(BFD)和路由协议作为增强型内部网关路由协议(EIGRP)或边界网关协议(BGP)到隧道以进行对等体故障检测。在Cisco CSR 1000v路由器之间配置VxLAN或IPsec隧道。
- Cisco CSR 1000v路由器之间的IPsec隧道。
crypto isakmp policy 1
encr aes 256 authentication pre-share
crypto isakmp key cisco address
- Cisco CSR 1000v路由器之间的VxLAN隧道。
Example:
interface Tunnel100
ip address 192.168.1.1 255.255.255.0
bfd interval 500 min_rx 500 multiplier 3
tunnel source GigabitEthernet1
tunnel mode vxlan-gpe ipv4
tunnel destination
步骤 4.1 (可选)在隧道接口上配置EIGRP。
router eigrp 1
bfd interface Tunnel1
network 192.168.1.0 0.0.0.255
- 自定义脚本可用于触发故障切换,例如:
event manager applet Interface_GigabitEthernet2
event syslog pattern “Interface GigabitEthernet2, changed state to administratively down”
action 1 cli command “enable”
action 2 cli command “guestshell run node_event.py -i 10 -e peerFail” exit
exit
AWS特定配置
步骤1.使用IAM配置身份验证。
为了CSR1000v路由器更新AWS网络中的路由表,路由器需要进行身份验证。在AWS中,您必须创建允许CSR 1000v路由器访问路由表的策略。然后,将创建使用此策略并应用于EC2资源的IAM角色。
创建CSR 1000v EC2实例后,创建的IAM角色需要附加到每台路由器。
新IAM角色中使用的策略是:
{
"Version": "2012-10-17",
    "Statement": [
        {
            "Sid": "VisualEditor0",
            "Effect": "Allow",
            "Action": [
                "logs:CreateLogStream",
                "cloudwatch:",
                "s3:",
                "ec2:AssociateRouteTable",
                "ec2:CreateRoute",
                "ec2:CreateRouteTable",
                "ec2:DeleteRoute",
                "ec2:DeleteRouteTable",
                "ec2:DescribeRouteTables",
                "ec2:DescribeVpcs",
                "ec2:ReplaceRoute",
                "ec2:DescribeRegions",
                "ec2:DescribeNetworkInterfaces",
                "ec2:DisassociateRouteTable",
                "ec2:ReplaceRouteTableAssociation",
                "logs:CreateLogGroup",
                "logs:PutLogEvents"
            ],
            "Resource": "*"
        }
    ]
}
注意:请参阅IAM角色与策略,并将其与VPC关联以了解详细步骤。
步骤2.安装HA python软件包。
[guestshell@guestshell ~]$ pip install csr_aws_ha --user
[guestshell@guestshell ~]$ source ~/.bashrc
步骤3.在主路由器上配置HA参数。
[guestshell@guestshell ~]$ create_node.py -i 10 -t rtb-01c5b0633a3422575 -rg ca-central-1 -n eni-0bc1912748614df2a -r 0.0.0.0/0 -m primary
步骤4.在辅助路由器上配置HA参数。
[guestshell@guestshell ~]$ create_node.py -i 10 -t rtb-01c5b0633a3422575 -rg ca-central-1 -n eni-0e351ab1b8f416728 -r 0.0.0.0/0 -m secondary
- 节点格式为:
create_node.py -i n -t rtb-private-route-table-id -rg region-id -n eni-CSR-id -r route(x.x.x.x/x) -m
Azure特定配置
注意:必须在GigabitEthernet1上配置面向外部的接口。 这是用于访问Azure API的接口。否则HA无法正常工作。在guestshell中,确保curl命令可以从Azure获取元数据。
[guestshell@guestshell ~]$ curl -H "Metadata:true" http://169.254.169.254/metadata/instance?api-version=2020-06-01
步骤1.必须使用Azure Active Directory(AAD)或托管服务身份(MSI)启用CSR1000v API调用的身份验证。 有关详细步骤,请参阅配置CSR1000v API调用的身份验证。 如果没有此步骤,CSR1000v路由器将无法授权更新路由表。
AAD参数

步骤2.安装HA python软件包。
[guestshell@guestshell ~]$ pip install csr_azure_ha --user
[guestshell@guestshell ~]$ source ~/.bashrc
步骤3.在主路由器上配置HA参数(MSI或AAD可用于此步骤)。
- 使用MSI身份验证。
[guestshell@guestshell ~]$ create_node -i 10 -p azure -s xxxxxxxx-xxxx-xxxx-xxxx-xxxxxxxxxxxxxx -g ResourceGroup -t Private-RouteTable -r 0.0.0.0/0 -n 10.1.0.10 -m primary
- 使用AAD身份验证(需要附加 — a、-d、-k标志)。
[guestshell@guestshell ~]$ create_node -i 10 -p azure -s xxxxxxxx-xxxx-xxxx-xxxx-xxxxxxxxxxxxxx -g ResourceGroup -t Private-RouteTable -r 0.0.0.0/0 -n 10.1.0.10 -m primary -a 1e0f69c3-b6aa-46cf-b5f9-xxxxxxxxx -d ae49849c-2622-4d45-b95e-xxxxxxxxx -k bDEN1k8batJqpeqjAuUvaUCZn5Md6rWEi=
步骤4.在辅助路由器上配置HA参数。
- 使用MSI身份验证
[guestshell@guestshell ~]$ create_node -i 10 -p azure -s xxxxxxxx-xxxx-xxxx-xxxx-xxxxxxxxxxxxxx -g ResourceGroup -t Private-RouteTable -r 0.0.0.0/0 -n 10.1.0.11 -m secondary
- 使用AAD身份验证(需要附加 — a、-d、-k标志)
[guestshell@guestshell ~]$ create_node -i 10 -p azure -s xxxxxxxx-xxxx-xxxx-xxxx-xxxxxxxxxxxxxx --g ResourceGroup -t Private-RouteTable -r 0.0.0.0/0 -n 10.0.0.11 -m secondary -a 1e0f69c3-b6aa-46cf-b5f9-xxxxxxxxx -d ae49849c-2622-4d45-b95e-xxxxxxxxx -k bDEN1k8batJqpeqjAuUvaUCZn5Md6rWEi=
GCP特定配置
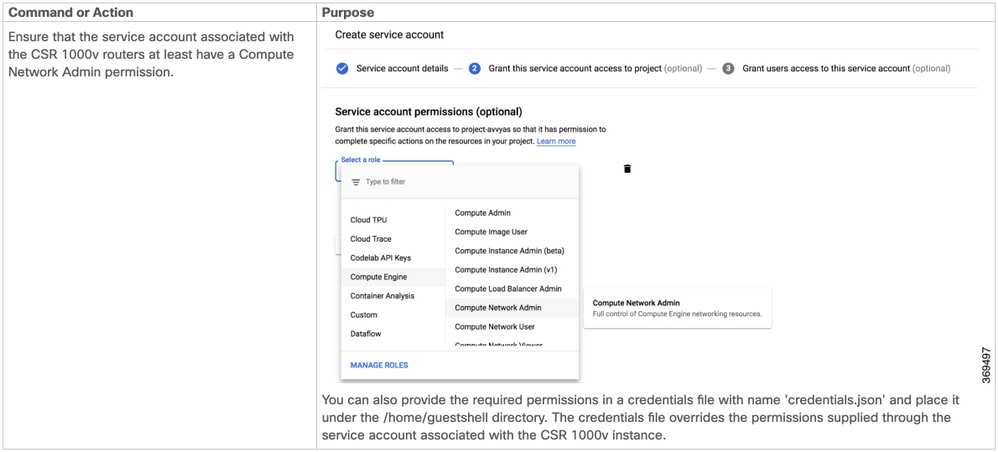
注意:确保与CSR 1000v路由器关联的服务帐户至少具有计算网络管理员权限。

步骤1.安装HA python软件包。
[guestshell@guestshell ~]$ pip install csr_gcp_ha --user
[guestshell@guestshell ~]$ source ~/.bashrc
步骤2.在主路由器上配置HA参数。
[guestshell@guestshell ~]$ create_node -i 1 -g -r dest_network -o 200 -n nexthop_ip_addr -a route-vpc2-csr1 -b route-vpc2-csr2 -p gcp -v vpc_name
步骤3.在辅助路由器上配置HA参数。
[guestshell@guestshell ~]$ create_node -i 1 -g -r dest_network -o 200 -n nexthop_ip_addr -a route-vpc2-csr2 -b route-vpc2-csr1 -p gcp -v vpc_name
验证
使用本部分可确认配置能否正常运行。
步骤1.使用node_event.py peerFail标志触发故障切换。
[guestshell@guestshell ~]$ node_event.py -i 10 -e peerFail 200: Node_event processed successfully
步骤2.导航至云提供商的私有路由表,验证路由是否已将下一跳更新为新的IP地址。
故障排除
目前没有针对此配置的故障排除信息。
相关信息
- Cisco CSR 1000v和Cisco ISRv软件配置指南中提供了详细的HAv3配置步骤
- Azure HAv2配置与HAv3基本类似,在PIP安装包和IOS冗余配置方面存在细微差异。 文档位于Microsoft Azure上的CSR1000v HA第2版配置指南
- Azure HAv1配置与CLI在Microsoft Azure上的CSR1000v HA冗余部署指南(与AzureCLI 2.0配合使用)中可找到
- AWS HAv1配置位于Amazon AWS上的CSR1000v HA冗余部署指南中
- 技术支持和文档 - Cisco Systems


 反馈
反馈