在终端服务器上使用菜单选项在Tty线路上配置SSH
下载选项
非歧视性语言
此产品的文档集力求使用非歧视性语言。在本文档集中,非歧视性语言是指不隐含针对年龄、残障、性别、种族身份、族群身份、性取向、社会经济地位和交叉性的歧视的语言。由于产品软件的用户界面中使用的硬编码语言、基于 RFP 文档使用的语言或引用的第三方产品使用的语言,文档中可能无法确保完全使用非歧视性语言。 深入了解思科如何使用包容性语言。
关于此翻译
思科采用人工翻译与机器翻译相结合的方式将此文档翻译成不同语言,希望全球的用户都能通过各自的语言得到支持性的内容。 请注意:即使是最好的机器翻译,其准确度也不及专业翻译人员的水平。 Cisco Systems, Inc. 对于翻译的准确性不承担任何责任,并建议您总是参考英文原始文档(已提供链接)。
简介
本文档介绍如何使用Secure Shell(SSH)将思科路由器配置为终端服务器,以通过菜单选项访问终端线路。
先决条件
要求
Cisco 建议您了解以下主题:
- 终端服务器使用和基本设置
- 连接控制台的八芯电缆
- 用于远程访问的SSH
使用的组件
本文档中的信息基于连接了HWIC-16A模块的Cisco 2911路由器。
本文档中的信息来自特定实验环境中的设备。本文档中使用的所有设备最初均采用原始(默认)配置。如果您使用的是真实网络,请确保您已经了解所有命令的潜在影响。
配置
网络图

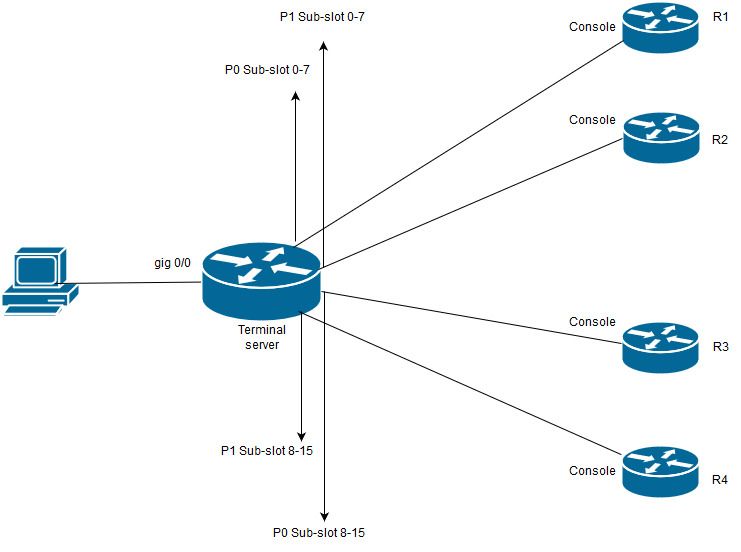
在此图中,Cisco 2911的HWIC-16A卡连接到插槽0,两根八口电缆连接到总共四个设备控制台(每个2个)。 从八口电缆1(0-7)端口0到R1,端口1到R2。同样,从八口电缆2,端口0到R3,端口1到R4。测试PC连接到终端服务器以进行控制台访问。
步骤1.确保在用作终端服务器的路由器上启用SSH。在配置示例中,本地数据库用于身份验证。也可以使用RADIUS或TACACS身份验证方法。
在路由器上配置一个环回接口,该接口稍后可用于打开与vty线路的反向telnet/SSH会话。其他物理接口IP也可用于终端线路访问。建议使用环回以实现可扩展性。
TS(config)#int lo 0
TS(config-if)#ip add 192.168.1.1 255.255.255.255
步骤2.在配置终端tty线路之前,最好了解这些端口映射的工作原理。使用以下命令可验证tty线路的数量:
TS#show line

   Tty Line Typ     Tx/Rx    A Modem  Roty AccO AccI  Uses  Noise Overruns  Int

*     0    0 CTY              -    -      -    -    -     4      0    0/0      -

      1    1 AUX   9600/9600  -    -      -    -    -     0      0    0/0      -

      2    2 TTY   9600/9600  -    -      -    -    -     0      0    0/0      -

  0/0/0    3 TTY   9600/9600  -    -      -    -    -    18    249    0/0      -

  0/0/1    4 TTY   9600/9600  -    -      -    -    -     6    257 1916/0      -

  0/0/2    5 TTY   9600/9600  -    -      -    -    -     0      0    0/0      -

  0/0/3    6 TTY   9600/9600  -    -      -    -    -     0      0    0/0      -

  0/0/4    7 TTY   9600/9600  -    -      -    -    -     0      0    0/0      -

  0/0/5    8 TTY   9600/9600  -    -      -    -    -     0      0    0/0      -

  0/0/6    9 TTY   9600/9600  -    -      -    -    -     0      0    0/0      -

  0/0/7   10 TTY   9600/9600  -    -      -    -    -     0      0    0/0      -

  0/0/8   11 TTY   9600/9600  -    -      -    -    -     3      0    0/0      -

  0/0/9   12 TTY   9600/9600  -    -      -    -    -    15    321    0/0      -

 0/0/10   13 TTY   9600/9600  -    -      -    -    -     0      0    0/0      -

 0/0/11   14 TTY   9600/9600  -    -      -    -    -     0      0    0/0      -

 0/0/12   15 TTY   9600/9600  -    -      -    -    -     0      0    0/0      -

 0/0/13   16 TTY   9600/9600  -    -      -    -    -     0      0    0/0      -

 0/0/14   17 TTY   9600/9600  -    -      -    -    -     0      0    0/0      -

 0/0/15   18 TTY   9600/9600  -    -      -    -    -     0      0    0/0      -

    388  388 VTY              -    -      -    -    -    50      0    0/0      -

    389  389 VTY              -    -      -    -    -     3      0    0/0      -

    390  390 VTY              -    -      -    -    -     0      0    0/0      -

   Tty Line Typ     Tx/Rx    A Modem  Roty AccO AccI  Uses  Noise Overruns  Int


    391  391 VTY              -    -      -    -    -     0      0    0/0      -

    392  392 VTY              -    -      -    -    -     0      0    0/0      -


Line(s) not in async mode -or- with no hardware support:

19-387
从输出中可以清楚地看到,使用HWIC-16A卡,它最多可以放弃16条ty线路,范围从0/0/0到0/0/15,允许连接16台设备。
每根八芯电缆有8根电线。在HWIC-16A卡上,可连接两根八芯电缆。在八芯电缆的每根电线和卡上都可以看到编号方案。几个简单的图表有助于更好地理解这一点。

仔细看电缆表示P0、P2、......P7模式中的数字,在卡上,顶部端口的数字为8 - 15,底部的数字为0 - 7。根据上图,您可以说,对于R1,您使用0/0/0行,对于R2线路0/0/1,对于R3线路0/0/8和R4 0/0/9。
步骤3.对于SSH访问,tty线路不侦听与telnet相同的端口。因此,您需要使用旋转组手动定义端口。
- 配置SSH以侦听一系列端口并将其映射到旋转组。
TS(config)#ip ssh port 2001 rotary 1 127
此命令以顺序方式将每个旋转组映射到端口。例如;rotary 1将映射到端口2001、rotary 2-2002、rotary 3-2003、......等
- 现在,您将在tty行下定义旋转组。配置时,您可以使用tty或线路号,如0/0/0行或第3行。无论您配置什么,它都会显示为tty。配置如下:
line 0/0/0

 login local

 rotary 1

 no exec

 transport input ssh

line 0/0/1

 login local

 rotary 2

 no exec

 transport input ssh

line 0/0/8

 login local

 rotary 11

 no exec

 transport input ssh

line 0/0/9

 login local

 rotary 12

 no exec

 transport input ssh
在本配置示例中,rotary 1在行0/0/0下定义,rotary 1已映射到端口2001。因此,线路将侦听SSH端口2001。同样,0/0/1线路将侦听端口2002。
步骤4.将SSH的vty线路配置为传出协议。由于您打开与线路的反向连接,因此它来自vty线路,因此应允许SSH。
TS(config)#line vty 0 4

TS(config-line)#transport output ssh

TS(config-line)#login local
步骤5.确保根据使用的身份验证标准正确配置了用户名。在此配置示例中,您已使用密码cisco123配置了本地用户名cisco。
现在,您已准备好访问设备。可以使用多种方法来实现此目的,此处将检查所有方法。
使用终端应用
使用SSH客户端软件,您可以使用基于终端线路映射的端口通过SSH进行连接。
直接从终端服务器访问
TS#ssh -l cisco -p 2012 192.168.1.1


Password:


Password OK


R4#
在本例中,1.1.1.1是终端服务器的环回地址。要返回终端服务器,您需要使用Ctrl + Shift + 6,松开按钮,然后立即按X键。
终端服务器的会话可以使用show sessions命令进行验证。
TS#show sessions

Conn Host                Address             Byte  Idle Conn Name

*  192.168.1.1         192.168.1.1                  0     2 192.168.1.1
*表示活动会话,要清除会话,可以使用clear line <line number;在本例中为12>或断开<conn number旁边的*>
TS#disconnect 1

Closing connection to 192.168.1.1 [confirm]
通过菜单选项访问设备:
这是访问设备的另一种方法。当有人登录到终端服务器时,它提供一组选项,使访问设备变得简单。
注意:为便于访问,您可以将IP绑定到允许使用该名称而非IP的主机名。此操作为可选操作。
步骤1.将终端服务器IP地址绑定到名称。
ip host R 192.168.1.1
步骤2.菜单选项提供了根据用户输入使用一组命令的选项。
- 配置菜单的标语或标题:。
TS(config)#menu nodes title $

Enter TEXT message.  End with the character '$'.


==================================================

Welcome to my access server.

==================================================

$
步骤3.这为从菜单中选择选项提供了一个界面。
TS(config)#menu cisco prompt $

Enter TEXT message. End with the character '$'.

enter your selection here :

$
步骤4.要连接到设备控制台,请在全局配置模式下使用以下选项。
menu nodes text 1 1800 P1/0

menu nodes command 1 ssh -l cisco -p 2001 R

menu nodes text 2 1800 P1/1

menu nodes command 2 ssh -l cisco -p 2002 R

menu nodes text 3 3825 P2/0

menu nodes command 3 ssh -l cisco -p 2011 R

menu nodes text 4 3850 P2/1

menu nodes command 4 ssh -l cisco -p 2012 R
步骤5.使用此命令可使用户在进行选择后按Enter键。默认情况下,当用户选择选项时,它会自动执行。
TS#(config)menu nodes line-mode
步骤6.配置这些选项以断开会话。
menu nodes text d disconnect last session

menu nodes command d disconnect

menu nodes text d<no> clear session by number ie: d1

menu nodes command d1 disconnect 1

menu nodes command d2 disconnect 2

menu nodes command d3 disconnect 3

menu nodes command d4 disconnect 4
步骤7.确保将选项配置为从菜单退出。
menu nodes text exit menu-exit

menu nodes command exit menu-exit
步骤8.菜单下也可能配置一些其他选项。
menu nodes single-space

! single-space menu entries on display

menu nodes status-line

! Display user status at top of screen

menu nodes text q Quit terminal server session

menu nodes command q exit

menu nodes text s show all established sessions

menu nodes command s show sessions

menu nodes options s pause

! pause after command, before redrawing menu
步骤9.在应用菜单之前,您不会看到任何更改。因此,将其应用于vty线路,以便当用户打开到终端服务器的远程会话时,它会提供菜单提示。
TS(config)#line vty 0 4

TS(config-line)#autocommand menu nodes
警告:如果您远程访问终端服务器并想对菜单进行一些修改,建议从vty线路中删除auto命令并进行更改。由于您从菜单中删除一行,它将删除整个菜单配置,并且如果您仅在菜单下配置了标语,则路由器进入菜单选项后,将无法中断它,除非通过控制台访问终端服务器从vty线路中删除auto命令。
需要对菜单进行的任何更改,请添加菜单命令而不删除任何内容,这将覆盖之前的配置。或者,备份菜单配置,进行更改。然后删除整个菜单,并再次应用修改的完整菜单配置。
验证
使用本部分可确认配置能否正常运行。
如果通过控制台访问终端服务器,这是您进入菜单选项的方式。
TS#menu nodes
对于远程访问,连接将直接登录到菜单选项。
login as: cisco

Using keyboard-interactive authentication.

Password:

Server "TS"    Line 388    Terminal-type xterm


==================================================

Welcome to my access server.

==================================================


    1          1800 P1/0

    2          1800 P1/1

    3          3825 P2/0

    4          3850 P2/1

    exit       menu-exit

    q          Quit terminal server session

    s          show all established sessions

    d          disconnect last session

    d<no>      clear session by number ie: d1


enter your selection here :4

Password:


Password OK


R4>
按CTRL + Shift + 6,然后按X以返回终端服务器。
检查和断开会话:
==================================================

Welcome to my access server.

==================================================


    1          1800 P1/0

    2          1800 P1/1

    3          3825 P2/0

    4          3850 P2/1

    exit       menu-exit

    q          Quit terminal server session

    s          show all established sessions

    d          disconnect last session

    d<no>      clear session by number ie: d1


enter your selection here :s

Conn Host                Address             Byte  Idle Conn Name

   1 R                192.168.1.1               0     0 R

*  2 R                192.168.1.1               0     0
可以看到,有两个会话,会话2当前处于活动状态。要断开连接:
 enter your selection here :d1

Closing connection to R [confirm]

Server "TS"    Line 388    Terminal-type xterm


enter your selection here :d2

Closing connection to R [confirm]

Server "TS"    Line 388    Terminal-type xterm

Exiting from menu options:

enter your selection here :exit

TS>
这将我们带回到终端服务器CLI。
注意:您可能已注意到,有时连接被远程主机拒绝,当您连接以解决此问题时,请从菜单选项或从cli exec模式断开任何活动连接,使用命令clear line <line number>并尝试再次连接设备。
故障排除
目前没有针对此配置的故障排除信息。
由思科工程师提供
- Dibyajyoti PandaCisco TAC Engineer
 反馈
反馈