PIX/ASA 7.x及更高版本:使用Internet连接多个内部网络的配置示例
目录
简介
本文档提供了一个使用命令行界面 (CLI) 或自适应安全设备管理器 (ASDM) 5.x 及更高版本在具有多个连接到 Internet(或外部网络)的内部网络的环境中配置 PIX/ASA 安全设备 7.x 及更高版本的示例。
有关如何通过 PIX/ASA 建立连接和排除连接故障的信息,请参阅通过 Cisco 安全设备建立连接和排除连接故障。
有关常见 PIX 命令的信息,请参阅在 PIX 上使用 nat、global、static、conduit 和 access-list 命令和端口重定向(转发)。
注意:其他ASDM版本中的某些选项可能与ASDM 5.1中的选项显示不同。有关详细信息,请参阅 ASDM 文档。
先决条件
要求
在 PIX 防火墙后添加多个内部网络时,请记住以下几点:
-
PIX 不支持辅助编址。
-
必须在 PIX 后使用路由器才能在现有网络和新添加的网络之间实现路由。
-
所有主机的默认网关都需要指向内部路由器。
-
在内部路由器上添加一个指向 PIX 的默认路由。
-
清除内部路由器上的地址解析协议(ARP)缓存。
为了允许使用 ASDM 配置设备,请参阅允许对 ASDM 进行 HTTPS 访问。
使用的组件
本文档中的信息基于以下软件和硬件版本:
-
安装有软件版本 7.1 的 PIX 安全设备 515E
-
ASDM 5.1
-
安装有 Cisco IOS® 软件版本 12.3(7)T 的 Cisco 路由器
注意:本文档已通过PIX/ASA软件版本8.x和Cisco IOS软件版本12.4的重新认证。
本文档中的信息都是基于特定实验室环境中的设备编写的。本文档中使用的所有设备最初均采用原始(默认)配置。如果您使用的是真实网络,请确保您已经了解所有命令的潜在影响。
相关产品
此配置也可用于 Cisco ASA 安全设备版本 7.x 及更高版本。
规则
有关文档约定的更多信息,请参考 Cisco 技术提示约定。
配置
本部分提供有关如何配置本文档所述功能的信息。
注意:要获取此部分中所用命令的更多信息,可使用命令查找工具(仅限已注册客户)。
此配置中使用的 IP 编址方案在 Internet 上不可合法路由。这些地址是在实验室环境中使用的 RFC 1918 地址。
背景信息
在此方案中,有三个内部网络(10.1.1.0/24、10.2.1.0/24 和 10.3.1.0/24)要通过 PIX 连接到 Internet(或外部网络)。内部网络被连接到 PIX 的内部接口。Internet 连接通过连接到 PIX 外部接口的路由器进行。PIX 的 IP 地址为 172.16.1.1/24。
使用静态路由将数据包从内部网络路由到 Internet,反之亦然。除了使用静态路由,您还可以使用动态路由协议,例如路由信息协议(RIP)或开放最短路径优先(OSPF)。
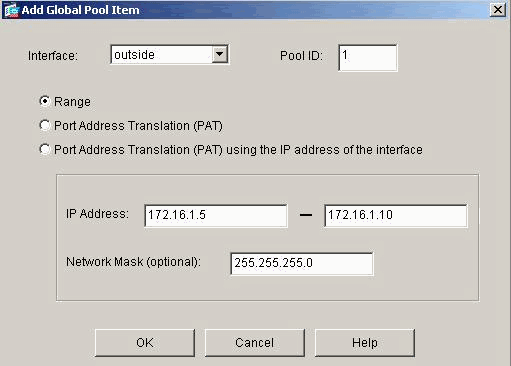
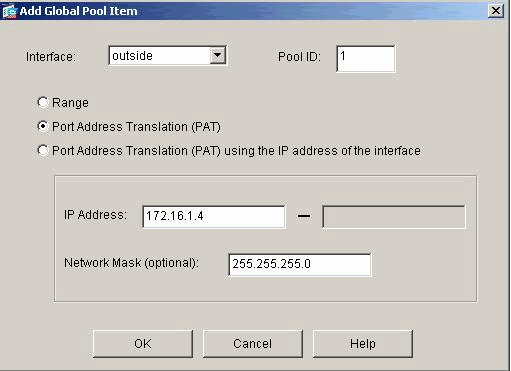
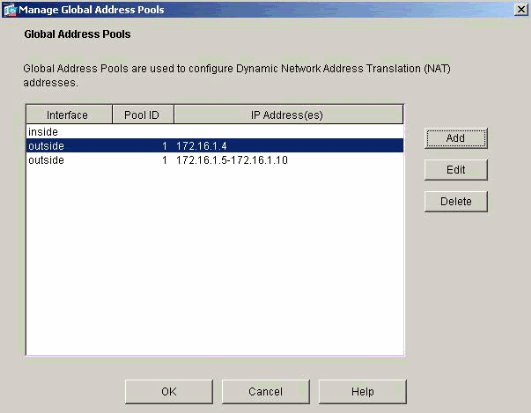
内部主机通过使用动态 NAT(IP 地址池 - 172.16.1.5 到 172.16.1.10)转换 PIX 上的内部网络来与 Internet 进行通信。如果 IP 地址池中的地址已用尽,PIX 将对内部主机进行 PAT(使用 IP 地址 172.16.1.4)以到达 Internet。
有关 NAT/PAT 的详细信息,请参阅 PIX/ASA 7.x NAT 和 PAT 语句。
注意:如果静态NAT使用外部IP (global_IP)地址进行转换,则可能会导致转换。因此,在静态转换中请使用关键字 interface 代替 IP 地址。
网络图
本文档使用以下网络设置:
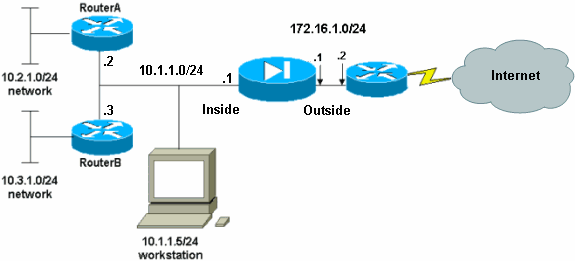
10.1.1.0 网络上的主机默认网关指向 RouterA。在 RouterB 上添加了指向 RouterA 的默认路线。RouterA 具有指向 PIX 内部接口的默认路线。
配置
本文档使用以下配置:
| RouterA 配置 |
|---|
RouterA#show running-config Building configuration... Current configuration : 1151 bytes ! version 12.4 service config service timestamps debug uptime service timestamps log uptime no service password-encryption ! hostname RouterA ! interface Ethernet2/0 ip address 10.2.1.1 255.255.255.0 half-duplex ! interface Ethernet2/1 ip address 10.1.1.2 255.255.255.0 half-duplex ! ip classless ip route 0.0.0.0 0.0.0.0 10.1.1.1 ip route 10.3.1.0 255.255.255.0 10.1.1.3 ! ! line con 0 line aux 0 line vty 0 4 ! end RouterA# |
| RouterB 配置 |
|---|
RouterB#show running-config Building configuration... Current configuration : 1132 bytes ! version 12.4 service config service timestamps debug datetime msec service timestamps log datetime msec no service password-encryption ! hostname RouterB ! interface FastEthernet0/0 ip address 10.1.1.3 255.255.255.0 speed auto ! interface Ethernet1/0 ip address 10.3.1.1 255.255.255.0 half-duplex ! ip classless ip route 0.0.0.0 0.0.0.0 10.1.1.2 ! control-plane ! ! line con 0 line aux 0 line vty 0 4 ! end RouterB# |
如果希望使用 ASDM 配置 PIX 安全设备,但是尚未引导设备,请完成以下步骤:
-
通过控制台连接到 PIX。
-
在原始配置下,使用交互提示启用 ASDM 以从工作站 10.1.1.5 管理 PIX。
| PIX 安全设备 7.1 配置 |
|---|
Pre-configure Firewall now through interactive prompts [yes]? yes
Firewall Mode [Routed]:
Enable password [<use current password>]: cisco
Allow password recovery [yes]?
Clock (UTC):
  Year [2005]:
  Month [Mar]:
  Day [15]:
  Time [05:40:35]: 14:45:00
Inside IP address: 10.1.1.1
Inside network mask: 255.255.255.0
Host name: OZ-PIX
Domain name: cisco.com
IP address of host running Device Manager: 10.1.1.5

The following configuration will be used:
         Enable password: cisco
         Allow password recovery: yes
         Clock (UTC): 14:45:00 Mar 15 2005
         Firewall Mode: Routed
         Inside IP address: 10.1.1.1
         Inside network mask: 255.255.255.0
         Host name: OZ-PIX
         Domain name: cisco.com
         IP address of host running Device Manager: 10.1.1.5

Use this configuration and write to flash? yes
         INFO: Security level for "inside" set to 100 by default.
         Cryptochecksum: a0bff9bb aa3d815f c9fd269a 3f67fef5

965 bytes copied in 0.880 secs
         INFO: converting 'fixup protocol dns maximum-length 512' to MPF commands
         INFO: converting 'fixup protocol ftp 21' to MPF commands
         INFO: converting 'fixup protocol h323_h225 1720' to MPF commands
         INFO: converting 'fixup protocol h323_ras 1718-1719' to MPF commands
         INFO: converting 'fixup protocol netbios 137-138' to MPF commands
         INFO: converting 'fixup protocol rsh 514' to MPF commands
         INFO: converting 'fixup protocol rtsp 554' to MPF commands
         INFO: converting 'fixup protocol sip 5060' to MPF commands
         INFO: converting 'fixup protocol skinny 2000' to MPF commands
         INFO: converting 'fixup protocol smtp 25' to MPF commands
         INFO: converting 'fixup protocol sqlnet 1521' to MPF commands
         INFO: converting 'fixup protocol sunrpc_udp 111' to MPF commands
         INFO: converting 'fixup protocol tftp 69' to MPF commands
         INFO: converting 'fixup protocol sip udp 5060' to MPF commands
         INFO: converting 'fixup protocol xdmcp 177' to MPF commands

Type help or '?' for a list of available commands.
OZ-PIX> |
使用 ASDM 配置 PIX
要通过 ASDM GUI 进行配置,请完成以下步骤:
-
从工作站 10.1.1.5 中打开 Web 浏览器以使用 ADSM(在本示例中,https://10.1.1.1)。
-
在提示证书时,单击 yes。
-
使用以前配置的启用口令登录。
-
如果这是 ASDM 第一次在该 PC 上运行,系统将提示您使用 ASDM 启动程序或将 ASDM 作为 Java 小程序使用。在本示例中,选择并安装 ASDM 启动程序。
-
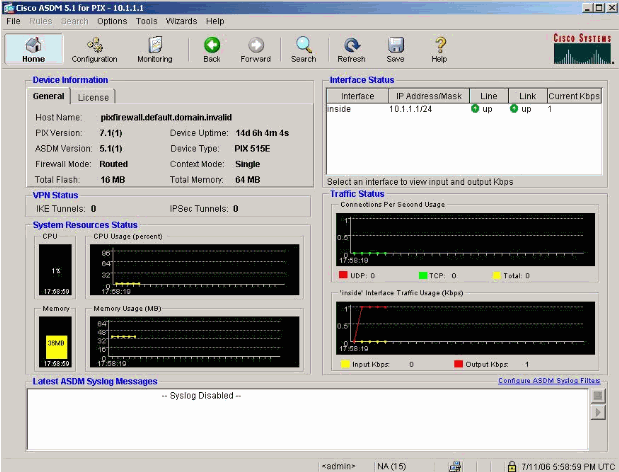
转到 ASDM 主窗口并单击 Configuration。
-
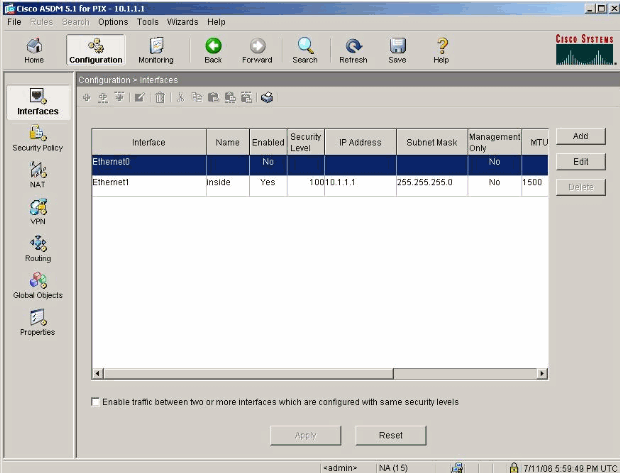
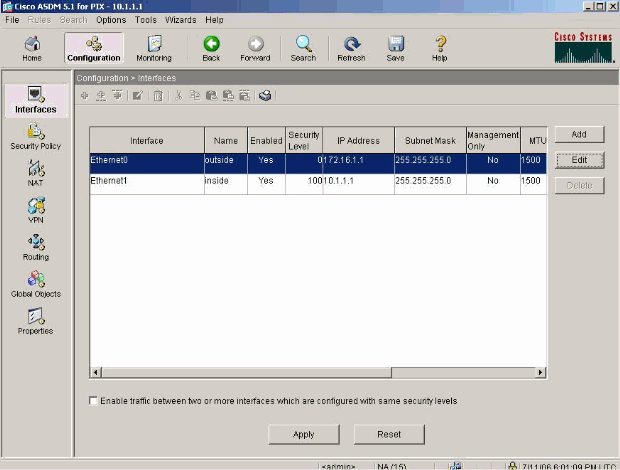
选择 Interface > Edit 以配置外部接口。
-
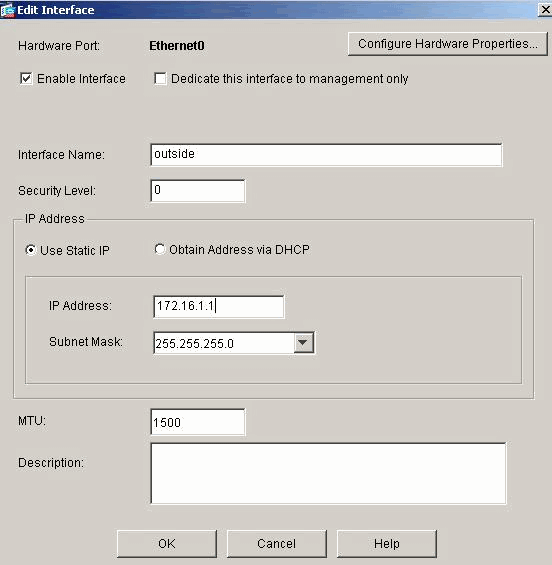
输入接口详细资料,并在完成后单击 OK。
-
单击 Security Level Change 对话框上的 OK。

-
点击 Apply 接受接口配置。此配置也将被推送到 PIX 上。
-
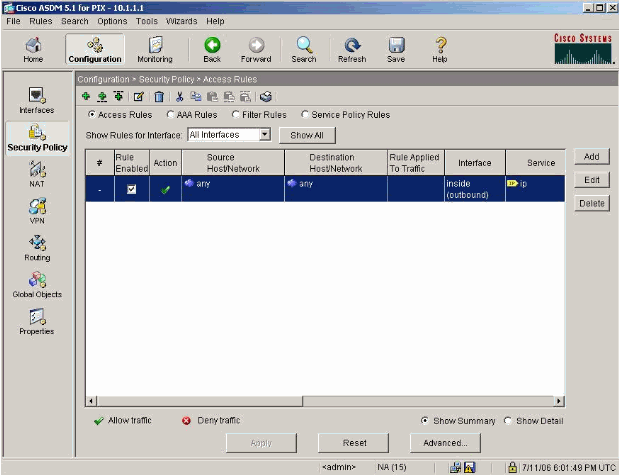
选择 Features 选项卡上的 Security Policy 以复查使用的安全策略规则。在本示例中,使用默认内部规则。
-
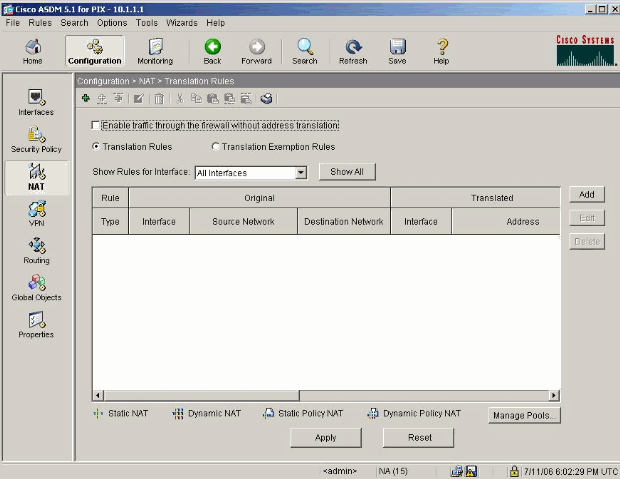
在本示例中,使用 NAT。取消选中 Enable traffic through the firewall without address translation 复选框并单击 Add 以配置 NAT 规则。
-
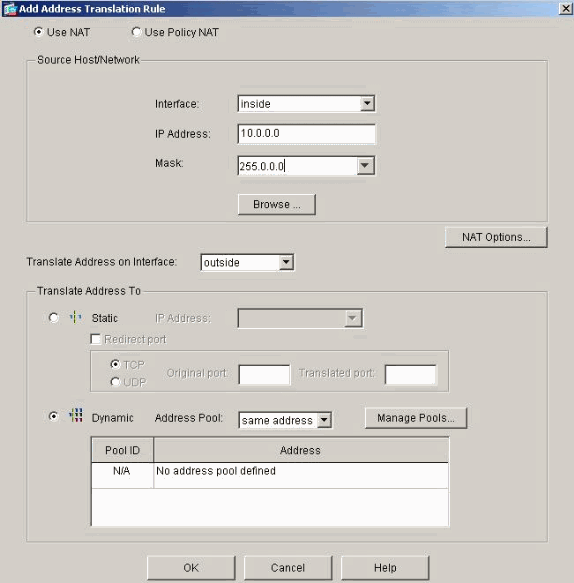
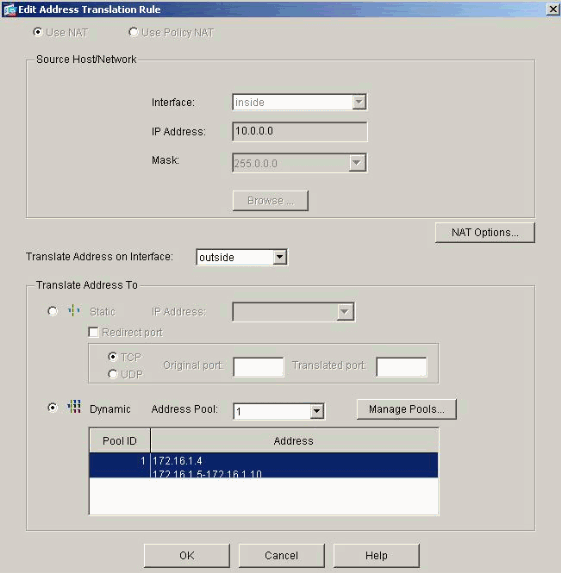
配置源网络。在本示例中,使用 10.0.0.0 作为 IP 地址,使用 255.0.0.0 作为掩码。
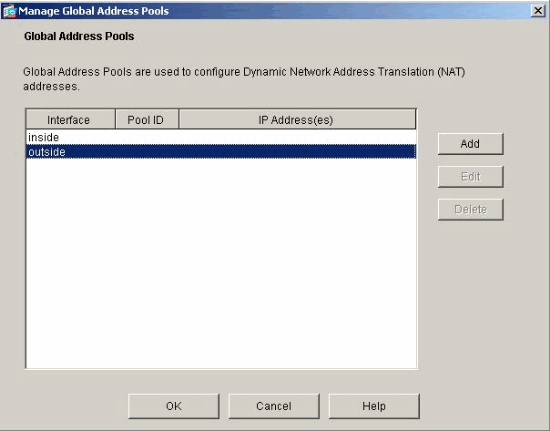
单击 Manage Pools 以定义 NAT 池地址。
-
选择外部接口并单击 Add。
-
在本示例中,配置了范围和 PAT 地址池。配置范围 NAT 池地址并单击 OK。
-
选择步骤 13 中的外部接口以配置 PAT 地址。单击 OK
单击 OK 以继续。
-
在 Edit Address Translation Rule 窗口上,选择要由配置的源网络使用的池 ID。Click OK.
-
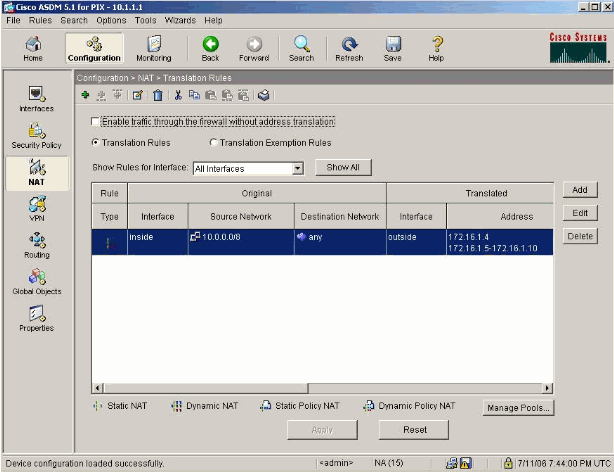
单击 Apply 以将配置的 NAT 规则推送到 PIX。
-
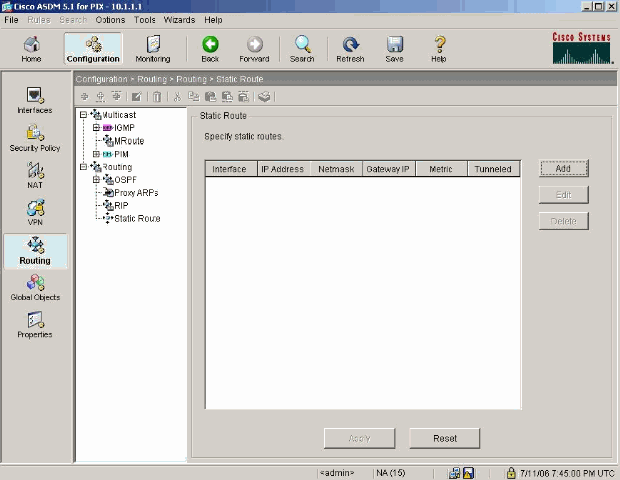
在本示例中,使用静态路由。单击 Routing,选择 Static Route 并单击 Add。
-
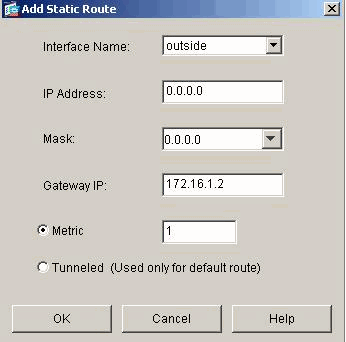
配置默认网关并单击 OK。
-
单击 Add 以将路由添加到网络内部。
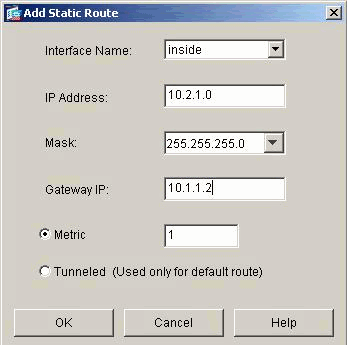
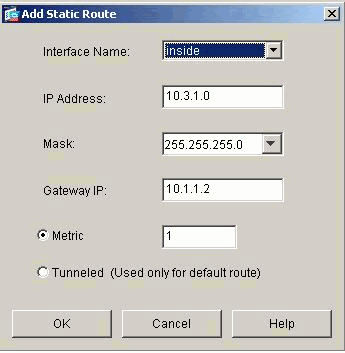
-
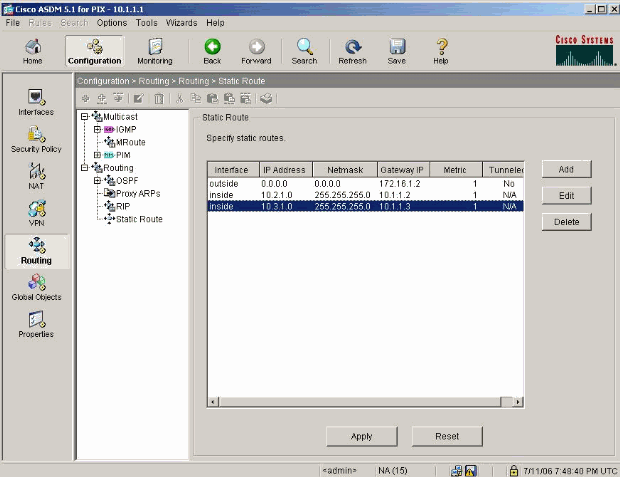
确认配置的路由正确,然后单击 Apply。
使用 CLI 配置 PIX
通过 ASDM GUI 进行配置的过程现已完成。
您可以通过 CLI 查看此配置:
| PIX 安全设备 CLI |
|---|
pixfirewall(config)#write terminal PIX Version 7.0(0)102 names ! interface Ethernet0 nameif outside security-level 0 ip address 172.16.1.1 255.255.255.0 ! interface Ethernet1 nameif inside security-level 100 ip address 10.1.1.1 255.255.255.0 !--- Assign name and IP address to the interfaces enable password 2KFQnbNIdI.2KYOU encrypted passwd 2KFQnbNIdI.2KYOU encrypted asdm image flash:/asdmfile.50073 no asdm history enable arp timeout 14400 nat-control !--- Enforce a strict NAT for all the traffic through the Security appliance global (outside) 1 172.16.1.5-172.16.1.10 netmask 255.255.255.0 !--- Define a pool of global addresses 172.16.1.5 to 172.16.1.10 with !--- NAT ID 1 to be used for NAT global (outside) 1 172.16.1.4 netmask 255.255.255.0 !--- Define a single IP address 172.16.1.4 with NAT ID 1 to be used for PAT nat (inside) 1 10.0.0.0 255.0.0.0 !--- Define the inside networks with same NAT ID 1 used in the global command for NAT route inside 10.3.1.0 255.255.255.0 10.1.1.3 1 route inside 10.2.1.0 255.255.255.0 10.1.1.2 1 !--- Configure static routes for routing the packets towards the internal network route outside 0.0.0.0 0.0.0.0 172.16.1.2 1 !--- Configure static route for routing the packets towards the Internet (or External network) timeout xlate 3:00:00 timeout conn 1:00:00 half-closed 0:10:00 udp 0:02:00 icmp 0:00:02 sunrpc 0:10:00 h323 0:05:00 h225 1:00:00 mgcp 0:05:00 mgcp-pat 0:05:00 sip 0:30:00 sip_media 0:02:00 timeout uauth 0:05:00 absolute http server enable !--- Enable the HTTP server on PIX for ASDM access http 10.1.1.5 255.255.255.255 inside !--- Enable HTTP access from host 10.1.1.5 to configure PIX using ASDM (GUI) ! !--- Output suppressed ! ! Cryptochecksum:a0bff9bbaa3d815fc9fd269a3f67fef5 : end |
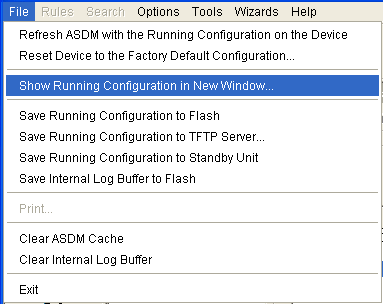
选择 File > Show Running Configuration in New Window 以在 ASDM 中查看 CLI 配置。
验证
当前没有可用于此配置的验证过程。
故障排除
故障排除命令
命令输出解释程序(仅限注册用户)(OIT) 支持某些 show 命令。使用 OIT 可查看对 show 命令输出的分析。
注意:使用debug命令之前,请参阅有关Debug命令的重要信息。
-
debug icmp trace - 显示来自主机的 ICMP 请求是否到达 PIX。要运行此 debug 命令,需要添加 access-list 命令以在您的配置中允许 ICMP。
-
logging buffer debugging - 显示已建立和拒绝的通过 PIX 到主机的连接。信息存储在 PIX 日志缓冲区中,使用 show log 命令可查看输出。
故障排除步骤
ASDM 可用于启用日志记录,也可用于查看日志:
-
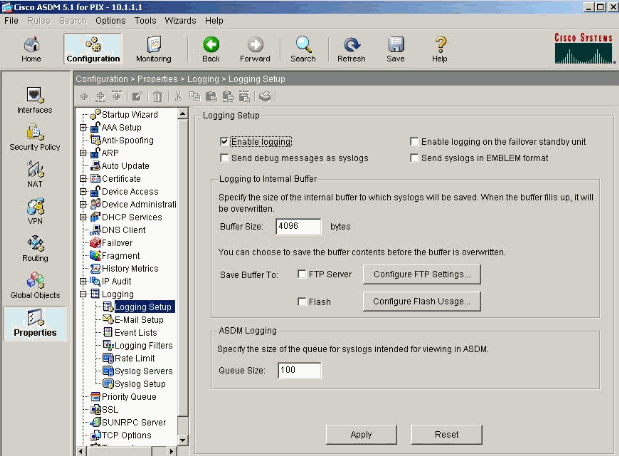
选择 Configuration > Properties > Logging > Logging Setup,选中 Enable Logging,然后单击 Apply。
-
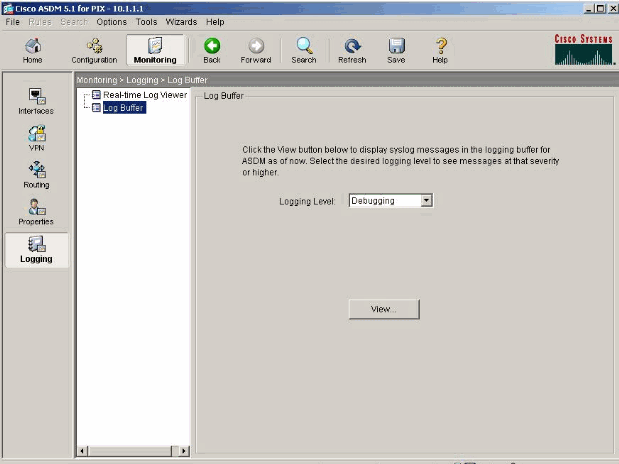
选择 Monitoring > Logging > Log Buffer > Logging Level 并从下拉列表中选择 Logging Buffer。单击 View。
-
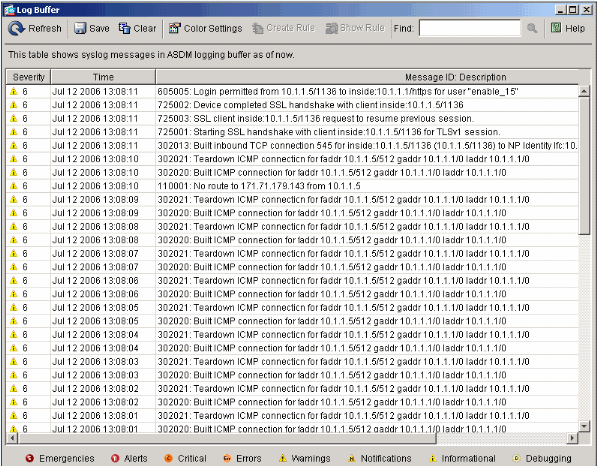
以下是 Log Buffer 的示例:
无法按名称访问网站
在某些方案中,内部网络无法通过使用 Web 浏览器中的名称(与 IP 地址一起使用)访问 Internet 网站。此问题很常见且经常发生在未定义 DNS 服务器的情况下,特别是在 PIX/ASA 是 DHCP 服务器的情况下。此外,在 PIX/ASA 无法推送 DNS 服务器或 DNS 服务器不可达的情况下,也会发生此问题。
相关信息
修订历史记录
| 版本 | 发布日期 | 备注 |
|---|---|---|
1.0 |
27-Jan-2005 |
初始版本 |
 反馈
反馈