FlexVPN部署:使用EAP-MD5的AnyConnect IKEv2远程访问
目录
简介
本文档提供了使用FlexVPN工具包在IOS上设置远程访问的示例配置。
远程访问VPN允许使用各种操作系统的终端客户端通过非安全介质(如Internet)安全地连接到其企业或家庭网络。在所示场景中,VPN隧道在使用IKEv2协议的Cisco IOS路由器上终止。
本文档说明如何通过EAP-MD5方法使用访问控制服务器(ACS)对用户进行身份验证和授权。
先决条件
网络图
Cisco IOS路由器有两个接口 — 一个指向ACS 5.3:

要求
本文档没有任何特定的要求。
使用的组件
本文档中的信息基于以下软件和硬件版本:
-
带补丁6的ACS 5.3
-
带15.2(4)M软件的IOS路由器
-
Windows 7 PC,带AnyConnect 3.1.01065
规则
有关文档约定的更多信息,请参考 Cisco 技术提示约定。
背景
在IKEv1 XAUTH在第1.5阶段中使用,您可以在IOS路由器上本地对用户进行身份验证,并使用RADIUS/TACACS+远程进行身份验证。IKEv2不再支持XAUTH和第1.5阶段。它包含内置EAP支持,在IKE_AUTH阶段完成。这的最大优势在于IKEv2设计,而EAP是众所周知的标准。
EAP支持两种模式:
-
隧道 — EAP-TLS、EAP/PSK、EAP-PEAP等
-
非隧道 — EAP-MSCHAPv2、EAP-GTC、EAP-MD5等
在本示例中,使用非隧道模式下的EAP-MD5,因为它是ACS 5.3中当前支持的EAP外部身份验证方法。
EAP只能用于对响应方(本例中为IOS)进行身份验证发起方(客户端)。
IOS初始配置
IOS - CA
首先,您需要创建证书颁发机构(CA)并为IOS路由器创建身份证书。客户端将根据该证书验证路由器的身份。
在IOS上配置CA如下:
crypto pki server CA
grant auto
hash sha1
eku server-auth client-auth
您需要记住扩展密钥使用(EAP需要服务器身份验证,RSA-SIG也需要客户端身份验证)。
在crypto pki server CA中使用no shutdown命令启用CA。
IOS — 身份证书
接下来,为证书启用简单证书注册协议(SCEP)并配置信任点。
ip http server
crypto pki trustpoint CA-self
enrollment url http://10.1.1.2:80
fqdn 10.1.1.2
ip-address 10.1.1.2
subject-name cn=10.1.1.2,ou=TAC
revocation-check none
eku request server-auth client-auth
然后,验证并注册证书:
(config)#crypto pki authenticate CA-self
Certificate has the following attributes:
       Fingerprint MD5: 741C671C 3202B3AE 6E05161C 694CA53E
      Fingerprint SHA1: 8C99513C 2198470F 7CB58FA2 32D8AA8D FC31D1ED
% Do you accept this certificate? [yes/no]: yes
Trustpoint CA certificate accepted.

R1(config)#crypto pki enroll CA-self
%
% Start certificate enrollment ..
% Create a challenge password. You will need to verbally provide this
   password to the CA Administrator in order to revoke your certificate.
   For security reasons your password will not be saved in the configuration.
   Please make a note of it.
Password:
Re-enter password:
% The subject name in the certificate will include: cn=10.1.1.2,ou=TAC
% The subject name in the certificate will include: 10.1.1.2
% Include the router serial number in the subject name? [yes/no]: no
% The IP address in the certificate is 10.1.1.2
Request certificate from CA? [yes/no]: yes
% Certificate request sent to Certificate Authority
% The 'show crypto pki certificate verbose CA-self' command
will show the fingerprint.
R1(config)#
*Dec  2 10:57:44.141: CRYPTO_PKI:  Certificate Request Fingerprint MD5:
BF8EF4B6 87FA8162 9079F917 698A5F36
*Dec  2 10:57:44.141: CRYPTO_PKI:  Certificate Request Fingerprint SHA1:
AC13FEA3 295F7AE6 7014EF60 784E33AF FD94C41D
R1(config)#
*Dec  2 10:57:44.198: %PKI-6-CERTRET: Certificate received from
Certificate Authority
如果不想在AnyConnect中显示提示消息,请记住cn必须等于AnyConnect配置文件中配置的主机名/IP地址。
在本例中,cn=10.1.1.2。因此,在AnyConnect 10.1.1.2中,在AnyConnect xml配置文件中输入服务器的IP地址。
IOS - AAA和Radius配置
您需要配置Radius和AAA身份验证和授权:
aaa new-model
radius-server host 192.168.56.202 key cisco
aaa group server radius SERV
server 192.168.56.202
aaa authentication login eap-list group SERV
aaa authorization network eap-list group SERV
ACS初始配置
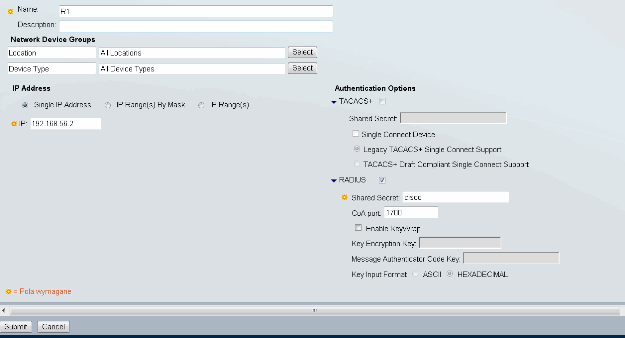
首先,在ACS中添加新的网络设备(Network Resources > Network Devices and AAA Clients > Create):
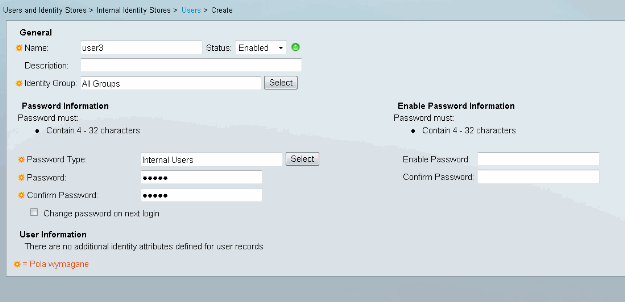
添加用户(Users and Identity Stores > Internal Identity Stores > Users > Create):
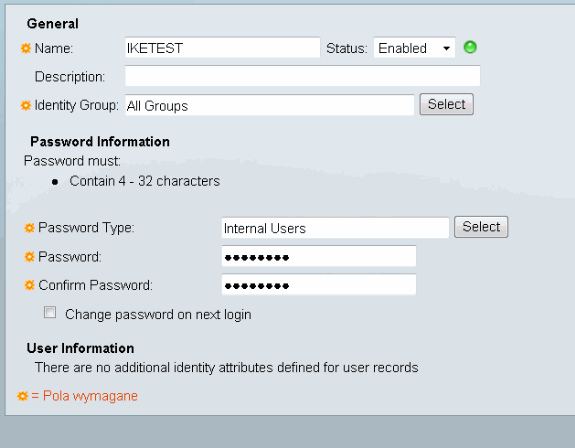
添加用户进行授权。在本例中,它是IKETEST。密码必须为“cisco”,因为它是IOS发送的默认密码。
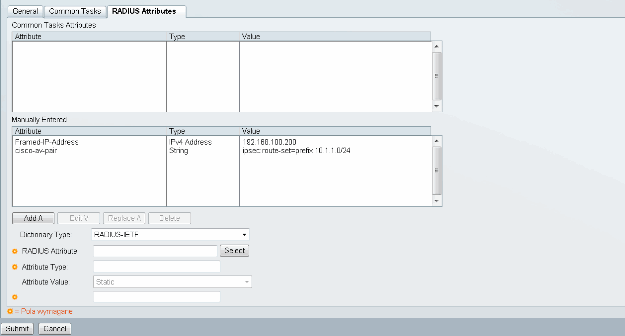
接下来,为用户创建授权配置文件(Policy elements > Authorization and Permissions > Network Access > Authorization Profiles > Create)。
在本例中,它称为POOL。在本示例中,输入拆分隧道AV对(作为前缀),并将Framed-IP-Address作为IP地址分配给连接的客户端。所有支持的AV对的列表可在以下位置找到:http://www.cisco.com/en/US/docs/ios-xml/ios/sec_conn_ike2vpn/configuration/15-2mt/sec-apx-flex-rad.html
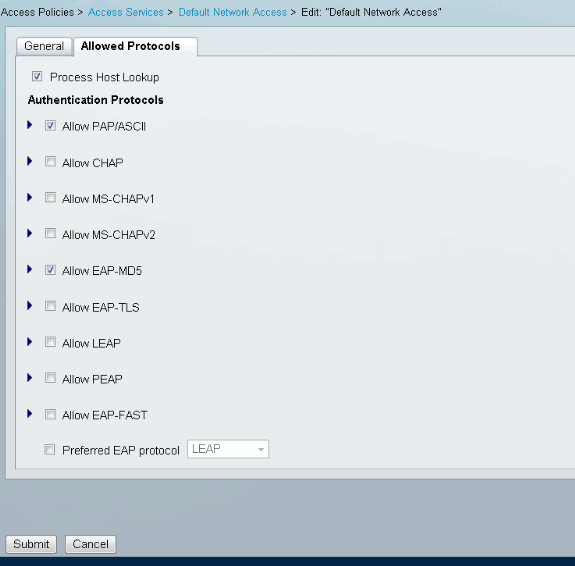
然后,您需要在访问策略中启用对EAP-MD5(用于身份验证)和PAP/ASCII(用于授权)的支持。此示例中使用默认值(Access Policies > Default Network Access):
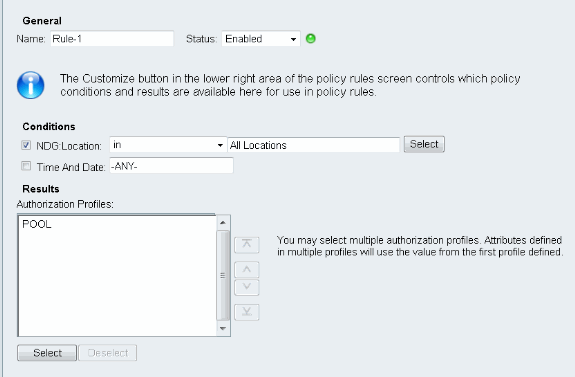
在访问策略中为创建条件并分配已创建的授权配置文件。在这种情况下,会创建NDG:Location in All Locations的条件,因此,对于所有Radius授权请求,将提供POOL授权配置文件(访问策略>访问服务>默认网络访问):
如果用户能正确进行身份验证,您应该能够在IOS路由器上测试:
R1#test aaa group SERV user3 Cisco123 new-code
User successfully authenticated

USER ATTRIBUTES
username             0   "user3"
addr                 0   192.168.100.200
route-set            0   "prefix 10.1.1.0/24"
IOS FlexVPN配置
您需要创建IKEv2建议和策略(您可能不必创建,请参阅CSCtn59317)。 本例中仅为其中一个IP地址(10.1.1.2)创建策略。
crypto ikev2 proposal PROP
encryption 3des
integrity sha1
group 2

crypto ikev2 policy 5
match address local 10.1.1.2
proposal PROP
然后,创建将绑定到虚拟模板的IKEV2配置文件和IPsec配置文件。
确保您正在关闭http-url证书,如配置指南中所述。
crypto ikev2 profile PROF
match identity remote address 0.0.0.0
match identity remote key-id IKETEST
authentication remote eap query-identity
authentication local rsa-sig
pki trustpoint CA-self
aaa authentication eap eap-list
aaa authorization user eap list eap-list IKETEST
virtual-template 1

no crypto ikev2 http-url cert
crypto ipsec transform-set transform1 esp-3des esp-sha-hmac
crypto ipsec profile PROF
set transform-set transform1
set ikev2-profile PROF
interface Virtual-Template1 type tunnel
ip unnumbered Ethernet0/0
tunnel mode ipsec ipv4
tunnel protection ipsec profile PROF
在本示例中,根据在ACS配置中创建的用户IKETEST设置授权。
Windows配置
将CA导入Windows信任
在IOS上导出CA证书(确保导出身份证书,并仅获取第一部分):
R1(config)#crypto pki export CA-self pem terminal
% CA certificate:
-----BEGIN CERTIFICATE-----
MIIB8zCCAVygAwIBAgIBATANBgkqhkiG9w0BAQUFADANMQswCQYDVQQDEwJDQTAe
Fw0xMjExMjYxNzMzMzlaFw0xNTExMjYxNzMzMzlaMA0xCzAJBgNVBAMTAkNBMIGf
MA0GCSqGSIb3DQEBAQUAA4GNADCBiQKBgQCvDR4lHOcrj42QfHpRuNu4EyFrLR8H
TbPanXYV+GdCBmu53pDILE00ASEHByD6DYBx01EZuDsiolJ7t2MPTguB+YZe6V4O
JbtayyxtZGmF7+eDqRegQHHC394adQQWl2ojgQiuTHeRDTqDJR8i5gN2Ee+KOsr3
+OjnHjUmXb/I6QIDAQABo2MwYTAPBgNVHRMBAf8EBTADAQH/MA4GA1UdDwEB/wQE
AwIBhjAfBgNVHSMEGDAWgBTH5Sdh69q4HAJulLQYLbYH0Nk9zzAdBgNVHQ4EFgQU
x+UnYevauBwCbpS0GC22B9DZPc8wDQYJKoZIhvcNAQEFBQADgYEADtBLiNXnl+LC
PIgJ0nl/jH5p2IwVlzwbPbZcOsZ9mn54QaqrhmhbHnmqKQJl/20+JPE6p+4noICq
VBrxoiX2KYQ1OwmEScPpQ2XJ9vhGqtQ4Xcx3g20HhxxFDfp2XuW7hwU0W8dTCmZw
4vodj47qEXKI6pGuzauw9MN1xhkNarc=
-----END CERTIFICATE-----
在BEGIN CERTIFICATE和END CERTIFICATE之间复制部件,并将其粘贴到Windows的记事本中,并另存为文件CA.crt。
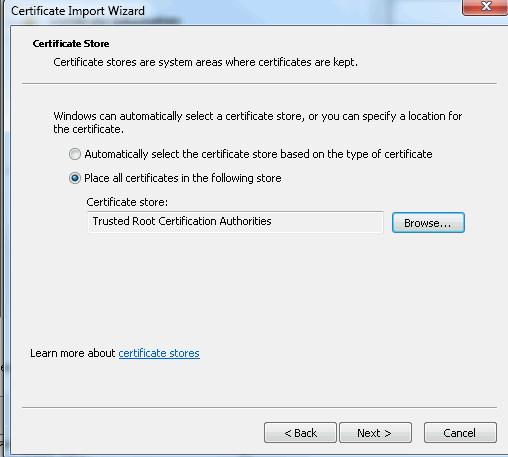
您需要像在受信任根颁发机构中一样安装它(双击文件>安装证书>将所有证书放在以下存储中>受信任根证书颁发机构):
配置AnyConnect XML配置文件
在C:\ProgramData\Cisco\Cisco AnyConnect Secure Mobility Client\Profile create a file "whatt.xml"中粘贴以下内容:
<?xml version="1.0" encoding="UTF-8"?>
<AnyConnectProfile xmlns="http://schemas.xmlsoap.org/encoding/"
 xmlns:xsi="http://www.w3.org/2001/XMLSchema-instance"
 xsi:schemaLocation="http://schemas.xmlsoap.org/encoding/ AnyConnectProfile.xsd">
    <ClientInitialization>
        <UseStartBeforeLogon UserControllable="true">false</UseStartBeforeLogon>
        <AutomaticCertSelection UserControllable="true">
         false</AutomaticCertSelection>
        <ShowPreConnectMessage>false</ShowPreConnectMessage>
        <CertificateStore>All</CertificateStore>
        <CertificateStoreOverride>false</CertificateStoreOverride>
        <ProxySettings>Native</ProxySettings>
        <AllowLocalProxyConnections>true</AllowLocalProxyConnections>
        <AuthenticationTimeout>12</AuthenticationTimeout>
        <AutoConnectOnStart UserControllable="true">false</AutoConnectOnStart>
        <MinimizeOnConnect UserControllable="true">true</MinimizeOnConnect>
        <LocalLanAccess UserControllable="true">false</LocalLanAccess>
        <ClearSmartcardPin UserControllable="true">true</ClearSmartcardPin>
        <IPProtocolSupport>IPv4,IPv6</IPProtocolSupport>
        <AutoReconnect UserControllable="false">true
            <AutoReconnectBehavior UserControllable="false">DisconnectOnSuspend
            </AutoReconnectBehavior>
        </AutoReconnect>
        <AutoUpdate UserControllable="false">true</AutoUpdate>
        <RSASecurIDIntegration UserControllable="false">
         Automatic</RSASecurIDIntegration>
        <WindowsLogonEnforcement>SingleLocalLogon</WindowsLogonEnforcement>
        <WindowsVPNEstablishment>LocalUsersOnly</WindowsVPNEstablishment>
        <AutomaticVPNPolicy>false</AutomaticVPNPolicy>
        <PPPExclusion UserControllable="false">Disable
            <PPPExclusionServerIP UserControllable="false"></PPPExclusionServerIP>
        </PPPExclusion>
        <EnableScripting UserControllable="false">false</EnableScripting>
        <EnableAutomaticServerSelection UserControllable="false">false
            <AutoServerSelectionImprovement>20</AutoServerSelectionImprovement>
            <AutoServerSelectionSuspendTime>4</AutoServerSelectionSuspendTime>
        </EnableAutomaticServerSelection>
        <RetainVpnOnLogoff>false
        </RetainVpnOnLogoff>
    </ClientInitialization>
    <ServerList>
           <HostEntry>
            <HostName>IOSEAP-MD5</HostName>
            <HostAddress>10.1.1.2</HostAddress>
            <PrimaryProtocol>IPsec
                <StandardAuthenticationOnly>true
                    <AuthMethodDuringIKENegotiation>EAP-MD5</AuthMethodDuringIKENegotiation>
                    <IKEIdentity>IKETEST</IKEIdentity>
                </StandardAuthenticationOnly>
            </PrimaryProtocol>
        </HostEntry>
     </ServerList>
</AnyConnectProfile>
确保10.1.1.2条目与为身份证书输入的CN=10.1.1.2完全相同。
测试
在此场景中,不使用SSL VPN,因此请确保IOS上禁用HTTP服务器(no ip http server)。 否则,您会在AnyConnect中收到一条错误消息,其中指出“使用浏览器访问”。
在AnyConnect中连接时,应提示您输入密码。在本例中,创建的是User3
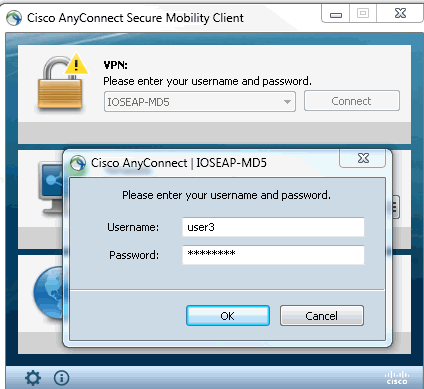
之后,用户即连接。
确认
IOS 路由器
R1#show ip inter brief | i Virtual
Virtual-Access1    10.1.1.2  YES unset  up  up
Virtual-Template1  10.1.1.2  YES unset  up down
R1# show ip route 192.168.100.200
Routing entry for 192.168.100.200/32
  Known via "static", distance 1, metric 0 (connected)
  Routing Descriptor Blocks:
  * directly connected, via Virtual-Access1
      Route metric is 0, traffic share count is 1
R1#show crypto ikev2 sa
IPv4 Crypto IKEv2  SA
Tunnel-id Local  Remote  fvrf/ivrf  Status
1  10.1.1.2/4500  110.1.1.100/61021  none/none  READY
      Encr: 3DES, Hash: SHA96, DH Grp:2, Auth sign: RSA, Auth verify: EAP
      Life/Active Time: 86400/94 sec
IPv6 Crypto IKEv2  SA
R1#show crypto session detail
Crypto session current status
Code: C - IKE Configuration mode, D - Dead Peer Detection
K - Keepalives, N - NAT-traversal, T - cTCP encapsulation
X - IKE Extended Authentication, F - IKE Fragmentation
Interface: Virtual-Access1
Uptime: 00:04:06
Session status: UP-ACTIVE
Peer: 192.168.56.1 port 61021 fvrf: (none) ivrf: (none)
      Phase1_id: IKETEST
      Desc: (none)
  IKEv2 SA: local 10.1.1.2/4500 remote 10.1.1.100/61021 Active
          Capabilities:(none) connid:1 lifetime:23:55:54
  IPSEC FLOW: permit ip 0.0.0.0/0.0.0.0 host 192.168.100.200
        Active SAs: 2, origin: crypto map
        Inbound:  #pkts dec'ed 1 drop 0 life (KB/Sec) 4160122/3353
        Outbound: #pkts enc'ed 0 drop 0 life (KB/Sec) 4160123/3353
您可以执行调试(debug crypto ikev2)。
Windows 窗口版本
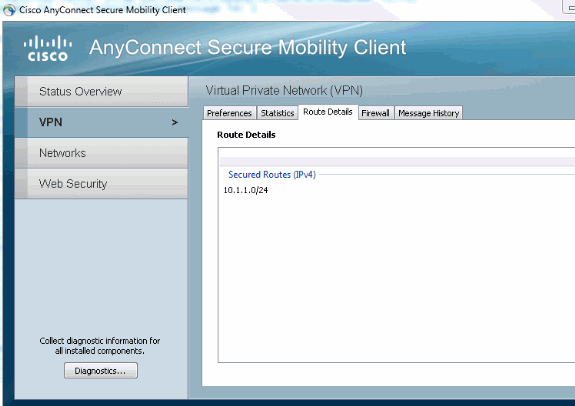
在VPN中AnyConnect的Advanced选项中,您可以选中Route Details(路由详细信息)以查看Split Tunneling networks(分割隧道网络):
已知警告和问题
-
请记住,当SHA1在IKEv2的签名哈希和完整性策略中(请参阅Cisco Bug ID CSCtn59317(仅限注册客户))。
-
IOS身份证书中的CN在ACS XML配置文件中必须是等于主机名。
-
如果要使用在身份验证期间传递的Radius AV对,而根本不使用组授权,可以在IKEv2配置文件中使用此功能:
aaa authorization user eap cached
-
授权始终使用密码“cisco”进行组/用户授权。在使用
aaa authorization user eap list SERV (without any paramaters)
因为它将尝试使用AnyConnect中以用户身份传递的用户和密码“cisco”进行授权,这可能不是用户的密码。
-
如果出现任何问题,您可以分析这些输出并提供给思科TAC:
-
debug crypto ikev2
-
debug crypto ikev2 internal
-
DART输出
-
-
如果不使用SSL VPN,请记住禁用ip http server(no ip http server)。 否则,AnyConnect将尝试连接到HTTP服务器并收到结果“使用浏览器访问”。
下一代加密
上述配置被提供以用于显示最简工作配置。
思科建议尽可能使用下一代加密(NGC)。
有关迁移的当前建议,请访问:http://www.cisco.com/web/about/security/intelligence/nextgen_crypto.html
选择NGC配置时,请确保客户端软件和头端硬件都支持它。建议将ISR第2代和ASR 1000路由器作为头端,因为它们对NGC的硬件支持。
在AnyConnect端,自AnyConnect 3.1版起,支持NSA的Suite B算法套件。
相关信息
修订历史记录
| 版本 | 发布日期 | 备注 |
|---|---|---|
1.0 |
14-Jan-2013 |
初始版本 |
 反馈
反馈