简介
本文档介绍使用PostMan作为REST客户端通过ERS API在ISE上创建网络访问设备(NAD)的过程。
先决条件
要求
Cisco 建议您了解以下主题:
- ISE(身份服务引擎)
- ERS(外部RESTful服务)
- REST客户包括Postman、RESTED、Insomnia等。
使用的组件
本文档中的信息基于以下软件版本:
- 思科ISE(身份服务引擎) 3.1补丁6
- Postman REST客户端v10.17.4

注意:其他ISE版本和REST客户端的步骤类似或相同。除非另有说明,您可在所有2.x和3.x ISE软件版本上使用这些步骤。
本文档中的信息都是基于特定实验室环境中的设备编写的。本文档中使用的所有设备最初均采用原始(默认)配置。如果您的网络处于活动状态,请确保您了解所有命令的潜在影响。
配置
启用ERS(端口9060)
ERS API是只使用HTTPS的REST API,在端口443和端口9060上运行。端口9060默认关闭,因此需要先打开。 如果尝试访问此端口的客户端不首先启用ERS,则会出现服务器超时。因此,第一个要求是从Cisco ISE管理员UI启用ERS。
导航到管理>设置> API设置并启用ERS(读/写)切换按钮。
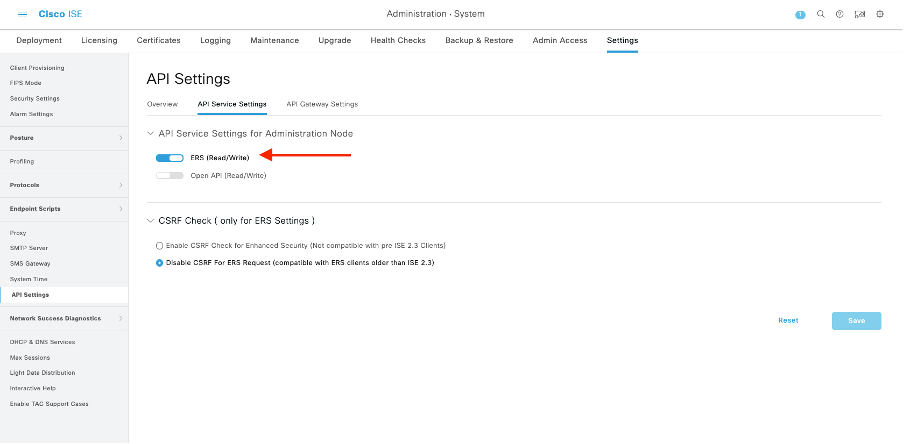

注:ERS API支持TLS 1.1和TLS 1.2。ERS API不支持TLS 1.0,无论在思科ISE GUI的安全设置窗口中启用TLS 1.0(管理>系统>设置>安全设置)。在Security Settings(安全设置)窗口中启用TLS 1.0仅与EAP协议相关,不会影响ERS API。
创建ERS管理员
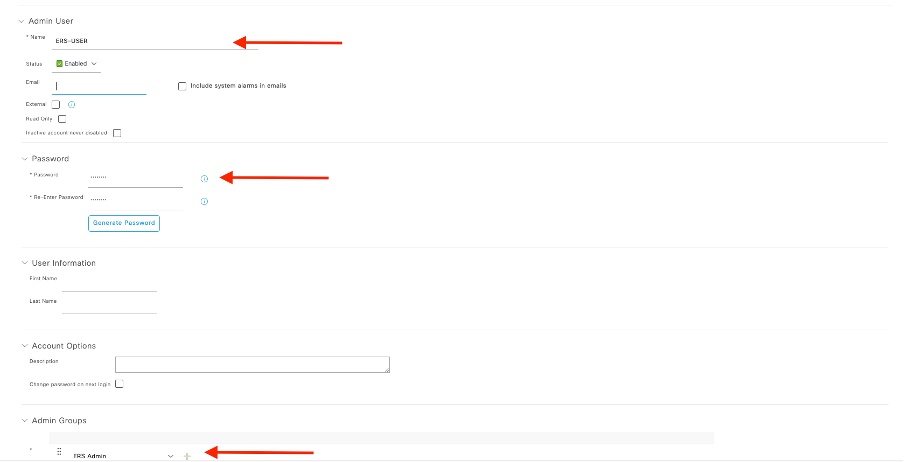
创建思科ISE管理员,分配密码,并将用户作为ERS管理员添加到管理员组。您可以将配置的其余部分留空。
设置Postman
下载或使用在线版Postman。
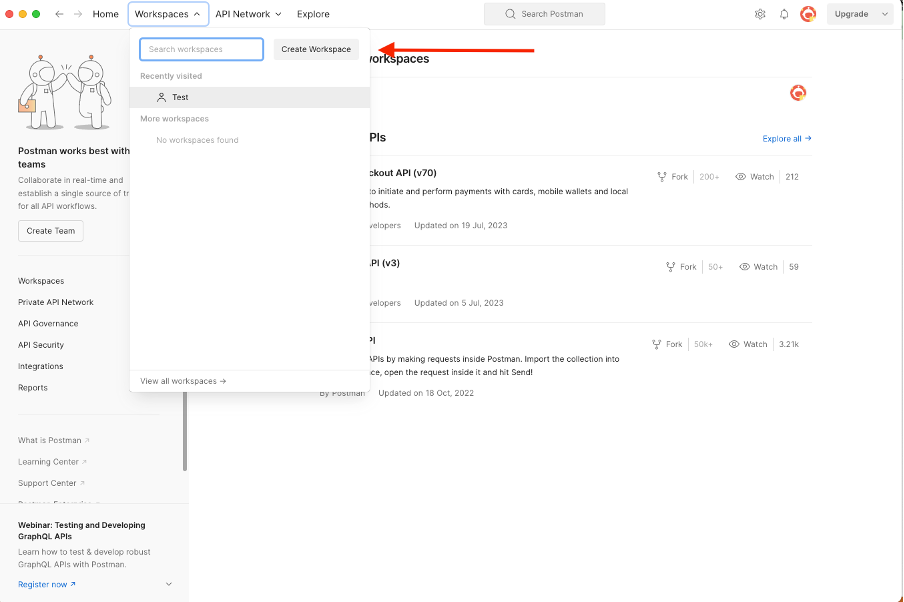
- 通过点击“工作区”选项卡下的“创建工作区”创建用户和工作区。
2. 选择空白工作区并为工作区指定名称。您可以添加说明并将其公开。 在本示例中,Personalis selected。
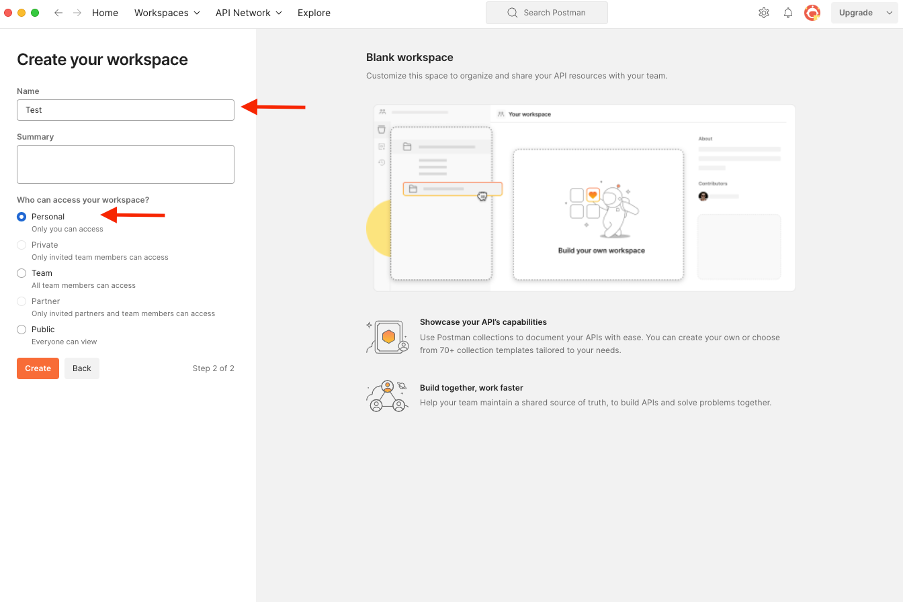
创建工作空间后,现在即可配置API调用。
ISE SDK和基本Postman授权
要配置任何呼叫,请首先访问ISE ERS SDK(软件开发套件)。此工具编译ISE可以执行的API调用的完整列表:
- 导航到https://{ise-ip}/ers/sdk。
- 使用您的ISE管理员凭证登录。
- 展开API文档。
- 向下滚动直至找到Network Device,然后单击。
- 在此选项下,您现在可找到可以对ISE上的网络设备执行的所有可用操作。选择创建。
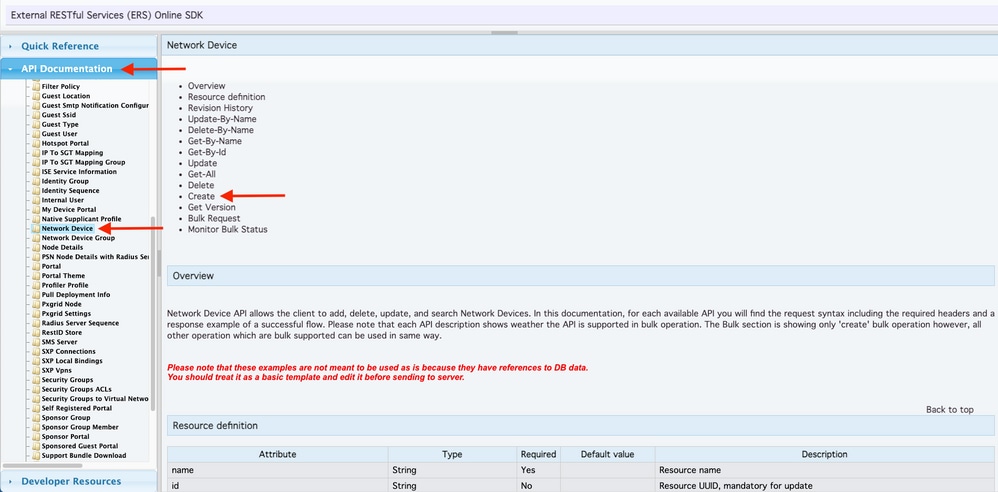
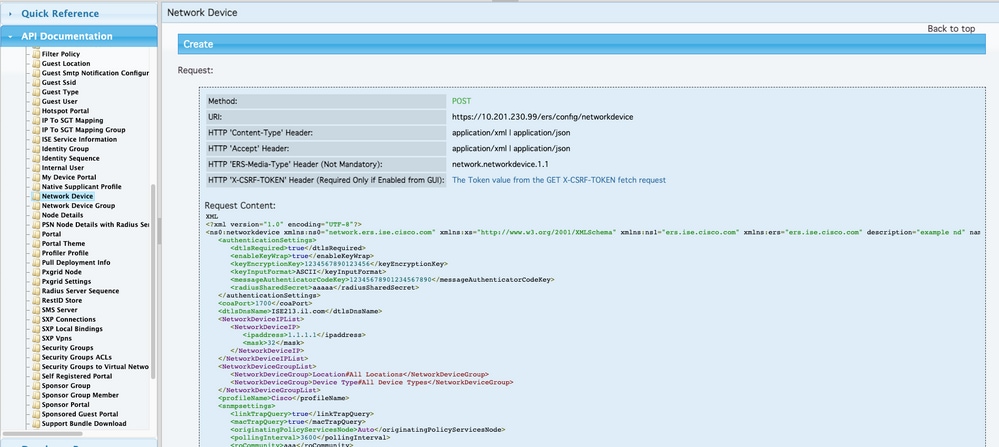
6. 现在,您可以看到在任何Rest客户端上使用XML或JSON执行API调用所需的配置以及预期的响应示例。
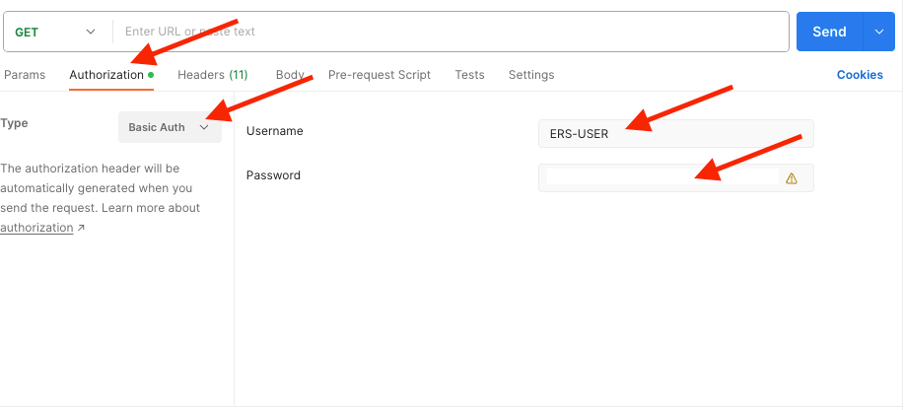
7. 返回Postman,为ISE配置基本身份验证。在授权选项卡下,选择基本身份验证作为身份验证类型,并添加之前在ISE中创建的ISE ERS用户凭证。

注意:除非在Postman上配置了变量,否则密码显示为明文。
使用XML创建NAD
使用XML创建具有RADIUS TACACS、SNMP和TrustSec设置的TESTNAD1。
1. 在SDK中的创建下方,包含执行呼叫所需的报头和模板,以及预期响应。
2.转到Headers选项卡并为API调用配置所需的报头,如SDK中所示。报头配置必须如下所示:
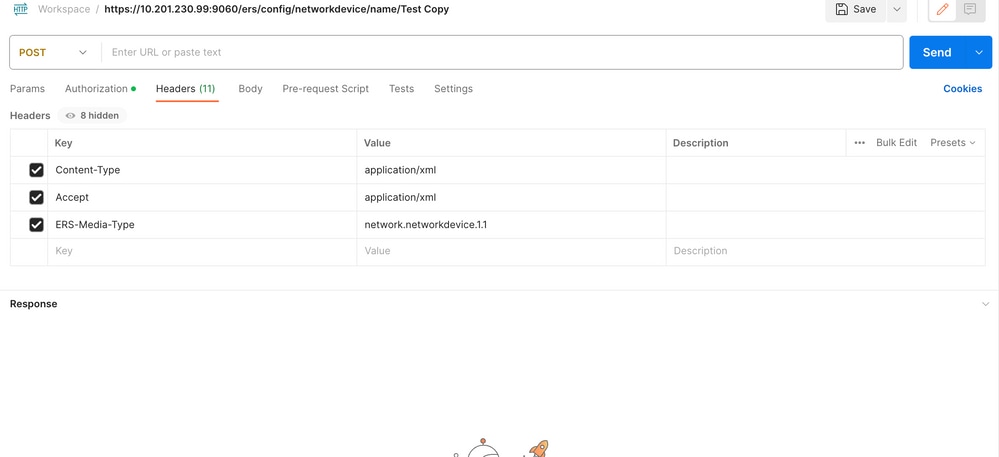
3. 移至正文题头,然后选择原始。这允许您粘贴创建NAD所需的XML模板。
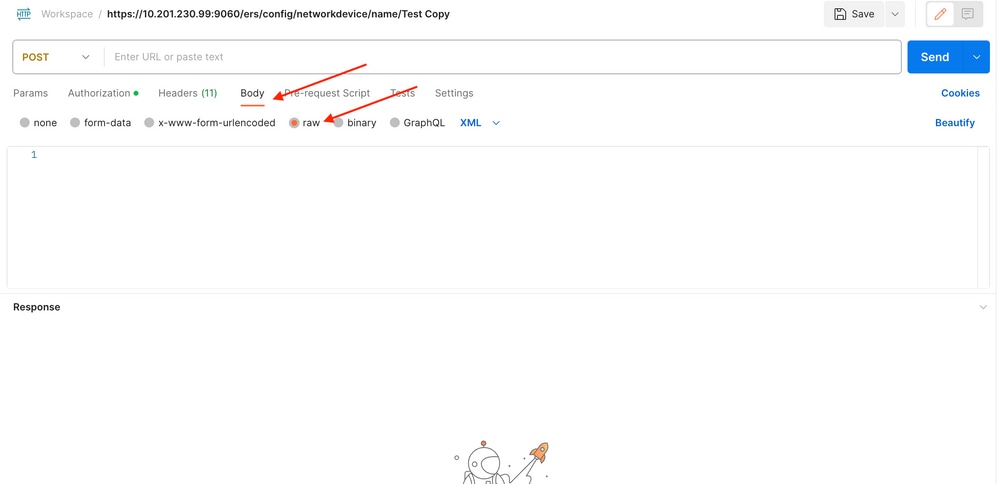
4. XML模板如下所示(根据需要更改值):
<?xml version="1.0" encoding="UTF-8"?> <ns0:networkdevice xmlns:ns0="network.ers.ise.cisco.com" xmlns:xs="Schema XML File" xmlns:ns1="ers.ise.cisco.com" xmlns:ers="ers.ise.cisco.com" description="This NAD was added via ERS API" name="TESTNAD1"> <authenticationSettings> <dtlsRequired>true</dtlsRequired> <enableKeyWrap>true</enableKeyWrap> <keyEncryptionKey>1234567890123456</keyEncryptionKey> <keyInputFormat>ASCII</keyInputFormat> <messageAuthenticatorCodeKey>12345678901234567890</messageAuthenticatorCodeKey> <radiusSharedSecret>cisco123</radiusSharedSecret> </authenticationSettings> <coaPort>1700</coaPort> <dtlsDnsName>Domain</dtlsDnsName> <NetworkDeviceIPList> <NetworkDeviceIP> <ipaddress>NAD IP Address</ipaddress> <mask>32</mask> </NetworkDeviceIP> </NetworkDeviceIPList> <NetworkDeviceGroupList> <NetworkDeviceGroup>Location#All Locations#LAB</NetworkDeviceGroup> <NetworkDeviceGroup>Device Type#All Device Types#Access-Layer</NetworkDeviceGroup> </NetworkDeviceGroupList> <profileName>Cisco</profileName> <snmpsettings> <linkTrapQuery>true</linkTrapQuery> <macTrapQuery>true</macTrapQuery> <originatingPolicyServicesNode>Auto</originatingPolicyServicesNode> <pollingInterval>3600</pollingInterval> <roCommunity>aaa</roCommunity> <version>ONE</version> </snmpsettings> <tacacsSettings> <connectModeOptions>ON_LEGACY</connectModeOptions> <sharedSecret>cisco123</sharedSecret> </tacacsSettings> <trustsecsettings> <deviceAuthenticationSettings> <sgaDeviceId>TESTNAD1</sgaDeviceId> <sgaDevicePassword>cisco123</sgaDevicePassword> </deviceAuthenticationSettings> <deviceConfigurationDeployment> <enableModePassword>cisco123</enableModePassword> <execModePassword>cisco123</execModePassword> <execModeUsername>Admin</execModeUsername> <includeWhenDeployingSGTUpdates>true</includeWhenDeployingSGTUpdates> </deviceConfigurationDeployment> <pushIdSupport>false</pushIdSupport> <sgaNotificationAndUpdates> <coaSourceHost>ise3-1test</coaSourceHost> <downlaodEnvironmentDataEveryXSeconds>86400</downlaodEnvironmentDataEveryXSeconds> <downlaodPeerAuthorizationPolicyEveryXSeconds>86400</downlaodPeerAuthorizationPolicyEveryXSeconds> <downloadSGACLListsEveryXSeconds>86400</downloadSGACLListsEveryXSeconds> <otherSGADevicesToTrustThisDevice>false</otherSGADevicesToTrustThisDevice> <reAuthenticationEveryXSeconds>86400</reAuthenticationEveryXSeconds> <sendConfigurationToDevice>false</sendConfigurationToDevice> <sendConfigurationToDeviceUsing>ENABLE_USING_COA</sendConfigurationToDeviceUsing> </sgaNotificationAndUpdates> </trustsecsettings> </ns0:networkdevice>

注意:请注意,只有在<enableKeyWrap>{false|true}</enableKeyWrap>设置为true时,才需要后面几行。否则,可以从XML模板中删除相同内容:
<keyEncryptionKey>1234567890123456</keyEncryptionKey> <keyInputFormat>ASCII</keyInputFormat> <messageAuthenticatorCodeKey>12345678901234567890</messageAuthenticatorCodeKey>
您可以从模板中删除不需要的配置,只需保留您在创建NAD期间实际需要添加的数据即可。例如,这是相同的模板,但仅与TACACS配置相同。无论所需的配置如何,确保模板以</ns0:networkdevice>结尾。
<?xml version="1.0" encoding="UTF-8"?> <ns0:networkdevice xmlns:ns0="network.ers.ise.cisco.com" xmlns:xs="Schema XML File" xmlns:ns1="ers.ise.cisco.com" xmlns:ers="ers.ise.cisco.com" description="This NAD was added via ERS API" name="TESTNAD1"> <NetworkDeviceIPList> <NetworkDeviceIP> <ipaddress>NAD IP Address</ipaddress> <mask>32</mask> </NetworkDeviceIP> </NetworkDeviceIPList> <NetworkDeviceGroupList> <NetworkDeviceGroup>Location#All Locations#LAB</NetworkDeviceGroup> <NetworkDeviceGroup>Device Type#All Device Types#Access-Layer</NetworkDeviceGroup> </NetworkDeviceGroupList> <profileName>Cisco</profileName> <tacacsSettings> <connectModeOptions>ON_LEGACY</connectModeOptions> <sharedSecret>cisco123</sharedSecret> </tacacsSettings> </ns0:networkdevice>
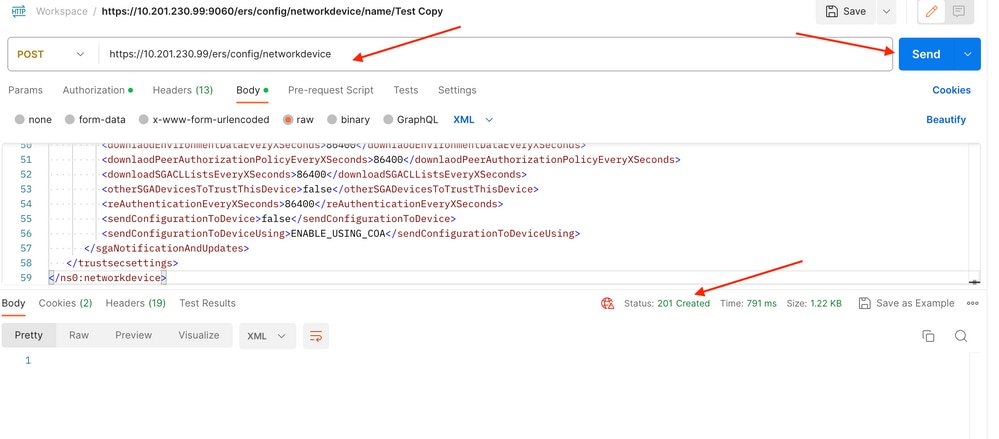
5. 将raw的XML模板粘贴到Body标题下。
6.选择POST作为方法,粘贴https://{ISE-ip}/ers/config/networkdevice,然后单击Send。 如果一切配置正确,您应该看到201 Created消息并且结果为空。
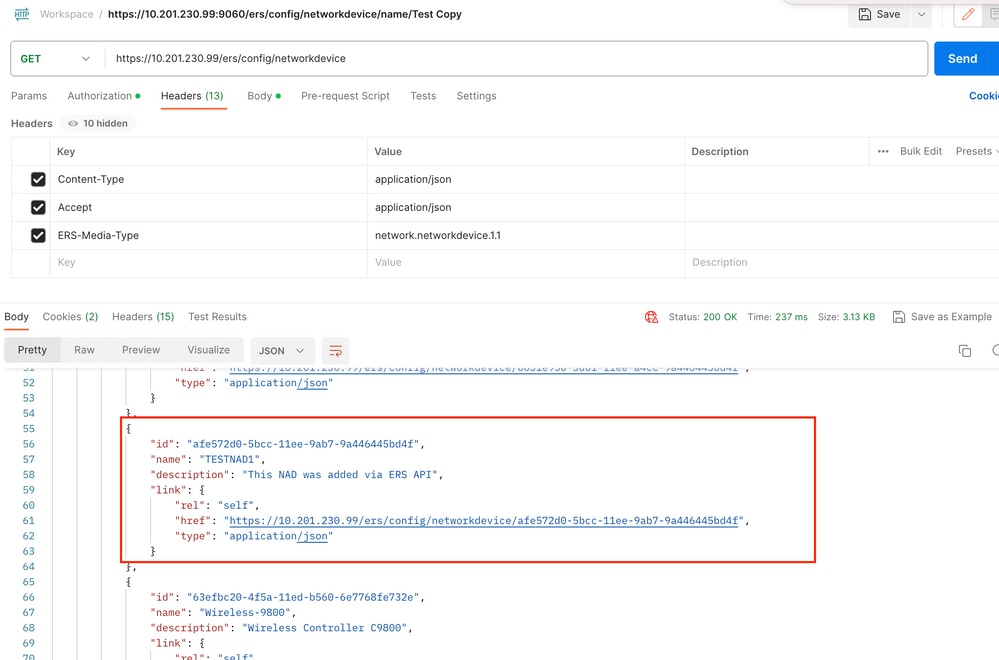
7.通过执行NAD的GET调用或检查ISE NAD列表确认NAD是否已创建。

使用JSON创建NAD
使用JSON创建RADIUS TACACS、SNMP和TrustSec设置的TESTNAD2。
1. 在SDK中的创建下方,包含执行呼叫所需的报头和模板,以及预期响应。
2.转到Headers选项卡并为API调用配置所需的报头,如SDK中所示。报头配置必须如下所示:
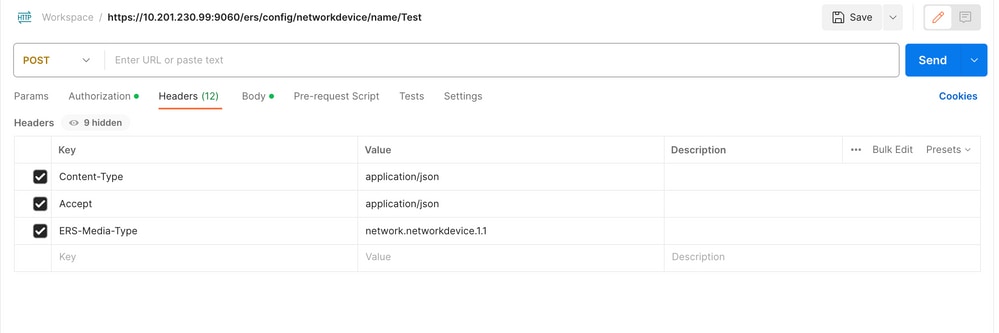
3. 移至正文题头,然后选择原始。这允许您粘贴创建NAD所需的JSON模板。
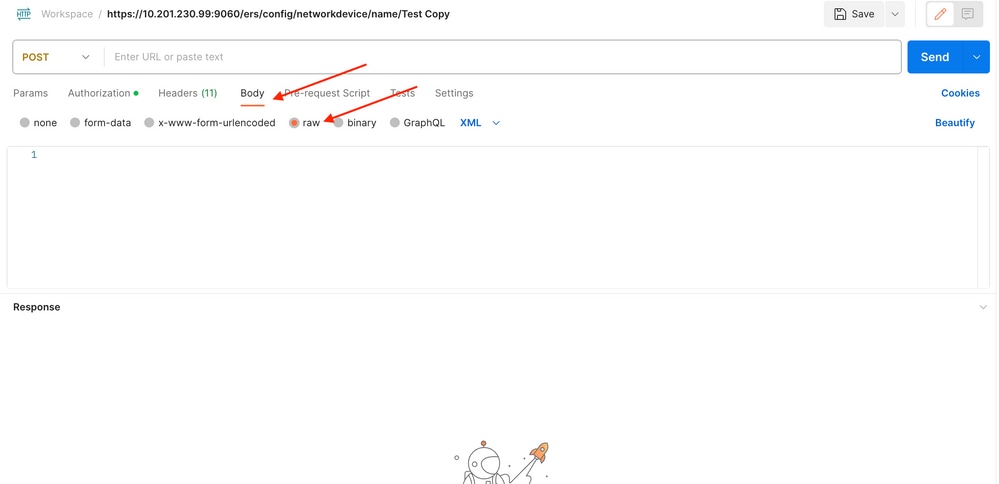
4. JSON模板必须如下所示(根据需要更改值):
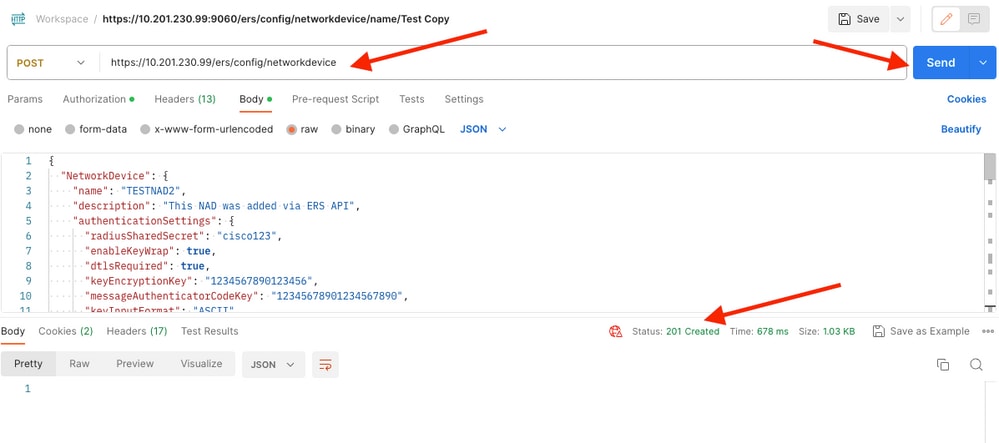
{ "NetworkDevice": { "name": "TESTNAD2", "description": "This NAD was added via ERS API", "authenticationSettings": { "radiusSharedSecret": "cisco123", "enableKeyWrap": true, "dtlsRequired": true, "keyEncryptionKey": "1234567890123456", "messageAuthenticatorCodeKey": "12345678901234567890", "keyInputFormat": "ASCII" }, "snmpsettings": { "version": "ONE", "roCommunity": "aaa", "pollingInterval": 3600, "linkTrapQuery": true, "macTrapQuery": true, "originatingPolicyServicesNode": "Auto" }, "trustsecsettings": { "deviceAuthenticationSettings": { "sgaDeviceId": "TESTNAD2", "sgaDevicePassword": "cisco123" }, "sgaNotificationAndUpdates": { "downlaodEnvironmentDataEveryXSeconds": 86400, "downlaodPeerAuthorizationPolicyEveryXSeconds": 86400, "reAuthenticationEveryXSeconds": 86400, "downloadSGACLListsEveryXSeconds": 86400, "otherSGADevicesToTrustThisDevice": false, "sendConfigurationToDevice": false, "sendConfigurationToDeviceUsing": "ENABLE_USING_COA", "coaSourceHost": "ise3-1test" }, "deviceConfigurationDeployment": { "includeWhenDeployingSGTUpdates": true, "enableModePassword": "cisco123", "execModePassword": "cisco123", "execModeUsername": "Admin" }, "pushIdSupport": "false" }, "tacacsSettings": { "sharedSecret": "cisco123", "connectModeOptions": "ON_LEGACY" }, "profileName": "Cisco", "coaPort": 1700, "dtlsDnsName": "Domain", "NetworkDeviceIPList": [ { "ipaddress": "NAD IP Adress", "mask": 32 } ], "NetworkDeviceGroupList": [ "Location#All Locations", "Device Type#All Device Types" ] } }

注意:请务必注意,只有在enableKeyWrap“:{false|true},设置为true时,才需要下一行。否则,也可以从JSON模板中删除相同的内容:
"keyEncryptionKey": "1234567890123456", "messageAuthenticatorCodeKey": "12345678901234567890", "keyInputFormat": "ASCII" 您还可以从模板中删除不需要的配置,并保留您在创建NAD期间实际需要添加的数据。
5. 将raw的JSON模板粘贴到Body标头下。
6.选择POST作为方法,粘贴https://{ISE-ip}/ers/config/networkdevice,然后单击Send。 如果一切配置正确,您应该看到201 Created消息并且结果为空。
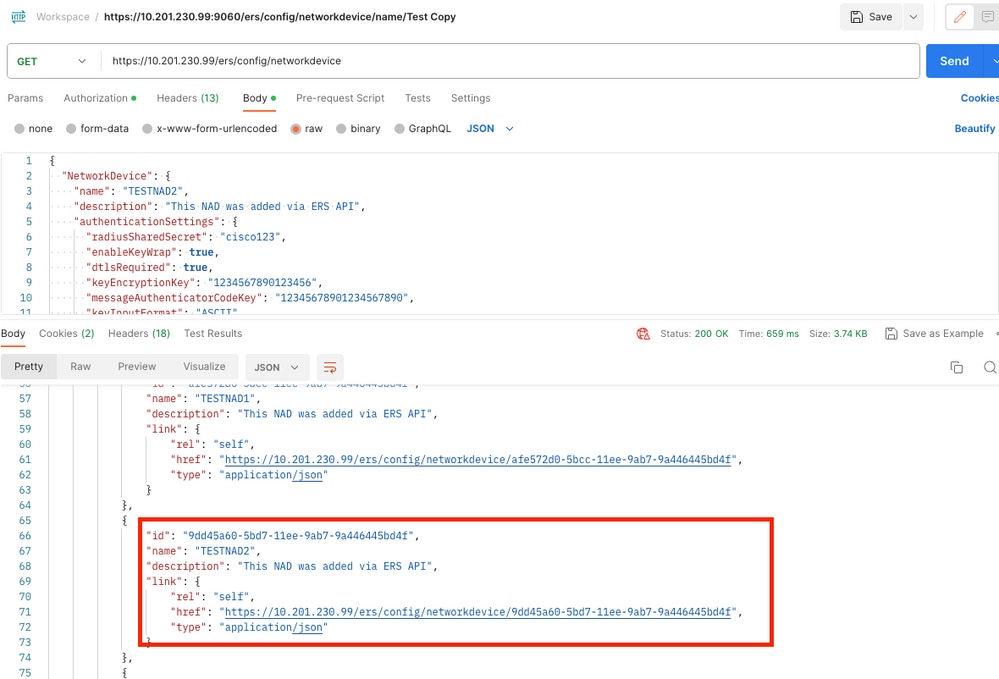
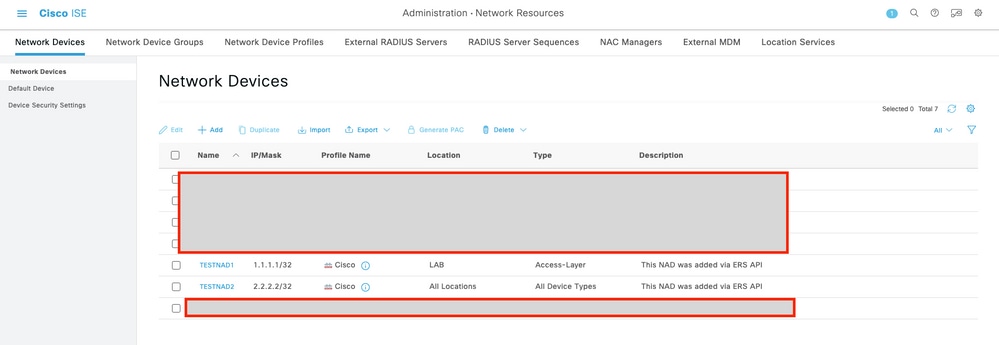
7.通过执行NAD的GET调用或检查ISE NAD列表确认NAD是否已创建。
验证
如果能够访问API服务GUI页面(例如https://{iseip}:{port}/api/swagger-ui/index.html或https://{iseip}:9060/ers/sdk),则表示API服务按照预期工作。
故障排除
- 所有REST操作都经过审核,并且日志记录在系统日志中。
- 要排除与开放式API相关的问题,请在调试日志配置窗口中将apiservice组件的日志级别设置为调试。
- 要排除与ERS API相关的问题,请在调试日志配置窗口中将ers组件的日志级别设置为调试。要查看此窗口,请导航到Cisco ISE GUI,单击菜单图标并选择Operations > Troubleshoot > Debug Wizard > Debug Log Configuration。
- 您可以从下载日志窗口下载日志。要查看此窗口,请导航到Cisco ISE GUI,点击菜单图标并选择操作>故障排除>下载日志。
- 您可以选择从“支持捆绑包”选项卡中下载支持捆绑包(通过点击选项卡下的下载按钮),也可以通过点击api服务调试日志的日志文件(Log File)值,从“调试日志”(Debug Logs)选项卡中下载api服务调试日志。


 反馈
反馈