简介
本文档介绍在C8300平台上,在自主模式下使用FQDN ACL模式匹配来配置ZBFW的过程。
先决条件
要求
Cisco 建议您了解以下主题:
- 基于区域的策略防火墙(ZBFW)
- 虚拟路由和转发(VRF)
- 网络地址转换 (NAT)
使用的组件
本文档中的信息基于以下软件和硬件版本:
本文档中的信息都是基于特定实验室环境中的设备编写的。本文档中使用的所有设备最初均采用原始(默认)配置。如果您的网络处于活动状态,请确保您了解所有命令的潜在影响。
背景信息
基于区域的策略防火墙(ZBFW)是Cisco IOS®和Cisco IOS XE设备上的一种高级防火墙配置方法,允许在网络中创建安全区域。
ZBFW允许管理员将接口分组到区域中,并将防火墙策略应用于在这些区域之间移动的流量。
FQDN ACL(完全限定域名访问控制列表)与Cisco路由器中的ZBFW一起使用,允许管理员创建根据域名(而非仅IP地址)匹配流量的防火墙规则。
在处理在AWS或Azure等平台上托管的服务时,此功能特别有用,在这些平台上,与服务关联的IP地址可能会频繁更改。
它简化了访问控制策略的管理,提高了网络内安全配置的灵活性。
配置
网络图
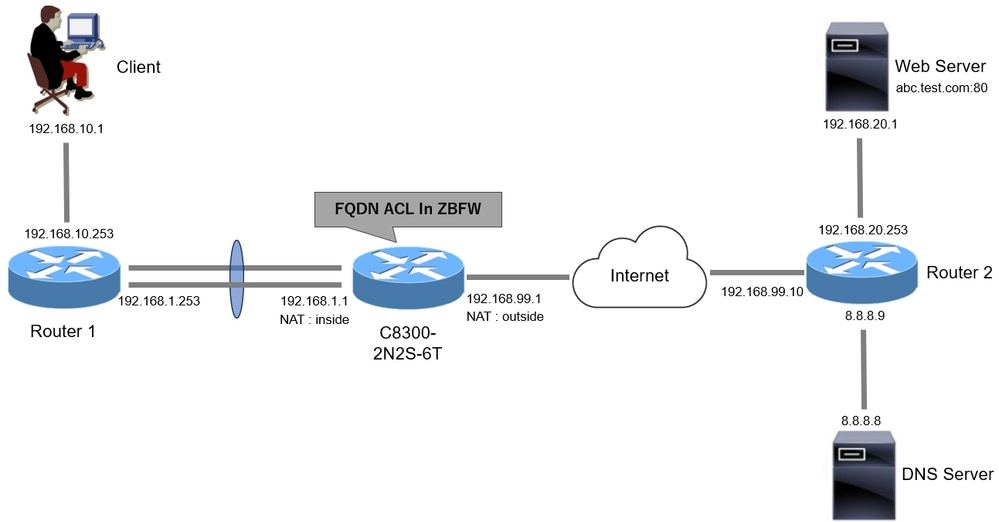
本文根据此图介绍ZBFW的配置和验证。 这是一个使用BlackJumboDog作为DNS服务器的模拟环境。
 网络图
网络图
配置
这是允许从客户端通信到Web服务器的配置。
步骤1. (可选)配置VRF
通过VRF(虚拟路由和转发)功能,可以在单个路由器中创建和管理多个独立的路由表。在本例中,我们创建名为WebVRF的VRF,并执行相关通信的路由。
vrf definition WebVRF
rd 65010:10
!
address-family ipv4
route-target export 65010:10
route-target import 65010:10
exit-address-family
!
address-family ipv6
route-target export 65010:10
route-target import 65010:10
exit-address-family

ip route vrf WebVRF 8.8.8.8 255.255.255.255 GigabitEthernet0/0/3 192.168.99.10
ip route vrf WebVRF 192.168.10.0 255.255.255.0 Port-channel1.2001 192.168.1.253
ip route vrf WebVRF 192.168.20.0 255.255.255.0 GigabitEthernet0/0/3 192.168.99.10
第二步:配置接口
为内部和外部接口配置基本信息,如区域成员、VRF、NAT和IP地址。
interface GigabitEthernet0/0/1
no ip address
negotiation auto
lacp rate fast
channel-group 1 mode active

interface GigabitEthernet0/0/2
no ip address
negotiation auto
lacp rate fast
channel-group 1 mode active

interface Port-channel1
no ip address
no negotiation auto

interface Port-channel1.2001
encapsulation dot1Q 2001
vrf forwarding WebVRF
ip address 192.168.1.1 255.255.255.0
ip broadcast-address 192.168.1.255
no ip redirects
no ip proxy-arp
ip nat inside
zone-member security zone_client

interface GigabitEthernet0/0/3
vrf forwarding WebVRF
ip address 192.168.99.1 255.255.255.0
ip nat outside
zone-member security zone_internet
speed 1000
no negotiation auto
步骤3.(可选)配置NAT
为内部和外部接口配置NAT。 在本示例中,来自客户端的源IP地址(192.168.10.1)被转换为192.168.99.100。
ip access-list standard nat_source
10 permit 192.168.10.0 0.0.0.255

ip nat pool natpool 192.168.99.100 192.168.99.100 prefix-length 24
ip nat inside source list nat_source pool natpool vrf WebVRF overload
第四步:配置FQDN ACL
配置FQDN ACL以匹配目标流量。在本示例中,在FQDN对象组的模式匹配中使用通配符“*”来匹配目标FQDN。
object-group network src_net
192.168.10.0 255.255.255.0

object-group fqdn dst_test_fqdn
pattern .*\.test\.com

object-group network dst_dns
host 8.8.8.8

ip access-list extended Client-WebServer
1 permit ip object-group src_net object-group dst_dns
5 permit ip object-group src_net fqdn-group dst_test_fqdn
第五步:配置ZBFW
为ZBFW配置区域、类映射和策略映射。 在本示例中,通过使用parameter-map,当ZBFW允许流量时生成日志。
zone security zone_client
zone security zone_internet

parameter-map type inspect inspect_log
audit-trail on

class-map type inspect match-any Client-WebServer-Class
match access-group name Client-WebServer

policy-map type inspect Client-WebServer-Policy
class type inspect Client-WebServer-Class
inspect inspect_log
class class-default
drop log

zone-pair security Client-WebServer-Pair source zone_client destination zone_internet
service-policy type inspect Client-WebServer-Policy
验证
步骤1:从客户端启动HTTP连接
确认从客户端到WEB服务器的HTTP通信成功。
 HTTP连接
第二步:确认IP缓存
运行show platform hardware qfp active feature dns-snoop-agent datapath ip-cache all命令以确认目标FQDN的IP缓存是在C8300-2N2S-6T中生成的。
02A7382#show platform hardware qfp active feature dns-snoop-agent datapath ip-cache all
IP Address Client(s) Expire RegexId Dirty VRF ID Match
------------------------------------------------------------------------------------------------------
192.168.20.1 0x1 117 0xdbccd400 0x00 0x0 .*\.test\.com
第三步:确认ZBFW日志
确认IP地址(192.168.20.1)与FQDN (.*\.test\.com)匹配,并验证ZBFW是否允许步骤1中的HTTP通信。
*Mar 7 11:08:23.018: %IOSXE-6-PLATFORM: R0/0: cpp_cp: QFP:0.0 Thread:003 TS:00000551336606461468 %FW-6-SESS_AUDIT_TRAIL_START: (target:class)-(Client-WebServer-Pair:Client-WebServer-Class):Start http session: initiator (192.168.10.1:51468) -- responder (192.168.20.1(.*\.test\.com):80) from Port-channel1.2001

*Mar 7 11:08:24.566: %IOSXE-6-PLATFORM: R0/0: cpp_cp: QFP:0.0 Thread:002 TS:00000551338150591101 %FW-6-SESS_AUDIT_TRAIL: (target:class)-(Client-WebServer-Pair:Client-WebServer-Class):Stop http session: initiator (192.168.10.1:51468) sent 943 bytes -- responder (192.168.20.1:80) sent 101288 bytes, from Port-channel1.2001
第四步:确认数据包捕获
确认目标FQDN的DNS解析以及客户端与WEB服务器之间的HTTP连接是否成功。
内部数据包捕获:
 内部DNS数据包
 内部HTTP数据包数
内部数据包捕获(192.168.10.1是NAT到192.168.19.100):
 外部DNS数据包
 外部的HTTP数据包
故障排除
对于使用FQDN ACL模式匹配排除与ZBFW相关的通信问题,您可以在问题期间收集日志并将它们提供给思科TAC。请注意,故障排除日志取决于问题的性质。
要收集的日志示例:
!!!! before reproduction
!! Confirm the IP cache
show platform hardware qfp active feature dns-snoop-agent datapath ip-cache all

!! Enable packet-trace
debug platform packet-trace packet 8192 fia-trace
debug platform packet-trace copy packet both
debug platform condition ipv4 access-list Client-WebServer both
debug platform condition feature fw dataplane submode all level verbose

!! Enable debug-level system logs and ZBFW debug logs
debug platform packet-trace drop
debug acl cca event
debug acl cca error
debug ip domain detail
!! Start to debug
debug platform condition start

!! Enable packet capture on the target interface (both sides) and start the capture
monitor capture CAPIN interface Port-channel1.2001 both
monitor capture CAPIN match ipv4 any any
monitor capture CAPIN buffer size 32
monitor capture CAPIN start

monitor capture CAPOUT interface g0/0/3 both
monitor capture CAPOUT match ipv4 any any
monitor capture CAPOUT buffer size 32
monitor capture CAPOUT start

!! (Optional) Clear the DNS cache on the client
ipconfig/flushdns
ipconfig /displaydns

!! Run the show command before reproduction
show platform hardware qfp active feature firewall drop all
show policy-map type inspect zone-pair Client-WebServer-Pair sessions
show platform packet-trace statistics
show platform packet-trace summary
show logging process cpp_cp internal start last boot
show platform hardware qfp active feature dns-snoop-agent client hw-pattern-list
show platform hardware qfp active feature dns-snoop-agent client info
show platform hardware qfp active feature dns-snoop-agent datapath stats
show ip dns-snoop all
show platform hardware qfp active feature dns-snoop-agent datapath ip-cache all
show platform software access-list F0 summary

!!!! Reproduce the issue - start

!! During the reproductionof the issue, run show commands at every 10 seconds
!! Skip show ip dns-snoop all command if it is not supported on the specific router
show ip dns-snoop all
show platform hardware qfp active feature dns-snoop-agent datapath ip-cache all

!!!! After reproduction
!! Stop the debugging logs and packet capture
debug platform condition stop
monitor capture CAPIN stop
monitor capture CAPOUT stop

!! Run the show commands
show platform hardware qfp active feature firewall drop all
show policy-map type inspect zone-pair Client-WebServer-Pair sessions
show platform packet-trace statistics
show platform packet-trace summary
show logging process cpp_cp internal start last boot
show platform hardware qfp active feature dns-snoop-agent client hw-pattern-list
show platform hardware qfp active feature dns-snoop-agent client info
show platform hardware qfp active feature dns-snoop-agent datapath stats
show ip dns-snoop all
show platform hardware qfp active feature dns-snoop-agent datapath ip-cache all
show platform software access-list F0 summary

show platform packet-trace packet all decode
show running-config
常见问题解答
问:如何确定路由器上的IP缓存的超时值?
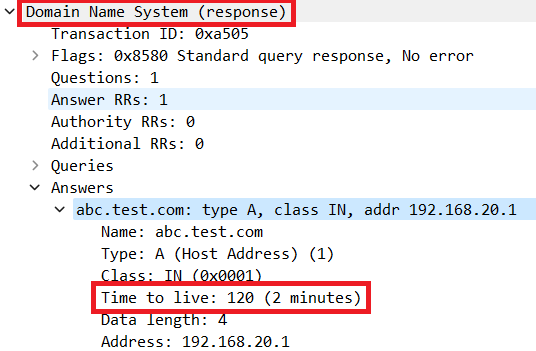
答:IP缓存的超时值由从DNS服务器返回的DNS数据包的TTL(生存时间)值确定。在本例中为120秒。当IP缓存超时时,会自动将其从路由器中删除。以下是数据包捕获的详细信息。
 DNS解析的数据包详细信息
问:当DNS服务器返回CNAME记录而非A记录时,是否可以接受它?
答:是的,这不是问题。当DNS服务器返回CNAME记录时,DNS解析和HTTP通信不会出现任何问题。以下是数据包捕获的详细信息。
 内部DNS数据包
 DNS解析的数据包详细信息
 内部HTTP数据包数
问:用于将在C8300路由器上收集的数据包捕获传输到FTP服务器的命令是什么?
答:使用monitor capture <capture name> export bootflash:<capture name>.pcap和copy bootflash:<capture name>.pcap ftp://<user>:<password>@<FTP IP Address>命令将数据包捕获传输到FTP服务器。以下是将CAPIN传输到FTP服务器的示例。
monitor capture CAPIN export bootflash:CAPIN.pcap
copy bootflash:CAPIN.pcap ftp://<user>:<password>@<FTP IP Address>
参考
了解基于区域的策略防火墙设计