PIX 7.x 和 VPN 3000 集中器之间的 IPSec 隧道配置示例
目录
简介
本文档提供了如何在 PIX 防火墙 7.x 和 Cisco VPN 3000 集中器之间建立 LAN 到 LAN IPSec VPN 隧道的示例配置。
要了解有关 PIX 之间的 LAN 到 LAN 隧道同时允许 VPN Client 通过中央 PIX 访问分支 PIX 的方案的详细信息,请参阅使用 TACACS+ 身份验证增强的 PIX/ASA 7.x 分支到客户端 VPN 配置示例。
要详细了解PIX/ASA和IOS路由器之间的LAN到LAN隧道的场景,请参阅PIX/ASA 7.x安全设备到IOS路由器的LAN到LAN隧道配置示例。
先决条件
要求
尝试进行此配置之前,请确保满足以下要求:
-
本文档需要对 IPSec 协议拥有基本的了解。要了解有关 IPsec 的详细信息,请参阅 IPsec 加密简介。
使用的组件
本文档中的信息基于以下软件和硬件版本:
-
安装有软件版本 7.1(1) 的 Cisco PIX 500 系列安全设备
-
安装有软件版本 4.7.2(B) 的 Cisco VPN 3060 集中器
注意:PIX 506/506E不支持7.x。
本文档中的信息都是基于特定实验室环境中的设备编写的。本文档中使用的所有设备最初均采用原始(默认)配置。如果您使用的是真实网络,请确保您已经了解所有命令的潜在影响。
要配置 PIX 6.x,请参阅在 Cisco VPN 3000 集中器和 PIX 防火墙之间建立 LAN 到 LAN IPSec 隧道的配置示例。
规则
有关文档约定的更多信息,请参考 Cisco 技术提示约定。
配置
本部分提供有关如何配置本文档所述功能的信息。
注意:使用命令查找工具(仅限注册客户)可获取有关本节中使用的命令的详细信息。
网络图
本文档使用以下网络设置:
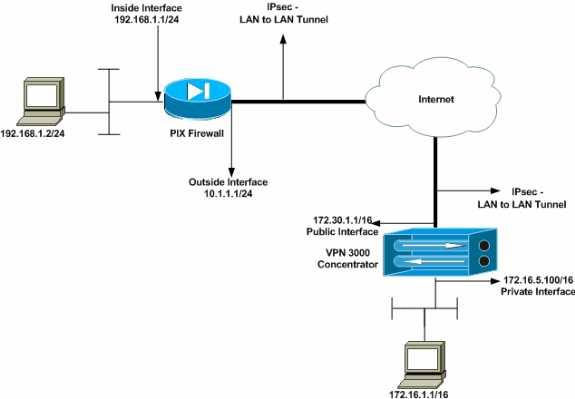
配置 PIX
| PIX |
|---|
PIX7#show running-config : Saved : PIX Version 7.1(1) ! hostname PIX7 enable password 8Ry2YjIyt7RRXU24 encrypted names ! !--- Configures the outside interface of the PIX. !--- By default, the security level for the outside interface is 0. interface Ethernet0 nameif outside security-level 0 ip address 10.1.1.1 255.255.255.0 ! !--- Configures the inside interface of the PIX. !--- By default, the security level for the inside interface is 100. interface Ethernet1 nameif inside security-level 100 ip address 192.168.1.1 255.255.255.0 ! !--- Defines the IP addresses that should not be NATed. access-list nonat extended permit ip 192.168.1.0 255.255.255.0 172.16.0.0 255.255.0.0 access-list outside extended permit icmp any any !--- Defines the IP addresses that can communicate via the IPsec tunnel. access-list 101 extended permit ip 192.168.1.0 255.255.255.0 172.16.0.0 255.255.0.0 access-list OUT extended permit ip any any pager lines 24 mtu outside 1500 mtu inside 1500 no failover asdm image flash:/asdm-504.bin no asdm history enable arp timeout 14400 nat (inside) 0 access-list nonat access-group OUT in interface outside route outside 0.0.0.0 0.0.0.0 10.1.1.2 1 !--- Output is suppressed. !--- These are the IPsec parameters that are negotiated with the client. crypto ipsec transform-set my-set esp-aes-256 esp-sha-hmac crypto map mymap 20 match address 101 crypto map mymap 20 set peer 172.30.1.1 crypto map mymap 20 set transform-set my-set crypto map mymap interface outside !--- These are the Phase I parameters negotiated by the two peers. isakmp enable outside isakmp policy 10 authentication pre-share isakmp policy 10 encryption aes-256 isakmp policy 10 hash sha isakmp policy 10 group 2 isakmp policy 10 lifetime 86400 !--- A tunnel group consists of a set of records !--- that contain tunnel connection policies. The two attributes !--- are General and IPsec. Use the remote peer IP address as the !--- name of the Tunnel group. In this example 172.30.1.1 is the peer IP address. !--- Refer to Tunnel Group for more information. tunnel-group 172.30.1.1 type ipsec-l2l tunnel-group 172.30.1.1 ipsec-attributes pre-shared-key * !--- Output is suppressed. ! : end PIX7# |
配置VPN 3000集中器
VPN集中器在他们的出厂设置中没有预编程序设置IP地址。必须使用控制台端口配置基于菜单的命令行界面 (CLI) 的初始配置。 有关如何通过控制台进行配置的信息,请参阅通过控制台配置 VPN 集中器。
在以太网 1(专用)接口上配置 IP 地址之后,可在 CLI 中或通过浏览器界面配置其余 IP 地址。浏览器界面支持 HTTP 和使用安全套接字层 (SSL) 的 HTTP。
以下参数通过控制台进行配置:
-
时间/日期 - 正确的时间和日期非常重要。他们帮助保证记录和记帐条目是准确的,并且系统能创建一个有效安全证书。
-
以太网 1(专用)接口 - 网络拓扑 172.16.5.100/16 的 IP 地址和掩码。
现在,可通过 HTML 浏览器从网络内部访问 VPN 集中器。有关如何在 CLI 模式下配置 VPN 集中器的信息,请参阅使用命令行界面快速配置。
从 Web 浏览器中键入专用接口的 IP 地址,以便启用 GUI 界面。
单击 save needed 图标将更改保存到内存中。出厂默认用户名和口令为 admin,且区分大小写。
-
启动 GUI,选择 Configuration > Interfaces 以便为公共接口配置 IP 地址和默认网关。
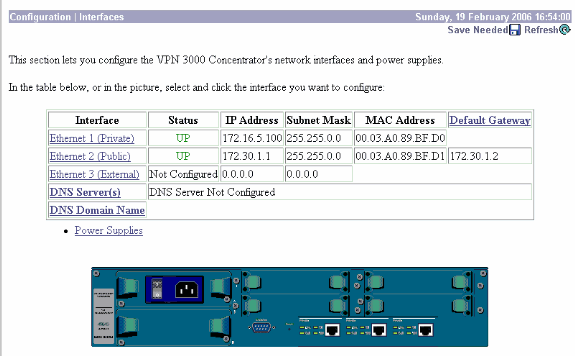
-
选择 Configuration > Policy Management > Traffic Management > Network Lists > Add or Modify 创建定义要加密的数据流的网络列表。
请在此处添加本地和远程网络。IP 地址应镜像在远程 PIX 上配置的访问列表中的 IP 地址。
在本示例中,这两个网络列表为 remote_network 和“VPN Client Local LAN”。
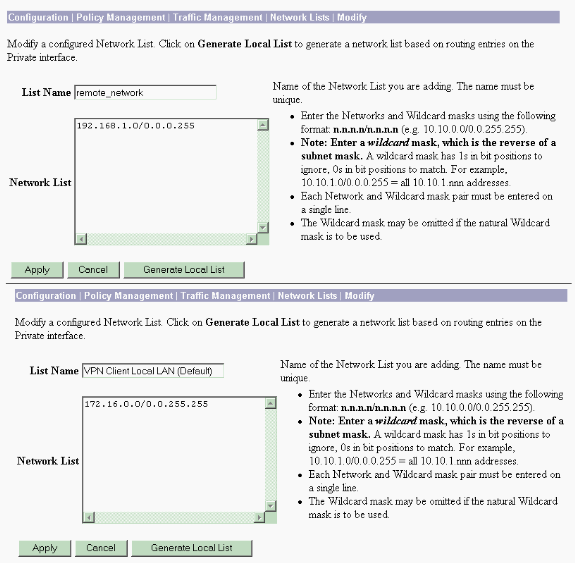
-
选择 Configuration > System > Tunneling Protocols > IPSec LAN-to-LAN > Add 配置 IPsec LAN 到 LAN 隧道。完成后,单击 Apply。
输入对等体 IP 地址、在第 2 步中创建的网络列表、IPsec 和 ISAKMP 参数,以及预共享密钥。
在本示例中,对等体 IP 地址为 10.1.1.1,网络列表为 remote_network 和“VPN Client Local LAN”,预共享密钥为“cisco”。
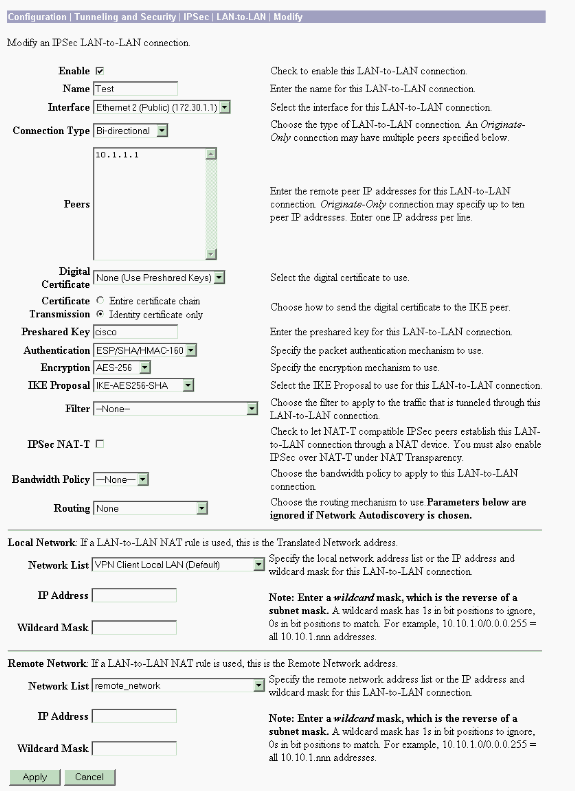
-
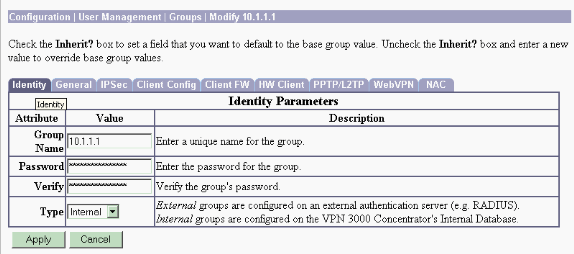
选择 Configuration > User Management > Groups > Modify 10.1.1.1 查看自动生成的组信息。
注意:请勿修改这些组设置。
验证
使用本部分可确认配置能否正常运行。
验证 PIX
命令输出解释程序(仅限注册用户)(OIT) 支持某些 show 命令。使用 OIT 可查看对 show 命令输出的分析。
-
show isakmp sa - 显示对等体上的所有当前 IKE 安全关联 (SA)。状态 MM_ACTIVE 表示使用主模式设置 IPsec VPN 隧道。
在本示例中,PIX 防火墙发起 IPsec 连接。对等体 IP 地址为 172.30.1.1,并使用主模式建立连接。
PIX7#show isakmp sa Active SA: 1 Rekey SA: 0 (A tunnel will report 1 Active and 1 Rekey SA during rekey) Total IKE SA: 1 1 IKE Peer: 172.30.1.1 Type : L2L Role : initiator Rekey : no State : MM_ACTIVE -
show ipsec sa - 显示当前 SA 使用的设置。检查对等 IP 地址、本地和远程端都可访问的网络,以及所使用的转换集。有两个 ESP SA,每个方向一个。
PIX7#show ipsec sa
interface: outside
    Crypto map tag: mymap, seq num: 20, local addr: 10.1.1.1

      access-list 101 permit ip 192.168.1.0 255.255.255.0 172.16.0.0 255.255.0.0

      local ident (addr/mask/prot/port): (192.168.1.0/255.255.255.0/0/0)
      remote ident (addr/mask/prot/port): (172.16.0.0/255.255.0.0/0/0)
      current_peer: 172.30.1.1

      #pkts encaps: 4, #pkts encrypt: 4, #pkts digest: 4
      #pkts decaps: 4, #pkts decrypt: 4, #pkts verify: 4
      #pkts compressed: 0, #pkts decompressed: 0
      #pkts not compressed: 4, #pkts comp failed: 0, #pkts decomp failed: 0
      #send errors: 0, #recv errors: 0

      local crypto endpt.: 10.1.1.1, remote crypto endpt.: 172.30.1.1

      path mtu 1500, ipsec overhead 76, media mtu 1500
      current outbound spi: 136580F6

    inbound esp sas:
      spi: 0xF24F4675 (4065281653)
         transform: esp-aes-256 esp-sha-hmac
         in use settings ={L2L, Tunnel,}
         slot: 0, conn_id: 1, crypto-map: mymap
         sa timing: remaining key lifetime (kB/sec): (3824999/28747)
         IV size: 16 bytes
         replay detection support: Y
    outbound esp sas:
      spi: 0x136580F6 (325419254)
         transform: esp-aes-256 esp-sha-hmac
         in use settings ={L2L, Tunnel,}
         slot: 0, conn_id: 1, crypto-map: mymap
         sa timing: remaining key lifetime (kB/sec): (3824999/28745)
         IV size: 16 bytes
         replay detection support: Y
验证 VPN 3000 集中器
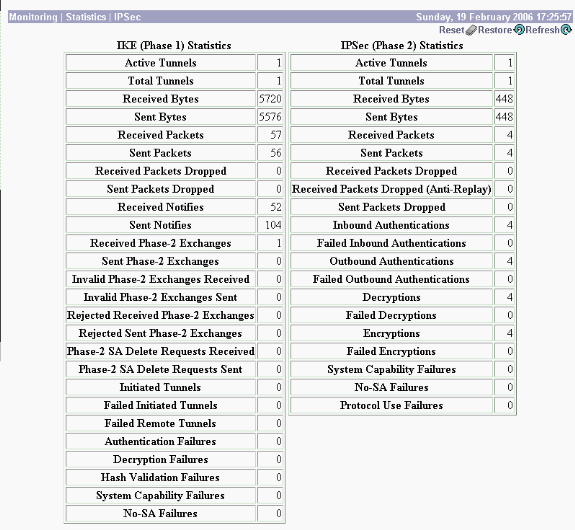
选择 Monitoring > Statistics > IPsec 验证是否已在 VPN 3000 集中器中建立隧道。这包含 IKE 和 IPsec 参数的统计信息。
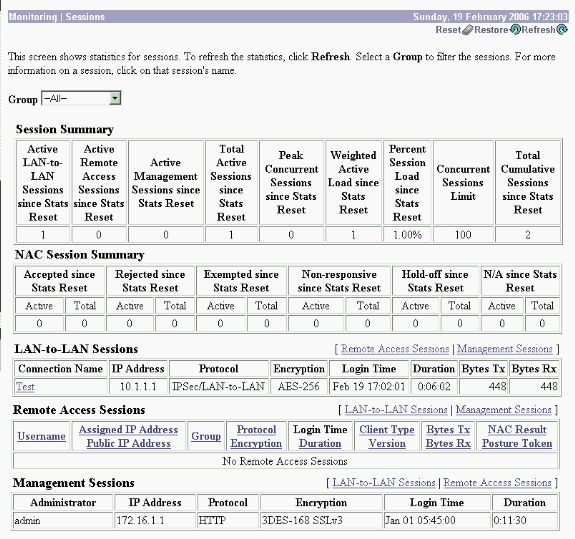
选择 Monitoring > Sessions 可主动监控会话。可在此处重置 IPsec 隧道。
故障排除
本部分提供的信息可用于对配置进行故障排除。
排除 PIX 故障
命令输出解释程序(仅限注册用户)(OIT) 支持某些 show 命令。使用 OIT 可查看对 show 命令输出的分析。
注意:在使用debug命令之前,请参阅有关Debug命令的重要信息。
PIX 上用于 VPN 隧道的 debug 命令包括:
-
debug crypto isakmp - 调试 ISAKMP SA 协商。
-
debug crypto ipsec - 调试 IPsec SA 协商。
排除 VPN 3000 集中器的故障
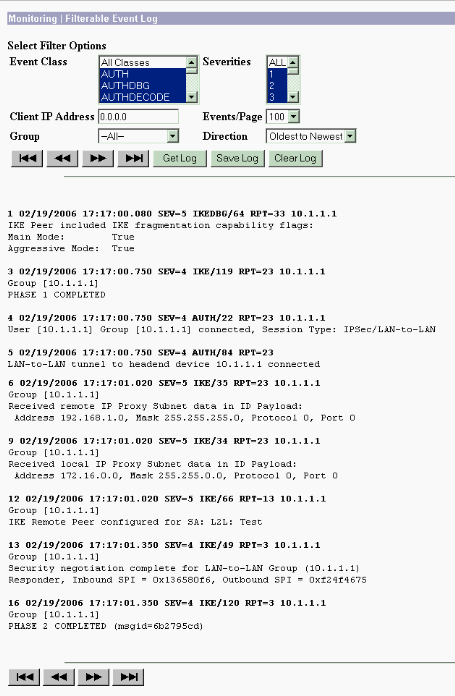
类似于Cisco路由器的debug命令,您能配置事件类型,以查看所有告警。选择 Configuration > System > Events > Classes > Add 以便对事件类启用日志记录。
选择 Monitoring > Filterable Event Log 监控已启用的事件。
PFS
在 IPsec 协商中,完全转发保密 (PFS) 可确保每个新的加密密钥与任何先前密钥不相关。请在两个隧道对等体上同时启用或禁用 PFS,否则不会在 PIX/ASA 中建立 LAN 到 LAN (L2L) IPsec 隧道。
默认情况下 PFS 处于禁用状态。要启用 PFS,请在组策略配置模式下使用 pfs 命令并指定 enable 关键字。要禁用 PFS,请输入 disable 关键字。
hostname(config-group-policy)#pfs {enable | disable}
要从正在运行的配置中删除 PFS 属性,请输入此命令的 no 形式。一个组策略可以从另一个组策略继承 PFS 的值。请输入此命令的 no 形式,以防止继承值。
hostname(config-group-policy)#no pfs
相关信息
修订历史记录
| 版本 | 发布日期 | 备注 |
|---|---|---|
1.0 |
16-Oct-2008 |
初始版本 |
 反馈
反馈