使用Configuration Professional將IOS路由器作為Easy VPN伺服器配置示例
目錄
簡介
本檔案介紹如何使用Cisco Configuration Professional(Cisco CP)和CLI將Cisco IOS®路由器設定為Easy VPN(EzVPN)伺服器。Easy VPN Server功能允許遠端終端使用者使用IP安全(IPsec)與任何Cisco IOS虛擬專用網路(VPN)網關通訊。伺服器將集中管理的IPsec策略「推送」到客戶端裝置,從而最大限度地減少了終端使用者的配置。
有關Easy VPN伺服器的詳細資訊,請參閱安全連線配置指南庫Cisco IOS版本12.4T的Easy VPN伺服器部分。
必要條件
採用元件
本文中的資訊係根據以下軟體和硬體版本:
-
採用Cisco IOS軟體版本12.4(15T)的Cisco 1841路由器
-
Cisco CP版本2.1
本文中的資訊是根據特定實驗室環境內的裝置所建立。文中使用到的所有裝置皆從已清除(預設)的組態來啟動。如果您的網路正在作用,請確保您已瞭解任何指令可能造成的影響。
安裝Cisco CP
執行以下步驟以安裝Cisco CP:
-
從Cisco Software Center(僅供註冊客戶使用)下載Cisco CP V2.1,然後將其安裝在本地PC上。
最新版本的Cisco CP可在Cisco CP網站上找到。
-
從本地PC通過開始 > 程式 > Cisco Configuration Professional(CCP)啟動Cisco CP,然後選擇具有您要配置的路由器的Community。
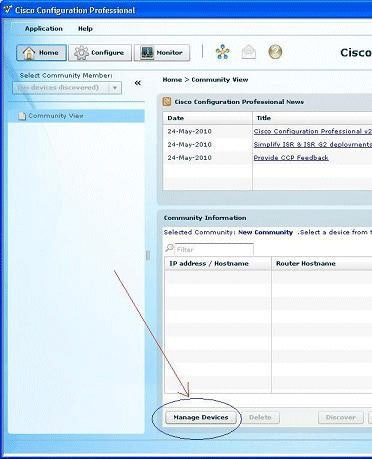
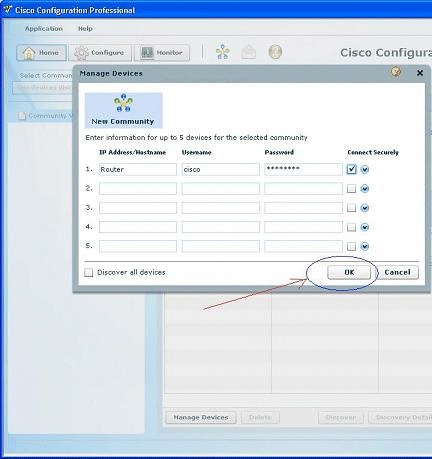
-
若要探索您想要設定的裝置,請突出顯示路由器,然後按一下「Discover」。
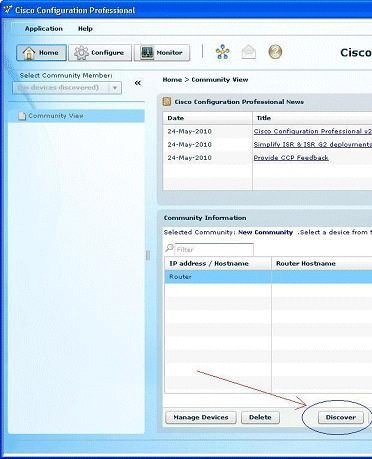
注意:有關與Cisco CP v2.1相容的Cisco路由器型號和IOS版本的資訊,請參閱相容Cisco IOS版本部分。
註:有關運行Cisco CP v2.1的PC要求的資訊,請參閱系統要求部分。
運行Cisco CP的路由器配置
要在Cisco路由器上運行Cisco CP,請執行以下步驟:
-
使用Telnet、SSH或通過控制檯連線到路由器。
使用以下命令進入全域性配置模式:
Router(config)#enable
Router(config)#
-
如果啟用了HTTP和HTTPS並將其配置為使用非標準埠號,則可以跳過此步驟,只使用已配置的埠號。
使用以下Cisco IOS軟體命令啟用路由器HTTP或HTTPS伺服器:
Router(config)# ip http server
Router(config)# ip http secure-server
Router(config)# ip http authentication local
-
建立許可權級別為15的使用者:
Router(config)# username
privilege 15 password 0 注意:將<username> 和<password>替換為要配置的使用者名稱和密碼。
-
為本地登入和許可權級別15配置SSH和Telnet。
Router(config)# line vty 0 4
Router(config-line)# privilege level 15
Router(config-line)# login local
Router(config-line)# transport input telnet
Router(config-line)# transport input telnet ssh
Router(config-line)# exit
-
(可選)啟用本地日誌記錄以支援日誌監控功能:
Router(config)# logging buffered 51200 warning
需求
本文檔假定Cisco路由器已完全運行並配置為允許Cisco CP更改配置。
有關如何開始使用Cisco CP的完整資訊,請參閱Cisco Configuration Professional入門。
慣例
設定
本節提供為網路中的路由器配置基本設定的相關資訊。
註:使用Command Lookup Tool(僅限註冊客戶)可獲取本節中使用的命令的詳細資訊。
網路圖表
本檔案會使用以下網路設定:

注意:此配置中使用的IP編址方案在Internet上不能合法路由。它們是RFC 1918 ![]() ,已在實驗室環境中使用。
,已在實驗室環境中使用。
Cisco CP - Easy VPN伺服器配置
執行以下步驟,將Cisco IOS路由器配置為Easy VPN伺服器:
-
選擇Configure > Security > VPN > Easy VPN Server > Create Easy VPN Server,然後點選Launch Easy VPN Server Wizard,將Cisco IOS路由器配置為Easy VPN伺服器:
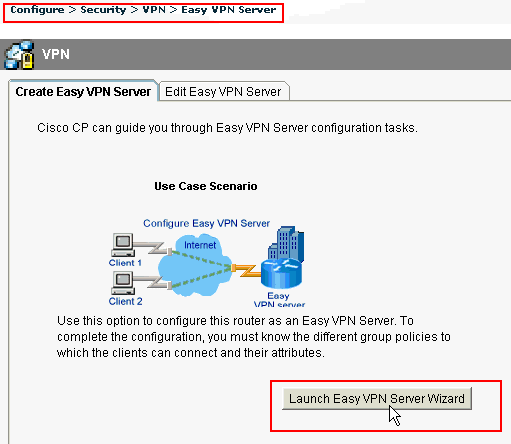
-
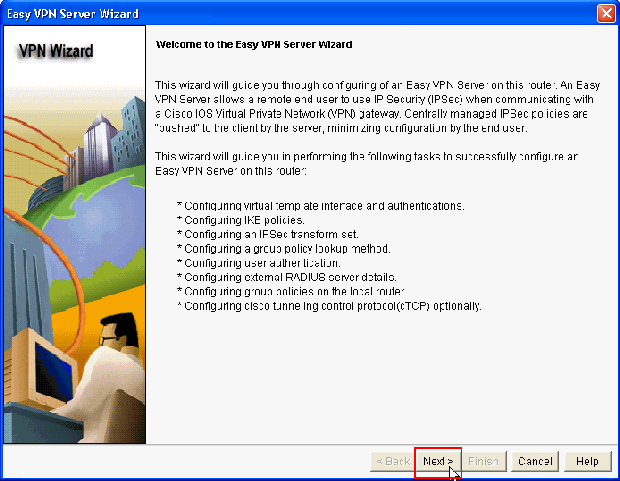
按一下Next以繼續Easy VPN Server配置。
-
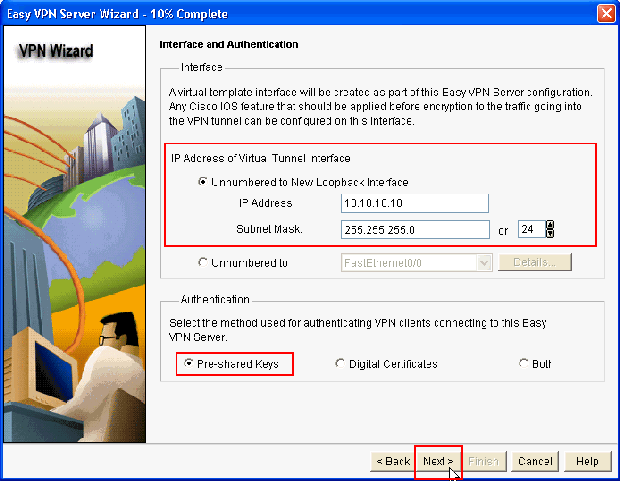
在出現的視窗中,虛擬介面將配置為Easy VPN伺服器配置的一部分。提供虛擬通道介面的IP位址,並選擇用於驗證VPN使用者端的驗證方法。此處,預共用金鑰是使用的身份驗證方法。按一下「Next」:
-
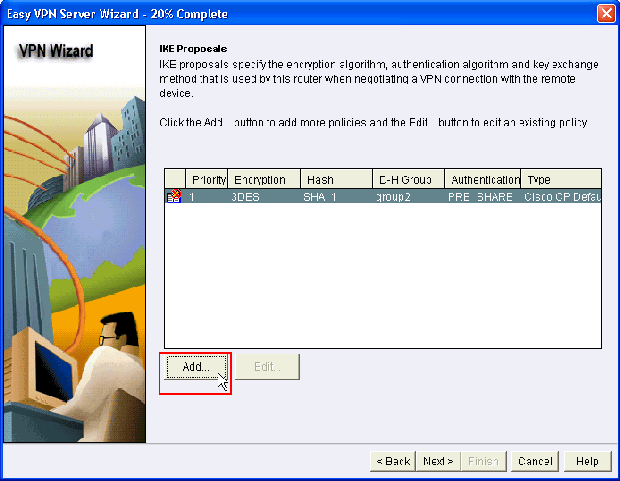
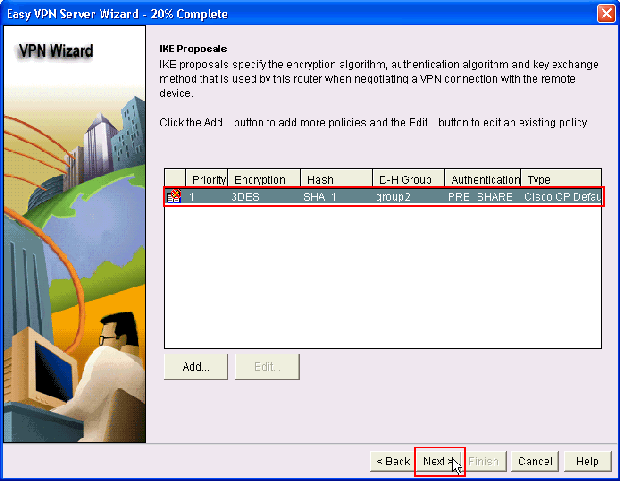
指定此路由器在與遠端裝置協商時要使用的加密演算法、身份驗證演算法和金鑰交換方法。路由器上存在預設IKE策略,如果需要,可以使用它。如果要新增新的IKE策略,請按一下Add。
-
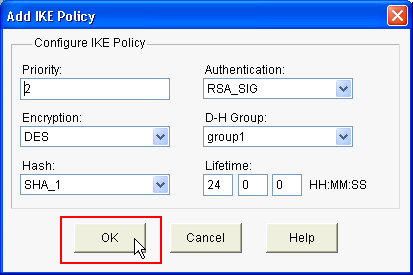
提供Encryption Algorithm、Authentication Algorithm和Key Exchange method(如此處所示),然後按一下OK:
-
本示例中使用的是預設IKE策略。因此,選擇預設IKE策略並按一下Next。
-
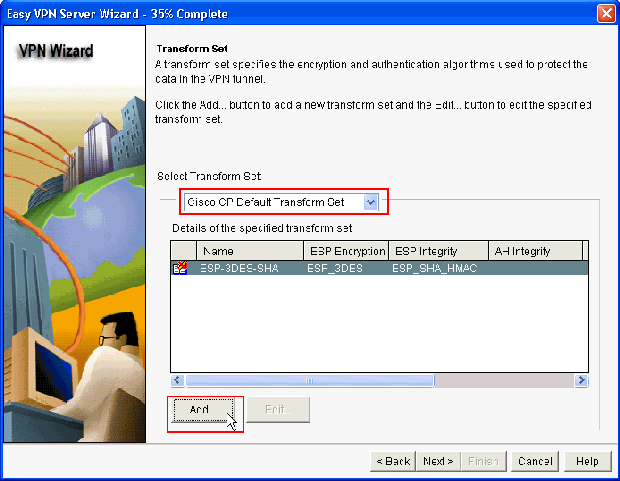
在新視窗中,應提供轉換集詳細資訊。轉換集指定用於保護VPN隧道中的資料的加密和身份驗證演算法。按一下「Add」以提供這些詳細資訊。按一下Add並提供詳細資訊時,可以根據需要新增任意數量的轉換集。
附註: 使用Cisco CP配置時,預設情況下路由器上會顯示CP默認轉換集。
-
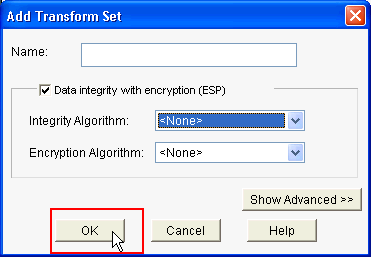
提供轉換集詳細資訊(加密和身份驗證演算法),然後按一下OK。
-
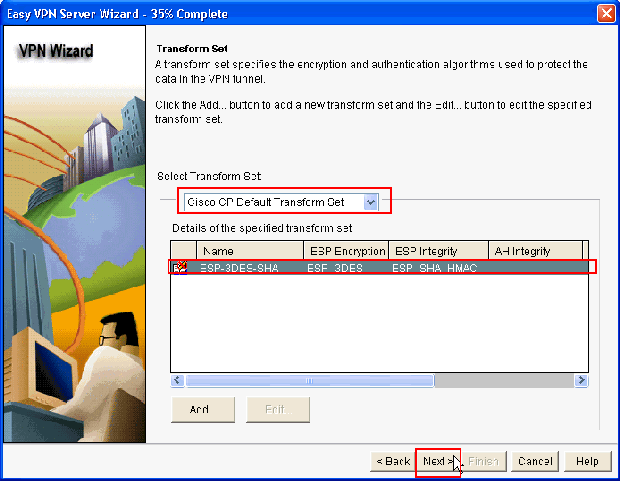
本示例中使用的是名為CP Default Transform Set的Default Transform Set。因此,選擇預設轉換集並按一下下一步。
-
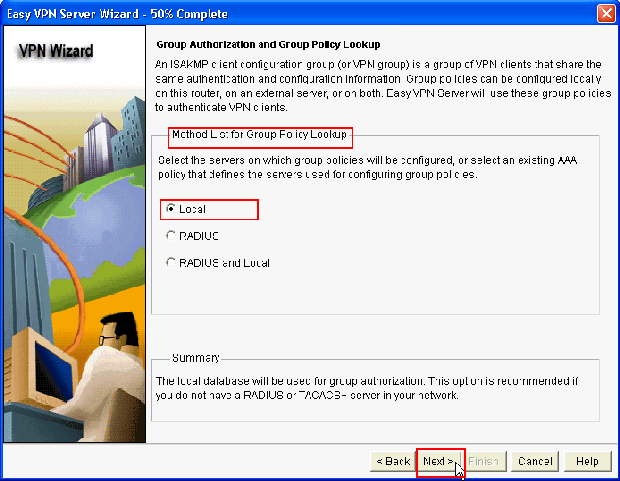
在新視窗中,選擇將在其上配置組策略的伺服器,該伺服器可以是Local或RADIUS,或者同時是Local和RADIUS。在本示例中,我們使用Local server來配置組策略。選擇Local,然後按一下Next。
-
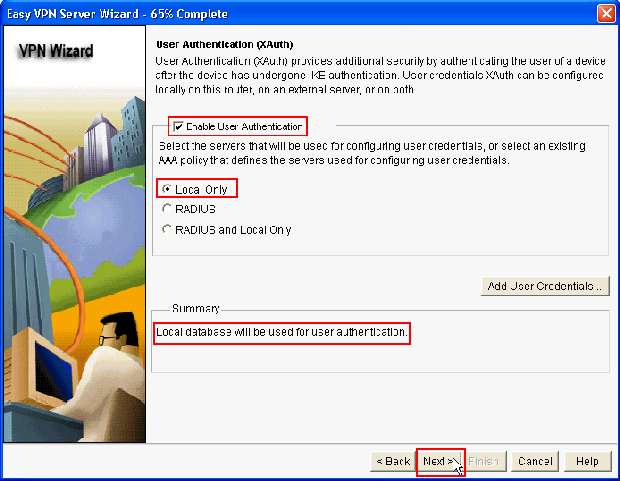
在此新視窗中選擇要用於使用者身份驗證的伺服器,可以是Local Only或RADIUS,也可以是Local Only和RADIUS。在本示例中,我們使用Local server配置用於身份驗證的使用者憑據。確保選中Enable User Authentication旁邊的覈取方塊。選擇「Local Only」,然後按一下「Next」。
-
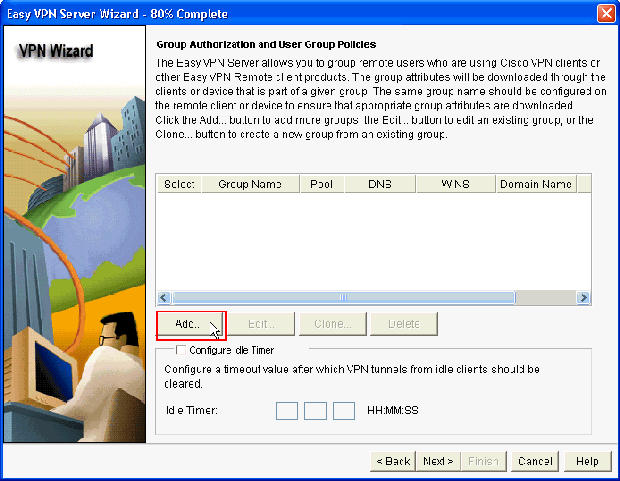
按一下Add以建立新的組策略,並在此組中新增遠端使用者。
-
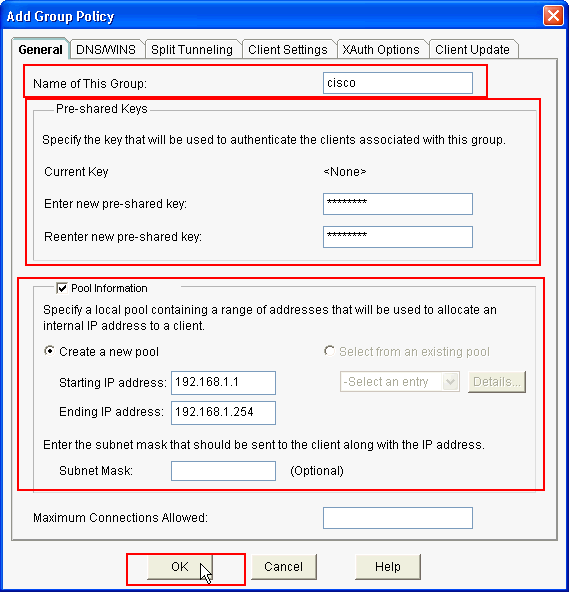
在Add Group Policy視窗中,在Space中提供Name for Name of This Group(在本例中為cisco)以及Pre-shared key,以及IP Pool(起始IP地址和結束IP地址)資訊,如圖所示,然後按一下OK。
注意:您可以建立新的IP池,或使用現有的IP池(如果存在)。
-
現在,選擇使用cisco名稱建立的新組策略,然後根據需要按一下配置空閒計時器旁邊的覈取方塊以配置空閒計時器。按「Next」(下一步)。
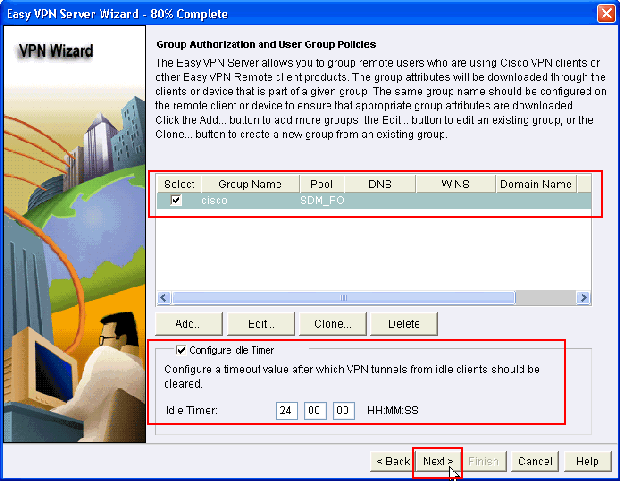
-
如果需要,啟用思科通道控制通訊協定(cTCP)。否則,請按一下下一步。
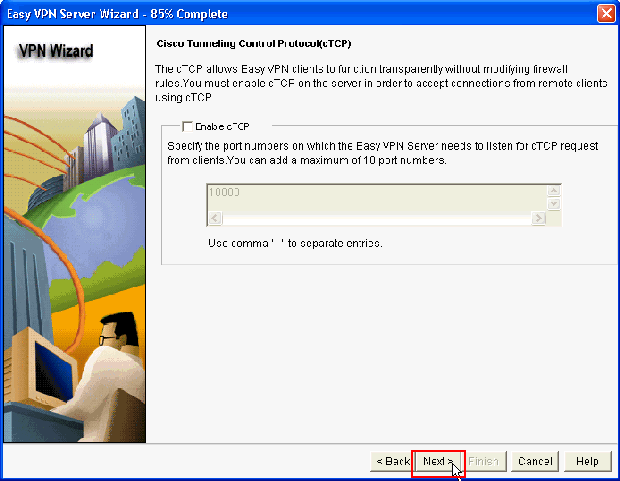
-
檢查配置摘要。按一下「Finish」(結束)。
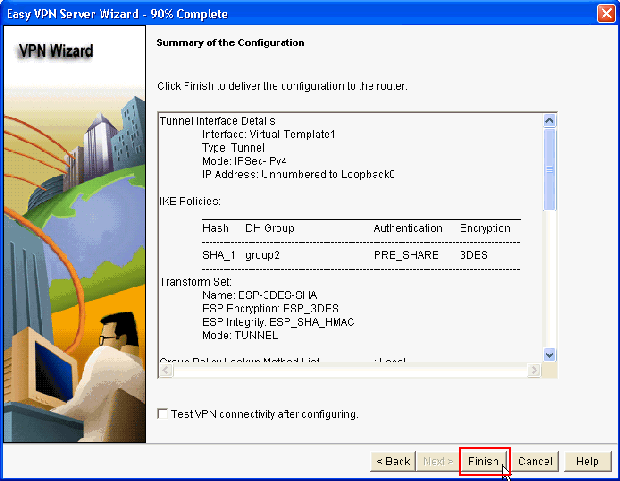
-
在「Deliver Configuration to Router」視窗中,按一下Deliver將配置傳送到路由器。您可以按一下Save to file,將配置儲存為PC上的檔案。
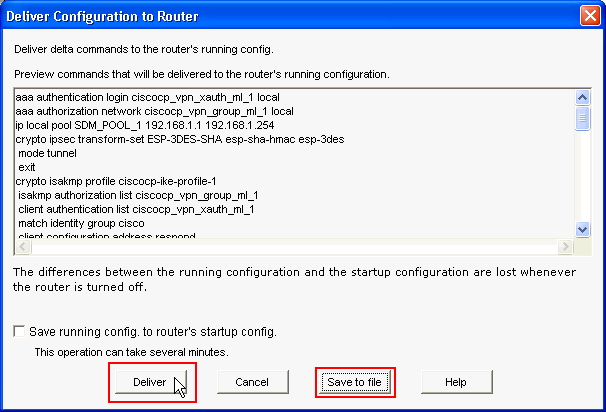
-
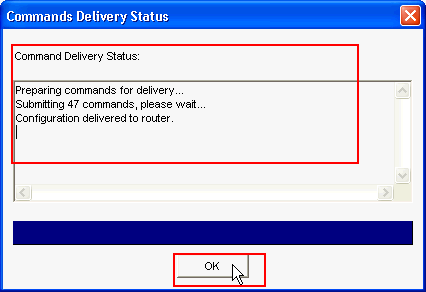
命令傳遞狀態視窗顯示命令到路由器的傳遞狀態。它顯示為Configuration delivered to router。按一下「OK」(確定)。
-
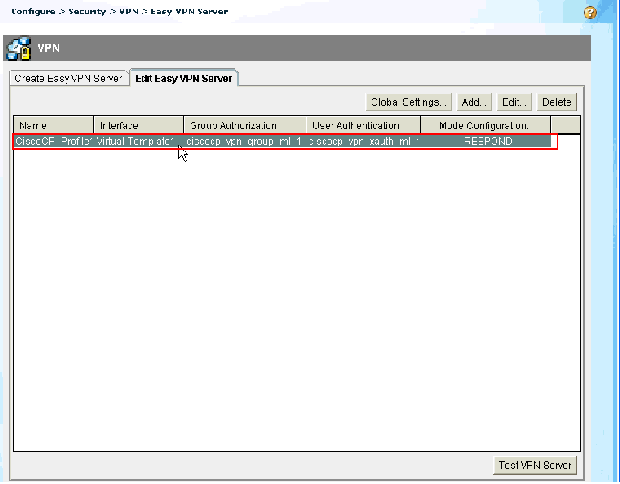
您可以看到新建立的Easy VPN伺服器。您可以通過選擇編輯Easy VPN伺服器來編輯現有伺服器。這將完成Cisco IOS路由器上的Easy VPN伺服器配置。
CLI組態
| 路由器配置 |
|---|
Router#show run Building configuration... Current configuration : 2069 bytes ! version 12.4 service timestamps debug datetime msec service timestamps log datetime msec no service password-encryption hostname Router boot-start-marker boot-end-marker no logging buffered enable password cisco !---AAA enabled using aaa newmodel command. Also AAA Authentication and Authorization are enabled---! aaa new-model ! ! aaa authentication login ciscocp_vpn_xauth_ml_1 local aaa authorization network ciscocp_vpn_group_ml_1 local ! ! aaa session-id common ip cef ! ! ! ! ip domain name cisco.com ! multilink bundle-name authenticated ! ! !--- Configuration for IKE policies. !--- Enables the IKE policy configuration (config-isakmp) !--- command mode, where you can specify the parameters that !--- are used during an IKE negotiation. Encryption and Policy details are hidden as the default values are chosen. crypto isakmp policy 1 encr 3des authentication pre-share group 2 crypto isakmp keepalive 10 ! crypto isakmp client configuration group cisco key cisco123 pool SDM_POOL_1 crypto isakmp profile ciscocp-ike-profile-1 match identity group cisco client authentication list ciscocp_vpn_xauth_ml_1 isakmp authorization list ciscocp_vpn_group_ml_1 client configuration address respond virtual-template 1 ! ! !--- Configuration for IPsec policies. !--- Enables the crypto transform configuration mode, !--- where you can specify the transform sets that are used !--- during an IPsec negotiation. crypto ipsec transform-set ESP-3DES-SHA esp-3des esp-sha-hmac ! crypto ipsec profile CiscoCP_Profile1 set security-association idle-time 86400 set transform-set ESP-3DES-SHA set isakmp-profile ciscocp-ike-profile-1 ! ! ! !--- RSA certificate generated after you enable the !--- ip http secure-server command. crypto pki trustpoint TP-self-signed-1742995674 enrollment selfsigned subject-name cn=IOS-Self-Signed-Certificate-1742995674 revocation-check none rsakeypair TP-self-signed-1742995674 !--- Create a user account named cisco123 with all privileges. username cisco123 privilege 15 password 0 cisco123 archive log config hidekeys ! ! !--- Interface configurations are done as shown below---! interface Loopback0 ip address 10.10.10.10 255.255.255.0 ! interface FastEthernet0/0 ip address 10.77.241.111 255.255.255.192 duplex auto speed auto ! interface Virtual-Template1 type tunnel ip unnumbered Loopback0 tunnel mode ipsec ipv4 tunnel protection ipsec profile CiscoCP_Profile1 ! !--- VPN pool named SDM_POOL_1 has been defined in the below command---! ip local pool SDM_POOL_1 192.168.1.1 192.168.1.254 !--- This is where the commands to enable HTTP and HTTPS are configured. ip http server ip http authentication local ip http secure-server ! ! ! ! control-plane ! line con 0 line aux 0 !--- Telnet enabled with password as cisco. line vty 0 4 password cisco transport input all scheduler allocate 20000 1000 ! ! ! ! end |
驗證
Easy VPN伺服器 — show命令
使用本節內容,確認您的組態是否正常運作。
-
show crypto isakmp sa — 顯示對等體上的所有當前IKE SA。
Router#show crypto isakmp sa

IPv4 Crypto ISAKMP SA
dst             src             state          conn-id slot status
10.77.241.111   172.16.1.1     QM_IDLE           1003    0 ACTIVE
-
show crypto ipsec sa — 顯示對等體上的所有當前IPsec SA。
Router#show crypto ipsec sa
		interface: Virtual-Access2
    Crypto map tag: Virtual-Access2-head-0, local addr 10.77.241.111

   protected vrf: (none)
   local  ident (addr/mask/prot/port): (0.0.0.0/0.0.0.0/0/0)
   remote ident (addr/mask/prot/port): (192.168.1.3/255.255.255.255/0/0)
   current_peer 172.16.1.1 port 1086
     PERMIT, flags={origin_is_acl,}
    #pkts encaps: 28, #pkts encrypt: 28, #pkts digest: 28
    #pkts decaps: 36, #pkts decrypt: 36, #pkts verify: 36
    #pkts compressed: 0, #pkts decompressed: 0
    #pkts not compressed: 0, #pkts compr. failed: 0
    #pkts not decompressed: 0, #pkts decompress failed: 0
    #send errors 0, #recv errors 2

     local crypto endpt.: 10.77.241.111, remote crypto endpt.: 172.16.1.1
     path mtu 1500, ip mtu 1500, ip mtu idb FastEthernet0/0
     current outbound spi: 0x186C05EF(409732591)

     inbound esp sas:
      spi: 0x42FC8173(1123844467)
        transform: esp-3des esp-sha-hmac
疑難排解
輸出直譯器工具(僅供已註冊客戶使用)(OIT)支援某些show命令。使用OIT檢視show命令輸出的分析。
註:在發出debug命令前,請先參閱有關Debug命令的重要資訊。
相關資訊
修訂記錄
| 修訂 | 發佈日期 | 意見 |
|---|---|---|
1.0 |
01-Dec-2013 |
初始版本 |
 意見
意見