簡介
本文說明如何用第三方憑證替換Hyperflex叢集中的自簽名SSL憑證。
必要條件
需求
思科建議您瞭解以下主題:
- 對SSL憑證有基礎認識。
- 對Linux命令列有基礎認識。
- Hyperflex集群操作。
採用元件
本檔案中的資訊是根據:
Hyperflex Data Platform(HXDP)5.0.(2a)及更高版本
本文中的資訊是根據特定實驗室環境內的裝置所建立。文中使用到的所有裝置皆從已清除(預設)的組態來啟動。如果您的網路運作中,請確保您瞭解任何指令可能造成的影響。
背景資訊
在Cisco HyperFlex部署中,元件之間會生成一組本地證書,以允許進行可信通訊。
如果您的組織已經擁有證書頒發機構,建議您用自己的證書替換預設SSL證書。
E嘗試此組態之前,請確保符合以下要求 :
設定
步驟1.建立openssl.cnf的副本
使用SSH作為管理使用者連線到Hyperflex群集管理IP(CMIP),然後切換到撥號使用者。
HyperFlex StorageController 5.0(2a)
admin @ X.X.X.X's password:
This is a Restricted shell.
Type '?' or 'help' to get the list of allowed commands.
hxshell:~$ su diag
Password:
 _____ _                     _____ _                              ___                       ____
|  ___(_)_   _____     _    |_   _| |__  _ __ ___  ___     _     / _ \ _ __   ___          / ___|  _____   _____ _ __
| |_  | \ \ / / _ \  _| |_    | | | '_ \| '__/ _ \/ _ \  _| |_  | | | | '_ \ / _ \  _____  \___ \ / _ \ \ / / _ \ '_ \
|  _| | |\ V /  __/ |_   _|   | | | | | | | |  __/  __/ |_   _| | |_| | | | |  __/ |_____|  ___) |  __/\ V /  __/ | | |
|_|   |_| \_/ \___|   |_|     |_| |_| |_|_|  \___|\___|   |_|    \___/|_| |_|\___|         |____/ \___| \_/ \___|_| |_|


Enter the output of above expression: 2
Valid captcha
diag#

註:在5.0(2a)版本中,diag使用者可用於允許使用者擁有更多許可權,如果您的群集在4.5中,請與Cisco TAC聯絡以完成此過程。
在/tmp資料夾中建立目錄
在本例中,它命名為ssl。
diag# mkdir /tmp/ssl
修改目錄許可權。
diag# chmod 777 /tmp/ssl
建立openssl.cnf的副本
在本例中, openssl.cnf的副本命名為openssl-san.cnf。
diag# cp /etc/ssl/openssl.cnf /tmp/ssl/openssl-san.cnf
diag# ls -l /tmp/ssl/
total 12
-rwxr-xr-x 1 diag diag 10835 Aug  3 21:39 openssl-san.cnf
步驟2.編輯openssl-san.cnf檔案
在本地Linux電腦上建立一個目錄,以從CMIP複製openssl-san.cnf內容。
在Linux電腦上編輯檔案的內容。

注意:可以使用vi在SCVM下編輯openssl-san.cnf。
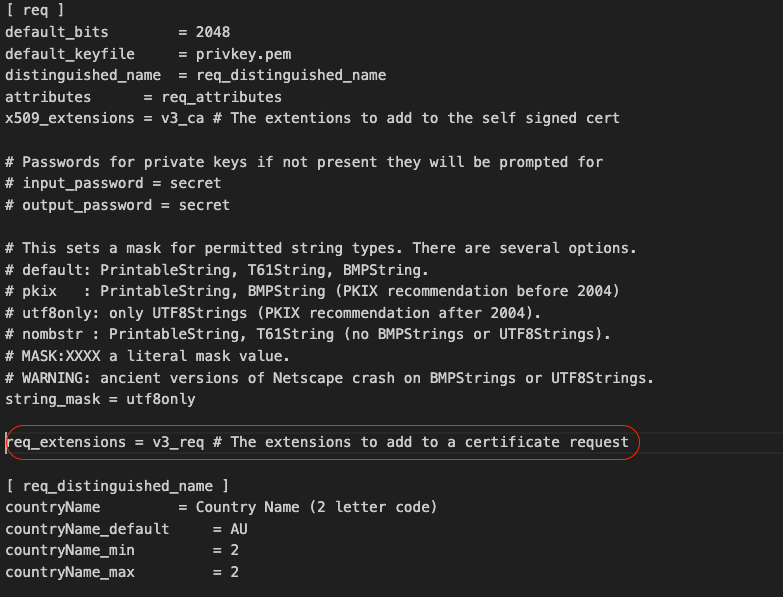
在[ req ]部分取消對req-extensions行的註釋。
從直線中移除#符號。

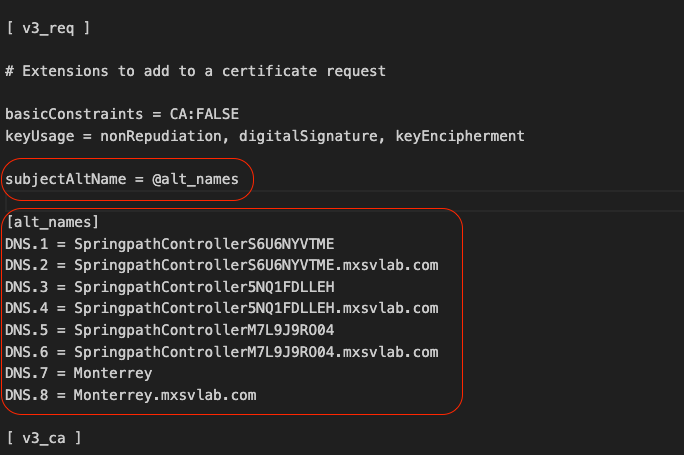
在[ v3_req ]部分新增主題替代名稱(SAN)。
在[ v3_req ]部分新增SAN行。確保新增所有儲存控制器虛擬機器(SCVM)和Hyperflex群集完全限定域名(FQDN)。

註:Chrome不再支援使用公用名,現在要求證書中必須存在主體替代名稱(SAN)。

步驟3.建立憑證
步驟 3a.建立CSR
在Linux電腦上運行命令:
openssl req -nodes -newkey rsa:2048 -keyout /


      /

       .key -out /

        /

         .csr -config /

          /openssl-san.cnf
user$ openssl req -nodes -newkey rsa:2048 -keyout /Users/user/Documents/SpringpathController5NQ1FDLLEH.key -out /Users/user/Documents/SpringpathController5NQ1FDLLEH.csr -config /Users/user/Documents/openssl-san.cnf
Generating a 2048 bit RSA private key
..........................+++++
.....................................................................................................+++++
writing new private key to '/tmp/ssl/SpringpathControllerM7L9J9RO04.key'
-----
You are about to be asked to enter information that will be incorporated
into your certificate request.
What you are about to enter is what is called a Distinguished Name or a DN.
There are quite a few fields but you can leave some blank
For some fields there will be a default value,
If you enter '.', the field will be left blank.
-----
Country Name (2 letter code) [AU]:MX
State or Province Name (full name) [Some-State]:CDMX
Locality Name (eg, city) []:Benito Juarez
Organization Name (eg, company) [Internet Widgits Pty Ltd]:Cisco Systems
Organizational Unit Name (eg, section) []:TAC
Common Name (e.g. server FQDN or YOUR name) []:Monterrey.mxsvlab.com
Email Address []:

Please enter the following 'extra' attributes
to be sent with your certificate request
A challenge password []:


      An optional company name []:Cisco Systems
執行指令後會產生兩個檔案;.key和.csr。
user$ ls -l
total 54
-rw-r--r--@ 1 user staff 1549 Aug 3 14:24 SpringpathControllerM7L9J9RO04.csr
-rw-r--r-- 1 user staff 1704 Aug 3 14:24 SpringpathControllerM7L9J9RO04.key
-rw-r--r-- 1 user staff 11193 Aug 3 14:19 openssl-san.cnf
步驟 3b.從證書頒發機構(CA)建立證書
導覽至http://<CA-IP>/certsrv/certrqxt.asp

複製<CVM的主機名>.csr檔案的內容,並將其貼上到您的憑證授權單位(CA)。
在Certificate template下選擇Web Server。
在「屬性」(Attributes)中按下一個格式鍵入ALT名稱。
san:dns=


      &dns=

       &dns=

        &dns=

按一下「提交」將證書生成為.cer文件

注意:確保證書型別為Web伺服器並且「屬性」欄位具有ALT名稱。

註:使用者輸入X.509 CSR的內容。對條目的內容不進行後端檢查。如果指定節點的[多個]主機名或IP作為主題備用名稱,或者使用萬用字元指定公用名的主機名,則可以為所有節點使用一個證書
步驟4.將證書從.cer轉換為.crt
將.cer證書復制到本地Linux電腦
在本地Linux電腦中,運行命令:
openssl x509 -inform PEM -in certnew.cer -out certnew.crt
user$ openssl x509 -inform PEM -in certnew.cer -out certnew.crt
user$ ls -l
total 56
-rw-r--r--@ 1 user  staff   1549 Aug  3 14:24 SpringpathControllerM7L9J9RO04.csr
-rw-r--r--  1 user  staff   1704 Aug  3 14:24 SpringpathControllerM7L9J9RO04.key
-rw-r--r--@ 1 user staff   2380 Aug  3 15:03 certnew.cer
-rw-r--r--  1 user  staff   2342 Aug  3 15:04 certnew.crt
-rw-r--r--  1 user  staff  11193 Aug  3 14:19 openssl-san.cnf
步驟5.匯入證書。
將.key和。crt檔案從本地Linux VM上載到CMIP上的/tmp/ssl。
diag# ls -l
total 20
-rw-r--r-- 1 admin springpath  1704 Aug  3 22:46 SpringpathControllerM7L9J9RO04.key
-rw-r--r-- 1 admin springpath  2342 Aug  3 22:46 certnew.crt
-rwxr-xr-x 1 diag  diag       10835 Aug  3 21:39 openssl-san.cnf
運行此命令
diag# /usr/share/springpath/storfs-misc/hx-scripts/certificate_import_input.sh
Enter the path for the key: /tmp/ssl/SpringpathControllerM7L9J9RO04.key
Enter the path for the certificate in crt format: /tmp/ssl/certnew.crt
Successfully installed certificate
The cluster needs to be re-registered with vCenter for the certificate import to be completed.
Do you want to continue with re-registration? (y/n): y
Enter vCenter username (user@domain): administrator @ vsphere.local
Enter vCenter Password:
Trying to retrieve vCenter information ....
Cluster re-registration in progress ....
Cluster re-registered successfully with vCenter !!
驗證
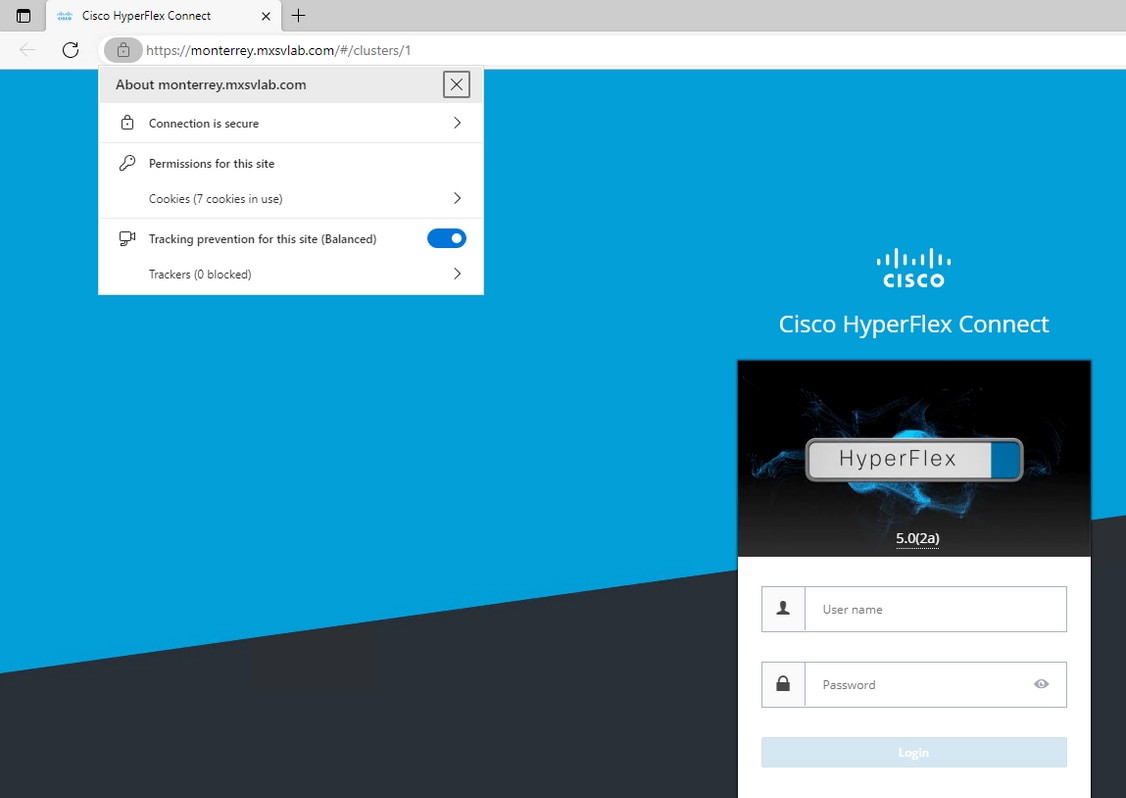
匯入證書後,確認您具有安全連線。

疑難排解
使用IP的證書無效。
SCVM IP的使用沒有安全連線,因為證書是使用FQDN生成的。

使用FQDN時,有一個安全的連線。

相關資訊