簡介
本文檔介紹用於恢復shell密碼的Linux root恢複方法。
必要條件
需求
思科建議您瞭解以下主題:
- 進化版可程式化網路管理員(EPNM)
- 對具有EPNM應用程式的虛擬機器的訪問
採用元件
本文中的資訊係根據以下軟體和硬體版本:
- EPNM軟體版本5.0
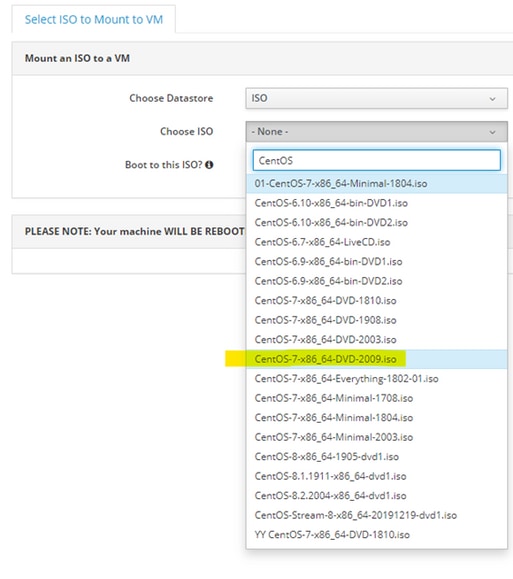
- CentOS-7-x86_64-DVD-2009.iso映像
本文中的資訊是根據特定實驗室環境內的裝置所建立。文中使用到的所有裝置皆從已清除(預設)的組態來啟動。如果您的網路運作中,請確保您瞭解任何指令可能造成的影響。
程式
附註:此過程需要多次重啟虛擬機器(VM)。最好在計畫的維護視窗中執行此過程。
步驟1.選擇CentOS-7-x86_64-DVD-2009.iso映像以啟動電腦。

步驟2.啟動後,從選單中選擇故障排除選項,然後選擇 Rescue a CentOS system.

步驟3.選擇語言/鍵盤的預設選項,不要選擇網路選項。
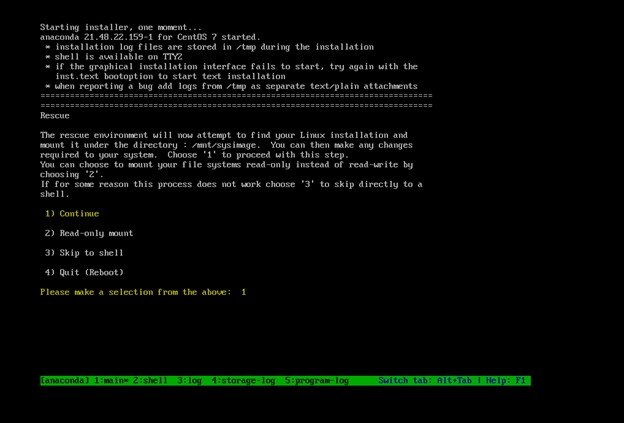
步驟4.您會看到以下訊息:
The rescue environment now attempts to find your Linux installation and mount it under the directory: /mnt/sysimage. You can then make any changes required to your system.
Choose '1' to process with this step. You can choose to mount your file systems read-only instead of read-write by choosing '2'.
If for some reason this process does not work choose '3' to skip directly to a shell
.
選擇 Continue 顯示。

步驟5. 找到當前安裝後,它會裝載到 /mnt/sysimage 並將您拖放到命令提示符下。

步驟6.使用以下命令將根目錄更改為PI安裝位置:
# chroot /mnt/sysimage

步驟7.移動 /storedconfig/rootpatchpw 使用以下命令存檔:
#mv /storedconfig/rootpatchpw /root/

步驟8.型別 exit 然後按一下 Enter 主要.
步驟9.然後,鍵入 reboot 命令,如下圖所示。

步驟10.系統重新啟動後,選擇 Troubleshooting 選項,這次選擇 Boot from local drive 因此它會啟動EPNM應用程式。
附註:如果它使您返回到CentOS選單,請選擇 Boot from local drive 請重試。

EPNM備份並運行後,您可以使用 shell 命令並提示您設定外殼密碼。
