構建和部署IR1101 ARM架構的Docker IOx軟體套件
下載選項
無偏見用語
本產品的文件集力求使用無偏見用語。針對本文件集的目的,無偏見係定義為未根據年齡、身心障礙、性別、種族身分、民族身分、性別傾向、社會經濟地位及交織性表示歧視的用語。由於本產品軟體使用者介面中硬式編碼的語言、根據 RFP 文件使用的語言,或引用第三方產品的語言,因此本文件中可能會出現例外狀況。深入瞭解思科如何使用包容性用語。
關於此翻譯
思科已使用電腦和人工技術翻譯本文件,讓全世界的使用者能夠以自己的語言理解支援內容。請注意,即使是最佳機器翻譯,也不如專業譯者翻譯的內容準確。Cisco Systems, Inc. 對這些翻譯的準確度概不負責,並建議一律查看原始英文文件(提供連結)。
簡介
本文檔介紹如何為基於IR1101 ARM的物聯網(IoT)網關準備、構建和部署基於Docker的IOx軟體套件。
必要條件
需求
思科建議您瞭解以下主題:
- Linux
- 容器
- IOx
採用元件
本文中的資訊係根據以下軟體和硬體版本:
- 可透過安全外殼(SSH)訪問的IR1101
- 已配置IP地址
- 使用許可權訪問裝置15使用者
- Linux主機(本文使用最小的Debian 9 (擴展)安裝)
- IOx客戶端安裝檔案,可從https://software.cisco.com/download/release.html?mdfid=286306005&softwareid=286306762下載
本文中的資訊是根據特定實驗室環境內的裝置所建立。文中使用到的所有裝置皆從已清除(預設)的組態來啟動。如果您的網路正在作用,請確保您已瞭解任何指令可能造成的影響。
背景資訊
IR1101與大多數其他IOx平台相比稍有不同,因為這些平台主要基於x86。IR1101以ARM64v8架構為基礎,因此您無法直接在平台上部署針對x86構建的容器或IOx軟體套件。本文檔從頭開始,為構建基於ARM64v8的Docker容器準備環境,並說明如何使用x86 PC在IR1101上構建、打包和部署這些容器。
例如,使用非常小的Python指令碼,該指令碼是一個簡單的Web伺服器,並構建了一個Docker容器,最終將其打包在IR1101上運行。Webserver唯一要做的事情是在預定義埠(9000)上偵聽,並在收到GET請求時返回簡單頁面。這可讓您測試執行您自己的程式碼的能力,並讓您在IOx應用程式開始執行後,測試其網路存取權。
該軟體套件由Docker工具使用Alpine Linux構建。Alpine Linux是一個小型Linux映像(約5MB),通常用作Docker容器的基礎。
由於大部分的桌上型電腦/筆記型電腦/虛擬機器器都採用x86架構,因此您需要在建置容器的x86機器上模擬ARM64v8架構。您可以使用快速模擬器(QEMU)使用者模擬輕鬆完成此作業。這允許在非原生架構中執行可執行檔,就像在原生架構上執行一樣。
設定
第1部分。為IR1101構建IOx軟體套件
1. 在Linux主機上安裝和準備IOx客戶端
您需要ioxclient,以便在生成Docker容器時將其打包為IOx包,因此讓我們首先準備此程式。
第一次複製或下載ioxclient軟體套件。可從https://software.cisco.com/download/release.html?mdfid=286306005&softwareid=286306762獲取。
jedepuyd@deb9:~$ scp jedepuyd@192.168.56.101:/home/jedepuyd/ioxclient_1.7.0.0_linux_amd64.tar.gz .
jedepuyd@192.168.56.101's password:
ioxclient_1.7.0.0_linux_amd64.tar.gz                             100% 4798KB  75.2MB/s   00:00
解壓縮包:
jedepuyd@deb9:~$ tar -xvzf ioxclient_1.7.0.0_linux_amd64.tar.gz
ioxclient_1.7.0.0_linux_amd64/ioxclient
ioxclient_1.7.0.0_linux_amd64/README.md
將路徑增加到PATH變數,以便在不使用完整位置的情況下使用該變數。如果重新啟動電腦或交換機使用者,則不要忘記重複此步驟:
jedepuyd@deb9:~$ export PATH=$PATH:/home/jedepuyd/ioxclient_1.7.0.0_linux_amd64/
首次啟動ioxclient以建立強制配置檔案。由於您僅使用ioxclient來封裝Docker容器,因此這些值可以保留為預設值:
jedepuyd@deb9:~$ ioxclient -v
ioxclient version 1.7.0.0
jedepuyd@deb9:~/iox_aarch64_webserver$ ioxclient profiles reset
Active Profile :  default
Your current config details will be lost. Continue (y/N) ? : y
Current config backed up at  /tmp/ioxclient731611124
Config data deleted.
jedepuyd@deb9:~/iox_aarch64_webserver$ ioxclient -v
Config file not found :  /home/jedepuyd/.ioxclientcfg.yaml
Creating one time configuration..
Your / your organization's name :
Your / your organization's URL :
Your IOx platform's IP address[127.0.0.1] :
Your IOx platform's port number[8443] :
Authorized user name[root] :
Password for root :
Local repository path on IOx platform[/software/downloads]:
URL Scheme (http/https) [https]:
API Prefix[/iox/api/v2/hosting/]:
Your IOx platform's SSH Port[2222]:
Your RSA key, for signing packages, in PEM format[]:
Your x.509 certificate in PEM format[]:
Activating Profile  default
Saving current configuration
ioxclient version 1.7.0.0
2. 在Linux生成電腦上安裝和準備Docker環境
此Docker用於從Alpine基礎映像構建容器並包括使用案例所需的檔案。以下步驟以Docker Community Edition (CE) for Debian的官方安裝指南為基礎:https://docs.docker.com/install/linux/docker-ce/debian/
更新您電腦上的封裝清單:
jedepuyd@deb9:~$ sudo apt-get update
...
Reading package lists... Done
安裝相依性以使用Docker回購:
jedepuyd@deb9:~$ sudo apt-get install apt-transport-https ca-certificates curl gnupg2 software-properties-common
Reading package lists... Done
Building dependency tree
...
Processing triggers for dbus (1.10.26-0+deb9u1) ...
增加Docker GNU Privacy Guard (GPG)金鑰作為有效的GPG金鑰:
jedepuyd@deb9:~$ curl -fsSL https://download.docker.com/linux/debian/gpg | sudo apt-key add -
OK
驗證已安裝的GPG金鑰的指紋:
jedepuyd@deb9:~$ sudo apt-key fingerprint 0EBFCD88
pub   rsa4096 2017-02-22 [SCEA]
      9DC8 5822 9FC7 DD38 854A  E2D8 8D81 803C 0EBF CD88
uid           [ unknown] Docker Release (CE deb) <docker@docker.com>
sub   rsa4096 2017-02-22 [S]
增加Docker穩定回購:
jedepuyd@deb9:~$ sudo add-apt-repository "deb [arch=amd64] https://download.docker.com/linux/debian $(lsb_release -cs) stable"
在您新增Docker回購時,再次更新封裝清單:
jedepuyd@deb9:~$ sudo apt-get update
...
Reading package lists... Done
安裝Docker:
jedepuyd@deb9:~$ sudo apt-get install docker-ce docker-ce-cli containerd.io
Reading package lists... Done
Building dependency tree
...
Processing triggers for systemd (232-25+deb9u9) ...
若要以一般使用者身分存取/執行Docker,請將此使用者新增至Docker群組,並重新整理群組成員資格:
jedepuyd@deb9:~$ sudo usermod -a -G docker jedepuyd
jedepuyd@deb9:~$ newgrp docker
3. 安裝QEMU使用者模擬套件
安裝Docker之後,您需要安裝QEMU使用者模擬程式。使用Docker容器中的靜態連結QEMU模擬程式,這樣您便可以在基於x86的Linux電腦上運行ARM64v8的容器,儘管目標容器是針對ARM64v8體系結構設計的。
安裝套裝軟體:
jedepuyd@deb9:~$ sudo apt-get install qemu-user qemu-user-static
Reading package lists... Done
Building dependency tree
...
Processing triggers for man-db (2.7.6.1-2) ...
安裝完成後,以下是在/usr/bin中可用的靜態連結的QEMU模擬器:
jedepuyd@deb9:~$ ls -al /usr/bin/qemu-*static
-rwxr-xr-x 1 root root 3468784 Nov  8 16:41 /usr/bin/qemu-aarch64-static
-rwxr-xr-x 1 root root 2791408 Nov  8 16:41 /usr/bin/qemu-alpha-static
-rwxr-xr-x 1 root root 3399344 Nov  8 16:41 /usr/bin/qemu-armeb-static
-rwxr-xr-x 1 root root 3391152 Nov  8 16:41 /usr/bin/qemu-arm-static
-rwxr-xr-x 1 root root 2800400 Nov  8 16:41 /usr/bin/qemu-cris-static
...
清單中的第一個是您需要的:aarch64是ARM64v8 for Linux的拱形名稱。
4. 測試aarch64/ARV64v8容器是否在x86 Linux機器上運行
現在您已安裝Docker和必要的QEMU二進位檔,就可以測試您是否能在x86機器上執行為ARM64v8建立的Docker容器:
jedepuyd@deb9:~$ docker run -v /usr/bin/qemu-aarch64-static:/usr/bin/qemu-aarch64-static --rm -ti arm64v8/alpine:3.7
Unable to find image 'arm64v8/alpine:3.7' locally
3.7: Pulling from arm64v8/alpine
40223db5366f: Pull complete
Digest: sha256:a50c0cd3b41129046184591963a7a76822777736258e5ade8445b07c88bfdcc3
Status: Downloaded newer image for arm64v8/alpine:3.7
/ # uname -a
Linux 1dbba69b60c5 4.9.0-8-amd64 #1 SMP Debian 4.9.144-3.1 (2019-02-19) aarch64 Linux
正如您在輸出中所看到的,arm64v8 Alpine容器已獲得,並且可透過訪問模擬程式運行。
如果您請求容器的體系結構,則可以看到代碼已針對aarch64進行編譯。與IR1101的目標拱門完全相同。
5. 準備檔案以建置Docker Webserver容器
現在,所有準備工作都完成了,您可以為需要在IR1101上運行的Web伺服器容器建立必要的檔案。
第一個檔案是webserver.py,您希望在容器中運行的Python指令碼。由於這只是一個示例,很顯然,您用實際代碼替換此代碼以便在IOx應用程式中運行:
jedepuyd@deb9:~$ mkdir iox_aarch64_webserver
jedepuyd@deb9:~$ cd iox_aarch64_webserver

jedepuyd@deb9:~/iox_aarch64_webserver$ vi webserver.py
jedepuyd@deb9:~/iox_aarch64_webserver$ cat webserver.py
#!/usr/bin/env python
from BaseHTTPServer import BaseHTTPRequestHandler, HTTPServer
import SocketServer
import os

class S(BaseHTTPRequestHandler):
    def _set_headers(self):
        self.send_response(200)
        self.send_header('Content-type', 'text/html')
        self.end_headers()

    def do_GET(self):
        self._set_headers()
        self.wfile.write("<html><body><h1>IOX python webserver on arm64v8</h1></body></html>")
        logf.write('Got GET\n')
        logf.flush()

def run(server_class=HTTPServer, handler_class=S, port=9000):
    server_address = ('', port)
    httpd = server_class(server_address, handler_class)
    print 'Starting webserver...'
    logf.write('Starting webserver....\n')
    logf.flush()
    httpd.serve_forever()

if __name__ == "__main__":
    log_file_dir = os.getenv("CAF_APP_LOG_DIR", "/tmp")
    log_file_path = os.path.join(log_file_dir, "webserver.log")
    logf = open(log_file_path, 'w')
    run()
    logf.close()
此程式碼包含寫入記錄檔的邏輯,可供本機管理員查閱。
需要的第二個檔案是Dockerfile。這定義了容器的構建方式:
jedepuyd@deb9:~/iox_aarch64_webserver$ vi Dockerfile
jedepuyd@deb9:~/iox_aarch64_webserver$ cat Dockerfile
FROM arm64v8/alpine:3.7
COPY qemu-aarch64-static /usr/bin

RUN apk add --no-cache python
COPY webserver.py /webserver.py
Dockerfile定義容器的建置方式。從ARM64v8的Apline基礎影像開始,複製容器中的模擬器,執行apk以新增Python套件,並將Web伺服器指令碼複製到容器中。
在構建容器之前需要的最後一個準備是將qemu-aarch64-static複製到從中構建容器的目錄:
jedepuyd@deb9:~/iox_aarch64_webserver$ cp /usr/bin/qemu-aarch64-static .
6. 建立Docker容器
現在所有準備工作都已完成,您可以使用Dockerfile建立容器:
jedepuyd@deb9:~/iox_aarch64_webserver$ docker build -t iox_aarch64_webserver .
Sending build context to Docker daemon  3.473MB
Step 1/4 : FROM arm64v8/alpine:3.7
 ---> e013d5426294
Step 2/4 : COPY qemu-aarch64-static /usr/bin
 ---> addf4e1cc965
Step 3/4 : RUN apk add --no-cache python
 ---> Running in ff3768926645
fetch http://dl-cdn.alpinelinux.org/alpine/v3.7/main/aarch64/APKINDEX.tar.gz
fetch http://dl-cdn.alpinelinux.org/alpine/v3.7/community/aarch64/APKINDEX.tar.gz
(1/10) Installing libbz2 (1.0.6-r6)
(2/10) Installing expat (2.2.5-r0)
(3/10) Installing libffi (3.2.1-r4)
(4/10) Installing gdbm (1.13-r1)
(5/10) Installing ncurses-terminfo-base (6.0_p20171125-r1)
(6/10) Installing ncurses-terminfo (6.0_p20171125-r1)
(7/10) Installing ncurses-libs (6.0_p20171125-r1)
(8/10) Installing readline (7.0.003-r0)
(9/10) Installing sqlite-libs (3.25.3-r0)
(10/10) Installing python2 (2.7.15-r2)
Executing busybox-1.27.2-r11.trigger
OK: 51 MiB in 23 packages
Removing intermediate container ff3768926645
 ---> eda469dab9c6
Step 4/4 : COPY webserver.py /webserver.py
 ---> ccf7ee7227c9
Successfully built ccf7ee7227c9
Successfully tagged iox_aarch64_webserver:latest
作為測試,請運行剛剛構建的容器,並檢查指令碼是否有效:
jedepuyd@deb9:~/iox_aarch64_webserver$ docker run -ti iox_aarch64_webserver
/ # uname -a
Linux dae047f1a6b2 4.9.0-8-amd64 #1 SMP Debian 4.9.144-3.1 (2019-02-19) aarch64 Linux
/ # python webserver.py &
/ # Starting webserver...

/ # netstat -tlpn
Active Internet connections (only servers)
Proto Recv-Q Send-Q Local Address           Foreign Address         State       PID/Program name
tcp        0      0 0.0.0.0:9000            0.0.0.0:*               LISTEN      13/qemu-aarch64-sta
/ # exit
正如您在此輸出中所看到的,容器的體系結構是目標的aarch64。啟動指令碼後,您會看到它正在偵聽埠9000上的請求。
7. 構建IOx包
容器已準備好進行封裝。在要求ioxclient執行此操作之前,首先需要建立包描述符:package.yaml。
此檔案說明封裝的外觀、需要執行多少資源以及啟動什麼。
jedepuyd@deb9:~/iox_aarch64_webserver$ vi package.yaml
jedepuyd@deb9:~/iox_aarch64_webserver$ cat package.yaml
descriptor-schema-version: "2.7"

info:
  name: "iox_aarch64_webserver"
  description: "simple docker webserver for arm64v8"
  version: "1.0"
  author-link: "http://www.cisco.com"
  author-name: "Jens Depuydt"

app:
  cpuarch: "aarch64"
  type: "docker"
  resources:
    profile: c1.tiny
    network:
      -
        interface-name: eth0
        ports:
          tcp: ["9000"]

  startup:
    rootfs: rootfs.tar
    target: ["python","/webserver.py"]
如您所見,CPU架構已設定為aarch64。要獲得訪問TCP埠9000的許可權,請使用rootfs.tar作為rootfs,並在啟動時運行python/webserver.py。
在打包前,最後需要做的就是從Docker容器中提取rootfs.tar:
jedepuyd@deb9:~/iox_aarch64_webserver$ docker save -o rootfs.tar iox_aarch64_webserver
此時,您可以使用ioxclient來構建用於IR1101的IOx包:
jedepuyd@deb9:~/iox_aarch64_webserver$ ioxclient package .
Currently active profile :  default
Command Name:  package
No rsa key and/or certificate files provided to sign the package
Checking if package descriptor file is present..
Validating descriptor file /home/jedepuyd/iox_aarch64_webserver/package.yaml with package schema definitions
Parsing descriptor file..
Found schema version  2.7
Loading schema file for version  2.7
Validating package descriptor file..
File /home/jedepuyd/iox_aarch64_webserver/package.yaml is valid under schema version 2.7
Created Staging directory at :  /tmp/017226485
Copying contents to staging directory
Creating an inner envelope for application artifacts
Generated  /tmp/017226485/artifacts.tar.gz
Calculating SHA1 checksum for package contents..
Updated package metadata file :  /tmp/017226485/.package.metadata
Root Directory :  /tmp/017226485
Output file:  /tmp/475248592
Path:  .package.metadata
SHA1 : 95abe28fc05395fc5f71f7c28f59eceb1495bf9b
Path:  artifacts.tar.gz
SHA1 : bdf5596a0747eae51bb0a1d2870fd09a5a16a098
Path:  package.yaml
SHA1 : e65a6fcbe96725dd5a09b60036448106acc0c138
Generated package manifest at  package.mf
Generating IOx Package..
Package generated at /home/jedepuyd/iox_aarch64_webserver/package.tar
現在,有一個軟體套件要部署在IR1101上,並準備為package.tar。下一部分說明如何準備部署裝置。
第2部分配置IR1101的IOx
1. 啟用Web介面、IOx和本機管理員
Local Manager是一種GUI,用於部署、啟用、啟動、管理並排除IOx應用故障。對於IR1101,它嵌入在常規管理Web介面中。因此,您需要先啟用該功能。
在IR1101上執行這些步驟以啟用IOx和Web介面。
BRU_IR1101_20#conf t
Enter configuration commands, one per line.  End with CNTL/Z.
BRU_IR1101_20(config)#iox
BRU_IR1101_20(config)#ip http server
BRU_IR1101_20(config)#ip http secure-server
BRU_IR1101_20(config)#ip http authentication local
BRU_IR1101_20(config)#username admin privilege 15 password 0 cisco
最後一行將增加具有15個許可權的使用者。此使用者有權訪問Web介面和IOx本地管理器。
2. 配置IOx網路
在訪問Web介面之前,讓我們為IOx網路增加所需的配置。背景資訊可以在IOx的IR1101文檔中找到:https://www.cisco.com/c/en/us/td/docs/routers/access/1101/software/configuration/guide/b-cisco-ir1101-scg.html
簡而言之,IOx應用程式可以使用VirtualPortGroup0介面與外界通訊(與IR809上的Gi2和IR829介面上的Gi5相當)。
BRU_IR1101_20(config)#interface VirtualPortGroup0
BRU_IR1101_20(config-if)# ip address 192.168.1.1 255.255.255.0
BRU_IR1101_20(config-if)# ip nat inside
BRU_IR1101_20(config-if)# ip virtual-reassembly
BRU_IR1101_20(config-if)#exit
在將VirtualPortGroup0介面配置為內部網路地址轉換(NAT)時,需要在Gi 0/0/0介面上增加ip nat outside語句,以允許使用NAT與IOx應用程式進行雙向通訊:
BRU_IR1101_20(config)#interface gigabitEthernet 0/0/0
BRU_IR1101_20(config-if)#ip nat outside
BRU_IR1101_20(config-if)#ip virtual-reassembly
為了允許訪問容器的埠9000(可以為192.168.1.15),您需要增加一個埠轉發:
BRU_IR1101_20(config)#$ip nat inside source static tcp 192.168.1.15 9000 interface GigabitEthernet0/0/0 9000
在本指南中,使用每個IOx應用的靜態配置的IP。如果要為應用程式動態分配IP地址,則需要為VirtualPortGroup0子網中的DHCP伺服器增加配置。
第3部分。訪問本地管理器並部署IOx應用程式
將這些行增加到配置後,可以使用Web介面訪問IR1101。使用瀏覽器導航到Gi 0/0/0 IP地址,如圖所示。
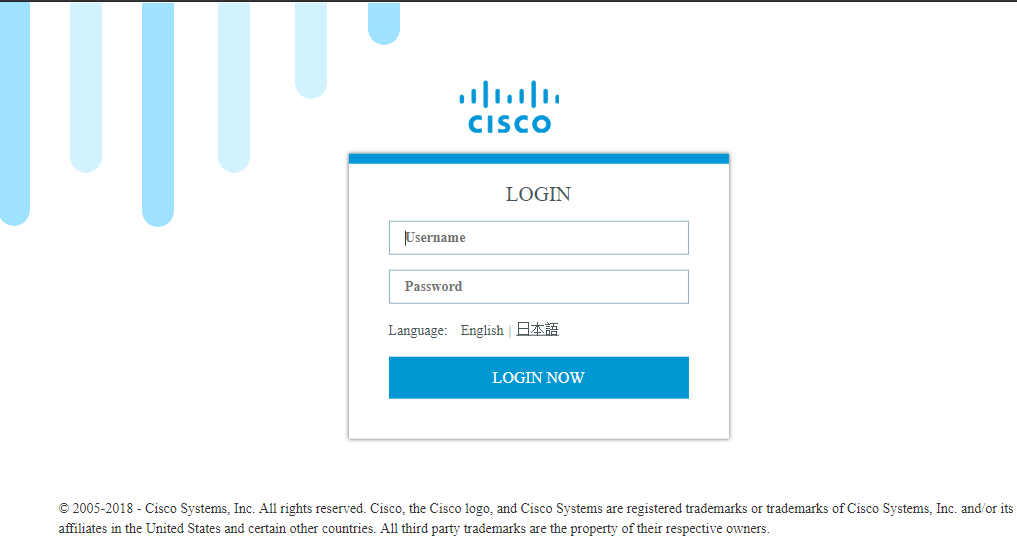
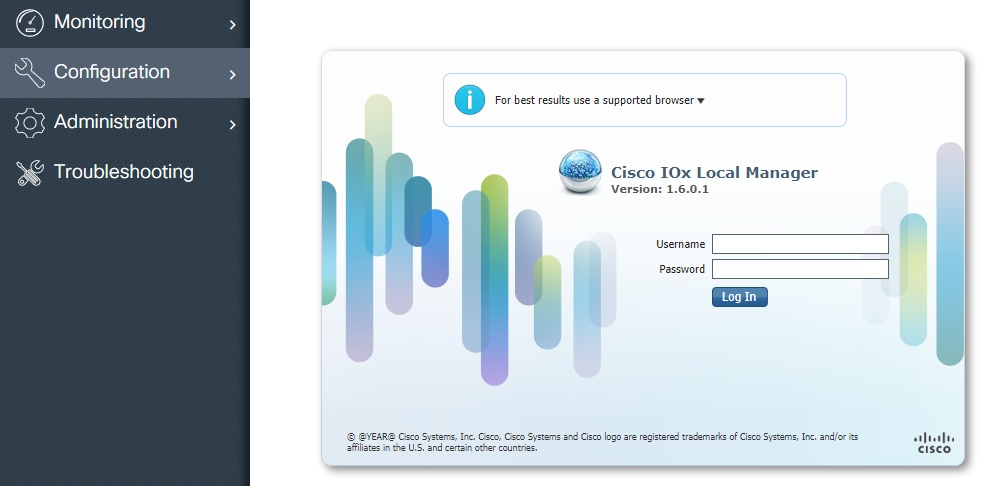
使用步驟1中建立的許可權15帳戶,以登入Web介面並導航到配置 - IOx,如圖所示。

在IOx Local Manager登入中,使用相同的帳戶繼續,如圖所示。
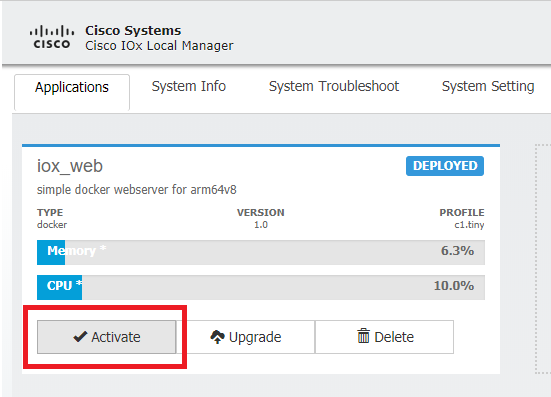
按一下Add New,選擇IOx應用程式的名稱,然後選擇在第1部分中構建的package.tar,如圖所示。

上傳封裝後,您可以將其啟用,如下圖所示。
在Resources頁籤中,打開介面設定以指定要分配給應用程式的固定IP,如圖所示。
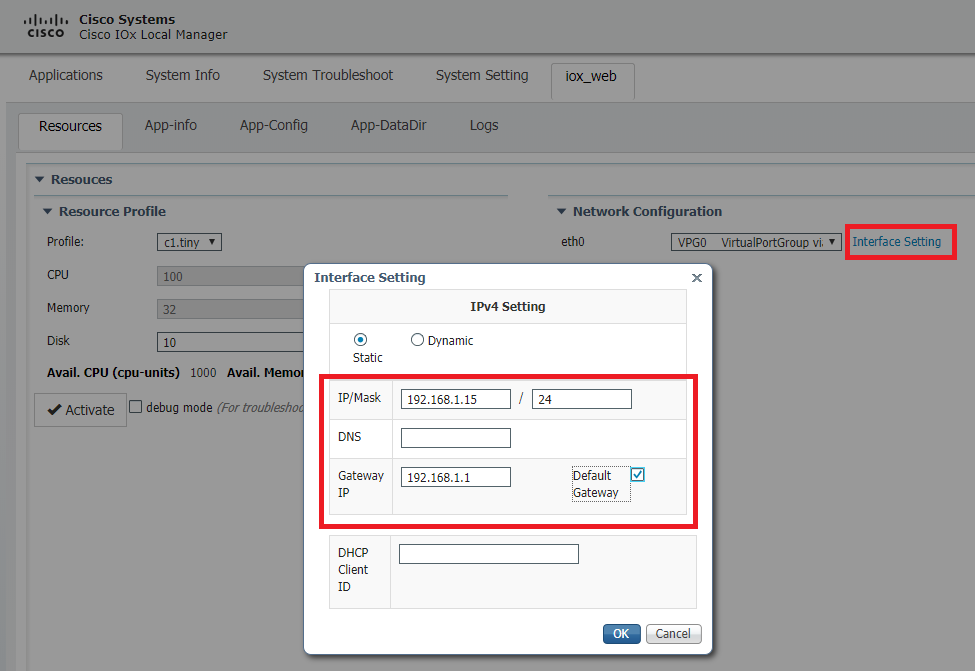
按一下OK,然後Activate。動作完成時,導覽回主Local Manager頁面(頂端功能表上的Applications按鈕),然後啟動應用程式,如下圖所示。
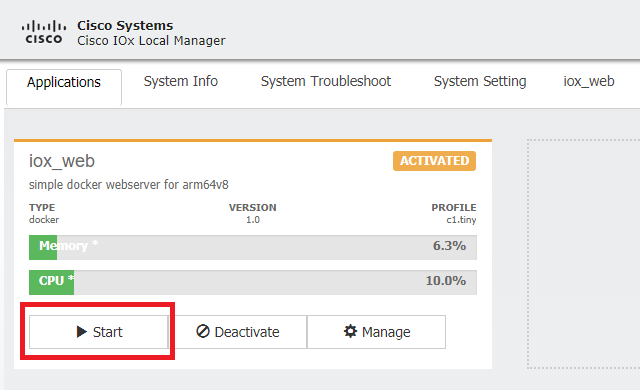
完成這些步驟後,您的應用程式將運行,並使用IR1101的Gi 0/0/0介面透過埠9000可用。
驗證
使用本節內容,確認您的組態是否正常運作。
要進行驗證,您可以使用埠9000訪問IR1101上Gi 0/0/0介面的IP地址。
如果一切順利的話,就會如同Python指令碼中建立的一樣。

疑難排解
本節提供的資訊可用於對組態進行疑難排解。
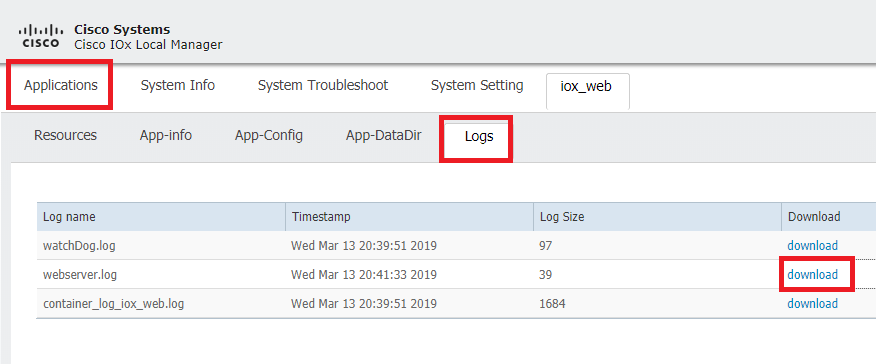
為了排除故障,您可以使用本地管理器檢查您在Python指令碼中建立的日誌檔案。
導覽至Applications,按一下iox_web應用程式上的Manage,然後選擇Logs索引標籤,如下圖所示。
修訂記錄
| 修訂 | 發佈日期 | 意見 |
|---|---|---|
2.0 |
23-Aug-2024 |
已修復《IR1101配置指南》的損壞鏈路。更新文本以符合思科出版標準。 |
1.0 |
06-May-2019 |
初始版本 |
 意見
意見