簡介
本文說明如何將Thousand Eyes Agent(TE)整合到軟體定義廣域網(SD-WAN)上。
必要條件
需求
思科建議您瞭解這些主題。
採用元件
本文件中的資訊是以下列軟體和硬體版本為依據.
- Cisco vManage版本20.6.3.1
- Cisco vBond版本20.6.3
- 思科vSmart版本20.6.3
- 整合服務路由器(ISR)4451-X/K9版本17.6.3a
- thousandeyes-enterprise-agent-4.3.0.cisco
本文中的資訊是根據特定實驗室環境內的裝置所建立。文中使用到的所有裝置皆從已清除(預設)的組態來啟動。如果您的網路運作中,請確保您瞭解任何指令可能造成的影響。
設定
下載TE代理

注意:您必須擁有Thousand Eyes帳戶才能下載最新版本。
- 從Cisco ThosandEyes Agent 頁面登入TE帳戶。
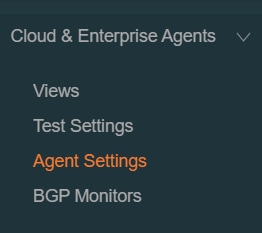
- 導覽至Cloud & Enterprise Agents > Agent Settings。
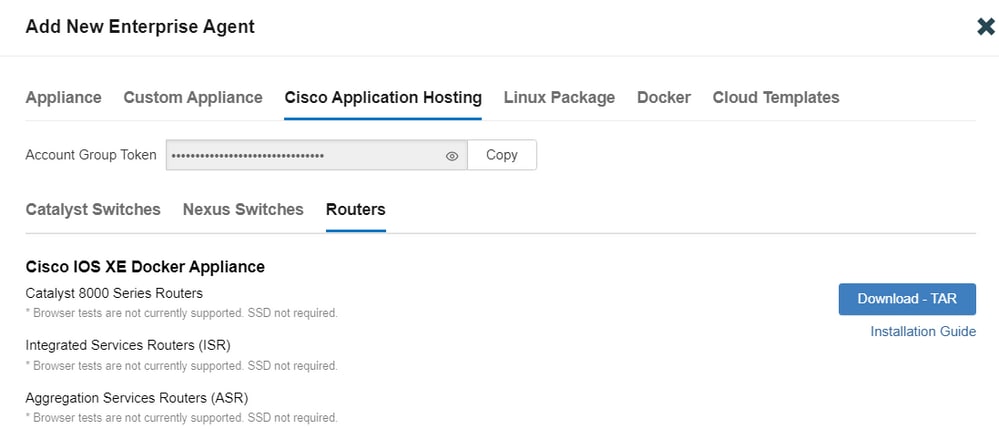
3.按一下Add New Enterprise Agent。

4.導航至思科應用託管。
5. 複製並儲存您的帳戶組令牌。
6.在SD-WAN的情況下選擇裝置型別。按一下「Routers」。
7.按一下Download-TAR下載代理。
將TE代理上傳到Cisco vManage
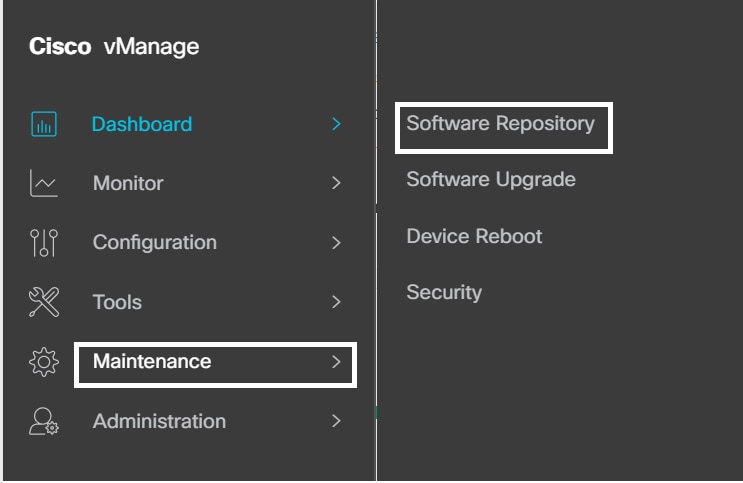
- 在Cisco vManage中選擇Maintenance > Software Repository。
2.按一下Virtual Images。
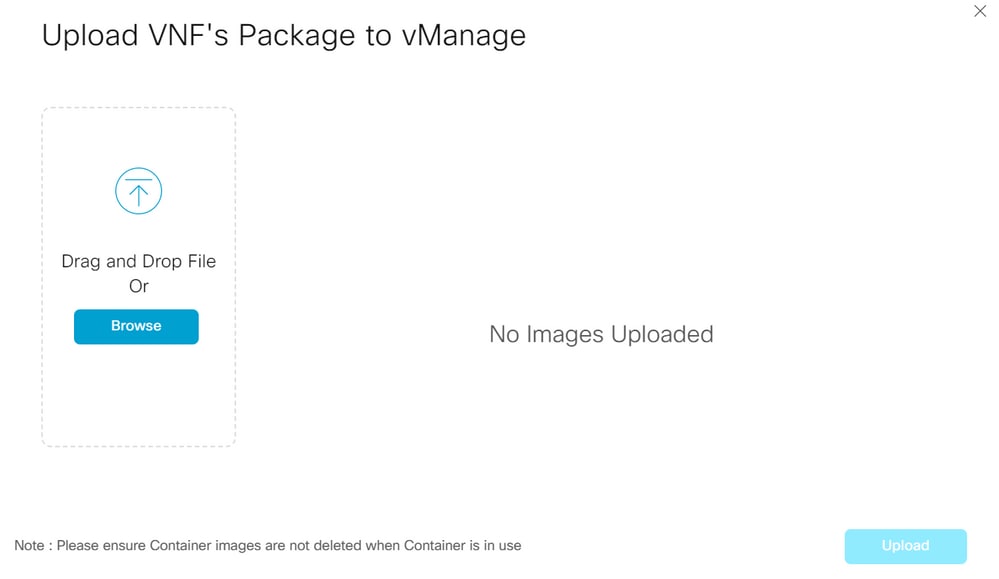
3.按一下Upload Virtual Image,然後按一下vManage。

4.在「將VNF包上傳到vManage」對話方塊中,瀏覽到下載的TE代理軟體檔案的位置,然後選擇該檔案。
或者,拖放Cisco ThousandEyes Enterprise代理軟體檔案。
5.按一下「Upload」。
在傳輸VPN上配置TE
- 導覽至Configuration > Templates。
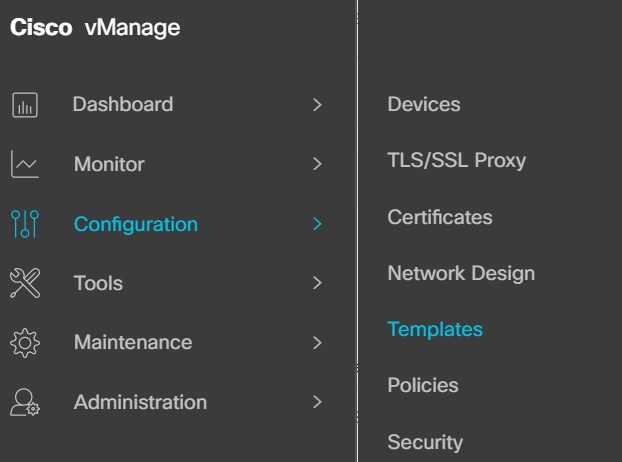
2.從Device Template中選擇要與TE整合的模板。

注意:在Cisco vManage 20.7.x版及更低版本中,裝置模板標題為「裝置」。
3.按一下樹點(...)>「編輯」。

4.定位至「附加模板」。
5.選擇ThousandEyes Agent下拉選單,然後按一下Create Template。
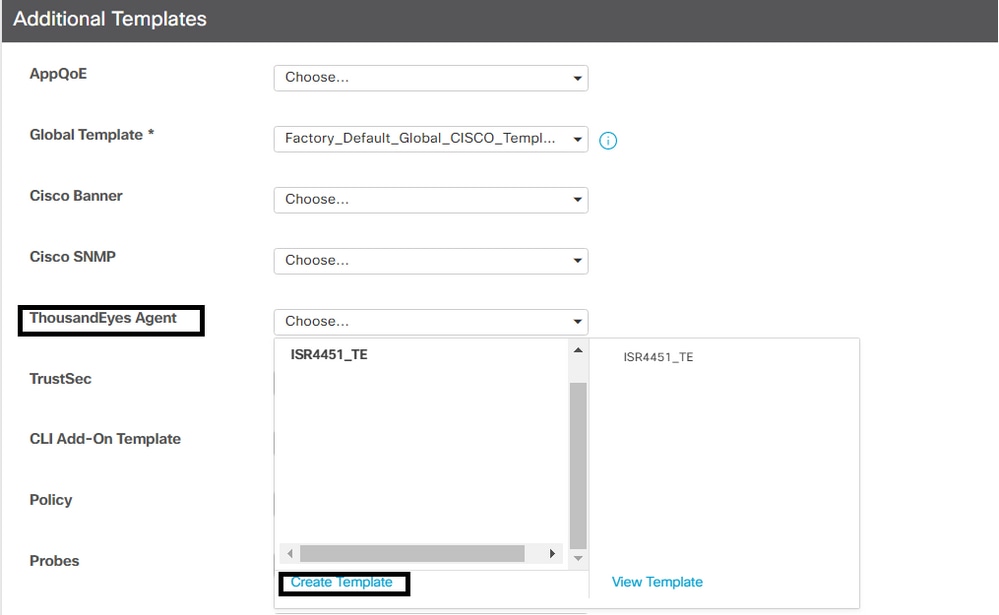
a.模板名稱:輸入模板的名稱。確保模板名稱是唯一的。
b.說明:輸入模板的說明。
c.在「基本配置」中,輸入通過上述步驟獲得的帳戶組令牌。
d. VPN必須保留為預設值。
e.在ADVANCED部分,輸入您的首選名稱伺服器的IP地址。
f.主機名是可選的。
g. Web代理型別不適用於VPN 0配置。
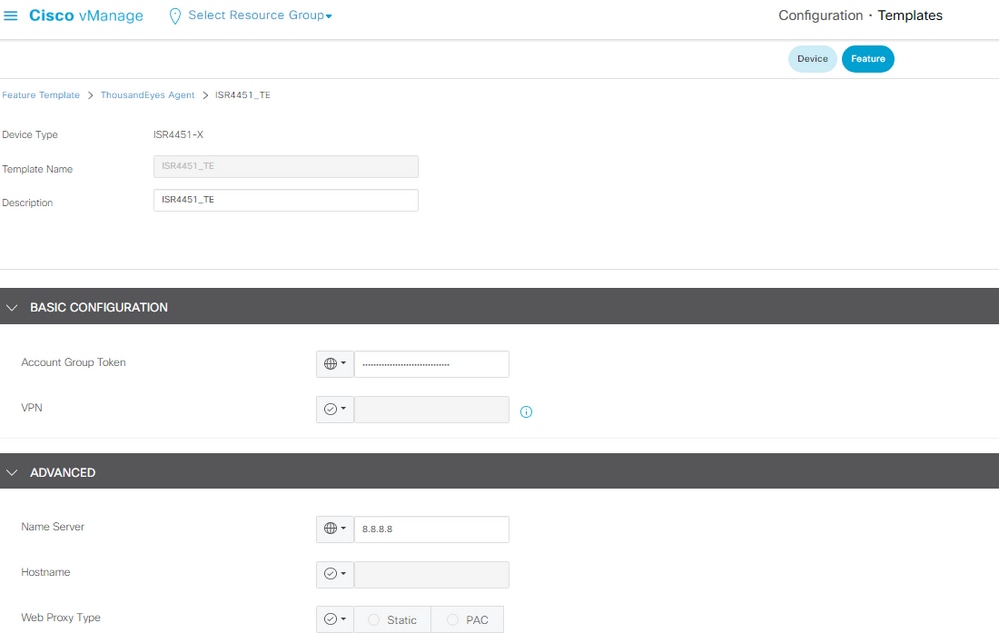
6.按一下Save。
7.按一下Update。
8.將模板推送到您的裝置。
在服務VPN上配置TE
- 導覽至Configuration > Templates。
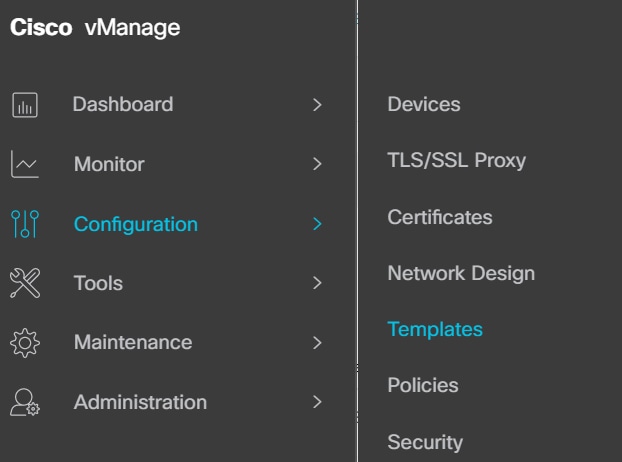
2.從「裝置模板」中選擇要與TE整合的模板。

注意:在Cisco vManage 20.7.x版及更低版本中,裝置模板標題為「裝置」。
3.按一下樹點(...)>「編輯」。

4.定位至「附加模板」。
5.選擇ThousandEyes Agent下拉選單,然後按一下Create Template。
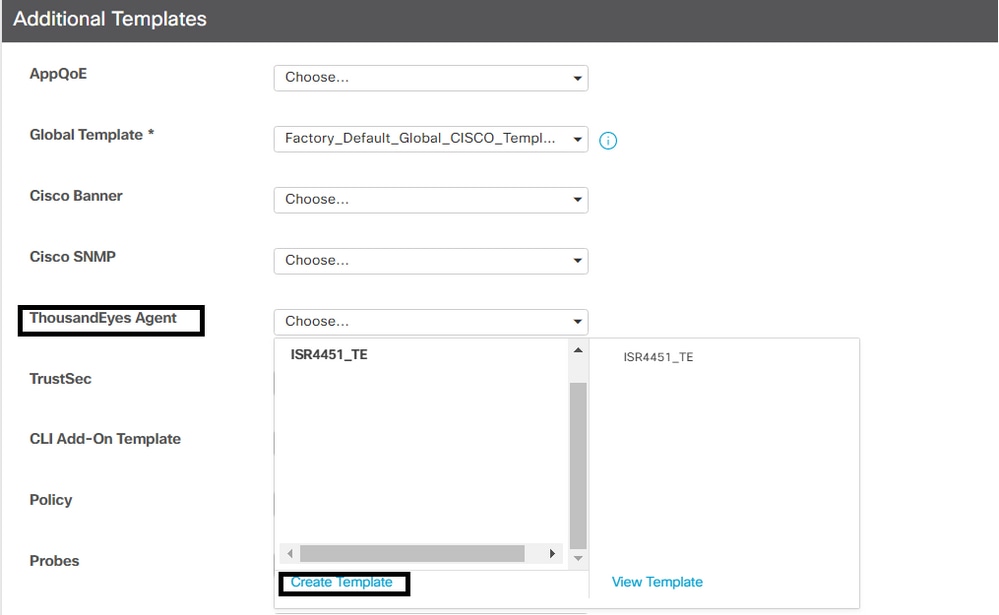
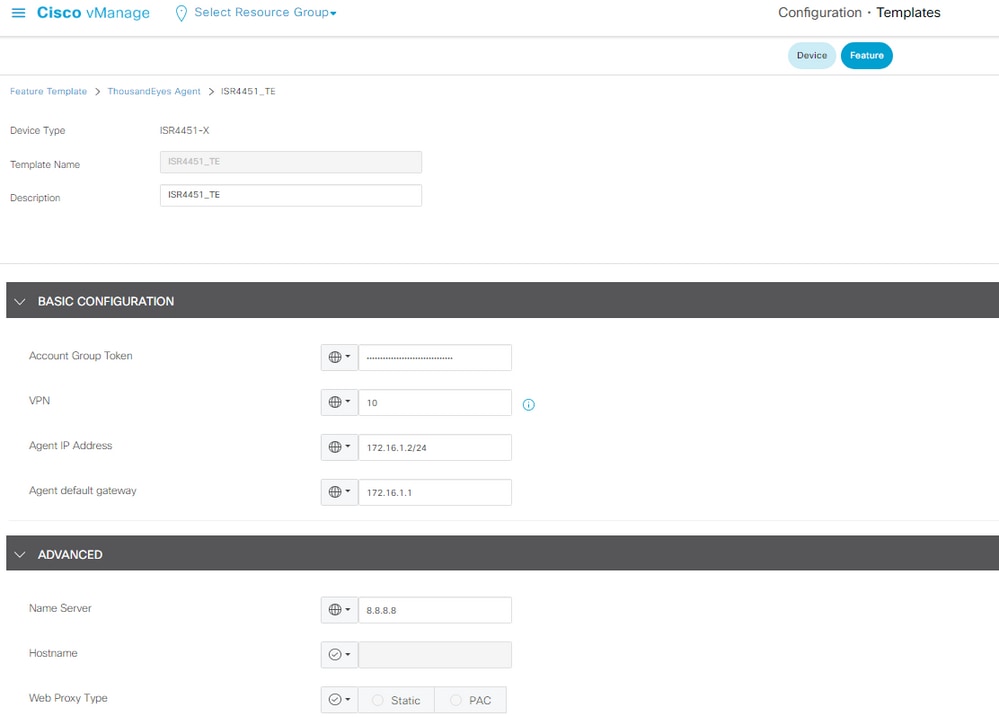
a.模板名稱:輸入模板的名稱。確保模板名稱是唯一的。
b.說明:輸入模板的說明。
c.在「基本配置」中,輸入通過上述步驟獲得的帳戶組令牌。
d.選擇服務VPN。在此步驟中,您可以使用全域性值或裝置特定值。
e.在ADVANCED部分,輸入您的首選名稱伺服器的IP地址。
f.主機名和Web代理型別是可選的。
6.按一下Save。
7.按一下Update。
8.將模板推送到您的裝置。
驗證
路由器端
Router#show app-hosting list
App id                                   State
---------------------------------------------------------
te                                       RUNNING   >>>> verify the status of app id

Router#show app-hosting detail
App id                 : te
Owner                  : iox
State                  : RUNNING
Application
  Type                 : docker
  Name                 : ThousandEyes Enterprise Agent
  Version              : 4.3.0  >>> verify latest version
  Description          :
  Author               : ThousandEyes
  Path                 : bootflash:.TE_IMAGES/iox-te_4.3.0.tar
  URL Path             :
Activated profile name : custom

Resource reservation
  Memory               : 500 MB
  Disk                 : 1 MB
  CPU                  : 1500 units
  CPU-percent          : 3 %
  VCPU                 : 1

Platform resource profiles
  Profile Name                  CPU(unit)  Memory(MB)  Disk(MB)
  --------------------------------------------------------------

Attached devices
  Type              Name               Alias
  ---------------------------------------------
  serial/shell     iox_console_shell   serial0
  serial/aux       iox_console_aux     serial1
  serial/syslog    iox_syslog          serial2
  serial/trace     iox_trace           serial3

Network interfaces
   ---------------------------------------
eth0:
   MAC address         : 52:54:dd:23:79:c4
   IPv4 address        : 172.16.1.2  >> verify here display the proper default gateway
   IPv6 address        : ::
   Network name        : VPG4

Router#show ip interface brief
Interface              IP-Address      OK? Method Status                Protocol
GigabitEthernet0/0/0   10.0.12.21      YES other  up                    up
GigabitEthernet0/0/1   unassigned      YES unset  down                  down
GigabitEthernet0/0/2   unassigned      YES unset  down                  down
GigabitEthernet0/0/3   172.16.10.1     YES other  down                  down
GigabitEthernet0       unassigned      YES other  administratively down down
Sdwan-system-intf      10.10.10.10     YES unset  up                    up
Loopback65528          192.168.1.1     YES other  up                    up
NVI0                   unassigned      YES unset  up                    up
Tunnel0                10.0.12.21      YES TFTP   up                    up
VirtualPortGroup4      172.16.1.1      YES other  up                    up  >>> check virtual group interface is UP
- 連線到Cisco ThousandEyes Enterprise代理並檢視var/log/agent/te-agent.log。
Router#app-hosting connect appid te session
# cat var/log/agent/te-agent.log
2023-03-29 13:35:53.900 INFO  [a273cf00]   enable-iox                         53.5207 seconds
2023-03-29 13:35:55.900 INFO [a273cf00]   download-package-te                24.0457 seconds
2023-03-29 13:35:55.900 INFO  [a273cf00]   install-te                         82.3967 seconds
2023-03-29 13:35:55.902 INFO [15816]:   pre-config-callback                169.5950 seconds
2023-03-29 13:35:55.902 INFO [15816]:   verify-install-te                  58.4398 seconds
2023-03-29 13:35:55.902 INFO [15816]:   post-config-callback               59.3583 seconds
2023-03-29 13:35:55.941 INFO [15816]: utdapp.py profile info
2023-03-29 13:35:55.941 INFO [15816]:   is-config-interesting              0.0012 seconds
2023-03-29 13:35:55.942 INFO [15816]:   TOTAL                              3.96 minutes
ThousandEyes側
驗證您的裝置在門戶中顯示為活動(綠色)。
1.在TE門戶中,導航至雲和企業代理> 代理設定。

2.按一下您的裝置並檢查資訊。


 意見
意見