ASA 8.3及更高版本:使用可下載ACL透過CLI和ASDM進行VPN訪問的RADIUS授權(ACS 5.x)配置示例
目錄
簡介
本文檔介紹如何配置安全裝置以對使用者進行網路訪問進行身份驗證。由於您可以隱式啟用RADIUS授權,因此本文檔不包含有關安全裝置上配置RADIUS授權的資訊。它提供關於安全裝置如何處理從RADIUS伺服器接收的訪問清單資訊的資訊。
您可以配置RADIUS伺服器以在身份驗證時將訪問清單下載到安全裝置或訪問清單名稱。使用者僅有權執行使用者特定存取清單中允許的作業。
當您使用Cisco Secure Access Control Server (ACS)為每個使用者提供適當的訪問清單時,可下載訪問清單是最具可擴充性的方法。有關可下載訪問清單功能和Cisco Secure ACS的詳細資訊,請參閱將RADIUS伺服器配置為傳送可下載訪問控制清單和可下載IP ACL。
有關在8.2及更低版本的Cisco ASA上進行相同配置的詳細資訊,請參閱ASA/PIX 8.x:使用可下載ACL和CLI進行RADIUS授權(ACS)網路訪問的配置示例。
必要條件
需求
本文檔假定自適應安全裝置(ASA)完全正常運行且已配置為允許思科自適應安全裝置管理器(ASDM)或CLI進行配置更改。
注意:要允許透過ASDM或Secure Shell (SSH)遠端配置裝置,請參閱允許ASDM進行HTTPS訪問。
採用元件
本文中的資訊係根據以下軟體和硬體版本:
-
Cisco ASA軟體8.3版及更高版本
-
Cisco ASDM 6.3版及更高版本
-
Cisco VPN Client版本5.x及更高版本
-
Cisco安全ACS 5.x
本文中的資訊是根據特定實驗室環境內的裝置所建立。文中使用到的所有裝置皆從已清除(預設)的組態來啟動。如果您的網路正在作用,請確保您已瞭解任何指令可能造成的影響。
慣例
如需文件慣例的詳細資訊,請參閱思科技術提示慣例。
背景資訊
您可以使用可下載的IP ACL來建立可套用到許多使用者或使用者群組的ACL定義集。這些ACL定義集稱為ACL內容。
可下載IP ACL的運作方式如下:
-
當ACS向使用者授予網路訪問許可權時,ACS將確定是否將可下載IP ACL分配給結果部分中的授權配置檔案。
-
如果ACS找到分配給授權配置檔案的可下載IP ACL,則ACS會傳送指定命名ACL和命名ACL版本的屬性(作為使用者會話的一部分,在RADIUS access-accept資料包中)。
-
如果AAA客戶端回應其快取中沒有當前版本的ACL(即,該ACL是新的或已更改),則ACS會向裝置傳送ACL(新的或已更新)。
可下載IP ACL是替代在每個使用者或使用者群組的RADIUS Cisco-av-pair屬性[26/9/1]中設定ACL的選項。您可以建立一個可下載IP ACL一次,為其命名,然後將該可下載IP ACL分配給任何授權配置檔案(如果引用其名稱)。與為授權配置檔案配置RADIUS Cisco-av-pair屬性相比,此方法更有效。
在ACS Web介面中輸入ACL定義時,請勿使用關鍵字或名稱條目;在所有其他方面,請為您要應用可下載IP ACL的AAA客戶端使用標準ACL命令語法和語義。您在ACS中輸入的ACL定義包含一條或多條ACL命令。每個ACL命令必須位於單獨的行上。
在ACS中,您可以定義多個可下載IP ACL並在不同的授權配置檔案中使用。根據Access Service Authorization規則中的條件,您可以將包含可下載IP ACL的不同授權配置檔案傳送到不同的AAA客戶端。
此外,您可以變更ACL內容在可下載IP ACL中的順序。ACS從表頂部開始檢查ACL內容,並下載找到的第一個ACL內容。設定順序時,如果您將最廣泛適用的ACL內容放在清單中的較高位置,就可以確保系統效率。
要在特定AAA客戶端上使用可下載的IP ACL,AAA客戶端必須遵守以下規則:
-
使用RADIUS進行身份驗證
-
支援可下載的IP ACL
以下是支援可下載IP ACL的Cisco裝置示例:
-
ASA
-
執行IOS版本12.3(8)T和更新版本的思科裝置
以下是必須在ACL定義框中輸入ASA ACL的格式示例:
permit ip 10.153.0.0 0.0.255.255 host 10.158.9.1
permit ip 10.154.0.0 0.0.255.255 10.158.10.0 0.0.0.255
permit 0 any host 10.159.1.22
deny ip 10.155.10.0 0.0.0.255 10.159.2.0 0.0.0.255 log
permit TCP any host 10.160.0.1 eq 80 log
permit TCP any host 10.160.0.2 eq 23 log
permit TCP any host 10.160.0.3 range 20 30
permit 6 any host HOSTNAME1
permit UDP any host HOSTNAME2 neq 53
deny 17 any host HOSTNAME3 lt 137 log
deny 17 any host HOSTNAME4 gt 138
deny ICMP any 10.161.0.0 0.0.255.255 log
permit TCP any host HOSTNAME5 neq 80
設定
本節提供用於設定本文件中所述功能的資訊。
網路圖表
此文件使用以下網路設定:
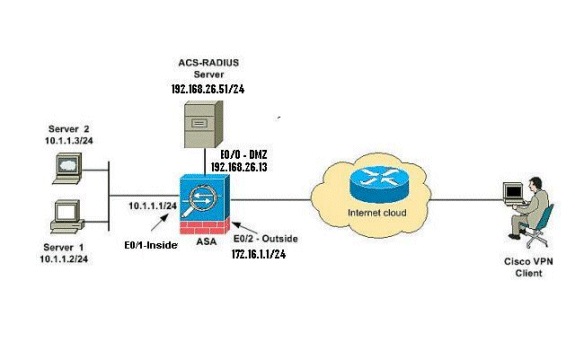
注意:此配置中使用的IP編址方案在Internet上無法合法路由。這些地址是在實驗室環境中使用的RFC 1918地址。
設定遠端存取VPN (IPsec)
ASDM過程
完成以下步驟以配置遠端訪問VPN:
-
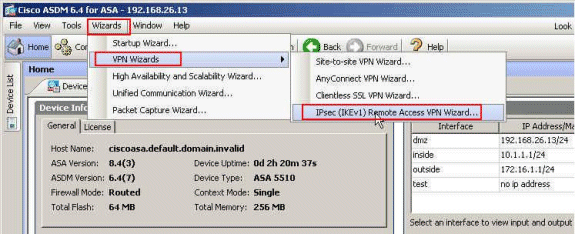
從主窗口中選擇Wizards > VPN Wizards > IPsec(IKEv1) Remote Access VPN Wizard。
-
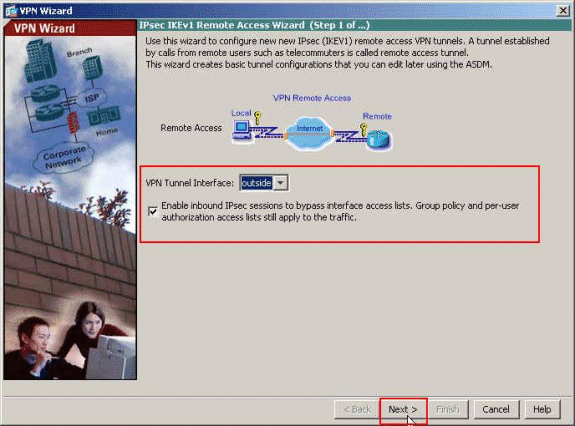
根據需要選擇VPN Tunnel Interface(在本示例中為Outside),並確保已選中Enable inbound IPsec sessions to bypass interface access lists旁邊的覈取方塊。
-
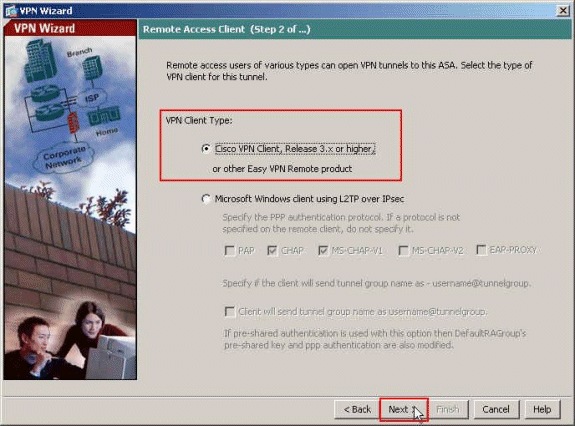
選擇VPN Client Type作為Cisco VPN Client Release 3.x or higher。按「Next」(下一步)。
-
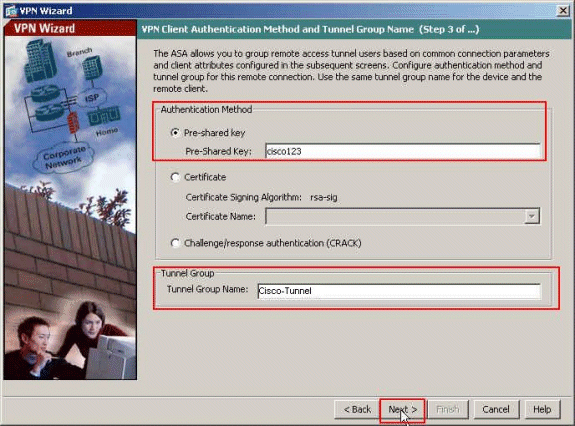
選擇Authentication Method並提供身份驗證資訊。此處使用的身份驗證方法為預共用金鑰。另外,請在提供的空白處提供隧道組名稱。此處使用的預共用金鑰是cisco123,此處使用的隧道組名稱是Cisco-Tunnel。按「Next」(下一步)。
-
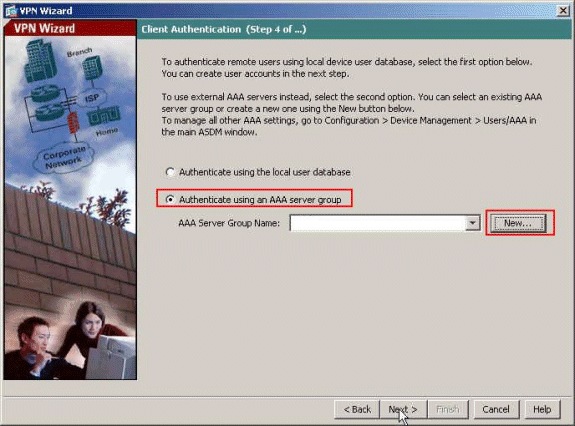
選擇是要向本地使用者資料庫還是向外部AAA伺服器組驗證遠端使用者。此處我們選擇Authenticate using an AAA server group。按一下「AAA Server Group Name」欄位旁的New,以便建立新的AAA伺服器組名稱。
-
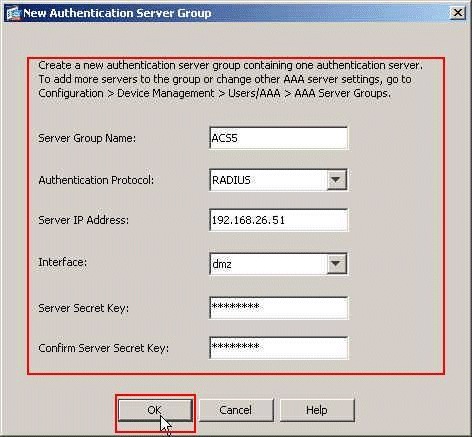
在所提供的相應空白處提供伺服器組名稱、身份驗證協定、伺服器IP地址、介面名稱和伺服器金鑰,然後按一下OK。
-
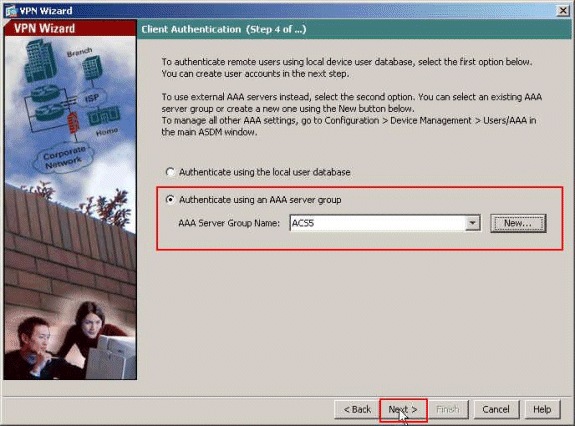
按「Next」(下一步)。
-
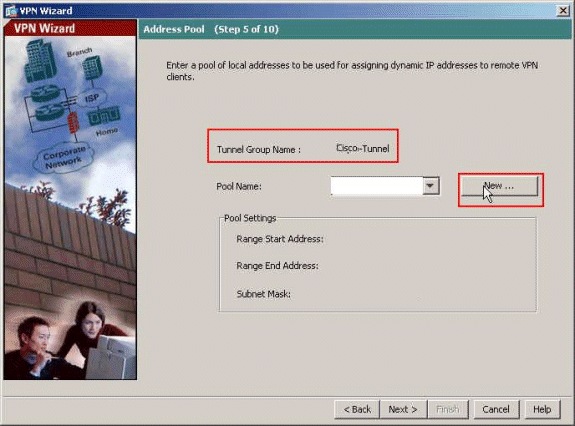
定義在遠端VPN客戶端連線時將動態分配給這些客戶端的本地地址池。按一下New以建立一個新的本地地址池。
-
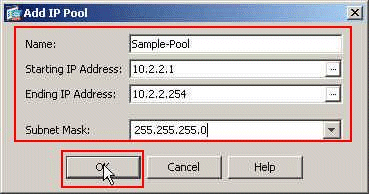
在Add IP Pool窗口中,提供池名稱、起始IP地址、結束IP地址和子網掩碼。按一下「OK」(確定)。
-
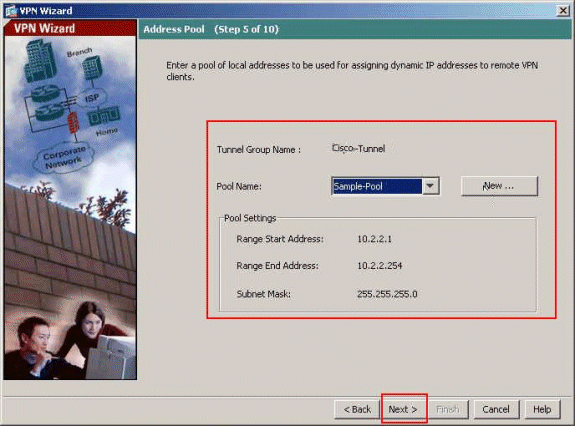
從下拉選單中選擇Pool Name,然後按一下Next。本示例的池名稱是在步驟9中建立的Sample-Pool。
-
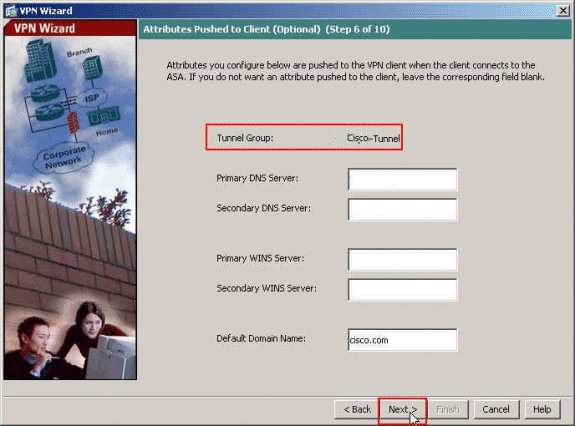
可選:指定要推送到遠端VPN客戶端的DNS和WINS伺服器資訊以及預設域名。
-
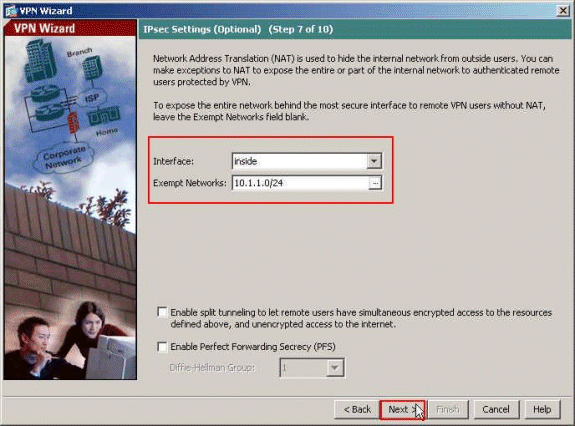
指定哪些內部主機或網路應向遠端VPN使用者公開(如果有)。在Exempt Networks欄位中提供介面名稱和要免除的網路,然後按一下Next。
如果將此清單留空,則允許遠端VPN使用者訪問ASA的整個內部網路。
您也可以在此窗口中啟用分割隧道。分割隧道會加密發往本過程前面定義的資源的流量,並透過不對該流量進行隧道傳輸來提供對整個Internet的未加密訪問。如果未啟用分割隧道,則來自遠端VPN使用者的所有資料流將透過隧道傳輸到ASA。根據您的配置,這會佔用大量頻寬和處理器。
-
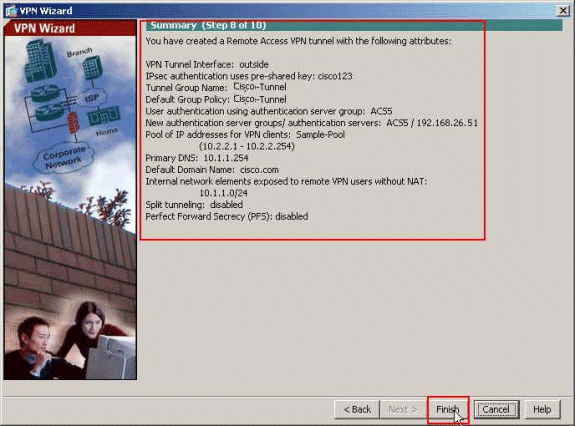
此視窗顯示您已經採取的動作摘要。如果對配置感到滿意,請按一下Finish。
使用CLI配置ASA
以下是CLI配置:
| 在ASA裝置上運行配置 |
|---|
ASA# sh run ASA Version 8.4(3) ! !--- Specify the hostname for the Security Appliance. hostname ciscoasa enable password y.tvDXf6yFbMTAdD encrypted passwd 2KFQnbNIdI.2KYOU encrypted names ! !--- Configure the outside and inside interfaces. interface Ethernet0/0 nameif dmz security-level 50 ip address 192.168.26.13 255.255.255.0 ! interface Ethernet0/1 nameif inside security-level 100 ip address 10.1.1.1 255.255.255.0 ! interface Ethernet0/2 nameif outside security-level 0 ip address 172.16.1.1 255.255.255.0 ! !--- Output is suppressed. boot system disk0:/asa843-k8.bin ftp mode passive object network NETWORK_OBJ_10.1.1.0_24 subnet 10.1.1.0 255.255.255.0 object network NETWORK_OBJ_10.2.2.0_24 subnet 10.2.2.0 255.255.255.0 access-list OUTIN extended permit icmp any any !--- This is the Access-List whose name will be sent by !--- RADIUS Server(ACS) in the Filter-ID attribute. access-list new extended permit ip any host 10.1.1.2 access-list new extended deny ip any any pager lines 24 logging enable logging asdm informational mtu inside 1500 mtu outside 1500 mtu dmz 1500 ip local pool Sample-Pool 10.2.2.1-10.2.2.254 mask 255.255.255.0 no failover icmp unreachable rate-limit 1 burst-size 1 !--- Specify the location of the ASDM image for ASA !--- to fetch the image for ASDM access. asdm image disk0:/asdm-647.bin no asdm history enable arp timeout 14400 !--- Specify the NAT from internal network to the Sample-Pool. nat (inside,outside) source static NETWORK_OBJ_10.1.1.0_24 NETWORK_OBJ_10.1.1.0_24 destination static NETWORK_OBJ_10.2.2.0_24 NETWORK_OBJ_10.2.2.0_24 no-proxy-arp route-lookup access-group OUTIN in interface outside !--- Create the AAA server group "ACS5" and specify the protocol as RADIUS. !--- Specify the ACS 5.x server as a member of the "ACS5" group and provide the !--- location and key. aaa-server ACS5 protocol radius aaa-server ACS5 (dmz) host 192.168.26.51 timeout 5 key ***** aaa authentication http console LOCAL http server enable 2003 http 0.0.0.0 0.0.0.0 inside !--- PHASE 2 CONFIGURATION ---! !--- The encryption & hashing types for Phase 2 are defined here. We are using !--- all the permutations of the PHASE 2 parameters. crypto ipsec ikev1 transform-set ESP-AES-256-MD5 esp-aes-256 esp-md5-hmac crypto ipsec ikev1 transform-set ESP-DES-SHA esp-des esp-sha-hmac crypto ipsec ikev1 transform-set ESP-3DES-SHA esp-3des esp-sha-hmac crypto ipsec ikev1 transform-set ESP-DES-MD5 esp-des esp-md5-hmac crypto ipsec ikev1 transform-set ESP-AES-192-MD5 esp-aes-192 esp-md5-hmac crypto ipsec ikev1 transform-set ESP-3DES-MD5 esp-3des esp-md5-hmac crypto ipsec ikev1 transform-set ESP-AES-256-SHA esp-aes-256 esp-sha-hmac crypto ipsec ikev1 transform-set ESP-AES-128-SHA esp-aes esp-sha-hmac crypto ipsec ikev1 transform-set ESP-AES-192-SHA esp-aes-192 esp-sha-hmac crypto ipsec ikev1 transform-set ESP-AES-128-MD5 esp-aes esp-md5-hmac !--- Defines a dynamic crypto map with !--- the specified transform-sets created earlier. We are specifying all the !--- transform-sets. crypto dynamic-map SYSTEM_DEFAULT_CRYPTO_MAP 65535 set ikev1 transform-set ESP-AES-128-SHA ESP-AES-128-MD5 ESP-AES-192-SHA ESP-AES-192-MD5 ESP-AES-256-SHA ESP-AES-256-MD5 ESP-3DES-SHA ESP-3DES-MD5 ESP-DES-SHA ESP-DES-MD5 !--- Binds the dynamic map to the IPsec/ISAKMP process. crypto map outside_map 65535 ipsec-isakmp dynamic SYSTEM_DEFAULT_CRYPTO_MAP !--- Specifies the interface to be used with !--- the settings defined in this configuration. crypto map outside_map interface outside !--- PHASE 1 CONFIGURATION ---! !--- This configuration uses ISAKMP policies defined with all the permutation !--- of the 5 ISAKMP parameters. The configuration commands here define the !--- Phase 1 policy parameters that are used. crypto ikev1 enable outside crypto ikev1 policy 10 authentication crack encryption aes-256 hash sha group 2 lifetime 86400 crypto ikev1 policy 20 authentication rsa-sig encryption aes-256 hash sha group 2 lifetime 86400 crypto ikev1 policy 30 authentication pre-share encryption aes-256 hash sha group 2 lifetime 86400 crypto ikev1 policy 40 authentication crack encryption aes-192 hash sha group 2 lifetime 86400 crypto ikev1 policy 50 authentication rsa-sig encryption aes-192 hash sha group 2 lifetime 86400 crypto ikev1 policy 60 authentication pre-share encryption aes-192 hash sha group 2 lifetime 86400 crypto ikev1 policy 70 authentication crack encryption aes hash sha group 2 lifetime 86400 crypto ikev1 policy 80 authentication rsa-sig encryption aes hash sha group 2 lifetime 86400 crypto ikev1 policy 90 authentication pre-share encryption aes hash sha group 2 lifetime 86400 crypto ikev1 policy 100 authentication crack encryption 3des hash sha group 2 lifetime 86400 crypto ikev1 policy 110 authentication rsa-sig encryption 3des hash sha group 2 lifetime 86400 crypto ikev1 policy 120 authentication pre-share encryption 3des hash sha group 2 lifetime 86400 crypto ikev1 policy 130 authentication crack encryption des hash sha group 2 lifetime 86400 crypto ikev1 policy 140 authentication rsa-sig encryption des hash sha group 2 lifetime 86400 crypto ikev1 policy 150 authentication pre-share encryption des hash sha group 2 lifetime 86400 webvpn group-policy Cisco-Tunnel internal group-policy Cisco-Tunnel attributes vpn-tunnel-protocol ikev1 default-domain value cisco.com username admin password CdOTKv3uhDhHIw3A encrypted privilege 15 !--- Associate the vpnclient pool to the tunnel group using the address pool. !--- Associate the AAA server group (ACS5) with the tunnel group. tunnel-group Cisco-Tunnel type remote-access tunnel-group Cisco-Tunnel general-attributes address-pool Sample-Pool authentication-server-group ACS5 default-group-policy Cisco-Tunnel !--- Enter the pre-shared-key to configure the authentication method. tunnel-group Cisco-Tunnel ipsec-attributes ikev1 pre-shared-key ***** prompt hostname context Cryptochecksum:e0725ca9ccc28af488ded9ee36b7822d : end ASA# |
為個人使用者配置可下載ACL的ACS
您可以將Cisco Secure ACS 5.x上的可下載訪問清單配置為命名許可權對象,然後將其分配到將在Access-Service規則的結果部分中選擇的授權配置檔案。
在本示例中,IPsec VPN使用者「cisco」成功進行了身份驗證,RADIUS伺服器向安全裝置傳送了一份可下載訪問清單。使用者「cisco」只能存取10.1.1.2伺服器,但拒絕所有其他的存取。要驗證ACL,請參閱適用於使用者/組的可下載ACL部分。
要在Cisco Secure ACS 5.x中配置RADIUS客戶端,請完成以下步驟:
-
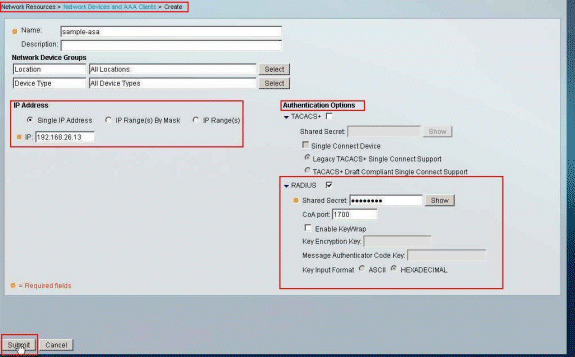
選擇Network Resources > Network Devices and AAA Clients,然後按一下Create以在RADIUS伺服器資料庫中為ASA增加條目。

-
為ASA輸入本地有效名稱(在本示例中為sample-asa),然後在IP address欄位中輸入192.168.26.13。透過選中RADIUS覈取方塊在Authentication Options部分中選擇RADIUS,並在Shared Secret欄位中輸入cisco123。按一下Submit。
-
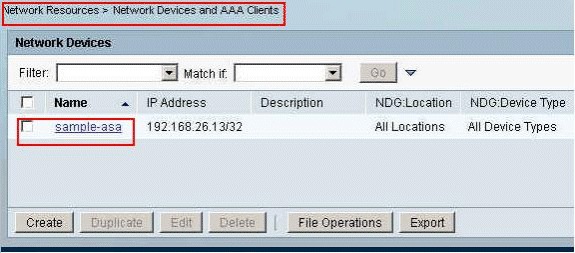
ASA已成功增加到RADIUS伺服器(ACS)資料庫。
-
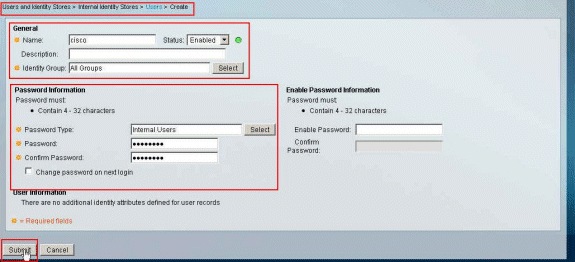
選擇Users and Identity Stores > Internal Identity Stores > Users,然後按一下Create以便在ACS的本地資料庫中為VPN身份驗證建立一個使用者。

-
輸入使用者名稱cisco。選擇Internal Users作為口令型別,然後輸入口令(本示例中為cisco123)。確認口令,然後按一下Submit。
-
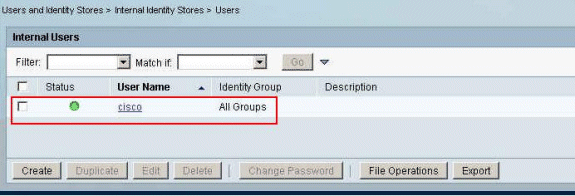
使用者cisco已成功建立。
-
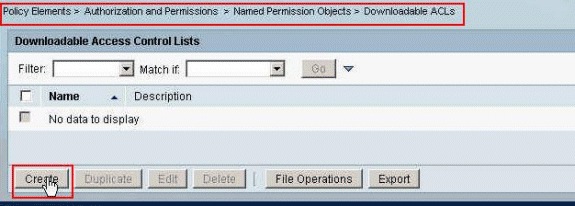
要建立可下載ACL,請選擇Policy Elements > Authorization and Permissions > Named Permission Objects > Downloadable ACLs,然後按一下Create。
-
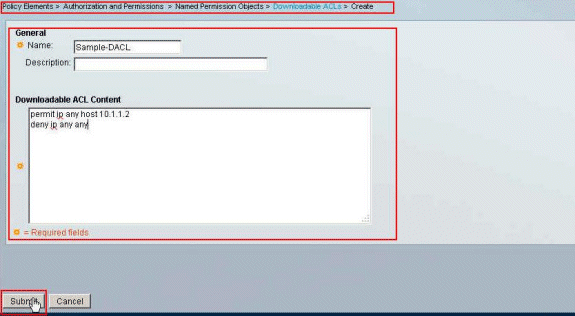
提供可下載ACL的名稱以及ACL內容。按一下Submit。
-
可下載ACL Sample-DACL已成功建立。

-
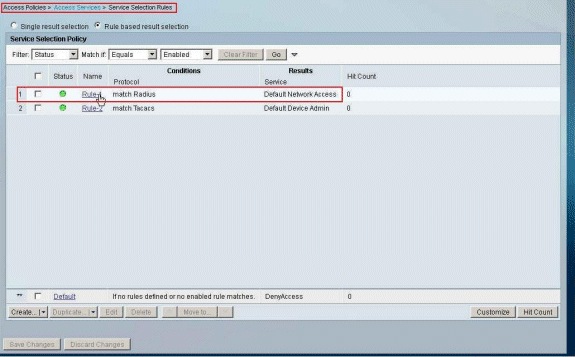
要為VPN身份驗證配置訪問策略,請選擇Access Policies > Access Services > Service Selection Rules,然後確定哪個服務符合RADIUS協定。在本示例中,規則1匹配RADIUS,而Default Network Access將滿足RADIUS請求。
-
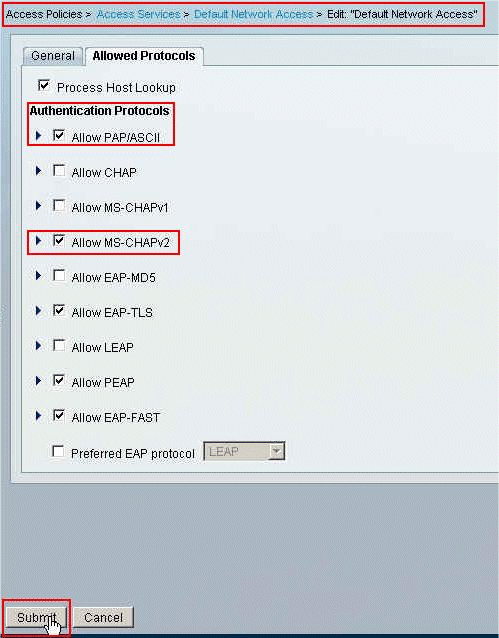
選擇步驟10中決定的Access Service。本例中使用的是預設網路訪問。選擇Allowed Protocols頁籤,並確保已選擇Allow PAP/ASCII和Allow MS-CHAPv2。按一下Submit。
-
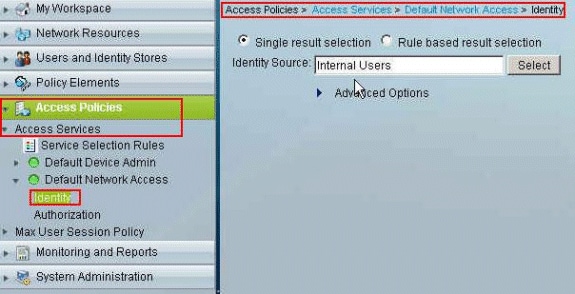
按一下Access Services的Identity部分,並確保已選擇Internal Users作為Identity Source。在本例中,我們採用預設網路訪問。
-
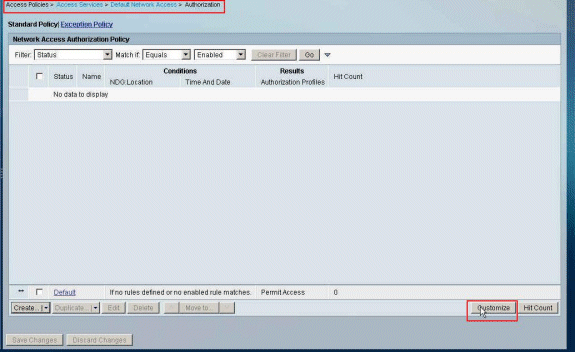
選擇Access Policies > Access Services > Default Network Access > Authorization,然後按一下Customize。
-
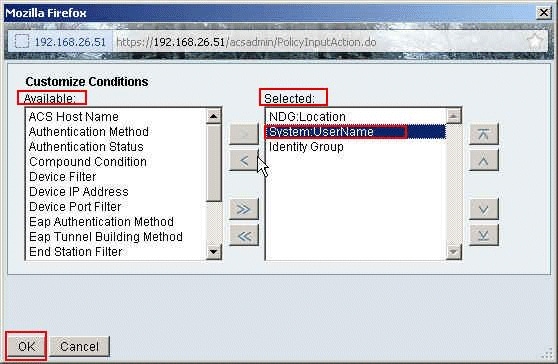
將System:UserName從Available列移到Selected列,然後按一下OK。
-
按一下Create以建立新規則。

-
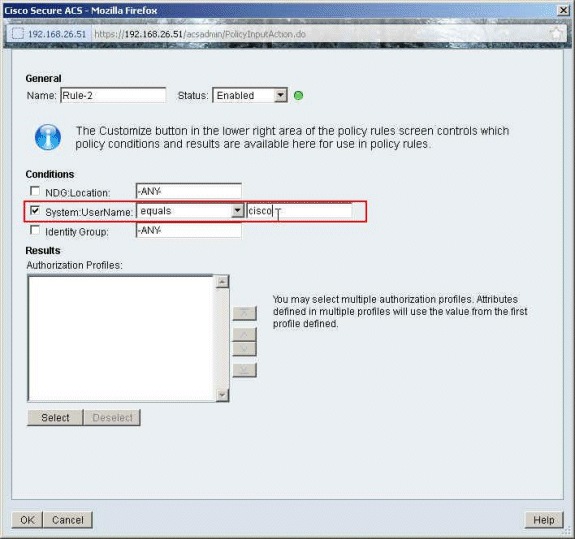
確保選中System:UserName旁邊的覈取方塊,從下拉選單中選擇equals,然後輸入使用者名稱cisco。
-
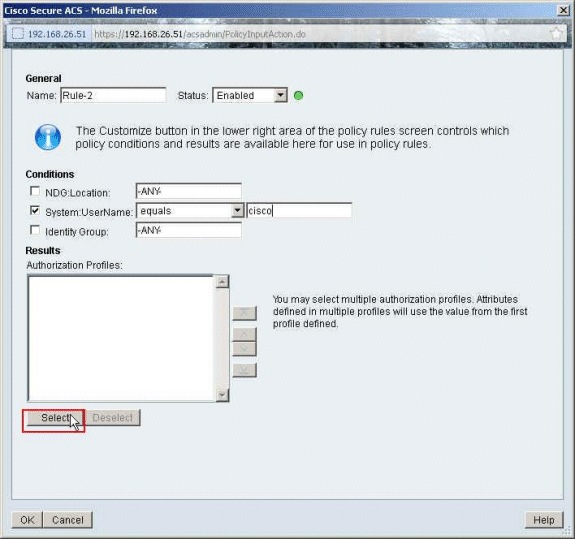
按一下選擇。
-
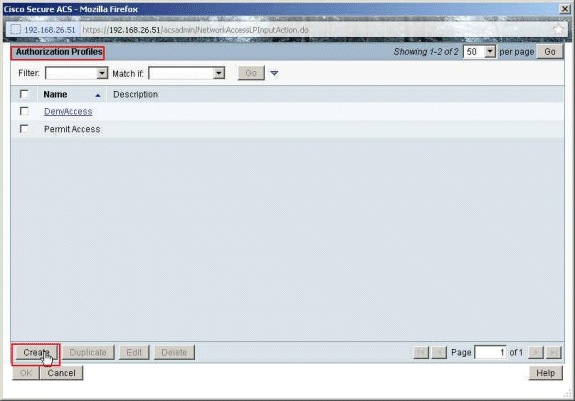
按一下Create以建立新的授權配置檔案。
-
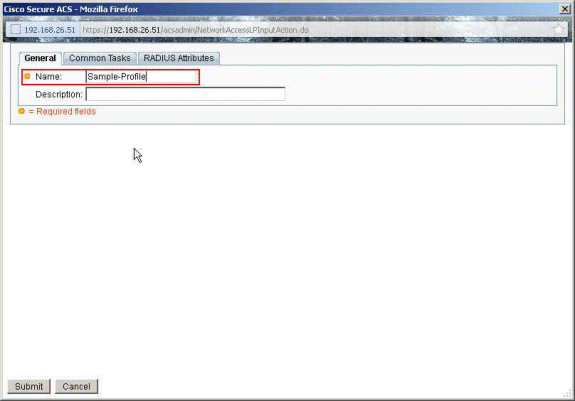
為Authorization Profile提供一個名稱。此示例中使用Sample-Profile。
-
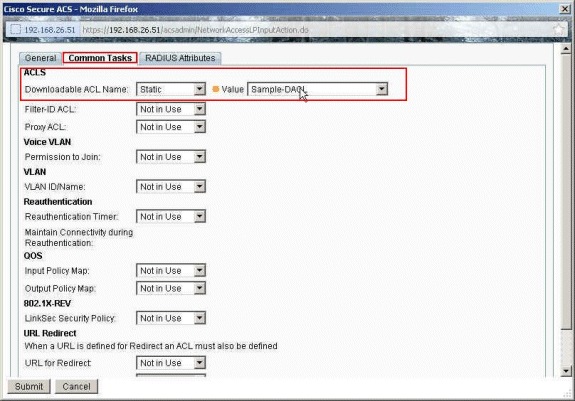
選擇Common Tasks頁籤,然後從Downloadable ACL Name的下拉選單中選擇Static。從value下拉選單中選擇新建立的DACL (Sample -DACL)。
-
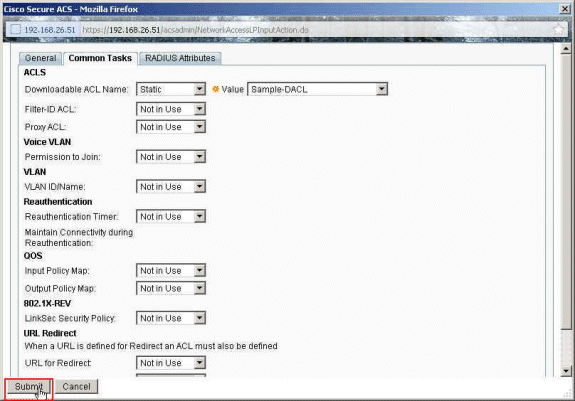
按一下Submit。
-
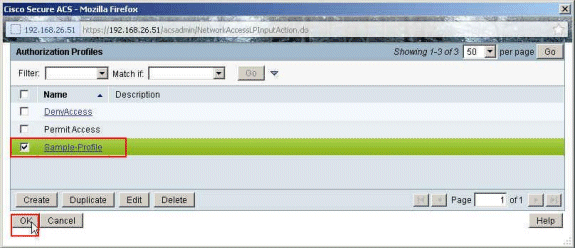
確保選中Sample-Profile(新建立的授權配置檔案)旁邊的覈取方塊,然後按一下OK。
-
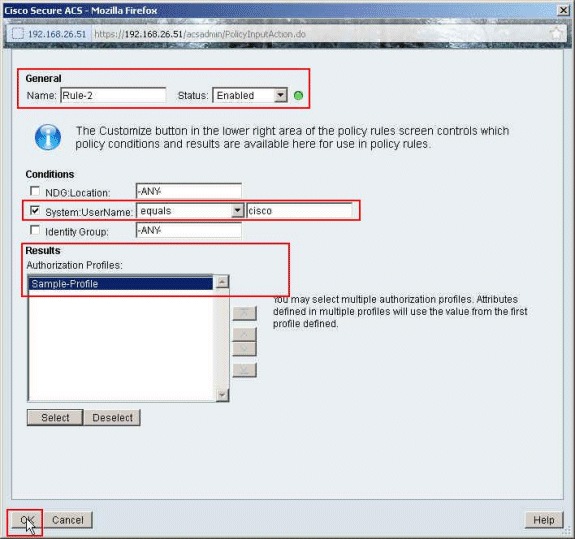
驗證在Authorization Profiles欄位中選擇了新建立的Sample-Profile後,按一下OK。
-
驗證是否已使用System:UserName equals cisco條件和Sample-Profile 建立新規則(Rule-2)。按一下Save Changes。已成功建立規則2。

為組的可下載ACL配置ACS
完成為適用於個人使用者的可下載ACL配置ACS 中的步驟1到12,然後執行以下步驟,在Cisco Secure ACS中為組配置可下載ACL。
在本示例中,IPsec VPN使用者「cisco」屬於Sample-Group。
示例組使用者「cisco」已成功進行身份驗證,RADIUS伺服器將向安全裝置傳送一份可下載訪問清單。使用者「cisco」只能存取10.1.1.2伺服器,但拒絕所有其他的存取。要驗證ACL,請參閱適用於使用者/組的可下載ACL部分。
-
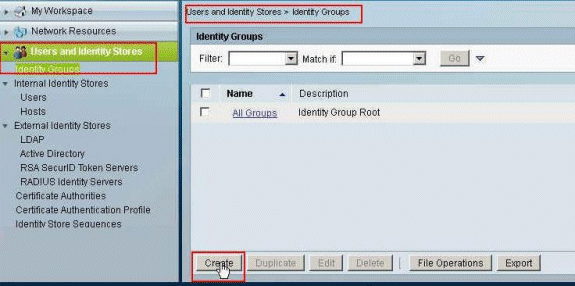
在導航欄中,按一下Users and Identity Stores > Identity Groups,然後按一下Create以建立新組。
-
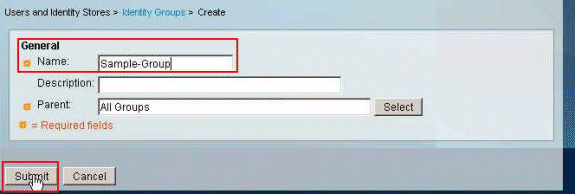
提供組名(Sample-Group),然後按一下Submit。
-
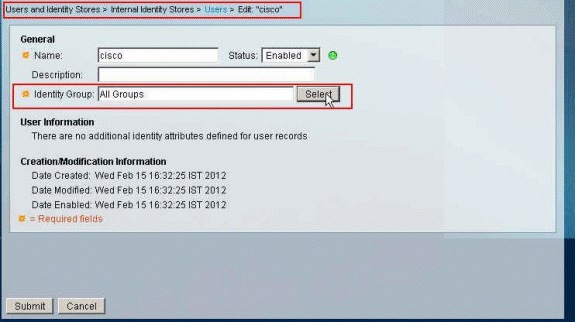
選擇User Identity Stores > Internal Identity Stores > Users,然後選擇使用者cisco。按一下Edit以更改此使用者的組成員資格。

-
按一下「Identity Group」旁邊的Select。
-
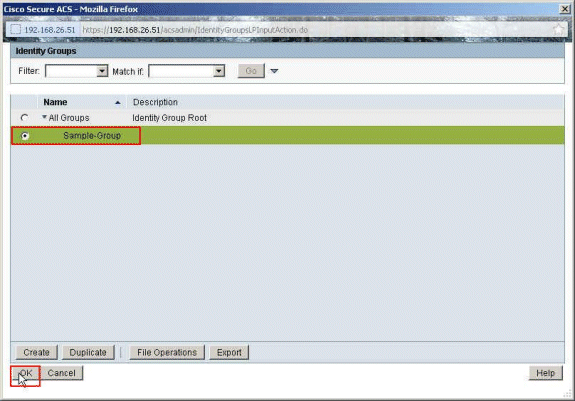
選擇新建立的組(即Sample-Group),然後按一下OK。
-
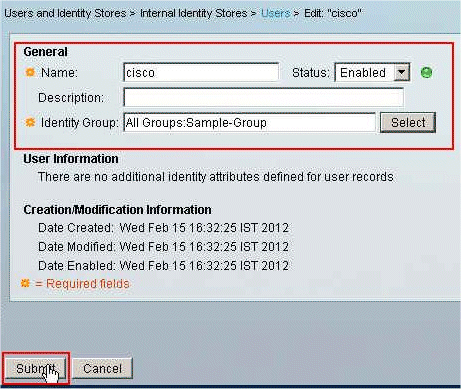
按一下Submit。
-
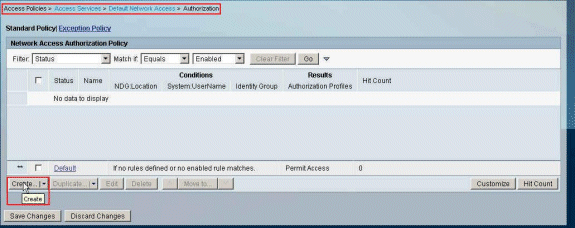
選擇Access Policies > Access Services > Default Network Access > Authorization,然後按一下Create以建立新規則。
-
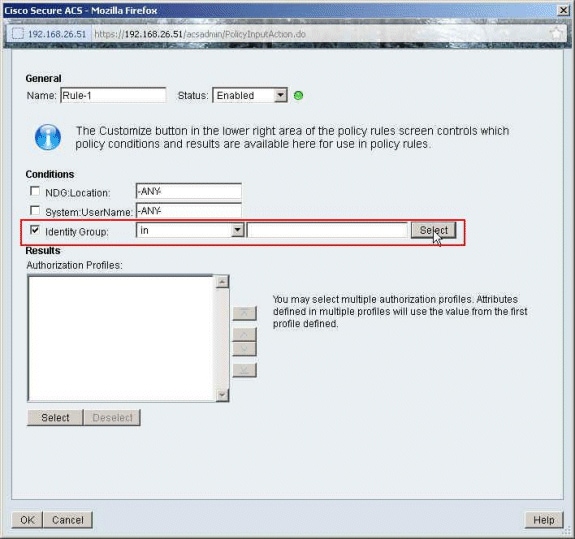
確保選中Identity Group旁邊的覈取方塊,然後按一下Select。
-
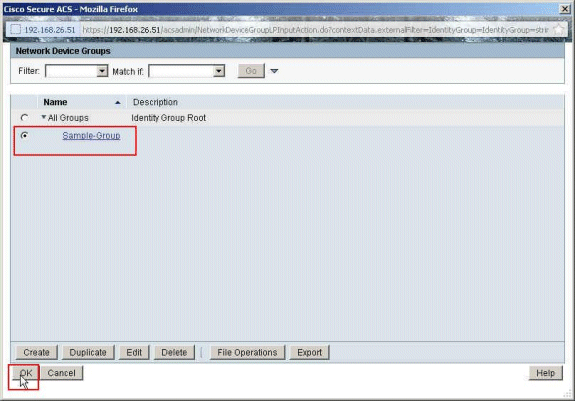
選擇Sample-Group,然後按一下OK。
-
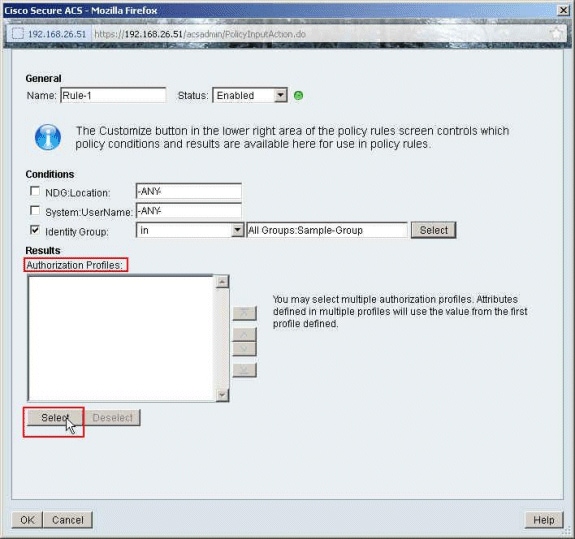
在Authorization Profiles部分中,按一下Select。
-
按一下Create以建立新的授權配置檔案。

-
為Authorization Profile提供一個名稱。Sample-Profile是本示例中使用的名稱。

-
選擇Common Tasks頁籤,然後從Downloadable ACL Name的下拉選單中選擇Static。從Value下拉選單中選擇新建立的DACL (Sample -DACL)。

-
按一下Submit。

-
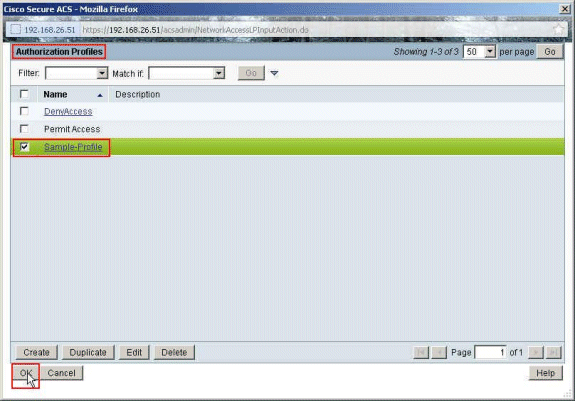
選擇之前建立的授權配置檔案Sample-Profile,然後按一下OK。
-
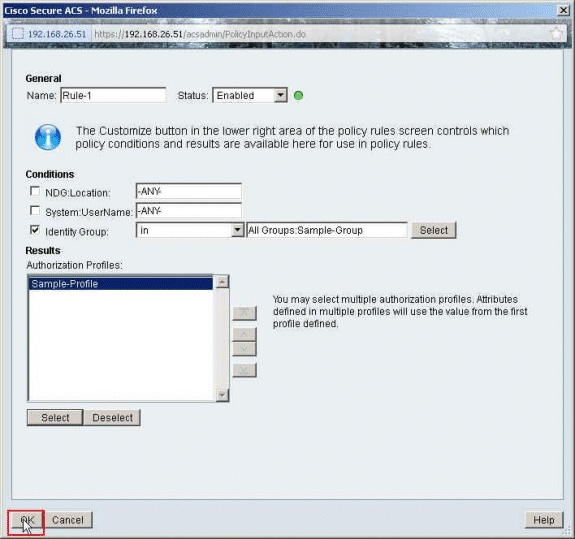
按一下「OK」(確定)。
-
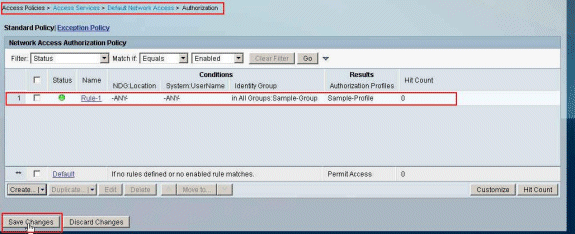
確保已建立Rule-1,並且以身份組Sample-Group作為條件,以Sample-Profile作為結果。按一下Save Changes。
為網路裝置組的可下載ACL配置ACS
完成為適用於個人使用者的可下載ACL配置ACS 中的步驟1到12,然後執行以下步驟,在Cisco Secure ACS中為網路裝置組配置可下載ACL。
在本示例中,RADIUS客戶端(ASA)屬於網路裝置組VPN-Gateways。來自ASA的使用者「cisco」的VPN身份驗證請求已成功進行身份驗證,RADIUS伺服器將向安全裝置傳送一份可下載訪問清單。使用者「cisco」只能存取10.1.1.2伺服器,但拒絕所有其他的存取。要驗證ACL,請參閱適用於使用者/組的可下載ACL部分。
-
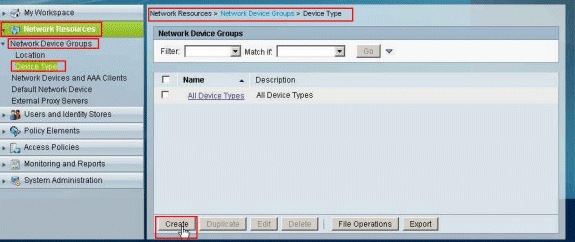
選擇網路資源 > 網路裝置組 > 裝置型別,然後按一下建立以建立新的網路裝置組。
-
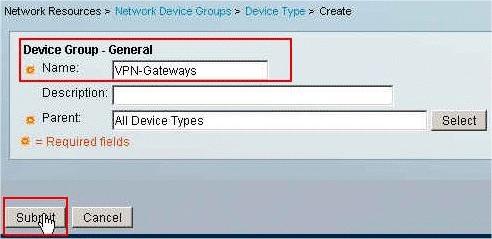
提供網路裝置組名稱(在本示例中為VPN-Gateways),然後按一下Submit。
-
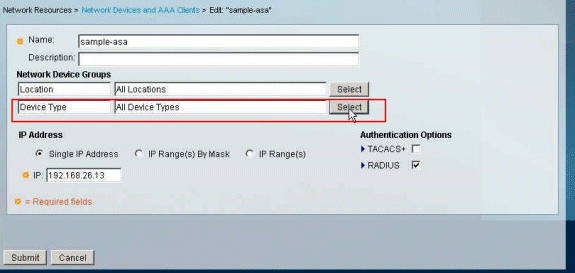
選擇Network Resources > Network Devices and AAA Clients,然後選擇之前建立的RADIUS Client sample-asa。按一下Edit以更改此RADIUS客戶端(asa)的網路裝置組成員資格。

-
按一下「Device Type」旁邊的Select。
-
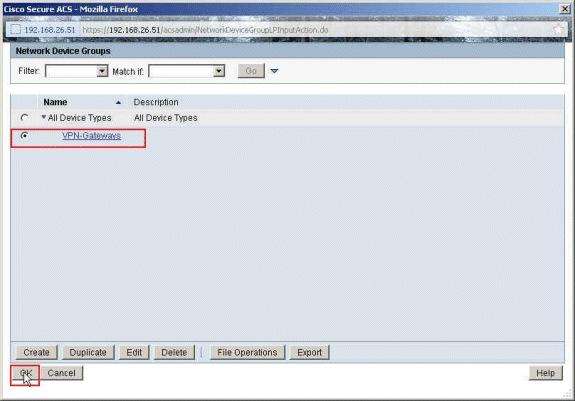
選擇新建立的網路裝置組(即VPN-Gateways),然後按一下OK。
-
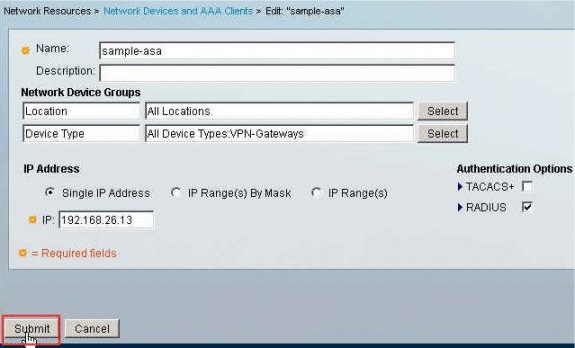
按一下Submit。
-
選擇Access Policies > Access Services > Default Network Access > Authorization,然後按一下Customize。

-
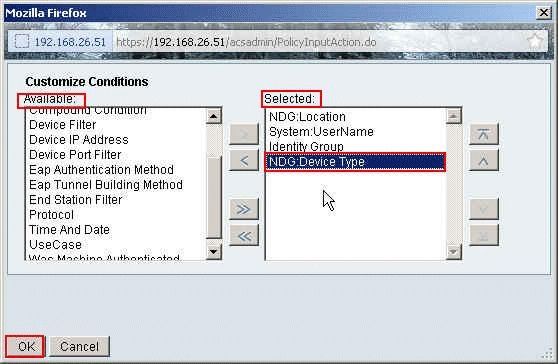
將NDG:Device Type從Available部分移動到Selected部分,然後按一下OK。
-
按一下Create以建立新規則。

-
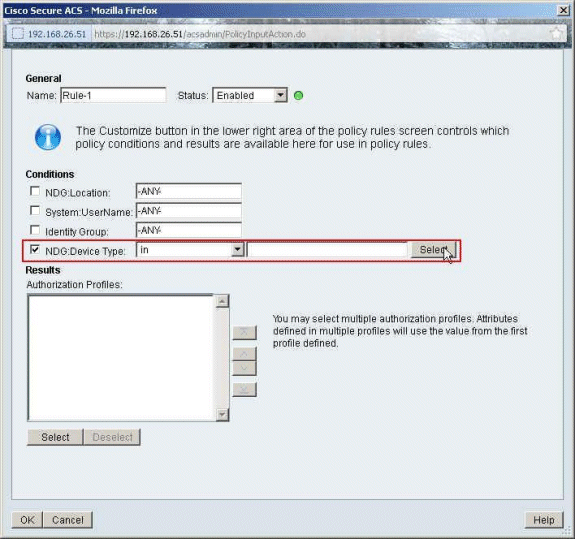
確保選中NDG:Device Type旁邊的覈取方塊,並從下拉選單中選擇in。按一下選擇。
-
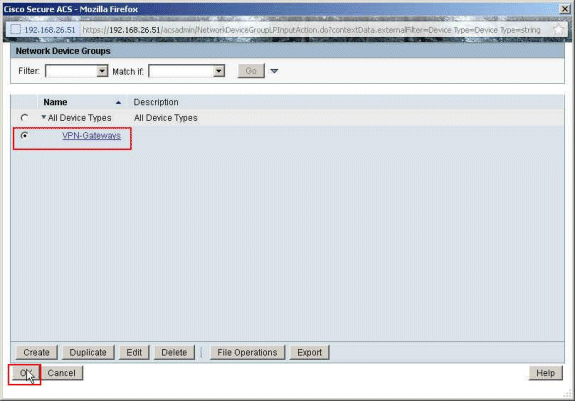
選擇之前建立的網路裝置組VPN-Gateways,然後按一下OK。
-
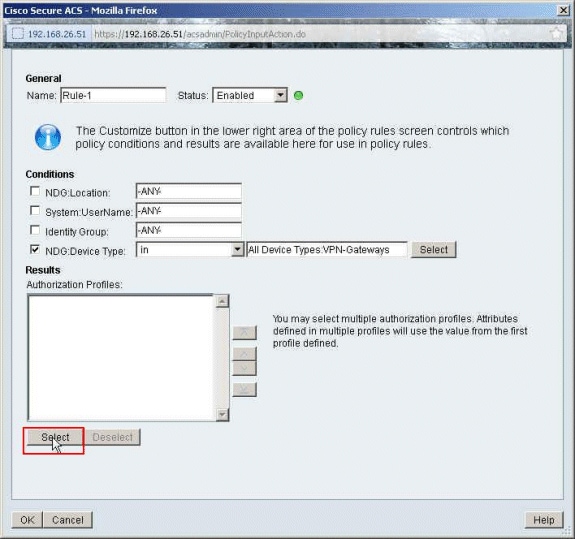
按一下選擇。
-
按一下Create以建立新的授權配置檔案。

-
為Authorization Profile提供一個名稱。Sample-Profile是本示例中使用的名稱。

-
選擇Common Tasks頁籤,然後從Downloadable ACL Name的下拉選單中選擇Static。從value下拉選單中選擇新建立的DACL (Sample-DACL)。

-
按一下Submit。

-
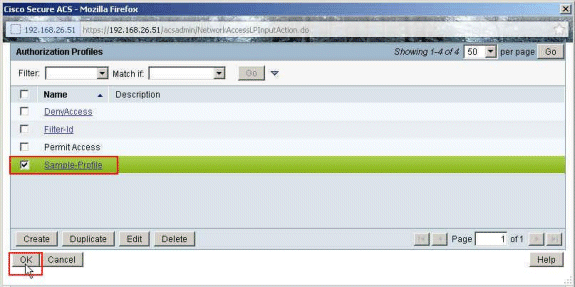
選擇Sample-Profile(之前已建立),然後按一下OK。
-
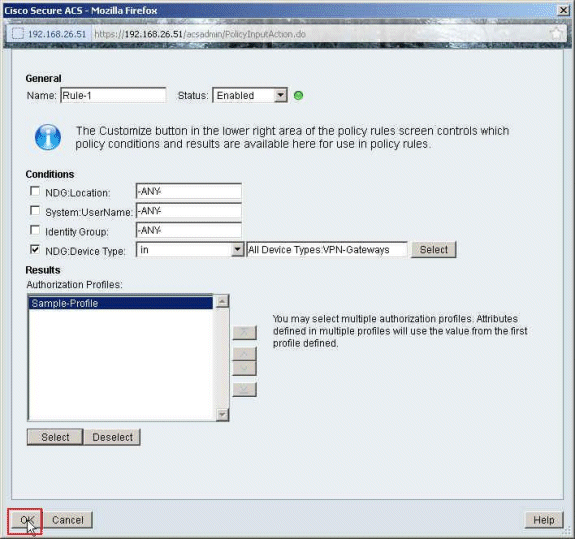
按一下「OK」(確定)。
-
驗證是否已建立Rule-1,並以VPN-Gateways作為NDG:Device Type作為條件,以Sample-Profile作為結果。按一下Save Changes。
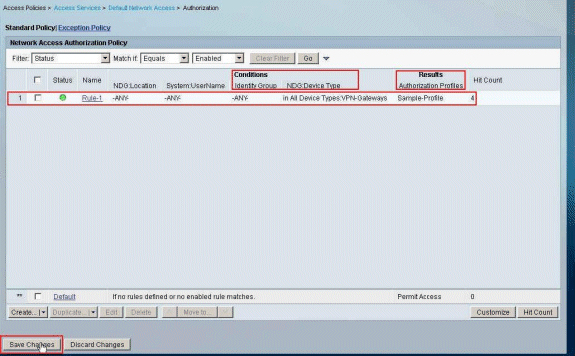
為使用者組配置IETF RADIUS設定
要在使用者身份驗證時從RADIUS伺服器下載已在安全裝置上建立的訪問清單的名稱,請配置IETF RADIUS filter-id屬性(屬性編號11):
filter-id=acl_name
示例組使用者cisco已成功進行身份驗證,RADIUS伺服器將為已在安全裝置上建立的訪問清單下載ACL名稱(新)。使用者「cisco」可以訪問ASA網路內部的所有裝置,除了10.1.1.2伺服器。要驗證ACL,請參閱Filter-Id ACL 部分。
根據本示例,名為new 的ACL配置為在ASA中過濾:
access-list new extended deny ip any host 10.1.1.2
access-list new extended permit ip any any
這些引數只有在為真時才會出現。您已設定:
-
AAA客戶端在網路配置中使用其中一個RADIUS協定
-
在Access-Service中規則的結果部分下選擇具有RADIUS (IETF) Filter-Id的授權配置檔案。
RADIUS屬性作為每個使用者的配置檔案從ACS傳送到發出請求的AAA客戶端。
完成為適用於個人使用者的可下載ACL配置ACS中的步驟1到6以及10到12,然後完成為適用於組的可下載ACL配置ACS中的步驟1到6,並執行以下部分中的步驟,以便在Cisco Secure ACS中配置Filter-Id。
要配置在授權配置檔案中應用的IETF RADIUS屬性設定,請執行以下步驟:
-
選擇Policy Elements > Authorization and Permissions > Network Access > Authorization Profiles,然後按一下Create以建立新的授權配置檔案。
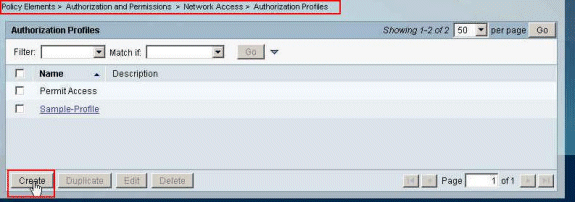
-
為Authorization Profile提供一個名稱。Filter-Id是本示例中選擇的授權配置檔名稱,為簡單起見。
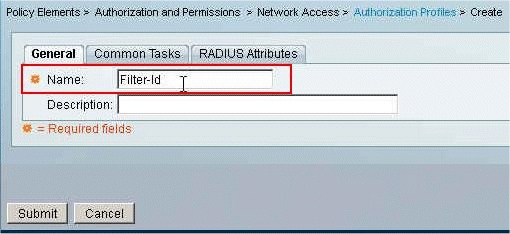
-
按一下Common Tasks頁籤,然後從Filter-ID ACL的下拉選單中選擇Static。在Value欄位中以new形式輸入訪問清單名稱,然後按一下Submit。
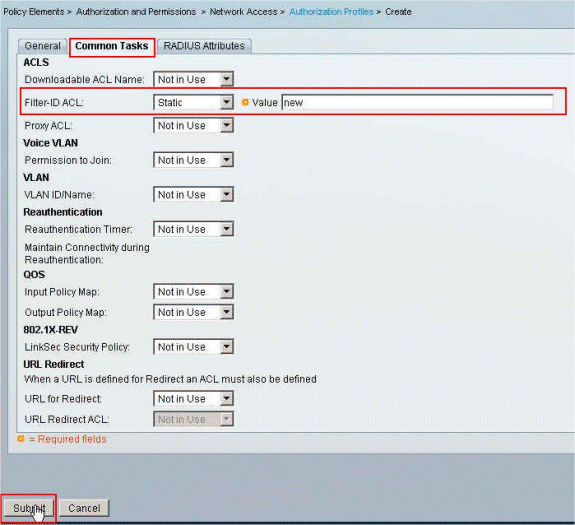
-
選擇Access Policies > Access Services > Default Network Access > Authorization,然後按一下Create以建立新規則。
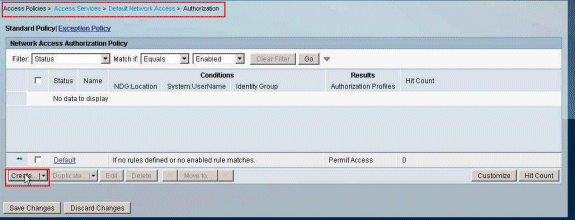
-
確保選中Identity Group旁邊的覈取方塊,然後按一下Select。
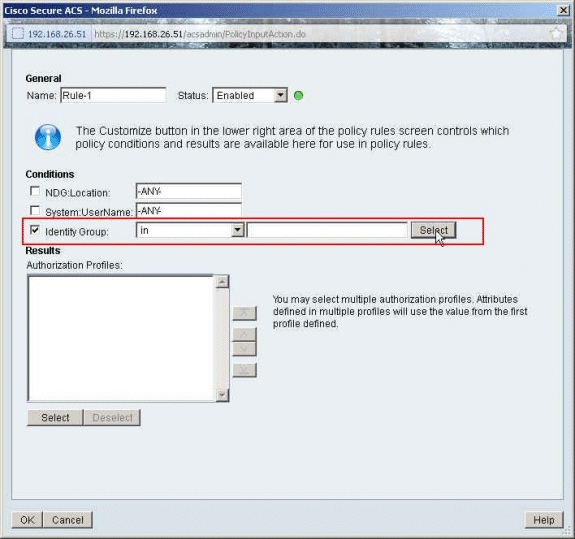
-
選擇Sample-Group,然後按一下OK。
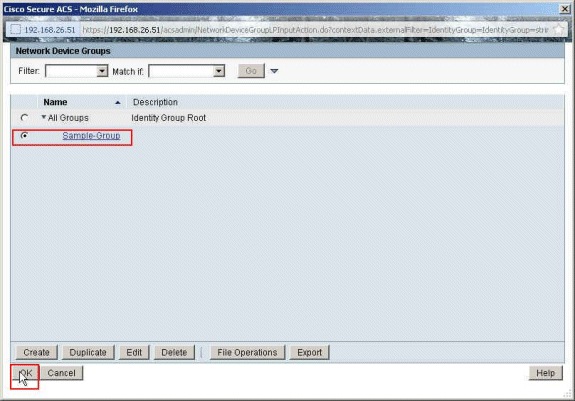
-
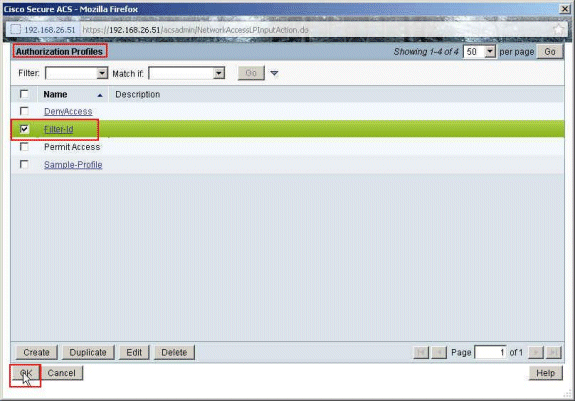
在Authorization Profiles部分中,按一下Select。
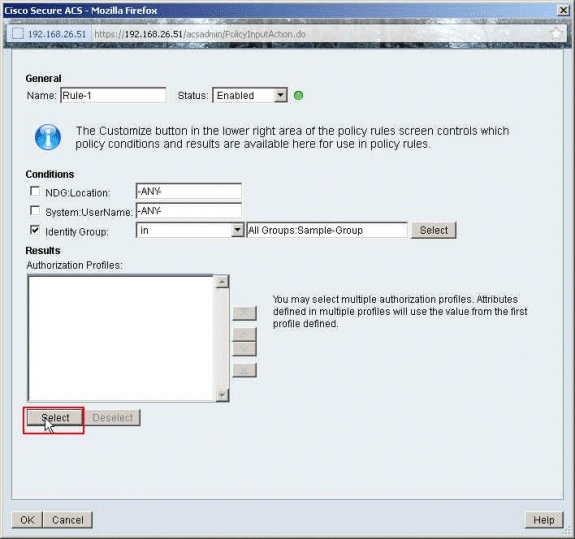
-
選擇之前建立的授權配置檔案Filter-Id,然後按一下OK。
-
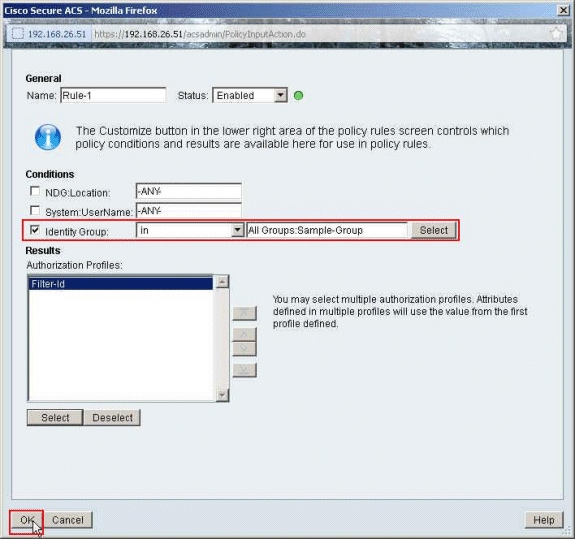
按一下「OK」(確定)。
-
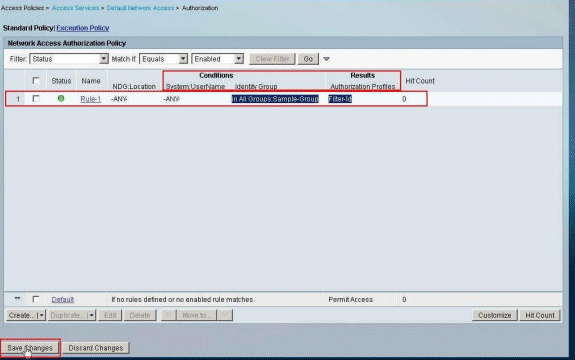
驗證是否已建立Rule-1,將身份組Sample-Group作為條件,將Filter-Id作為結果。按一下Save Changes。
Cisco VPN客戶端配置
使用Cisco VPN客戶端連線到Cisco ASA,以驗證是否成功配置了ASA。
請完成以下步驟:
-
選擇Start > Programs > Cisco Systems VPN Client > VPN Client。
-
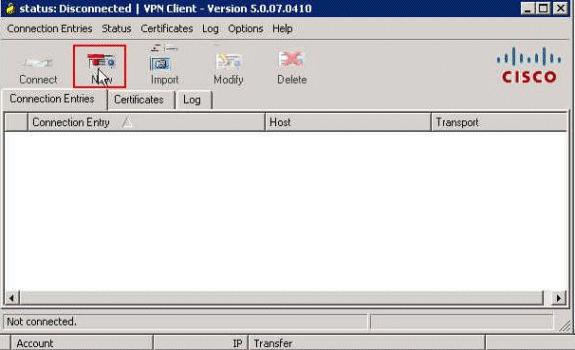
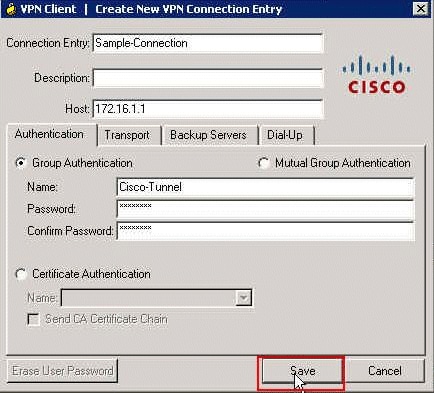
按一下New以啟動Create New VPN Connection Entry窗口。
-
填寫新連線的詳細資訊:
-
輸入連線條目的名稱和說明。
-
在Host框中輸入ASA的外部IP地址。
-
輸入在ASA中配置的VPN隧道組名稱(Cisco-Tunnel)和密碼(預共用金鑰- cisco123)。
-
按一下Save。
-
-
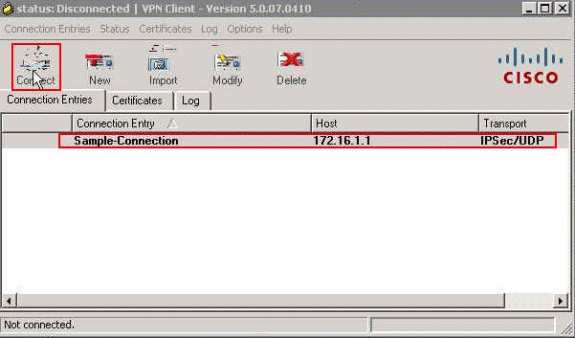
按一下要使用的連線,然後在VPN客戶端主窗口中按一下Connect。
-
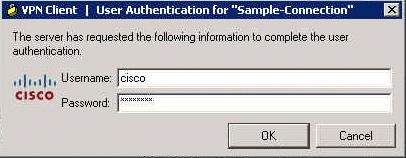
出現提示時,輸入在ASA中配置的用於身份驗證的使用者名稱cisco和口令cisco123,然後按一下OK以連線遠端網路。
-
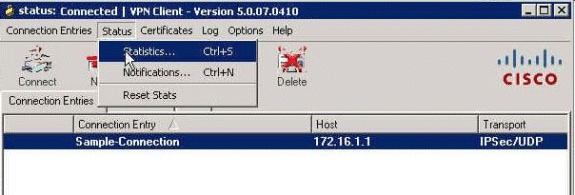
成功建立連線後,在Status選單中選擇Statistics以驗證隧道的詳細資訊。
驗證
使用本節內容,確認您的組態是否正常運作。
輸出直譯器工具(僅供註冊客戶使用) (OIT)支援某些show指令。使用OIT檢視對show命令輸出的分析。
Show Crypto命令
-
show crypto isakmp sa -顯示對等體上的所有當前IKE安全關聯(SA)。
ciscoasa# sh crypto isakmp sa IKEv1 SAs: Active SA: 1 Rekey SA: 0 (A tunnel will report 1 Active and 1 Rekey SA during rekey) Total IKE SA: 1 1 IKE Peer: 172.16.1.50 Type : user Role : responder Rekey : no State : AM_ACTIVE ciscoasa# -
show crypto ipsec sa -顯示當前SA使用的設定。
ciscoasa# sh crypto ipsec sa
interface: outside
    Crypto map tag: SYSTEM_DEFAULT_CRYPTO_MAP, seq num: 65535, local addr:
       172.16.1.1

      local ident (addr/mask/prot/port): (0.0.0.0/0.0.0.0/0/0)
      remote ident (addr/mask/prot/port): (10.2.2.1/255.255.255.255/0/0)
      current_peer: 172.16.1.50, username: cisco
      dynamic allocated peer ip: 10.2.2.1

      #pkts encaps: 4, #pkts encrypt: 4, #pkts digest: 0
      #pkts decaps: 333, #pkts decrypt: 333, #pkts verify: 333
      #pkts compressed: 0, #pkts decompressed: 0
      #pkts not compressed: 0, #pkts comp failed: 0, #pkts decomp failed: 0
      #pre-frag successes: 0, #pre-frag failures: 0, #fragments created: 0
      #PMTUs sent: 0, #PMTUs rcvd: 0, #decapsulated frgs needing reassembly:
        0
      #send errors: 0, #recv errors: 0

      local crypto endpt.: 172.16.1.1/0, remote crypto endpt.: 172.16.1.50/0
      path mtu 1500, ipsec overhead 74, media mtu 1500
      current outbound spi: 9A06E834
      current inbound spi : FA372121

    inbound esp sas:
      spi: 0xFA372121 (4197916961)
         transform: esp-aes esp-sha-hmac no compression
         in use settings ={RA, Tunnel, }
         slot: 0, conn_id: 16384, crypto-map: SYSTEM_DEFAULT_CRYPTO_MAP
         sa timing: remaining key lifetime (sec): 28678
         IV size: 16 bytes
         replay detection support: Y
         Anti replay bitmap:
          0xFFFFFFFF 0xFFFFFFFF
    outbound esp sas:
      spi: 0x9A06E834 (2584143924)
         transform: esp-aes esp-sha-hmac no compression
         in use settings ={RA, Tunnel, }
         slot: 0, conn_id: 16384, crypto-map: SYSTEM_DEFAULT_CRYPTO_MAP
         sa timing: remaining key lifetime (sec): 28678
         IV size: 16 bytes
         replay detection support: Y
         Anti replay bitmap:
          0x00000000 0x00000001
適用於使用者/群組的可下載ACL
驗證使用者Cisco的可下載ACL。ACL會從CSACS下載。
ciscoasa# sh access-list
access-list cached ACL log flows: total 0, denied 0 (deny-flow-max 4096)
            alert-interval 300
access-list OUTIN; 1 elements; name hash: 0x683c318c
access-list OUTIN line 1 extended permit icmp any any (hitcnt=1) 0x2ba5809c
access-list #ACSACL#-IP-Sample-DACL-4f3b9117; 2 elements; name hash: 0x3c878038
   (dynamic)
access-list #ACSACL#-IP-Sample-DACL-4f3b9117 line 1 extended permit ip any host
   10.1.1.2 (hitcnt=0) 0x5e896ac3
access-list #ACSACL#-IP-Sample-DACL-4f3b9117 line 2 extended deny ip any any
   (hitcnt=130) 0x19b3b8f5
Filter-Id ACL
[011] Filter-Id已應用於Group - Sample-Group,並且根據ASA中定義的ACL(新)過濾該組的使用者。
ciscoasa# sh access-list
access-list cached ACL log flows: total 0, denied 0 (deny-flow-max 4096)
            alert-interval 300
access-list OUTIN; 1 elements; name hash: 0x683c318c
access-list OUTIN line 1 extended permit icmp any any (hitcnt=1) 0x2ba5809c
access-list new; 2 elements; name hash: 0xa39433d3
access-list new line 1 extended permit ip any host 10.1.1.2 (hitcnt=4)
   0x58a3ea12
access-list new line 2 extended deny ip any any (hitcnt=27) 0x61f918cd
疑難排解
本節提供的資訊可用於對組態進行疑難排解。還顯示了debug輸出的示例。
注意:有關遠端訪問IPsec VPN故障排除的詳細資訊,請參閱最常見的L2L和遠端訪問IPsec VPN故障排除解決方案。
清除安全性關聯
進行故障排除時,請確保在進行更改後清除現有的SA。在PIX的特權模式下,使用以下命令:
-
clear [crypto] ipsec sa -刪除活動的IPsec SA。關鍵字crypto是可選的。
-
clear [crypto] isakmp sa -刪除活動的IKE SA。關鍵字crypto是可選的。
疑難排解指令
輸出直譯器工具(僅供註冊客戶使用) (OIT)支援某些show指令。使用OIT檢視對show命令輸出的分析。
附註:使用 debug 指令之前,請先參閱有關 Debug 指令的重要資訊。
-
debug crypto ipsec 7 -顯示第2階段的IPsec協商。
-
debug crypto isakmp 7 -顯示第1階段的ISAKMP協商。
相關資訊
修訂記錄
| 修訂 | 發佈日期 | 意見 |
|---|---|---|
1.0 |
21-Feb-2012 |
初始版本 |
 意見
意見