簡介
本文檔介紹如何使用REST API在Firepower裝置管理6.7版上啟用簡單網路管理協定(SNMP)。
必要條件
需求
思科建議您瞭解以下主題:
- 由Firepower裝置管理(FDM) 6.7版管理的Firepower威脅防禦(FTD)
- REST API知識
- SNMP知識
採用元件
由Firepower裝置管理版本6.7管理的Firepower威脅防禦。
本文中的資訊是根據特定實驗室環境內的裝置所建立。文中使用到的所有裝置皆從已清除(預設)的組態來啟動。如果您的網路運作中,請確保您瞭解任何指令可能造成的影響。
背景資訊
6.7的新增功能
FTD Device REST API支援SNMP伺服器、使用者、主機和主機群組的組態和管理。透過FP 6.7中的SNMP FTD裝置REST API支援:
- 使用者可以透過FTD Device REST API設定SNMP以管理網路。
- SNMP伺服器、使用者及主機/主機群組可透過FTD Device REST API新增/更新或管理。
檔案中包含的範例說明FDM API Explorer採取的組態步驟。
注意:當FTD執行版本6.7並由FDM管理時,只能透過REST API設定SNMP。
功能概述- SNMP FTD裝置REST API支援
- 此功能會新增特定於SNMP的新FDM URL端點。
- 這些新的API可用於配置輪詢的SNMP和監控系統的陷阱。
- 透過API、Firepower裝置上的管理資訊庫(MIB)發佈SNMP配置後,即可在NMS/SNMP客戶端上進行輪詢或陷阱通知。
SNMP API/URL端點
| URL |
方法 |
型號 |
| /devicesettings/default/snmpservers |
取得 |
SNMP伺服器 |
| /devicesettings/default/snmpservers/{objId} |
PUT, GET |
SNMP伺服器 |
| /object/snmphosts |
POST,取得 |
SNMPHost |
| /object/snmphosts/{objId} |
PUT、DELETE、GET |
SNMPHost |
| /object/snmpusergroups |
POST,取得 |
SNMPUserGroup |
| /object/snmpusergroups/{objId} |
PUT、DELETE、GET |
SNMPUserGroup |
| /object/snmpusers |
POST,取得 |
SNMPUser |
| /object/snmpusers/{objId} |
PUT、DELETE、GET |
SNMPUser |
設定
SNMP主機有3個主要版本:
- SNMP V1
- SNMP V2C
- SNMP V3
每個都具有securityConfiguration的特定格式。 對於V1和V2C:它包含社群字串和標識配置為V1或V2C的型別欄位。
對於SNMP V3:它包含一個有效的SNMP V3使用者和標識配置為V3的type欄位。
SNMP v3
1. 存取FDM API Explorer。
若要從FDM GUI存取FDM REST API Explorer,請選取3點,然後選取API Explorer。或者,導航到URL API Explorer。

2. 網路對象配置。
為SNMP主機建立新網路對象。在FDM API瀏覽器中,依次選擇網路對象和POST /object/networks:

SNMP主機JSON格式如下。將此JSON貼上到body部分並更改IP address on值以匹配SNMP主機IP地址:
{
"version": "null",
"name": "snmpHost",
"description": "SNMP Server Host",
"subType": "HOST",
"value": "192.168.203.61",
"isSystemDefined": false,
"dnsResolution": "IPV4_ONLY",
"type": "networkobject"
}
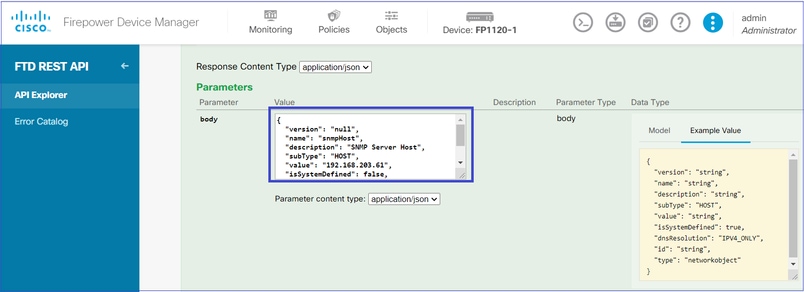
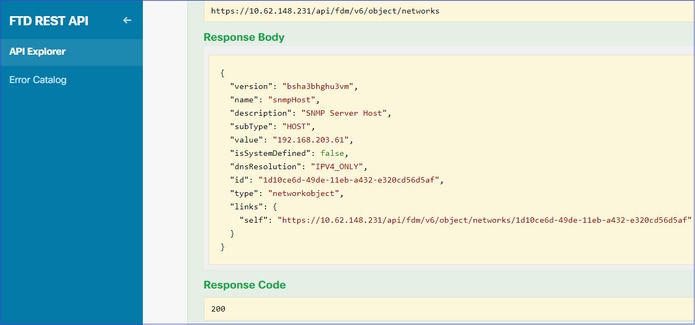
向下滾動並選擇TRY IT OUT!按鈕以執行API呼叫。成功的呼叫返迴響應代碼200。

將JSON資料從響應正文複製到記事本。稍後,您需要填寫有關SNMP主機的資訊。
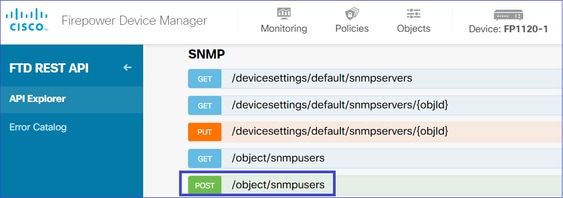
3. 建立新的SNMPv3使用者。
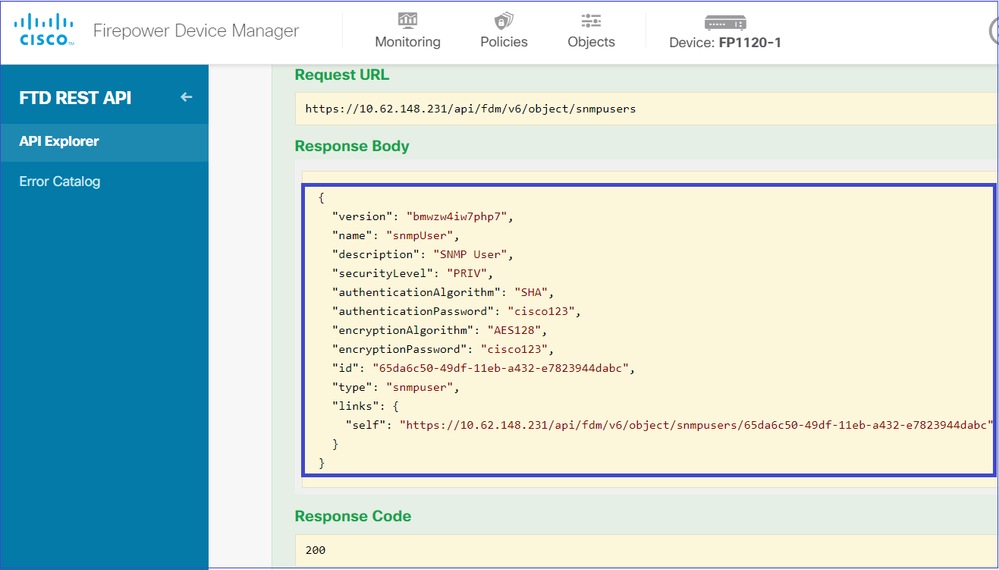
在FDM API Explorer上,選取SNMP,然後選取POST /object/snmpusers。
將此JSON資料複製到記事本,然後修改您感興趣的部分(例如authenticationPassword、encryptionPassword或演算法):
{
"version": null,
"name": "snmpUser",
"description": "SNMP User",
"securityLevel": "PRIV",
"authenticationAlgorithm": "SHA",
"authenticationPassword": "cisco123",
"encryptionAlgorithm": "AES128",
"encryptionPassword": "cisco123",
"id": null,
"type": "snmpuser"
}
注意:示例中使用的口令僅用於演示目的。在生產環境中,請確保使用強密碼
將修改後的JSON資料複製到正文部分:
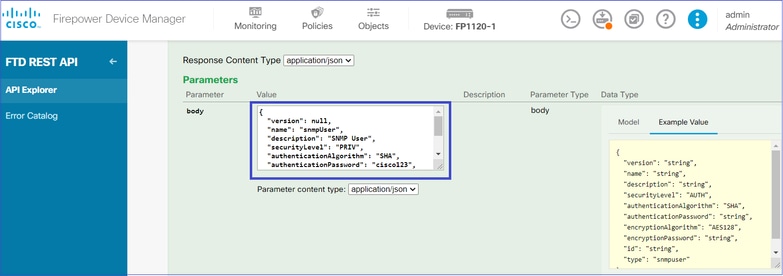
向下滾動並選擇TRY IT OUT!按鈕以執行API呼叫。成功的呼叫返迴響應代碼200。將JSON資料從響應正文複製到記事本。稍後,您需要填寫有關SNMP使用者的資訊。
4. 獲取介面資訊。
在FDM API Explorer中,選擇Interface,然後選擇GET /devices/default/interfaces。您需要從連線到SNMP伺服器的介面收集資訊。

向下滾動並選擇TRY IT OUT!按鈕以執行API呼叫。成功的呼叫返迴響應代碼200。將JSON資料從響應正文複製到記事本。稍後,您需要填寫有關介面的資訊。
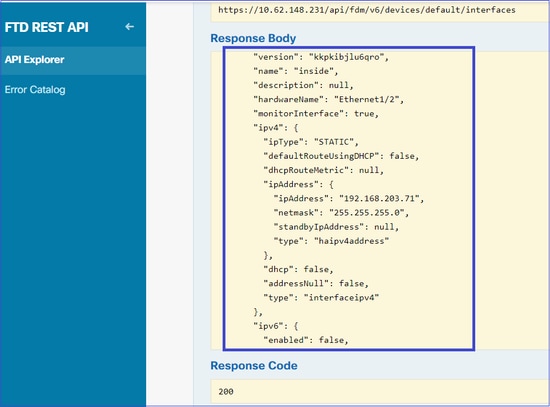
記住來自JSON資料的介面版本、名稱、ID和型別。來自內部介面的JSON資料示例:
 {
"version": "kkpkibjlu6qro",
"name": "inside",
"description": null,
"hardwareName": "Ethernet1/2",
"monitorInterface": true,
"ipv4": {
"ipType": "STATIC",
"defaultRouteUsingDHCP": false,
"dhcpRouteMetric": null,
"ipAddress": {
"ipAddress": "192.168.203.71",
"netmask": "255.255.255.0",
"standbyIpAddress": null,
"type": "haipv4address"
},
"dhcp": false,
"addressNull": false,
"type": "interfaceipv4"
},
"ipv6": {
"enabled": false,
"autoConfig": false,
"dhcpForManagedConfig": false,
"dhcpForOtherConfig": false,
"enableRA": false,
"dadAttempts": 1,
"linkLocalAddress": {
"ipAddress": "",
"standbyIpAddress": "",
"type": "haipv6address"
},
"ipAddresses": [
{
"ipAddress": "",
"standbyIpAddress": "",
"type": "haipv6address"
}
],
"prefixes": null,
"type": "interfaceipv6"
},
"managementOnly": false,
"managementInterface": false,
"mode": "ROUTED",
"linkState": "UP",
"mtu": 1500,
"enabled": true,
"macAddress": null,
"standbyMacAddress": null,
"pppoe": null,
"speedType": "AUTO",
"duplexType": "AUTO",
"present": true,
"tenGigabitInterface": false,
"gigabitInterface": false,
"id": "fc3d07d4-49d2-11eb-85a8-65aec636a0fc",
"type": "physicalinterface",
"links": {
"self": "https://10.62.148.231/api/fdm/v6/devices/default/interfaces/fc3d07d4-49d2-11eb-85a8-65aec636a0fc"
}
},
從JSON資料中,您可以看到內部的介面有此資料需要與SNMP伺服器關聯:
- 版本:kkpkibjlu6qro
- 名稱:inside,iid:fc3d07d4-49d2-11eb-85a8-65aec636a0fc,
- 型別:physicalinterface、
5. 建立新的SNMPv3主機。
在FDM API Explorer中,選擇SNMP,然後選擇SNMP下的POST /object/snmphosts/。

使用此JSON作為模板。將先前步驟中的資料複製並貼上到範本中:
{
"version": null,
"name": "snmpv3-host",
"description": null,
"managerAddress": {
"version": "bsha3bhghu3vmk",
"name": "snmpHost",
"id": "1d10ce6d-49de-11eb-a432-e320cd56d5af",
"type": "networkobject"
},
"pollEnabled": true,
"trapEnabled": true,
"securityConfiguration": {
"authentication": {
"version": "bmwzw4iw7php7",
"name": "snmpUser",
"id": "65da6c50-49df-11eb-a432-e7823944dabc",
"type": "snmpuser"
},
"type": "snmpv3securityconfiguration"
},
"interface": {
"version": "kkpkibjlu6qro",
"name": "inside",
"id": "fc3d07d4-49d2-11eb-85a8-65aec636a0fc",
"type": "physicalinterface"
},
"id": null,
"type": "snmphost"
}

附註:
- 使用從步驟1收到的資訊替換managerAddress id、type、version和name中的值。
- 使用從步驟2收到的資訊替換身份驗證中的值。
- 使用從步驟3接收的資料替換介面中的值。對於SNMP2,沒有身份驗證,型別為snmpv2csecurityconfiguration,而不是snmpv3securityconfiguration。
將修改後的JSON資料複製到正文部分。
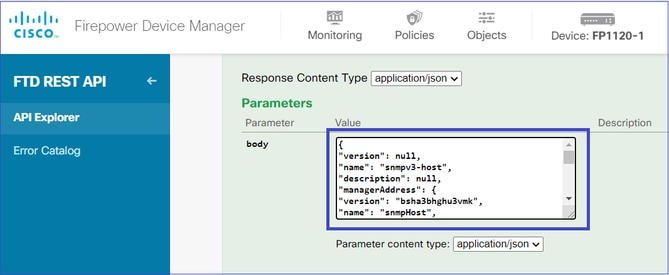
向下滾動並選擇TRY IT OUT!按鈕以執行API呼叫。成功的呼叫返迴響應代碼200。
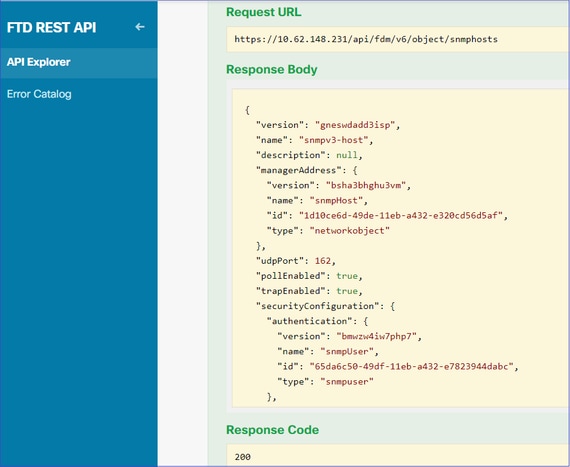
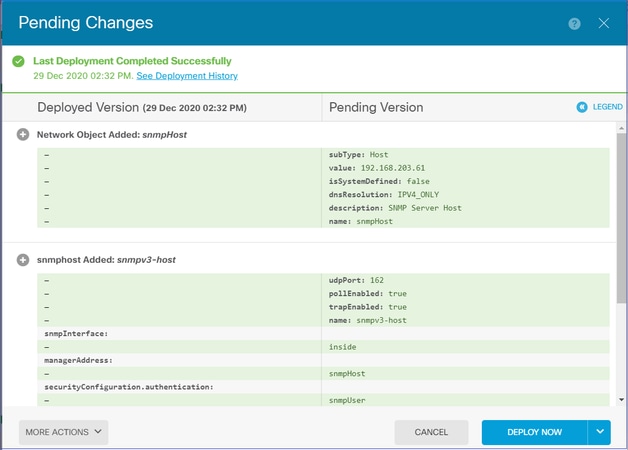
導覽至FDM GUI並部署變更。您可以看到大部分SNMP配置:
SNMP v2c
對於v2c,您不需要建立使用者,但是仍然需要:
- 建立網路物件組態(與SNMPv3一節中的說明相同)
- 獲取介面資訊(如SNMPv3部分所述)
- 建立新的SNMPv2c主機對象
以下是建立SNMPv2c對象的JSON負載示例:
{
"version": null,
"name": "snmpv2-Host",
"description": null,
"managerAddress": {
"version": "bsha3bhghu3vmk",
"name": "snmpv4hostgrp",
"id": "1d10ce6d-49de-11eb-a432-e320cd56d5af",
"type": "networkobject"
},
"pollEnabled": true,
"trapEnabled": true,
"securityConfiguration": {
"community": "cisco123",
"type": "snmpv2csecurityconfiguration"
},
"interface": {
"version": "kkpkibjlu6qro",
"name": "inside",
"id": "fc3d07d4-49d2-11eb-85a8-65aec636a0fc",
"type": "physicalinterface"
},
"id": null,
"type": "snmphost"
}
使用POST方法部署JSON負載:
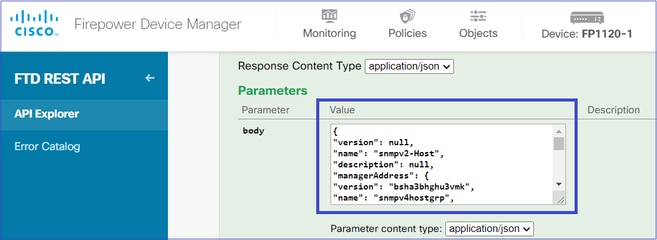
向下滾動並選擇TRY IT OUT!按鈕以執行API呼叫。成功的呼叫返迴響應代碼200。
SNMP組態移除
步驟 1.
獲取SNMP主機資訊(SNMP > /object/snmphosts):

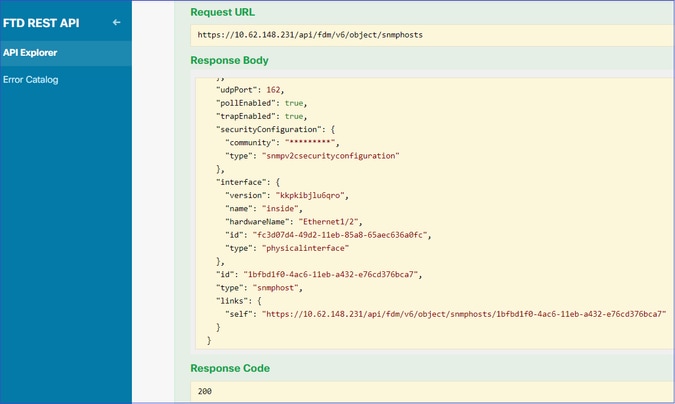
向下滾動並選擇TRY IT OUT!按鈕以執行API呼叫。成功的呼叫返迴響應代碼200。
您會得到一份物件清單。記下您要移除的快照物件的id:
{
"items": [
{
"version": "ofaasthu26ulx",
"name": "snmpv2-Host",
"description": null,
"managerAddress": {
"version": "bsha3bhghu3vm",
"name": "snmpHost",
"id": "1d10ce6d-49de-11eb-a432-e320cd56d5af",
"type": "networkobject"
},
"udpPort": 162,
"pollEnabled": true,
"trapEnabled": true,
"securityConfiguration": {
"community": "*********",
"type": "snmpv2csecurityconfiguration"
},
"interface": {
"version": "kkpkibjlu6qro",¬
"name": "inside",
"hardwareName": "Ethernet1/2",
"id": "fc3d07d4-49d2-11eb-85a8-65aec636a0fc",
"type": "physicalinterface"
},
"id": "1bfbd1f0-4ac6-11eb-a432-e76cd376bca7",
"type": "snmphost",
"links": {
"self": "https://10.62.148.231/api/fdm/v6/object/snmphosts/1bfbd1f0-4ac6-11eb-a432-e76cd376bca7"
}
},
步驟 2.
在SNMP > /object/snmphosts{objId}中選擇DELETE選項。貼上您在步驟1中收集的ID:

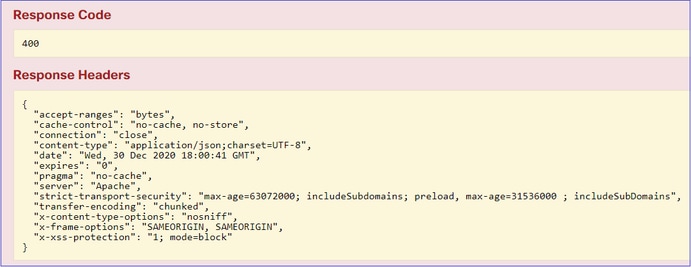
向下滾動並選擇TRY IT OUT!按鈕以執行API呼叫。該呼叫返迴響應代碼400。
步驟 3.
部署變更:
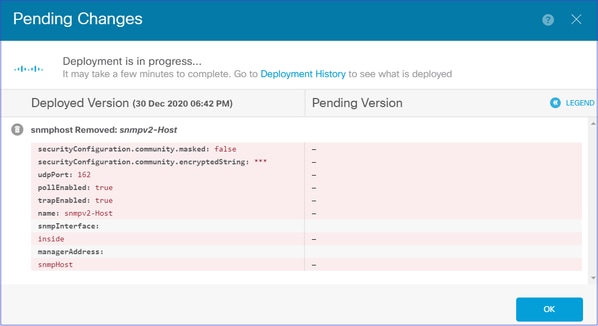
部署會移除主機資訊:
FP1120-1# show run snmp-server
snmp-server group AUTH v3 auth
snmp-server group PRIV v3 priv
snmp-server group NOAUTH v3 noauth
snmp-server location null
snmp-server contact null
snmp-server community *****
v2c的snmpwalk失敗:
root@kali2:~# snmpwalk -v2c -c cisco123 -OS 192.168.203.71
Timeout: No Response from 192.168.203.71
對於v3,必須按此順序刪除對象。
- SNMP主機(成功的返回代碼為204)
- SNMP使用者(成功的返回代碼為204)
如果您嘗試以錯誤的順序刪除物件,則會發生以下錯誤:
{
"error": {
"severity": "ERROR",
"key": "Validation",
"messages": [
{
"description": "You cannot delete the object because it contains SNMPHost: snmpv3-host2, SNMPHost: snmpv3-host.
You must remove the object from all parts of the configuration before you can delete it.",
"code": "deleteObjWithRel",
"location": ""
}
]
}
}
驗證
SNMP v3驗證
部署後,導覽至FTD CLI以驗證SNMP組態。請注意,engineID值是自動產生的。
FP1120-1# connect ftd
> system support diagnostic-cli
Attaching to Diagnostic CLI ... Press 'Ctrl+a then d' to detach.
Type help or '?' for a list of available commands.

FP1120-1> enable
Password:
FP1120-1# show run all snmp-server
snmp-server group AUTH v3 auth
snmp-server group PRIV v3 priv
snmp-server group NOAUTH v3 noauth
snmp-server user snmpUser PRIV v3 engineID 80000009febdf0129a799ef469aba2d5fcf1bfd7e86135a1f8 encrypted auth sha ca:1b:18:f3:62:b1:63:7e:92:34:92:b3:cf:54:86:f9:8e:2a:4c:fd priv aes 128 ca:1b:18:f3:62:b1:63:7e:92:34:92:b3:cf:54:86:f9
snmp-server listen-port 161
snmp-server host inside 192.168.203.61 version 3 snmpUser udp-port 162
snmp-server location null
snmp-server contact null
snmp-server community *****
snmp-server enable traps snmp authentication linkup linkdown coldstart warmstart
no snmp-server enable traps syslog
no snmp-server enable traps ipsec start stop
no snmp-server enable traps entity config-change fru-insert fru-remove fan-failure power-supply power-supply-presence cpu-temperature chassis-temperature power-supply-temperature chassis-fan-failure accelerator-temperature l1-bypass-status
no snmp-server enable traps memory-threshold
no snmp-server enable traps interface-threshold
no snmp-server enable traps remote-access session-threshold-exceeded
no snmp-server enable traps connection-limit-reached
no snmp-server enable traps cpu threshold rising
no snmp-server enable traps ikev2 start stop
no snmp-server enable traps nat packet-discard
no snmp-server enable traps config
no snmp-server enable traps failover-state
no snmp-server enable traps cluster-state
snmp-server enable oid mempool
snmp-server enable
snmpwalk測試
root@kali2:~# snmpwalk -v3 -l authPriv -u snmpUser -a SHA -A cisco123 -x AES -X cisco123 192.168.203.71
iso.3.6.1.2.1.1.1.0 = STRING: "Cisco Firepower Threat Defense, Version 6.7.0 (Build 65), ASA Version 9.15(1)"
iso.3.6.1.2.1.1.2.0 = OID: iso.3.6.1.4.1.9.1.2663
iso.3.6.1.2.1.1.3.0 = Timeticks: (1616700) 4:29:27.00
iso.3.6.1.2.1.1.4.0 = STRING: "null"
iso.3.6.1.2.1.1.5.0 = STRING: "FP1120-1"
iso.3.6.1.2.1.1.6.0 = STRING: "null"
iso.3.6.1.2.1.1.7.0 = INTEGER: 4
...
SNMP v2c驗證
FP1120-1# show run snmp-server
snmp-server host inside 192.168.203.61 community ***** version 2c
snmp-server location null
snmp-server contact null
snmp-server community *****
v2c的snmpwalk:
root@kali2:~# snmpwalk -v2c -c cisco123 -OS 192.168.203.71
iso.3.6.1.2.1.1.1.0 = STRING: "Cisco Firepower Threat Defense, Version 6.7.0 (Build 65), ASA Version 9.15(1)"
iso.3.6.1.2.1.1.2.0 = OID: iso.3.6.1.4.1.9.1.2663
iso.3.6.1.2.1.1.3.0 = Timeticks: (10482200) 1 day, 5:07:02.00
iso.3.6.1.2.1.1.4.0 = STRING: "null"
iso.3.6.1.2.1.1.5.0 = STRING: "FP1120-1"
iso.3.6.1.2.1.1.6.0 = STRING: "null"
iso.3.6.1.2.1.1.7.0 = INTEGER: 4
疑難排解
在防火牆上啟用含有追蹤軌跡的擷取:
FP1120-1# capture CAPI trace interface inside match udp any any eq snmp
使用snmpwalk工具並驗證您是否可以看到資料包:
FP1120-1# show capture
capture CAPI type raw-data trace interface inside [Capturing - 3137 bytes]
  match udp any any eq snmp
擷取內容:
FP1120-1# show capture CAPI

154 packets captured

   1: 17:04:16.720131       192.168.203.61.51308 > 192.168.203.71.161:  udp 39
   2: 17:04:16.722252       192.168.203.71.161 > 192.168.203.61.51308:  udp 119
   3: 17:04:16.722679       192.168.203.61.51308 > 192.168.203.71.161:  udp 42
   4: 17:04:16.756400       192.168.203.71.161 > 192.168.203.61.51308:  udp 51
   5: 17:04:16.756918       192.168.203.61.51308 > 192.168.203.71.161:  udp 42
驗證SNMP伺服器統計計數器是否顯示SNMP Get或Get-next請求和響應:
FP1120-1# show snmp-server statistics
62 SNMP packets input
0 Bad SNMP version errors
0 Unknown community name
0 Illegal operation for community name supplied
0 Encoding errors
58 Number of requested variables
0 Number of altered variables
0 Get-request PDUs
58 Get-next PDUs
0 Get-bulk PDUs
0 Set-request PDUs (Not supported)
58 SNMP packets output
0 Too big errors (Maximum packet size 1500)
0 No such name errors
0 Bad values errors
0 General errors
58 Response PDUs
0 Trap PDUs
跟蹤入口資料包。資料包透過UN-NAT連線到內部NLP介面:
FP1120-1# show capture CAPI packet-number 1 trace

30 packets captured

1: 17:04:16.720131 192.168.203.61.51308 > 192.168.203.71.161: udp 39
Phase: 1
Type: CAPTURE
Subtype:
Result: ALLOW
Config:
Additional Information:
MAC Access list

Phase: 2
Type: ACCESS-LIST
Subtype:
Result: ALLOW
Config:
Implicit Rule
Additional Information:
MAC Access list

Phase: 3
Type: UN-NAT
Subtype: static
Result: ALLOW
Config:
Additional Information:
NAT divert to egress interface nlp_int_tap(vrfid:0)
Untranslate 192.168.203.71/161 to 169.254.1.3/4161

Phase: 4
Type: ACCESS-LIST
Subtype:
Result: ALLOW
Config:
Implicit Rule
Additional Information:

Phase: 5
Type: NAT
Subtype: per-session
Result: ALLOW
Config:
Additional Information:

Phase: 6
Type: IP-OPTIONS
Subtype:
Result: ALLOW
Config:
Additional Information:

Phase: 7
Type: NAT
Subtype: rpf-check
Result: ALLOW
Config:
Additional Information:

Phase: 8
Type: NAT
Subtype: per-session
Result: ALLOW
Config:
Additional Information:

Phase: 9
Type: FLOW-CREATION
Subtype:
Result: ALLOW
Config:
Additional Information:
New flow created with id 1078, packet dispatched to next module

Phase: 10
Type: INPUT-ROUTE-LOOKUP-FROM-OUTPUT-ROUTE-LOOKUP
Subtype: Resolve Preferred Egress interface
Result: ALLOW
Config:
Additional Information:
Found next-hop 169.254.1.3 using egress ifc nlp_int_tap(vrfid:0)

Phase: 11
Type: ADJACENCY-LOOKUP
Subtype: Resolve Nexthop IP address to MAC
Result: ALLOW
Config:
Additional Information:
Found adjacency entry for Next-hop 169.254.1.3 on interface nlp_int_tap
Adjacency :Active
MAC address 3208.e2f2.b5f9 hits 0 reference 1

Result:
input-interface: inside(vrfid:0)
input-status: up
input-line-status: up
output-interface: nlp_int_tap(vrfid:0)
output-status: up
output-line-status: up
Action: allow
NAT規則作為SNMP配置的一部分自動部署:
FP1120-1# show nat
Manual NAT Policies (Section 1)
1 (nlp_int_tap) to (inside) source dynamic nlp_client_0_192.168.203.61_intf4 interface destination static nlp_client_0_ipv4_40 nlp_client_0_ipv4_40 service nlp_client_0_17svc162_39 nlp_client_0_17svc162_39
translate_hits = 0, untranslate_hits = 0

Auto NAT Policies (Section 2)
…
2 (nlp_int_tap) to (inside) source static nlp_server_0_snmp_intf4 interface service udp 4161 snmp
translate_hits = 0, untranslate_hits = 2
在後端埠中,UDP 4161偵聽SNMP流量:
> expert
admin@FP1120-1:~$ sudo netstat -an | grep 4161
Password:
udp 0 0 169.254.1.3:4161 0.0.0.0:*
udp6 0 0 fd00:0:0:1::3:4161 :::*
如果配置不正確/不完整,由於沒有UN-NAT階段,因此會丟棄入口SNMP資料包:
FP1120-1# show cap CAPI packet-number 1 trace

6 packets captured

1: 18:36:35.868485 192.168.203.61.50105 > 192.168.203.71.161: udp 42
Phase: 1
Type: CAPTURE
Subtype:
Result: ALLOW
Config:
Additional Information:
MAC Access list

Phase: 2
Type: ACCESS-LIST
Subtype:
Result: ALLOW
Config:
Implicit Rule
Additional Information:
MAC Access list

Phase: 3
Type: ROUTE-LOOKUP
Subtype: No ECMP load balancing
Result: ALLOW
Config:
Additional Information:
Destination is locally connected. No ECMP load balancing.
Found next-hop 192.168.203.71 using egress ifc identity(vrfid:0)

Phase: 4
Type: NAT
Subtype: per-session
Result: ALLOW
Config:
Additional Information:

Phase: 5
Type: ACCESS-LIST
Subtype:
Result: DROP
Config:
Implicit Rule
Additional Information:

Result:
input-interface: inside(vrfid:0)
input-status: up
input-line-status: up
Action: drop
Drop-reason: (acl-drop) Flow is denied by configured rule, Drop-location: frame 0x0000557415b6347d flow (NA)/NA
FTD LINA系統日誌顯示入口封包遭捨棄:
FP1120-1# show log | include 161
Dec 30 2020 18:36:38: %FTD-7-710005: UDP request discarded from 192.168.203.61/50105 to inside:192.168.203.71/161
Dec 30 2020 18:36:39: %FTD-7-710005: UDP request discarded from 192.168.203.61/50105 to inside:192.168.203.71/161
問答
問:我是否可以使用FTD管理介面傳送SNMP訊息?
否,目前不支援此功能。
相關增強缺陷:6.7 SNMP Rest API支援ngfw-mgmt介面
相關資訊


 意見
意見