簡介
本文檔介紹使用PostMan作為REST客戶端透過ERS API在ISE上建立網路訪問裝置(NAD)的過程。
必要條件
需求
思科建議您瞭解以下主題:
- ISE (身份服務引擎)
- ERS (外部RESTful服務)
- REST客戶包括Postman、REST、Insomnia等。
採用元件
本檔案中的資訊是根據以下軟體版本:
- Cisco ISE (身份服務引擎) 3.1修補6
- Postman REST客戶端v10.17.4

注意:此過程對於其他ISE版本和REST客戶端相似或相同。除非另有說明,否則您可以在所有2.x和3.x ISE軟體版本上使用這些步驟。
本文中的資訊是根據特定實驗室環境內的裝置所建立。文中使用到的所有裝置皆從已清除(預設)的組態來啟動。如果您的網路運作中,請確保您瞭解任何指令可能造成的影響。
設定
啟用ERS (埠9060)
ERS API是僅適用於HTTPS的REST API,透過埠443和埠9060運行。埠9060預設關閉,因此需要首先打開。 如果嘗試存取此連線埠的從屬端未先啟用ERS,就會出現伺服器逾時。因此,第一個要求是從思科ISE管理UI啟用ERS。
導航到管理>設定> API設定並啟用ERS(讀/寫)切換按鈕。
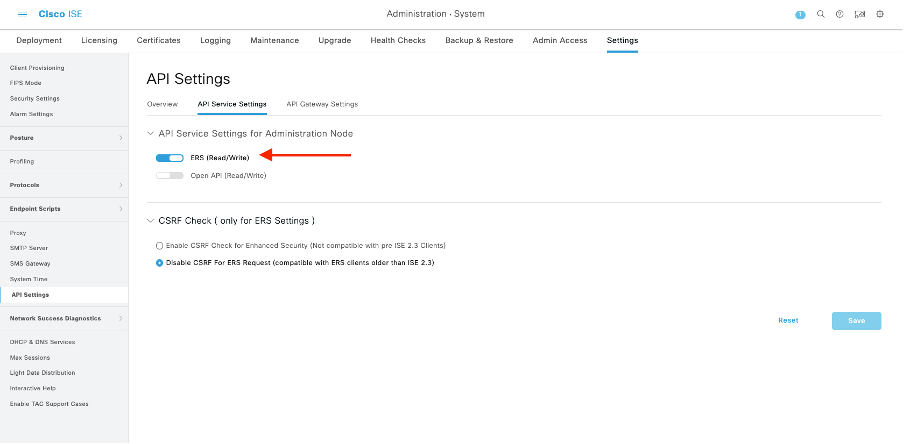

註:ERS API支援TLS 1.1和TLS 1.2。無論在Cisco ISE GUI的Security Settings窗口(Administration > System > Settings > Security Settings)中啟用TLS 1.0,ERS API都不支援TLS 1.0。在「保全性設定」視窗中啟用TLS 1.0僅與EAP通訊協定有關,且不會影響ERS API。
建立ERS管理員
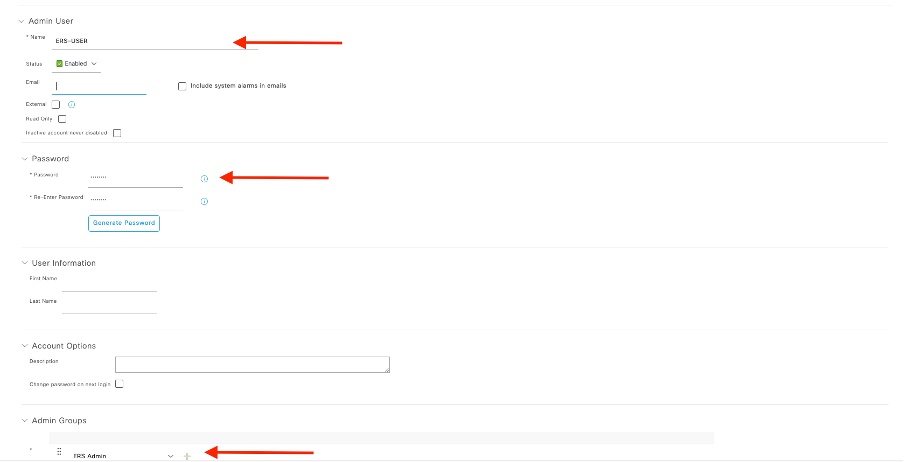
建立思科ISE管理員,分配密碼,並將使用者作為ERS管理員增加到管理員組。您可以將配置的其餘部分留空。
設定Postman
下載或使用線上版Postman。
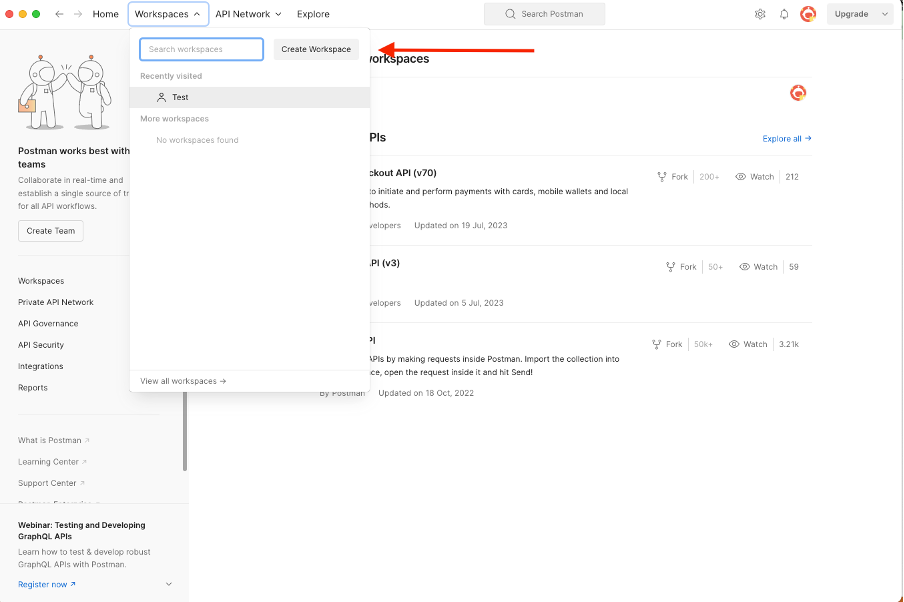
- 按一下「工作區」標簽底下的「建立工作區」來建立使用者和建立工作區。
2. 選擇空白工作區並為工作區分配名稱。您可以增加描述並將其公之於眾。 在本示例中,選擇了「Personalis」。
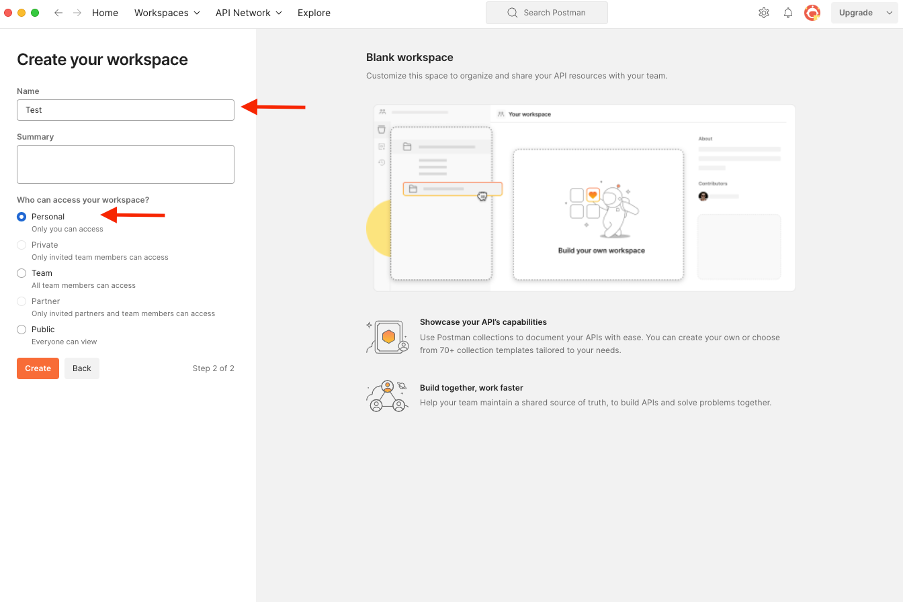
建立工作區後,現在即可配置API呼叫。
ISE SDK和基本Postman授權
要配置任何呼叫,請先訪問ISE ERS SDK(軟體開發工具包)。此工具編譯ISE可以執行的所有API呼叫清單:
- 導航到https://{ise-ip}/ers/sdk。
- 使用您的ISE管理員憑證登入。
- 展開API Documentation。
- 向下滾動直至找到Network Device,然後按一下它。
- 在此選項下,您現在可找到可在ISE上為網路裝置執行的所有可用操作。選擇Create。
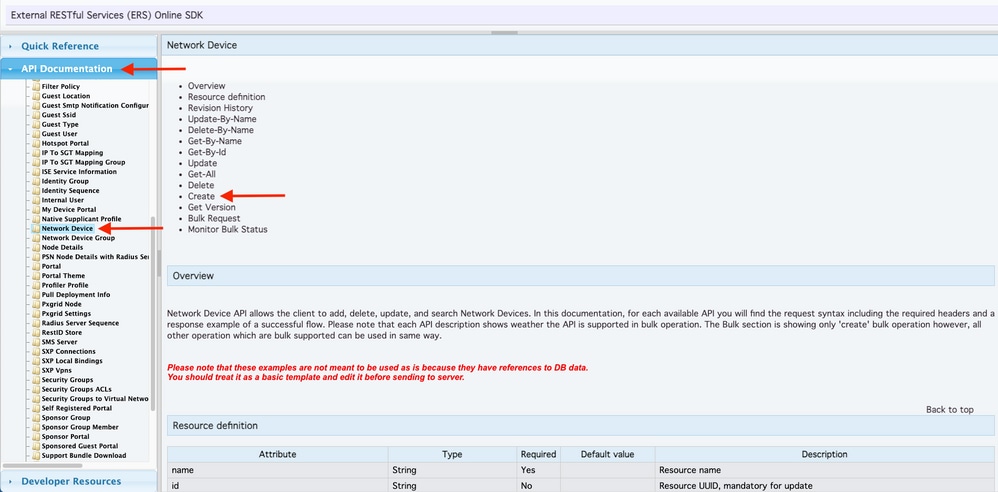
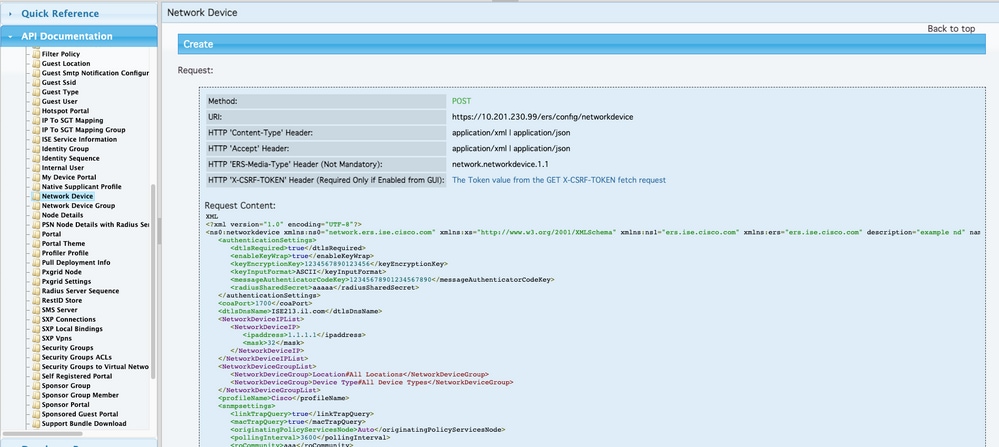
6. 現在,您可以看到在任何Rest客戶端上使用XML或JSON執行API呼叫所需的配置以及預期響應示例。
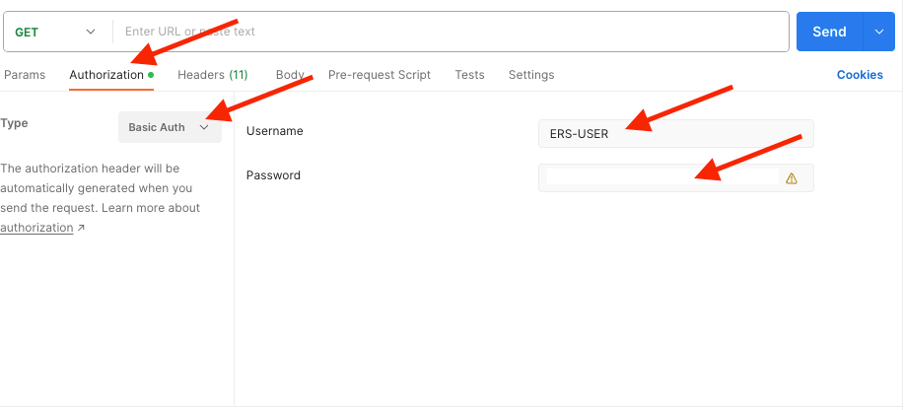
7. 返回Postman,配置基本身份驗證到ISE。在授權頁籤下,選擇基本身份驗證作為身份驗證型別,並增加以前在ISE上建立的ISE ERS使用者憑證。

注意:除非在Postman上配置了變數,否則口令顯示為明文。
使用XML建立並執行NAD
使用XML建立具有RADIUS TACACS、SNMP和TrustSec設定的測試NAD1。
1. 在SDK上的建立下方,是執行呼叫所需的報頭和模板,以及預期響應。
2.移至Headers 頁籤,為API呼叫配置所需的標頭,如SDK中所示。報頭配置必須如下所示:
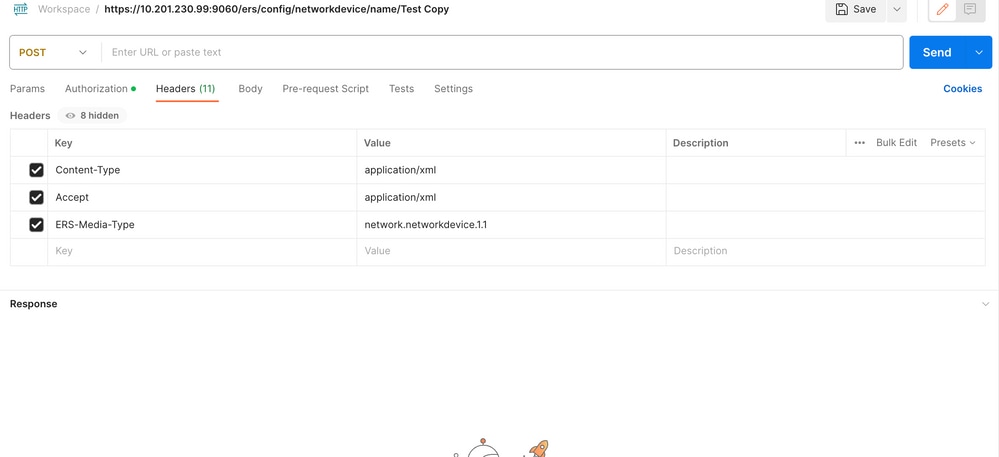
3. 移至「主體」表頭,然後選取原始。這可讓您貼上建立NAD所需的XML範本。
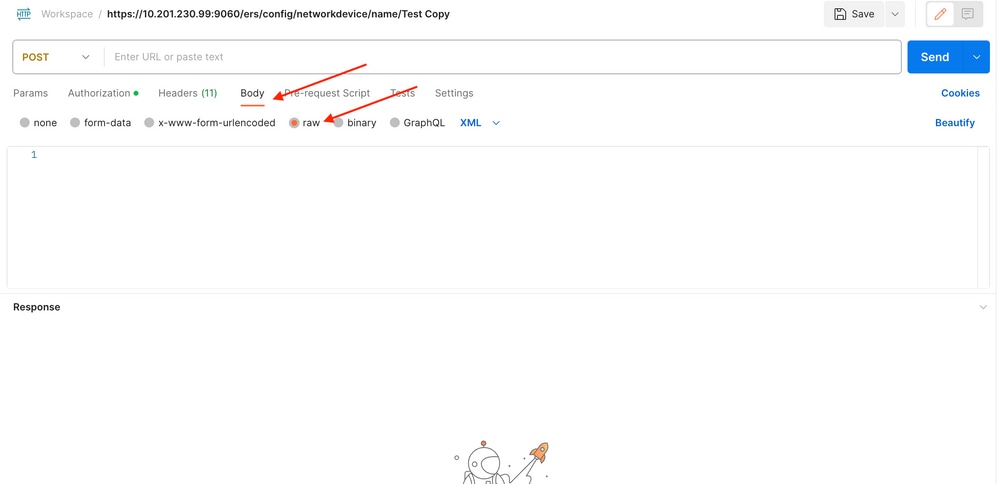
4. XML樣版如下所示(視需要變更值):
<?xml version="1.0" encoding="UTF-8"?> <ns0:networkdevice xmlns:ns0="network.ers.ise.cisco.com" xmlns:xs="Schema XML File" xmlns:ns1="ers.ise.cisco.com" xmlns:ers="ers.ise.cisco.com" description="This NAD was added via ERS API" name="TESTNAD1"> <authenticationSettings> <dtlsRequired>true</dtlsRequired> <enableKeyWrap>true</enableKeyWrap> <keyEncryptionKey>1234567890123456</keyEncryptionKey> <keyInputFormat>ASCII</keyInputFormat> <messageAuthenticatorCodeKey>12345678901234567890</messageAuthenticatorCodeKey> <radiusSharedSecret>cisco123</radiusSharedSecret> </authenticationSettings> <coaPort>1700</coaPort> <dtlsDnsName>Domain</dtlsDnsName> <NetworkDeviceIPList> <NetworkDeviceIP> <ipaddress>NAD IP Address</ipaddress> <mask>32</mask> </NetworkDeviceIP> </NetworkDeviceIPList> <NetworkDeviceGroupList> <NetworkDeviceGroup>Location#All Locations#LAB</NetworkDeviceGroup> <NetworkDeviceGroup>Device Type#All Device Types#Access-Layer</NetworkDeviceGroup> </NetworkDeviceGroupList> <profileName>Cisco</profileName> <snmpsettings> <linkTrapQuery>true</linkTrapQuery> <macTrapQuery>true</macTrapQuery> <originatingPolicyServicesNode>Auto</originatingPolicyServicesNode> <pollingInterval>3600</pollingInterval> <roCommunity>aaa</roCommunity> <version>ONE</version> </snmpsettings> <tacacsSettings> <connectModeOptions>ON_LEGACY</connectModeOptions> <sharedSecret>cisco123</sharedSecret> </tacacsSettings> <trustsecsettings> <deviceAuthenticationSettings> <sgaDeviceId>TESTNAD1</sgaDeviceId> <sgaDevicePassword>cisco123</sgaDevicePassword> </deviceAuthenticationSettings> <deviceConfigurationDeployment> <enableModePassword>cisco123</enableModePassword> <execModePassword>cisco123</execModePassword> <execModeUsername>Admin</execModeUsername> <includeWhenDeployingSGTUpdates>true</includeWhenDeployingSGTUpdates> </deviceConfigurationDeployment> <pushIdSupport>false</pushIdSupport> <sgaNotificationAndUpdates> <coaSourceHost>ise3-1test</coaSourceHost> <downlaodEnvironmentDataEveryXSeconds>86400</downlaodEnvironmentDataEveryXSeconds> <downlaodPeerAuthorizationPolicyEveryXSeconds>86400</downlaodPeerAuthorizationPolicyEveryXSeconds> <downloadSGACLListsEveryXSeconds>86400</downloadSGACLListsEveryXSeconds> <otherSGADevicesToTrustThisDevice>false</otherSGADevicesToTrustThisDevice> <reAuthenticationEveryXSeconds>86400</reAuthenticationEveryXSeconds> <sendConfigurationToDevice>false</sendConfigurationToDevice> <sendConfigurationToDeviceUsing>ENABLE_USING_COA</sendConfigurationToDeviceUsing> </sgaNotificationAndUpdates> </trustsecsettings> </ns0:networkdevice>

注意:請注意,只有在<enableKeyWrap>{false|true}</enableKeyWrap>設定為true時才需要後面幾行。否則,可從XML範本中刪除相同內容:
<keyEncryptionKey>1234567890123456</keyEncryptionKey> <keyInputFormat>ASCII</keyInputFormat> <messageAuthenticatorCodeKey>12345678901234567890</messageAuthenticatorCodeKey>
您可以從模板中刪除您不需要的配置,只需保留您在建立NAD期間實際需要增加的資料。例如,以下是相同的模板,但僅適用於TACACS配置。無論所需的配置如何,確保模板以</ns0:networkdevice> 結尾。
<?xml version="1.0" encoding="UTF-8"?> <ns0:networkdevice xmlns:ns0="network.ers.ise.cisco.com" xmlns:xs="Schema XML File" xmlns:ns1="ers.ise.cisco.com" xmlns:ers="ers.ise.cisco.com" description="This NAD was added via ERS API" name="TESTNAD1"> <NetworkDeviceIPList> <NetworkDeviceIP> <ipaddress>NAD IP Address</ipaddress> <mask>32</mask> </NetworkDeviceIP> </NetworkDeviceIPList> <NetworkDeviceGroupList> <NetworkDeviceGroup>Location#All Locations#LAB</NetworkDeviceGroup> <NetworkDeviceGroup>Device Type#All Device Types#Access-Layer</NetworkDeviceGroup> </NetworkDeviceGroupList> <profileName>Cisco</profileName> <tacacsSettings> <connectModeOptions>ON_LEGACY</connectModeOptions> <sharedSecret>cisco123</sharedSecret> </tacacsSettings> </ns0:networkdevice>
5. 將raw的XML樣版貼到「主體」標頭下。
6.選擇POST作為方法,貼上https://{ISE-ip}/ers/config/networkdevice,然後按一下傳送。 如果已正確配置所有內容,則您必須看到201 Created消息且結果為空。
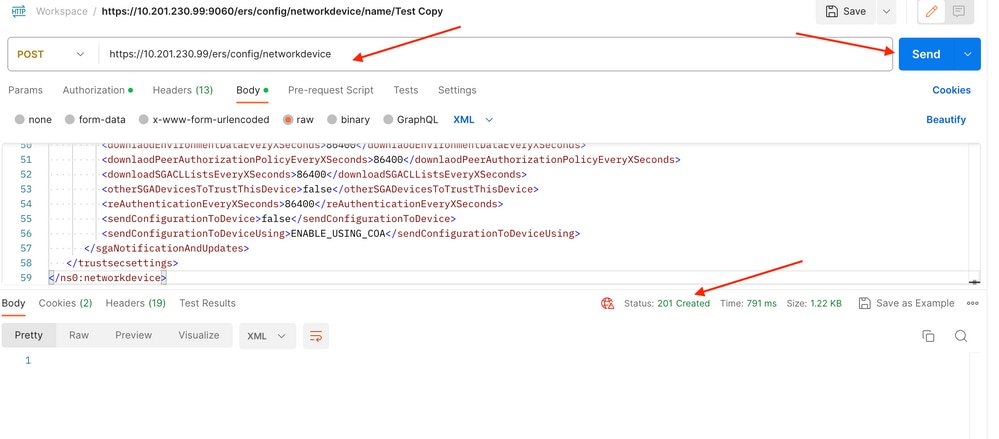
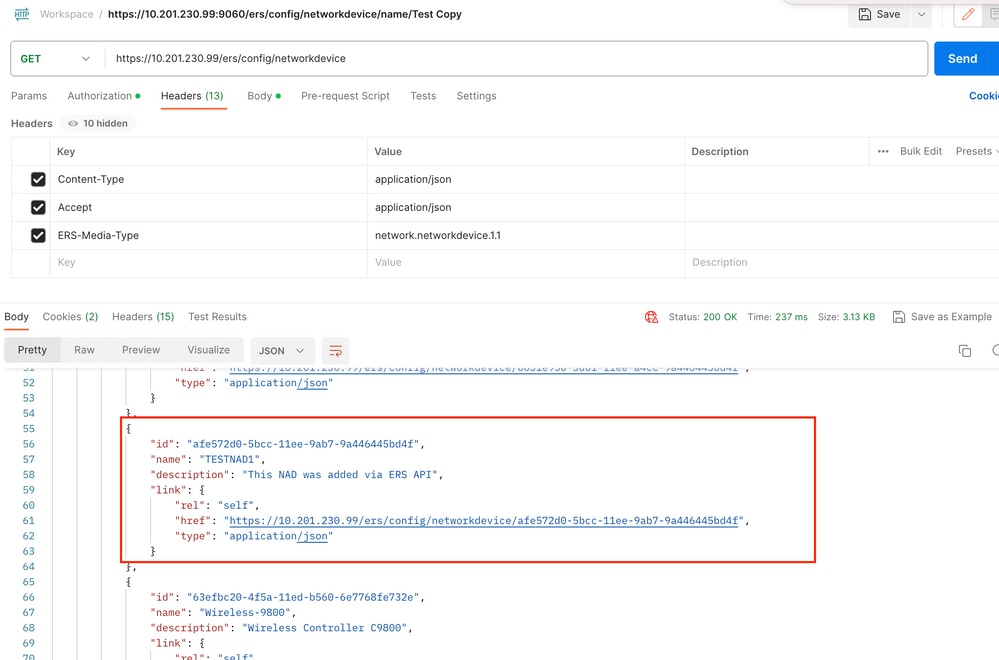
7.透過執行NAD的GET呼叫確認NAD是否已建立,或者檢查ISE NAD清單。

使用JSON建立NAD
使用JSON建立具有RADIUS TACACS、SNMP和TrustSec設定的TESTAND2。
1. 在SDK上的建立下方,是執行呼叫所需的報頭和模板,以及預期響應。
2.移至Headers 頁籤,為API呼叫配置所需的標頭,如SDK中所示。報頭配置必須如下所示:
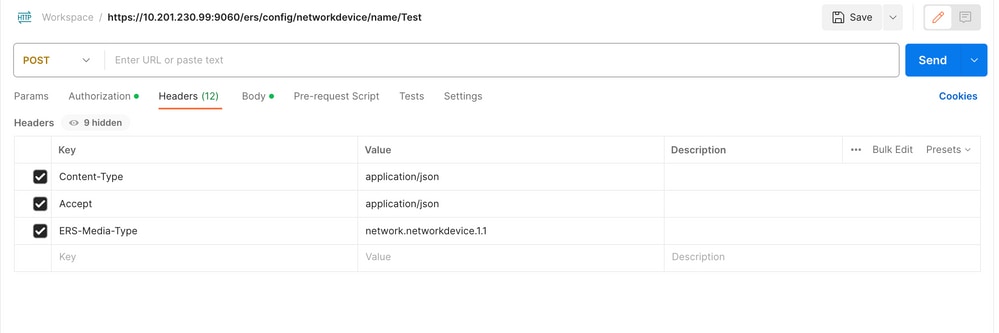
3. 移至「主體」表頭,然後選取原始。這允許您貼上建立NAD所需的JSON模板。
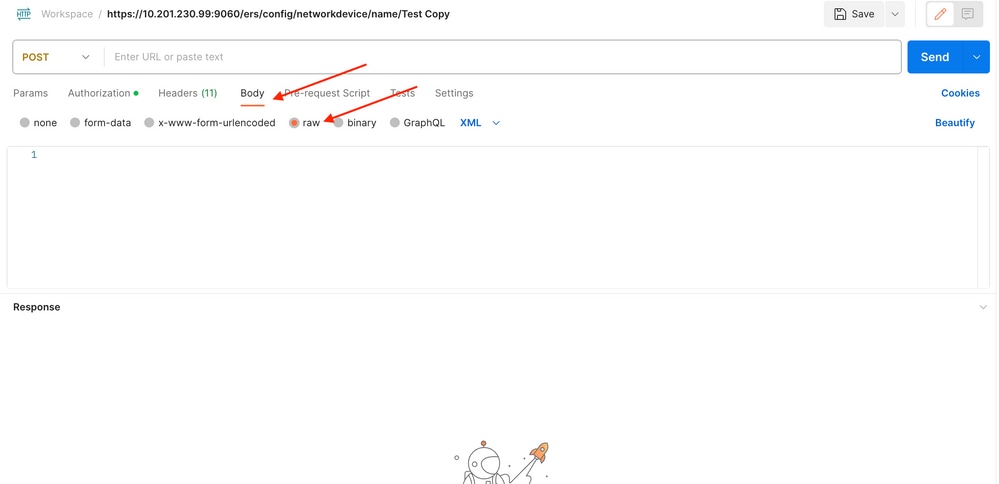
4. JSON模板必須如下所示(根據需要更改值):
{ "NetworkDevice": { "name": "TESTNAD2", "description": "This NAD was added via ERS API", "authenticationSettings": { "radiusSharedSecret": "cisco123", "enableKeyWrap": true, "dtlsRequired": true, "keyEncryptionKey": "1234567890123456", "messageAuthenticatorCodeKey": "12345678901234567890", "keyInputFormat": "ASCII" }, "snmpsettings": { "version": "ONE", "roCommunity": "aaa", "pollingInterval": 3600, "linkTrapQuery": true, "macTrapQuery": true, "originatingPolicyServicesNode": "Auto" }, "trustsecsettings": { "deviceAuthenticationSettings": { "sgaDeviceId": "TESTNAD2", "sgaDevicePassword": "cisco123" }, "sgaNotificationAndUpdates": { "downlaodEnvironmentDataEveryXSeconds": 86400, "downlaodPeerAuthorizationPolicyEveryXSeconds": 86400, "reAuthenticationEveryXSeconds": 86400, "downloadSGACLListsEveryXSeconds": 86400, "otherSGADevicesToTrustThisDevice": false, "sendConfigurationToDevice": false, "sendConfigurationToDeviceUsing": "ENABLE_USING_COA", "coaSourceHost": "ise3-1test" }, "deviceConfigurationDeployment": { "includeWhenDeployingSGTUpdates": true, "enableModePassword": "cisco123", "execModePassword": "cisco123", "execModeUsername": "Admin" }, "pushIdSupport": "false" }, "tacacsSettings": { "sharedSecret": "cisco123", "connectModeOptions": "ON_LEGACY" }, "profileName": "Cisco", "coaPort": 1700, "dtlsDnsName": "Domain", "NetworkDeviceIPList": [ { "ipaddress": "NAD IP Adress", "mask": 32 } ], "NetworkDeviceGroupList": [ "Location#All Locations", "Device Type#All Device Types" ] } }

注意:請務必注意,只有在enableKeyWrap「:{false|true}設定為true時,才需要以下幾行。否則,可從JSON模板中刪除相同內容:
"keyEncryptionKey": "1234567890123456", "messageAuthenticatorCodeKey": "12345678901234567890", "keyInputFormat": "ASCII" 您也可以從模板中刪除不需要的配置,並保留您在建立NAD期間實際需要增加的資料。
5. 將raw的JSON模板貼上到Body標頭下。
6.選擇POST作為方法,貼上https://{ISE-ip}/ers/config/networkdevice,然後按一下傳送。 如果已正確配置所有內容,則您必須看到201 Created消息且結果為空。
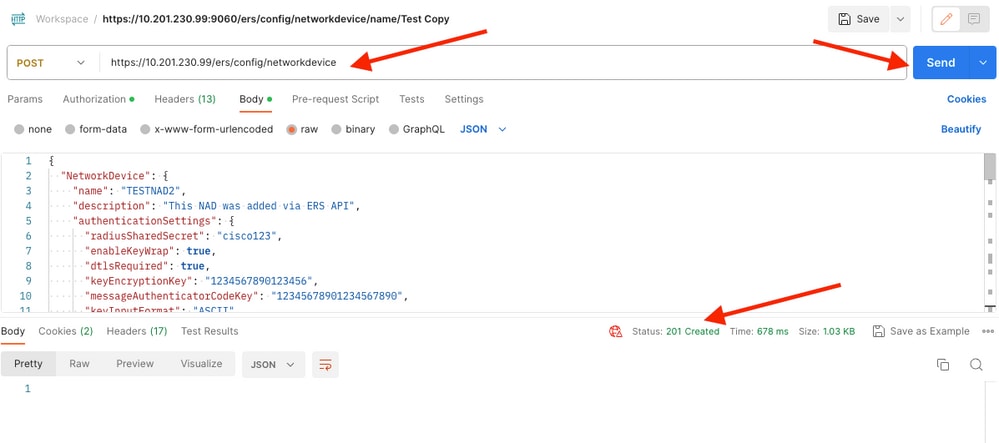
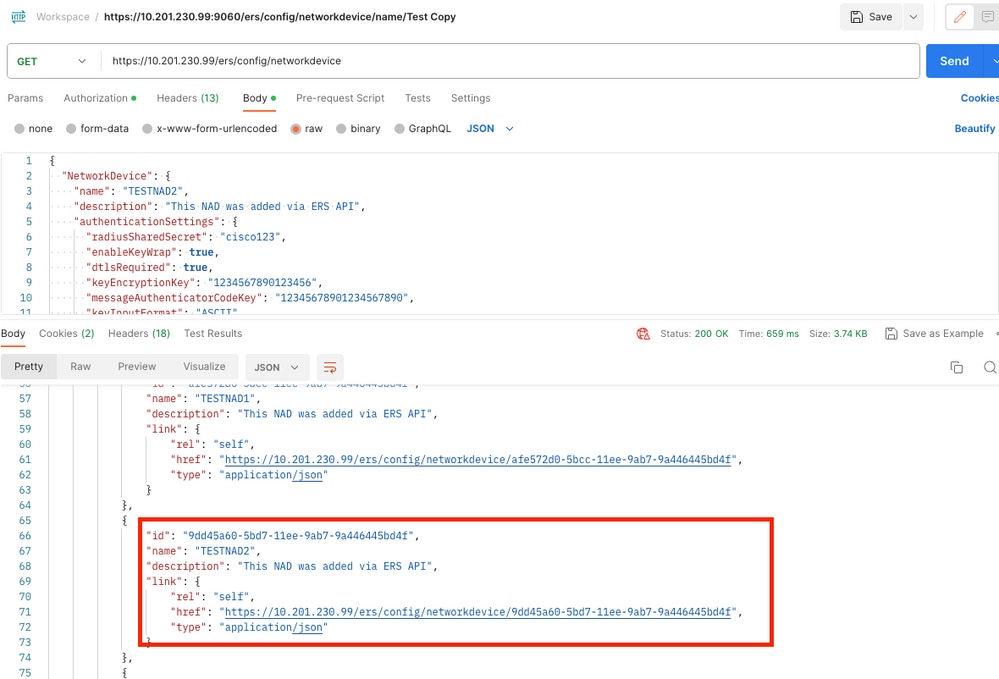
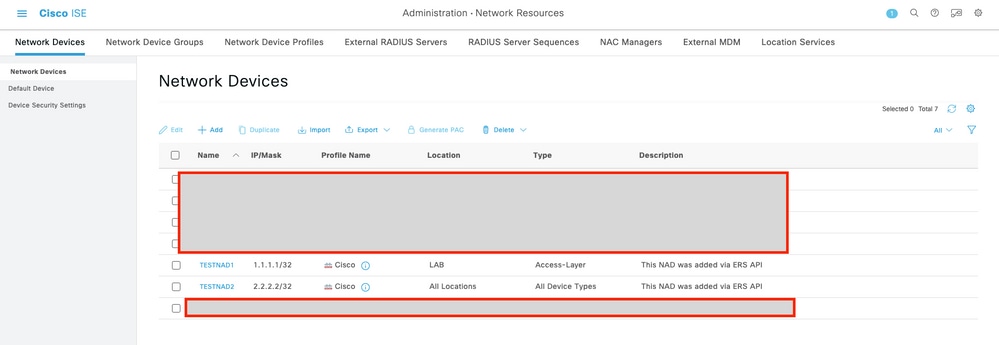
7.透過執行NAD的GET呼叫或檢查ISE NAD清單確認NAD是否已建立。
驗證
如果能夠訪問API服務GUI頁,例如https://{iseip}:{port}/api/swagger-ui/index.html或https://{iseip}:9060/ers/sdk,則表示API服務正在按預期工作。
疑難排解
- 所有REST操作都經過稽核,並且日誌記錄在系統日誌中。
- 要排除與打開API相關的問題,請在調試日誌配置窗口中將apiservice元件的日誌級別設定為調試。
- 要排除與ERS API相關的問題,請在調試日誌配置窗口中將ers元件的日誌級別設定為調試。要檢視此窗口,請導航到思科ISE GUI,點選選單圖示並選擇操作>故障排除>調試嚮導>調試日誌配置。
- 您可以從下載日誌窗口下載日誌。要檢視此窗口,請導航到思科ISE GUI,點選選單圖示並選擇操作>故障排除>下載日誌。
- 您可以選擇從Support Bundle頁籤下載支援捆綁包(透過按一下頁籤下的Download按鈕),或透過按一下api-service debug log日誌的Log File值從Debug Logs頁籤下載api-service debug logs。