簡介
本文檔介紹在ASA上使用帶AAA和證書身份驗證的ASDM配置IKEv2上的安全客戶端所需的步驟。
必要條件
需求
思科建議您瞭解以下主題:
- 思科身份服務引擎(ISE)的配置
- 思科自適應安全虛擬裝置(ASAv)的配置
- 思科自適應安全裝置管理器(ASDM)的配置
- VPN身份驗證流程
採用元件
本文中的資訊係根據以下軟體和硬體版本:
- 身分辨識服務引擎虛擬3.3修補程式1
- 調適型安全虛擬裝置9.20(2)21
- 調適型安全裝置管理器7.20(2)
- 思科安全使用者端5.1.3.62
- Windows Server 2016
- Windows 10
本文中的資訊是根據特定實驗室環境內的裝置所建立。文中使用到的所有裝置皆從已清除(預設)的組態來啟動。如果您的網路運作中,請確保您瞭解任何指令可能造成的影響。
網路圖表
下圖顯示本文檔示例中使用的拓撲。
在Windows Server 2016上配置的域名是ad.rem-system.com,本文檔中用作示例。
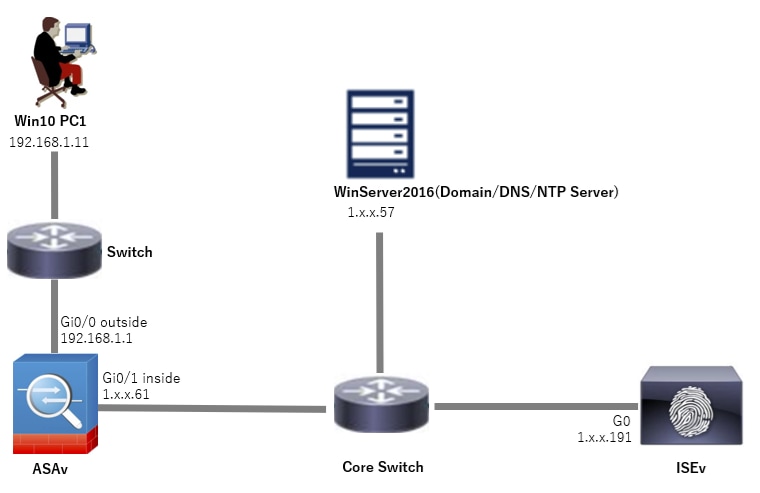 網路圖表
網路圖表
組態
ASDM中的配置
步驟 1.開放式VPN嚮導
導航到Wizards > VPN Wizards,按一下Secure Client VPN Wizard。
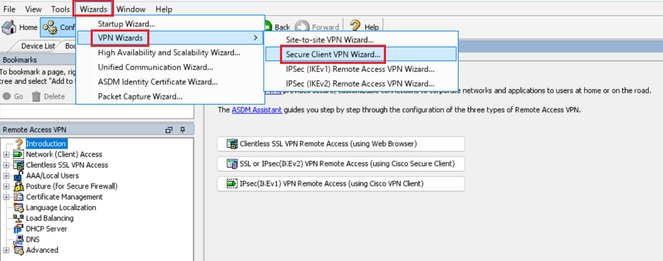 開放式VPN嚮導
按「Next」(下一步)。
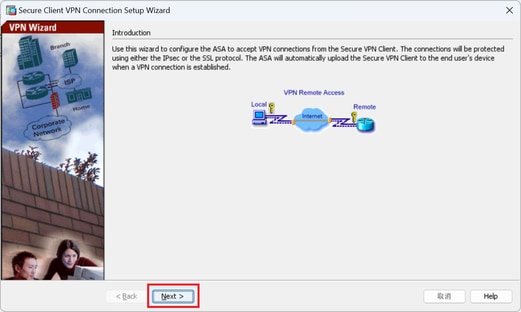 按一下「下一步」按鈕
步驟 2.連線設定檔辨識
輸入連線配置檔案的資訊。
連線配置檔名稱:vpn-ipsec-tunnel-grp
VPN訪問介面:outside
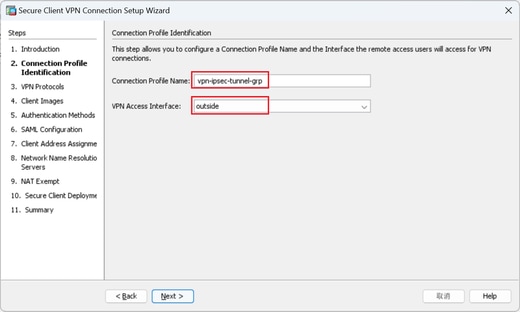 連線設定檔辨識
步驟 3.VPN通訊協定
選擇IPsec,按一下Add按鈕以增加新的自簽名證書。
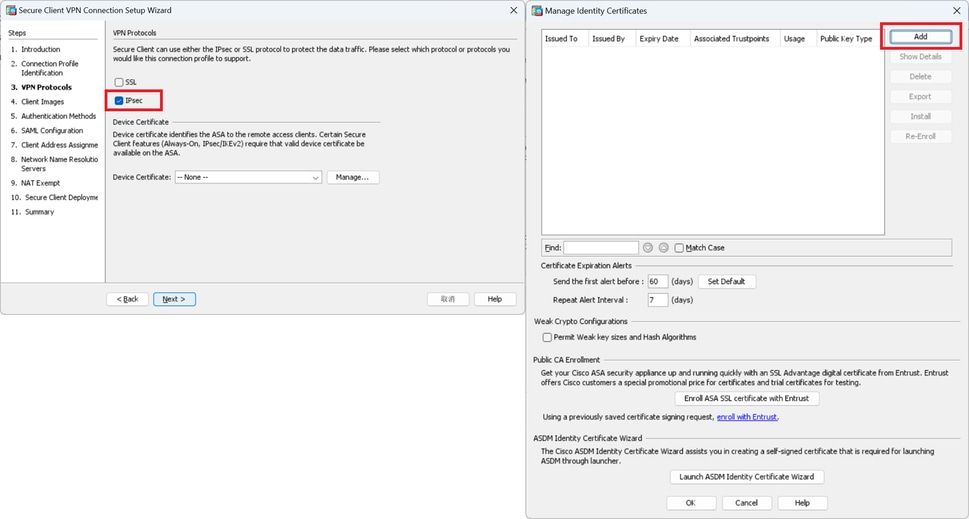 VPN通訊協定
輸入自簽名證書的資訊。
信任點名稱:vpn-ipsec-trustpoint
金鑰對:ipsec-kp
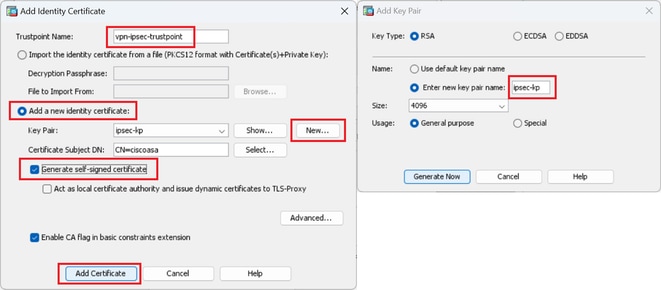 自簽名證書的詳細資訊
確認VPN協定的設定,按一下Next按鈕。
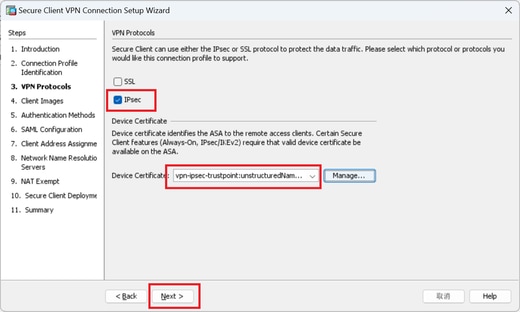 確認VPN協定的設定
步驟 4.客戶端映像
按一下Add按鈕增加安全客戶端映像,然後按一下Next按鈕。
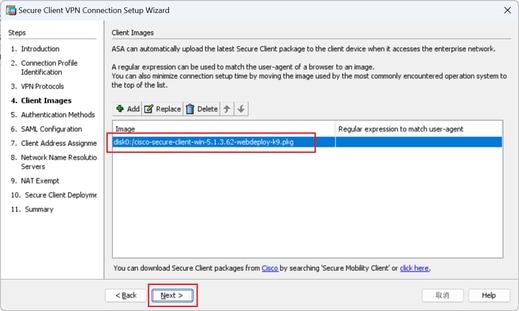 客戶端映像
客戶端映像
步驟 5.驗證方法
按一下New按鈕增加新的aaa伺服器,按一下Next按鈕。
伺服器組名稱:radius-grp
身份驗證協定:RADIUS
伺服器IP地址:1.x.x.191
介面:inside
 驗證方法
驗證方法
步驟 6.SAML配置
按一下Next按鈕。
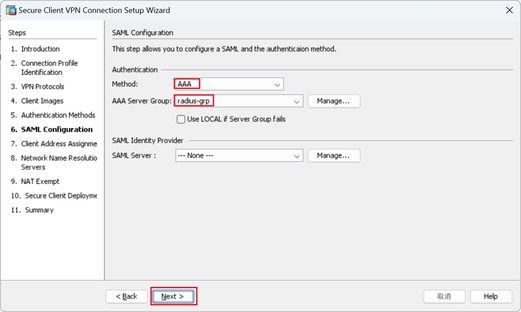 SAML配置
步驟 7.客戶端地址分配
按一下New按鈕增加新的IPv4池,然後按一下Next按鈕。
名稱:vpn-ipsec-pool
起始IP地址:172.16.1.20
結束IP地址:172.16.1.30
子網掩碼:255.255.255.0
 客戶端地址分配
步驟 8.網路名稱解析伺服器
輸入DNS和域的資訊,然後按一下Next按鈕。
DNS伺服器:1.x.x.57
域名:ad.rem-system.com
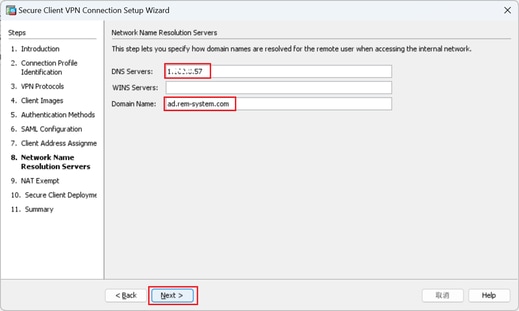 網路名稱解析伺服器
步驟 9.NAT免除
按一下Next按鈕。
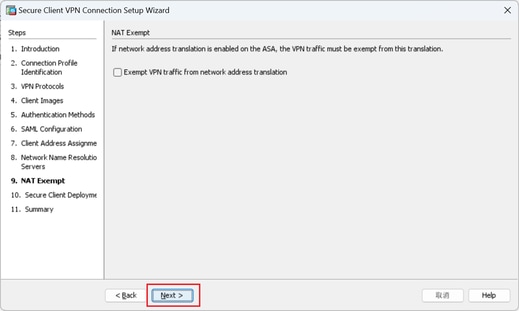 NAT免除
NAT免除
步驟 10.安全客戶端部署
選擇允許Web啟動,然後按一下「下一步」按鈕。
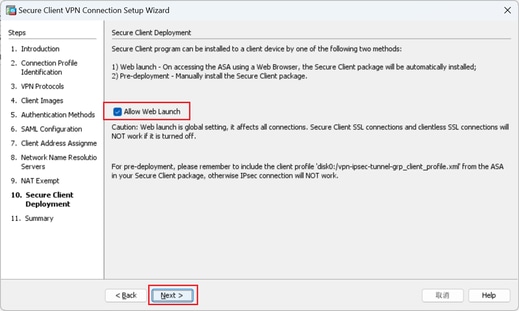 安全客戶端部署
步驟 11.儲存設定
按一下Finish按鈕並儲存設定。
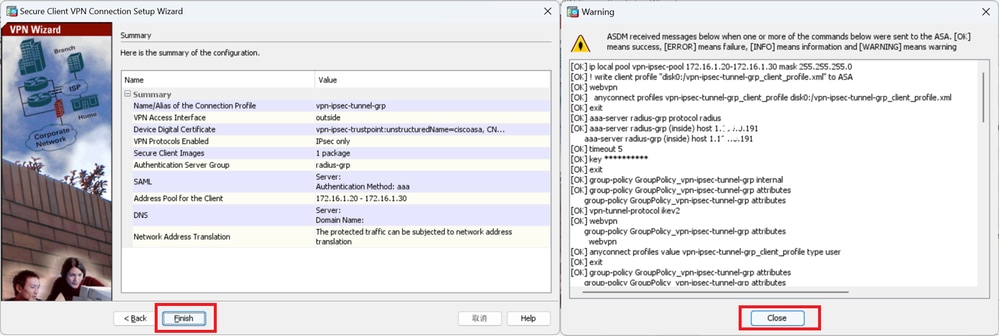 儲存設定
儲存設定
步驟 12.確認並匯出安全使用者端設定檔
導航到Configuration > Remote Access VPN > Network (Client) Access > Secure Client Profile,按一下Edit按鈕。
 編輯安全客戶端配置檔案
確認設定檔的詳細資訊。
- 顯示名稱(必填):ciscoasa (IPsec) IPv4
- FQDN或IP地址: 192.168.1.1
- 主要協定:IPsec
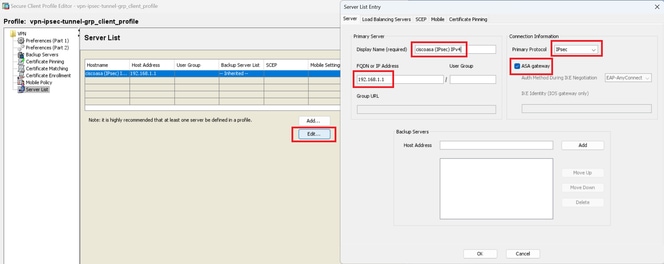 確認安全客戶端配置檔案
按一下Export按鈕將配置檔案導出到本地PC。
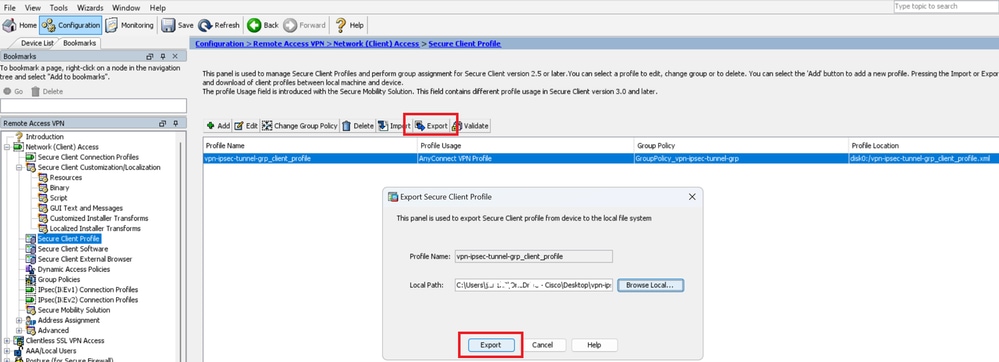 導出安全客戶端配置檔案
步驟 13.確認安全客戶端配置檔案的詳細資訊
透過瀏覽器打開Secure Client Profile,確認主機的主要協定是IPsec。
 安全客戶端配置檔案的詳細資訊
步驟 14.在ASA CLI中確認設定
在ASA CLI中確認ASDM建立的IPsec設定。
// Defines a pool of addresses
ip local pool vpn-ipsec-pool 172.16.1.20-172.16.1.30 mask 255.255.255.0

// Defines radius server
aaa-server radius-grp protocol radius
aaa-server radius-grp (inside) host 1.x.x.191
timeout 5

// Define the transform sets that IKEv2 can use
crypto ipsec ikev2 ipsec-proposal AES256
protocol esp encryption aes-256
protocol esp integrity sha-256 sha-1
crypto ipsec ikev2 ipsec-proposal AES192
protocol esp encryption aes-192
protocol esp integrity sha-256 sha-1
crypto ipsec ikev2 ipsec-proposal AES
protocol esp encryption aes
protocol esp integrity sha-256 sha-1
crypto ipsec ikev2 ipsec-proposal 3DES
protocol esp encryption aes
protocol esp integrity sha-256 sha-1
crypto ipsec ikev2 ipsec-proposal DES
protocol esp encryption aes
protocol esp integrity sha-256 sha-1

// Configures the crypto map to use the IKEv2 transform-sets
crypto dynamic-map SYSTEM_DEFAULT_CRYPTO_MAP 65535 set ikev2 ipsec-proposal AES256 AES192 AES 3DES DES
crypto map outside_map 65535 ipsec-isakmp dynamic SYSTEM_DEFAULT_CRYPTO_MAP
crypto map outside_map interface outside

// Defines trustpoint
crypto ca trustpoint vpn-ipsec-trustpoint
enrollment self
subject-name CN=ciscoasa
keypair ipsec-kp
crl configure

// Defines self-signed certificate
crypto ca certificate chain vpn-ipsec-trustpoint
certificate 6651a2a2
308204ed 308202d5 a0030201 02020466 51a2a230 0d06092a 864886f7 0d01010b
......
ac76f984 efd41d13 073d0be6 f923a9c6 7b
quit

// IKEv2 Policies
crypto ikev2 policy 1
encryption aes-256
integrity sha256
group 5
prf sha256
lifetime seconds 86400
crypto ikev2 policy 10
encryption aes-192
integrity sha256
group 5
prf sha256
lifetime seconds 86400
crypto ikev2 policy 20
encryption aes
integrity sha256
group 5
prf sha256
lifetime seconds 86400
crypto ikev2 policy 40
encryption aes
integrity sha256
group 5
prf sha256
lifetime seconds 86400

// Enabling client-services on the outside interface
crypto ikev2 enable outside client-services port 443

// Specifiies the certificate the ASA uses for IKEv2
crypto ikev2 remote-access trustpoint vpn-ipsec-trustpoint

// Configures the ASA to allow Cisco Secure Client connections and the valid Cisco Secure Client images
webvpn
enable outside
enable
anyconnect image disk0:/cisco-secure-client-win-5.1.3.62-webdeploy-k9.pkg 1
anyconnect profiles vpn-ipsec-tunnel-grp_client_profile disk0:/vpn-ipsec-tunnel-grp_client_profile.xml
anyconnect enable
tunnel-group-list enable

// Configures the group-policy to allow IKEv2 connections and defines which Cisco Secure Client profile for the user
group-policy GroupPolicy_vpn-ipsec-tunnel-grp internal
group-policy GroupPolicy_vpn-ipsec-tunnel-grp attributes
wins-server none
dns-server value 1.x.x.57
vpn-tunnel-protocol ikev2
default-domain value ad.rem-system.com
webvpn
anyconnect profiles value vpn-ipsec-tunnel-grp_client_profile type user

// Ties the pool of addressess to the vpn connection
tunnel-group vpn-ipsec-tunnel-grp type remote-access
tunnel-group vpn-ipsec-tunnel-grp general-attributes
address-pool vpn-ipsec-pool
authentication-server-group radius-grp
default-group-policy GroupPolicy_vpn-ipsec-tunnel-grp
tunnel-group vpn-ipsec-tunnel-grp webvpn-attributes
group-alias vpn-ipsec-tunnel-grp enable
步驟 15.增加加密演算法
在ASA CLI中,將組19增加到IKEv2策略。

注意:對於IKEv2/IPsec連線,自版本4.9.00086起,Cisco Secure Client不再支援Diffie-Hellman (DH)組2、5、14和24。此更改可能導致由於加密演算法不匹配而導致連線失敗。
ciscoasa(config)# crypto ikev2 policy 1
ciscoasa(config-ikev2-policy)# group 19
ciscoasa(config-ikev2-policy)#
Windows Server中的配置
您需要為VPN連線增加域使用者。 導覽至Active Directory Users and Computers,然後按一下Users。將vpnuser新增為網域使用者。
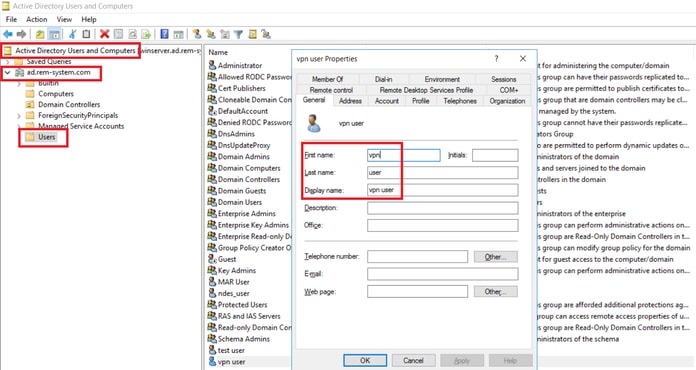 新增網域使用者
將域使用者增加到域管理員和域使用者的成員。
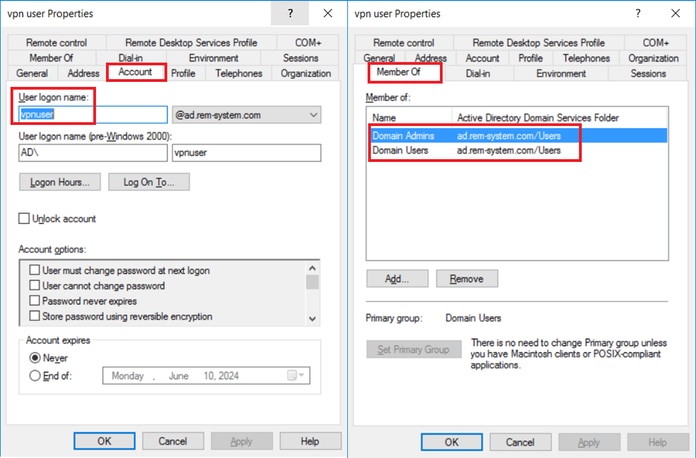 域管理員和域使用者
ISE中的配置
步驟 1.增加裝置
導航到管理>網路裝置,點選增加按鈕,增加ASAv裝置。
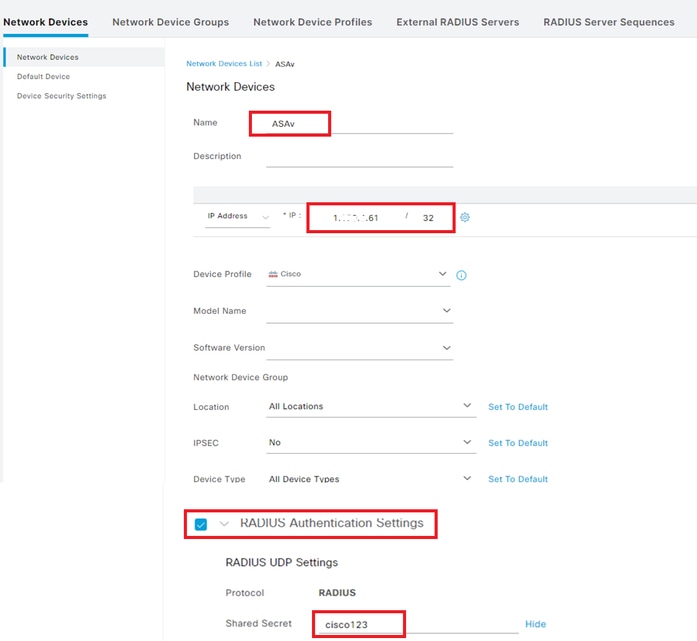 增加裝置
增加裝置
步驟 2.新增Active Directory
導航到管理>外部身份源> Active Directory,點選連線頁籤,將Active Directory增加到ISE。
- 連線點名稱:AD_Join_Point
- Active Directory網域: ad.rem-system.com
 新增Active Directory
導覽至Groups索引標籤,選取從目錄選取群組從下拉式清單。從目錄選 取群組
取群組
按一下「擷取群組」下拉式清單。Checkad.rem-system.com/Users/Domain Computersandad.rem-system.com/Users/Domain Userand clickOK。
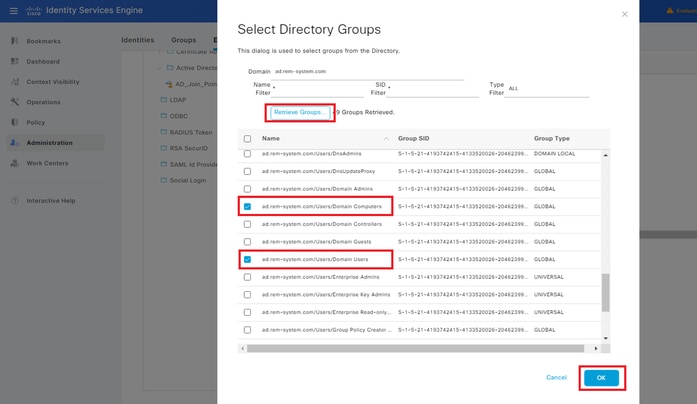 增加域電腦和使用者
步驟 3.增加身份源隔離
導航到管理>身份源序列,增加身份源序列。
- 名稱:Identity_AD
- 身份驗證搜尋清單:AD_Join_Point
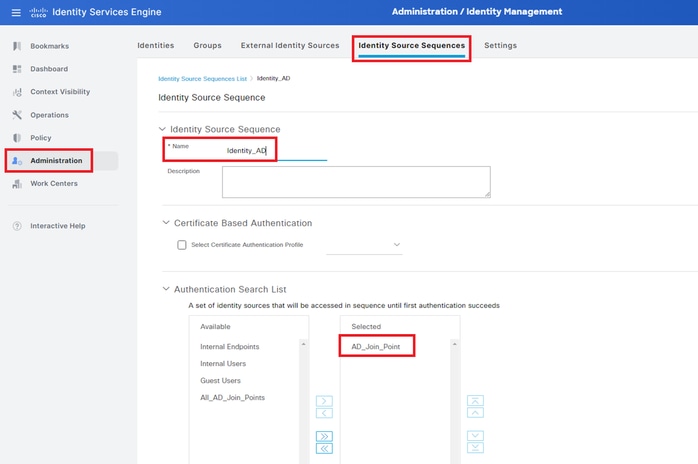 增加身份源序列
步驟 4.增加策略集
導航到策略>策略集,點選+ 增加策略集。
- 策略集名稱:VPN_Test
- 條件:裝置裝置型別等於所有裝置型別
- 允許的協定/伺服器序列:預設網路訪問
 增加策略集
增加策略集
步驟 5.增加身份驗證策略
導航到策略集,點選VPN_Test增加身份驗證策略。
- 規則名稱:VPN_Authentication
- 條件:網路訪問裝置IP地址等於1.x.x.61
- 使用:Identity_AD
 增加身份驗證策略
步驟 6.增加授權策略
導航到策略集,點選VPN_Test增加授權策略。
- 規則名稱:VPN_Authorization
- 條件:Network_Access_Authentication_Passed
- 結果:PermitAccess
 增加授權策略
驗證
步驟 1.將安全客戶端配置檔案複製到Win10 PC1
將安全客戶端配置檔案複製到C:\ProgramData\Cisco\Cisco Secure Client\VPN\Profile目錄。
 將設定檔複製到PC
步驟 2.啟動VPN連線
在終端上,運行Cisco Secure Client並輸入使用者名稱和密碼,然後確認Cisco Secure Client連線成功。
 連線成功
連線成功
步驟 3.確認ASA上的系統日誌
在系統日誌中,確認IKEv2連線成功。
May 28 20xx 08:xx:20: %ASA-5-750006: Local:192.168.1.1:4500 Remote:192.168.1.11:50982 Username:vpnuser IKEv2 SA UP. Reason: New Connection Established
May 28 20xx 08:xx:20: %ASA-6-751026: Local:192.168.1.1:4500 Remote:192.168.1.11:50982 Username:vpnuser IKEv2 Client OS: Windows Client: AnyConnect 5.1.3.62
步驟 4.確認ASA上的IPsec會話
運行show vpn-sessiondb detail anyconnect命令以確認ASA上的IKEv2/IPsec會話。
ciscoasa# show vpn-sessiondb detail anyconnect

Session Type: AnyConnect Detailed

Username : vpnuser Index : 23
Assigned IP : 172.16.1.20 Public IP : 192.168.1.11
Protocol : IKEv2 IPsecOverNatT AnyConnect-Parent
License : AnyConnect Premium
Encryption : IKEv2: (1)AES256 IPsecOverNatT: (1)AES256 AnyConnect-Parent: (1)none
Hashing : IKEv2: (1)SHA256 IPsecOverNatT: (1)SHA256 AnyConnect-Parent: (1)none
Bytes Tx : 840 Bytes Rx : 52408
Pkts Tx : 21 Pkts Rx : 307
Pkts Tx Drop : 0 Pkts Rx Drop : 0
Group Policy : GroupPolicy_vpn-ipsec-tunnel-grp
Tunnel Group : vpn-ipsec-tunnel-grp
Login Time : 08:13:20 UTC Tue May 28 2024
Duration : 0h:10m:10s
Inactivity : 0h:00m:00s
VLAN Mapping : N/A VLAN : none
Audt Sess ID : 01aa003d0001700066559220
Security Grp : none

IKEv2 Tunnels: 1
IPsecOverNatT Tunnels: 1
AnyConnect-Parent Tunnels: 1

AnyConnect-Parent:
Tunnel ID : 23.1
Public IP : 192.168.1.11
Encryption : none Hashing : none
Auth Mode : userPassword
Idle Time Out: 30 Minutes Idle TO Left : 19 Minutes
Client OS : win
Client OS Ver: 10.0.15063
Client Type : AnyConnect
Client Ver : 5.1.3.62

IKEv2:
Tunnel ID : 23.2
UDP Src Port : 50982 UDP Dst Port : 4500
Rem Auth Mode: userPassword
Loc Auth Mode: rsaCertificate
Encryption : AES256 Hashing : SHA256
Rekey Int (T): 86400 Seconds Rekey Left(T): 85790 Seconds
PRF : SHA256 D/H Group : 19
Filter Name :
Client OS : Windows Client Type : AnyConnect

IPsecOverNatT:
Tunnel ID : 23.3
Local Addr : 0.0.0.0/0.0.0.0/0/0
Remote Addr : 172.16.1.20/255.255.255.255/0/0
Encryption : AES256 Hashing : SHA256
Encapsulation: Tunnel
Rekey Int (T): 28800 Seconds Rekey Left(T): 28190 Seconds
Idle Time Out: 30 Minutes Idle TO Left : 29 Minutes
Bytes Tx : 840 Bytes Rx : 52408
Pkts Tx : 21 Pkts Rx : 307
步驟 5.確認Radius即時日誌
在ISE GUI中導航到操作> RADIUS >即時日誌,確認vpn身份驗證的即時日誌。
 Radius即時日誌
按一下[狀態]以確認即時記錄檔的詳細資訊。
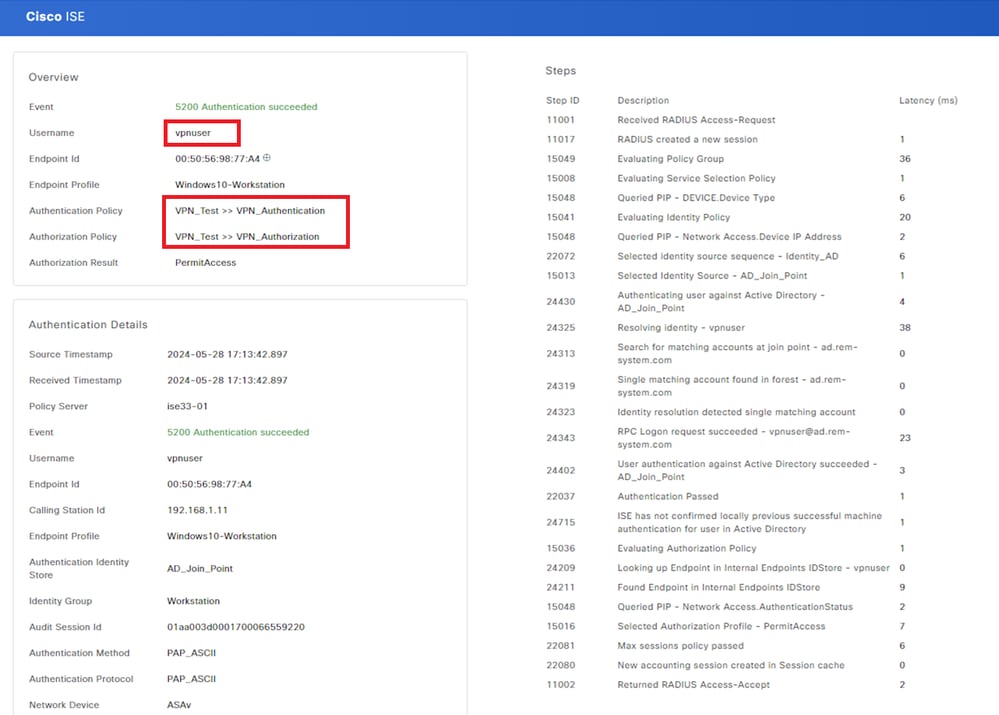 即時日誌的詳細資訊
疑難排解
密碼編譯演演算法不相符可能會導致連線失敗。這是發生演演算法不相符問題的範例。在ASDM中執行Configuration部分的第15步可解決此問題。
步驟 1.啟動VPN連線
在終端上,運行Cisco Secure Client並確認由於加密演算法不匹配導致連線失敗。
The cryptographic algorithms required by the secure gateway do not match those supported by AnyConnect.Please contact your network administrator.
 連線失敗
連線失敗
步驟 2.在CLI中確認系統日誌
在系統日誌中,確認IKEv2協商失敗。
May 28 20xx 08:xx:29: %ASA-5-750002: Local:192.168.1.1:500 Remote:192.168.1.11:57711 Username:Unknown IKEv2 Received a IKE_INIT_SA request
May 28 20xx 08:xx:29: %ASA-4-750003: Local:192.168.1.1:500 Remote:192.168.1.11:57711 Username:Unknown IKEv2 Negotiation aborted due to ERROR: Failed to find a matching policy
參考
透過IKEv2到具有AAA和證書身份驗證的ASA的AnyConnect