PIX 7.x和VPN 3000集中器之間的IPsec隧道配置示例
目錄
簡介
本文檔提供了如何在PIX防火牆7.x和Cisco VPN 3000集中器之間建立LAN到LAN IPsec VPN隧道的配置示例。
請參閱採用TACACS+驗證的PIX/ASA 7.x增強型分支到客戶端VPN配置示例,以瞭解更多有關PIX之間的LAN到LAN隧道也允許VPN客戶端通過中心PIX訪問分支PIX的方案的資訊。
請參閱PIX/ASA 7.x安全裝置到IOS路由器LAN到LAN IPsec隧道配置示例,以瞭解有關PIX/ASA和IOS路由器之間的LAN到LAN隧道的方案的詳細資訊。
必要條件
需求
嘗試此組態之前,請確保符合以下要求:
-
本文檔需要對IPsec協定有基本的瞭解。請參閱IPsec加密簡介以瞭解有關IPsec的詳細資訊。
採用元件
本文中的資訊係根據以下軟體和硬體版本:
-
Cisco PIX 500系列安全裝置,軟體版本為7.1(1)
-
Cisco VPN 3060集中器及軟體版本4.7.2(B)
註:PIX 506/506E不支援7.x。
本文中的資訊是根據特定實驗室環境內的裝置所建立。文中使用到的所有裝置皆從已清除(預設)的組態來啟動。如果您的網路正在作用,請確保您已瞭解任何指令可能造成的影響。
要配置PIX 6.x,請參閱Cisco VPN 3000集中器和PIX防火牆之間的LAN到LAN IPSec隧道配置示例。
慣例
設定
本節提供用於設定本文件中所述功能的資訊。
註:使用Command Lookup Tool(僅供已註冊客戶使用)可獲取本節中使用的命令的詳細資訊。
網路圖表
本檔案會使用以下網路設定:
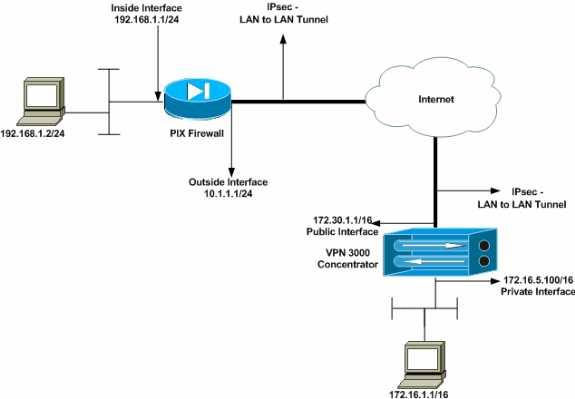
配置PIX
| PIX |
|---|
PIX7#show running-config : Saved : PIX Version 7.1(1) ! hostname PIX7 enable password 8Ry2YjIyt7RRXU24 encrypted names ! !--- Configures the outside interface of the PIX. !--- By default, the security level for the outside interface is 0. interface Ethernet0 nameif outside security-level 0 ip address 10.1.1.1 255.255.255.0 ! !--- Configures the inside interface of the PIX. !--- By default, the security level for the inside interface is 100. interface Ethernet1 nameif inside security-level 100 ip address 192.168.1.1 255.255.255.0 ! !--- Defines the IP addresses that should not be NATed. access-list nonat extended permit ip 192.168.1.0 255.255.255.0 172.16.0.0 255.255.0.0 access-list outside extended permit icmp any any !--- Defines the IP addresses that can communicate via the IPsec tunnel. access-list 101 extended permit ip 192.168.1.0 255.255.255.0 172.16.0.0 255.255.0.0 access-list OUT extended permit ip any any pager lines 24 mtu outside 1500 mtu inside 1500 no failover asdm image flash:/asdm-504.bin no asdm history enable arp timeout 14400 nat (inside) 0 access-list nonat access-group OUT in interface outside route outside 0.0.0.0 0.0.0.0 10.1.1.2 1 !--- Output is suppressed. !--- These are the IPsec parameters that are negotiated with the client. crypto ipsec transform-set my-set esp-aes-256 esp-sha-hmac crypto map mymap 20 match address 101 crypto map mymap 20 set peer 172.30.1.1 crypto map mymap 20 set transform-set my-set crypto map mymap interface outside !--- These are the Phase I parameters negotiated by the two peers. isakmp enable outside isakmp policy 10 authentication pre-share isakmp policy 10 encryption aes-256 isakmp policy 10 hash sha isakmp policy 10 group 2 isakmp policy 10 lifetime 86400 !--- A tunnel group consists of a set of records !--- that contain tunnel connection policies. The two attributes !--- are General and IPsec. Use the remote peer IP address as the !--- name of the Tunnel group. In this example 172.30.1.1 is the peer IP address. !--- Refer to Tunnel Group for more information. tunnel-group 172.30.1.1 type ipsec-l2l tunnel-group 172.30.1.1 ipsec-attributes pre-shared-key * !--- Output is suppressed. ! : end PIX7# |
配置VPN 3000 Concentrator
VPN集中器出廠設定中未預先設定IP地址。您必須使用控制檯埠來配置初始配置,這些配置是基於選單的命令列介面(CLI)。 有關如何通過控制檯進行配置的資訊,請參閱通過控制檯配置VPN集中器。
在Ethernet 1(專用)介面上配置IP地址後,可以通過CLI或通過瀏覽器介面配置其餘地址。瀏覽器介面同時支援HTTP和HTTP over Secure Socket Layer(SSL)。
這些引數是通過控制檯配置的:
-
時間/日期 — 正確的時間和日期非常重要。它們有助於確保日誌記錄和會計分錄準確無誤,並且系統可以建立有效的安全證書。
-
Ethernet 1(private)interface - IP地址和掩碼(來自網路拓撲172.16.5.100/16)。
現在,可從內部網路通過HTML瀏覽器訪問VPN集中器。有關如何在CLI模式下配置VPN集中器的資訊,請參閱使用命令列介面進行快速配置。
從Web瀏覽器鍵入專用介面的IP地址以啟用GUI介面。
按一下save needed圖示將更改儲存到記憶體。出廠預設使用者名稱和密碼是admin,區分大小寫。
-
啟動GUI並選擇Configuration > Interfaces以配置公共介面和預設網關的IP地址。
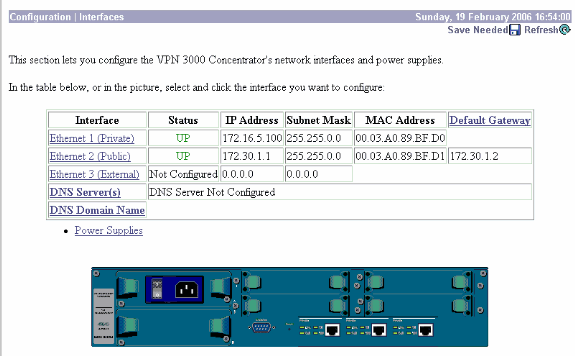
-
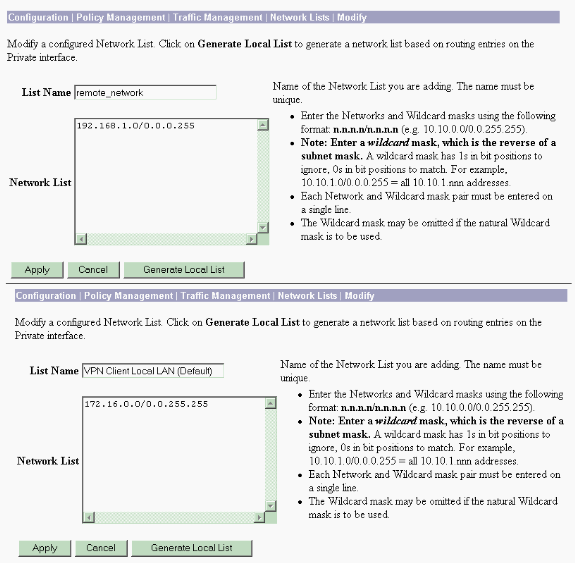
選擇Configuration > Policy Management > Traffic Management > Network Lists > Add or Modify以建立定義要加密的流量的網路清單。
在此處新增本地和遠端網路。IP地址應映象遠端PIX上配置的訪問清單中的地址。
在本示例中,兩個網路清單是remote_network和VPN Client Local LAN。
-
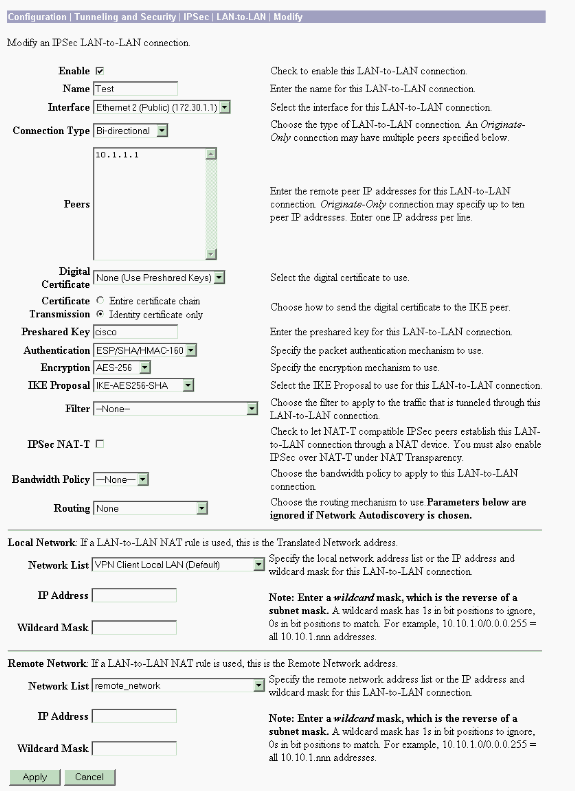
選擇Configuration > System > Tunneling Protocols > IPSec LAN-to-LAN > Add以配置IPsec LAN-to-LAN隧道。完成後按一下Apply。
輸入對等IP地址、步驟2中建立的網路清單、IPsec和ISAKMP引數以及預共用金鑰。
在本示例中,對等IP地址為10.1.1.1,網路清單為remote_network和VPN Client Local LAN,而cisco是預共用金鑰。
-
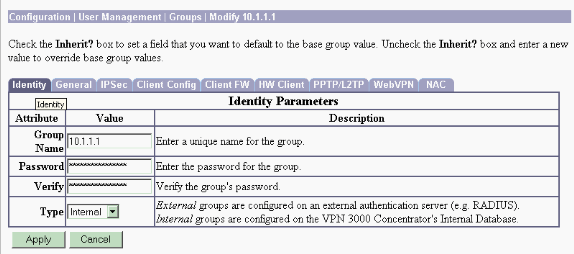
選擇Configuration > User Management > Groups > Modify 10.1.1.1以檢視自動生成的組資訊。
注意:請勿修改這些組設定。
驗證
使用本節內容,確認您的組態是否正常運作。
檢驗PIX
輸出直譯器工具(僅供已註冊客戶使用)(OIT)支援某些show命令。使用OIT檢視show命令輸出的分析。
-
show isakmp sa — 顯示對等體上的所有當前IKE安全關聯(SA)。狀態MM_ACTIVE表示主模式用於設定IPsec VPN隧道。
在此示例中,PIX防火牆發起IPsec連線。對等IP地址為172.30.1.1並使用主模式建立連線。
PIX7#show isakmp sa Active SA: 1 Rekey SA: 0 (A tunnel will report 1 Active and 1 Rekey SA during rekey) Total IKE SA: 1 1 IKE Peer: 172.30.1.1 Type : L2L Role : initiator Rekey : no State : MM_ACTIVE -
show ipsec sa — 顯示當前SA使用的設定。檢查對等IP地址、可在本地和遠端端訪問的網路,以及使用的轉換集。有兩個ESP SA,每個方向一個。
PIX7#show ipsec sa interface: outside Crypto map tag: mymap, seq num: 20, local addr: 10.1.1.1 access-list 101 permit ip 192.168.1.0 255.255.255.0 172.16.0.0 255.255.0.0 local ident (addr/mask/prot/port): (192.168.1.0/255.255.255.0/0/0) remote ident (addr/mask/prot/port): (172.16.0.0/255.255.0.0/0/0) current_peer: 172.30.1.1 #pkts encaps: 4, #pkts encrypt: 4, #pkts digest: 4 #pkts decaps: 4, #pkts decrypt: 4, #pkts verify: 4 #pkts compressed: 0, #pkts decompressed: 0 #pkts not compressed: 4, #pkts comp failed: 0, #pkts decomp failed: 0 #send errors: 0, #recv errors: 0 local crypto endpt.: 10.1.1.1, remote crypto endpt.: 172.30.1.1 path mtu 1500, ipsec overhead 76, media mtu 1500 current outbound spi: 136580F6 inbound esp sas: spi: 0xF24F4675 (4065281653) transform: esp-aes-256 esp-sha-hmac in use settings ={L2L, Tunnel,} slot: 0, conn_id: 1, crypto-map: mymap sa timing: remaining key lifetime (kB/sec): (3824999/28747) IV size: 16 bytes replay detection support: Y outbound esp sas: spi: 0x136580F6 (325419254) transform: esp-aes-256 esp-sha-hmac in use settings ={L2L, Tunnel,} slot: 0, conn_id: 1, crypto-map: mymap sa timing: remaining key lifetime (kB/sec): (3824999/28745) IV size: 16 bytes replay detection support: Y使用clear ipsec sa 和clear isakmp sa 命令重置隧道。
驗證VPN 3000 Concentrator
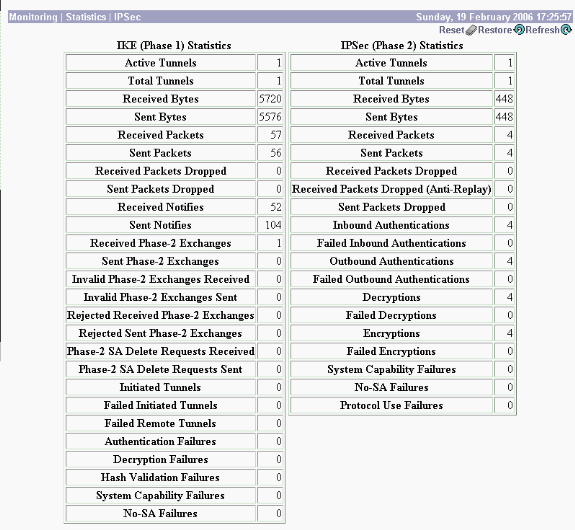
選擇Monitoring > Statistics > IPsec以驗證隧道是否已在VPN 3000 Concentrator中啟動。它包含IKE和IPsec引數的統計資訊。
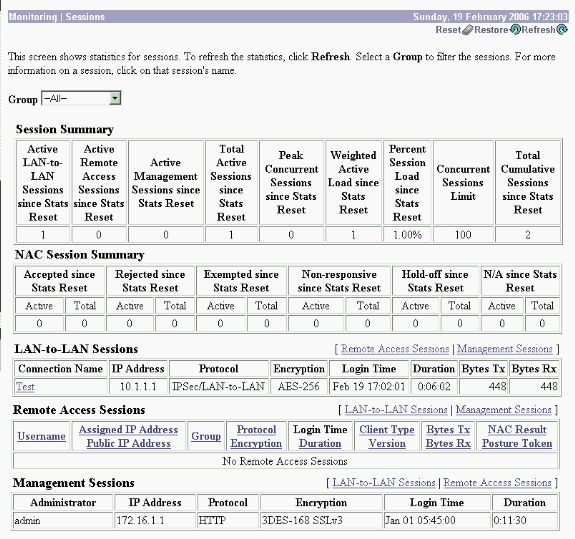
您可以通過Monitoring > Sessions活動監控會話。您可以在此處重置IPsec隧道。
疑難排解
本節提供的資訊可用於對組態進行疑難排解。
排除PIX故障
輸出直譯器工具(僅供已註冊客戶使用)(OIT)支援某些show命令。使用OIT檢視show命令輸出的分析。
附註:使用 debug 指令之前,請先參閱有關 Debug 指令的重要資訊。
PIX for VPN隧道上的debug命令如下:
-
debug crypto isakmp — 調試ISAKMP SA協商。
-
debug crypto ipsec — 調試IPsec SA協商。
VPN 3000 Concentrator故障排除
與Cisco路由器上的debug命令類似,您可以配置事件類以檢視所有警報。選擇Configuration > System > Events > Classes > Add以開啟事件類的日誌記錄。
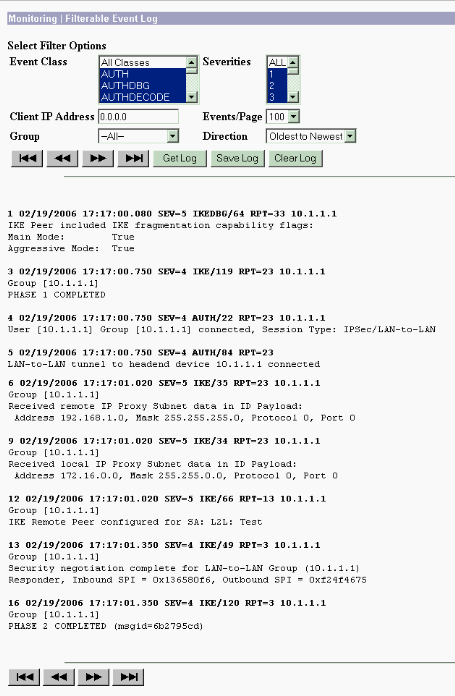
選擇Monitoring > Filterable Event Log以監視啟用的事件。
PFS
在IPsec協商中,完全向前保密(PFS)可確保每個新的加密金鑰與之前的任何金鑰無關。在隧道對等體上啟用或禁用PFS,否則在PIX/ASA中未建立LAN到LAN(L2L)IPsec隧道。
預設情況下,PFS處於禁用狀態。若要啟用PFS,請在組策略配置模式下使用帶有enable 關鍵字的pfs命令。若要停用PFS,請輸入disable 關鍵字。
hostname(config-group-policy)#pfs {enable | disable}
要從運行配置中刪除PFS屬性,請輸入此命令的no形式。組策略可以從其他組策略繼承PFS的值。輸入此命令的no形式可防止繼承值。
hostname(config-group-policy)#no pfs
相關資訊
修訂記錄
| 修訂 | 發佈日期 | 意見 |
|---|---|---|
1.0 |
16-Oct-2008 |
初始版本 |
 意見
意見