簡介
本文說明如何在6400系列光纖互連(FI)上存在不可用的映像時,從載入器提示中復原FI。
必要條件
需求
思科建議您瞭解以下主題:
- 思科整合運算系統管理員(UCSM)
- 6400系列光纖互連
- 命令列介面(CLI)
採用元件
本檔案中的資訊是根據6400系列光纖互連。
本文中的資訊是根據特定實驗室環境內的裝置所建立。文中使用到的所有裝置皆從已清除(預設)的組態來啟動。如果您的網路運作中,請確保您瞭解任何指令可能造成的影響。
背景資訊
- 當韌體升級期間兩個或所有交換矩陣互聯均發生故障、重新引導並在載入程式提示符下停滯,並且交換矩陣互聯上沒有工作映像時,您可以執行這些步驟。
- 本文中的解決方案需要載入必需檔案的通用串列匯流排(USB)驅動器或簡單檔案傳輸協定(如簡單檔案傳輸協定,TFTP)。這兩種解決方案都需要通過控制檯電纜連線FI,如果使用TFTP,也需要通過電纜連線FI的管理埠。
- 必須使用檔案分配表(FAT)檔案系統格式化USB。
- 從UCS基礎設施檔案中提取二進位制檔案需要使用7-Zip或WinRAR之類的提取工具。
問題:6400系列交換矩陣互聯重新啟動並在載入程式提示符下停滯
這最常見的情況是FI在韌體升級期間關閉、重新引導並在載入程式提示符處停滯。您可能會遇到載入程式提示的一些其他情況是:出現意外斷電或出現嚴重檔案系統問題。
解決方案
使用USB或TFTP上的映像恢復6400 FI檔案系統,需要控制檯連線。如果使用TFTP,則還需要用電纜連線FI管理埠。傳送並啟用FI上新安裝的檔案,根據需要配置FI,並確認它不再引導至載入程式提示。
注意:僅當無法以任何其他方式恢復FI且無法引導時,才必須使用此文章。如果您由於任何原因不能確定,請與Cisco TAC聯絡。
通過USB恢復交換矩陣互聯
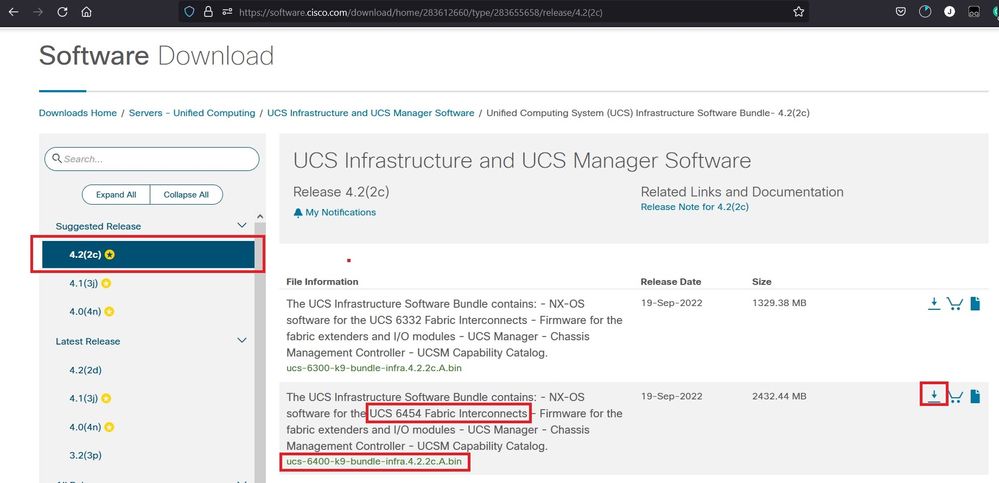
步驟 1.啟動瀏覽器並導航至思科網站上的軟體部分。下載正確的 UCS Infrastructure Software Bundle 6400系列FI的版本。在圖中所示的範例中,使用版本4.2(2c)A套件組合。
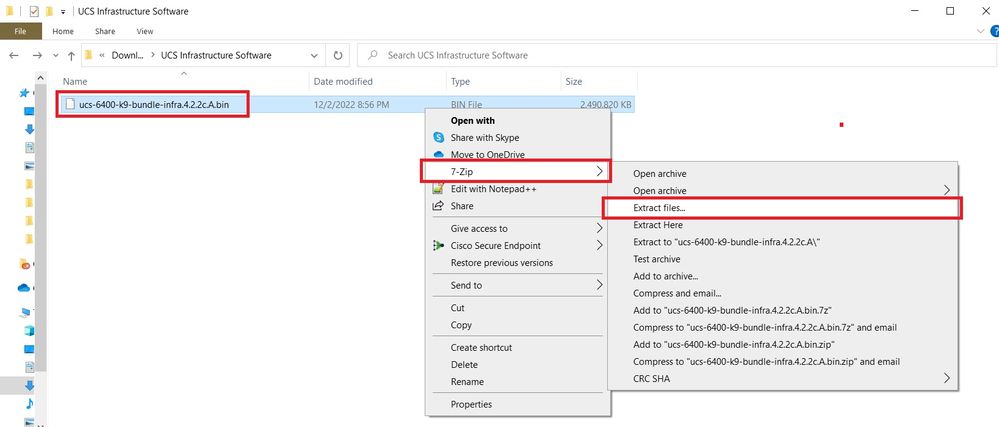
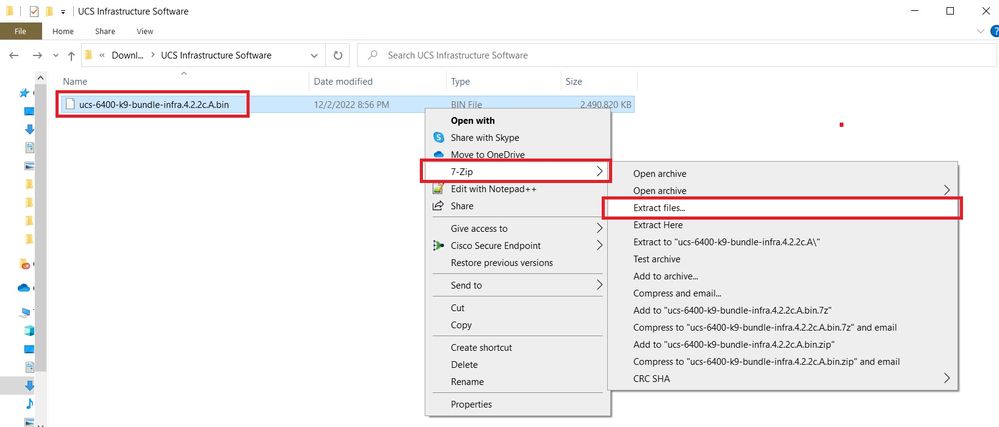
步驟 2.按一下右鍵 UCS Infrastructure Software Bundle 檔案並選擇 Extract Files.
註:此步驟要求您使用7-Zip、WinRAR等解壓縮工具。
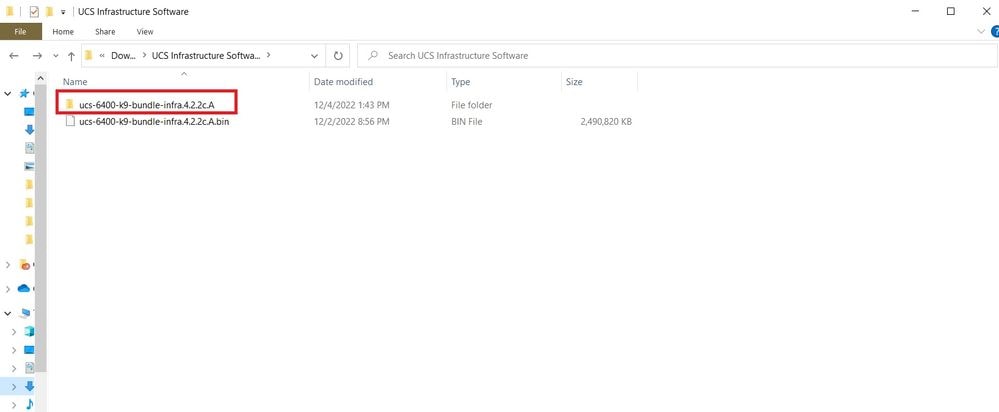
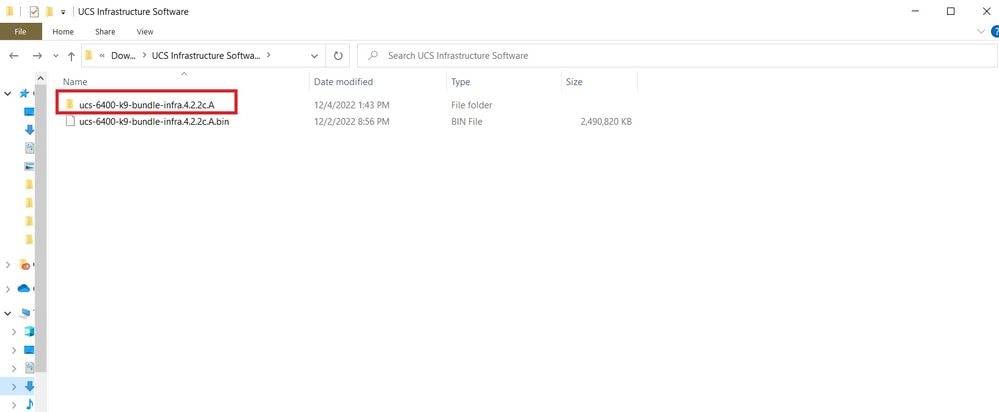
步驟 3.按兩下新提取的 UCS Infrastructure Software Bundle 資料夾。
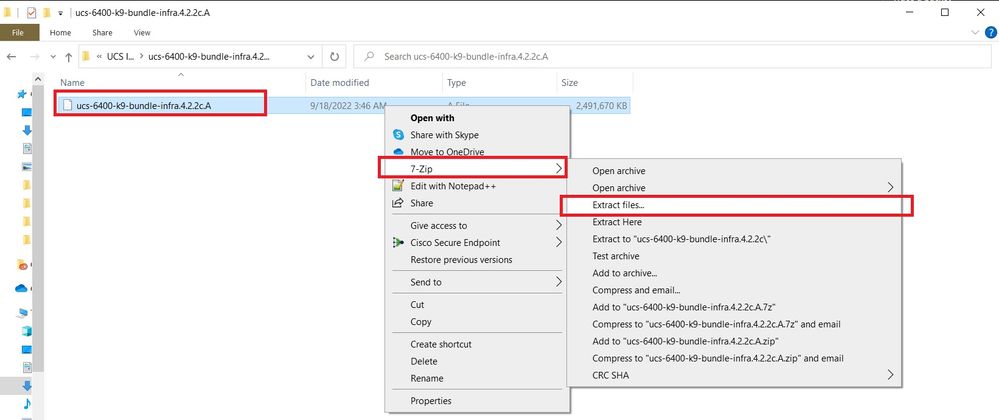
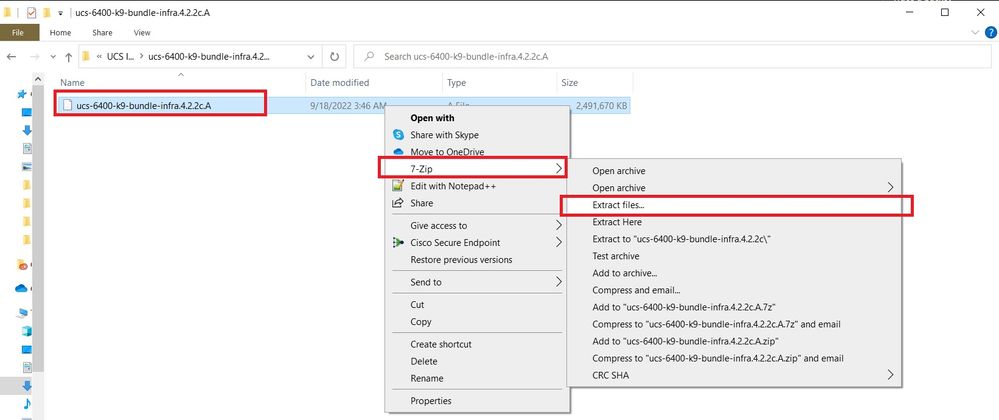
步驟 4.按一下右鍵 UCS Infrastructure Software Bundle 在資料夾內並選擇 Extract Files.
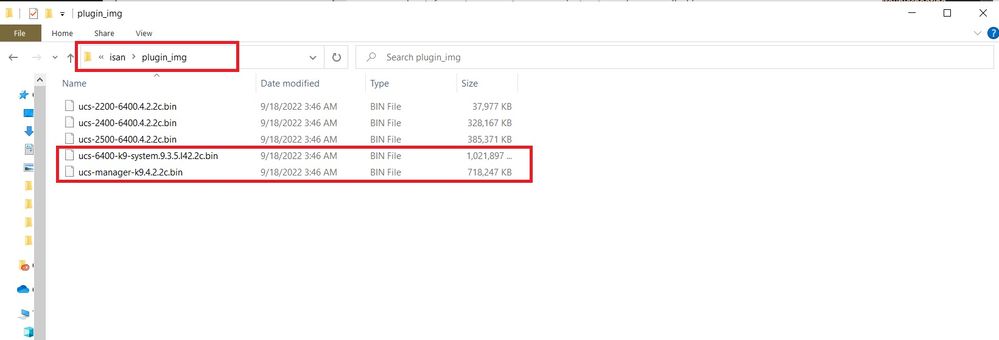
步驟 5.按兩下新解壓的資料夾。導航至 isan > plugin_img 並將系統和管理器檔案複製到USB中。
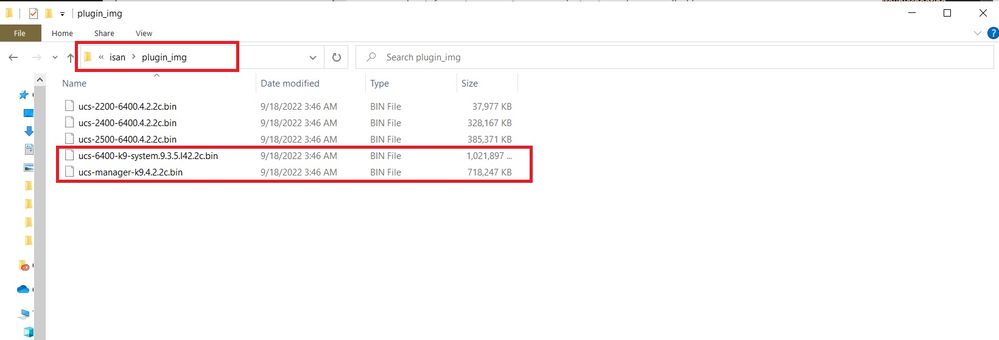
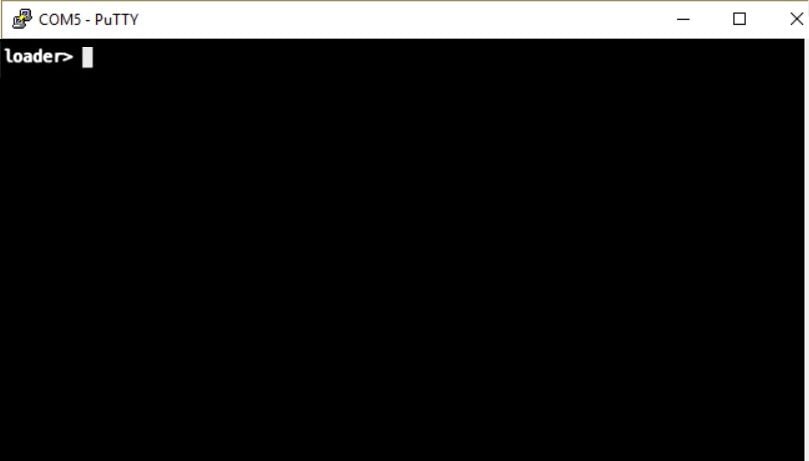
步驟 6.直接連線控制檯電纜並將USB插入FI。開啟終端模擬器並重新啟動交換機,當交換機開始加電時繼續按 Ctrl-C 進入載入程式提示。
提示:如果您看到任何嘗試載入的影象,或FI掛起,則可能錯過載入程式。開啟FI電源後,立即將其重新通電,並連續按Ctrl-C。
步驟 7.執行命令 cmdline recoverymode=1 在載入程式提示符下進入恢復模式。
loader > cmdline recoverymode=1
步驟 8.從實際插入的USB啟動系統映像。
loader> boot usb1:ucs-6400-k9-system.9.3.5.I42.2c.bin
步驟 9.執行命令 start 輸入bash,然後 mount | egrep "sda|mtdblock" 顯示分割槽。
switch(boot)# start
bash-4.2# mount | egrep "sda|mtdblock"
/dev/sda8 on /opt type ext4
/dev/sda9 on /workspace type ext4
/dev/sda10 on /spare type ext4
/dev/sda5 on /mnt/cfg/0 type ext3
/dev/sda6 on /mnt/cfg/1 type ext3
/dev/sda3 on /mnt/pss type ext3
/dev/sda4 on /bootflash type ext3
/dev/sda7 on /logflash type ext3
/dev/mtdblock4 on /opt/db/nvram type ext2
注意:在某些情況下,您可以看到mtdblock0而不是mtdblock4,如果看到,請確保在步驟10中解除安裝mtdblock0。
步驟 10.分別為所有當前分割槽運行命令umount。
bash-4.2# umount /dev/sda3
bash-4.2# umount /dev/sda4
bash-4.2# umount /dev/sda5
bash-4.2# umount /dev/sda6
bash-4.2# umount /dev/sda7
bash-4.2# umount /dev/sda8
bash-4.2# umount /dev/sda9
bash-4.2# umount /dev/sda10
bash-4.2# umount /dev/mtdblock4
注意:如果任何解除安裝命令返回目標忙,請轉到下一個要解除安裝的分割槽,然後嘗試最後解除安裝忙碌的分割槽。
步驟 11.分別對所有未裝載的分割槽運行檔案系統檢查。
bash-4.2# e2fsck -y /dev/sda3
bash-4.2# e2fsck -y /dev/sda4
bash-4.2# e2fsck -y /dev/sda5
bash-4.2# e2fsck -y /dev/sda6
bash-4.2# e2fsck -y /dev/sda7
bash-4.2# e2fsck -y /dev/sda8
bash-4.2# e2fsck -y /dev/sda9
bash-4.2# e2fsck -y /dev/sda10
bash-4.2# e2fsck -y /dev/mtdblock4
步驟 12.初始化系統快閃記憶體並等待完成。
bash-4.2# init-system
Initializing the system ...
Checking flash ...
Erasing Flash ...
Partitioning ...
UCSM Partition size:10485760
Wipe all partitions
Reinitializing NVRAM contents ...Initialization completed.
步驟 13.安裝bootflash和USB。將系統和管理器檔案從USB複製到bootflash並建立符號連結。
bash-4.2# mount /dev/sda4 /bootflash
bash-4.2# mount /dev/sdb1 /mnt/usbslot1
bash-4.2# cp /mnt/usbslot1/ucs-6400-k9-system.9.3.5.I42.2c.bin /bootflash
bash-4.2# cp /mnt/usbslot1/ucs-manager-k9.4.2.2c.bin /bootflash
bash-4.2# ln -sf /bootflash/ucs-manager-k9.4.2.2c.bin /bootflash/nuova-sim-mgmt-nsg.0.1.0.001.bin
bash-4.2# reboot
步驟 14.交換器重新開機並在載入器提示時返回,這是預期的行為。從bootflash引導系統映像。
loader > boot bootflash:ucs-6400-k9-system.9.3.5.I42.2c.bin
Booting bootflash:ucs-6400-k9-system.9.3.5.I42.2c.bin
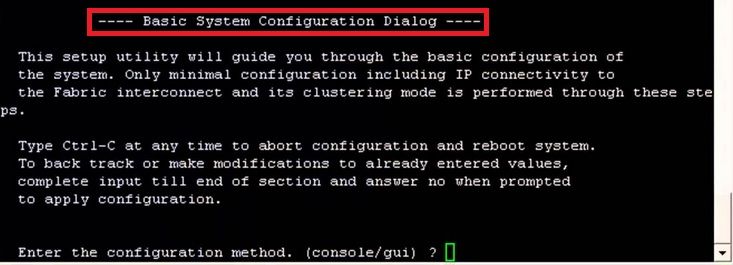
步驟 15.交換器完全開機後, Basic System Configuration Dialog 顯示。根據您的環境配置FI。
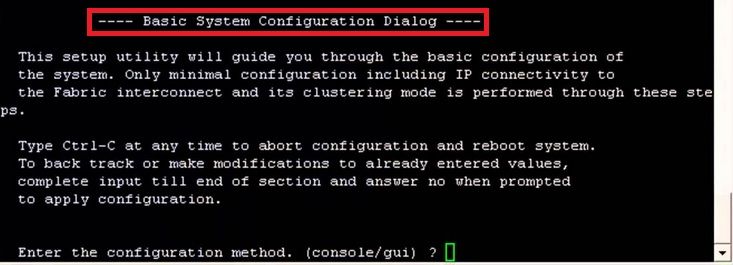
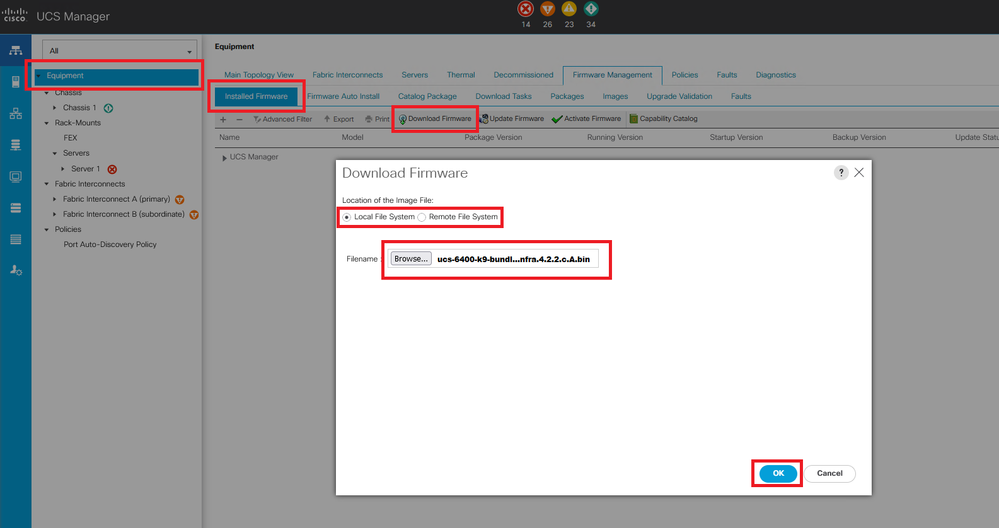
步驟 16.設定交換器後,登入圖形使用者介面(GUI)。導航至 Equipment > Installed Firmware > Download Firmware. 在此步驟中,必須使用您先前下載的UCS基礎設施A檔案,而不是解壓的檔案。選擇 Local File System 或 Remote File System > Browse. 選擇基礎結構檔案,然後選擇 Ok.
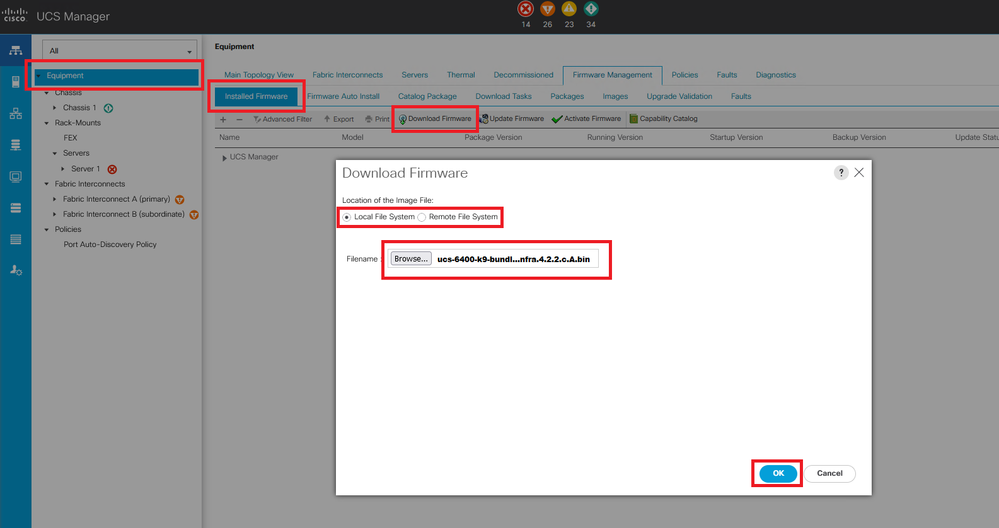
步驟 17.導航至 Equipment > Firmware Management > Installed Firmware > Activate Firmware > UCS Manager > Fabric Interconnects 並選擇所問FI的下拉選單。
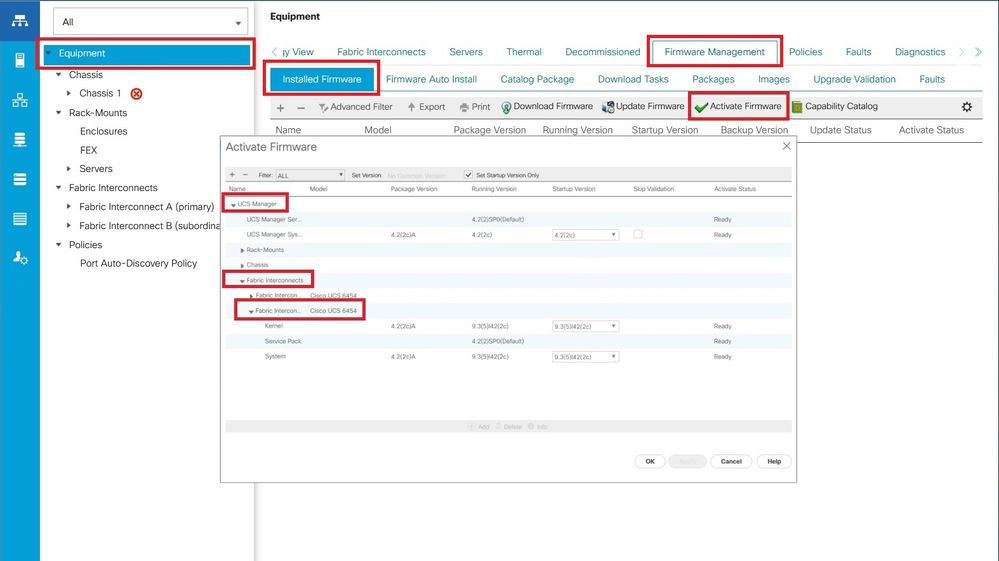
步驟 18.導航至核心下拉選單,然後選擇正確的版本。選擇 Apply > Yes.
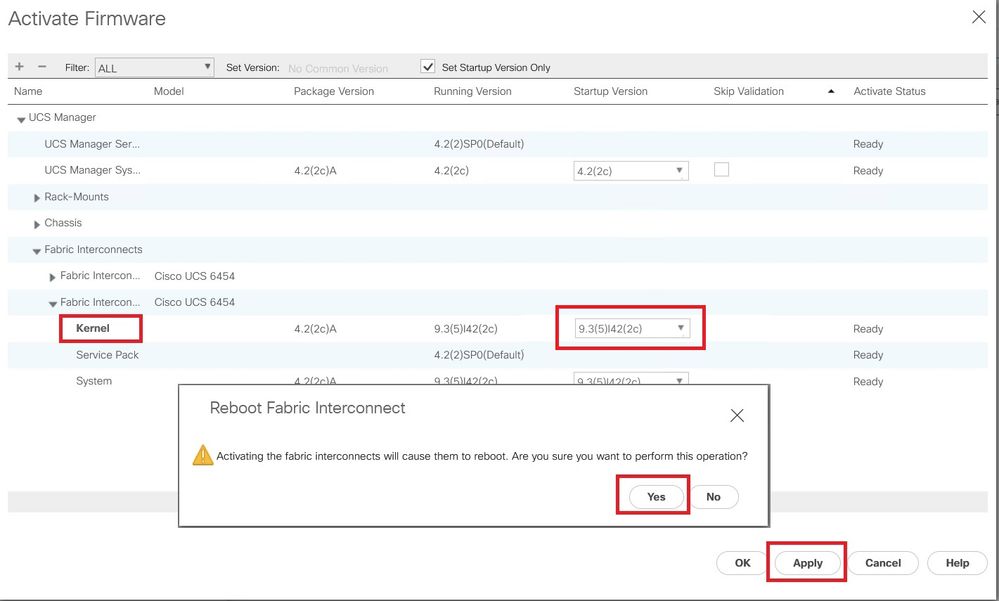
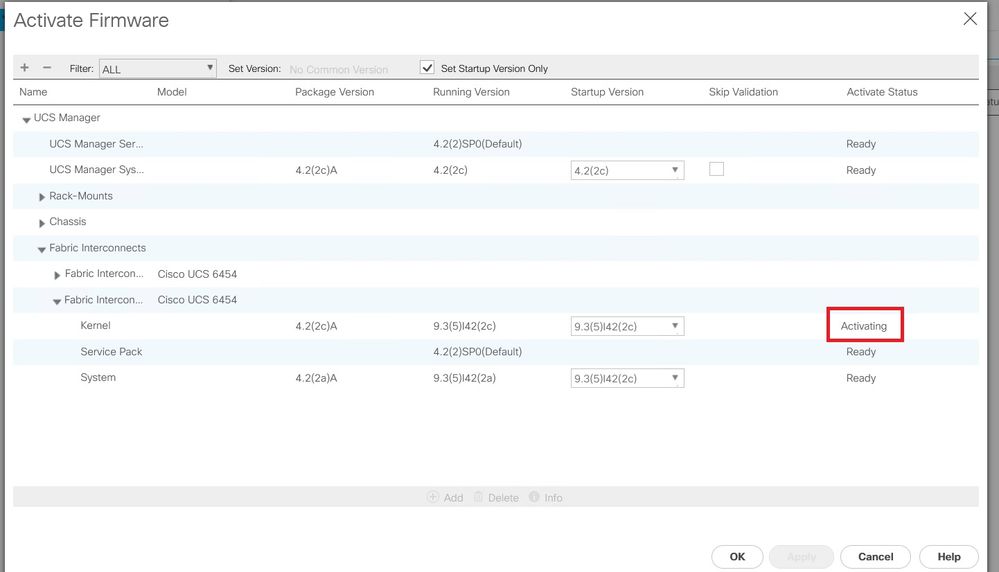
步驟 19.核心狀態現在為 Activating,請等待20分鐘或更長時間,狀態將為 Ready.
步驟 20.所有韌體都準備就緒後,請通過手動重新引導驗證您的FI是否成功啟動。使用connect local-mgmt x ,其中x表示已重建的FI。如果您的FI啟動回載入程式提示,請與Cisco TAC聯絡。
TAC-FI-REBUILD-A# connect local-mgmt b
TAC-FI-REBUILD-B(local-mgmt)# reboot
Before rebooting, please take a configuration backup.
Do you still want to reboot? (yes/no):yes
通過TFTP恢復交換矩陣互聯
步驟 1.啟動瀏覽器並導航至思科網站上的軟體部分。下載正確的 UCS Infrastructure Software Bundle 6400系列FI的版本。在圖中所示的範例中,使用版本4.2(2c)A套件組合。
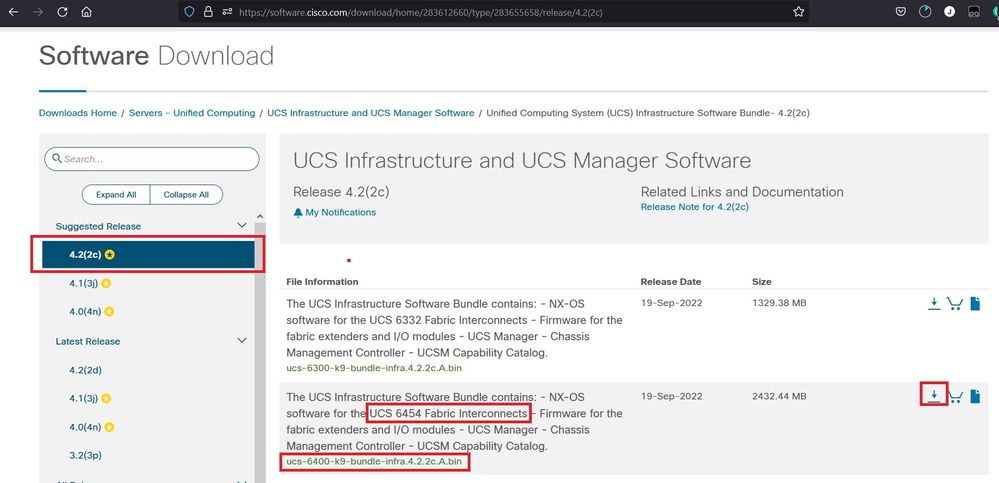
步驟 2.按一下右鍵 UCS Infrastructure Software Bundle 檔案並選擇 Extract Files.
註:此步驟要求您使用7-Zip、WinRAR等解壓縮工具。
步驟 3.按兩下新提取的 UCS Infrastructure Software Bundle 資料夾。
步驟 4.按一下右鍵 UCS Infrastructure Software Bundle 在資料夾內並選擇 Extract Files.
步驟 5.按兩下新解壓的資料夾。導航至 isan > plugin_img 並將系統和管理器檔案複製到TFTP伺服器的根目錄中。
步驟 6.將控制檯和管理電纜連線到FI。開啟終端模擬器並重新啟動交換機,當交換機開始加電時繼續按 Ctrl-C 進入載入程式提示。
提示:如果您看到任何嘗試載入的影象,或FI掛起,則可能錯過載入程式。開啟FI電源後,立即將其重新通電,並連續按Ctrl-C。
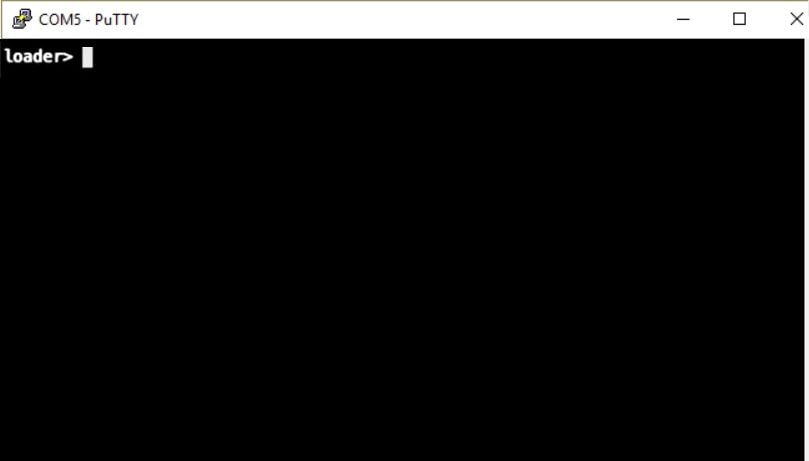
步驟 7.發出命令 cmdline recoverymode=1 進入恢復模式並配置管理介面。
loader > cmdline recoverymode=1
loader > set ip x.x.x.x y.y.y.y
loader > set gw z.z.z.z
註:X表示FI IP,Y表示子網掩碼,Z表示網關。
步驟 8.從TFTP伺服器引導系統映像。
loader> boot tftp://x.x.x.x/ucs-6400-k9-system.9.3.5.I42.2c.bin
註:X表示TFTP伺服器IP。
步驟 9.執行命令 start 輸入bash,然後 mount | egrep "sda|mtdblock" 顯示分割槽。
switch(boot)# start
bash-4.2# mount | egrep "sda|mtdblock"
/dev/sda8 on /opt type ext4
/dev/sda9 on /workspace type ext4
/dev/sda10 on /spare type ext4
/dev/sda5 on /mnt/cfg/0 type ext3
/dev/sda6 on /mnt/cfg/1 type ext3
/dev/sda3 on /mnt/pss type ext3
/dev/sda4 on /bootflash type ext3
/dev/sda7 on /logflash type ext3
/dev/mtdblock4 on /opt/db/nvram type ext2
注意:在某些情況下,您可以看到mtdblock0而不是mtdblock4,如果看到,請確保在步驟10中解除安裝mtdblock0。
步驟 10.分別為所有當前分割槽運行命令umount。
bash-4.2# umount /dev/sda3
bash-4.2# umount /dev/sda4
bash-4.2# umount /dev/sda5
bash-4.2# umount /dev/sda6
bash-4.2# umount /dev/sda7
bash-4.2# umount /dev/sda8
bash-4.2# umount /dev/sda9
bash-4.2# umount /dev/sda10
bash-4.2# umount /dev/mtdblock4
注意:如果任何解除安裝命令返回目標忙,請轉到下一個要解除安裝的分割槽,然後嘗試最後解除安裝忙碌的分割槽。
步驟 11.分別對所有未裝載的分割槽運行檔案系統檢查。
bash-4.2# e2fsck -y /dev/sda3
bash-4.2# e2fsck -y /dev/sda4
bash-4.2# e2fsck -y /dev/sda5
bash-4.2# e2fsck -y /dev/sda6
bash-4.2# e2fsck -y /dev/sda7
bash-4.2# e2fsck -y /dev/sda8
bash-4.2# e2fsck -y /dev/sda9
bash-4.2# e2fsck -y /dev/sda10
bash-4.2# e2fsck -y /dev/mtdblock4
步驟 12.初始化系統快閃記憶體並等待完成。
bash-4.2# init-system
Initializing the system ...
Checking flash ...
Erasing Flash ...
Partitioning ...
UCSM Partition size:10485760
Wipe all partitions
Reinitializing NVRAM contents ...Initialization completed.
步驟 13.退出bash shell並返回交換機引導提示。
bash-4.2# exit
switch(boot)#
步驟 14.在交換機引導提示符下配置管理介面。
switch(boot)# config terminal
switch(boot)(config)# interface mgmt 0
switch(boot)(config-if)# ip address x.x.x.x y.y.y.y
switch(boot)(config-if)# no shut
switch(boot)(config-if)# exit
switch(boot)(config)# ip default-gateway z.z.z.z
switch(boot)(config)# exit
switch(boot)#
註:X表示FI IP,Y表示子網掩碼,Z表示網關。
步驟 15.將manager和系統檔案從TFTP複製到bootflash。
switch(boot)# copy tftp://x.x.x.x/ucs-manager-k9.4.2.2c.bin bootflash:
switch(boot)# copy tftp://x.x.x.x/ucs-6400-k9-system.9.3.5.I42.2c.bin bootflash:
步驟 16.發出命令 start 要呼叫bash shell,請建立符號連結,然後重新啟動。
bash-4.2# start
bash-4.2# ln -sf /bootflash/ucs-manager-k9.4.2.2c.bin /bootflash/nuova-sim-mgmt-nsg.0.1.0.001.bin
bash-4.2# reboot
步驟 17.交換器重新開機並在載入器提示時返回,這是預期的行為。從bootflash引導系統映像。
loader > boot bootflash:ucs-6400-k9-system.9.3.5.I42.2c.bin
Booting bootflash:ucs-6400-k9-system.9.3.5.I42.2c.bin
步驟 18.交換器完全開機後, Basic System Configuration Dialog 顯示。根據您的環境配置FI。
步驟 19.設定交換器後,登入圖形使用者介面(GUI)。導航至 Equipment > Installed Firmware > Download Firmware. 在此步驟中,必須使用您先前下載的UCS基礎設施A檔案,而不是解壓的檔案。選擇 Local File System 或 Remote File System > Browse. 選擇基礎結構檔案,然後選擇 Ok.
步驟 20.導航至 Equipment > Firmware Management > Installed Firmware > Activate Firmware > UCS Manager > Fabric Interconnects 並選擇所問FI的下拉選單。
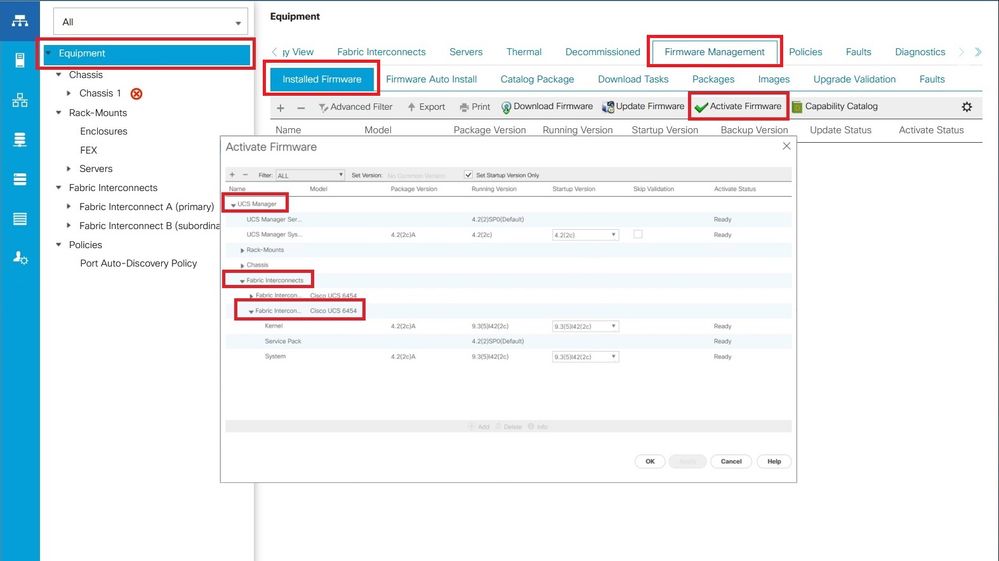
步驟 21.導航至核心下拉選單,然後選擇正確的版本。選擇 Apply > Yes.
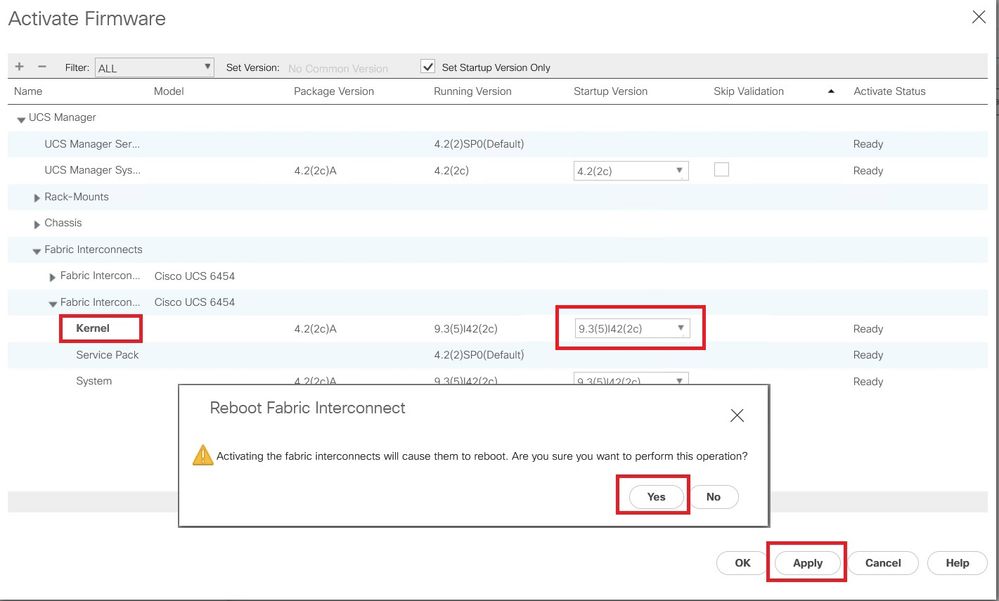
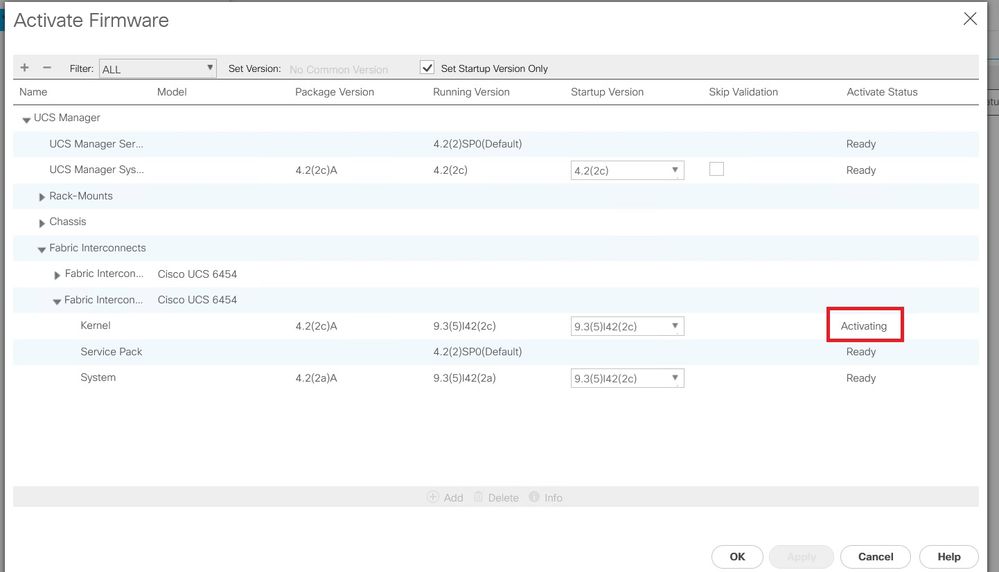
步驟 22.核心狀態現在為 Activating,請等待20分鐘或更長時間,狀態將為 Ready.
步驟 23.所有韌體都準備就緒後,請通過手動重新引導驗證您的FI是否成功啟動。使用connect local-mgmt x ,其中x表示已重建的FI。如果您的FI啟動回載入程式提示,請與Cisco TAC聯絡。
TAC-FI-REBUILD-A# connect local-mgmt b
TAC-FI-REBUILD-B(local-mgmt)# reboot
Before rebooting, please take a configuration backup.
Do you still want to reboot? (yes/no):yes
相關資訊


 意見
意見