簡介
本文檔介紹使用Ansible自動執行Firepower管理中心(FMC)以配置Firepower威脅防禦(FTD)介面IP的步驟。
必要條件
需求
思科建議您瞭解以下主題:
- 阿尼塞
- Ubuntu伺服器
- Cisco Firepower管理中心(FMC)虛擬
- Cisco Firepower威脅防禦(FTD)虛擬
在這種實驗室情況下,Ansible被部署在Ubuntu。
必須確保Ansible成功安裝在Ansible支援的任何平台上,以便運行本文中引用的Ansible命令。
採用元件
本文中的資訊係根據以下軟體和硬體版本:
- Ubuntu伺服器22.04
- 阿尼塞2.10.8
- Python 3.10
- Cisco Firepower威脅防禦虛擬7.4.1
- Cisco Firepower管理中心虛擬7.4.1
本文中的資訊是根據特定實驗室環境內的裝置所建立。文中使用到的所有裝置皆從已清除(預設)的組態來啟動。如果您的網路運作中,請確保您瞭解任何指令可能造成的影響。
背景資訊
Ansible是一個功能非常豐富的工具,在管理網路裝置方面展現了極大的效率。使用Ansible可以採用多種方法來運行自動化任務。本文所採用的方法為試驗提供了參考。
在本範例中,成功執行播放程式範例後,介面ip位址、遮罩和介面名稱會更新為FTD。
設定
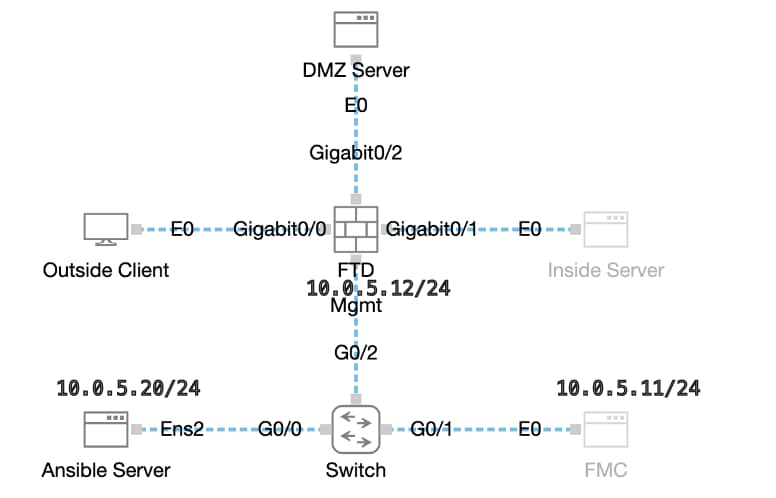
網路圖表
 拓撲
拓撲
組態
由於Cisco不支援示例指令碼或客戶編寫的指令碼,我們提供了一些可根據您的需求進行測試的示例。
必須確保適當完成初步核查。
- Ansible伺服器具有internet連線。
- Ansible伺服器能夠與FMC GUI埠成功通訊(FMC GUI的預設埠是443)。
- FTD已順利註冊到FMC。
步驟 1. 透過SSH或控制檯連線到Ansible伺服器的CLI。
步驟 2.運行命令ansible-galaxy collection install cisco.fmcansible以在Ansible伺服器上安裝FMC的Ansible集合。
cisco@inserthostname-here:~$ ansible-galaxy collection install cisco.fmcansible
步驟 3.運行命令mkdir /home/cisco/fmc_ansible以建立一個新資料夾來儲存相關檔案。在本示例中,主目錄是/home/cisco/ ,新資料夾名稱為fmc_ansible。
cisco@inserthostname-here:~$ mkdir /home/cisco/fmc_ansible
步驟 4. 導航到資料夾/home/cisco/fmc_ansible,選擇建立資產檔案。在本示例中,資產檔名為inventory.ini。
cisco@inserthostname-here:~$ cd /home/cisco/fmc_ansible/
ccisco@inserthostname-here:~/fmc_ansible$ ls
inventory.ini
您可以複製此內容並貼上以供使用,使用準確引數來更改突出顯示的部分。
[fmc]
10.0.5.11

[fmc:vars]
ansible_user=cisco
ansible_password=cisco
ansible_httpapi_port=443
ansible_httpapi_use_ssl=True
ansible_httpapi_validate_certs=False
network_type=HOST
ansible_network_os=cisco.fmcansible.fmc
步驟 5. 導航到資料夾/home/cisco/fmc_ansible,選擇create variable file。在本示例中,變數檔名是fmc-configure-interface-vars.yml。
cisco@inserthostname-here:~$ cd /home/cisco/fmc_ansible/
ccisco@inserthostname-here:~/fmc_ansible$ ls
fmc-configure-interface-vars.yml inventory.ini
您可以複製此內容並貼上以供使用,並使用準確引數更改突出顯示的部分。
user: domain: 'Global' onboard: acp_name: 'TEMPACP' device_name: ftd1: 'FTDA' ftd_data: outside_name: 'Outside' inside_name: 'Inside' dmz_name: 'DMZ' outside_ip: '10.1.1.1' inside_ip: '10.1.2.1' dmz_ip: '10.1.3.1' mask24: '255.255.255.0'
第6步:導航到資料夾/home/cisco/fmc_ansible,建立攻略檔案。在本示例中,播放手冊檔名為fmc-configure-interface-playbook.yaml。
cisco@inserthostname-here:~$ cd /home/cisco/fmc_ansible/
ccisco@inserthostname-here:~/fmc_ansible$ ls
fmc-configure-interface-playbook.yaml fmc-configure-interface-vars.yml inventory.ini
您可以複製此內容並貼上以供使用,並使用準確引數更改突出顯示的部分。
--- - name: Update FTD Interface IP Address hosts: fmc connection: httpapi tasks: - name: Task01 - Get User Domain cisco.fmcansible.fmc_configuration: operation: getAllDomain filters: name: "{{ user.domain }}" register_as: domain - name: Task02 - Get Devices cisco.fmcansible.fmc_configuration: operation: getAllDevice path_params: domainUUID: '{{ domain[0].uuid }}' query_params: expanded: true filters: name: "{{ device_name.ftd1 }}" register_as: device_list - name: Task03 - Get Physical Interfaces cisco.fmcansible.fmc_configuration: operation: getAllFTDPhysicalInterface path_params: containerUUID: '{{ device_list[0].id }}' domainUUID: '{{ domain[0].uuid }}' register_as: physical_interfaces - name: Task04 - Setup Outside Interface with static IP cisco.fmcansible.fmc_configuration: operation: updateFTDPhysicalInterface data: ifname: "{{ ftd_data.outside_name }}" ipv4: static: address: "{{ Outside_ip | default(ftd_data.outside_ip) }}" netmask: "{{ Outside_netmask | default(ftd_data.mask24) }}" MTU: 1500 enabled: True mode: NONE type: physicalinterface name: GigabitEthernet0/0 path_params: domainUUID: '{{ domain[0].uuid }}' containerUUID: '{{ device_list[0].id }}' objectId: '{{ physical_interfaces[0].id }}' - name: Task05 - Setup Inside Interface with static IP cisco.fmcansible.fmc_configuration: operation: updateFTDPhysicalInterface data: ifname: "{{ ftd_data.inside_name }}" ipv4: static: address: "{{ Inside_ip | default(ftd_data.inside_ip) }}" netmask: "{{ Inside_netmask | default(ftd_data.mask24) }}" MTU: 1500 enabled: True mode: NONE type: physicalinterface name: GigabitEthernet0/1 path_params: domainUUID: '{{ domain[0].uuid }}' containerUUID: '{{ device_list[0].id }}' objectId: '{{ physical_interfaces[1].id }}' - name: Task06 - Setup DMZ Interface with static cisco.fmcansible.fmc_configuration: operation: updateFTDPhysicalInterface data: ifname: "{{ ftd_data.dmz_name }}" ipv4: static: address: "{{ DMZ_ip | default(ftd_data.dmz_ip) }}" netmask: "{{ DMZ_netmask | default(ftd_data.mask24) }}" MTU: 1500 enabled: True mode: NONE type: physicalinterface name: GigabitEthernet0/2 path_params: domainUUID: '{{ domain[0].uuid }}' containerUUID: '{{ device_list[0].id }}' objectId: '{{ physical_interfaces[2].id }}' - name: Task07 - Get Deployable Devices cisco.fmcansible.fmc_configuration: operation: getDeployableDevice path_params: domainUUID: '{{ domain[0].uuid }}' query_params: expanded: true register_as: deploy_devices - name: Task08 - Start Deployment cisco.fmcansible.fmc_configuration: operation: createDeploymentRequest data: version: '{{ deploy_devices[0].version }}' deviceList: - '{{ deploy_devices[0].device.id }}' forceDeploy: True path_params: domainUUID: '{{ domain[0].uuid }}' register_as: deployment_job - name: Wait for Deployment Complete ansible.builtin.wait_for: timeout: 120 delegate_to: localhost - name: Task09 - Poll Deployment Status Until Deployment Successful cisco.fmcansible.fmc_configuration: operation: getDeploymentDetail path_params: containerUUID: '{{ deploy_devices[0].device.id }}' domainUUID: '{{ domain[0].uuid }}' register_as: deployment_status until: deployment_status[0].status is match("SUCCEEDED") retries: 200 delay: 3 - name: Task10 - Stop The Playbook If The Deployment Failed fail: msg: 'Deployment failed. Status: {{ deployment_status[0].status }}' when: deployment_status[0].status is not match("SUCCEEDED")

注意:在此範例手冊中反白的名稱會作為變數。這些變數的對應值會保留在變數檔案中。
步驟 7. 導航到資料夾/home/cisco/fmc_ansible,運行命令ansible-playbook -i <inventory_name>.ini <playbook_name>.yaml -e@"<playbook_vars>.yml"以播放ansible任務。
在本示例中,該命令是ansible-playbook -i inventory.ini fmc-configure-interface-playbook.yaml -e@"fmc-configure-interface-vars.yml"。
cisco@inserthostname-here:~$ cd /home/cisco/fmc_ansible/

cisco@inserthostname-here:~/fmc_ansible$ ls
fmc-configure-interface-playbook.yaml fmc-configure-interface-vars.yml inventory.ini

cisco@inserthostname-here:~/fmc_ansible$ ansible-playbook -i inventory.ini fmc-configure-interface-playbook.yaml -e@"fmc-configure-interface-vars.yml"

PLAY [Update FTD Interface IP Address] ***************************************************************************************************************************

TASK [Gathering Facts] *******************************************************************************************************************************************
ok: [10.0.5.11]

TASK [Task01 - Get User Domain] **********************************************************************************************************************************
ok: [10.0.5.11]

TASK [Task02 - Get Devices] **************************************************************************************************************************************
ok: [10.0.5.11]

TASK [Task03 - Get Physical Interfaces] **************************************************************************************************************************
ok: [10.0.5.11]

TASK [Task04 - Setup Outside Interface with static IP] ***********************************************************************************************************
changed: [10.0.5.11]

TASK [Task05 - Setup Inside Interface with static IP] ************************************************************************************************************
changed: [10.0.5.11]

TASK [Task06 - Setup DMZ Interface with static] ******************************************************************************************************************
changed: [10.0.5.11]

TASK [Task07 - Get Deployable Devices] ***************************************************************************************************************************
ok: [10.0.5.11]

TASK [Task08 - Start Deployment] *********************************************************************************************************************************
changed: [10.0.5.11]

TASK [Wait for Deployment Complete] ******************************************************************************************************************************
ok: [10.0.5.11]

TASK [Task09 - Poll Deployment Status Until Deployment Successful] ***********************************************************************************************
ok: [10.0.5.11]

TASK [Task10 - Stop The Playbook If The Deployment Failed] *******************************************************************************************************
skipping: [10.0.5.11]

PLAY RECAP *******************************************************************************************************************************************************
10.0.5.11 : ok=11 changed=4 unreachable=0 failed=0 skipped=1 rescued=0 ignored=0
驗證
使用本節內容,確認您的組態是否正常運作。
透過SSH或主控台連線至FTD的CLI,並執行命令show interface ip brief和show running-config interface GigabitEthernet 0/X 。
介面名稱、IP地址和掩碼配置成功。
> show interface ip brief
Interface IP-Address OK? Method Status Protocol
GigabitEthernet0/0 10.1.1.1 YES manual up up
GigabitEthernet0/1 10.1.2.1 YES manual up up
GigabitEthernet0/2 10.1.3.1 YES manual up up

> show running-config interface GigabitEthernet 0/0
!
interface GigabitEthernet0/0
nameif Outside
cts manual
propagate sgt preserve-untag
policy static sgt disabled trusted
security-level 0
ip address 10.1.1.1 255.255.255.0


> show running-config interface GigabitEthernet 0/1
!
interface GigabitEthernet0/1
nameif Inside
cts manual
propagate sgt preserve-untag
policy static sgt disabled trusted
security-level 0
ip address 10.1.2.1 255.255.255.0


> show running-config interface GigabitEthernet 0/2
!
interface GigabitEthernet0/2
nameif DMZ
cts manual
propagate sgt preserve-untag
policy static sgt disabled trusted
security-level 0
ip address 10.1.3.1 255.255.255.0
疑難排解
本節提供的資訊可用於對組態進行疑難排解。
若要檢視更多有關ansible攻略的記錄,您可以使用-vvv執行ansible攻略
cisco@inserthostname-here:~/fmc_ansible$ ansible-playbook -i inventory.ini fmc-configure-interface-playbook.yaml -e@"fmc-configure-interface-vars.yml" -vvv
相關資訊
Cisco Devnet FMC Ansible