簡介
本檔案介紹如何將Catalyst 9800系列無線控制器(C9800 WLC)與Prime基礎架構(3.x)整合。
必要條件
需求
思科建議您瞭解以下主題:
- C9800 WLC
- Prime基礎架構(PI)版本3.5
- 簡易網路管理通訊協定(SNMP)
採用元件
本文中的資訊係根據以下軟體和硬體版本:
- C9800 WLC
- Cisco IOS XE直布羅陀版16.10.1到17.3
本文中的資訊是根據特定實驗室環境內的裝置所建立。文中使用到的所有裝置皆從已清除(預設)的組態來啟動。如果您的網路運作中,請確保您瞭解任何指令可能造成的影響。
附註:Prime Infra 3.8僅支援17.x 9800 WLC。如果您嘗試使用Prime Infra 3.8管理16.12 WLC,則客戶端不會顯示在Prime基礎架構上。
設定
為了使Prime基礎設施能夠配置、管理和監控Catalyst 9800系列無線LAN控制器,它需要能夠通過CLI、SNMP和Netconf訪問C9800。將C9800新增到Prime基礎設施時,需要指定telnet/SSH憑證以及SNMP社群字串、版本等。PI使用此資訊來驗證可達性並清點C9800 WLC。它還使用SNMP推送配置模板,並支援接入點(AP)和客戶端事件的陷阱。但是,為了讓PI收集AP和客戶端統計資訊,需要使用Netconf。C9800 WLC上預設未啟用Netconf,且需要在16.10.1版本上透過CLI手動設定(16.11.1中提供GUI)。
已使用的埠
C9800和Prime基礎設施之間的通訊使用不同的埠。
- Prime Infra中的所有配置和模板都通過SNMP和CLI推送。這使用UDP埠161。
- C9800 WLC本身的運算元據是透過SNMP取得。這使用UDP埠162。
- AP和客戶端運行資料利用流遙測。
Prime Infrastructure到WLC:TCP埠830 - Prime Infra使用此埠將遙測配置推送到9800裝置(使用Netconf)。
WLC到Prime Infrastructure:TCP連20828埠(適用於Cisco® IOS XE 16.10和16.11)或20830(適用於Cisco IOS XE 16.12、17.x和更高版本)。
附註:Keepalive每5秒傳送一次,即使沒有要報告的遙測也是如此。
附註:如果Prime基礎設施和C9800之間存在防火牆,請確保開啟這些埠以建立通訊。
Cat 9800 WLC上的SNMPv2組態
GUI:
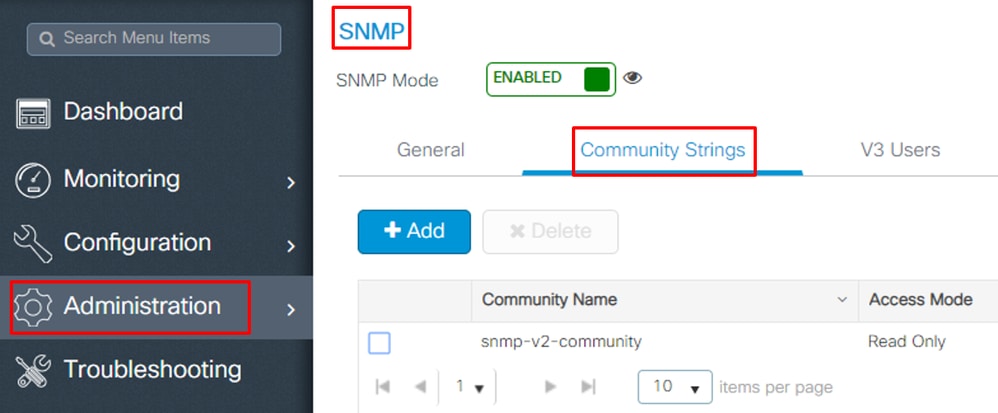
步驟1.導航至 Administration > SNMP > Slide to Enable SNMP中。
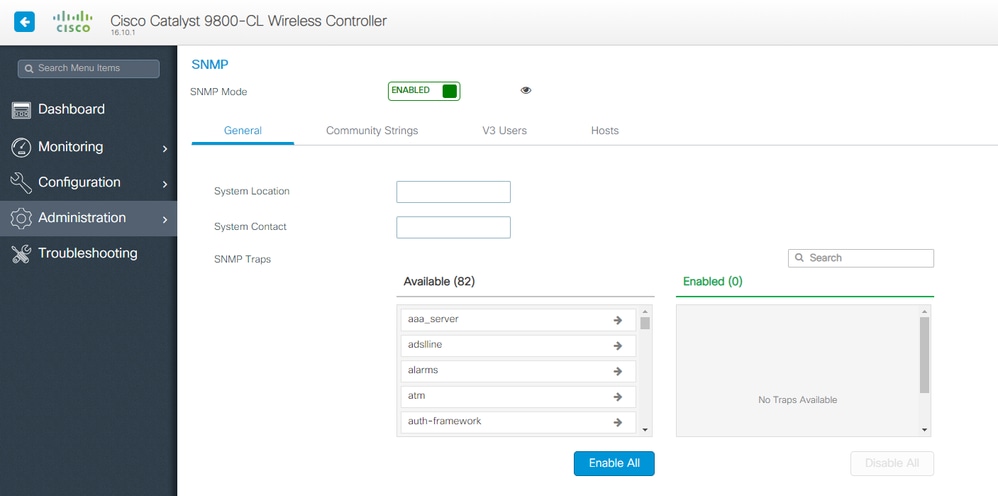
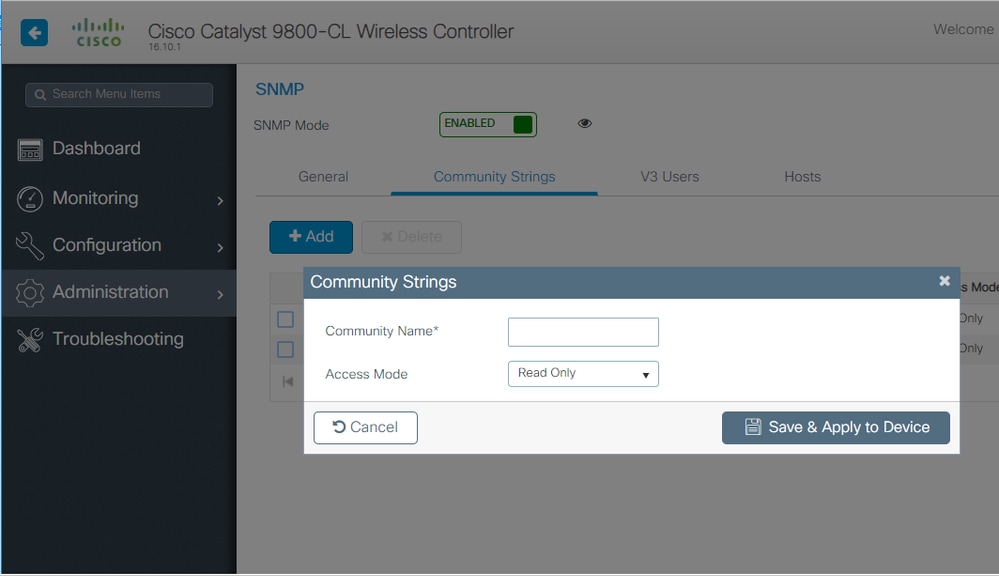
步驟2.單Community Strings擊並建立一個唯讀和讀取/寫入社群名稱。
CLI:
(config)#snmp-server community <snmpv2-community-name>
(optional)(config)# snmp-server location <site-location>
(optional)(config)# snmp-server contact <contact-number>
Cat 9800 WLC上的SNMPv3組態
GUI:
附註:自17.1 Cisco IOS XE起,Web UI僅允許您建立只讀v3使用者。您需要運行CLI過程來建立讀取/寫入v3使用者。
CLI:
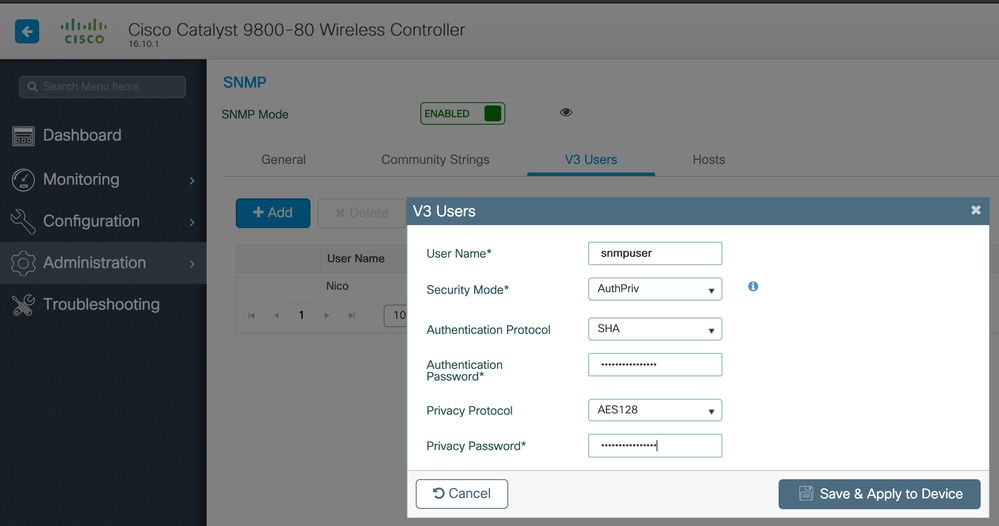
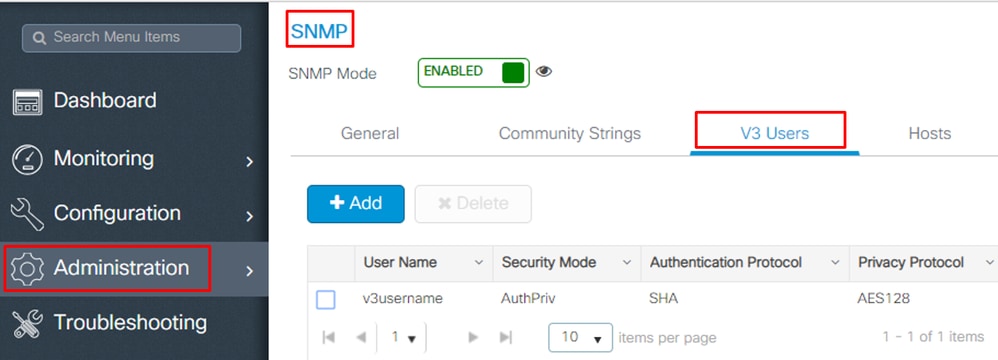
按一下V3 users並建立使用者。選擇authPriv和SHA,AES protocols然後選擇長密碼。MD5 而且它DES/3DES們是不安全的協定,儘管它們仍是9800中的一個選項,但是它們不能被選擇並且不再經過完全測試。
附註:SNMPv3使用者配置未反映在運行配置上。只看到SNMPv3組配置。
CLI:
(config)#snmp-server view primeview iso included
(config)#snmp-server group <v3-group-name> v3 auth write primeview
(config)#snmp-server user <v3username> <v3-group-name> v3 auth {md5 | sha} <AUTHPASSWORD> priv {3des | aes | des} {optional for aes 128 | 192| 256} <PRIVACYPASSWORD>


9800#show snmp user

User name: Nico
Engine ID: 800000090300706D1535998C
storage-type: nonvolatile	 active
Authentication Protocol: SHA
Privacy Protocol: AES128
Group-name: SnmpAuthPrivGroup
Cat 9800 WLC上的Netconf組態
GUI(從16.11開始):
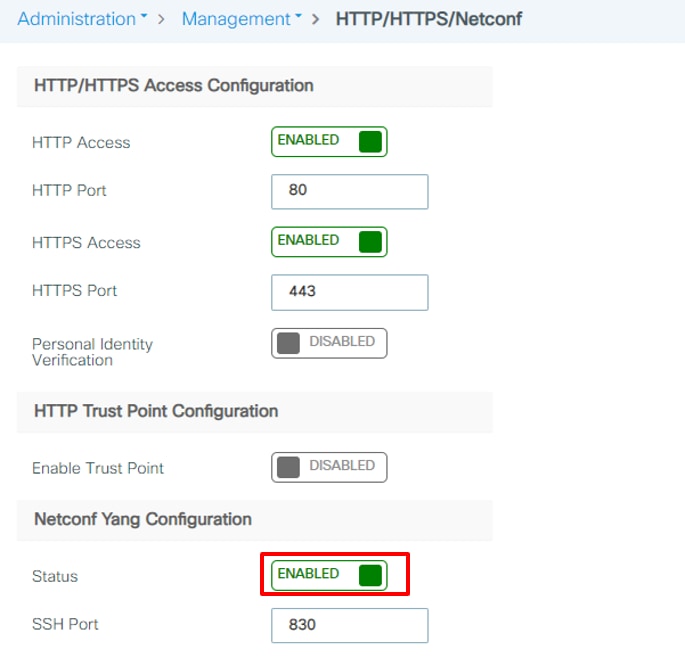
導航到Administration > HTTP/HTTPS/Netconf。
CLI:
(config)#netconf-yang
注意:如果在C9800上啟用aaa new-model,則還需要配置:
(config)#aaa authorization exec default <local or radius/tacacs group>
(config)#aaa authentication login default <local or radius/tacacs group>
C9800上的Netconf對aaa驗證登入和aaa授權exec使用預設方法(您無法變更此方法)。如果您要為SSH連線定義不同的方法,可以在命令列下line vty定義。Netconf繼續使用預設方法。
注意:Prime基礎架構在將9800控制器新增到其清單中時,會覆寫您配置的aaa驗證登入預設值和aaa授權exec預設值方法,並僅在WLC上未啟用Netconf的情況下將其指向本機驗證。如果Prime Infrastructure能夠使用Netconf登入,它不會變更組態。這表示如果您使用的是TACACS,則將9800新增到Prime後會失去CLI存取許可權。您可以稍後復原這些組態命令,並將其指向TACACS(如果您偏好該設定)。

附註:NETCONF使用的信任點當前僅支援RSA金鑰。尚不支援EC(橢圓曲線)金鑰,如果使用它們,會導致ncsshd進程崩潰。您可以驗證執行「show logging process ncsshd internal start last 1 hours」命令的ncsshd進程使用的金鑰 | sec key name"。已開啟增強功能要求,可在未來版本中增加對EC金鑰的支援:思科錯誤ID CSCwk02600 
配置(Prime Infrastructure 3.5及更高版本)
步驟1.擷取Catalyst 9800 WLC上設定的無線管理IP位址。
GUI:
導航到Configuration > Interface: Wireless。

CLI:
# show wireless interface summary
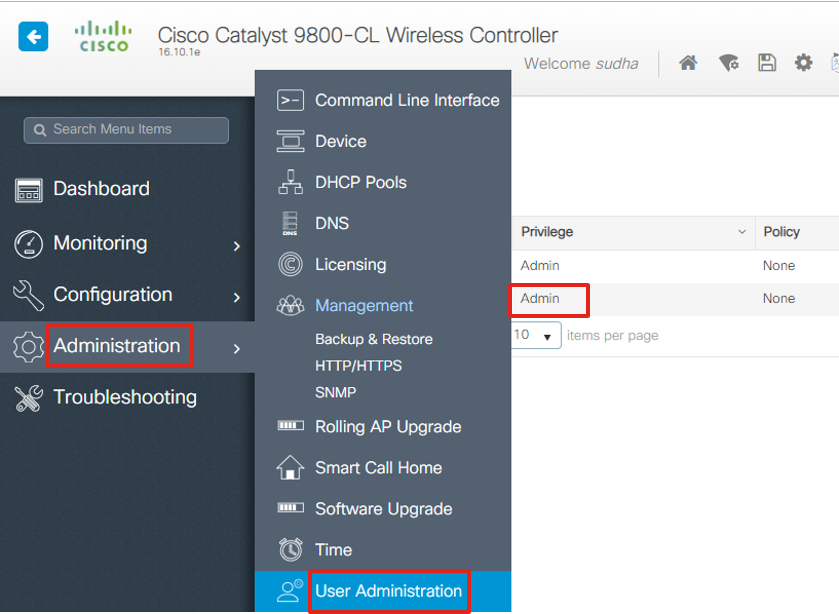
步驟2.捕獲許可權15使用者憑據並啟用密碼。
GUI:
導航到Administration > User Administration。
CLI:
# show run | inc username
# show run | inc enable
步驟3.獲取適用的SNMPv2社群字串和/或SNMPv3使用者。
GUI:
對於SNMPv2,請導航到Administration > SNMP > Community Strings。
對於SNMPv3,請導航到Administration > SNMP > V3 Users。
CLI:
For SNMPv2 community strings
# show run | sec snmp

For SNMPv3 user
# show user
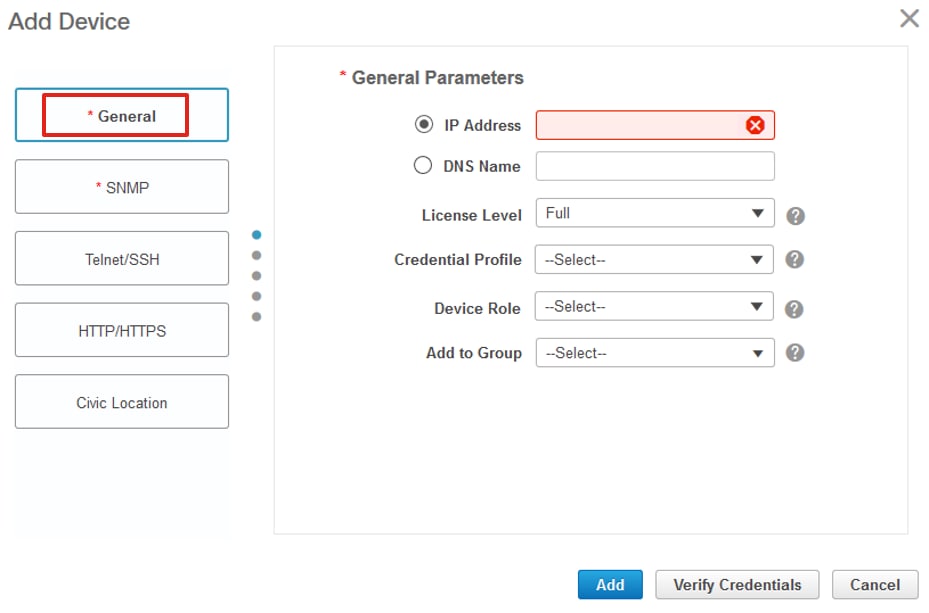
步驟4.在Prime Infrastructure GUI上,導覽至Configuration > Network: Network Devices,點選旁邊的下拉選單並+ 進行選Add Device擇。
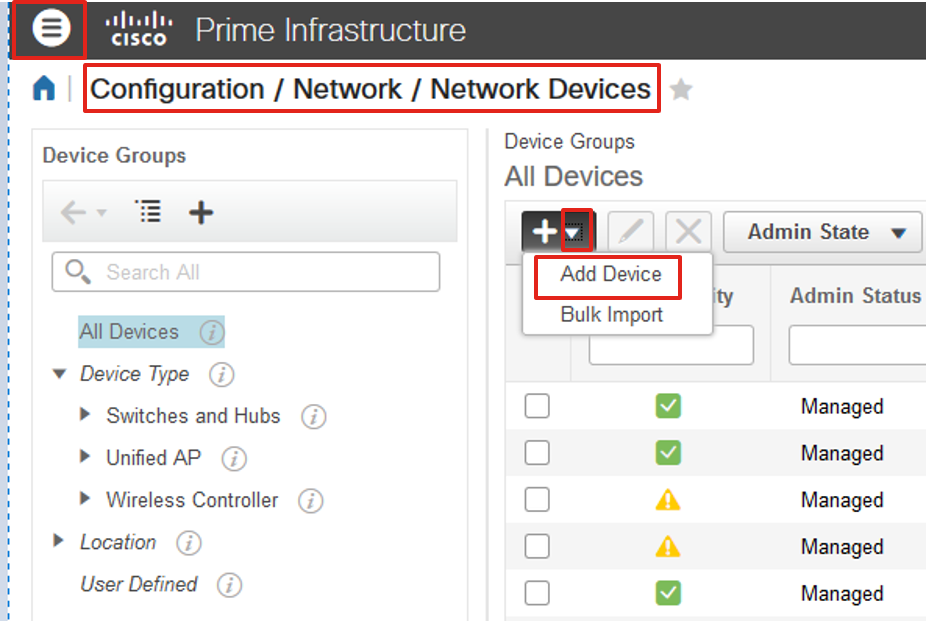
步驟5.在彈Add Device出視窗中,輸入用於與Prime基礎設施建立通訊的介面IP地址9800。
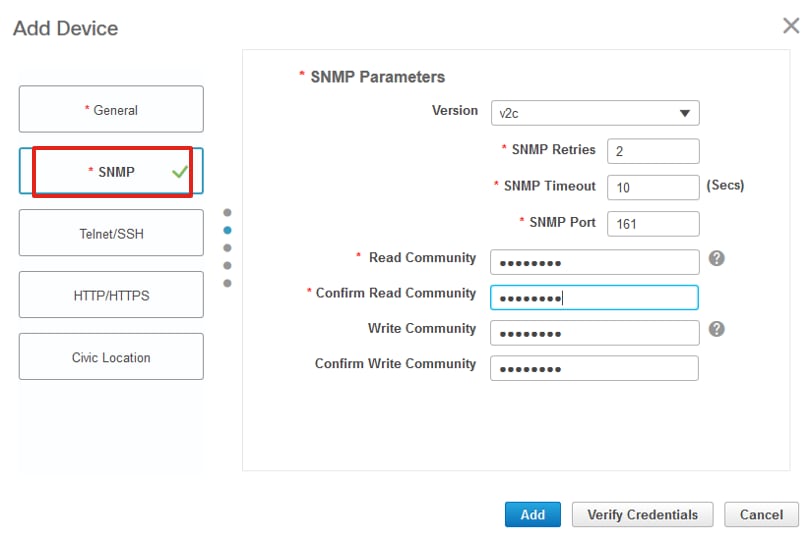
步驟6.導覽至SNMP標籤並提SNMPv2 Read-Only and Read-Write Community Strings供C9800 WLC上設定。
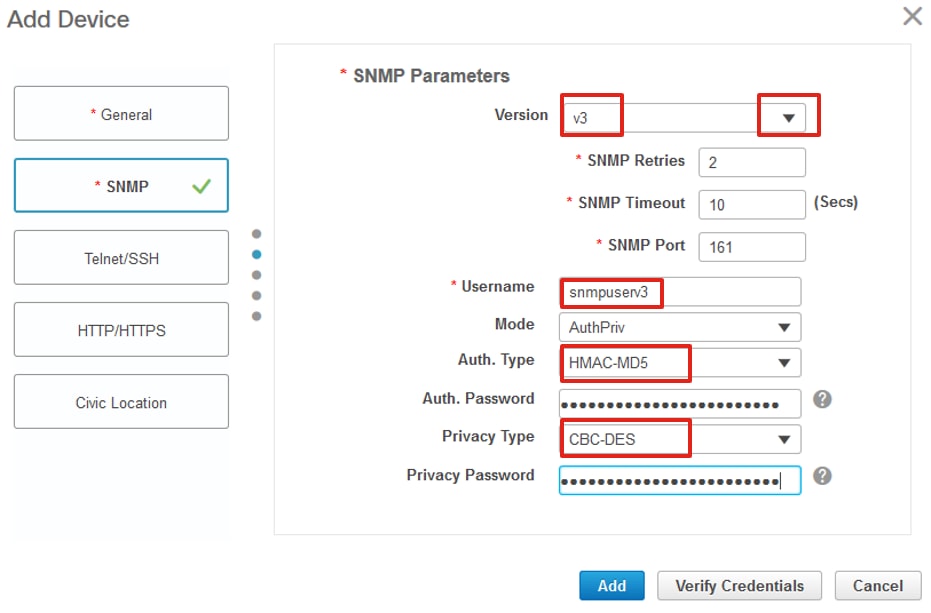
步驟7.如果使用SNMPv3,請從下拉選單中選擇v3並提供SNMPv3使用者名稱。從Auth-Type下拉選單匹配先前配置的身份驗證型別,Privacy Type然後從下拉選單中選擇在C9800 WLC上配置的加密方法。
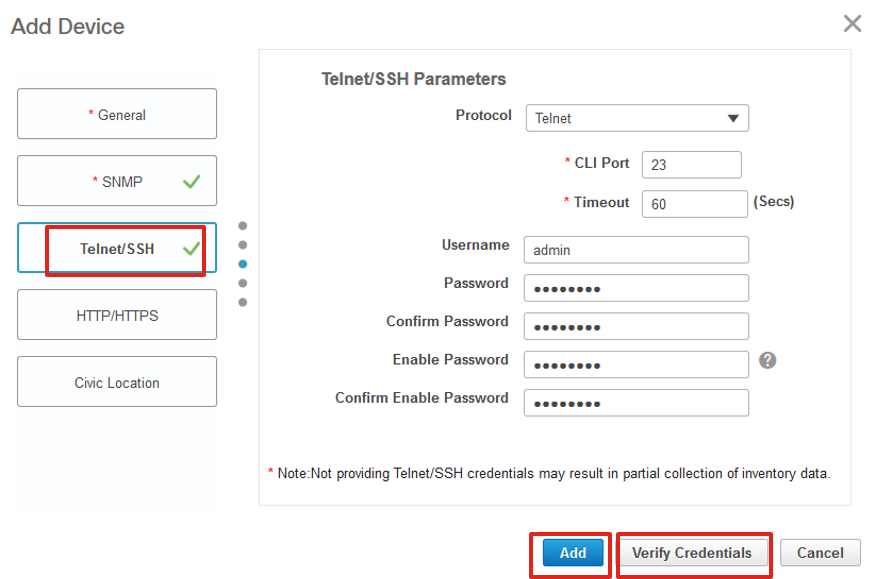
步驟8.導航到Telnet/SSH的頁籤Add Device,提供Privilege 15 Username and Password和Enable Password。按一下以Verify Credentials確保CLI和SNMP憑證正常工作。然後按一下Add。
驗證
驗證遙測狀態
步驟1.檢驗C9800上是否已啟用Netconf。
#show run | inc netconf
netconf-yang
如果沒有,請輸入「Cat 9800 WLC上的NETCONF組態」一節。
步驟2.驗證從C9800到Prime的遙測連線。
#show telemetry internal connection
Telemetry connection

Address Port Transport State Profile
------------------------------------------------------------------
x.x.x.x 20828 cntp-tcp Active
附註:x.x.x.x是Prime基礎設施的ip地址,並且狀態必須為Active。如果狀態不是Active,請參閱故障排除部分。
在17.9中,必須使用稍有不同的命令:
9800-17-9-2#show telemetry connection all
Telemetry connections

Index Peer Address               Port  VRF Source Address             State      State Description
----- -------------------------- ----- --- -------------------------- ---------- --------------------
    0 10.48.39.25                25103 0   10.48.39.228               Active     Connection up

9800-17-9-2#
步驟3.在Prime Infrastructure上,導航至Inventory > Network Devices > Device Type: Wireless Controller。

步驟4.要檢視到Prime基礎設施的遙測連線的詳細資訊,請運行以下命令:
#show telemetry internal protocol cntp-tcp manager x.x.x.x 20828
Telemetry protocol manager stats:

Con str                : x.x.x.x:20828::
Sockfd                 : 79
Protocol               : cntp-tcp
State                  : CNDP_STATE_CONNECTED
Table id               : 0
Wait Mask              :
Connection Retries     : 0
Send Retries           : 0
Pending events         : 0
Source ip              : <9800_IP_ADD>
Bytes Sent             : 1540271694
Msgs Sent              : 1296530
Msgs Received          : 0
在17.9或更高版本中,您需要使用不同的命令,如下圖所示。
#show telemetry connection all
Telemetry connections
Index Peer Address Port VRF Source Address State State Description
----- -------------------------- ----- --- -------------------------- ---------- --------------------
 1 172.16.0.4 25103 0 172.16.2.44 Active Connection up

C9800-Classic#show telemetry internal connection <Index> detail
Telemetry protocol manager stats:

Con str : 172.16.0.4:25103:0:172.16.2.44
Sockfd : 116
Protocol : tls-native
State : CNDP_STATE_CONNECTED
Table id : 0
Profile : sdn-network-infra-iwan
Version : TLSv1.2
Wait Mask :
Connection Retries : 0
Send Retries : 0
Pending events : 0
Session requests : 1
Session replies : 1
Source ip : 172.16.2.44
Bytes Sent : 49098323
Msgs Sent : 49918
Msgs Received : 0
Creation time: : Mon Sep 30 16:18:19:535
Last connected time: : Mon Sep 30 16:18:19:587
Last disconnect time: :
Last error: :
Connection flaps: : 0
Last flap Reason: :
Keep Alive Timeouts: : 0
Last Transport Error : No Error
步驟5.驗證來自C9800的遙測訂閱狀態,以及它們顯示為「有效」的事實。
#show telemetry ietf subscription configured
Telemetry subscription brief

ID Type State Filter type
-----------------------------------------------------
68060586 Configured Valid transform-na
98468759 Configured Valid tdl-uri
520450489 Configured Valid transform-na
551293206 Configured Valid transform-na
657148953 Configured Valid transform-na
824003685 Configured Valid transform-na
996216912 Configured Valid transform-na
1072751042 Configured Valid tdl-uri
1183166899 Configured Valid transform-na
1516559804 Configured Valid transform-na
1944559252 Configured Valid transform-na
2006694178 Configured Valid transform-na
步驟 6:可以按訂閱ID檢視訂閱統計資訊,也可以使用以下方式檢視所有訂閱的訂閱統計資訊:
#show telemetry internal subscription { all | id } stats
Telemetry subscription stats:

Subscription ID  Connection Info            Msgs Sent  Msgs Drop  Records Sent
------------------------------------------------------------------------------
865925973        x.x.x.x:20828::      2          0          2
634673555        x.x.x.x:20828::      0          0          0
538584704        x.x.x.x:20828::      0          0          0
1649750869       x.x.x.x:20828::      1          0          2
750608483        x.x.x.x:20828::      10         0          10
129958638        x.x.x.x:20828::      10         0          10
1050262948       x.x.x.x:20828::      1369       0          1369
209286788        x.x.x.x:20828::      15         0          15
1040991478       x.x.x.x:20828::      0          0          0
1775678906       x.x.x.x:20828::      2888       0          2889
1613608097       x.x.x.x:20828::      6          0          6
1202853917       x.x.x.x:20828::      99         0          99
1331436193       x.x.x.x:20828::      743        0          743
1988797793       x.x.x.x:20828::      0          0          0
1885346452       x.x.x.x:20828::      0          0          0
163905892        x.x.x.x:20828::      1668       0          1668
1252125139       x.x.x.x:20828::      13764      0          13764
2078345366       x.x.x.x:20828::      13764      0          13764
239168021        x.x.x.x:20828::      1668       0          1668
373185515        x.x.x.x:20828::      9012       0          9012
635732050        x.x.x.x:20828::      7284       0          7284
1275999538       x.x.x.x:20828::      1236       0          1236
825464779        x.x.x.x:20828::      1225711    0          1225780
169050560        x.x.x.x:20828::      0          0          0
229901535        x.x.x.x:20828::      372        0          372
592451065        x.x.x.x:20828::      8          0          8
2130768585       x.x.x.x:20828::      0          0          0
疑難排解
Prime基礎設施故障排除
- 首先檢查Prime基礎設施的是IP地址和介面。Prime Infrastructure不支援雙宿模式,也不在其第二個連線埠上偵聽遙測資料。
- 在Prime基礎設施中新增的WLC的IP地址必須是用作「無線管理介面」的IP地址。 Prime基礎架構IP位址必須可從控制器端上的無線管理介面到達。
- 如果使用服務埠(裝置上的gig0/0)進行發現,則WLC和AP會以庫存中的託管狀態顯示,但WLC和相關接入點的遙測不起作用。
- 如果您看到遙測狀態在Prime基礎設施上為「成功」,但AP計數為0,則可能是Prime基礎設施可以在埠830上連線到WLC,但控制器無法在埠20830上連線回Prime基礎設施。
對於任何SNMP問題或裝置配置問題,請從Prime Infrastructure收集以下日誌:
cd /opt/CSCOlumos/logs/

[root@prime-tdl logs]# ncs-0-0.log

Tdl.logs
對於遙測/珊瑚問題,首先要檢查珊瑚狀態:
shell

cd /opt/CSCOlumos/coralinstances/coral2/coral/bin

./coral version 1

./coral status 1

./coral stats 1
如果一切正常,請從prime coral logs資料夾收集這些日誌。
附註:根據Prime Infrastructure版本及其支援的Cisco IOS XE版本數量,Prime Infrastructure上可以有幾個Coral例項。有關更多詳細資訊,請檢視版本說明,例如:https://www.cisco.com/c/en/us/td/docs/net_mgmt/prime/infrastructure/3-7/release/notes/bk_Cisco_Prime_Infrastructure_3_7_0_Release_Notes.html
步驟 1.
cd /opt/CSCOlumos/coral/bin/

[root@prime-tdl bin]# ./coral attach 1

Attached to Coral instance 1 [pid=8511]

Coral-1#cd /tmp/rp/trace/

Coral-1#ls

Collect the  “Prime_TDL_collector_R0-”* logs
Coral-1# cd /tmp/rp/trace/
Coral-1# btdecode P* > coralbtlog.txt
Coral-1# cat  coralbtlog.txt
還可以在以下目錄中找到這些日誌:
*解碼的跟蹤檔案在路徑中可用/opt/CSCOlumos/coralinstances/coral2/coral/run/1/storage/harddisk
* ade# cd /opt/CSCOlumos/coralinstances/coral2/coral/run/1/storage/harddisk
* ade# cp coraltrace.txt /localdisk/defaultRepo
步驟2.要在調試模式下啟用Coral,需要在檔案中設定調試級debug.conf別。
從容器中的任一項:
echo "rp:0:0:tdlcold:-e BINOS_BTRACE_LEVEL=DEBUG;" > /harddisk/debug.conf
或者,在Prime 3.8上,可以使用以下方式在容器外部重新啟動Coral服務:
"sudo /opt/CSCOlumos/coralinstances/coral2/coral/bin/coral restart 1"
如果重新啟動不起作用,可以使用這些來擦除珊瑚例項並順利啟動它:
sudo /opt/CSCOlumos/coralinstances/coral2/coral/bin/coral stop 1

sudo /opt/CSCOlumos/coralinstances/coral2/coral/bin/coral purge 1

sudo /opt/CSCOlumos/coralinstances/coral2/coral/bin/coral start 1
重新啟動珊瑚號,這是強制性的。如果鍵入「Exit」,則可以離開珊瑚例項,然後:
./coral/bin/coral restart 1
附註:在Prime 3.8上,可以使用「sudo /opt/CSCOlumos/coralinstances/coral2/coral/bin/coral restart 1」在容器外部重新啟動珊瑚服務
如果您需要解碼Coral日誌檔案,可以使用以下內容在Coral容器中解碼:
btdecode Prime_TDL_collector_*.bin
附註:啟用Coral的調試級別後,必須重新啟動Coral。
Catalyst 9800 WLC上的疑難排解
要監控Prime Infra推送到C9800 WLC的配置,可以運行EEM小程式。
#config terminal
#event manager applet catchall
 #event cli pattern ".*" sync no skip no
 #action 1 syslog msg "$_cli_msg"
從WLC配置中刪除所有遙測訂閱
有時可能需要取消配置WLC上配置的所有遙測訂閱。這只需使用以下命令即可完成:
WLC#term shell
WLC#function removeall() {
for id in `sh run | grep telemetry | cut -f4 -d' '`
do
conf t
no telemetry ietf subscription $id
exit
done
}
WLC#removeall
要啟用跟蹤,請執行以下操作:
# debug netconf-yang level debug
要驗證:
WLC#show platform software trace level mdt-pubd chassis active R0 | inc Debug

pubd                            Debug

WLC#show platform software trace level ndbman chassis active R0 | inc Debug

ndbmand                         Debug
要檢視跟蹤輸出,請執行以下操作:
show platform software trace message mdt-pubd chassis active R0

show platform software trace message ndbman chassis active R0
檢查AP資訊的訂閱ID
按一下DB Query。導航tohttps://<Prime_IP>/webacs/ncsDiag.do。
從*OWNINGENTITYIDewlcSubscription(如「%Controller_IP」和CLASSNAME='UnifiedAp')處進行選擇。
在WLC上:
驗證訂閱ID正在傳送資訊,並且cntp計數器上沒有丟包。
show tel int sub all stats

show telemetry internal protocol cntp-tcp connector counters drop

show telemetry internal protocol cntp-tcp connector counters queue

show telemetry internal protocol cntp-tcp connector counters rate

show telemetry internal protocol cntp-tcp connector counters sub-rate

show telemetry internal protocol cntp-tcp connector counters reset
附註:9800 WLC在17.6之前支援100個遙測訂閱,在17.6之後支援最多128個訂閱(因為最新版本的Catalyst Center可使用超過100個訂閱。
從PI遷移到Cisco Catalyst Center
C9800不能同時由PI和Cisco Catalyst Center管理。如果計畫遷移到Catalyst Center作為網路管理解決方案,則需要在將C9800新增到Catalyst Center之前將其從Prime基礎設施中刪除。從PI 3.5刪除/刪除C9800時,PI在清點時推送到C9800的所有配置都不會回滾,需要從系統中手動刪除這些配置。具體來說,為C9800 WLC建立的用於發佈流遙測資料的訂閱通道不會刪除。
要確定此特定配置,請執行以下操作:
#show run | sec telemetry
要刪除此配置,請運行no以下命令形式:
(config) # no telemetry ietf subscription <Subscription-Id>
Repeat this CLI to remove each of the subscription identifiers.


(config) # no telemetry transform <Transform-Name>
Repeat this CLI to remove each of the transform names
附註:如果您同時使用Catalyst Center和Prime Infrastructure管理9800控制器,由於Prime管理,Catalyst Center庫存合規性預計會失敗。
在最新版本中,Prime Infrastructure和Catalyst Center都可能對WLC使用過多的遙測訂閱,使兩台伺服器無法同時管理9800。因此,不能同時使用Catalyst Center和Prime Infrastructure來管理9800,並且遙測和統計功能也工作正常。因此,從PI遷移到Catalyst Center的速度必須儘可能快,因為只要Prime Infrastructure管理9800控制器,Catalyst Center就無法擁有9800的遙測資料。
 意見
意見